Kiddy - Car seat Lorelli - Free user manual and instructions
Find the device manual for free Kiddy Lorelli in PDF.


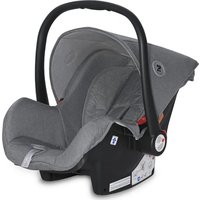
| Product Type | Car Seat |
| Brand | Lorelli |
| Model | Kiddy |
| Category | Child Car Seat |
| Dimensions (H x W x D) | 66 x 45 x 44 cm |
| Weight | 4.5 kg |
| Age Range | 0 to 4 years |
| Weight Group | Group 0+ (0-13 kg) and Group 1 (9-18 kg) |
| Installation Method | Vehicle seat belt (3-point) or ISOFIX compatible |
| Harness Type | 5-point harness with adjustable straps |
| Side Impact Protection | Yes, integrated headrest and side wings |
| Facing Direction | Rear-facing for 0-13 kg, forward-facing for 9-18 kg |
| Cover Material | Polyester, removable and machine washable at 30°C |
| Safety Standard | ECE R44/04 approved |
| Cleaning Instructions | Hand wash cover or machine wash at 30°C, air dry |
| Spare Parts Availability | Yes, contact Lorelli customer service |
| Manual Included | Yes, free PDF download available |
Frequently Asked Questions - Kiddy Lorelli
User questions about Kiddy Lorelli
0 question about this device. Answer the ones you know or ask your own.
Ask a new question about this device
Download the instructions for your Car seat in PDF format for free! Find your manual Kiddy - Lorelli and take your electronic device back in hand. On this page are published all the documents necessary for the use of your device. Kiddy by Lorelli.
USER MANUAL Kiddy Lorelli
natural_image
Line drawing of a car seatbelt with two red buttons placed on the seat (no text or symbols)Фиг. 1
Фиг. 2

natural_image
Diagram of a car seatbelt with red arrows indicating force or movement (no text or labels)Фиг. 3

natural_image
Line drawing of a car seatbelt mechanism (no text or symbols)Фиг. 4

natural_image
Diagram of a car interior showing seatbelt and dashboard with red arrows indicating movement or force (no text or labels)Фиг. 5
natural_image
Line drawing of a car seat assembly with no text or symbolsФиг. 1
Фиг. 2
natural_image
Line drawing of a child wearing a seatbelt in a car seat (no text or symbols)Фиг. 3
natural_image
Line drawing of a car seat with no text or symbolsnatural_image
Line drawing of a car seatbelt with hands placed on the seat (no text or symbols)Фиг. 1
natural_image
Illustration of a child seated in a car seat with red arrows indicating pressure or force direction (no text or symbols)Фиг. 2

natural_image
Line drawing of a baby in a car seat with a red arrow indicating the seatbelt (no text or symbols present)Фиг. 3
УПОТРЕБА
natural_image
Simple line drawing of a human head with two vertical supports (no text or symbols)Не - твърде ниско

natural_image
Simple line drawing of a human figure with two vertical bars, no text or symbols presentНе - твърде високо

natural_image
Simple line drawing of a human head with two vertical bars, no text or symbols presentДа - правилно
ПРОМЯНА ВИСОЧИНАТА НА РАМЕННИТЕ КОЛАНИ
natural_image
Technical diagram of a mechanical device with labeled components (no readable text or symbols)Фиг. 1


natural_image
Technical line drawing of a mechanical device with no visible text or symbolsФиг. 1
natural_image
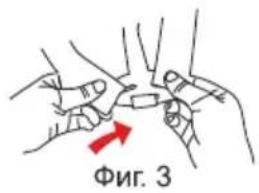
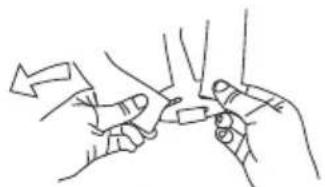
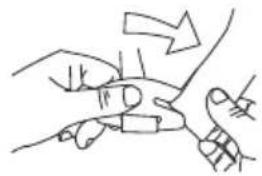
Line drawing of two hands holding a small object, no text or symbols presentФиг. 2
natural_image
Line drawing of a hand holding a small object with an arrow indicating motion (no text or symbols)Фиг. 3

natural_image
Line drawing of two hands adjusting a mechanical component (no text or symbols)Фиг. 4
ПРЕМАХВАНЕ НА КОЛАНИТЕ ПРЕЗ СКУТА
Фиг. 1
natural_image
Illustration of two hands holding scissors with a small object inside, no text or symbols present

natural_image
Diagram of a person wearing a seatbelt with arrows indicating movement or force direction (no text or symbols)Фиг. 3
Фиг. 1
IMPORTANT! KEEP FOR FURTHER REFERENCES. READ CAREFULLY!
NOTICE
- This is an "universally" securing device for children. It is approved in accordance with Rule No 44 for general use in vehicles and is suitable for most but not all seats in cars.
- Placing is correct if the vehicle manufacturer has declared in the Manual for the use of the vehicle that in the vehicle may be placed "Universal" Safety devices for children of this age group.
- This securing device for children is classified as "universal" under more stringent conditions than those applied in previous structures, which don't have this remark.
- If you have doubt, consult the manufacturer of safety equipment for children or the seller.
Only suitable if the approved vehicles are fitted with 3-points static or 3-point retractor safety-belts.
Approved to UN/ECER Regulation No. 16 or other equivalent standarts.
Important safety instructions!
WARNING! This car seat can be used with the harness for children of 9 to 18 kg in weight (approx. 9 months to 4 years) (Group I)!
WARNING! This car seat can be used without the harness for children weighting from 15 to 36 kg (Group II/III)!
WARNING! The hard components or plastic parts of safety device for children should be deployed and installed in way that during everyday use of the vehicle not be jammed by the movable seats or doors.
WANING! Periodically inspect the harness for wear by paying particular attention to attachment points, stitching and adjusting devices!
WARNING! All belts fastening car chair must be tight, belts restrain the child, must be adjusted to his body and not twisted.
WARNING! Waist belt has to be adjusted low so that child's pelvis is restrained tight!
WARNING! The device must be replaced if it has undergone significant load of an accident.
WARNING! It is dangerous to make changes or to supplement safety device without approval of the competent authority!
WARNING! Follow closely the instructions for installation. Failure can result in injury to the child!
WARNING! Do not leave the child unattended in the safety device!
WARNING! Any luggage or other items that can cause injury if a collision should be properly secured!
WARNING! Safety device for children should not be used without case!
WARNING! Cases of seat should not be replaced with another, unless recommended by the manufacturer, because it is an integral part of the system for securing children!
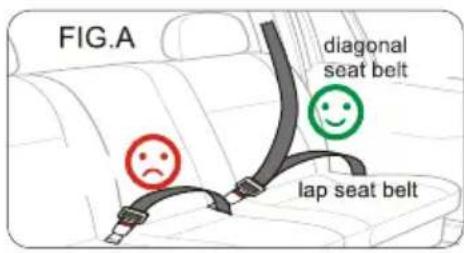
WARNING! Your child seat can only be fitted into the passengers seat of a car with a lap and diagonal seat belt. Do not use any load bearing contact points other than those described in the instructions and marked on the child restraint. Ensure the vehicle seat buckle is not positioned in or in front of the specified (labelled) belt guide of the child restraint system.
WARNING! Car interior can become very hot when in direct sunlight. Therefore it is recommended that the child seat should be covered when not in use. This prevents components, particularly those attached to the child seat, to become hot and burning the child!
WARNING! This seat can only be installed in forward-facing position!
WARNING! Do not use this child seat at home. It has not been designed for domestic use and should only be used in your vehicle!
WARNING! The safest seating position for this child seat is on the rear seat of a vehicle!
WARNING! The instructions can be retained on the child seat for its life period in the case of built-in restraints and take good care of it for reference in future.
WARNING! Please, remove this child seat from the vehicle when not in use in a safe place out of child reach!
THE TYPE OF APPROVED SEAT BELT YOU MUST HAVE
Your child seat can only be installed forward facing using a lap and diagonal seat belt in the front or rear passenger seat of the car. (FIG. A)
(MAINTENANCE AND CARE)
WASHING INSTRUCTIONS
- The car seat can be cleaned using lukewarm water and soap. Do not use aggressive cleaners like abrasives or thinner.
- The cover should be washed by hand at a maximum temperature of 30^ C. Do not put in the dryer, just airing it.
- The plastic parts can be cleaned by using a wettish drapery. Please, do not use any solvate.
Backrest cover removal
First, release the elastic strap at the bottom of the backrest cover. Slide the cover off. The cover can now be cleaned.
Headrest & booster seat cover removal
Slide the cover off. The cover can now be cleaned.
FEATURES

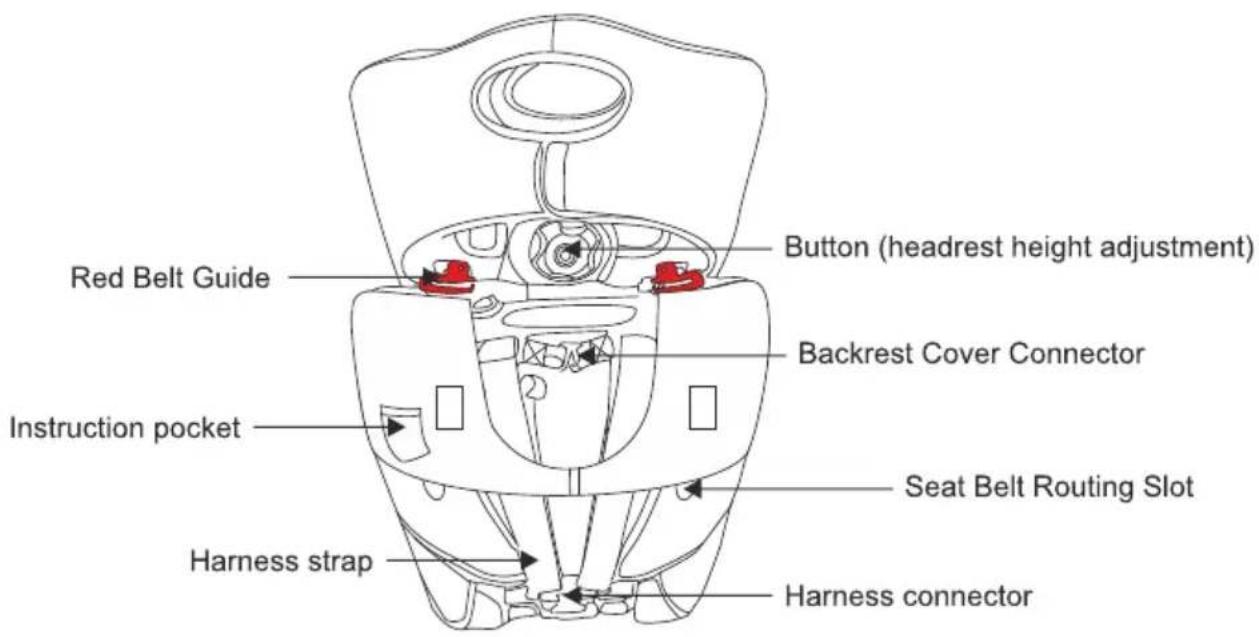
FITTING THE SEAT IN THE VEHICLE
"Group I" /9 - 18 kg/
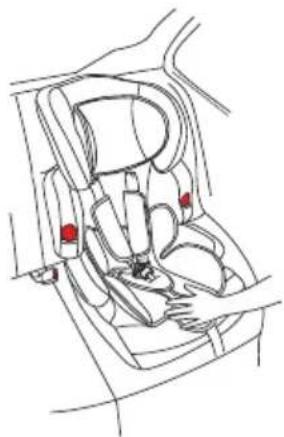
- Ensure that all parts are locked into place correctly and not be trapped in the adjustable seats or doors. The backrest of the car seat has to against the back of the vehicle seat. If necessary, adjust the inclination of the vehicle seat.
- Place the child safety seat on the vehicle's seat ensuring it is firmly pressed against the vehicle seat backrest. Pull the car seat belt out and fasten the car safety belt. (Fig. 1)
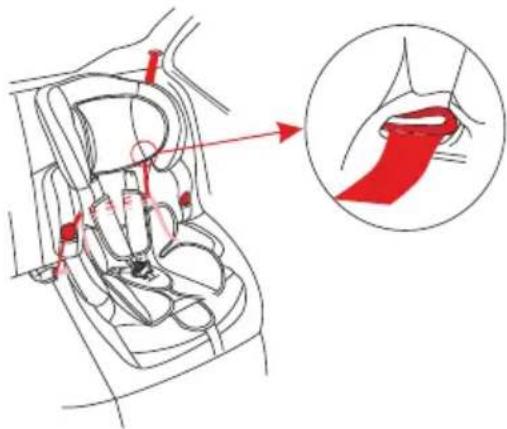
- Thread the car seat belt through the seat belt route slot in the seat plastic backrest furthest from the car seat belt buckle and then out through the other seat belt route slot and fasten it into the seat belt buckle. (Fig. 2)
- Check the webbing of the seat belt has not become twisted or tangled and that the lap belt goes under the armrest and diagonal belt under the headrest belt guide and then goes over the red belt guide on the side of the backrest. (Fig. 3)
- Place your knee on the base of the safety seat and grip the top piece of the seat belt webbing. Pull the webbing upwards to tighten the seat belt. (Fig. 4)
- Finish tightening the webbing by pulling the diagonal strap upwards until there is no slack and the seat is held firmly in place. (Fig. 5)
- Now you can strap your child into the seat. Make sure the seat belt has not become twisted. Also check that the cover is not impeding the movement or fit of the seat belt webbing in anyway. To release your child seat follow the above instructions in reverse order.
natural_image
Line drawing of a car seat assembly with red buttons indicating specific seats (no text or symbols present)Fig. 1
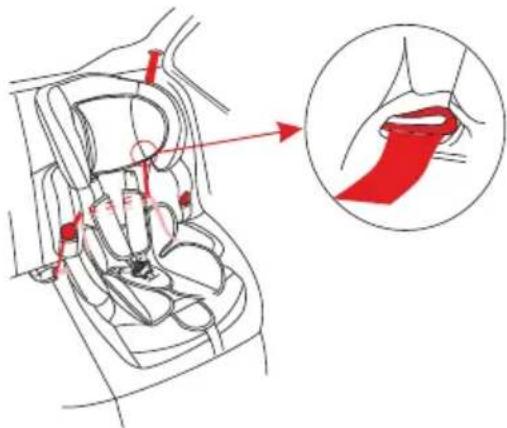
Fig. 2

natural_image
Diagram of a car seatbelt mechanism showing hand placement and red directional arrows (no text or labels)Fig. 3

natural_image
Line drawing of a car interior showing seatbelt and dashboard (no text or symbols)Fig. 4

natural_image
Diagram of a car interior showing hand positioning and valve placement (no text or labels)Fig. 5
FITTING THE SEAT IN THE VEHICLE
"Group II" /15 - 25 kg/
IMPORTANT: Before fitting the seat remove the shoulder straps, buckle and crotch strap and lap strap.
- Place the child safety seat on the vehicle's seat ensuring it is firmly pressed against the car seat backrest. (Fig. 1)
- Place the child in the child safety seat.
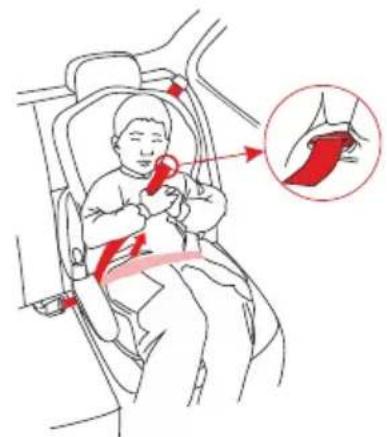
- Fasten the seat belt making sure that both sections of the seat belt webbing go under the armrest closest to the buckle, the diagonal belt goes through the belt guide on the side of the headrest. (Fig. 2)
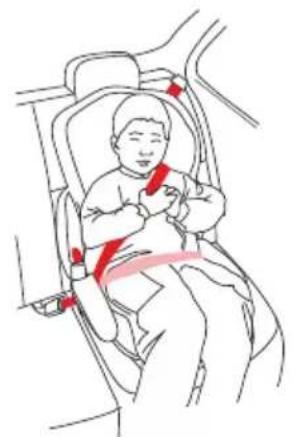
- Make sure the seat belt has not become twisted. (Fig. 3) Also check that the cover is not impeding the movement or fit of the seat belt webbing in any way.

natural_image
Line drawing of a car seat assembly with red buttons and a spring mechanism (no text or symbols)Fig. 1

Fig. 2

natural_image
Line drawing of a child wearing a car seatbelt, no text or symbols presentFig. 3
FITTING THE BOOSTER SEAT
"Group III" /22 - 36 kg/
IMPORTANT: Remove the backrest of the car seat.

Booster Seat

natural_image
Line drawing of a seat with visible ribs and seat plate (no text or symbols)- Remove the backrest from the booster seat and place in a safe place with other fittings.
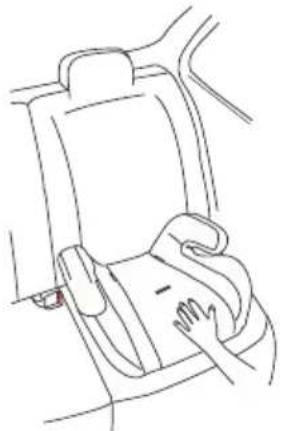
- Place the booster seat on the seat of the vehicle ensuring it is firmly against the vehicle's seat and backrest. (Fig. 1)
- Place the child in the booster seat.
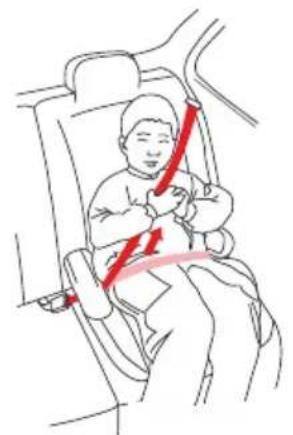
- Fasten the seat belt making sure that the lap belt webbing goes under both armrests and the diagonal belt webbing goes over the armrest near the buckle. Check the webbing has not become twisted. Tighten the seat belt by pulling upwards the diagonal strap. (Fig. 2)
- Check the seat belt to ensure there is no slack and the belt has not become twisted. (Fig. 3) Also check that the cover is not impeding the movement or fit of the seat belt in anyway.
- To release the child simply unfasten the seat belt in the normal way.
natural_image
Line drawing of a car seatbelt with hands placed on the seat (no text or symbols)Fig. 1

natural_image
Line drawing of a child seated in a car seat with red arrows indicating seatbelting (no text or symbols)Fig. 2

natural_image
Line drawing of a child seated in a car seat with red arrows indicating seatbelting (no text or symbols)Fig. 3
USAGE
Correct shoulder strap height (Group I)

natural_image
Simple line drawing of a human head with two vertical supports (no text or symbols)No - Too Low

natural_image
Simple line drawing of a human head with two rectangular objects on the shoulders (no text or symbols)No - To High

natural_image
Simple line drawing of a human head with two side panels, no text or symbols presentYes - correct
SHOULDER STRAP HEIGHT ADJUSTMENT
- Firstly, release the strap that holding the backrest covet to gain access to the harness. (Fig. 1)
- Slide the belt off chest pad connector and rethread the chest pad onto chest pad connector at the back of the seat. (Fig. 2)
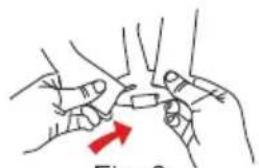
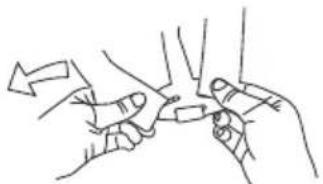
- Slide one of the harness straps off the harness connector. Re-thread the harness strap back onto the harness connector. (Fig. 3)
- From the front of the seat pull it through the slot in the seat's backrest and fabric cover; through the next slot up or down on the cover and backrest. (Fig. 4)
- Repeat for the other harness. Ensure both straps are at the same height.

natural_image
Technical diagram of a mechanical device with no visible text or symbolsFig. 1

Fig. 2
natural_image
Illustration of two hands performing a finger manipulation technique with a red arrow indicating direction (no text or symbols)Fig. 3

natural_image
Illustration of a car seatbelt with a hand adjusting the seat (no text or symbols)
natural_image
Line drawing of a car seatbelt with a hand adjusting the seat (no text or symbols)Fig. 4
SHOULDER BELTS REMOVAL
- Release the strap at the bottom of the backrest cover to gain access to the harness. (Fig. 1)
- Slide both harness straps off the harness connector (Fig. 2 & 3) at the back of the backrest and pull the webbing through the slots in the seat's backrest and fabric's cover.
- Slide the chest pad connector. (Fig. 4)

natural_image
Technical line drawing of a car interior showing steering wheel, dashboard, and seat (no text or labels)Fig. 1
natural_image
Line drawing of two hands holding a small object, possibly a tool or device (no text or symbols present)Fig. 2

natural_image
Line drawing of a hand holding a finger with an arrow indicating direction (no text or symbols)Fig. 3
natural_image
Line drawing of a hand gripping a small object (no text or symbols)Fig. 4
LAP BELTS REMOVAL
- Turn the retainers on their narrowest end and feed them through the slots in the base of the seat and then through the slots in the fabric's cover. (Fig. 1)

Fig. 1
FASTENING THE CAR SEAT BUCKLE
- Slot both metal parts of the buckle together. (Fig. 1)
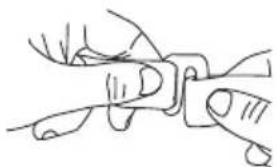
- Insert both buckle connectors into the slot in the top of the buckle until "click" into place. (Fig. 2)
- Always check the harness is correctly locked by pulling the shoulder straps upwards. (Fig. 3)
- To release the harnesses press the red button on the buckle downwards.

natural_image
Illustration of two hands holding a knife with a double-headed arrow indicating rotation (no text or symbols)
natural_image
Diagram showing a mechanical assembly with two parts and a downward arrow, labeled Fig. 2 (no text or symbols on the diagram itself)
natural_image
Diagram of a person wearing a seatbelt with directional arrows indicating movement or force (no text or symbols)Fig. 3
TIGHTENING THE HARNESSES
- Pull the shoulder straps upwards to remove the slack from the lap section of the harness. (Fig. 1)
- Now, pull the adjuster strap until the harnesses are fully tightened. (Fig. 2)
- The harnesses should be adjusted as tightly as possible without causing discomfort to your child. Straps should not be twisted.
Ensure that lap strap portion of the harness is located as low as possible towards the thighs - not around the tummy so that the pelvis is firmly engaged.
A loose harnesses can be dangerous. Check the harnesses adjustment and tighten each time when child is placed in the seat.

SLACKENING THE HARNESSES
The harnesses are slackened by pressing the lever (under the seat cover) on the front of the seat.
- Press down on the label marked with "Press" (Fig. 1), as you grip the two shoulder straps with your other hand. Pull the shoulder straps towards you to loosen the other harnesses (Fig. 2).
- Take care when adjusting the shoulder straps that you do not trap the harness adjuster strap as you press the lever down.

HEADREST HEIGHT ADJUSTMENT
"Group II" /15 - 25 kg/
The headrest can be adjusted up or down (according to the child's height).
Put your left (or right) hand on the backrest. Press the button and turn left or right with your other hand. Move the headrest up or down as required ensuring the position fits for your child. (Fig. 1)
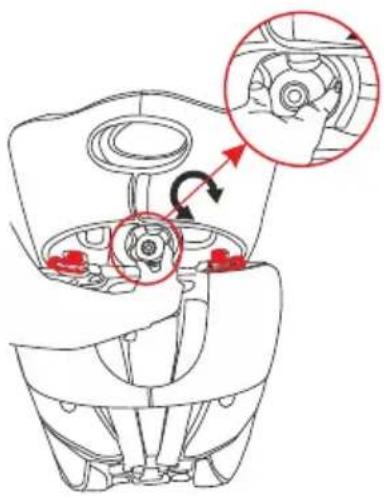
Fig. 1

lorelli®
Дидис ООД, България
Шумен 9700, "Правда" 1
Тел.: 054/850 830
Факс: 054/850 839
e-mail: office@didis-ltd.com
Didis LTD, Bulgaria
Shumen 9700, "Pravda" 1 Str.
Tel.: +359 54 850 830
Fax: +359 54 850 839
e-mail: office@didis-ltd.com
- УПОТРЕБА
- ПРОМЯНА ВИСОЧИНАТА НА РАМЕННИТЕ КОЛАНИ
- ПРЕМАХВАНЕ НА КОЛАНИТЕ ПРЕЗ СКУТА
- IMPORTANT! KEEP FOR FURTHER REFERENCES. READ CAREFULLY!
- NOTICE
- Important safety instructions!
- THE TYPE OF APPROVED SEAT BELT YOU MUST HAVE
- (MAINTENANCE AND CARE)
- WASHING INSTRUCTIONS
- Backrest cover removal
- Headrest & booster seat cover removal
- FEATURES
- FITTING THE SEAT IN THE VEHICLE
- "Group I" /9 - 18 kg/
- "Group II" /15 - 25 kg/
- IMPORTANT: Before fitting the seat remove the shoulder straps, buckle and crotch strap and lap strap.
- FITTING THE BOOSTER SEAT
- "Group III" /22 - 36 kg/
- USAGE
- Correct shoulder strap height (Group I)
- SHOULDER STRAP HEIGHT ADJUSTMENT
- SHOULDER BELTS REMOVAL
- LAP BELTS REMOVAL
- FASTENING THE CAR SEAT BUCKLE
- TIGHTENING THE HARNESSES
- SLACKENING THE HARNESSES
- HEADREST HEIGHT ADJUSTMENT
- lorelli®
Brand : Lorelli
Model : Kiddy
Category : Car seat