F1 - Car seat Lorelli - Free user manual and instructions
Find the device manual for free F1 Lorelli in PDF.


| Product Type | Car Seat |
| Brand | Lorelli |
| Model | F1 |
| Weight Range | Group 0+ / 1 (0-18 kg) |
| Installation | Forward-facing & Rear-facing with seat belt |
| Harness Type | 5-point harness |
| Dimensions (HxWxD) | 62 x 44 x 38 cm |
| Weight | 4.5 kg |
| Material | Polyester fabric, molded foam, polypropylene shell |
| Safety Standards | ECE R44/04 approved |
| Side Impact Protection | Integrated headrest & side wings |
| Headrest Adjustment | Multiple positions |
| Recline Positions | 3 positions |
| Cover Removal | Removable and washable at 30°C |
| Cleaning | Hand wash cover, wipe plastic parts with damp cloth |
| Accessories Included | Instruction manual, safety belt guides |
| Spare Parts Availability | Contact manufacturer for replacement parts |
| Warranty | 2 years |
Frequently Asked Questions - F1 Lorelli
User questions about F1 Lorelli
0 question about this device. Answer the ones you know or ask your own.
Ask a new question about this device
Download the instructions for your Car seat in PDF format for free! Find your manual F1 - Lorelli and take your electronic device back in hand. On this page are published all the documents necessary for the use of your device. F1 by Lorelli.
USER MANUAL F1 Lorelli
natural_image
Illustration of a knife cutting through layered fabric, enclosed in a circle (no text or symbols)Фиг.1

Фиг.2
natural_image
Diagram of a biological structure with curved layers and a labeled rotation arrow (3-4), no readable text or symbols present.Фиг.3

natural_image
Diagram of a mechanical component with a lever and shaft, enclosed in a circular frame (no text or labels)Фиг.7
natural_image
Cross-sectional diagram of a mechanical component or housing (no text or symbols visible)Фиг.8
natural_image
Diagram of a helmet with head and shoulders, enclosed in a circle (no text or symbols)Фиг.11
natural_image
Line drawing of a bird's seatbelt with a flower on the wing (no text or symbols)Фиг.12

Фиг.13
natural_image
Illustration of a child wearing a seatbelt and holding a broom, enclosed in a circular frame (no text or symbols)Фиг.15

Фиг.16
natural_image
Diagram of a mechanical component inside a circular frame, showing symmetrical parts and no text or symbols.Фиг.18

Фиг.19

natural_image
Line drawing of a car seatbelt with no text or symbolsФиг.20
IMPORTANT! KEEP FOR FURTHER REFERENCES. READ CAREFULLY!
NOTICE
- This is an "universally" securing device for children. It is approved in accordance with Rule No 44 for general use in vehicles and is suitable for most but not all seats in cars.
- Placing is correct if the vehicle manufacturer has declared in the Manual for the use of the vehicle that in the vehicle may be placed "Universal" Safety devices for children of this age group.
- This securing device for children is classified as "universal" under more stringent conditions than those applied in previous structures, which don't have this remark.
- If you have doubt, consult the manufacturer of safety equipment for children or the seller.
Only suitable if the approved vehicles are fitted with 3-points static or 3-point retractor safety-belts. Approved to UN/ECER Regulation No. 16 or other equivalent standards.
Important safety instructions!
WARNING! It is appropriate only if approved vehicles are equipped with a 3-point holding device of safety belt, approved in accordance with Rule No 16 of the ECE at the UN or other equivalent standards.
WARNING! The hard components or plastic parts of safety device for children should be deployed and installed in way that during everyday use of the vehicle not be jammed by the movable seats or doors.
WARNING! All belts fastening car chair must be tight, belts restrain the child, must be adjusted to his body and not twisted.
WARNING! The device must be replaced if it has undergone significant load of an accident.
WARNING! Waist belt has to be adjusted low so that child's pelvis is restrained tight!
WARNING! It is dangerous to make changes or to supplement safety device without approval of the competent authority!
WARNING! Follow closely the instructions for installation. Failure can result in injury to the child!
WARNING! Do not leave the child unattended in the safety device!
WARNING! Any luggage or other items that can cause injury if a collision should be properly secured!
WARNING! Safety device for children should not be used without case!
WARNING! Cases of seat should not be replaced with another, unless recommended by the manufacturer, because it is an integral part of the system for securing children!
WARNING! Your child seat can only be fitted into the passengers seat of a car with a lap and diagonal seat belt. Do not use any load bearing contact points other than those described in the instructions and marked on the child restraint. Ensure the vehicle seat buckle is not positioned in or in front of the specified (labelled) belt guide of the child restraint system.
ECE R44/04
MAINTENANCE AND CLEANING
-
The car seat can be cleaned using lukewarm water and soap. Do not use aggressive cleaners like abrasives or thinner.
-
The cover should be washed by hand at a maximum temperature of 30^ C. Do not put in the dryer.
Step 1. Take the car seat out of your car.
step 2. Clean food particles and dirt with a vacuum. If possible, use a vacuum cleaner's furniture attachment to clean the small, hard-to reach areas of the car seat.
Step 3. Clean off the plastic portions of the seat with gentle soap and water.
Step 4. Remove the entire car seat cover, if possible, and run it through your washing machine gentle cycle.
Step 5. Spot clean the stained spots on the car seat if you cannot remove the cover, make certain you can use the soap on the car seat's material by checking the package's guidelines.
Step 6. Re-install the clean car seat in your car, and take special care that all parts of the car seat are present and installed safely and correctly.
REMOVING AND REPLACING THE COVER AND BELT PADS
-
Loosen the belts pads. (See "Adjusting the height of the shoulder belts")
-
Loosen the cover all around. (Fig.20)
-
Pull the belts, buckle tongues and buckle through the cover.
-
Remove the cover.
-
After washing, attach the belt pads and place the cover on the shell.
-
Thread the buckle, tongues and belts through the cover and fasten the cover at the release button/positioning handle.
-
Secure the cover on the pins.
-
Close the buckle and thread the belts through the belt pads, cover and shell.
-
Connect the shoulder belts to the belt yoke.
-
Fasten the cover all around, behind the pins.
FEATURES
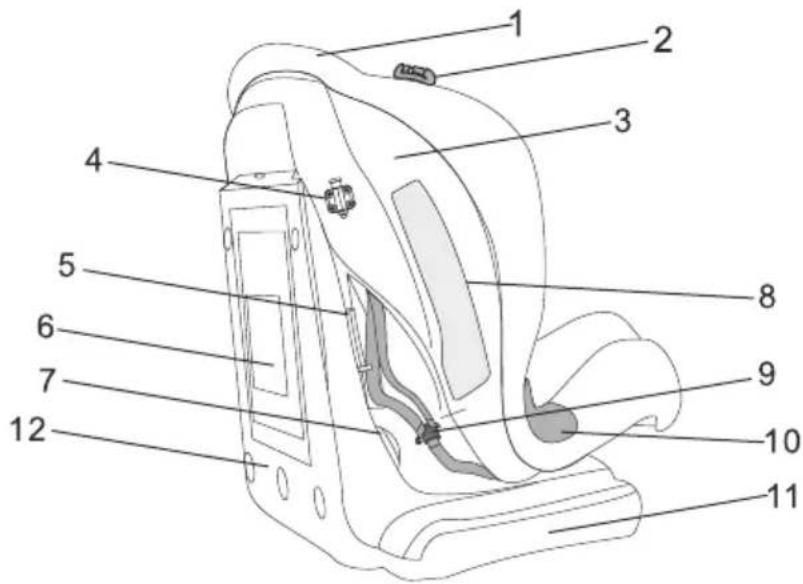
- Fabric Cover
- Hook
- Shell
- Shaft and Lock
- Lock-off Device
- Instruction Manual Storage
- Lap Belt Indicator
- Installation Sticker
- Belt Yoke
- Belt Guider
- Base
- Backrest
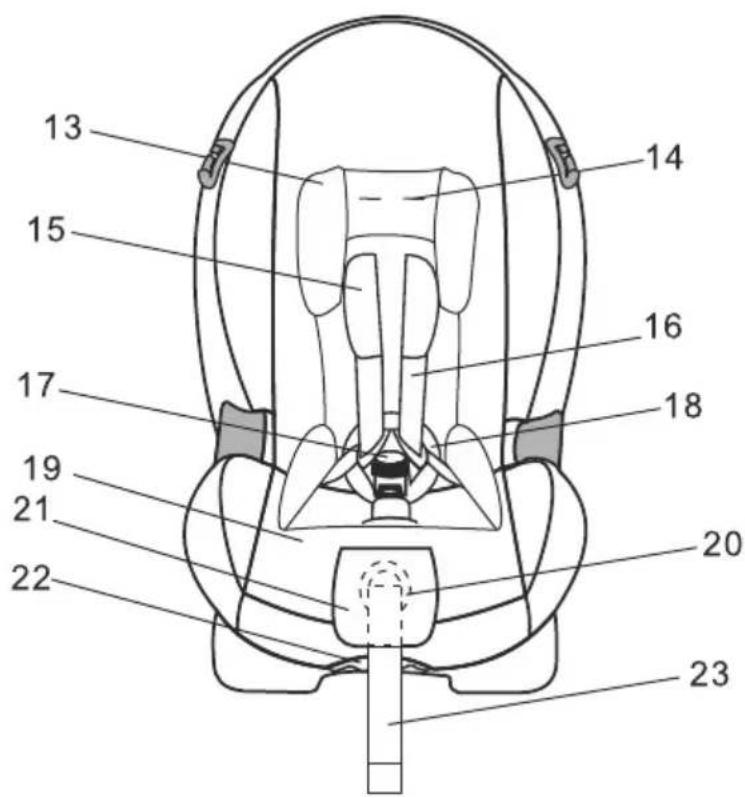
- Head Pillow
- Belt Slots
- Belt Pads
- Shoulder Belt
- Buckle
- Crotch Strap
- Cushion
- Center Adjuster
- Adjuster Cover
- Positioning Handle
- Adjuster Belt
INSTALLATION
The car seat "F1" can only be used with an automatic 3-point safety belt. (Fig.1) The car seat "F1" can be used in five position (Fig.2): Pull the positioning handle under the front of the seat forwards or backwards (feel the spring underneath), release the handle on your required position while hearing a distinct click.

natural_image
Illustration of a knife cutting through layered fabric, enclosed in a circular frame (no text or symbols)Fig.1

Fig.2
INSTALLING THE CAR SEAT group I /9-18 kg/
- Place the car seat in the sleeping position 3 or 4. (Fig. 3)
- Remove the installation shaft by pulling the moveable part of the lock from the car seat. (Fig.4-A)
- Pull and hold the shell forward, then thread the seat belt between the shell and the base, fasten the seat belt with the seat buckle, and ensure the belt is not twisted. (Fig.5)
*Make sure the shoulder belt go from top of the seat and through the lock-off device (Fig.5-A) and the lap belt go horizontally under the lap belt indicator (Fig.5-B) and joint with the shoulder belt and buckle up the seat. (Fig.5-C) - Return the shell to its original position, and thread the installation shaft into the hole and lock the device by pushing the moveable part on the other side until hear a distinct click. (Fig.4-B)
- Adjust the shell to your child's most comfortable position.

natural_image
Diagram of a biological structure with curved layers and a labeled directional arrow (3-4), no readable text or symbols present.Fig.3

Fig.5
INSTALLING THE CAR SEAT group II /15-25 kg/
This installation method is for child within Group II (15 - 25 kg).
- Remove the harness system first, including thee belt pads, buckle and crotch strap..
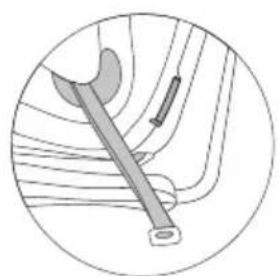
- Install the shoulder and lap belt by threading the vehicle's lap and shoulder belt through the hook (Fig.6-A) on the top of shell and over the belt guider. (Fig.6-7)
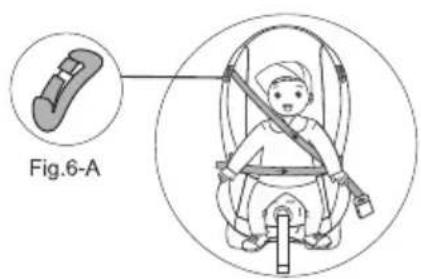
Fig.6
natural_image
Diagram of a medical or surgical procedure showing a tool inserted into tissue (no text or labels)Fig.7
PLACING YOUR CHILD IN THE CAR SEAT
- Loosen the shoulder belts by pressing the push button and pull the shoulder belts towards you. Important: Do not pull on the belt pads when doing so. (Fig.8-9)
- Press the red button to open the buckle. (Fig.10)
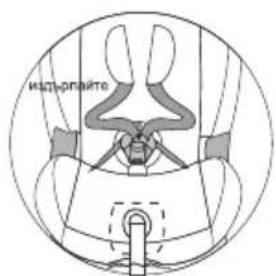
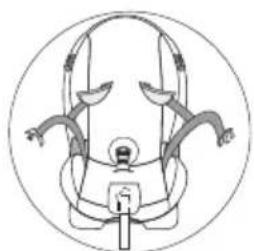
- Part the belts over the sides of the shell. (Fig.11)
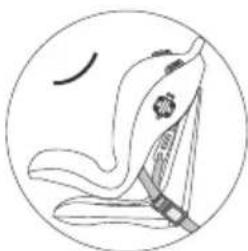
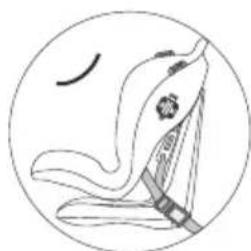
- Position your child into the shell and make sure that there are no toys or other hard objects in the shell. (Fig.12)
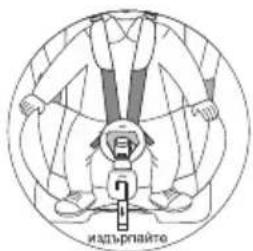
- Match buckle tongue sections together and insert them into the buckle. (Fig.13)
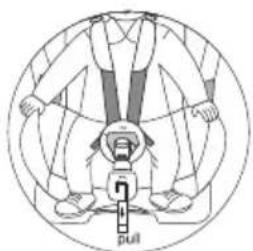
- Make sure the shoulder belts fit your child snugly by pulling the adjuster belt. (Fig.14)

natural_image
Top-down schematic of a mechanical component or assembly (no text or symbols visible)Fig.8

Fig.9

Fig.10
natural_image
Line drawing of a helmet with straps and seat (no text or symbols)Fig.11
natural_image
Simple line drawing of a bird's head and neck, enclosed in a circular frame (no text or symbols)Fig.12

Fig.13
natural_image
Diagram of a person seated in a seatbelt with a pull symbol, enclosed in a circular frame (no text or labels)Fig.14
ADJUSTING THE HEIGHT OF THE SHOULDER BELTS
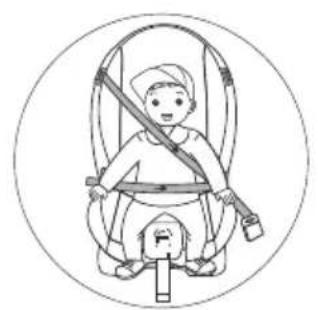
- The correct belt height of the shoulder belts is attained when the belt disappears into the shell slightly above the shoulder of the child. Ensure that the shoulder belts fit comfortably over the child's shoulder. (Fig.15)
- Loosen the shoulder belts by pressing the push button of the adjuster and pulling the shoulder belts towards you as far as possible.
Important: Do not pull the belt pads when doing so. (Fig.9) - Place the shell of the seat in the sleeping position.
- Remove the shoulder belts from the yoke. (Fig.16-A).
- Pull the shoulder belts through the shell and cover out of the belt pads, ensuring that the buckle remains fixed to prevent the belts from twisting. (Fig.17)
- If you wish to alter the belts from or to the lowest positions, place the car seat in the sleeping position.
- If you wish to alter the belts from or to higher positions, place the car seat in the sitting position.
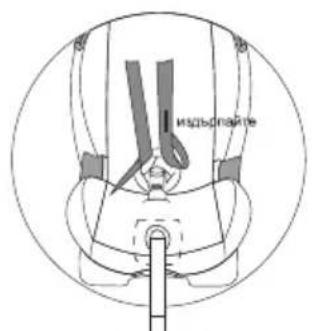
- Place the shoulder pads at the desired height and thread the shoulder straps back through the shoulder pads, cover and shell. (Fig.18)
- Connect the shoulder belts to the belt yoke. (Fig.19-A)
natural_image
Illustration of a child wearing a seatbelt and holding a horizontal bar, enclosed in a circle (no text or symbols)Fig.15

Fig.16

Fig.17

natural_image
Diagram of a symmetrical mechanical or biological structure within a circular boundary, no text or symbols present.Fig.18

Fig.19

natural_image
Diagram of a car's seatbelt and steering wheel (no text or labels)Fig.20
lorelli®
Дидис ООД, България
Шумен 9700, "Правда" 1
Тел.: 054/850 830
Факс: 054/850 839
e-mail: office@didis-ltd.com
Didis LTD, Bulgaria
Shumen 9700, "Pravda" 1 Str.
Tel.: +359 54 850 830
Fax: +359 54 850 839
e-mail: office@didis-ltd.com
- IMPORTANT! KEEP FOR FURTHER REFERENCES. READ CAREFULLY!
- NOTICE
- Important safety instructions!
- MAINTENANCE AND CLEANING
- REMOVING AND REPLACING THE COVER AND BELT PADS
- FEATURES
- INSTALLATION
- INSTALLING THE CAR SEAT group I /9-18 kg/
- INSTALLING THE CAR SEAT group II /15-25 kg/
- PLACING YOUR CHILD IN THE CAR SEAT
- ADJUSTING THE HEIGHT OF THE SHOULDER BELTS
- lorelli®
Brand : Lorelli
Model : F1
Category : Car seat