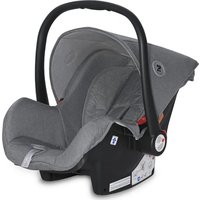
Comet - Car seat Lorelli - Free user manual and instructions
Find the device manual for free Comet Lorelli in PDF.


| Product Type | Car Seat |
| Brand | Lorelli |
| Model | Comet |
| Age Group | 0–12 years |
| Weight Range | 0–36 kg |
| Installation Type | Seat belt / ISOFIX compatible |
| Orientation | Rear-facing (0–105 cm) and forward-facing (100–150 cm) |
| Safety Standard | ECE R44/04 |
| Dimensions (W x D x H) | 44 x 54 x 64 cm |
| Net Weight | 7.5 kg |
| Material | Polypropylene shell, breathable fabric cover |
| Harness Type | 5-point adjustable harness |
| Headrest Adjustment | Multiple positions, grow-with-child |
| Recline Positions | Multi-position recline for comfort |
| Side Impact Protection | Integrated side impact protection system |
| Cleaning | Removable and washable cover (30°C) |
| Warranty | 24 months |
| Certification | ECE R44/04 approved |
Frequently Asked Questions - Comet Lorelli
User questions about Comet Lorelli
0 question about this device. Answer the ones you know or ask your own.
Ask a new question about this device
Download the instructions for your Car seat in PDF format for free! Find your manual Comet - Lorelli and take your electronic device back in hand. On this page are published all the documents necessary for the use of your device. Comet by Lorelli.
USER MANUAL Comet Lorelli
car seat
COMET
group: 0+
0-13 kg
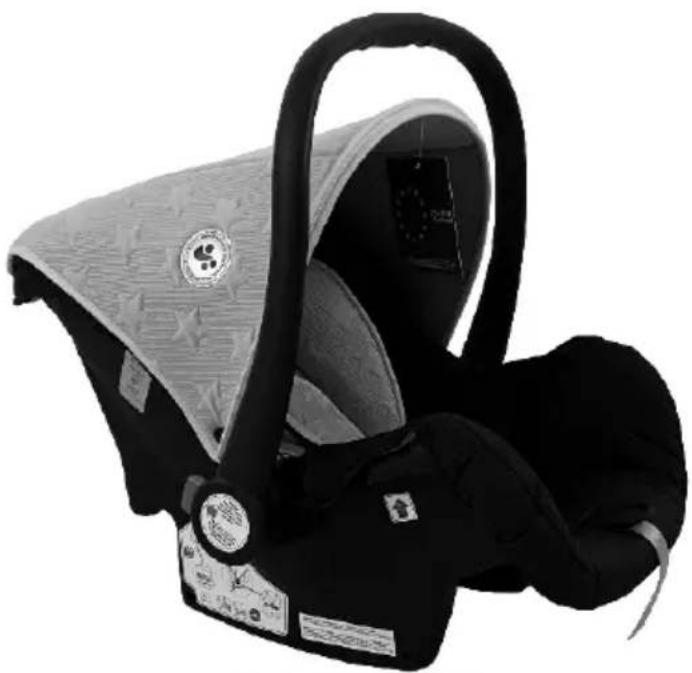
natural_image
Black and white photo of a baby car seat with star patterns and a logo on the cover (no visible text or symbols)MANUAL INSTRUCTION
designed in EU
V1.3
www.lorelli.eu


find us on
СЪДЪРЖАНИЕ / CONTENT
EN Manual Instruction....6
BG Инструкция за употреба....10
RO Instructiuni de utilizare....14
EN-Scan the QR code to get more product information and manual instruction in more languages. Download QR Scanner App onto your device.
SRB/HR/ME/BIH
Skenirajte QR kod kako bi ste dobili više informacija o proizvodu i uputsva za upotrebu na više jezika. Preuzmite aplikaciju QR Scanner na svoj uređaj.
2

NO-Toolow
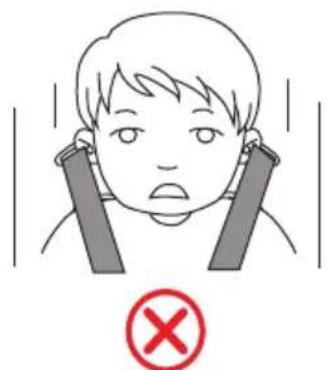
NO-Too high

natural_image
Simple line drawing of a smiling child with pigtails and a green checkmark below (no text or symbols)Yes - Correct
3
natural_image
Illustration of a child receiving a medical or rehabilitation procedure, with hands adjusting the neck and neck (no text or symbols present)4
natural_image
Illustration of a hand holding a cable inside a device (no text or symbols)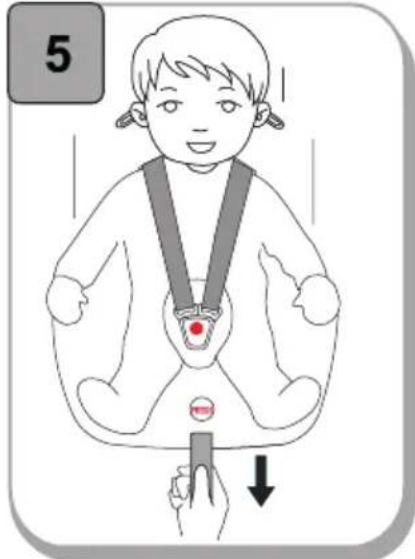


natural_image
Medical illustration showing a surgical procedure on a patient's chest with a catheter and suture (no text or labels)


natural_image
Illustration of a hand using a tool to adjust or install a component, with no visible text or symbols.


natural_image
Illustration of a robotic leg with a highlighted red area, no text or symbols present

natural_image
Line drawing of a hand holding a small object, possibly a tool or device, with no visible text or symbols.
natural_image
Simple line drawing of a flower with a red center, no text or symbols present
natural_image
Line drawing of a mechanical component with a red mark on the central part (no text or symbols)

natural_image
Diagram of a car seatbelt system with blue and red belt bands, no text or symbols present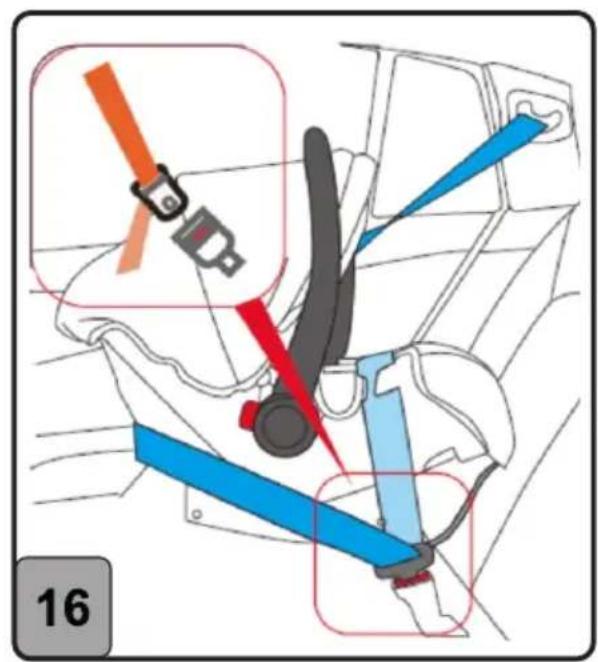
natural_image
Interior view of a car showing a blue seatbelt and directional arrow (no text or symbols)
natural_image
Illustration of a bicycle seatbelt mechanism with blue and red components (no text or symbols)
natural_image
Diagram showing two mechanical or fluidic system configurations with directional arrows indicating flow or movement (no text or symbols present)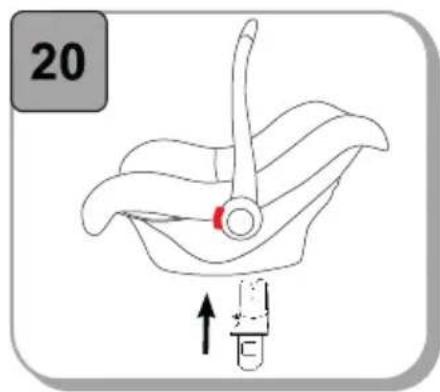

natural_image
Line drawing of a baby stroller with wheels and seat (no text or symbols)

IMPORTANT! KEEP FOR FUTURE REFERENCE! READ CAREFULLY!
CAR SEAT "Group 0+" / newborn and weighing up to 13 kg. /
NOTICE
- This is a 'Universal' child restraint. It is approved to Regulation No 44, 04 series of amendments, for general use in vehicles and it will fit most, but not all, car seats.
- A correct fit is likely if the vehicle manufacturer has declared in the vehicle handbook that the vehicle is capable of accepting a 'Universal' child restraint for this age group.
- This child restraint has been classified as 'Universal' under more stringent conditions than those which applied to earlier designs which do not carry this notice.
- If in doubt, consult either the child restraint manufacturer or the retailer.
Only suitable if the approved vehicles are fitted with 3 point/with retractor safety belts, approved to UN/ECE Regulation No 16 or other equivalent standards.
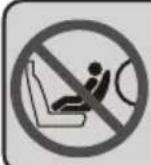
Do not place rear-facing child seat on front seat with airbag. Death or serious injury can occur.
Important safety instructions!
Please read the instructions carefully, because improper installation may cause serious injury, in this case, the manufacturer is not responsible.
-
WARNING! The car seat can not be used forward facing!
-
WARNING! The rigid items and plastic parts of a child restraint shall be so located and installed that they are not liable, during everyday use of the vehicle, to become trapped by a movable seat or in a door of the vehicle. Prevent harness/vehicle belt from getting trapped between car doors or rubbing against sharp parts of the seat or body.
-
WARNING! All straps holding the restraint to the vehicle should be tight, all straps restraining the child should be adjusted to the child's body. The straps should not be twisted! Always make sure that the booster seat harness and vehicle belt are correctly tensioned to ensure maximum protection for your child.
-
WARNING! The device should be changed when it has been subject to violent stresses in an accident. After an accident, replace your child restraint and the vehicle seat belts. Although they may look undamaged, they may not protect your child as well as they should.
-
WARNING! Follow closely the instructions for installation. Failure can result in injury to the child!
-
WARNING! It is dangerous to make any alterations or additions to the device without the approval of the Type Approval Authority. Your child is in danger if you don't follow closely the installation instructions provided by the child restraint manufacturer.
-
WARNING! Do not use any load bearing contact points other than those described in the instructions and marked in the child restrained. Ensure the vehicle seat belt buckle is connected to the correct main load bearing contact point which is intended for the occupied vehicle seat. Ensure the buckle and the seat belt of the vehicle do not interfere with the main load bearing contact points of the child restrained system. Ensure you are following the correct way path of the vehicle's safety belt by the installation of the restrained system and by the restraining of the child. On this way you will avoid an unsatisfactory position of the adult safety belt buckle relative to the main load bearing contact points on the restraint. Please contact the child restraint manufacturer if in doubt about this point.
-
WARNING! Rearward child restraint systems should not be used in seats protected by an airbag.
-
WARNING! NEVER leave your child unattended in the safety device, even for the shortest time!
-
WARNING! Any luggage or other objects liable to cause injuries in the event of a collision shall be properly secured.
-
WARNING! Do not use the child restraint system without the cover.
-
WARNING! Do not replace the seat cover with any other than the one recommended by the manufacturer, because the cover constitutes an integral part of the restraint performance.
-
WARNING: DO NOT attempt to dismantle, modify or add to any part of the booster car seat or change the way your vehicle seat belts are made or used.
-
WARNING! Do not leave the buckle in a partially closed position and it must only lock when all parts are engaged. It must be possible to release the child from the restraint immediately in an emergency.
-
WARNING! Install the child restraint in vehicle seating positions categorized as 'Universal' in the vehicle owner's manual, by using the primary belt route.
-
WARNING! If the chair is not provided with a textile cover, keep it away from sunlight, otherwise it may be too hot for the child's skin. If the vehicle has been left in the sun for a long time, check the seat cover and make sure it is not too hot before placing the child in the child cushion.
-
WARNING! Do not use the car seat in the house. It is not designed for home use and should only be used in the vehicle!
-
WARNING! Periodically check the belts for wear, paying special attention to the points of attachment, protections and regulating devices. If the harness/vehicles belts becomes cut or frayed, replace it before traveling.
-
WARNING: ALWAYS secure your child with the safety belts when using the car seat.
-
WARNING! Do not leave the buckle in a partially closed position and it must only lock when all parts are engaged. It must be possible to release the child from the restraint immediately in an emergency. Your child must be taught never to play with the buckle. The buckle is NOT CHILD PROOF
-
WARNING! The baby seat must be secured with car safety belt, even when it is not in use.
An unsecured seat may injure other passengers in the car in an urgent stop.
-
WARNING! Store this child seat in a safe place when it is not being used. Avoid placing heavy objects on top of it. Do not allow your child seat to come into contact with corrosive substances e.g. battery acid.
-
WARNING! Do not leave your child in this safety seat for a long period of time. By long trips make more breaks and take out the child from the safety seat.
-
WARNING! Security is only guaranteed if the child restraint is fitted in accordance with these instructions.
-
WARNING! The instruction must be retained on the child restraint for its life period
-
Car seat is compatible with stroller Lora, Alba premium, Alba classic, Myla, Storm, Boston, Viola, Glory!
-
When using the car seat: This product does not replace a cot or a bed. Should your child need to sleep, then it should be placed in a suitable pram body, cot or bed./
-
Images on the title page and in the instruction manual are only illustrative and may differ from the real product.
WASHING INSTRUCTIONS
ECE R44/04
-
The car seat can be cleaned using lukewarm water and soap. Do not use aggressive cleaners like abrasives or thinner.
-
The cover should be washed by hand at a maximum temperature of 30^ C. Do not put in the dryer, just airing it.
-
The plastic parts can be cleaned by using a wettish drapery. Please, do not use any solvate.
TYPES OF APPROVED BELTS TO HAVE IN THE CAR
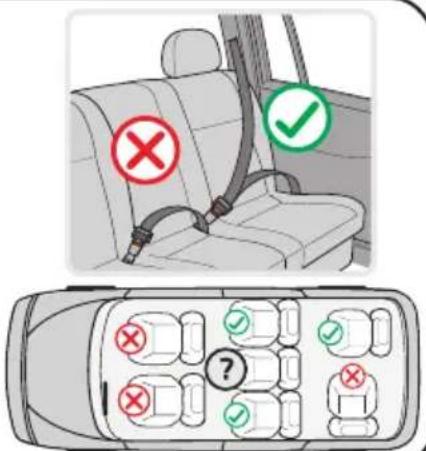
Your child seat can be installed ONLY with the help of 3-point belts!!! ONLY in the OPPOSITE direction of movement of the car!

Possibility to install ONLY on seats with 3-point seat belts!
CAN NOT BE USED FOR SEATS with 2-point belt!
Parts
Picture 1
- Carrying handle
- Belt softener
- Belt buckles
- Strap for belts adjustment
- Button for adjusting the belt (under the cover)
-
Lap belt guide
-
Red button for handle adjusting
- Diagonal belt guide
- Openings for shoulder straps
- Shoulder straps
- Buckle Pads
- Soft Cusion
- Cover
- Canopy
15*. Adaptors*
*Additional accessories - not included in the set.
Check the height of the shoulder belts
Always check that the shoulder belts are placed at the correct height for your child. Select the height of the straps according to the child's height. The position of the straps should be at or slightly above the shoulders of the child. Warning: Do not place the straps too high or so that the child can lean on them!
In the back of the safety seat, there are 2 pairs of holes, which can be used to adjust the shoulder straps to suit your child's weight (Fig. 2)
Adjusting the height of seat belts
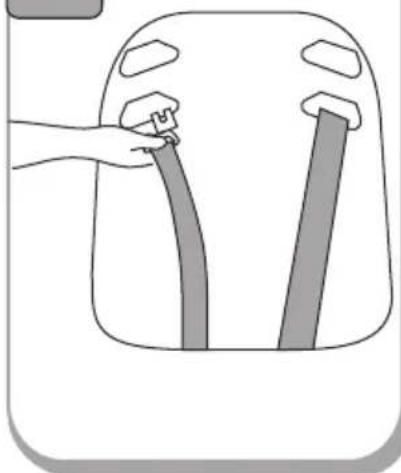
- Press the button for belts adjusting "5" and at the same time pull both shoulder straps. (Picture 3)
- Take out the belts "11" of the holes on the back from the front of the seat.
- Place back the belts in the desired holes on the front side of the backrest and connect them behind the back with the adjusting strap "4". Make sure the straps are placed on the same level and are not twisted.
Fastening the seat belt
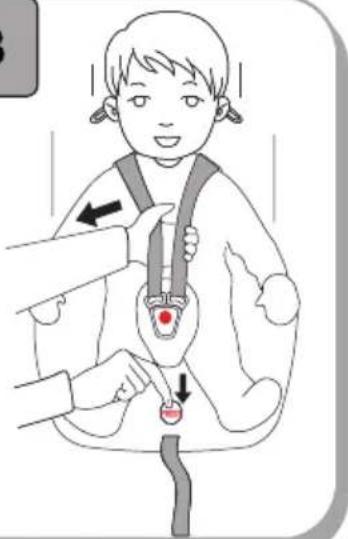
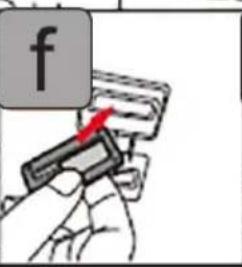
- Combine the two pieces "E" and "F" at the end of the belt (Picture 6) and place them in the central buckle "3" until it clicks into place. (Picture 7)
- Make sure the belt is locked by pulling the shoulder straps up. (Picture 8)
- To release belt, press down the red button on the central buckle "3".
Adjusting the length of the belts
- Slack the belts: Press the button for belts adjusting "5" and at the same time pull both shoulder straps. (Picture 3)
- Tightening the belt: Place your child in the seat, fasten both belts in the buckle in the center and pull the strap "4" in the middle of the seat. (Picture 5)
Removing the upholstery - Picture 19
For children with weight up to 10kg. the car seat should be used with the soft cushion. Once your child's weight is between 10kg. and 13kg. you should remove the soft cushion. Release the belts from the buckle and take out the soft cushion.
Crotch belt adjustment
The crotch belt is position at the inner slot of the car seat. Once when you feel that the crotch belt is too tight for your child, please adjust as follow:
- Pull up the cover at the front of your car seat. Picture 9
- Lift the metal part on the end of the belt, rotate and goes through the openings to pull out the belt. Picture 9 a;b;c;d
- Insert the metal part through outer slot, then under the bottom and through the inner slot. Place the metal part at horizontal position and pull the belt to ensure that it is secure. Picture 9 e;f;g
Adjusting of the carry handle
The carry handle of the car seat, can be adjusted in 3 stable positions. To adjust the handle, please press the red button on handle on both side at the same time. Now it can be rotated. (Picture 10)
1 Position - Straight up for carrying. (Picture 11)
2 Position - Handle clicked back to initiate the rocking feature . (Picture 12)
3 Position - Down to support baby for feeding. (Picture 13)
Ensure that the handle is locked in a position, the harness is correctly fitted and buckle fastened before carrying your car seat.
INSTALLATION OF SEAT
"Group 0 +" / newborn and weighing up to 13 kg.
Please use 3-point safety belts of the car to ensure the safety of the child and to secure the child seat! Your child seat can be installed ONLY with the help of 3-point belts!!! ONLY in the OPPOSITE direction of movement of the car!
Step 1. Adjust the handle to the upright position. (Picture14)
Step 2. Place the child seat on the seat of the car in the OPPOSITE direction of movement of the car, ensuring it is firmly pressed against the car seat backrest. If your car has an air bag on the passenger seat, the child seat should be used only in the rear of the car!
Step 3. Slide the lap belt of the vehicle's 3-point seatbelt through both Lap belt guides. (Picture 15) Let the tongue plate snap in the belt lock with a clearly audible "click". (Picture 16) Pull the shoulder belt in arrow direction to tighten the lap belt. Check to make sure the tongue plate is locked by pulling on the belt.
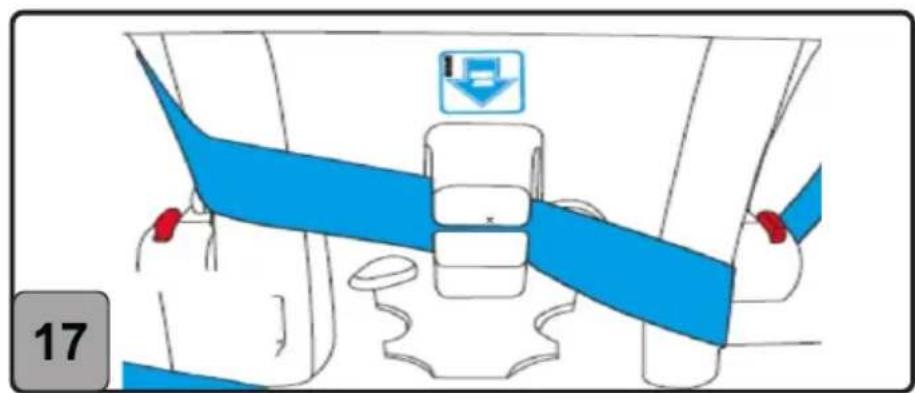
Step 4. Place the diagonal belt in the diagonal belt guide at the back of the seat (Picture 17)
Step 5. Tighten the vehicle's own 3-pointseatbelt by pulling hard on the positions. (Picture 18)
Step 6. Make sure that the belt is not twisted and strongly tightened. Make sure the seat is fixed firmly on the car seat.
Step 7. Place the child in the seat. Check the height of the shoulder belts. Make sure the straps are not twisted or hanging somewhere. Fasten the seat belts on the child, making sure that they are well placed and pull the strap in the centre of the seat to tighten.
CAR SEAT INSTALLATION ON A STROLLER FRAME
-
Mounting of the car seat - Put the adapters (*not included in the set Photo 1, position 15*) into the holes on both sides of the seat, taking into account the difference for the left and right side. (Photo 20) Insert the legs of the adaptors into the openings of the plastic holders on both sides of the frame. (Photo 21) A click will signal that the seat has been secured.
-
Unmounting of the car seat - Push simultaneously the buttons at both sides of the adaptors and lift the car seat from the stroller frame . (Picture 22) To unmount the adaptor from the car seat - catch the adaptor with hand and with thumb press the red button and pull out the adaptor . (Picture 23)
WARNING: The car seat should only be installed facing the parents, as shown in figure 21.

Части: Снимка 1
COMPONENTE
Figura 1
COMPONENTE
Zdjęcie 1
PIÈCES
Photo 1

PARTI
Foto 1

E3APTHMATA
Φωτογραφία 1

ДЕЛОВИ
Слика 1
Части:
ФОТО 1

DELOVI
Slika 1
- Drška za nošenje
- Zaštitnik za pojaseve
- Kopče za kaiš
- Kaiš za podešavanje pojaseva
- Dugme za podešavanje pojaseva (ispod presvlaka)
-
Vođica za pojas preko krila
-
Crveno dugme za podešavanje drške
- Vođica za dijagonalni pojas
- Otvori za podešavanje pojaseva za ramena
- Pojasevi za ramena
- Umekšivač kopče
- Mekana podloga
- Presvlaka
- Suncobran
15*. Adapteri*
PARÇALARI
Resim 1
ALKATRÉSZEK
PJESA
Fotografia 1

Piezas: Foto 1
e-mails: home.market@didis-ltd.com;
export@didis-ltd.com
Дидис ООД
e-mails: home.market@didis-ltd.com;
export@didis-ltd.com
Unic importator in Romania
DIDIS INTERNATIONAL
Strada Sfantul Pantelimon Nr.1
Oras Pantelimon, Judetul Ilfov
Phone: +40 21 211 65 60
Fax: +40 21 210 65 62
E-mail: office@didis.ro
- СЪДЪРЖАНИЕ / CONTENT
- SRB/HR/ME/BIH
- IMPORTANT! KEEP FOR FUTURE REFERENCE! READ CAREFULLY!
- NOTICE
- Important safety instructions!
- WASHING INSTRUCTIONS
- TYPES OF APPROVED BELTS TO HAVE IN THE CAR
- Parts
- Check the height of the shoulder belts
- Adjusting the height of seat belts
- Fastening the seat belt
- Adjusting the length of the belts
- Removing the upholstery - Picture 19
- Crotch belt adjustment
- Adjusting of the carry handle
- INSTALLATION OF SEAT
- CAR SEAT INSTALLATION ON A STROLLER FRAME
- Части: Снимка 1
- COMPONENTE
- Figura 1
- PIÈCES
- Photo 1
- PARTI
- Foto 1
- E3APTHMATA
- ДЕЛОВИ
- Части:
- ФОТО 1
- DELOVI
- Slika 1
- PARÇALARI
- Resim 1
- ALKATRÉSZEK
- PJESA
- Piezas: Foto 1
- Дидис ООД
- Unic importator in Romania
Brand : Lorelli
Model : Comet
Category : Car seat