Nomad GT P 5220 - Gps Pentagram - Free user manual and instructions
Find the device manual for free Nomad GT P 5220 Pentagram in PDF.


| Product Type | GPS Navigator |
| Brand | Pentagram |
| Model | Nomad GT P 5220 |
| Display Size | 5 inches (approximately) |
| Dimensions | 140 x 85 x 20 mm (estimated) |
| Weight | 200 g (estimated) |
| Power Source | Rechargeable lithium-ion battery, 12V car charger |
| Battery Life | Up to 4 hours (estimated) |
| Navigation Functions | Turn-by-turn directions, points of interest, route planning, voice guidance |
| Map Preloading | Preloaded maps for selected regions |
| Connectivity | USB for map updates and charging |
| Mounting | Suction cup windshield mount |
| Memory | Internal memory, expandable via microSD (if supported) |
| Language Support | Multiple languages including English |
| Maintenance | Clean screen with soft, dry cloth; avoid liquids |
| Safety | Use windshield mount; do not operate while driving |
| Spare Parts | Charger, USB cable, windshield mount, car adapter |
| Repairability | Limited; consult manufacturer or authorized service center |
| General Information | User manual available for download; GPS device for car navigation |
Frequently Asked Questions - Nomad GT P 5220 Pentagram
User questions about Nomad GT P 5220 Pentagram
0 question about this device. Answer the ones you know or ask your own.
Ask a new question about this device
Download the instructions for your Gps in PDF format for free! Find your manual Nomad GT P 5220 - Pentagram and take your electronic device back in hand. On this page are published all the documents necessary for the use of your device. Nomad GT P 5220 by Pentagram.
USER MANUAL Nomad GT P 5220 Pentagram
The latest versions of manuals, drivers and software are available on www.pentagram.eu
NOTE! All information and technical specifications are subject to change without prior notice and/or its indication in this manual.
© 2009 PENTAGRAM
All rights reserved, duplication and copying forbidden
TABLE OF CONTENTS
INTRODUCTION 5
SYSTEM REQUIREMENTS....5
BOX CONTENTS....5
MOUNTING IN A CAR .... 5
PREPARATION FOR OPERATION....6
PRECAUTIONS 6
DEVICE IN PICTURES....7
MEMORY CARD......8
BATTERY CHARGING 8
AV-IN......9
CONNECTING TO THE COMPUTER....9
FIRMWARE UPGRADE......9
DEVICE OPERATION....10
MAIN MENU....10
NAVIGATION MENU....10
PHOTO MENU 11
BLUETOOTH MENU....13
MUSIC MENU 22
VIDEO MENU 25
SETTINGS MENU 28
TROUBLESHOOTING 40
SPECIFICATION* 41

Introduction
Thank you for purchasing the PENTAGRAM Nomad GT navigation system. The device incorporates a GPS receiver, sound and video files player, photo browser, and has a built-in SD/MMC card reader, Video input and FM transmitter. Additionally, the device supports the communication with Bluetooth equipment.
System requirements
These requirements are only important when connecting the device to a computer.
• A PC with an available USB port
- Operating system: Windows Me / 2000 / XP / Vista
Box contents
• PENTAGRAM Nomad GT (P 5220)
- USB cable
- Quick operation manual
- AC charger (option)
- Car charger
• Windscreen mounting kit (a sucker with an arm and a holding frame for the navigation system)
- SD card (option)
Mounting in a car
NOTE! If you have to connect the navigation system to the car cigarette lighter socket, start the engine first. Power surges during the ignition may damage the device permanently.
Use the supplied windscreen mounting kit (the sucker with the arm and the holding frame) to attach the system to the vehicle windscreen. Make sure that:
- the device location does not obstruct the visibility for the driver,
- the sucker is firmly holding to the windscreen,
- the device is firmly held in the frame,
- the frame with the device is properly mounted on the sucker arm,
- the system is not mounted near the airbag.
In case of any doubts regarding the navigation system mounting, contact the technical support.
Preparation for operation
Precautions
• Using a satellite navigation system does not mean that the user can disobey traffic regulations (lights, signs, etc.), stop behave politely when driving or stop using common sense.
- Avoid placing the device under direct sun. Do not store it in dusty places or where the temperature is extremely low or high (e.g. car interior with the windows closed in the summer).
- Do not drop or shake the device.
- Do not let moisture or foreign objects get into the device.
- When cleaning the device, do not use chemicals, such as white spirit or detergents.
- Clean the device with a soft, dry cloth.
• Before cleaning, turn off the device and disconnect it from the computer or the power source.
- Do not modify or repair the device yourself, because it may void the guarantee.
• Do not operate the device with wet hands. It might damage the device or cause an electric shock.
- Do not disconnect the device from the computer when transferring data. They might get irrecoverably lost.
- Files and data stored in the device memory and on the memory card are prone to damage like any other files. For this reason, if necessary, make the backup copies of those files and data.
Using the touch screen
You can use your finger to operate the touch screen. However, as the screen surface area is big, the stylus is much more precise and just a little bit less comfortable. The stylus is located in the back of the device casing. You can use the stylus to perform four basic operations:
- tapping – light touching the screen surface with the stylus,
- double tapping – quick tapping twice with the stylus on the same point of the screen,
- dragging – touching and dragging the stylus on the screen,
- holding – touching and holding the stylus several seconds on the same point of the screen.
Always operate the touch screen with the stylus or a clean finger. Using other objects might scratch the screen, rendering the device operation difficult, or it might even void the guarantee.
Device in pictures
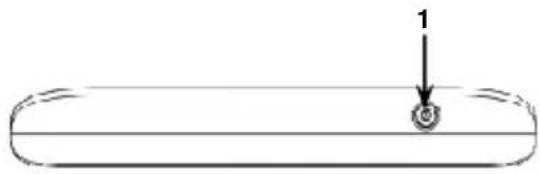
natural_image
Simple line drawing of a cylindrical object with a small circular feature and an arrow pointing to it (no text or symbols)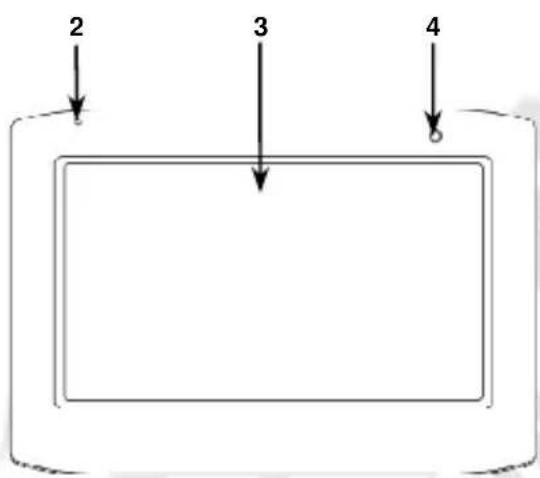
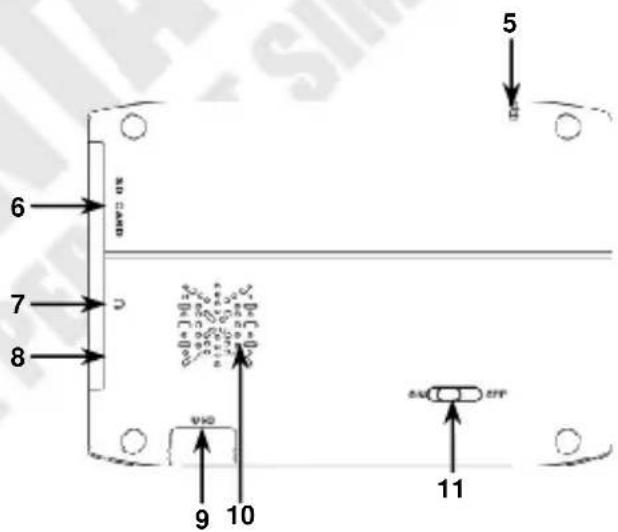
Legend:
- Sleep button:
- To turn on the sleep mode (energy saving), press and hold the button for approx. 5 seconds. - To turn off the sleep mode (energy saving), press and hold the button for approx. 3 seconds.
- Microphone.
- LCD touch screen.
- Battery charging LED.
- Stylus - allows precise operation of the device.
- SD card slot.
- Headphones socket – when connected, the headphones are used instead of the built-in loudspeaker.
- Video input (AV-IN) – option; an external video device can be connected here.
- USB socket.
- Loudspeaker – if no headphones are connected to the device, all the sounds will be played through the built-in loudspeaker.
- Switch – when in ON position (left side), the device is turned on. To turn it off, just slide the switch to the OFF position (right side).
Memory card
Insert the memory cards into the device in such a way so that when looking at the device front, the card label is visible, and when looking at the device back, the card connectors are visible.
To remove the card from the device, press the card so that it gently slides out, and then pull it out. Prior to removing the card, make sure that all the applications accessing it (like the media player, the navigation application) have been closed and that no files are being transferred from/to the card. Some navigation applications use the memory card for storing the configuration and map files. If you remove such a card, it may cause the application to operate improperly, and in extreme cases even the necessity to reinstall the application.
NOTE! Removing the card when it is in use can cause damage or loss of data, application crash or it can even freeze the device.
Battery charging
In the top right corner of the main menu there is the icon representing the battery charge. When the icon is filled with bars, it means the battery is fully charged. If the icon is empty, the battery is very low and you have to charge it as quickly as possible. The battery will start charging automatically after connecting the device to the AC charger or the car charger, plugged in the appropriate socket. During charging, the bars in the icon appear and disappear one by one, and you can operate the device as normal. The LED under the touch screen is an additional battery charge indicator – it is red during charging and becomes green when the charging is complete.
To charge the battery:
- connect the device to the computer USB port, or
- connect the device to the mains socket using the AC charger (option), or
- connect the device to the car lighter socket using the car changer.
AV-IN (option)
Using this connector and the included cable, you can connect an external video device to the navigation system. The picture from the external device will appear on the system display immediately after it is connected. If necessary, select the appropriate option in the Settings / Video Input menu.
Connecting to the computer
NOTES:
- Only use the device built-in flash memory (visible as "ResidentFlash" or "NANDFlash") or the inserted memory card (visible as "SDMMC") for the installation of applications and storage of own files. All files stored outside these locations will be deleted when the system is turned off.
- When the data are being transferred, do not disconnect the device from the computer to prevent the possible damage or loss of data.
The device works with the following operating systems: Windows Me / 2000 / XP / Vista.
When connected to the computer, the system is visible as USB Mass storage device. The built-in flash memory (ResidentFlash or NANDFlash) and the inserted memory card (SDMMC) are treated as normal removable storage. You can copy files directly from/to those storage media.
Firmware upgrade
If necessary, you can upgrade the device firmware to a newer version. The latest firmware is downloadable from www.pentagram.eu. The downloaded new firmware archive contains detailed information on preparing and performing the upgrade.
Device operation
Main menu
When you turn on the device, the welcome screen will be displayed for a moment. Then, the main system menu will be launched.
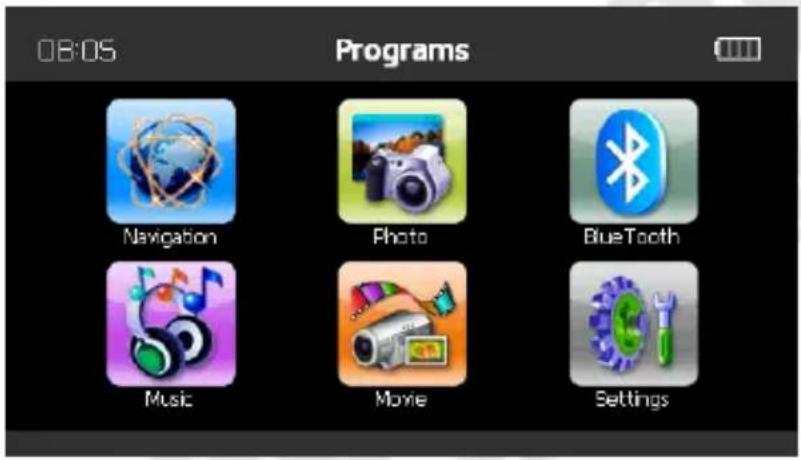
Navigating the menu is very simple – tap the appropriate icon with the stylus to launch it. In the top right corner of the display the battery status icon is visible, and in the left corner the clock is displayed.
Below there is the main menu elements list along with the corresponding functions.
Navigation menu
If the navigation application has been properly installed and configured, tapping the icon will launch the program. Before you start using the application, configure the path to its main executable file. You can do this in the Settings / Nav Setup menu. If you turn off the device before closing the application, it may result in losing the entered data – for this reason, we recommend closing the application before you turn off the device.
Photo menu
Tap the icon to open the graphic files browser.
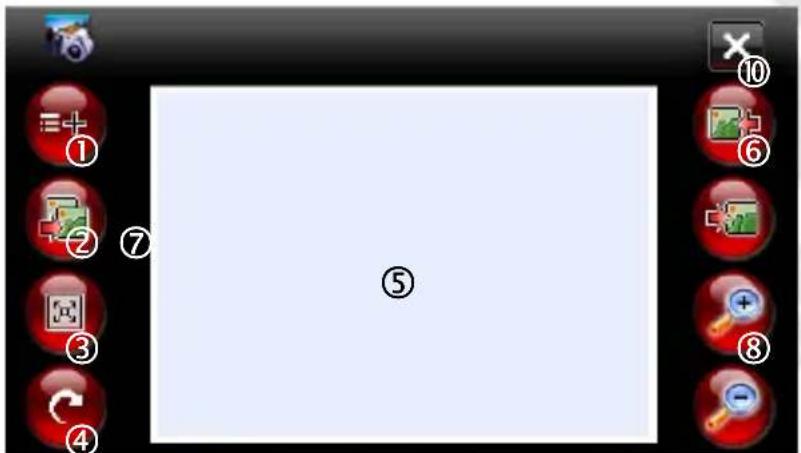
- The list of files allowing the selection of the folder and file to be displayed.
- Turn on the slide show. In this mode, the full screen mode is automatically activated. Tap the screen to exit the full screen mode and end the slide show.
- Turn on the full screen mode. Tap the screen to exit the full screen mode.
- Rotate the picture by 90^ CW.
- File display area. If the file is zoomed in, dragging will move the displayed file.
- Previous file.
- Next file.
- Picture zoom in.
- Picture zoom out.
- Back to the main menu.
List of files
Double tap a folder to display its contents. Double tap a file to open it. Only the file types supported in this mode are displayed on the list.
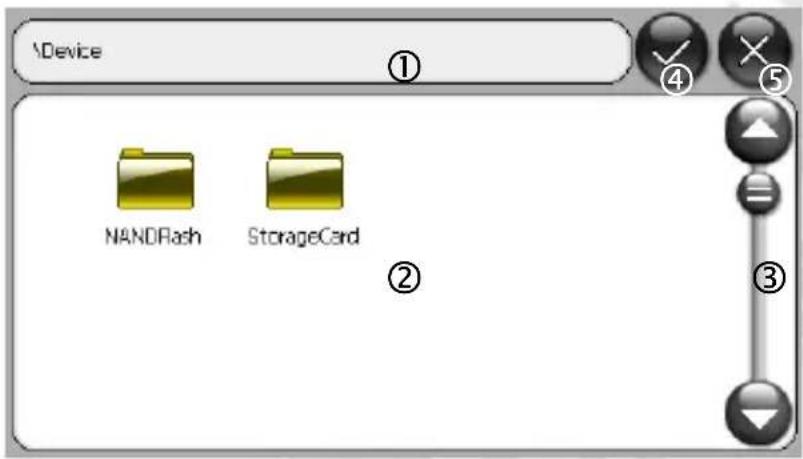
- Path to the current folder.
- Current folder contents.
- Scroll bar.
- Confirm the selection (equivalent to the double tap).
- Exit the list of files without selecting a file to display.
Bluetooth menu
Tap the icon to turn on the device Bluetooth module and display the menu allowing you to configure and use the Bluetooth connection. Enabling the Bluetooth module increases battery power consumption, hence we recommend disabling it when not in use. Because of this, the Bluetooth module is disabled by default when you exit to the main menu (You can change it in the Settings window of the Bluetooth menu).
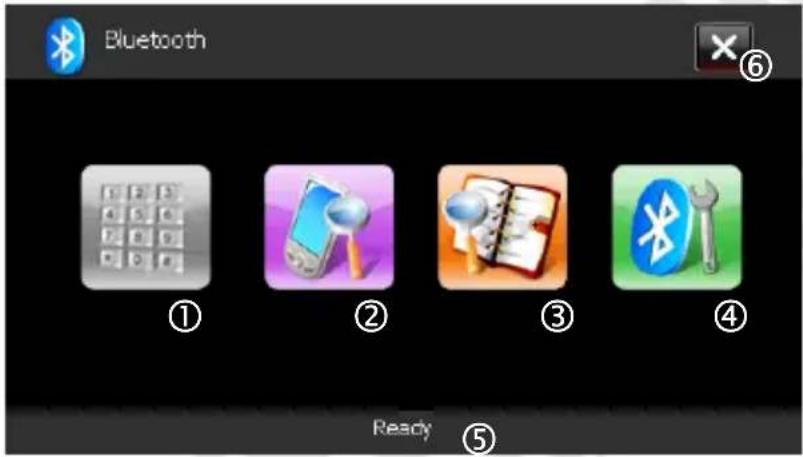
- Open the Dial Pad window used for making a phone call.
- Open the Pair window used for pairing with another Bluetooth device.
- Open the Paired Devices window with the list of known Bluetooth devices.
- Open the Settings window with the Bluetooth options.
- Bluetooth connection status bar.
- Back to the main menu.
Telephone call window
This window is not accessible from the menu level, but is displayed every time you make (or have made) an inbound or outbound phone call. The window looks different depending on the connection type and status.
Outbound call
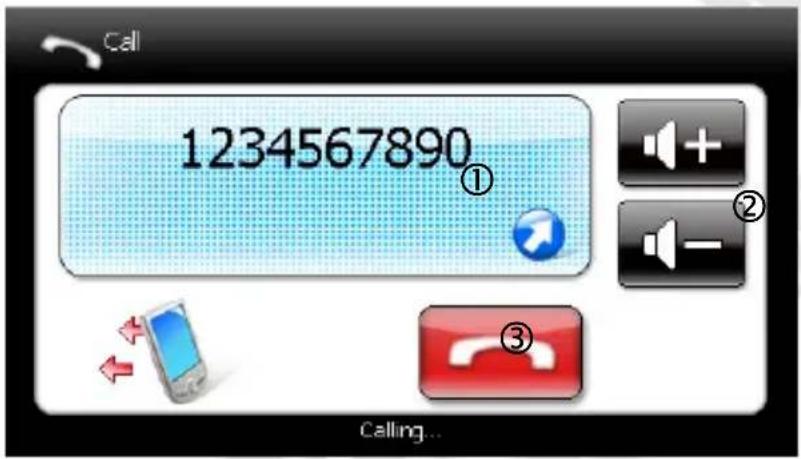
- Called phone number.
- Volume adjustment buttons.
- Cancel the call and go back to the previous menu.
Inbound call
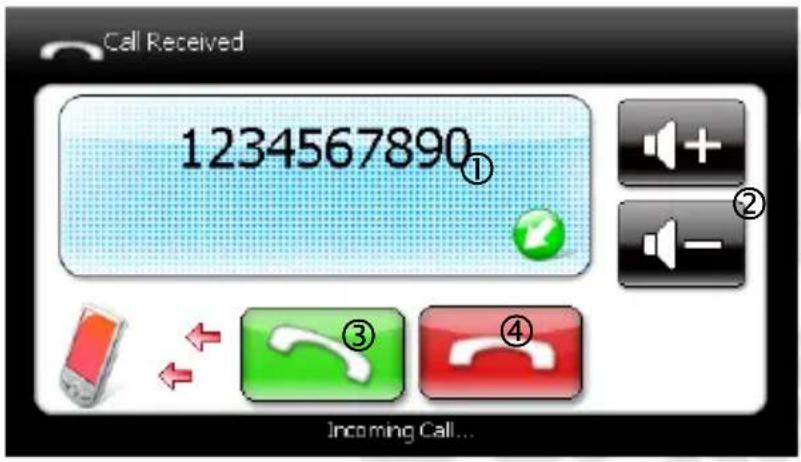
- Calling phone number.
- Volume adjustment buttons.
- Accept the inbound call.
- Reject the inbound call and go back to the previous menu.
In-call
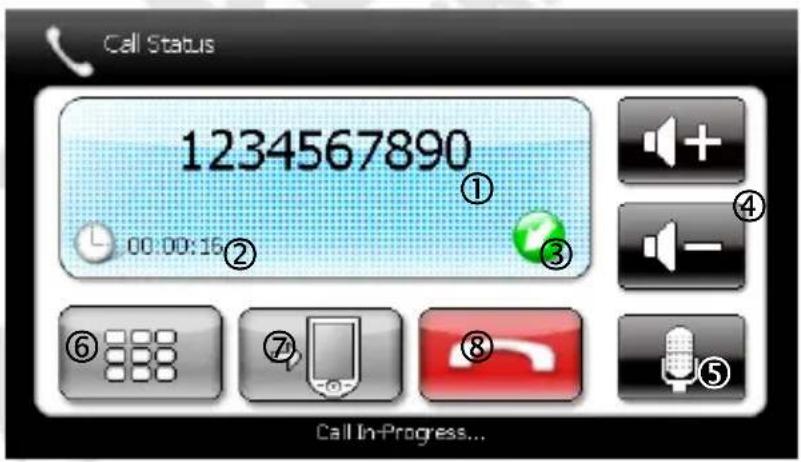
- Calling/called phone number.
-
Elapsed call time.
-
Connection type icon (blue – outbound, green – inbound).
- Volume adjustment buttons.
- Mic mute.
- Show or hide on-screen keypad for, e.g. dialing the extension number.
- Forward the call to the phone or back to the device.
- End the call and go back to the previous menu.
Dial Pad window
The window allows you to make a phone call with the given phone number.
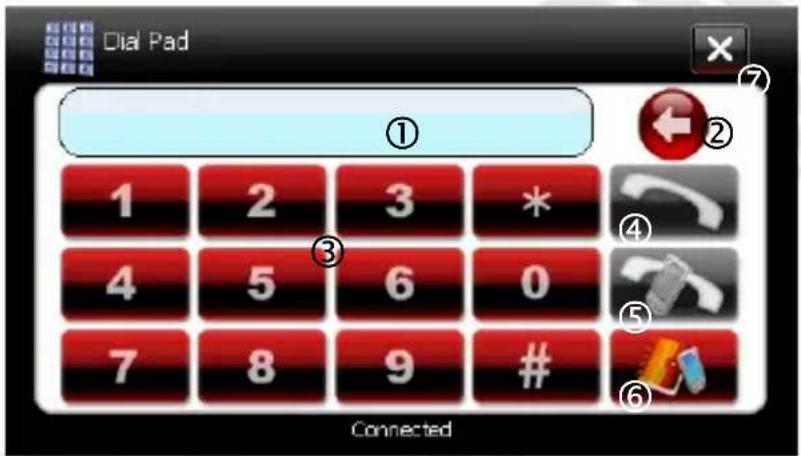
- Phone number to be called.
- Delete the last digit.
- Key pad for dialing.
- Establish connection with the dialed phone number.
- Establish connection with the last dialed phone number.
- Open the Call Log window with the list of the last calls.
- Back to the previous menu.
Call Log window
Contains the lists of the last calls (outbound, answered, missed).
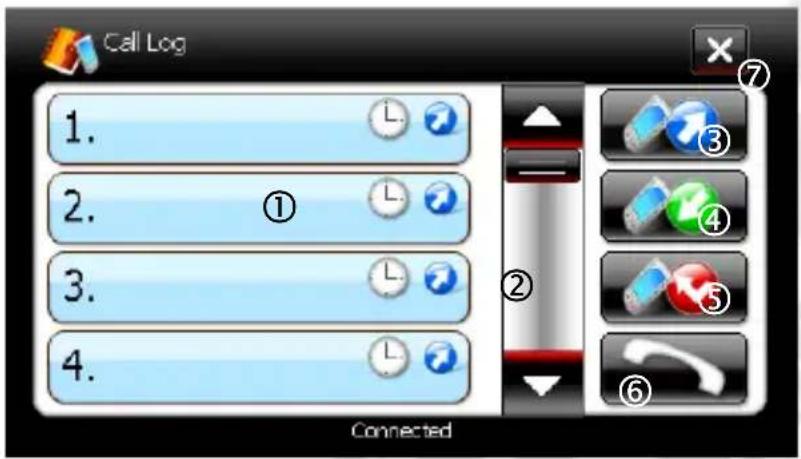
- Items of the currently selected list.
- List scroll bar.
- Outbound calls list.
- Answered calls list.
- Missed calls list.
- Call the number selected on the list.
- Back to the previous menu.
Pair window
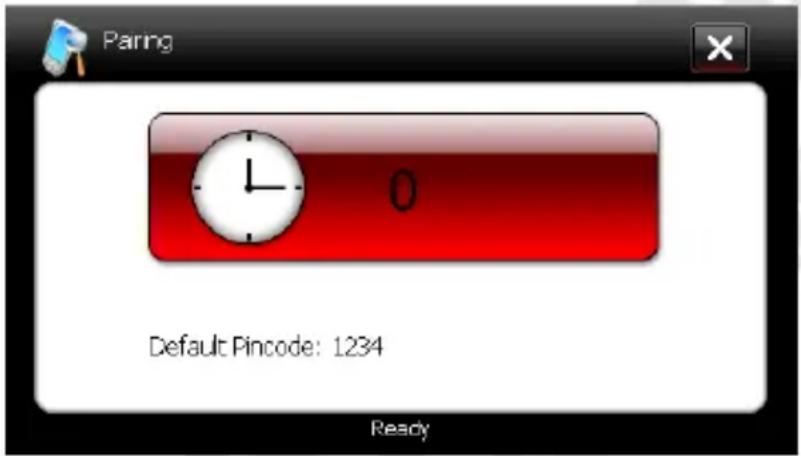
In order to pair the device with a mobile phone, enable the Bluetooth module in the paired phone, then search for it and add to the devices list (the documentation that came with the phone should contain detailed instructions on Bluetooth enabling and configuration). The navigation system is identified as GPS, and the default pairing PIN code is 1234 (you can change the PIN code in the Settings window). After pairing, connect the phone and the device. To exit the screen without pairing, tap the icon in the top right corner of the display.
Paired Devices window
The window contains the list of known Bluetooth devices.
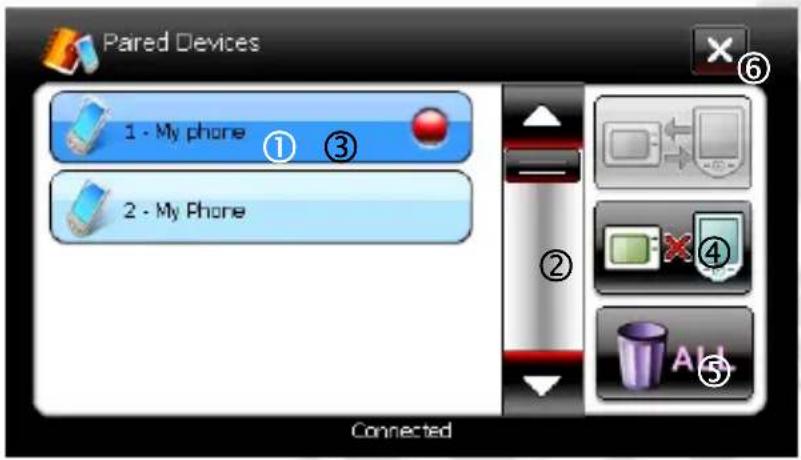
- The name identifying the Bluetooth device. The red dot marks the active connection.
- List scroll bar.
- Connect with the selected device. It is not accessible if any connection is active.
- End the connection with the selected device.
- Clear the list. You will have to pair the connected device again.
- Back to the previous menu.
Settings window
This window contains the Bluetooth-related device settings.
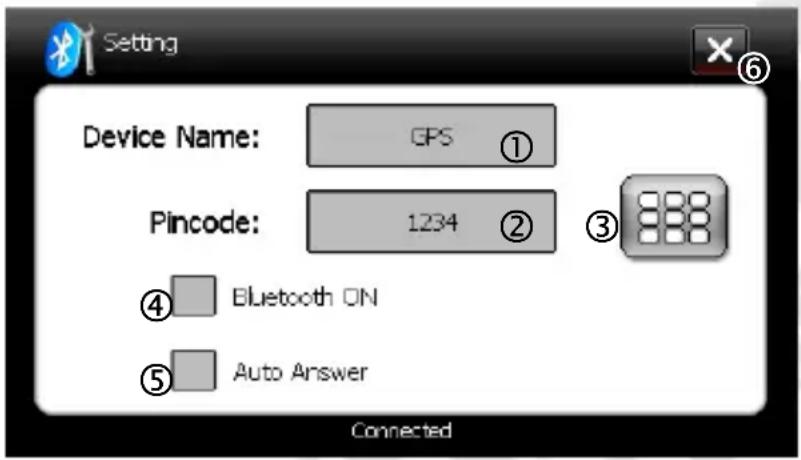
- Name identifying the device (read-only).
- PIN code required for pairing with other Bluetooth devices.
- Open the Pincode Reset window for entering a new PIN code.
- When this option is selected, the Bluetooth module will remain enabled after you exit the Bluetooth menu. This is not recommended because the enabled Bluetooth module consumes more power.
- When this option is selected, all incoming connections will be accepted automatically.
- Back to the previous menu.
Pincode Reset window
This window allows you to change the PIN code, which is required when pairing the device with a Bluetooth phone.
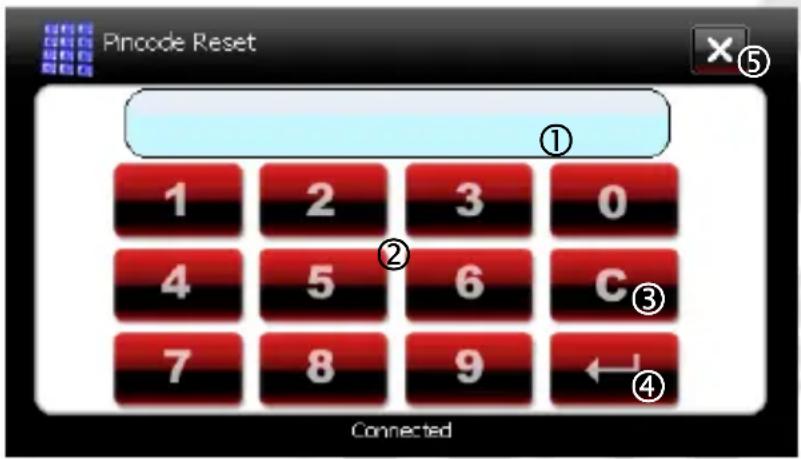
- New PIN code.
- Key pad for entering the new PIN code.
- Delete the last digit.
- Save the settings and go back to the previous menu.
- Back to the previous menu without saving the settings.
Music menu
Tap the icon to open the audio files player. If the playlist is empty, the list of files will be automatically opened.
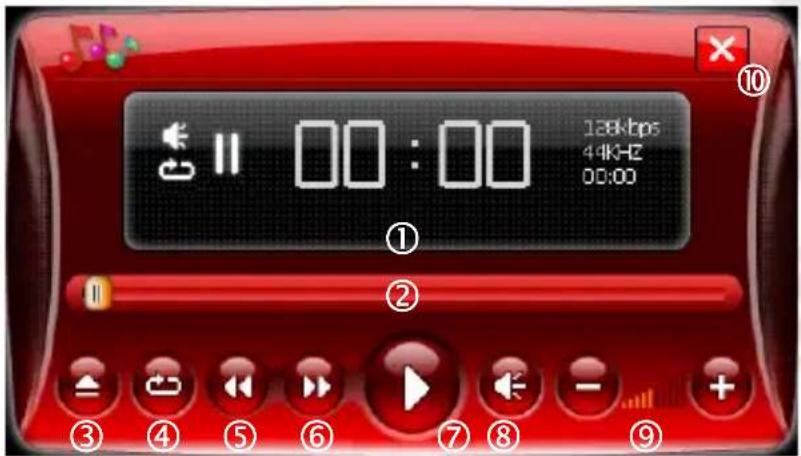
- Information about playing and the file:
• left: mute on/off, play mode, play/pause,
- center: elapsed time of the playing and the file name,
- right: bit rate, sampling frequency, total file time.
- Playing progress bar.
- Display the playlist.
- Change the play mode: play list once, repeat whole list.
- Previous piece.
- Next piece.
- Pause/resume play.
- Mute on/off.
- Volume adjustment.
- Back to the main menu.
Playlist
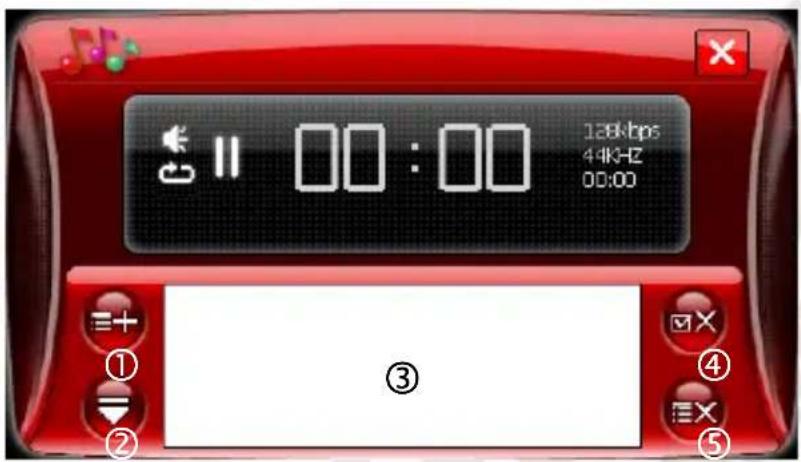
- Open the list of files.
- Hide the list of files.
- Current contents of the list of files.
- Delete the selected item from the list.
- Delete all the items from the list.
List of files
Double tap a folder to display its contents. Double tap a file to open it. Only the file types supported in this mode are displayed on the list.
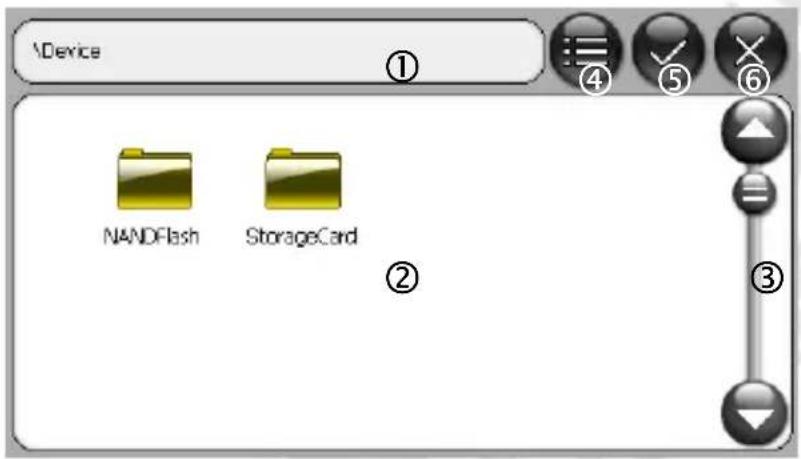
- Path to the current folder.
- Contents of the current folder.
- Scroll bar.
- Select all files.
- Confirm the file/folder selection (equivalent to the double tap) or add all the selected files to the playlist.
- Exit the list of files without selecting any files.
Video menu
Tap the icon to open the video files player. If the playlist is empty, the list of files will open automatically.
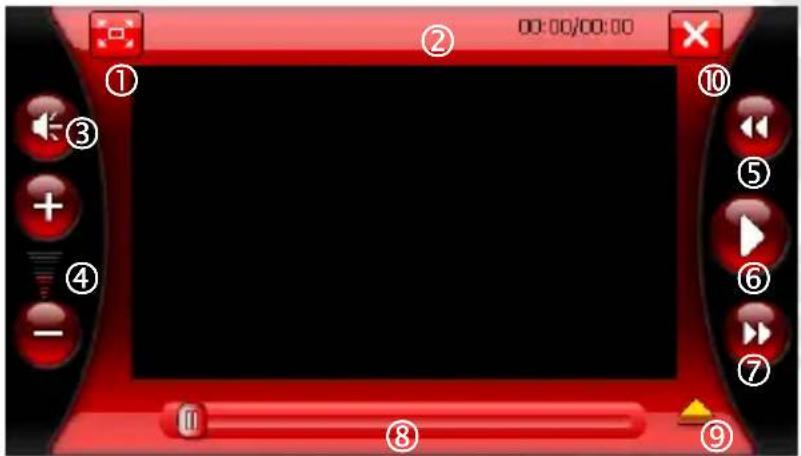
- Full screen mode on. To exit the full screen mode, just tap the screen.
-
Playing and file information:
-
left: file name,
• right: elapsed and total file time. -
Mute on/off.
-
Volume adjustment.
- Previous video.
- Pause/resume play.
- Next video.
- Playing progress bar.
- Show/hide the playlist.
- Back to the main menu.
NOTE! High quality video files may not be played smoothly.
Playlist
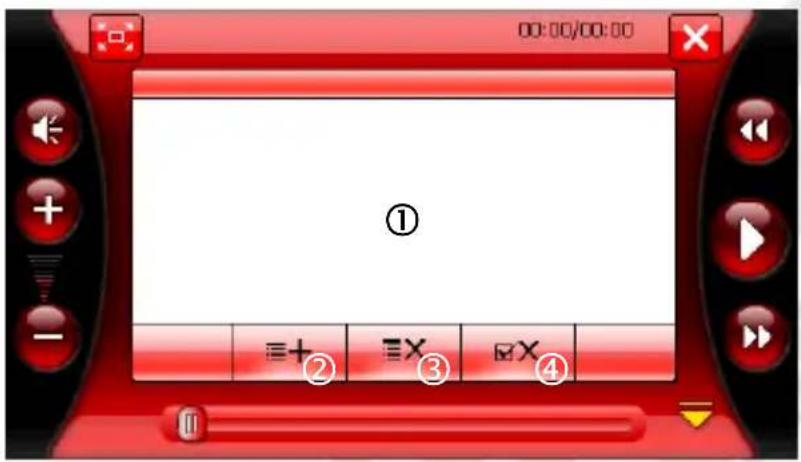
- Current playlist contents.
- Open the list of files.
- Delete all the items from the list.
- Delete the selected item from the list.
List of files
Double tap a folder to display its contents. Double tap a file to open it. Only the file types supported in this mode are displayed on the list.
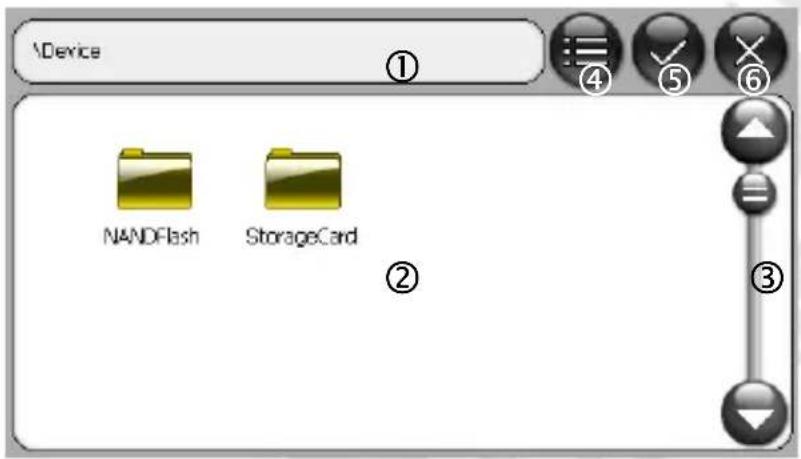
- Path to the current folder.
- Contents of the current folder.
- Scroll bar.
- Select all files.
- Confirm the file/folder selection (equivalent to the double tap) or add all the selected files to the playlist.
- Exit the list of files without selecting any files.
Settings menu
Tap the icon to enter the system settings menu. Tap the icon corresponding to the option you want to change. Tap the button in the top right corner of the screen to go back to the main menu. Scroll the menu using the arrow buttons on the left and right sides of the settings.
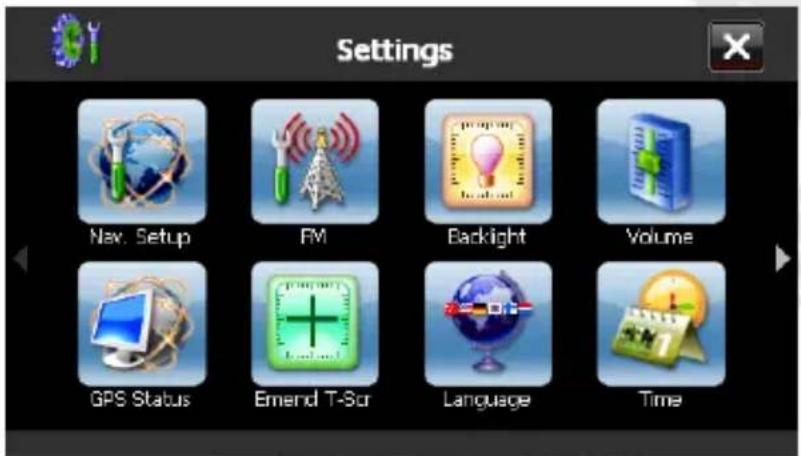
Nav. Setup
This menu allows you to configure the navigation application.
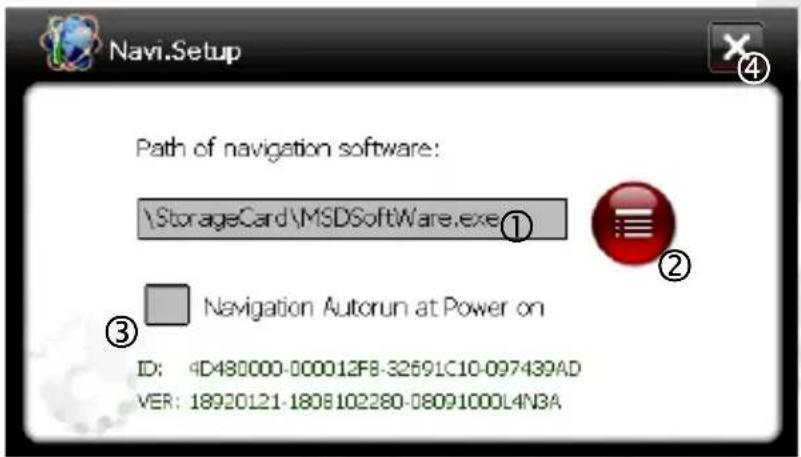
- Current path to the navigation application executable file.
- Select the navigation application executable file.
- Select this option to launch the application when the device is started up.
- Back to the previous menu.
GPS Status
This menu allows you to browse the available satellites and reset the device GPS receiver.
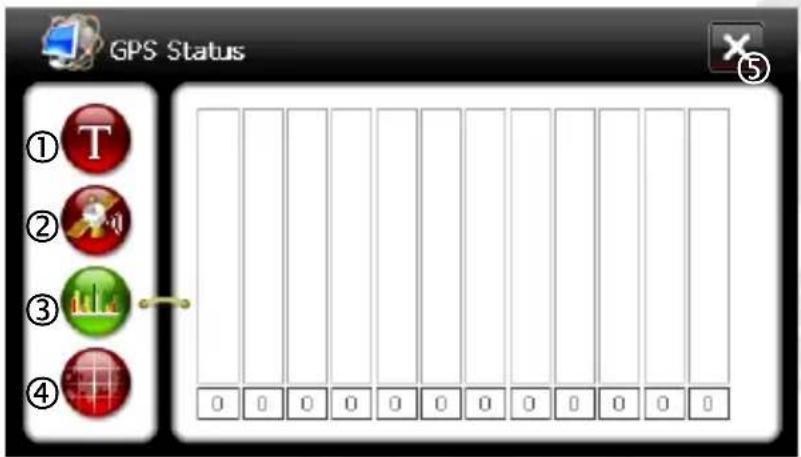
- Tab with a short description and the option for resetting the device GPS receiver – Reset GPS.
- Tab with all data received from the GPS system.
- Tab with information on available and used satellites along with the signal strength.
- Tab with exact position and time received from the GPS system.
- Back to the previous menu.
FM
Using this menu, you can change the device FM transmitter settings.
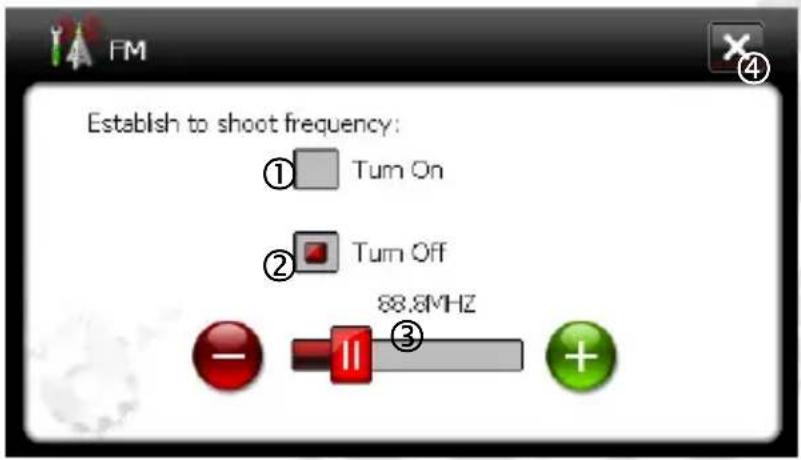
- Turn on the FM transmitter.
- Turn off the FM transmitter.
- The frequency on which the FM transmitter will broadcast. Use the slider and the +/- buttons to change the frequency.
- Back to the previous menu.
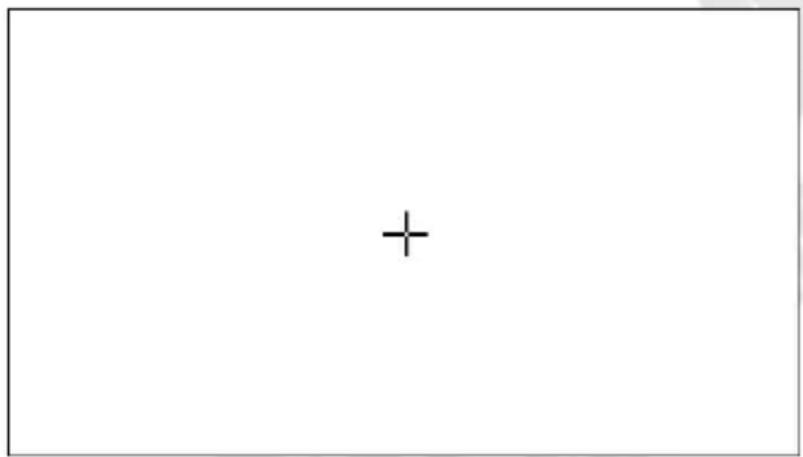
Emend T-Scr (Calibrate the screen)
You may have to calibrate the screen if there are differences between the displayed and the real point where you tap the screen with the stylus. To calibrate the screen, hold the stylus pressed for a moment in the center of the cross displayed on the screen. Repeat the operation until the following screen is displayed. Once the OK caption is displayed, the correct calibration is finished. Click the OK to go back to the previous menu.
Backlight
Using this menu, you can change the backlight brightness and its timeout.
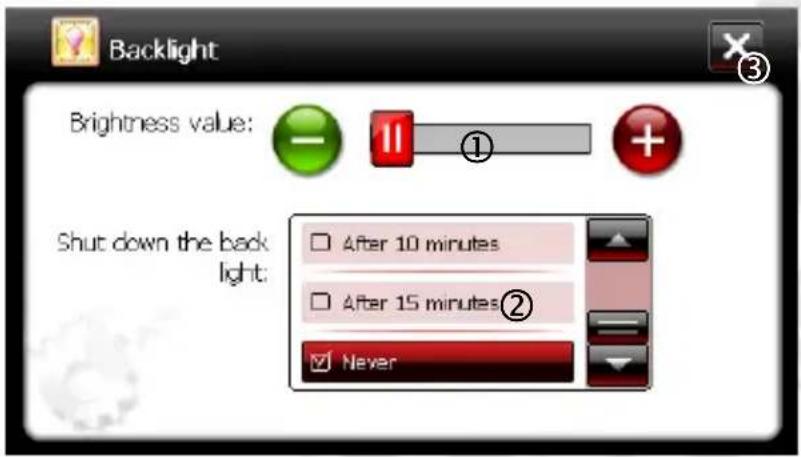
- Screen brightness level. Use the slider and the + and - buttons to change it.
- Select the idle time, after which the screen backlight will turn off.
- Back to the previous menu.
Language
Using this menu, you can change the displayed language.
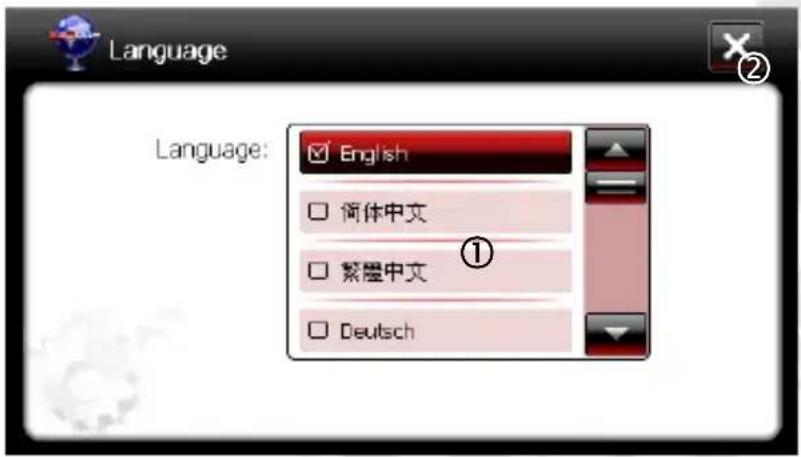
- List allowing you to select the language of the device menu.
- Back to the previous menu. Before you exit the screen, make sure you have selected the correct language!
Volume
Use this menu to adjust the sound volume and enable/disable the tap sounds.
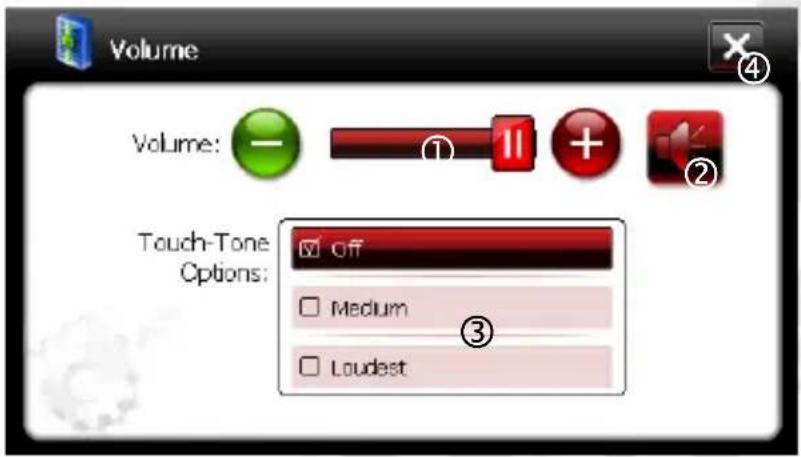
- Device volume level. Use the slider and the + and - buttons to change it.
- Mute/unmute all sounds.
- Change the tap sounds volume or turn them Off.
- Back to the previous menu.
Time&Date
This menu shows the current settings of the date, time and time zone of the device.
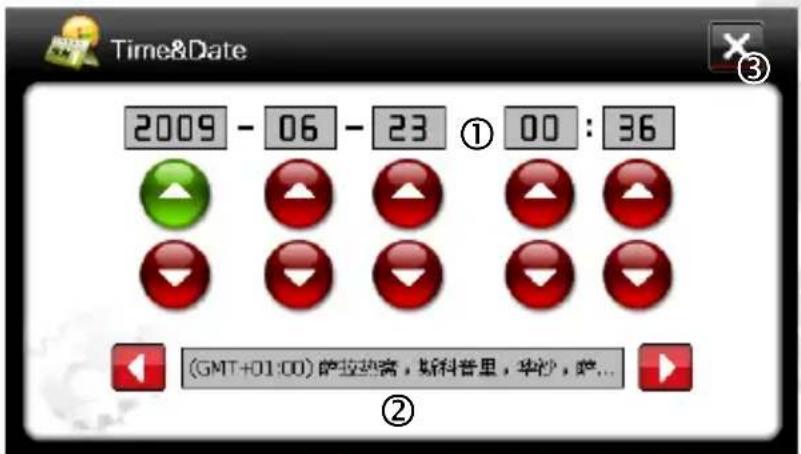
- Currently set date and time. Use the arrow buttons below the corresponding items to change them.
- Currently set time zone. Use the arrow buttons to change it.
- Back to the previous menu.
System
This menu shows information about the device. You can also use this menu to reset the device to factory defaults.
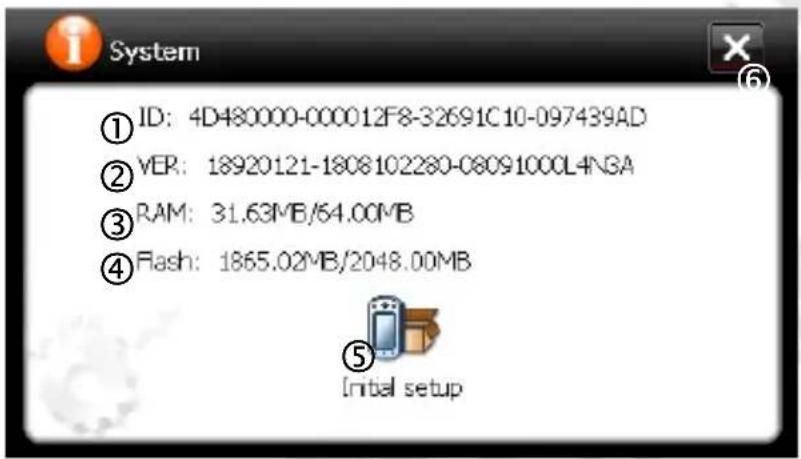
- Device ID.
- Device version number.
- Free/total storage in the main memory of the device.
- Free/total storage in the NandFlash memory of the device.
- Restore the factory defaults.
- Back to the previous menu.
Skin
Using this menu, you can change the look (color theme) of the device menu.
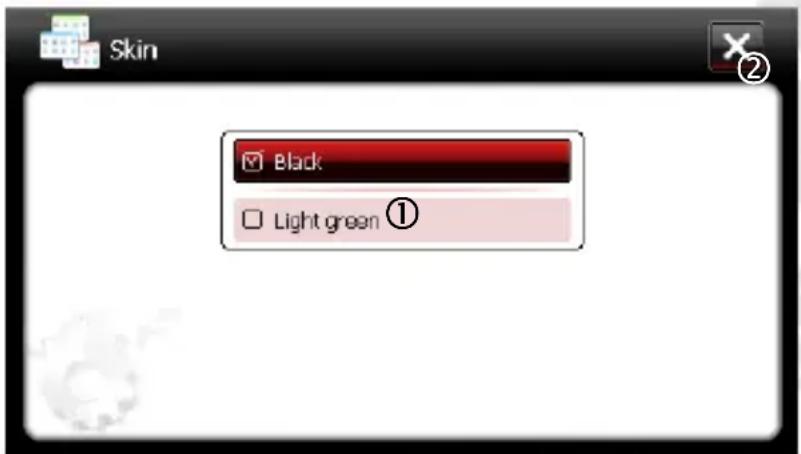
- List of available color themes.
- Back to the previous menu.
Video Input
Using this menu, you can adjust the picture from the video camera connected to the optional device Video input (AV-IN).
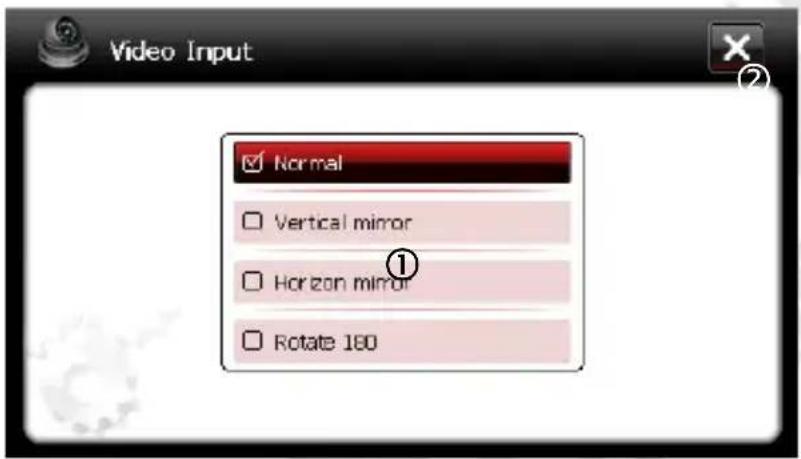
- List of available picture modifications:
• Normal – the picture from the Video input is displayed unmodified.
• Vertical Mirror – the displayed picture is the vertical mirror of the picture from the Video input.
- Horizontal Mirror – the displayed picture is the horizontal mirror of the picture from the Video input.
- Rotate 180 – the displayed picture is rotated by 180^ in relation to the picture from the Video input.
- Back to the previous menu.
Troubleshooting
If you experience problems with the device, use the following tips. The current list of problems along with the solutions can be found on http://www.pentagram.eu/support. If you cannot solve the problem, contact the Technical Support.
If you experience problems with the navigation application or another program, contact the technical support of the software vendor – you can find the contact data in the documentation (paper and electronic) that comes with the software.
| Symptoms Probable cause How to fix | ||
| I cannot turn on the device. | Low battery. Charge the battery. | |
| The device turns off itself. | Low battery or display backlight/device turn off timeouts are too short. | Charge the battery or change the settings for automatic backlight or device turn off timeout. |
| I cannot insert the memory card. | The card is inserted in an incorrect way. | Read the Memory card section, which describes the method of inserting the memory card. |
| The screen does not respond to taps. | The device has frozen. | Turn off and on the device with the switch. |
| Problems with connecting to the PC. | The USB cable is not connected properly. | Connect the USB cable properly. |
| The navigation application does not save the settings. | The device was turned off before the application stopped. | Always close the navigation application before you turn off the device. |
| The memory card switch is in LOCK (read-only) position. | Unlock the card with the switch. | |
| No GPS signal. | The environment conditions hinder the position lock. | Move the device to open space. |
| The device is indoors. | Indoors, locking the position can take much longer than in open space, or it may not be possible at all. | |
| The GPS receiver freezes. Reset the GPS receiver. | ||
Specification*
| Technical parameters | |
| Processor Samsung 400 MHz | |
| RAM | 64 MB |
| Nand Flash 2 GB | |
| External memory SD card slot | |
| Operating system Windows CE 5.0 Core Version | |
| Basic parameters | |
| Screen size 4.3" | |
| Screen resolution | 480*272 |
| Battery Built-in Li-Ion 850 mAh | |
| GPS parameters | |
| Frequency | 1,575 MHz |
| C/A code 1,023 MHz | |
| No. of channels 20 | |
| Sensitivity | -150 dBm |
| Accuracy | 10 meters |
| Speed | 0.1 mps |
| Hot start | less than 3 seconds |
| Warm start approx. 40 seconds | |
| Cold start less than 100 seconds | |
| Maximum altitude | 18,000 m |
| Maximum speed 515 mps | |
| Acceleration | < 4 g |
| Built-in antenna | Ceramic, active |
| Bluetooth parameters | |
| Maximum range 10 meters | |
| Communication type | V1.2 |
| FM transmitter parameters | |
| Frequency | 88 MHz ~ 92 MHz |
| Maximum range | 3~5 meters |
| Dimensions | 120 mm * 84 mm * 17.5 mm |
| Operating temperature | -10°~ +60° |
| Storage temperature | -20°~ +70° |
* The specification may change without prior notice.
- TABLE OF CONTENTS
- Introduction
- System requirements
- Box contents
- Mounting in a car
- Preparation for operation
- Precautions
- Using the touch screen
- Device in pictures
- Legend:
- Memory card
- Battery charging
- To charge the battery:
- AV-IN (option)
- Connecting to the computer
- NOTES:
- Firmware upgrade
- Device operation
- Main menu
- Navigation menu
- Photo menu
- List of files
- Bluetooth menu
- Telephone call window
- Outbound call
- Inbound call
- In-call
- Dial Pad window
- Call Log window
- Pair window
- Paired Devices window
- Settings window
- Pincode Reset window
- Music menu
- Playlist
- Video menu
- Settings menu
- Nav. Setup
- GPS Status
- FM
- Emend T-Scr (Calibrate the screen)
- Backlight
- Language
- Volume
- Time&Date
- System
- Skin
- Video Input
- Troubleshooting
Brand : Pentagram
Model : Nomad GT P 5220
Category : Gps