
CAM 04 - Dash cam Overmax - Free user manual and instructions
Find the device manual for free CAM 04 Overmax in PDF.


| Type de produit | Dash cam (caméra embarquée) |
| Marque | Overmax |
| Modèle | CAM 04 |
| Résolution vidéo | Full HD 1080p (1920x1080) à 30 ips |
| Angle de vue | 120° grand angle |
| Écran | Écran LCD 2 pouces |
| Capteur | Capteur CMOS |
| Enregistrement en boucle | Oui, avec détection de mouvement G-sensor |
| Vision nocturne | Oui, avec lumière infrarouge |
| Stockage | Cartes microSD jusqu'à 32 Go (classe 10 recommandée) |
| Alimentation | Adaptateur allume-cigare 12-24V DC, batterie interne lithium-ion 200 mAh |
| Dimensions | Environ 6,5 x 4,5 x 3,0 cm |
| Poids | Environ 60 g |
| Fixation | Ventouse sur pare-brise |
| Fonctions principales | Enregistrement continu, mode parking, détection de choc, verrouillage d'urgence |
| Entretien et nettoyage | Nettoyer la lentille avec un chiffon doux et sec ; éviter les solvants |
| Sécurité | Utiliser uniquement l'adaptateur fourni ; ne pas exposer à l'humidité |
| Pièces détachées et réparabilité | Support ventouse et câble USB disponibles séparément ; batterie non remplaçable par l'utilisateur |
| Informations générales | Garantie 2 ans ; compatible Windows/Mac ; manuel disponible en PDF |
Frequently Asked Questions - CAM 04 Overmax
User questions about CAM 04 Overmax
0 question about this device. Answer the ones you know or ask your own.
Ask a new question about this device
Download the instructions for your Dash cam in PDF format for free! Find your manual CAM 04 - Overmax and take your electronic device back in hand. On this page are published all the documents necessary for the use of your device. CAM 04 by Overmax.
USER MANUAL CAM 04 Overmax
Your electronic world
natural_image
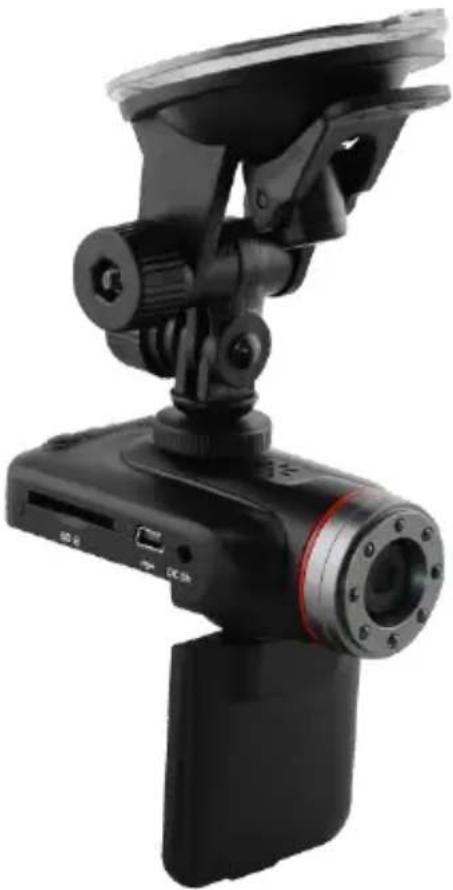
Black digital camera with mounted sensor and display unit (no visible text or symbols)INSTRUKCJA
UŻYTKOWNIKA
PL/EN/CZ/SK
OV-CAM-04
1 Instrukcja
1. Wstep
Thank you for purchasing our company products, high-denion trac recorder, the leading product technology, the unique appearance and powerful funcon.
In order to easily operate and enjoy our products, we will guide you how to use It, you can obtain informaon in the product's introducon, the use of methods such as knowledge, read the instrucons carefully read the following words before you prepare use it, so that you can use them rightly.
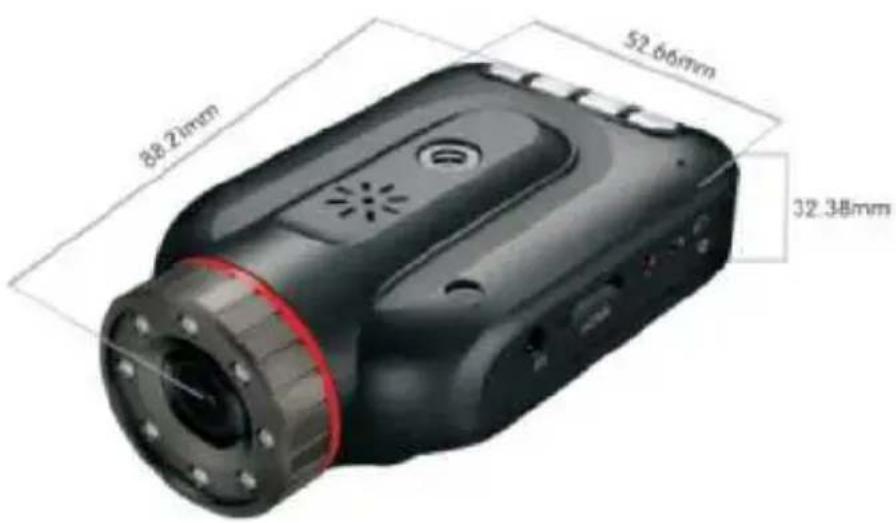
- 2 [Basic parameters]
| LCD screen size | 2. Ooinch TFT Screen |
| Video resoluon | 1920* 1080P 1280720P 640*480P, |
| Photo resoluon | 1280*720 |
| video format | AVI |
| Lens Angle | 120° |
| Display Screen | can rotate the screen 270 degrees, 90 degrees vercal |
| TF card Format | TF (512M-32G), High speed card advised |
1.3 Product Features
• Built-in 120-degree ultra-wide-angle lens HD 1280
• 720p HD picture quality
- start the car automatically start recording, turn off automatic shutdown
• Night Vision Super eight lights, radio waves farther, so you see more clearly at night (can be set to turn off/ on)
- Loop recording function, recording will automatically delete the old file new file
• Built-in 2.0-inch large screen TFT, traffic disputes can occur immediately play the video, the film does not have to busy looking for the computer to read Date and time video screen embedded watermark,
• Supports up to 32GB SDHC cards to meet the needs of a long recording
• to adjust the shooting direction of the bracket adjustable direction than the built-in lens models more stable picture without vibration
- A country language: Simplified and Traditional language
1) Product funcon structure
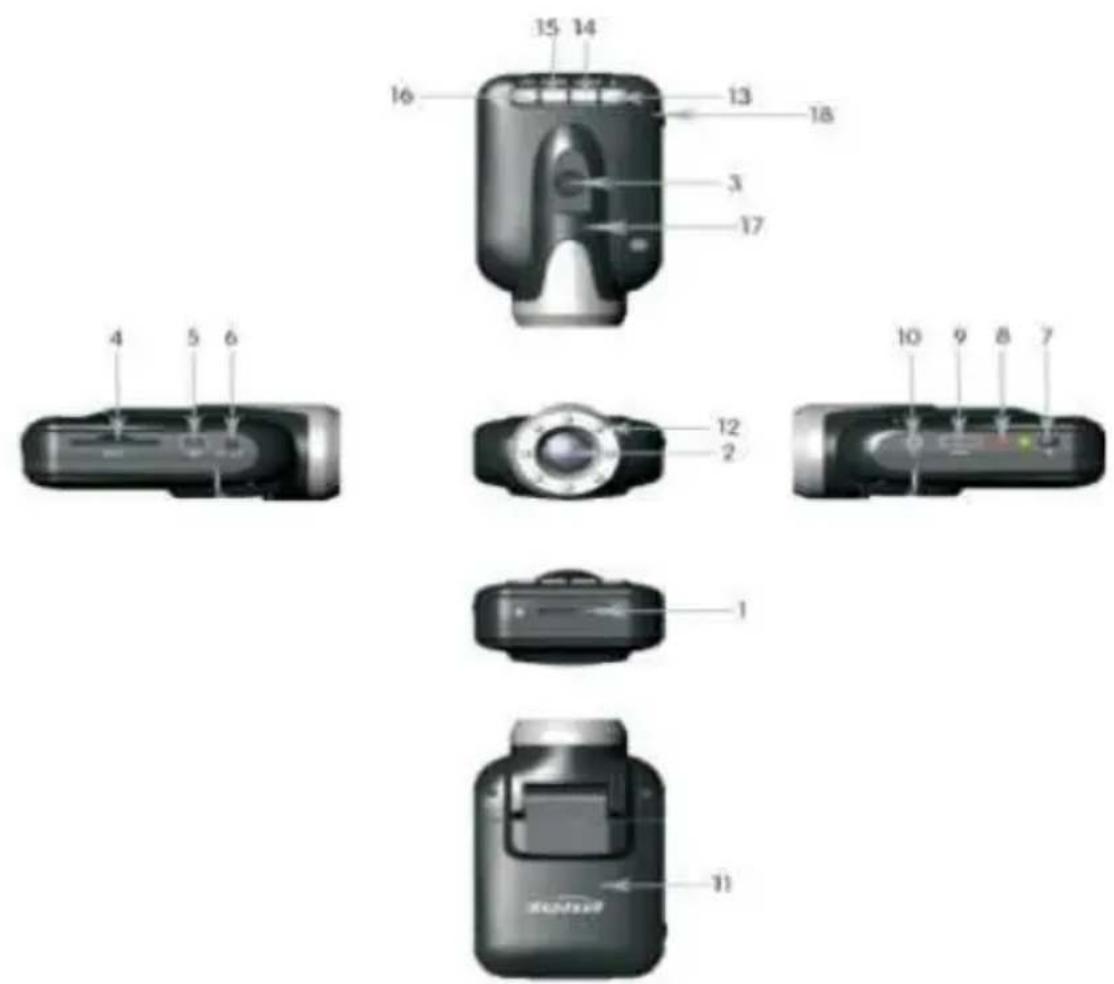
2) Dene the key
1: the key to open
2: Lens
3:Stand-hole
4: SD card slot
5: USB Interface
6: DC5V Interface
7: RESET reset buon
8: On the key indicator
9: HDMI Interface
10: AV interface
11: display cover
12: infrared night vision light
13: MEN menu key
14: DOWN scroll down key
15: UP on turn key
16: MODE mode buon
17: Speaker
18 Microphone
1.5 [power supply]
1 Using the built-in rechargeable lithium baery. Charging method: 3 Connect car charger 4 Computers with a USB conncon Note: Use lithium baery powered, you need to press the switch on or o on their own machine recording mode.
2 Connect 5V car charger Aer the car starts automacally start recording, stop recording and turn o automacally save the previous le. Note: You can only use the car charger output to 5V.
1.6 [Funcons]
1. Features
A). Power: There are two boot methods, turned o, short press the ON / OFF buon, the machine automacally boot into the video mode and start recording, then the green light ashes; or
in the o state to connect car charger, boot the machine directly into the video mode the green light ashes; unplug the car charger to save the video le aer the machine automacally shut down.
TF card machine is not plugged in, turned on the LCD screen displays "Card Error."
B). O: in the boot state press ON / OFF buon, the machine shut down.
When the lithium baery is low, the machine screen displays the baery is low, then save the video le and automacally shut down.
C). Video: Aer the machine will boot directly into the video, blue lights ashing, press the REC / UP buon to save the video le and stop recording, long bright blue light, the machine into standby mode; in standby mode, press REC / UP key machine into the video, the blue lights ashing.
D). photo: In standby mode, short press MODE key to the machine to enter the camera mode, press the REC / UP buon to take pictures, but you can hear the horn beep sounds.
E). Playback and Delete: In standby mode, short press MODE buon twice to enter the playback mode, the machine, press the REC / UP key or DOWN key to select the desired le preview, press ON / OFF to play or stop such operaons; If you want to delete the le, press the MENU key to enter the delete menu, press the REC / UP key or DOWN key to select "Run" or "cancel", press ON / OFF key to conrm and exit the Delete menu, return to playback mode.
F). LED night-light opening: the camera automacally detects the external light intensity, if detected relavely dark environment, the machine automacally acvated LED night-
light, easy to machine records images in a dark light, normal environment, LED night-light automacally turns o to save power, light detecon is to take the camera around the average light value.
G). Switch the lens: In standby or recording mode, click the ON / OFF buon to switch the camera work, the factory is set to about two-camera mode, click the ON / OFF key to switch to the right side of the camera work alone mode, click again to switch to the left of the camera alone mode, click again to switch to the dual-camera mode while in the following order cycle: dual cameras - camera right - the le side of the camera - Dual Camera the rst state to switch the video camera will save a video le on a.
2. Menu sengs
In standby mode, press the MENU key to enter the setup menu interface, press the UP key or DOWN key to select the seng item, press ON / OFF buon to conrm the funcon parameters to set the interface to enter, then press the REC /UP key or DOWN key to select the specic parameters, and nally press the ON / OFF buon to conrm the seng is completed press the MENU key to exit the setup menu.
1) Recording Rate: 10 / 20 / 30
2) Recording me: 2 minutes / 5 minutes
3) beep (sound recording): On or O (When closed, the machine will no longer sound recording)
4) Language: English / Simplified Chinese / Traditional Chinese / Russian / Japanese/ Korean
5) opcal frequency seng: 50HZ / 60HZ
6) Seng date: Press the ON / OFF to enter the setup menu, press UP or DOWN key to select "O" or "Sengs", press ON / OFF conrmaon (conrmaon "O" to exit the me seng, conrm the "Sengs" to enter the me seng interface); in the me seng interface, press the UP key or DOWN key to change the date and me parameters, press the ON / OFF buon to conrm and enter the next parameter set, when all the setup is complete, press the ON / OFF buon to conrm and exit.
3. Download
1). USB cable to connect the computer and the machine.
2). Computer in the "My Computer" will appear in the "Removable Disk."
3). The recorded le is stored in the memory card inside the DCIM folder.
4. Note
1) Insert before using TF memory card.
2) In the video, please set the me before.
3) The recorder video recording mode for the cycle, when the memory card capacity is full, the recorder will automatically save the le from the initial start recording, and overwrite the old le.
Note:
To avoid all the old les deleted in its enrety in the video, the system default save le of 2 minutes, when the TF memory card memory is full and rerecording, one by one the old le will be overwrien) when the lithium baery is low, the recorder
will be displayed on the screen "low baery" aer automat shutdown.
1.7 [Download Help]
1) Connect the USB cable to the computer and DVR.
2) computer "My Computer" will appear in the "Removable Disk."
3) DCIM/100DSCIM folder to download the required documents.
Note:
1) In the video before you insert the SD / MMC card.
2) This video camera recording mode for the cycle, when the memory card is full, the camera automacally from the rst memory card to start recording, and overwrite the old les.
(Note: In order to avoid all the old les will delete all the me in the video, save the le about 3 minutes, when the SD / MMC memory card is full and re-record one by one when the old le will be overwrien).
3) When the lithium baery is low, DVR will display on the screen "low baery", shut down automacally aer 5 seconds.
4) Restart, press the RESET key to restart.
1.8 [Accessories]
Tip: Please purchase this product, as illustrated inventory of accessories, so as to avoid your loss!
| Car DVR | Holder | Charger 5V | USB | Manual | Baery inside |
český
Návod k použití
1 Předmluva
1. 1 [Předmluva]
- 2 [Základné parametre]
Your electronic world
OV-CAM-04
Brand : Overmax
Model : CAM 04
Category : Dash cam