CamRoad 4.6 - Dash cam Overmax - Free user manual and instructions
Find the device manual for free CamRoad 4.6 Overmax in PDF.

| Brand | Overmax |
| Model | CamRoad 4.6 |
| Product Type | Dashboard Camera (Dash Cam) |
| Dimensions | 6.5 x 4.5 x 3.0 cm |
| Weight | 60 g |
| Power Supply | 12V car adapter; built-in rechargeable battery |
| Recording Resolution | Full HD 1920x1080p |
| Wide Angle Lens | 170° |
| Loop Recording | Supported |
| G-Sensor | Built-in, auto-saves footage on impact |
| Night Vision | Yes, with infrared LEDs |
| Parking Mode | Supported (requires hardwire kit) |
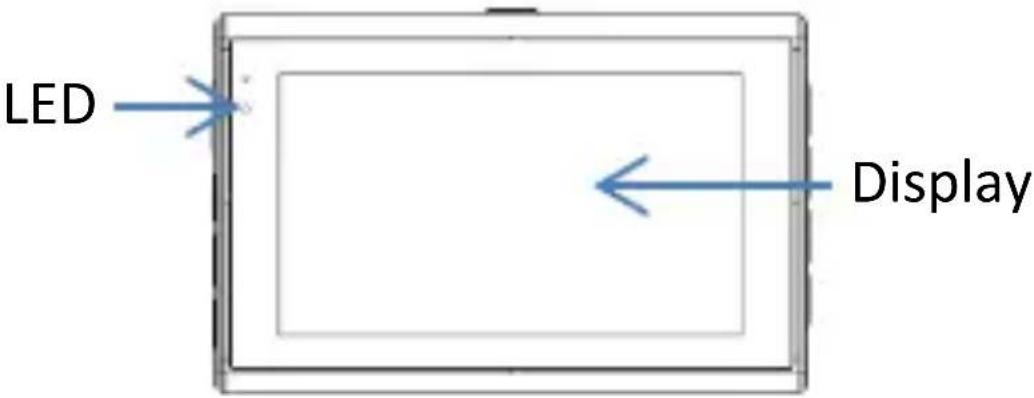
| Display | 2.4 inch LCD screen |
| Storage | MicroSD card up to 32GB |
| Maintenance | Clean lens with soft cloth; update firmware via SD card |
| Safety | Use only supplied mount; avoid direct sunlight; do not disassemble |
| Spare Parts & Repairability | Available: USB cable, suction mount, car charger; repair by authorized service |
| General Information | User manual available in multiple languages; downloadable PDF |
Frequently Asked Questions - CamRoad 4.6 Overmax
User questions about CamRoad 4.6 Overmax
0 question about this device. Answer the ones you know or ask your own.
Ask a new question about this device
Download the instructions for your Dash cam in PDF format for free! Find your manual CamRoad 4.6 - Overmax and take your electronic device back in hand. On this page are published all the documents necessary for the use of your device. CamRoad 4.6 by Overmax.
USER MANUAL CamRoad 4.6 Overmax
Thank you for the purchase of our product!
Before using it, please read the included user manual carefully.
In case of any questions, please visit our website:
www.overmax.eu
FUNCTIONS:
Product illustration and buttons description
Front panel
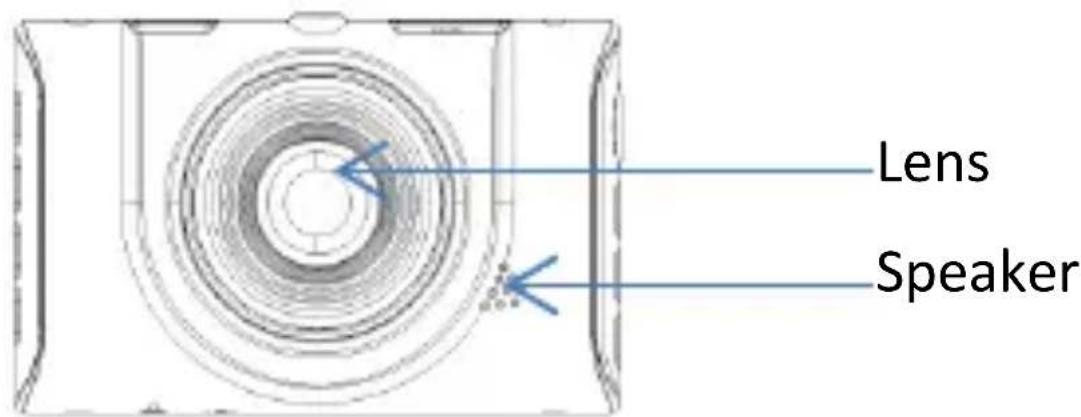
Rear panel
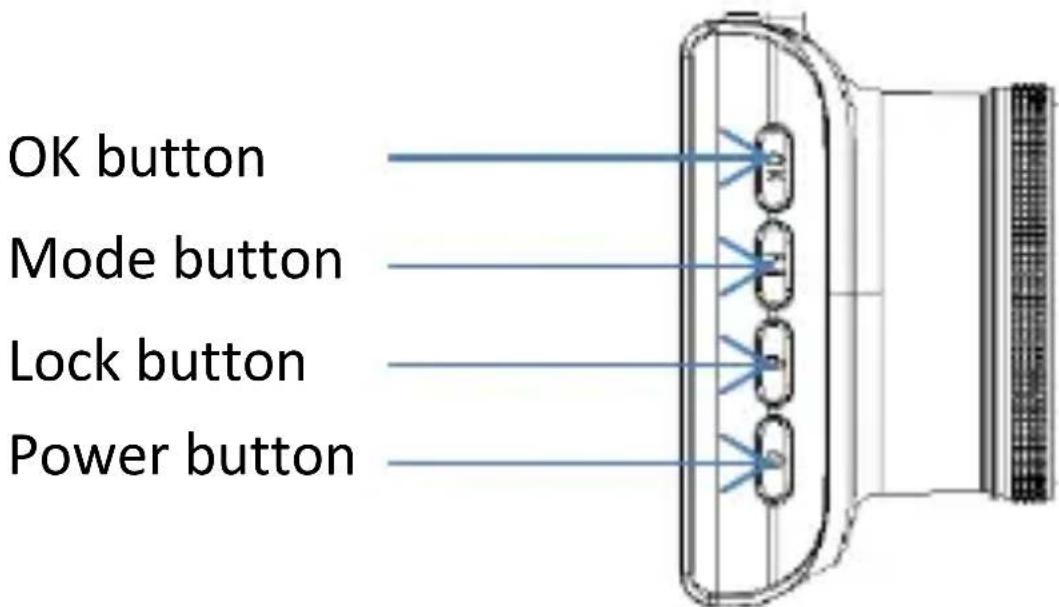
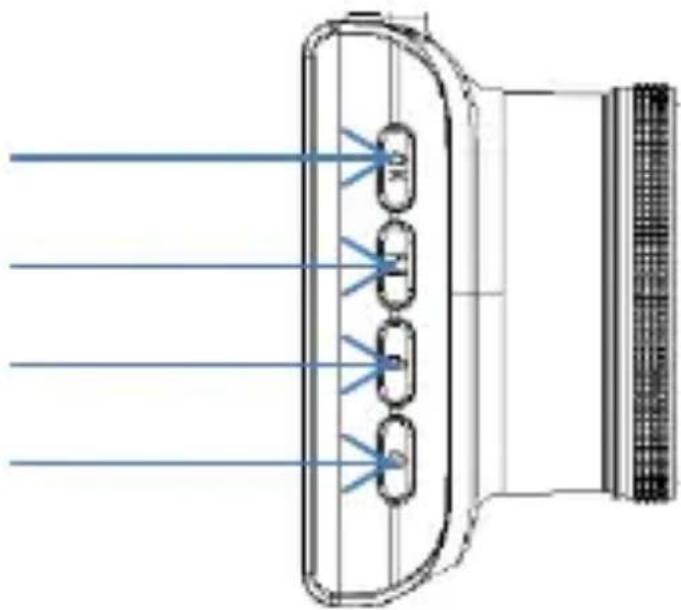
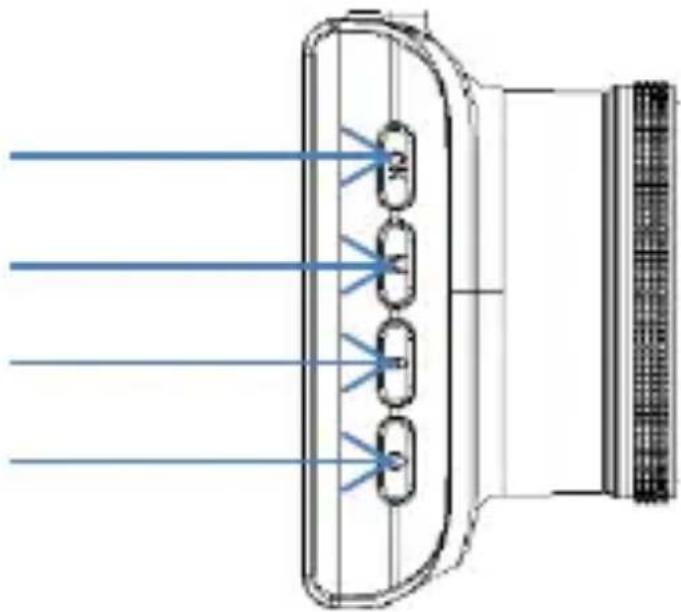
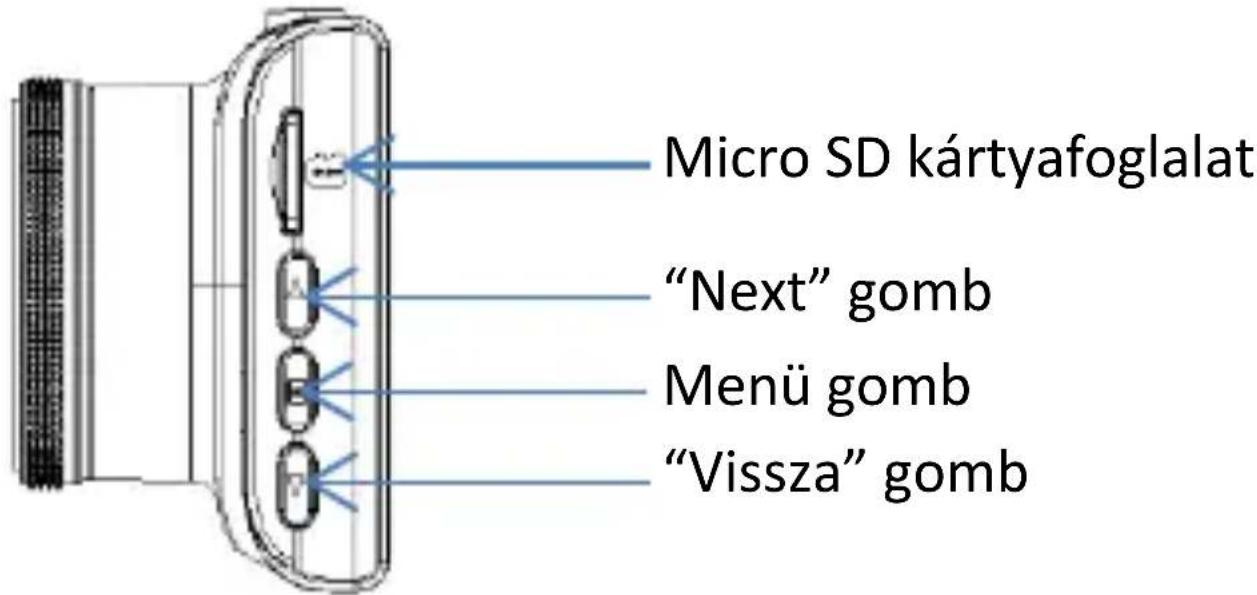
Left panel
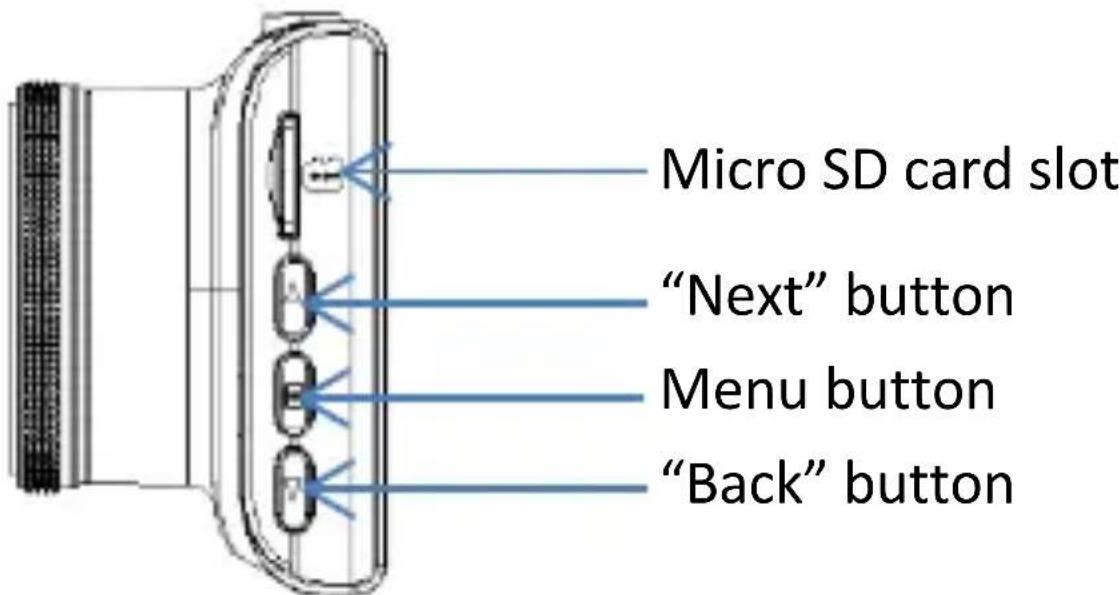
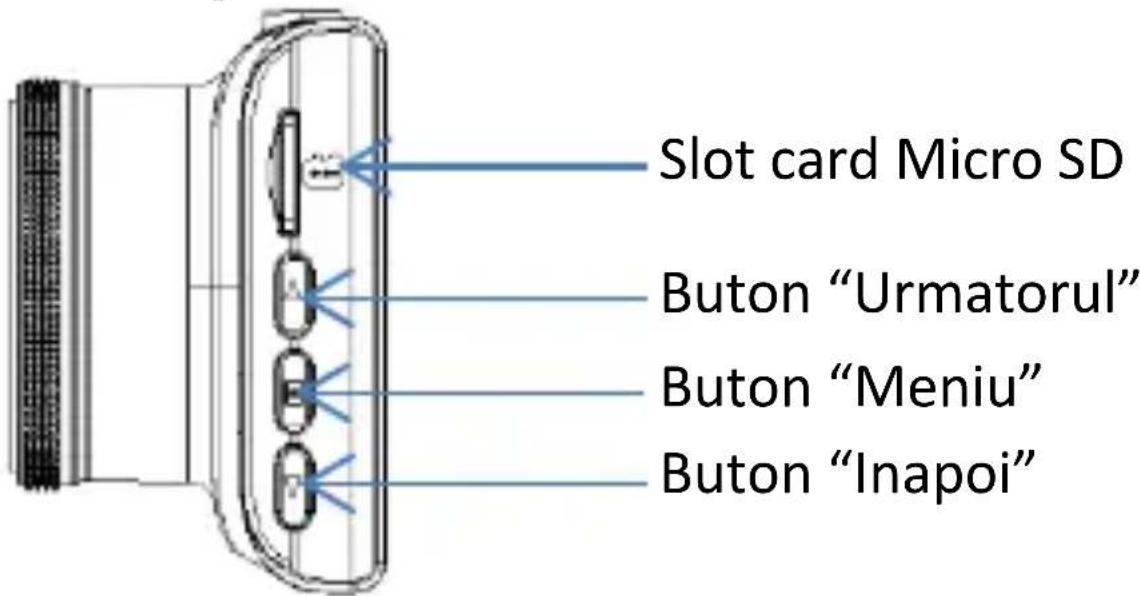
Right panel
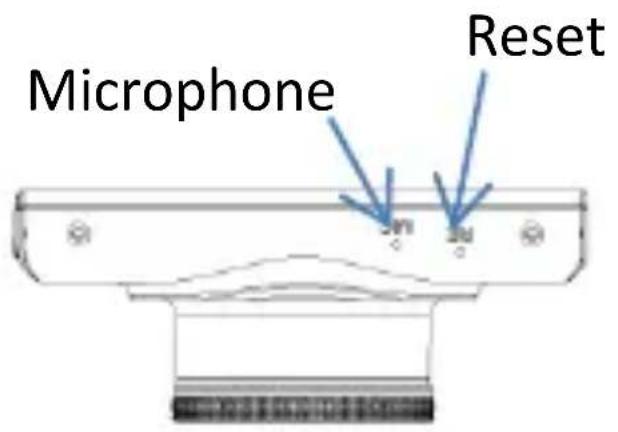
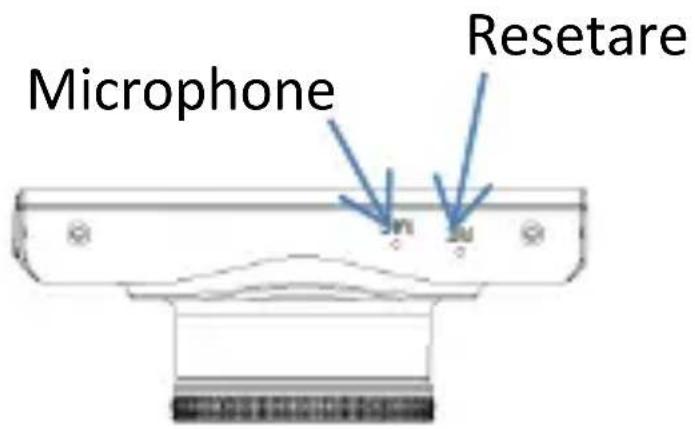
Upper panel
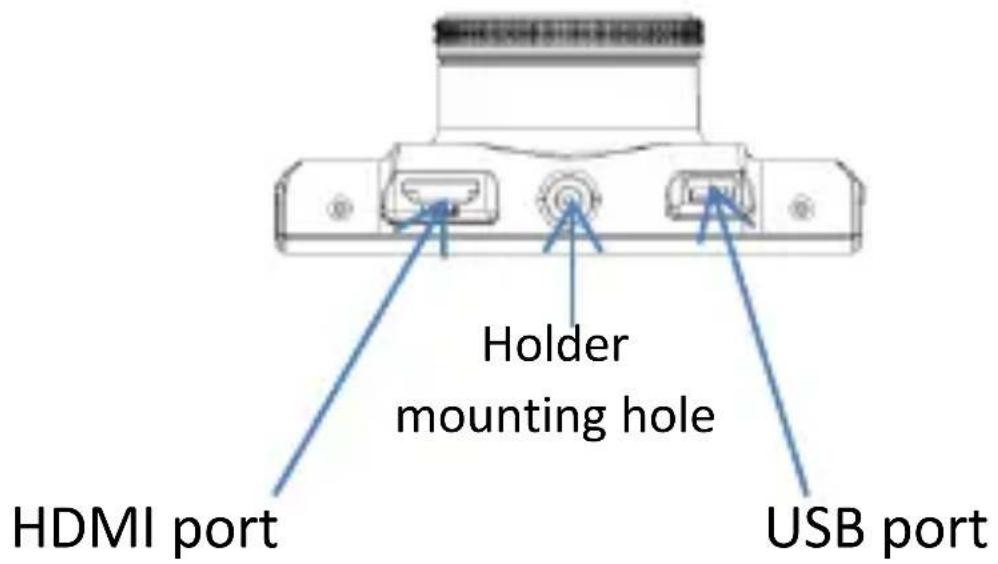
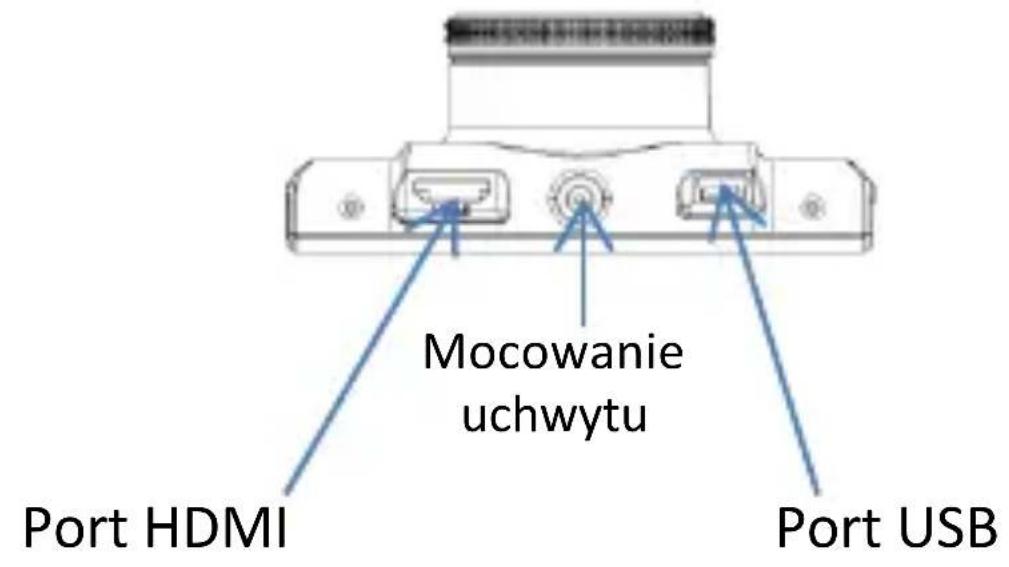
Bottom panel
USAGE
Functions description
- Installing a micro SD card Insert a micro SD card into the micro SD port until you hear a “click” sound. It indicates the card has been properly installed in the slot.
- In order to remove the card from the slot, push it gently to unlock it and then pull it out.
Note:
- Before you start using the device, please install a micro SD memory card (4GB - 32GB) with a Speed Class 6 or higher and FAT32 file format.
- While installing a card please make sure you insert it in a correct position. Otherwise it may damage the card or/and the device.
- Make sure the device is switched off before inserting or removing a micro SD card!
Charging / powering
Please fully charge the device's battery before the first use. In order to do so, use the included 12V car charger and mini USB port.
Note: Being used, the device should be permanently connected to the power source. The built-in battery allows you to use the camera only for a short time.
Holder
The included holder allows you to attach the camera to a windscreen.
Connecting the camera to a vehicle's power supply
- Insert the power cord into the cigarette lighter socket in a car.
- Connect the USB power cable to the USB port of the recorder.
Note:
- Once connected to the car charger, the device turns on automatically and starts recording.
- When the battery of the camera is fully discharged the device will save the file being recorded and turn off automatically.
- In that case, please charge the camera at least 10 minutes before you turn it on again.
Turning on / off
Turning on:
Press and hold the power button for about 2 seconds until the start screen appears and the blue LED indicator starts to glow.
Turning off:
Press and hold the power button for about 2 seconds. The end screen will appear for a brief moment and the device will turn off.
Switching between modes
The camcorder has 3 operational modes: a video mode, a photo mode and a preview mode. In order to switch between them, please use the following button:
Video recording
- Press and hold the power button for 2 seconds to turn the device on.
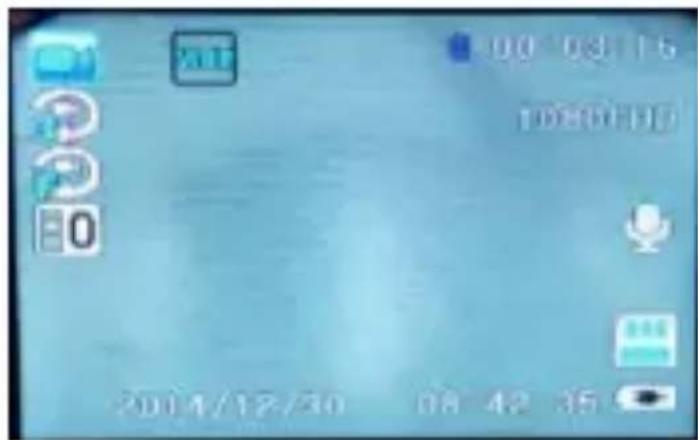
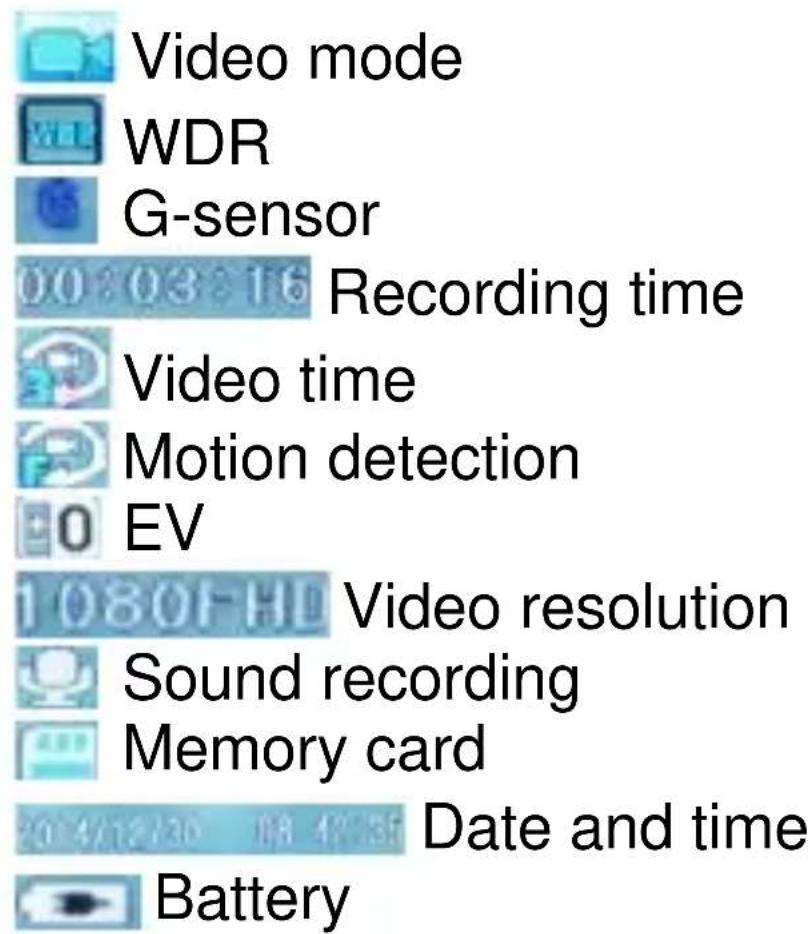
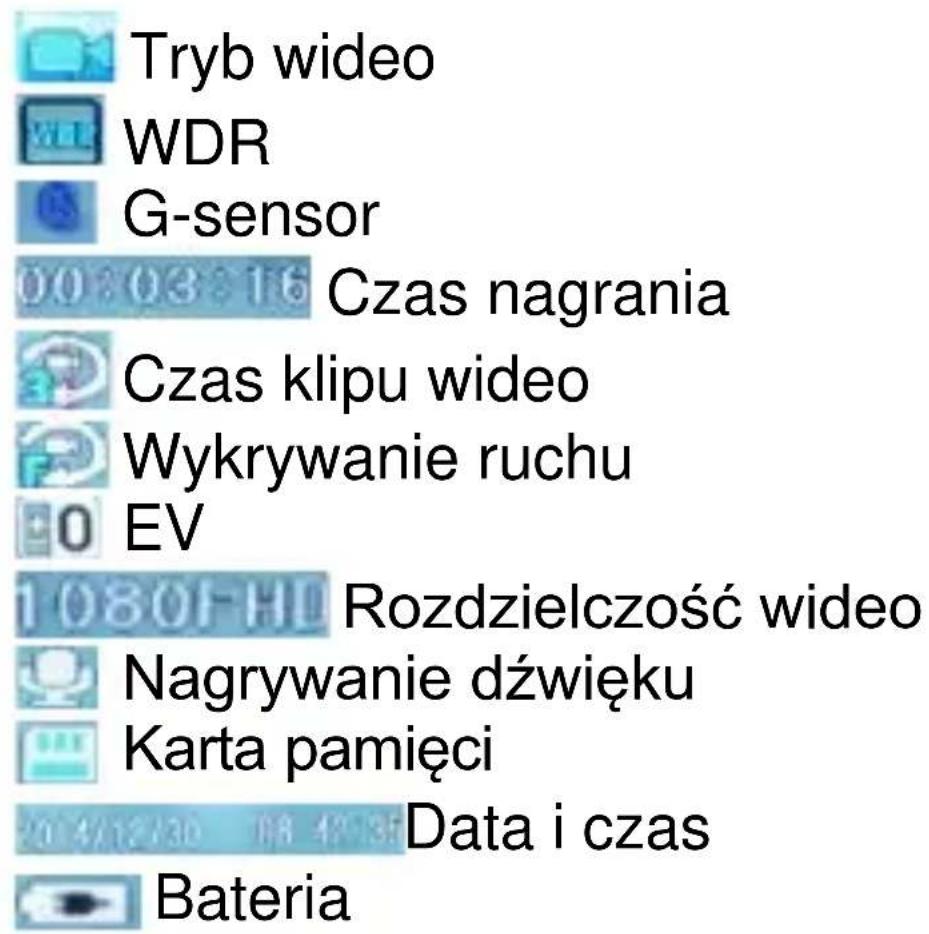
Once the startup process is finished, the device activates the video mode and starts recording automatically. The video camera icon will be displayed in the upper left corner of the screen.
- Press the OK button to start recording. Press it again to stop:
Taking pictures
- Use the Menu button to activate the photo mode. The camera icon will be displayed in the upper left corner of the screen.
- Press the OK button to take a photo.
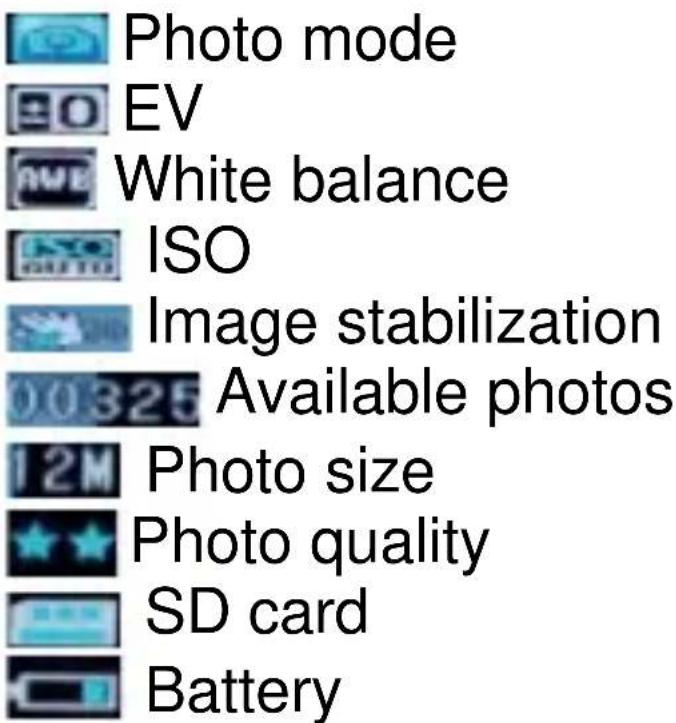
Preview mode
natural_image
Grid of blue rectangular panels with triangular icons, no visible text or symbols- Use the Menu button to activate the preview mode. The icons of recorded video and photo files will appear on the camera screen.
- Use the “Next” and “Back” buttons to select a file.
- Press the OK button to display it.
- In this mode you can also delete files and mark them as protected ones. Press the MENU button to start a slideshow.
SETTINGS
There are three setting tabs: video settings, photo settings and general settings.
Note:
The video and photo settings are available when the device operates in the corresponding mode.
- Press the Menu button to open the setting interface.
- Use the “Next” and “Back” buttons to navigate through the settings.
- Press OK to select a given parameter and press it again to confirm.
Note:
You must end a given setting first and go back to the menu screen in order to proceed to another option.
USB mode
After connecting the device to a computer using a USB cable, the camcorder enters the web camera mode.
Displaying files on a TV / monitor screen
In order to display the files from the device on a TV / monitor screen, connect a compatible Audio / Video cable into an AV / HDMI port of the camcorder and a TV / monitor.
Additional information
- G-sensor - During an event such as sudden hit or move of the camcorder etc. the G-sensor makes the camera to automatically start recording and lock the current file so that it cannot be overwritten.
- Wide Dynamic Range (WDR) ensures reliable representation of recorded images despite the high contrast.
- Loop recording
- The camcorder powers on / off automatically when plugged into the cigarette lighter socket.
- Manual file protection
You can choose a single file (or all of them) to be protected from being overwritten.
Common problems and solutions
In case of any problems, please refer to the following instructions. If the action does not solve the problem, please contact our Technical Support Department. For more information please visit:
www.overmax.eu.
-
The camera doesn't record:
-
Replace the SD card.
- Change the resolution / frame rate.
- Use a card of a greater capacity.
- Make sure the card has been installed correctly.
- Delete unnecessary files from the memory card.
- The image is unclear
- Make sure the lens is clean.
- The device operates properly but the buttons do not respond
- Press the RESET button to restart the device. Under normal circumstances, the use of reset button may cause the loss of data.
All the pictures and information in the manual have been submitted for illustrative purposes only and are subject to change without prior notice.
natural_image
Diagram of a device with four labeled ports and blue light rays, no text or symbols presentPrawy panel
Panel górný
natural_image
Grid of blue rectangular panels with triangular icons, no visible text or symbolsPanou stanga
Buton OK
Buton "Mode"
Buton blocare
Buton alimentare
natural_image
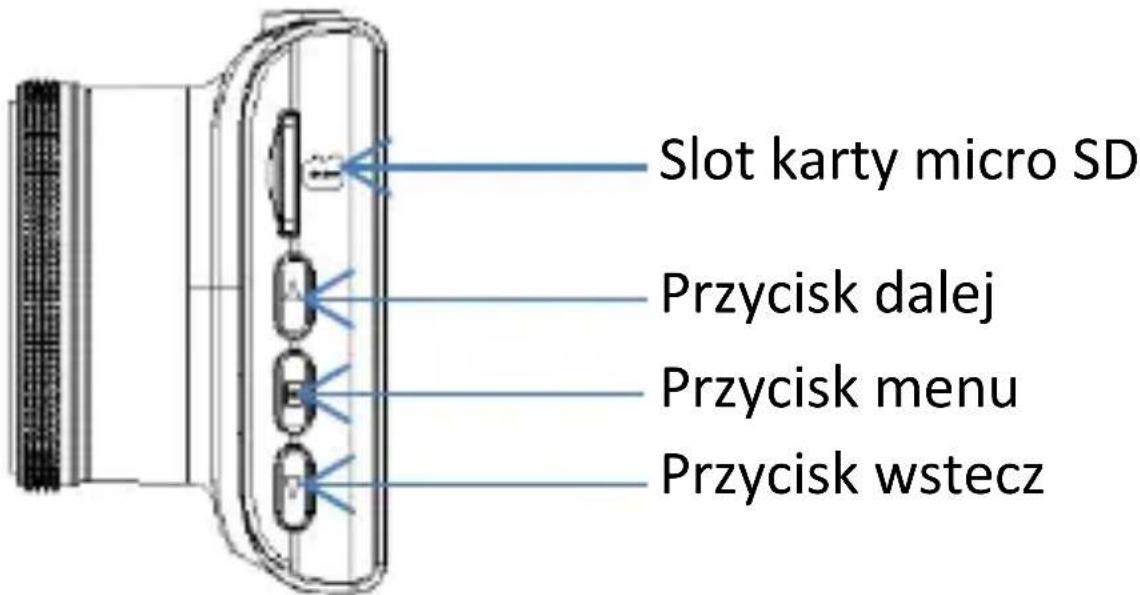
Diagram of a device with four labeled ports and light rays, no text or symbols presentPanou dreapta
Panoul superior
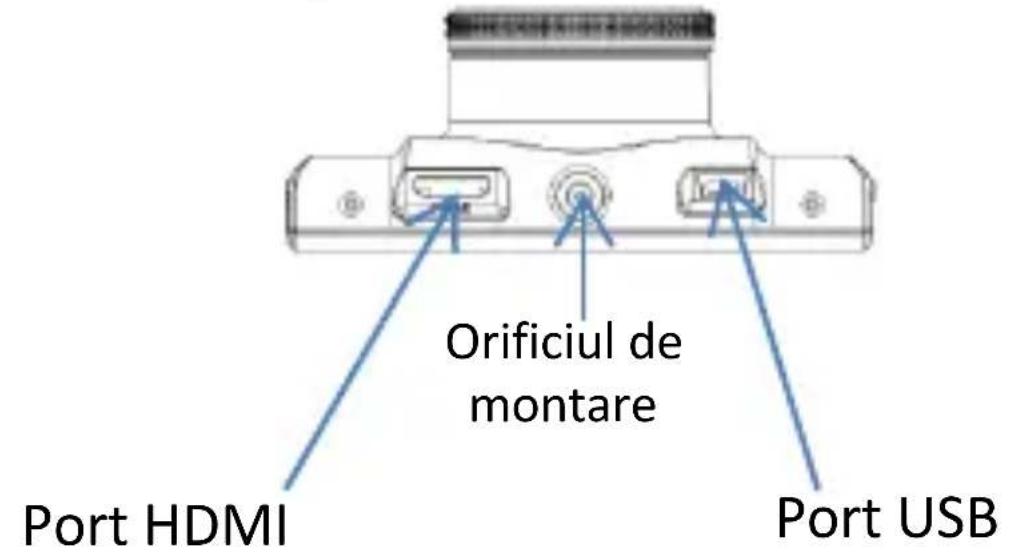
Panoul inferior
MOD DE UTILIZARE
Descrierea functiilor
natural_image
Digital camera interface showing exposure mode, shutter speed, and control buttons (no readable text or symbols)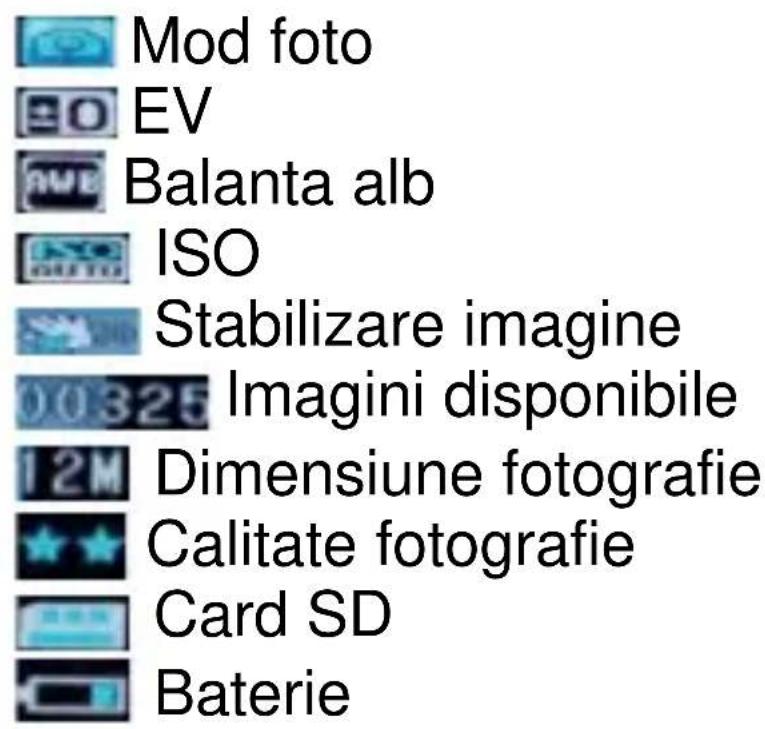
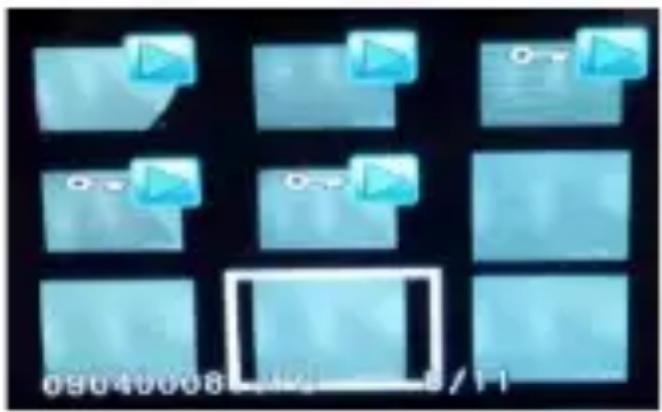
Mod previzualizare

natural_image
Grid of blue rectangular panels with triangular and circular icons, no visible text or symbolsBaloldali panel
OK gomb
Mód gomb
Zár gomb
Power gomb
natural_image
Diagram of a device with four labeled ports and blue light rays, no text or symbols presentJobboldali panel
natural_image
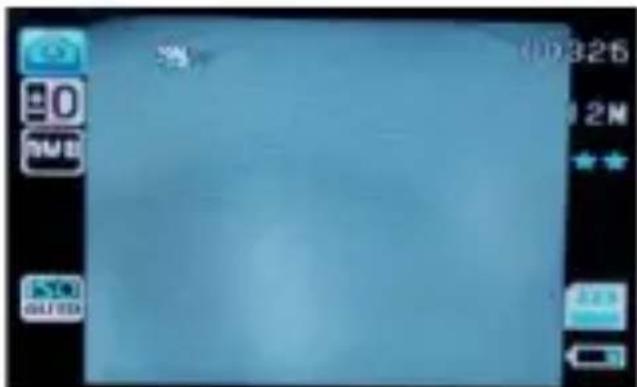
Digital camera interface showing exposure settings and status bar (no readable text or symbols)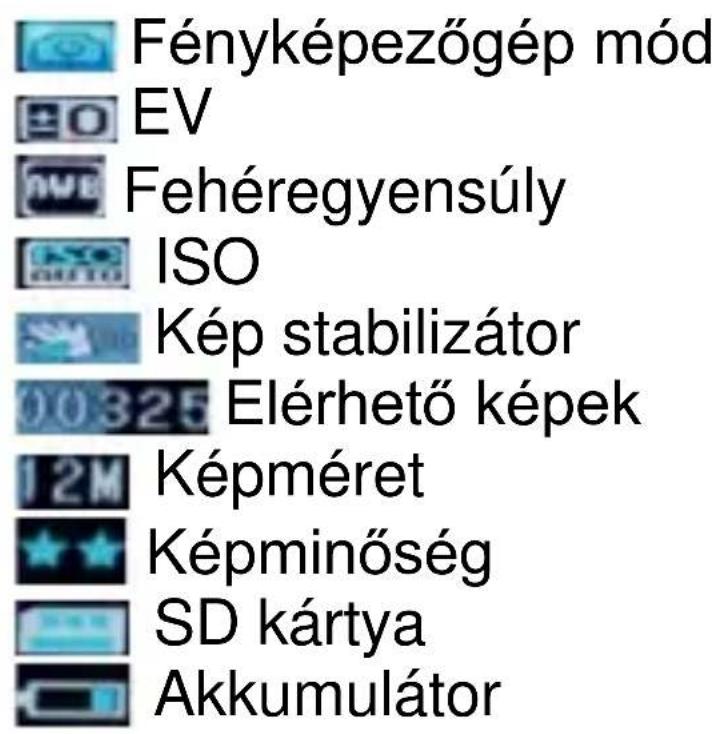
Fényképezőgép mód
EV
Fehéregyensúly
ISO
Kép stabilizátor
Elérhető képek
Képméret
Képminőség
SD kártya
Akkumulátor
Előnézeti mód

natural_image
Grid of blue rectangular panels with triangular icons, no visible text or symbolsModel(s): OV-CamRoad 4.6
Declaration & Applicable standards
We, BrandLine Group Sp. z o. o., hereby declare under our sole responsibility that the of the above referenced product complies the following directives:
R&TTE Directive 1999/5/EC
EMC Directive 2004/108/EC
Low Voltage Directive 2006/95/EC
RoHS Directive 2011/65/EU
The following harmonized standards have been applied:
Safety and Health:
EN 62479: 2010
EN 60950-1: 2006+A11: 2009+A1: 2010+A12: 2011+A2: 2013
EMC:
EN 301 489-1 V 1.9.2 (2011-09)
EN 301 489-17 V 2.2.1 (2012-09)
RF Spectrum Efficiency:
EN 300 328 V1.8.1 (2012-06)
Representative
BrandLine Group Sp. z o. o.