
Camroad 2.3 - Dash cam Overmax - Free user manual and instructions
Find the device manual for free Camroad 2.3 Overmax in PDF.


| Product Type | Dash cam (car video recorder) |
| Brand | Overmax |
| Model | Camroad 2.3 |
| Lens | 120° wide-angle |
| Display | Built-in screen |
| Recording Modes | Video, photo, playback |
| Video Resolution | Not specified (typical HD) |
| Storage | MicroSD card (SDHC Class 6 or higher recommended) |
| Power Source | Built-in battery; USB/DC charger |
| Battery Indicator | Full, slightly low, low, empty |
| Night Vision | IR LED (can be turned on/off via power button) |
| Special Functions | G-sensor (6g trigger), loop recording, file lock, automatic power on/off |
| USB Interface | Data transfer and charging |
| Mount | Windscreen holder (included) |
| Reset | Reset button for crashes |
| Microphone | Built-in |
| Speaker | Built-in for playback and alerts |
| Lens Cleaning | Use lens paper; avoid fingerprints/dirt |
| File Format | Not specified (likely AVI/MOV/MP4) |
Frequently Asked Questions - Camroad 2.3 Overmax
User questions about Camroad 2.3 Overmax
0 question about this device. Answer the ones you know or ask your own.
Ask a new question about this device
Download the instructions for your Dash cam in PDF format for free! Find your manual Camroad 2.3 - Overmax and take your electronic device back in hand. On this page are published all the documents necessary for the use of your device. Camroad 2.3 by Overmax.
USER MANUAL Camroad 2.3 Overmax
natural_image
Black camera module with multiple sensor points and a lens (no visible text or symbols)USER MANUAL
Instrukcja obsługi
EN PL CZ SK RO HU EE CR
Product description
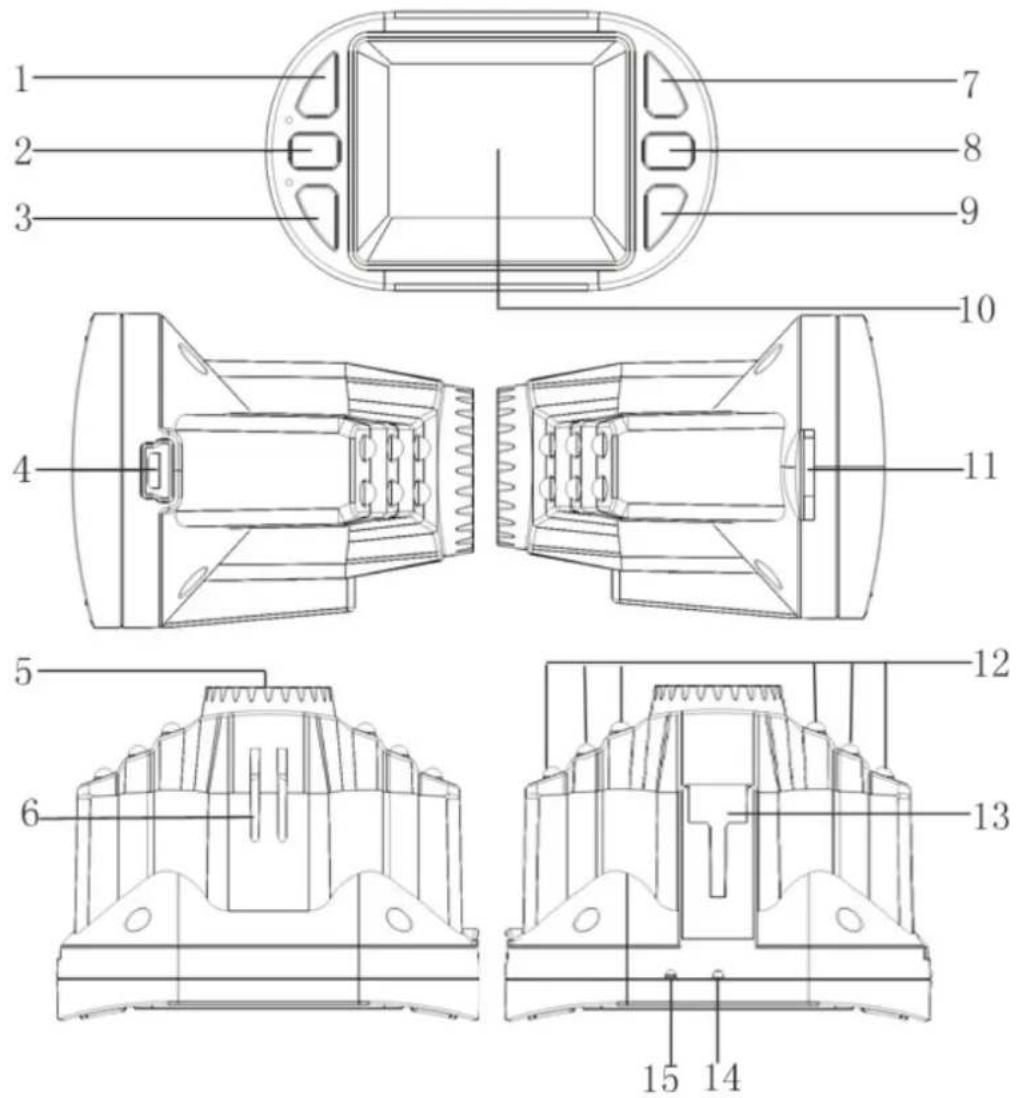
Press this button during recording to zoom in.
Press to choose function higher in MENU mode.
2) MENU button - Short press this button to turn on system settings.
3) DOWN button
Press this button during recording to zoom out.
Press to choose function lower in MENU mode.
4) USB interface
Connect PC for data transfer
Connect external power to charge battery or provide power.
5) Camera - 120° wide-angle Lens
6) Speaker - Video playback, voice monitor, operating sound warning
7) OK button
Confirmation button for video recording and taking photo;
In recording mode, press this mode to start video recording, re-press to stop.
In photo mode, short press to take a photo.
In menu mode means Confirmation.
8) MODE / LOCK
Short press on this button to shift among Photo mode, Recording mode and Playback mode
File Lock function: short press this key to enforce saving the current video when Video recording
9) POWER ON / OFF - Power switch: continuous press for power on/off, shortly press for IR light on/off.
10) Screen - Display screen
11) SD slot - Slot for memory micro-SD card
12) IR LED light - Night vision light which can be turned on by short press on "POWER" button.
13) Holder mount - Install windscreen holder
14) Reset - Use this to reset camera
15) MIC - Microphone
Special function description
- G-sensor function - When gravitational acceleration reach 6g (1g=9.80m/s), machine will save present video as undeletable file.
● Automatic power on/off function. - Seamless loop recording.
- File lock - Short press "M" to enforce saving the current video when video recording
REC / Photo operations
- Power on/off
Long press on “power on/off” button to start, Indicator light will shine when power on. Then long press again on “power on/off” button to shut down and the indicator light goes out
- Recording mode
Short press on "M" button to enter Recording mode, REC icon is on the top left corner. Short press on "OK" mode to start recording, flashing red dot indicates the recording.
- Photo mode
Short press on "M" button to enter Photo mode, an photo icon is on the top left corner. Then short press on "OK" button to take a photo, screen flash one time while capturing.
- Video/photo playback
Short press on "M" button, shift to Playback mode, playback icon is on the top left corner.
Short press on ⬆ key can choose files up.
Short press on ⬇ key can choose files down.
Press Menu button to delete, lock or turn the slideshow on.
Short press on "OK" button to play the selected video files.
- Menu setting
Short press on menu button to enter video settings in Recording mode, press "M" button again to go to system settings.
In settings press 🔊 keys to shift up and down in menus, then press "OK" button to enter. Short press on "MENU" or "MODE" button to exit.
- Time settings
Short press “MENU” button twice to enter settings. By pressing arrows keys choose date time, short press “OK” to enter, set time by arrows, switch between y/m/d/h/m/s by pressing “OK”.
- File Lock
Short press "M" to enforce saving the current video when video recording
USB mode
Separate USB cable and computer, press "power on" button, car DVR will automatically go to USB-Disk. In this mode we can access video files and photo files
Battery
- Battery indication image:
 |  |  |  |
| Full battery S | lightly low battery | Low battery Battery empty | |
- While charging the red indicator light is on, indicator will automatically turn off when charging is completed.
- Use power adapter to charge
- Use PC-USB to charge
Troubleshooting:
- Can't take photo and recording
Check the if the SD card has enough space or is locked.
● Automatically stop when recording
Use the compatible high-speed CD card with SDHC Class 6 at least.
- Appear "files error" when replay photo or video
Uncompleted files because of SD card storage error, please use formatting function to format your SD card.
- Unclear video
Checks if there are any dirt or fingerprint on lens. Use lens paper to clean the camera lens.
● Black image when recording sky or water scene
Scenes with big contrast will influence the automatic exposure function of camera; you can adjust "EV in setting mode to correct.
● Color is not perfect in cloudy day and outdoor light
Set the "white balance" to automatic.
- Stripes in image
Because of wrong “light frequency”, please set it to 50Hz or 60Hz according to the local power supply frequency.
- Crash
Restart by pressing shortly on" RESET" button after crash.
POLSKI
Schemat produktu
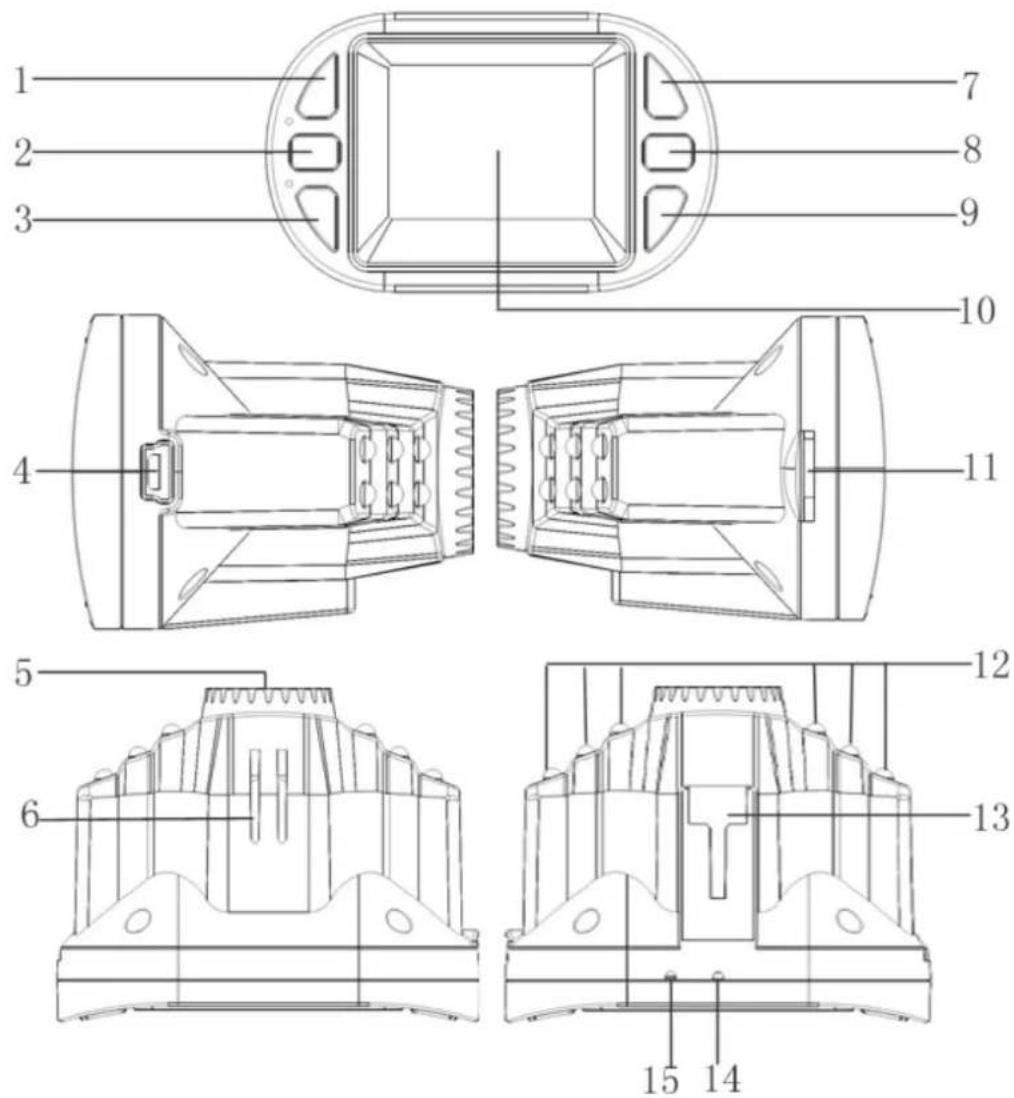
Brand : Overmax
Model : Camroad 2.3
Category : Dash cam