
DE3125 - Computing AOPEN - Free user manual and instructions
Find the device manual for free DE3125 AOPEN in PDF.


| Product Type | Desktop PC |
| Brand | AOpen |
| Model | DE3125 |
| Dimensions (W x D x H) | 200 x 200 x 50 mm |
| Weight | 1.5 kg |
| Processor | Intel Celeron or AMD equivalent |
| Memory (RAM) | 2 GB (upgradable to 4 GB) |
| Storage | 80 GB HDD |
| Operating System | Windows XP or Linux |
| Power Supply | External AC adapter, 65W |
| Input Voltage | 100-240V AC, 50-60Hz |
| Connectivity | USB 2.0, VGA, Ethernet, audio jacks |
| Wireless | Optional Wi-Fi via USB adapter |
| Main Functions | Office applications, web browsing, multimedia playback |
| Maintenance | Clean with a soft, dry cloth; avoid solvents |
| Safety | Keep away from liquids; unplug before cleaning |
| Spare Parts | RAM modules, 2.5-inch SATA HDD/SSD |
| Repairability | User-accessible RAM and storage bay |
| Certifications | CE, FCC |
| Operating Temperature | 0°C to 35°C |
Frequently Asked Questions - DE3125 AOPEN
User questions about DE3125 AOPEN
0 question about this device. Answer the ones you know or ask your own.
Ask a new question about this device
Download the instructions for your Computing in PDF format for free! Find your manual DE3125 - AOPEN and take your electronic device back in hand. On this page are published all the documents necessary for the use of your device. DE3125 by AOPEN.
USER MANUAL DE3125 AOPEN
natural_image
Exterior view of a black industrial electronic device with ventilation grilles and control buttons (no text or symbols visible)Disposal Instruction (US)
For the better protection of our Earth, please refrain from disposing of this electronic device in the municipal trash bin. To minimize pollution and ensure the utmost protection of the global environment, please kindly consider recycling the product. For more information about the collection and recycling of Waste Electrical and Electronic Equipment (WEEE), please visit our homepage at www.aopen.com under "Green Products".
廃棄上の指示
Instruction de Disposition (French)
Copyright of this publication belongs to AOpen Inc. AOpen reserves the right to change the content of this publication without obligation to notify any party of such changes or revisions. No part of this publication may be reproduced, transcribed, transmitted, translated into any language, or stored in a retrieval system, in any form or by any means, electronically, mechanically,gq or optically, without the prior written permission of this company.
■ Disclaimer
AOpen makes no warranties or representations, either expressed or implied, with respect to the content herein and specifically disclaims any warranties of merchantability or fitness for any particular purpose.
The AOpen and AOpen logos used herein are registered trademarks of AOpen Inc.
All other brand names and trademarks mentioned in this publication are owned by their respective owners.
Copyright © 2023 by AOpen Inc.
All rights reserved.
■ FCC notice
This device has been tested and found to comply with the limits for a Class B digital device, pursuant to Part 15 of the FCC Rules. These limits are designed to provide reasonable protection against harmful interference in a residential installation. This device generates, uses, and can radiate radio frequency energy, and if not installed and used in accordance with the instructions, may cause harmful interference to radio communications.
■ Notice: Canadian users
This Class B digital apparatus complies with Canadian ICES-003.
■ Safety Instructions
- Please read these safety instructions carefully.
-
Please keep this User Guide for later reference.
-
Before cleaning, disconnect this equipment from the AC adapter. Use a soft, moist cloth for cleaning. Do not use liquid or sprayed detergent.
-
Ensure the equipment is connected to the power source with the correct voltage, frequency, and ampere.
-
Pay attention to all cautions and warnings on the equipment.
-
Never pour any liquid into unit openings; doing so could cause fire or electrical shock.
-
For safety reasons, never open the equipment. Only qualified service personnel are authorized to perform the servicing.
-
If any of the following situations arise, promptly have the equipment checked by a qualified service technician:
a. Liquid has leaked into the equipment.
b. The equipment has been exposed to moisture.
c. The equipment does not function properly or cannot be operated according to the user guide.
d. The equipment was dropped and damaged.
e. There are obvious signs of breakage on the equipment.
- Caution on use of battery: Use the battery recommended by the manufacturer or the same type of battery installed by the manufacturer. Using an incorrect battery may cause explosion or fire hazard. Recycle or discard used batteries according to the manufacturer's instruction or your local authority.

- Ambient operation temperature: 0°C to 35°C
- Risk of overheating!
- Do not install DE3125 in a-closed space. Ensure the ventilation holes on the top have at least 1 to 2 inches (2 to 5 cm) of clearance for proper airflow and prevent obstruction by other objects.

Maintain at least 5cm (2 inches) of top clearance for ventilation.

Do not place the operating device in an enclosed space.
I/O of DE3125
Front I/O Rear I/O


- Packing List
DE3125
- 1 x DE3125 system unit
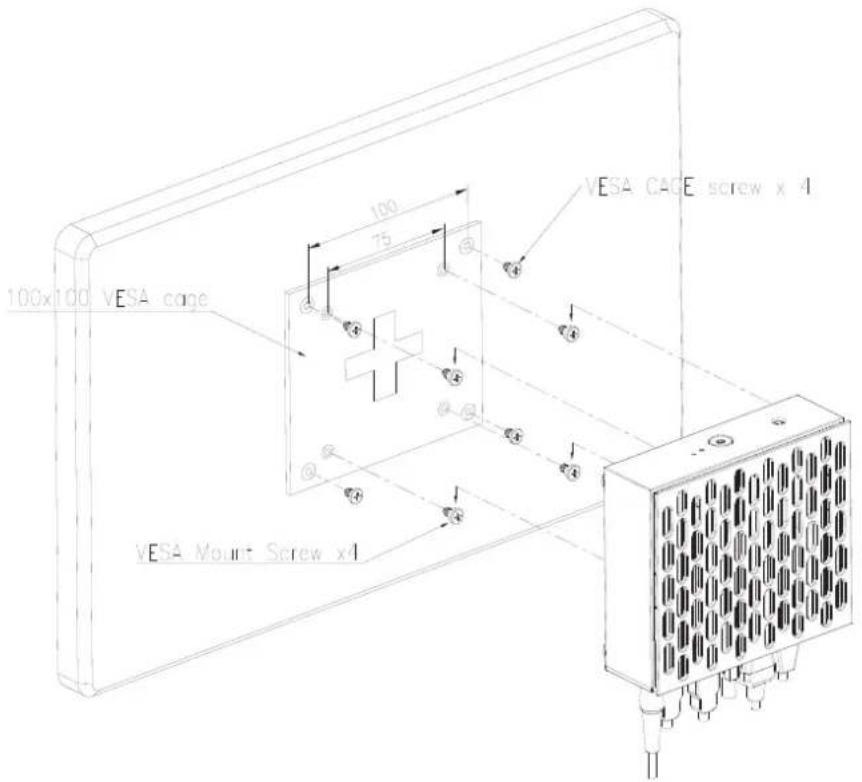
- 4 x VESA mount screws
• 1 x Caution label for heatsink
• 1 x 40W adapter and power cord
- 1 x Insert page for driver download website
■ Product Specifications
| CPU Intel® Alder Lake-N Dual Core CPU Quad/Dual core processor (TDP<=6W) | |
| Storage M.2 2280 SSD | |
| Memory Signal Band DDR4 SO-DIMM x 1 slot, support 2666/3200 MAX. up to 16GB | |
| Graphics Intel UHD Graphics for 12th Gen Intel Processors | |
| Expansion Slot M.2 2230 x 1(key E for WiFi), M.2 2280 x 1(key M for SSD) | |
| Audio Realtek ALC897 HD Audio CODEC on-Board. | |
| LAN Maxlinear GIGA LAN x 1 | |
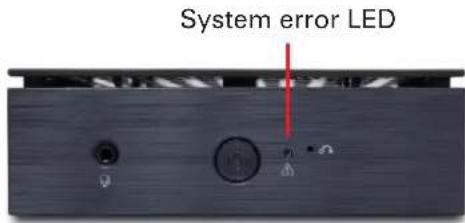
| Front Panel IO | Power Button x 1 (with Power/HDD indicator), System Error LED x 1, Combo Audio Jack x 1, BIOS Recovery Button x 1 |
| Rear Panel IO DC 19V Jack x 1, HDMI 2.0 x 2, RJ45 LAN x 1, USB 3.2 x 1, USB Type C x 1,USB2.0 x 2 | |
| Adapter DELTA ADP-40KD BB 40W (19VDC, 2.1A) AC Power Adapter | |
| Input Voltage | AC 100 ~ 240V |
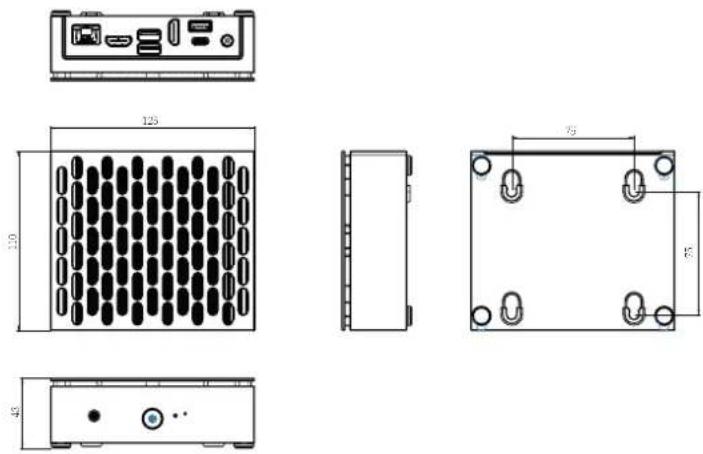
■ Chassis Dimension
DE3125 Dimension (unit: mm[inch])
AOPEN Smart function provides several key features as shown below:
- System Error LED:
This LED indicator illuminates with different colors to display the status of essential devices during the boot process. When an error occurs, the color of the LED can help determine the current issue. This feature aids in speeding up debugging and repair process.
During the BIOS POST initialization, the LED color indicates the following:
Step 1. Memory Initialization >> Blue color
Step 2. Display Device Initialization >> Green color
Step 3. Boot device Initialization >> Blue + Green color
Step 4. BIOS Handoff to Operating System >> LED Off (Default after boot)
- BIOS Recovery:
In case of BIOS corruption, the BIOS Recovery feature allows you to reload the BIOS and successfully boot your system again through the following steps.
Step 1. Prepare a USB flash drive (formatted with FAT32) and BIOS bin file (\FPT\TEAxxx.bin). Rename the BIOS file name to AOPEN.bin and copy it to the root directory of the USB flash drive.
Step 2. Connect the AC adapter to the DE system and insert the USB flash drive into the Smart function USB port.
Step 3. Insert a paper clip to press the BIOS RECOVERY BUTTON on the front panel.
Step 4. The system power LED will illuminate and the System Error LED will start flashing green to indicate that the BIOS update is in progress. The BIOS update process takes around 7 minutes.
Step 5. The system will automatically reboot when the BIOS update is completed.


BIOS Recovery button
P.S. BIOS recovery will clear data in the DMI table and Mac address. Therefore, please contact your system integrator before executing the BIOS recovery process.
- USB Keyboard to Power On/Off/Reset PC system:
The Smart function USB port offers the capability to use a USB Keyboard to for powering On/Off/Reset of the PC system through specific keyboard shortcuts as outlined below. To utilize this feature, insert an USB Keyboard into the Smart function USB port and follow the indicated keyboard shortcuts. Please note that this function is disabled by default in the OS; if you wish to use it under the OS, you can enable it through the BIOS menu.
Keyboard shortcuts:
Power On: ALT+P
Power Off: ALT+P+O
Reset: ALT+R+T
Insert USB Keyboard to this USB portInsert

natural_image
Back panel of a computer interface showing ports and connectors (no readable text or symbols)VESA Mount (75mm x 75mm) installation Schematic Diagram (Screws Included)
Ver: DE3125-MU-06052023
Brand : AOPEN
Model : DE3125
Category : Computing