
GCSTAC6952 - Iron OSTER - Free user manual and instructions
Find the device manual for free GCSTAC6952 OSTER in PDF.


| Product Type | Steam Iron |
| Brand | Oster |
| Model | GCSTAC6952 (also GCSTAC6901, GCSTAC6902, GCSTAC6951, GCSTAC6953) |
| Power Consumption | 1600 W (127 V) / 2200 W (220 V) depending on model |
| Voltage / Frequency | 127 V~ 60 Hz or 220 V~ 50 Hz |
| Soleplate Material | Ceramic |
| Water Reservoir | See-through, with MAX fill line |
| Ironing Modes | Dry, Steam, Spray Mist, Shot of Steam, Vertical Steam |
| Eco Function | Yes, lower-power option |
| Anti-Calc Feature | Yes, reduces mineral buildup |
| Self-Cleaning (Calc Clean) | Yes |
| Auto-Off (3-Way) | Horizontal: 30 seconds; Vertical: 15 minutes; Tip-over: 30 seconds |
| Swivel Cord | 360° |
| Temperature Settings | Adjustable dial, including synthetic, silk, wool, cotton, linen |
| Indicator Lights | Power on, temperature ready |
| Water Type | Tap water recommended; distilled for hard water |
| Cleaning Soleplate | Water and vinegar solution |
| Cleaning Housing | Moist cloth, then dry |
| Storage | Upright position, cord wrapped around heel rest |
| Safety Precautions | Do not immerse, unplug before filling, keep away from children |
Frequently Asked Questions - GCSTAC6952 OSTER
User questions about GCSTAC6952 OSTER
0 question about this device. Answer the ones you know or ask your own.
Ask a new question about this device
Download the instructions for your Iron in PDF format for free! Find your manual GCSTAC6952 - OSTER and take your electronic device back in hand. On this page are published all the documents necessary for the use of your device. GCSTAC6952 by OSTER.
USER MANUAL GCSTAC6952 OSTER
natural_image
Line drawing of an electric iron with brand mark 'Oster' and ECO branding, no text or symbols presentMODELOS MODELS
GCSTAC6901, GCSTAC6902 GCSTAC6951, GCSTAC6952 GCSTAC6953
READ ALL INSTRUCTIONS BEFORE USING THIS APPLIANCE
PRECAUCIONES IMPORTANTES
natural_image
Line drawing of a steam iron iron with handle and mounting bracket (no text or symbols)Figura 2
PLANCHADO EN SECO
-
READ ALL INSTRUCTIONS BEFORE USING THIS APPLIANCE.
-
Use appliance only for its intended use.
-
To reduce the risk of electric shock, do not immerse the appliance in water or other liquids.
-
Always turn the appliance to "Off" before plugging or unplugging the appliance from the electrical outlet. Never yank cord to disconnect from outlet; instead, grasp plug and pull to disconnect.
-
Do not allow cord to touch hot surfaces. Let appliance cool completely before putting away. Loop cord loosely around appliance when storing.
-
Make sure unit is off, unplugged and allow it to cool completely before filling or cleaning.
-
Always disconnect appliance from electrical outlet when filling with water or emptying, and when not in use.
-
Do not operate appliance with a damaged cord, or if the appliance has been dropped or damaged. To reduce the risk of electric shock, do not disassemble or attempt to repair the appliance, take it to a qualified service center for examination and repair. Incorrect reassembly or repair could cause a risk of fire, electric shock, or injury to persons when the appliance is used.
-
This appliance is not intended for use by persons (including children) with reduced physical, sensory or mental capabilities, or lack of experience and knowledge, unless they have been given supervision or instruction concerning use of the appliance by a person responsible for their safety.
-
Children should be supervised to ensure that they do not play with the appliance.
-
Burns could occur from touching hot metal parts, hot water, or steam. Use caution when you turn a steam appliance upside down – there may be hot water in the reservoir.
-
To reduce the risk of contact with hot water emitting from steam vents, check appliance before each use by holding it away from body and operating steam button.
-
To reduce the likelihood of circuit overload, do not operate another high wattage appliance on the same circuit.
-
If an extension cord is absolutely necessary, a cord with an ampere rating equal to or greater than the maximum rating of the iron shall be used. A cord rated for less amperage can result in a risk of fire or electric shock due to overheating. Care shall be taken to arrange the cord so that it cannot be pulled or be tripped over.
-
When filling the water tank, watch for water that can drip onto the floor and cause you to slip and fall.
-
Appliance may cause personal injury or be damaged if dropped.
-
The use of attachments not recommended or sold by the appliance manufacturer may cause injuries or void your warranty.
-
To avoid personal injury and damage to the appliance, only add water to the water tank. NEVER add cleaning solutions, perfumes, oils or any other chemical additives.
-
Care should be taken when using the appliance due to the emission of steam.
-
Do not set the iron on an unprotected surface, even if it is on the heel rest.
-
The iron must not be left unattended while it is connected to the supply mains.
-
The plug must be removed from the socket-outlet before the water reservoir is filled with water.
ENGLISH-1
- The filling aperture must not be opened during use. Instructions for the safe refilling of the water reservoir must be followed.
- The iron must be used and rested on a stable surface.
- When placing the iron on its stand, ensure that the surface on which the stand is placed is stable.
- The iron is not to be used if it has been dropped, if there are visible signs of damage or if it is leaking.
- If the iron is not operating normally, disconnect from power supply and have the iron serviced by an authorized service center.
SAVE THESE INSTRUCTIONS HOUSEHOLD USE ONLY
ENGLISH-2
DESCRIPTION OF THE APPLIANCE
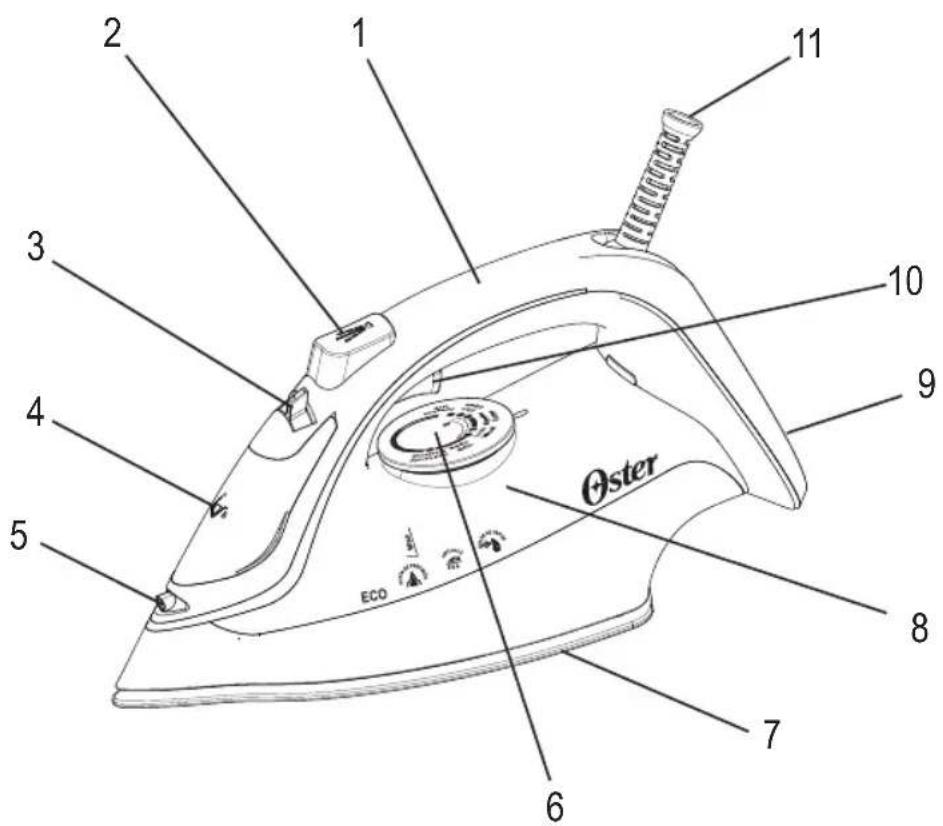
- Handle
- Spray mist button
- Steam select lever
- Water reservoir lid
- Spray noozzle
-
Temperature control dial
-
Ceramic soleplate
- See through water reservoir
- Wide rest heel
- Shot of steam Trigger/ vertical steam
- 360° Swivel cord
ENGLISH-3
BEFORE FIRST USE
- When using the Iron for the first time, test it on a piece of old cloth to be sure that the Soleplate and the Water Reservoir are clean.
- It is possible that the Iron will discharge some smoke or give off a slight odor during its first usage. This is due to the initial heating of the materials used. This is completely normal and will stop shortly afterwards.
- When not ironing, always have the Steam Select Lever turned to the closed position ✗
INSTRUCTIONS FOR USE
- Set the Steam Iron in an upright position and insert the plug into the wall electrical outlet. The Power On Indicator Light will turn on.
- Select the desired temperature on the Temperature Control Dial.
- The Temperature Indicator Light will turn on once the selected temperature is reached and you can begin to iron. The Temperature Indicator Light will turn on and off from time to time while you are ironing since the thermostat automatically maintains the Soleplate at the same temperature.
- Another important feature of your Steam Iron is the 360° Swivel Cord, which prevents tangling and allows for easy use by both right and left handed people.
CHOOSING THE RIGHT WATER
- This Steam Iron may be used with normal tap water. However, if the water of the region in which you live is especially hard, it is recommended to use distilled water to prolong the life of your Iron.
- Do not use water that has been desalinated with chemicals.
ENGLISH-4
FILLING WITH WATER
- Turn off the Iron and disconnect the plug from the electrical wall outlet before filling the Iron with water.
- Turn the Steam Select Lever to the closed position ✗
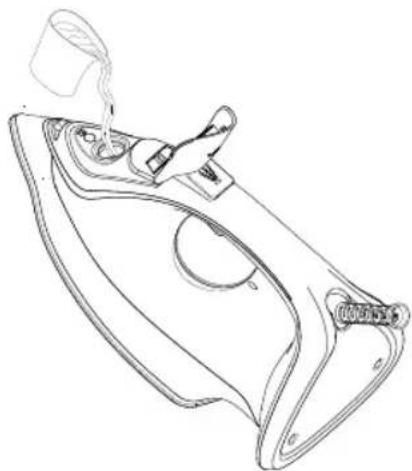
- Set the Iron in the position indicated below (Figure 2) and fill it with water, no higher than the Max fill level shown on the See Through Water Window.
natural_image
Line drawing of a mechanical component with no visible text or symbolsFigure 2
DRY IRONING ✕
- Insert the plug in the electrical wall socket.
- Make sure that the Steam Select Lever is in the closed position ✗
- Select the desired temperature on the Temperature Control Dial.
- When the Temperature Indicator Light turns on, you may start to iron.
ENGLISH-5
STEAM IRONING

Steam ironing is only possible at high temperatures (silk, wool, cotton, linen), as indicated on the Temperature Control Dial (Figure 3).
- Be sure that there is enough water in the Reservoir.
- Set the iron in an upright position.
- Plug the steam Iron into the wall electrical outlet.
- Turn the Temperature Control Dial to the desired position within the range of temperatures included in the steam area of the dial.
- Wait until the Temperature Indicator Light turns on.
- Set the Steam Select Lever to the desired steam level position. You are now ready to start steam ironing. The steam will be released evenly through vents located in the soleplate for easier ironing.
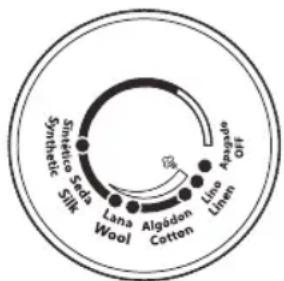
Figure 3
SPRAY MIST

The Spray Mist feature is a powerful water spray mist that dampens the fabric to help remove wrinkles from heavy fabrics and to set creases.
- Press the Spray Mist button firmly to start the spray.
ENGLISH-6
SHOT OF STEAM
The Shot of Steam feature provides an extra burst of steam for deep penetration of stubborn wrinkles. The Shot of Steam feature can be used with dry or steam ironing provided it has at least a 14 tank of water and the Temperature Control Dial is set within the steam band.
- Allow the iron to heat for approximately two minutes.
- Press the Shot of Steam Button several times to prime the pump.
- Press the Shot of Steam Button another three to four times in order to clean the unit.
- The Shot of Steam feature is now ready for use. The Shot of Steam feature can be used continuously with just a short pause between shots. The Shot of Steam feature is most effective with the Iron held in a horizontal position just above the fabric being ironed.
- If the Water Reservoir runs dry, unplug the Iron and refill with water. The Iron may be filled with water while it is hot. Note: It may be necessary to re-prime the pump before using the Shot of Steam feature again.
VERTICAL SHOT OF STEAM
The vertical shot steam feature allows your iron to function as a garment steamer.
TIP: When using the vertical shot of steam on clothing, hang the clothing on a clothes hanger for best results. Hanging curtains and drapes may also be steamed.
HOW TO USE VERTICAL STEAM
- Allow iron to warm up (2 minutes).
- Hold the iron in a vertical position, with the iron close to but not touching the fabric you want to steam.
- With your other hand, pull the fabric tight.
- Press the Shot of Steam button in approximately 3-second intervals as you move the iron across the wrinkled area.
WARNING: To prevent the risk of burns, keep your hand away from the area being steamed.
WARNING: DO NOT steam garments while wearing them; this may result in injuries.
ENGLISH-7
IRONING TEMPERATURE
- Check the ironing instructions on the label of the item that you wish to iron. Check the temperature settings table for further instructions.
- Should the specific ironing instructions not appear on the label, follow instructions on the temperature settings table. This table is only valid for the fabrics indicated and does not apply to special textiles with a gloss finish, etc. Textiles with special coatings (such as gloss, relief wrinkles, etc.) are best ironed at very low temperatures. If the textile consists of several different types of fibers, always select the lowest temperature, i.e. the temperature recommended for the most delicate fiber in the composition (for example, if the composition consists of 60% polyester and 40% cotton, you should iron at the temperature indicated for polyester).
SETTING THE TEMPERATURE
- Set the Iron in an upright position.
- Connect the Iron to an electrical wall socket.
- Set the Temperature Control Dial (Figure 4) to the correct ironing temperature as indicated on the label or the temperature settings table.
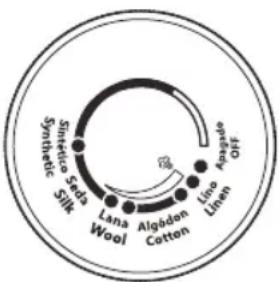
Figure 4
ENGLISH-8
TEMPERATURE SETTINGS TABLE
| Temperature Control Dial | Kind of Textile Fiber Material | ||
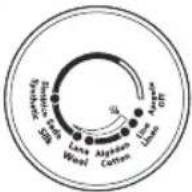 | synthetic synthetic synthetic | Acrylic, modacrylic, polypropylene Acetate, Rayon, viscose, polyester, cupro, modal | |
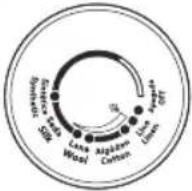 | Silk wool cotton | Silk wool cotton | |
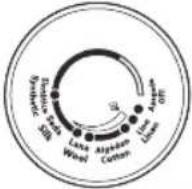 | lino linen | ||
 | on the label means: This article cannot be ironed (e.g. chlorofiber, elastodiene) | ||
ANTI-CALC

The anti-calc feature helps prevent the build up of mineral deposits in your iron. This prolongs its life and improves the iron's performance.
ECO FUNCTION ECO
Eco function is a lower-power option for the energy-conscious, and note that in order to conserve energy, the steam output may decrease.
ENGLISH-9
3 WAY AUTO-OFF FEATURE
When the iron is plugged in, the Power Indicator will light steadily, indicating that there is power to the iron.
IF YOU LEAVE THE IRON
- In a horizontal position without moving it, or accidentally tip the iron over, it will automatically stop heating after 30 seconds. The ON/OFF indicator light will blink repeatedly to let you know that the iron has stopped heating.
- In a vertical position (on its heel rest) without moving it, the iron will automatically turn off after 15 minutes. The ON/OFF indicator light will blink repeatedly to let you know that the iron has stopped heating.
TO RESET THE IRON
Move the iron back and forth and allow it to reheat for 2 minutes. The indicator will stop blinking and the iron will start heating again.
WARNING: The 3 Way Auto-Off is a safety feature, not a recommended means for turning your iron off.
MAINTENANCE AND CLEANING
Before cleaning the Iron, always make sure that it is disconnected from the electrical wall socket and is completely cool.
SOLEPLATE
- Residue on the Soleplate can be wiped off with a cloth soaked in a solution of water and vinegar.
- Do not use scouring pads, abrasives or chemical cleaning solvents as they may damage the finish.
HOUSING
- The housing can be cleaned with a moist cloth and then wiped dry.
- Other than the recommended cleaning, no further user maintenance should be necessary. If for any reason your Steam Iron should require repairs, do not try to fix it yourself. Send it to an Authorized Service Center.
ENGLISH-10
SELF-CLEANING FEATURE CALC CLEAN
You should use the Self-Cleaning feature to maintain the optimal performance of your iron. The Self Cleaning feature will clean the water reservoir and steam vents of accumulated minerals, dust and lint.
TO USE THE SELF-CLEANING FEATURE
- Move the Steam Select Lever back and forth several times to remove debris and minerals from the steam valve. This keeps water flowing into the steam chamber.
- Fill the water reservoir with tap water to the "MAX" line.
- Plug in the iron and move the temperature control dial to the "Linen" position, and allow the iron to heat for two minutes.
- Unplug the iron.
- Hold the iron over a sink in a horizontal position. WARNING: Be careful not to touch the iron's hot surfaces.
- Turn the Steam Select Lever to CLAC CLEAN position. Water will begin dripping from the steam vents. Slowly rock the iron side-to-side and front to back for 30 seconds. When rocking the iron, dip the nose of the iron slightly below the rear to make certain the water circulates completely.
- Turn the iron upside down and allow the remaining water to flow out of the fill hole.
- Dry the soleplate with a towel.
- Plug in the iron and turn the Temperature Control Dial to the "Linen" position. Let the iron heat for two minutes and dry out the iron completely.
- Turn the Temperature Control Dial to the "Off" position. The light will go out, indicating that the iron has turned itself off. Unplug the iron and allow it to cool before storing.
STORING THE IRON
- Turn off the iron and disconnect the plug from the electrical wall socket.
- Set the Iron in an upright position and let it cool down completely.
- Set the Steam Select Lever to the closed position ✕
- Empty out all the water remaining in the Water Reservoir by opening the Water Reservoir Lid and inverting the Iron over the sink.
- The Power Cord can be wound around the Heel Rest for easier and tidy storing once the unit has cooled down. The Iron should always be stored in an upright position.
ENGLISH-II
Oster®
| Características eléctricas de los modelos de la serie:Electric characteristics of series models:GCSTAC6901-013, GCSTAC6902-013, GCSTAC6951-013, GCSTAC6952-013, GCSTAC6953-013 | ||
| Voltaje / Voltage Frecuencia / Frequency Potencia / Power | ||
| 127 V~ 60 Hz 1600 W | ||
| Características eléctricas de los modelos de la serie:Electric characteristics of series models:GCSTAC6901-053, GCSTAC6902-053, GCSTAC6951-053, GCSTAC6952-053, GCSTAC6953-053GCSTAC6901-052, GCSTAC6902-052, GCSTAC6951-052, GCSTAC6952-052, GCSTAC6953-052 | ||
| Voltaje / Voltage Frecuencia / Frequency Potencia / Power | ||
| 220 V~ 50 Hz 2200 | W | |
For Mexican models only:
© 2020 Sunbeam Products, Inc. All rights reserved. One year limited warranty – please see insert for details.
www.oster.com
Printed in China
Impreso en China
P.N. 202910
GCDS-OST-JC

- PRECAUCIONES IMPORTANTES
- PLANCHADO EN SECO
- SAVE THESE INSTRUCTIONS HOUSEHOLD USE ONLY
- DESCRIPTION OF THE APPLIANCE
- BEFORE FIRST USE
- INSTRUCTIONS FOR USE
- CHOOSING THE RIGHT WATER
- FILLING WITH WATER
- DRY IRONING ✕
- STEAM IRONING
- SPRAY MIST
- SHOT OF STEAM
- VERTICAL SHOT OF STEAM
- HOW TO USE VERTICAL STEAM
- IRONING TEMPERATURE
- SETTING THE TEMPERATURE
- TEMPERATURE SETTINGS TABLE
- ANTI-CALC
- ECO FUNCTION ECO
- WAY AUTO-OFF FEATURE
- IF YOU LEAVE THE IRON
- TO RESET THE IRON
- MAINTENANCE AND CLEANING
- SOLEPLATE
- HOUSING
- SELF-CLEANING FEATURE CALC CLEAN
- TO USE THE SELF-CLEANING FEATURE
- STORING THE IRON
- Oster®
Brand : OSTER
Model : GCSTAC6952
Category : Iron