
GCSTBS5855013 - Iron OSTER - Free user manual and instructions
Find the device manual for free GCSTBS5855013 OSTER in PDF.


| Product Type | Steam Iron |
| Brand | Oster |
| Model | GCSTBS5855013 |
| Dimensions (approx.) | 12.2 x 5.5 x 6.7 inches (31 x 14 x 17 cm) |
| Weight (approx.) | 2.5 lbs (1.13 kg) |
| Power | 1500 W |
| Voltage | 120 V, 60 Hz |
| Water Tank Capacity | 10 oz (300 ml) |
| Soleplate Material | Stainless Steel |
| Steam Output (max) | 30 g/min |
| Spray / Mist Function | Yes |
| Anti-Drip System | Yes |
| Self-Cleaning Function | Yes |
| Auto Shut-Off | Yes (after 8 minutes of inactivity) |
| Cord Length | 8 ft (2.4 m) |
| Variable Temperature Control | Yes |
| Vertical Steaming | Yes |
| Fast Heat-Up | Yes (less than 1 minute) |
Frequently Asked Questions - GCSTBS5855013 OSTER
User questions about GCSTBS5855013 OSTER
0 question about this device. Answer the ones you know or ask your own.
Ask a new question about this device
Download the instructions for your Iron in PDF format for free! Find your manual GCSTBS5855013 - OSTER and take your electronic device back in hand. On this page are published all the documents necessary for the use of your device. GCSTBS5855013 by OSTER.
USER MANUAL GCSTBS5855013 OSTER
natural_image
Illustration of three different Oster air fairs with steam iron, shown from different angles (no text or symbols on the fans themselves)MODELO
MODEL
GCSTBS5802, GCSTBS5803, GCSTBS5813, GCSTBS5804, GCSTBS5805, GCSTBS5806, GCSTBS5807, GCSTBS5812, GCSTBS5854, GCSTBS5855, GCSTBS5856 & GCSTBS5857
READ ALL INSTRUCTIONS BEFORE USING THIS APPLIANCE
MANUAL DE INSTRUÇÕES
FERRO ELÉTRICO A VAPOR
LEIA TODAS AS INSTRUÇÕES ANTES DE USAR ESTE APARELHO
PRECAUCIONES IMPORTANTES
natural_image
Line drawing of a steam iron with label 'Ostez' and handle (no text or symbols on the device itself)(figura 2)
PLANCHADO EN SECO
When using electrical appliances, basic safety instructions should always be followed, including the following:
READ ALL INSTRUCTIONS BEFORE USING THE STEAM IRON.
- The Iron should always be turned to the "OFF" position before plugging or unplugging from outlet. Never yank Cord to disconnect from outlet; grasp Plug and pull to disconnect.
- Before connecting the Steam Iron, make sure the voltage in your outlet is the same as the voltage indicated on the appliance's rating label. Use it with wall receptacle only.
- To protect against risk of electrical shock, do not immerse the Power Cord, plug or the Steam Iron in water or other liquid.
- Never use the Steam Iron if you have wet hands.
- This appliance should not be used by children.
- Never leave the Steam Iron unattended while it is turned on or is on top of the ironing board.
- Unplug from outlet while not in use.
- Let Steam Iron completely cool off in the upright position before storing it. Wind the Power Cord around the Heel Rest before storing.
- Burns may occur by touching hot parts, the hot water or the steam. Be careful if you have to turn the Steam Iron upside down, since there still may be hot water in the Reservoir.
- Do not operate Iron with a damaged cord or if the Iron has been dropped or damaged. To avoid the risk of electric shock, do not disassemble the Iron. Take it to an Authorized Oster® Service Center for examination and repair. Incorrect reassembly can cause a risk of electric shock when the Iron is used.
- Do not use it outdoors.
- Do not let the Power Cord come in contact with hot surfaces.
- This Steam Iron is intended for household use only.
- Use the Steam Iron only for the purpose intended.
- Do not leave Steam Iron unattended while using it. Be careful; if you leave the Steam Iron unattended, always turn it off, disconnect the unit from the electric outlet and set the Iron in an upright position.
- Repairs to the appliance may only be carried out by trained personnel. As a result of incorrect repairs considerable dangers for the user may result. Please contact an Authorized Oster® Service Center in the event of repairs being necessary.
- Always disconnect the Steam Iron from the wall socket when filling it with water or emptying it out.
- Avoid overfilling the Reservoir. Never fill it above the maximum water level.
-
In order to avoid overloading the circuits, never use another appliance with high wattage on the same circuit.
-
The manufacturer is not liable for any damages, which are caused by using the appliance incorrectly or for any other purpose than that intended.
- If an extension cord is absolutely necessary, a cord with the same amperage or higher than that of your iron should be used. Cords rated for less amperage may overheat. Care should be taken to arrange the cord so that it cannot be pulled or tripped over.
- This appliance is not intended for use by persons (including children) with reduced physical, sensory or mental capabilities, or lack of experience and knowledge, unless they have been given supervision or instruction concerning use of the appliance by a person responsible for their safety. Children should be supervised to ensure that they do not play with the appliance.
- Close supervision is necessary when any appliance is used by or near children, or incapacitated individuals.
SAVE THESE INSTRUCTIONS
DESCRIPTION OF THE APPLIANCE
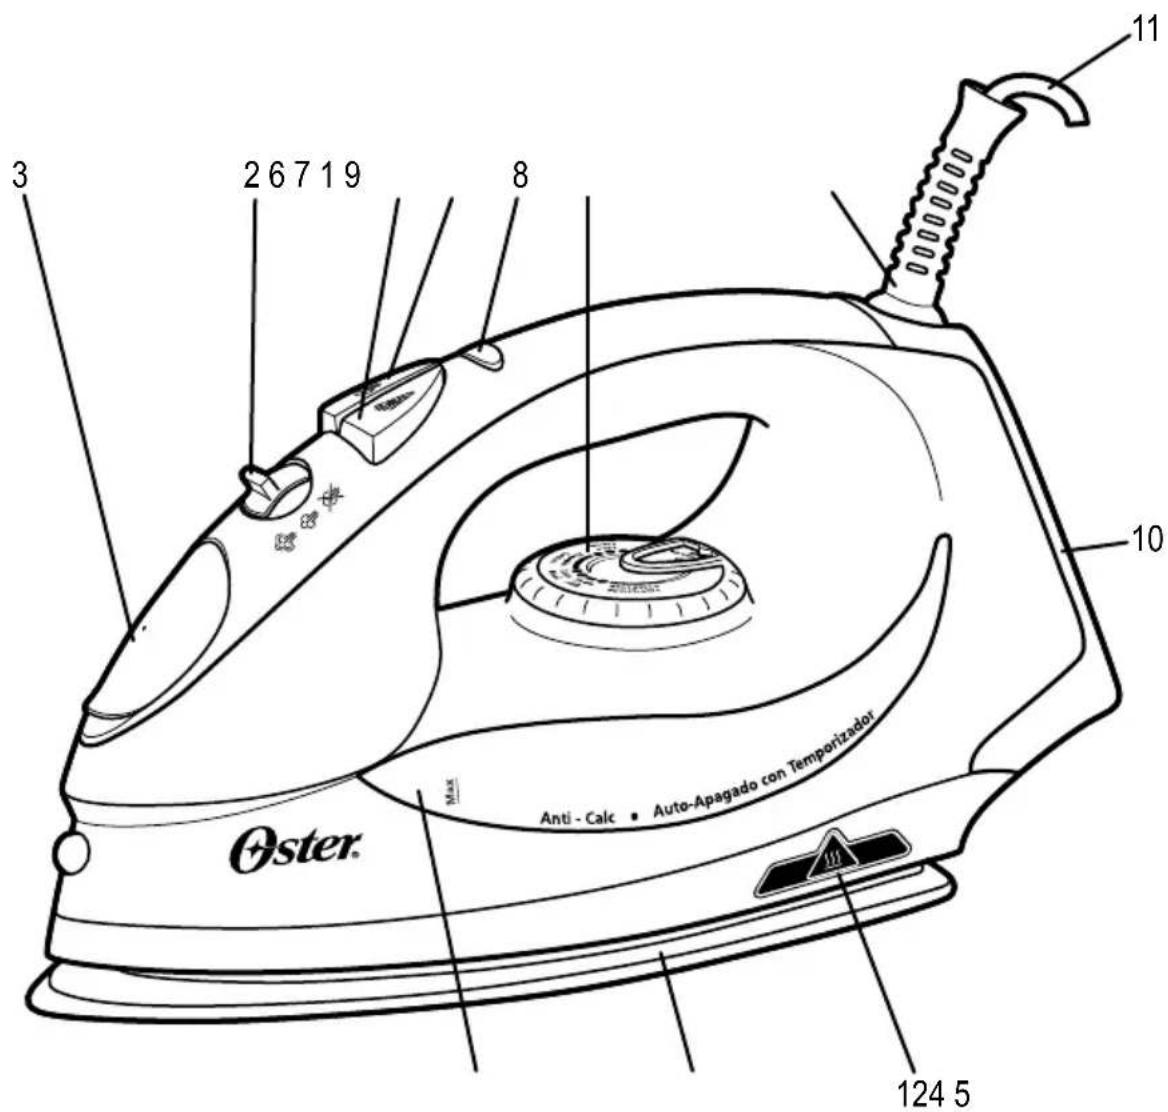
- Temperature Control Dial
- Steam Select Switch
- Water Reservoir Lid
- See Through Water Window
- Soleplate - polished aluminum on model 5802, non-stick finish on models 5803, 5813, 5804, 5805, 5806, 5807 & 5812 and ceramic non-stick on models 5854, 5855, 5856 & 5857
-
Spray Mist Button (models 5804, 5854, 5805, 5855, 5806, 5856, 5807 & 5857 only)
-
Shot of Steam Button (model 5805, 5855, 5806, 5856, 5807 & 5857 only)/Dual Shot of Steam Button (models 5806, 5856, 5807 & 5857 only)
- Indicator Light
- 180° Swivel Cord
- Wide Heel Rest
- Power Cord
- Safe Storage Indicator
BEFORE FIRST USE
- When using the Iron for the first time, test it on a piece of old cloth to be sure that the Soleplate and the Water Reservoir are clean.
- It is possible that the Iron will discharge some smoke or give off a slight odor during its first usage. This is due to the initial heating of the materials used. This is completely normal and will stop shortly afterwards.
- When not ironing, always have the Steam Select Switch turned to the closed position ✗
INSTRUCTIONS FOR USE
- Set the Steam Iron in an upright position and insert the plug into the wall electrical outlet.
- Select the desired temperature on the Temperature Control Dial.
- The Indicator Light will go on and once the selected temperature is reached, the light will go off and you can begin to Iron. The Indicator Light will be on every time the Iron is heating. Once it reaches the temperature setting, the Indicator Light will turn off. The Light will turn on and off from time to time while you are ironing since the thermostat automatically maintains the Soleplate at the same temperature.
- The Large Soleplate increases ironing efficiency while the non-stick finish included on models 5803, 5813, 5804, 5805, 5806, 5807 & 5812 and the ceramic non-stick finish include on models 5854, 5855, 5856 & 5857 makes gliding across fabrics even smoother.
- Another important feature of your Steam Iron is the 180^ Swivel Cord, which prevents tangling and allows for easy use by both right and left handed people.
CHOOSING THE RIGHT WATER
- This Steam Iron may be used with normal tap water. However, if the water of the region in which you live is especially hard, it is recommended to use distilled water to prolong the life of your Iron.
- Do not use water that has been desalinated with chemicals.
FILLING WITH WATER
- Turn off the Iron and disconnect the plug from the electrical wall outlet before filling the Iron with water.
- Turn the Steam Select Switch to the closed position
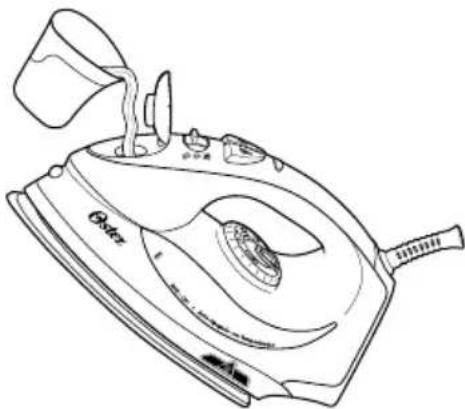
- Set the Iron in the position indicated below (figure 2) and fill it with water, no higher than the Max fill level shown on the See Through Water Window.
natural_image
Line drawing of a steam iron with label 'Oste' and handle (no text or symbols on the device itself)(figure 2)
DRY IRONING
- Insert the plug in the electrical wall socket.
- Make sure that the Steam Select Switch is in the closed position ✗
- Select the desired temperature on the Temperature Control Dial.
• After the Indicator Light goes off, you may start to iron.
STEAM IRONING
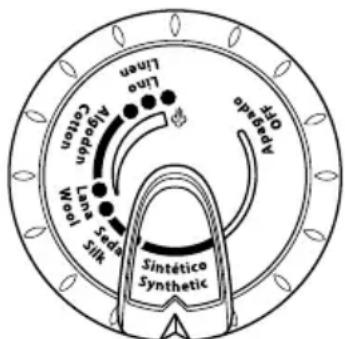
- Steam ironing is only possible at high temperatures ("●", "●"), as indicated on the Temperature Control Dial.
- Be sure that there is enough water in the Reservoir.
- Set the iron in an upright position.
- Plug the steam Iron into the wall electrical outlet.
-
Turn the Temperature Control Dial to the desired position within the range of temperatures included in the steam area of the dial.
-
Wait until the Indicator Light has turned off after lighting up.
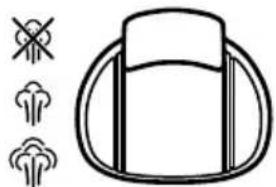
- Set the Steam Select Switch to the desired steam level position (figure 3). You are now ready to start steam ironing. The steam will be released evenly through vents located in the soleplate for easier ironing.
natural_image
Simple line drawing of a helmet with exhaust symbols (no text or labels)(figure 3)
SPRAY MIST

(Models 5804, 5854, 5805, 5855, 5806, 5856, 5807 & 5857 Only)
- The Spray Mist feature is a powerful water spray mist that dampens the fabric to help remove wrinkles from heavy fabrics and to set creases.
- Press the Spray Mist button firmly to start the spray.
DUAL SHOT OF STEAM

This feature allows you to use shot of steam while ironing horizontally or vertically, as the next two sections describe.
SHOT OF STEAM

(Models 5805, 5855, 5806, 5856, 5807 & 5857 Only)
- The Shot of Steam feature provides an extra burst of steam for deep penetration of stubborn wrinkles. The Shot of Steam feature can be used with dry or steam ironing provided it has at least a 14 tank of water and the Temperature Control Dial is set within the steam band.
- Allow the iron to heat for approximately two minutes. Make sure that the steam select switch is in the off position ✗ for optimal performance.
- Press the Shot of Steam Button several times to prime the pump.
- Press the Shot of Steam Button another three to four times in order to clean the unit.
- The Shot of Steam feature is now ready for use. The Shot of Steam feature can be used continuously with just a short pause between shots. The Shot of Steam feature is most effective with the Iron held in a horizontal position just above the fabric being ironed.
- If the Water Reservoir runs dry, unplug the Iron and refill with water. The Iron may be filled with water while it is hot. Note: It may be necessary to re-prime the pump before using the Shot of Steam feature again.
VERTICAL SHOT OF STEAM (Models 5806, 5856, 5807 & 5857 Only)
The vertical shot of steam feature allows your iron to function as a garment steamer. Tip: When using the vertical shot of steam on clothing, hang the clothing on a cloth hanger for best results. Hanging curtains and drapes may also be steamed.
How to use Vertical Steam:
- Allow iron to warm up (2 minutes). Make sure that the steam select switch is in the off position ✗ for optimal performance.
- Hold the iron in a vertical position, with the iron close to but not touching the fabric you want to steam.
- With your other hand, pull the fabric tight.
- Press the Shot of Steam button in approximately 3-second intervals as you move the iron across the wrinkled area.
WARNING: To prevent the risk of burns, keep your hand away from the area being steamed.
WARNING: DO NOT steam garments while wearing them; this may result in injuries.
IRONING TEMPERATURE
- Check the ironing instructions on the label of the item that you wish to iron. Check the temperature settings table for further instructions.
- Should the specific ironing instructions not appear on the label, follow instructions on the temperature settings table. This table is only valid for the fabrics indicated and does not apply to special textiles with a gloss finish, etc. Textiles with special coatings (such as gloss, relief wrinkles, etc.) are best ironed at very low temperatures. If the textile consists of several different types of fibers, always select the lowest temperature, i.e. the temperature recommended for the most delicate fiber in the composition (for example, if the composition consists of 60% polyester and 40% cotton, you should iron at the temperature indicated for polyester).
SETTING THE TEMPERATURE
- Set the Iron in an upright position.
- Connect the Iron to an electrical wall socket.
- Set the Temperature Control Dial (figure 4) to the correct ironing temperature as indicated on the label or the temperature settings table.
(figure 4)
TEMPERATURE SETTINGS TABLE
| Temperature Control Dial Kind of Textile Fiber Material | ||||
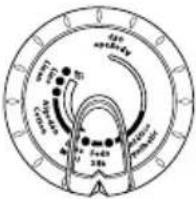 | ● | [70W4] | synthetic | Acrylic, modacryl polypropylene, polyurethane |
| synthetic | acetate, triacetate | |||
| synthetic | metalized, cupro, polyamide (nylon), polyester | |||
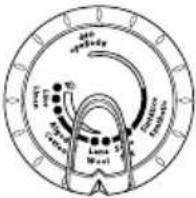 | ●● |  | silk | silk |
| wool | wool | |||
| cotton | cotton | |||
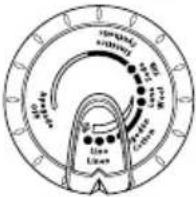 |  | linen linen | ||
| [HOTX] | on the label means: This article cannot be ironed (e.g. chlorofiber, elastodiene) | |||
Non-Stick FINISH
(Models 5803, 5813, 5804, 5805, 5806, 5807 & 5812 Only)
- The non-stick coating prevents fabrics and starch residue from sticking to the Soleplate.
- Avoid all contact of the Soleplate with metal objects.
Note: Scratches in the non-stick Soleplate do not affect the performance of the Iron.
CERAMIC NON-STICK FINISH
(Models 5854, 5855, 5856 & 5857 Only)
- Ceramic coating soleplate produces negative ions that result in a better ironing experience, more uniform and shiny results..
- Avoid all contact of the Soleplate with metal objects.
Note: Scratches in the ceramic non-stick Soleplate do not affect the performance of the Iron.
ANTI-CALC

The anti-calc feature helps prevent the build up of mineral deposits in your iron. This prolongs its life and improves the iron's performance.
TIMED AUTO SHUT-OFF

(Models 5807 & 5857 Only)
When the iron is plugged in and turned on, the power indicator will light steadily, indicating there is power to the iron. Once the selected temperature is reached, the light will go off and you can begin to Iron.
A 45-minute timer will start once the unit has been plugged in. After 45 minutes, the iron will beep 6 times indicating it will automatically shut-off.
To reset the iron:
Unplug the iron and then put it back into the wall outlet. This will restart the timer for the auto shut-off feature.
WARNING: The timed auto shut-off is a safety feature, not a recommended means for turning your iron off. See the "Storing the Iron" section for information on turning off your iron and storing it safely between uses.
MAINTENANCE AND CLEANING
- Before cleaning the iron, always make sure that it is disconnected from the electrical wall socket and is completely cool.
SOLEPLATE
- Residue on the Soleplate can be wiped off with a cloth soaked in a solution of water and vinegar.
- Do not use scouring pads, abrasives or chemical cleaning solvents as they may damage the finish.
HOUSING
- The housing can be cleaned with a moist cloth and then wiped dry.
Other than the recommended cleaning, no further user maintenance should be necessary. If for any reason your Steam Iron should require repairs, do not try to fix it yourself. Send it to an Oster® Authorized Service Center.
STORING THE IRON
- Your Oster® Steam Iron includes a Safe Storage Indicator which changes from red to black when the iron is ready for safe storage.
- Turn off the iron and disconnect the plug from the electrical wall socket.
- Set the Iron in an upright position and let it cool down completely.
- Set the Steam Select Switch to the closed position.
- Empty out all the water remaining in the Water Reservoir by opening the Water Reservoir Lid and inverting the Iron over the sink.
- The Power Cord can be wound around the Heel Rest for easier and tidy storing once the unit has cooled down. The Iron should always be stored in an upright position.
PRECAUÇÕES IMPORTANTES
INSTRUÇÕES PARA O USO
natural_image
Line drawing of a steam iron with label 'Ostez' and handle (no text or symbols on the device itself)(figura 2)
PASSANDO A SECO
• Ligue o ferro na tomada.
natural_image
Simple line drawing of a helmet with icons for weight, air, cloud, and exhaust (no text or symbols)(figura 3)
SPRAY
(somente nos modelos 5804, 5854, 5805, 5855, 5806, 5856, 5807 e 5857)
© 2013 Sunbeam Products, Inc. All rights reserved. Distributed by Sunbeam Latin America, LLC, 5200 Blue Lagoon Drive, Suite 470, Miami, FL 33126. One year limited warranty – please see insert for details.
- PRECAUCIONES IMPORTANTES
- PLANCHADO EN SECO
- READ ALL INSTRUCTIONS BEFORE USING THE STEAM IRON.
- SAVE THESE INSTRUCTIONS
- DESCRIPTION OF THE APPLIANCE
- BEFORE FIRST USE
- INSTRUCTIONS FOR USE
- CHOOSING THE RIGHT WATER
- FILLING WITH WATER
- DRY IRONING
- STEAM IRONING
- SPRAY MIST
- DUAL SHOT OF STEAM
- SHOT OF STEAM
- VERTICAL SHOT OF STEAM (Models 5806, 5856, 5807 & 5857 Only)
- How to use Vertical Steam:
- IRONING TEMPERATURE
- SETTING THE TEMPERATURE
- TEMPERATURE SETTINGS TABLE
- Non-Stick FINISH
- CERAMIC NON-STICK FINISH
- ANTI-CALC
- TIMED AUTO SHUT-OFF
- To reset the iron:
- MAINTENANCE AND CLEANING
- SOLEPLATE
- HOUSING
- STORING THE IRON
- PRECAUÇÕES IMPORTANTES
- INSTRUÇÕES PARA O USO
- PASSANDO A SECO
- SPRAY
Brand : OSTER
Model : GCSTBS5855013
Category : Iron