
TC-PO 110 - Polisher EINHELL - Free user manual and instructions
Find the device manual for free TC-PO 110 EINHELL in PDF.


| Product Type | Random Orbital Polisher |
| Power Rating | 400 W |
| Pad Diameter | 110 mm |
| No-Load Speed | 1500 - 3000 min⁻¹ |
| Vibration Level | ≤ 7.5 m/s² (typical) |
| Sound Pressure Level | 74 dB(A) (typical) |
| Power Supply | 230 V ~ 50 Hz |
| Safety Class | II (Double Insulation) |
| Weight | 2.5 kg |
| Dimensions (L x W x H) | 280 x 160 x 180 mm |
| Speed Control | Variable speed dial |
| Soft Grip Handle | Yes |
| Lock-on Button | Yes |
| Dust Protection | Integrated dust cover |
| Carbon Brushes | Replaceable |
| Power Cord Length | 2 m |
| Spindle Thread | M6 |
| Accessories Included | Polishing pad, backing plate, hex key |
| Maintenance | Clean ventilation slots; replace carbon brushes as needed |
| Reparability | Spare parts available via customer service |
Frequently Asked Questions - TC-PO 110 EINHELL
User questions about TC-PO 110 EINHELL
0 question about this device. Answer the ones you know or ask your own.
Ask a new question about this device
Download the instructions for your Polisher in PDF format for free! Find your manual TC-PO 110 - EINHELL and take your electronic device back in hand. On this page are published all the documents necessary for the use of your device. TC-PO 110 by EINHELL.
USER MANUAL TC-PO 110 EINHELL
GB Original operating instructions Polishing machine
8


South America


natural_image
Illustration of a hand holding a bowl over a textured surface, with another container and bottle nearby (no text or symbols)
natural_image
Illustration of hands using a tool to clean a small container (no text or symbols present)-2-
natural_image
Illustration of a hand using a tool to press or spread a material on a circular base (no text or symbols)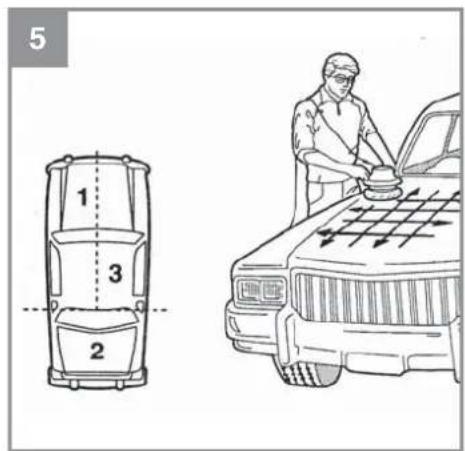

natural_image
Illustration of hands cleaning a car wheel with a mesh material (no text or symbols)
natural_image
Illustration of a hand holding a textured object inside a circular opening, with no visible text or symbols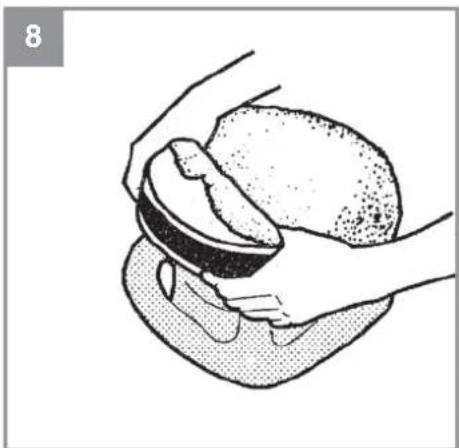
natural_image
Illustration of hands holding a bowl over a textured surface (no text or symbols)E

Caution - Read the operating instructions to reduce the risk of inquiry

Wear ear-muffs. The impact of noise can cause damage to hearing.

Wear a breathing mask. Dust which is injurious to health can be generated when working on wood and other materials. Never use the device to work on any materials containing asbestos!

Wear safety goggles. Sparks generated during working or splinters, chips and dust emitted by the device can cause loss of sight.
GB
⚠️ Important!
When using the equipment, a few safety precautions must be observed to avoid injuries and damage. Please read the complete operating instructions and safety regulations with due care. Keep this manual in a safe place, so that the information is available at all times. If you give the equipment to any other person, hand over these operating instructions and safety regulations as well. We cannot accept any liability for damage or accidents which arise due to a failure to follow these instructions and the safety instructions.
1. Safety regulations
The corresponding safety information can be found in the enclosed booklet.
Caution!
Read all safety regulations and instructions.
Any errors made in following the safety regulations and instructions may result in an electric shock, fire and/or serious injury.
Keep all safety regulations and instructions in a safe place for future use.
This appliance is not intended for use by persons (including children) with reduced physical, sensory or mental capabilities, or lack of experience and knowledge, unless they have been given supervision or instruction concerning use of the appliance by a person responsible for their safety. Children should be supervised to ensure that they do not play with the appliance.
Safety information for polishing machines
- Ensure that the polishing bonnet is securely fastened to the polishing disk.
• Do not touch any rotating parts! - Before you switch on, make sure that the polishing disk is not blocked and can run without any danger.
- Always check the polishing bonnets and the polishing disk for damage.
- Replace torn or damaged polishing bonnets / polishing disk immediately.
- Do not switch on the polishing machine until the polishing disk is resting on the surface you want to polish.
- Do not use any abrasives; these can destroy the lacquer.
- Harmful dust can develop during dry polishing. Be sure to wear a suitable dust mask to protect you from inhaling this dust.
2. Layout and items supplied
2.1 Layout (Fig. 1)
- Handle
- Polishing disk
- On/Off switch
- Power cable
- Textile polishing bonnet
- Synthetic polishing bonnet
2.2 Items supplied
Please check that the article is complete as specified in the scope of delivery. If parts are missing, please contact our service center or the sales outlet where you made your purchase at the latest within 5 working days after purchasing the product and upon presentation of a valid bill of purchase. Also, refer to the warranty table in the service information at the end of the operating instructions.
- Open the packaging and take out the equipment with care.
- Remove the packaging material and any packaging and/or transportation braces (if available).
- Check to see if all items are supplied.
- Inspect the equipment and accessories for transport damage.
- If possible, please keep the packaging until the end of the guarantee period.
Important!
The equipment and packaging material are not toys. Do not let children play with plastic bags, foils or small parts. There is a danger of swallowing or suffocating!
- Polishing machine
• Textile polishing bonnet
• Synthetic polishing bonnet
• Original operating instructions
• Safety information
GB
3. Proper use
The equipment is designed solely for waxing/polishing and dewaxing paintwork on motor vehicles, boats, caravans or mobile homes.
The equipment is to be used only for its prescribed purpose. Any other use is deemed to be a case of misuse. The user / operator and not the manufacturer will be liable for any damage or injuries of any kind caused as a result of this.
Please note that our equipment has not been designed for use in commercial, trade or industrial applications. Our warranty will be voided if the machine is used in commercial, trade or industrial businesses or for equivalent purposes.
4. Technical data
See warranty card of your country.
Wear ear-muff s.
The impact of noise can cause damage to hearing.
Total vibration values (vector sum of three directions) determined in accordance with EN 60745.
Vibration emission value a_h = 9.619 m/s^2 K uncertainty = 1.5 m/s ^2
Warning!
The specified vibration value was established in accordance with a standardized testing method. It may change according to how the electric equipment is used and may exceed the specified value in exceptional circumstances.
The specified vibration value can be used to compare the equipment with other electric power tools.
The specified vibration value can be used for initial assessment of a harmful effect.
Keep the noise emissions and vibrations to a minimum.
- Only use appliances which are in perfect working order.
• Service and clean the appliance regularly.
• Adapt your working style to suit the appliance.
• Do not overload the appliance. - Have the appliance serviced whenever necessary.
- Switch the appliance off when it is not in use.
• Wear protective gloves.
Residual risks
Even if you use this electric power tool in accordance with instructions, certain residual risks cannot be rules out. The following hazards may arise in connection with the equipment's construction and layout:
- Lung damage if no suitable protective dust mask is used.
- Damage to hearing if no suitable ear protection is used.
- Health damage caused by hand-arm vibrations if the equipment is used over a prolonged period or is not properly guided and maintained.
5. Before starting the equipment
Before you connect the equipment to the mains supply make sure that the data on the rating plate are identical to the mains data.
Always pull the power plug before making adjustments to the equipment.
GB
6. Operation
6.1 Mounting the polishing bonnet on the polishing disk (Fig. 2)
- Turn the car polishing machine upside down so that the polishing disk is facing up.
- Pull the textile polishing bonnet over the polishing disk (Fig. 2). Make sure that the textile polishing bonnet is free of any foreign bodies.
6.2 Applying wax/polishing paste to the textile polishing bonnet (Fig. 3)
Note: Use only high-quality waxing and polishing products and follow the processing instructions issued by the manufacturer on the packaging. Distribute the polishing agent evenly as far as the edge of the textile polishing bonnet so that a uniform, thin coating is produced overall.
Note: Applying too much polishing agent will only make it more difficult to remove the layer of polishing agent later from the paintwork and will not improve the results.
6.3 Switching on and applying the polishing agent to the paintwork
Note: The paintwork you want to process must be carefully cleaned and completely dry. Severely oxidized paintwork requires the use of a special cleaner.
Select a cleaner from the products available to suit the state of the paintwork and the stress it is exposed to.
- Dab with the textile polishing bonnet on different positions of the paintwork you want to polish. This will help to distribute any excess polishing agent over the textile polishing bonnet and/or over the paintwork you want to polish.
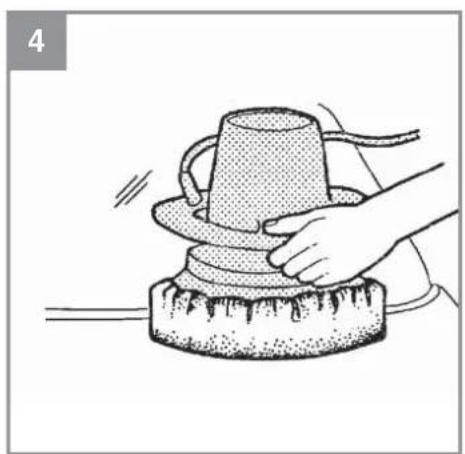
- Hold the handle of the equipment firmly in both hands, place the polishing machine onto the paintwork you want to polish (Fig. 4) and switch on the equipment by pressing the On/Off switch (Fig. 1 / Item 3).
- First work on the large level surfaces such as the engine hood, boot lid and roof (Fig. 5), then on the smaller surfaces such as the doors and mudguards (Fig. 6). Guide the equipment smoothly over the paintwork, exerting no pressure.
- Switch off the equipment with the On/Off switch (Fig. 1 / Item 3) before you remove it from the paintwork you are polishing.
- For areas which are difficult to reach, remove
the textile polishing bonnet from the polishing disk and process these areas by hand (Fig. 7).
6.4 Polishing the paintwork with the synthetic polishing bonnet
Note: After the previously applied polishing agent has dried completely on the paintwork, you can begin with the polishing. Damp polish will be smeared by the synthetic polishing bonnet.
- Replace the textile polishing bonnet with the synthetic polishing bonnet. Make sure that the synthetic polishing bonnet is free of any foreign bodies.
-
Remove the polish layer in the same order in which you applied the polishing agent to the paintwork. Be sure to follow the instructions issued for using the waxing and polishing agent.
-
Replacing the power cable
If the power cable for this equipment is damaged, it must be replaced by the manufacturer or its after-sales service or similarly trained personnel to avoid danger.
- Cleaning, maintenance and ordering of spare parts
Always pull out the mains power plug before starting any cleaning work.
8.1 Cleaning
- Keep all safety devices, air vents and the motor housing free of dirt and dust as far as possible. Wipe the equipment with a clean cloth or blow it with compressed air at low pressure.
• We recommend that you clean the device immediately each time you have finished using it. - Clean the equipment regularly with a moist cloth and some soft soap. Do not use cleaning agents or solvents; these could attack the plastic parts of the equipment. Ensure that no water can seep into the device. The ingress of water into an electric tool increases the risk of an electric shock.
- Wash the polishing bonnets only by hand and let them air-dry.
- When the polishing machine is not being
GB
used it should be stored face up with the polishing bonnet removed so that the polishing disk can dry and retain its original shape.
8.2 Maintenance
There are no parts inside the equipment which require additional maintenance.
8.3 Ordering replacement parts:
Please quote the following data when ordering replacement parts:
• Type of machine
• Article number of the machine
• Identification number of the machine
- Replacement part number of the part required For our latest prices and information please go to www.isc-gmbh.info
9. Disposal and recycling
The equipment is supplied in packaging to prevent it from being damaged in transit. The raw materials in this packaging can be reused or recycled. The equipment and its accessories are made of various types of material, such as metal and plastic. Never place defective equipment in your household refuse. The equipment should be taken to a suitable collection center for proper disposal. If you do not know the whereabouts of such a collection point, you should ask in your local council offices.
10. Storage
Store the equipment and accessories out of children's reach in a dark and dry place at above freezing temperature. The ideal storage temperature is between 5 and 30^ . Store the electric tool in its original packaging.
GB

For EU countries only
Never place any electric power tools in your household refuse.
To comply with European Directive 2002/96/EC concerning old electric and electronic equipment and its implementation in national laws, old electric power tools have to be separated from other waste and disposed of in an environment-friendly fashion, e.g. by taking to a recycling depot.
Recycling alternative to the return request:
As an alternative to returning the equipment to the manufacturer, the owner of the electrical equipment must make sure that the equipment is properly disposed of if he no longer wants to keep the equipment. The old equipment can be returned to a suitable collection point that will dispose of the equipment in accordance with the national recycling and waste disposal regulations. This does not apply to any accessories or aids without electrical components supplied with the old equipment.
The reprinting or reproduction by any other means, in whole or in part, of documentation and papers accompanying products is permitted only with the express consent of the iSC GmbH.
Subject to technical changes
AR
e-mail. homeservice2008@hotmail.com
(Línea Eléctrica)
e-mail. servicyc@yahoo.com
Cali - Valle del Cauca
S.I.E. Service Solutions
Avenida Ferrocarril No. 32B 26, La Francia
Tel. +57 (8) 266 0606 - 2644013
e-mail. repuestos@sieservice.com
Servifer del Tolima
Carrera 4 Tamana No. 31 - 45, La Francia
Tel. +57 316 8084916
e-mail. sfdeltolima@gmail.com
La Dorada - Caldas
Tecnibobinados
Dir. Carrera 2 No. 20 - 71, Barrio Obrero
Tel. +57 312 2120634
e-mail.tecnobibinados-jair@hotmail.com
Leticia - Amazonas
Dir. Carrera 50 No. 41 – 90, Palace
Tel. +57 (4) 444 3215
e-mail.emergenciatecnica@hotmail.com
Granada - Meta
Dir. Carrera 2 No. 8 – 23, San Agustín
Tel. 314 4737985
E-mail. odilioval@hotmail.com
Monteria – Cordoba
CRG Servitools
Calle 38 No. 2 – 18, Centro
Tel. +57 322 6953118 - 304 5386810
e-mail. crgservitools@hotmail.com
Nariño - Pasto
Dir. Calle 19 No. 18 – 40 Local 10
Tel. +57 (2) 736 4645
e-mail. ceseelsas@gmail.com
Neiva – Huila
Dir. Carrera 7 No. 3 – 16, Centro
Tel. +57 (8) 872 2126
ventas@construequiposdelhuila.com
CO
Pereira – Risaralda
Electrocenter
Dir. Carrera 7 No. 29 - 33, Centro
Tel. +57 (6) 345 3689
e-mail. electrocenter_pereira@hotmail.com
Pitalito – Huila
Agrotec Pitalito
Dir. Carrera 6 No. 3 – 45, Ba Trinidad
Tel. +57 319 2604410
e-mail. agrotecpitalito@hotmail.com
Santa Marta – Magdalena
Comercializadora Metropolitana Ltda
Dir. Calle 11 No. 5 - 82, Centro
Tel. +57 (5) 431 4323
metropolitanacomercializadora@gmail.com
Saravena – Arauca
Cacharrería Acxel
Dir. Calle 27 No. 13 – 13
Tel. +57 (7) 882 1639
e-mail. cacharreriacxel@hotmail.com
Sincelejo – Sucre
Electroaires de la costa
Dir. Carrera 18 No. 23 – 67, Centro
Tel. +57 (5) 276 5031
e-mail. frioairescosta@hotmail.com
- E
- GB
- ⚠️ Important!
- Safety regulations
- Caution!
- Read all safety regulations and instructions.
- Keep all safety regulations and instructions in a safe place for future use.
- Safety information for polishing machines
- Layout and items supplied
- Layout (Fig. 1)
- Items supplied
- Important!
- Proper use
- Technical data
- Wear ear-muff s.
- Warning!
- Keep the noise emissions and vibrations to a minimum.
- Residual risks
- Before starting the equipment
- Operation
- Cleaning
- Maintenance
- Ordering replacement parts:
- Disposal and recycling
- Storage
- AR
- CO
Brand : EINHELL
Model : TC-PO 110
Category : Polisher