
FSFTPVR500 - Receiver BUSH - Free user manual and instructions
Find the device manual for free FSFTPVR500 BUSH in PDF.


| Product Type | Satellite TV Receiver with Recording |
| Brand | Bush |
| Model | FSFTPVR500 |
| Dimensions | 275 x 213.6 x 47.5 mm |
| Weight | 1152 g |
| Power Supply | 12V DC, 4A adapter (220-240V AC, 50-60Hz) |
| Power Consumption (max) | 40 W |
| Standby Power Consumption | <0.5 W |
| Hard Disk Capacity | 500 GB |
| Tuners | 2x LNB IN (F connector, 75 ohm) |
| Video Output | HDMI (1080p, 60fps) |
| Audio Outputs | Optical SPDIF, Analogue (headphone + CVBS) |
| Connectivity | Ethernet, Wi-Fi (2.4/5 GHz), 1x USB (5V 500mA) |
| Remote Control Range | 7 m max |
| Remote Control Batteries | 2x 1.5V Micro (R-03/AAA) |
| Supported Video Formats | MPEG-2, MPEG-4 HD, H.264, VC-1, DivX, MPEG-1, H.263 |
| Supported Audio Formats | Dolby Digital, Dolby Digital Plus, MPEG, MP3, WMA, AAC |
| Recording Features | Pause and rewind live TV (up to 2h), one-touch record, series recording, conflict resolution |
| On-Demand Services | BBC iPlayer, ITV Hub, BBC News, BBC Sport, Hopster (optional) |
| Parental Control | 4-digit PIN, adult channel hiding |
| Accessibility | Subtitles, audio description, sign language |
| Operating Temperature | 5°C to +40°C |
| Storage Temperature | -15°C to +55°C |
| Warranty | 12 months from original purchase |
Frequently Asked Questions - FSFTPVR500 BUSH
User questions about FSFTPVR500 BUSH
0 question about this device. Answer the ones you know or ask your own.
Ask a new question about this device
Download the instructions for your Receiver in PDF format for free! Find your manual FSFTPVR500 - BUSH and take your electronic device back in hand. On this page are published all the documents necessary for the use of your device. FSFTPVR500 by BUSH.
USER MANUAL FSFTPVR500 BUSH
Your
USER GUIDE
Welcome to Freesat.
INCLUDED WITH YOUR SMART TV RECORDER
√ Quality state of the art satellite TV receiver
√ Over 200 of your favourite channels
√ Picture perfect High Definition on selected channels
√ BBC iPlayer, ITV Hub, BBC News and BBC Sport app
√ Pay for a little extra telly if you want with Hopster
√ Catch up on the last 7 days of TV with a unique Roll Back TV Guide
√ Showcase (specially selected editorial TV picks)
√ Clever Recording – the smart way to organise your recorded shows
√ Easy plug and play set up
√ Free, expert customer support – visit freesat.co.uk/help or call 0345 313 0051
NEED A HAND?
If you need help anywhere along the way, just go to the Help & info menu on the Home screen or visit freesat.co.uk/help
Contents
| Basics | Safety precautions 2Setting up your Freesat box 4Your remote control 6On screen icons 7Home screen 8The TV Guide 9Your main controls 10 |
| See what's on TV | Seeing what's on - Now & Next 11 |
| Watching something on earlier 12 | |
| Planning what to watch later 13 | |
| Browsing whilst watching TV 14 | |
| Find out more about a programme 15 | |
| Find programmes by channel category 16 | |
| Finding and listening to radio channels 17 | |
| Setting a reminder 18 |
| Recordings | Recordings | 19 |
| Handy auto prompts | 20 | |
| See what you’ve set to record | 21 | |
| Find and watch a recording | 22 | |
| Recording playback controls | 23 | |
| Pick up a recording from where you left off | 24 | |
| Managing your recording space | 25 | |
| Pause and rewind live TV | 26 |
| Extras | Connect to the Internet | 27 |
| On Demand | 28 | |
| Showcase | 29 | |
| Search | 30 | |
| Controlling your children's viewing | 31 | |
| Hiding Adult channels | 32 | |
| Accessibility | 33 | |
| Specifications | 34 |
Safety precautions
Thank you for choosing this product. This manual will guide you for the proper operation of your set top box. Before operating the set top box, please read this manual thoroughly. Please keep this manual in a safe place for future reference. Read the corresponding instructions of this handbook prior to the first use of the device, even when the usage of electronic devices is familiar to you.
IMPORTANT - Please read these instructions fully before installing or operating.
Power Source
Always use the provided AC adapter.
Operate only from the power source specified on the AC adapter.
The power adapter may become hot during normal operation. This is not a malfunction.
Please make sure that the adapter is not covered while in operation. Leave a space of 15 cm (minimum) around the AC adapter.
The rating information and safety caution of the AC adapter are provided on the adapter.
WARNING: When the set is not in use for a long time, disconnect from the power.
Power Cord
Do not place the unit or a piece of furniture, etc., on the power cord, or pinch the cord.
Handle the power cord by the plug. Do not pull out the plug by tugging the cord and never touch the power cord when your hands are wet as this could cause a short circuit or electric shock.
Never make a knot in the cord or tie it with other cords. The power cords should be routed in such a way that they are not likely to be stepped on. A damaged power cord can cause fire or give you an electrical shock.
Check the power cord once in a while. If you find it damaged, ask closest service agent for help.
Position
Please do not place the unit in a place subject to direct sun light, excessive dust or mechanical shock or in a location near heat sources.
The device should be placed on a solid and safe base. Do not place the apparatus on a soft surface such as a rug that might block the ventilation holes on the bottom.
A location should not be selected such as a room with high humidity, as the condensation, arising in the kitchen for example, may cause malfunction or damage the device. Heating or other thermal radiation under the set also may cause malfunction or damage the device.
The hot air, which arises during the operation, should be ventilated with sufficient air circulation. Please do not put the device into closed areas and do not cover it.
Please avoid contact of the device with water or humidity. Do not put into operation near a bath or swimming pools.
Take care to provide good air circulation. Place the device in a location with adequate ventilation to prevent heat build-up in the device.
Should any solid object or liquid fall into the cabinet, unplug the device and have it checked by qualified personnel before operating it any further.
The device should not be exposed to dripping or splashing and no objects filled with liquids, such as vases, should be placed on the device.

CE
Batteries
CAUTION: Batteries should not be exposed to excessive heat such as sunshine, fire or the like.
WARNING: Incorrect installation of batteries may cause battery leakage and corrosion, resulting in damage to the remote control.
Do not mix old and new batteries, or batteries of different types.
Do not dispose of batteries in a fire.
Do not dispose of batteries with normal household waste, take to a local recycling centre.
CAUTION: Insert the batteries / rechargeable batteries in the correct polarity. Don't try to recharge non rechargeable batteries and under no circumstances throw them into fire. Danger of explosion.
Do not use unequal batteries (old and new, alkaline and carbon, etc.) simultaneously.
If you will not use the device for a long time, remove the batteries and store the device in a dry and dust free place.
Improper use of batteries may cause an explosion or leakage. If the batteries have leaked, use gloves and clean the appliance thoroughly with a dry cloth.
Markings on the Product
The following symbols are used on the product as a marker for restrictions and precautions and safety instructions. Each explanation shall be considered where the product bears related marking only. Note such information for security reasons.

Class II Equipment: This appliance is designed in such a way that it does not require a safety connection to electrical earth.

Class II Equipment With Functional Earthing: This appliance is designed in such a way that it does not require a safety connection to electrical earth, the earth connection is used for functional purposes.

Protective Earth Connection: The marked terminal is intended for connection of the protective earthing conductor associated with the supply wiring.

Hazardous Live Terminal: The marked terminal(s) is/are hazardous live under normal operating conditions.

Caution, See Operating Instructions: The marked area(s) contain(s) user replaceable coin or button cell batteries.
Class 1 Laser Product: This product contains Class 1 laser source that is safe under reasonably foreseeable conditions of operation.
WARNING: RISK OF ELECTRIC SHOCK

The lightning flash with arrowhead symbol, within an equilateral triangle, is intended to alert the user to the presence of uninsulated “dangerous voltage within” the product’s enclosure that may be of sufficient magnitude to constitute a risk of electric shock.
Setting up your Freesat box
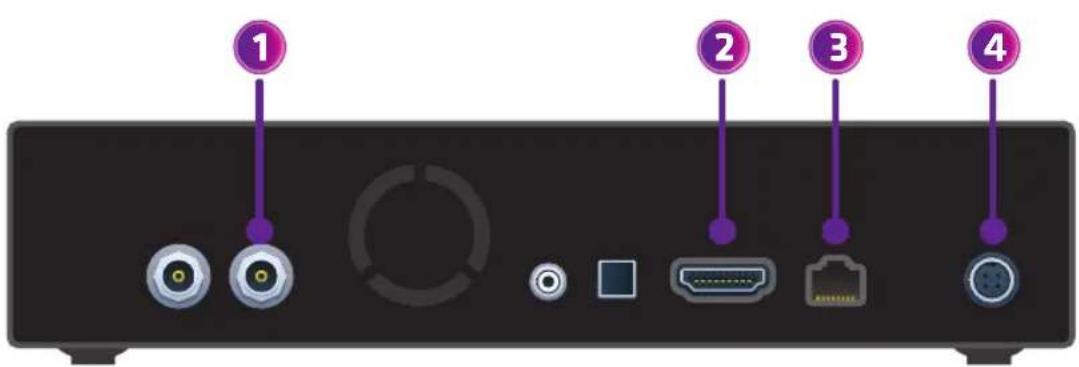
How to set up your box
-
With the power on your box turned off, screw in the cables from your satellite dish into the port(s) on the back of the box. If you want to record to this box please make sure you screw two cables into the box before turning it on. If you only screw one cable in, the box will not be able to record until two cables are screwed in and you change the set up from 'single' to 'dual' in Settings Freesat Channels menu, or do a Factory reset.
-
Now connect your box to your TV using the HDMI cable supplied.
-
Next, connect your box to your home broadband by plugging in an Ethernet cable, or connect to WiFi once the box is switched on.
-
Finally, plug the box in and switch it on at the socket.
Connect to your broadband
Connect your box to your home broadband to access great On Demand players and extra features like Showcase and the Roll Back TV Guide.
The best way to connect is with an Ethernet cable. Slot one end into the Ethernet port on the back of the box and the other into an Ethernet port on your router.
Alternatively you can connect to your home WiFi network once the box is switched on.
Press HOME, go to Settings then Network Connection and the box will show all available wireless networks. Select yours and enter your password using your remote control, and you're all set.
On-screen set up
Just follow the on-screen instructions to get set up. Here are a couple of tips.
Software updates
When the box is turned on for the first time it will search for software updates. If an update is available you can choose to install it immediately, but if you don't want to the box will automatically run the update later.
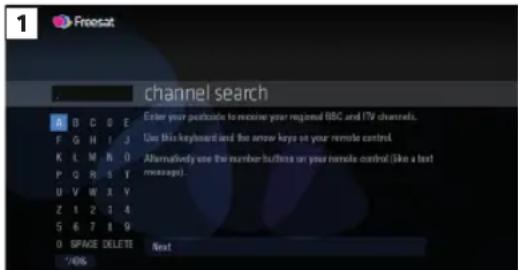
Enter your postcode
This will give you your local regional channels and news from the BBC and ITV. Enter your postcode using the on-screen keyboard and make sure you include the space (Screen 1).
Protect your children's viewing
Create a four digit PIN to control access to On Demand and recorded programmes that might be unsuitable for younger viewers. You can manage this once your box has been set up by pressing HOME, select Settings and then General Settings (Screen 2).

Your remote control
TV Standby – puts your TV in/out of standby
Recordings – goes to your recordings
TV Guide - opens and closes the TV Guide
Mute - silences audio
Volume – increase or decrease the sound level
MAIN CONTROLS
Up, down, left, right arrows – get around the TV Guide and menus
OK – confirm your selection
Back – goes back one step
Rewind - rewind up to x32 times faster
Record – records what you're watching or sets a recording in the TV Guide
List – sorts the TV Guide into channel categories
Number buttons - to enter channel numbers
Sub - turns subtitles on or off

Standby – puts the box into standby and switches it on again
AV - changes the input source on your TV
On Demand – takes you to our Catch Up players
Showcase – our top picks for what to watch
Channel switcher - change the channel up or down, or move through the TV Guide quickly
Info - gives you more info about a programme
Home - takes you to the Home screen
Exit - returns to live TV
Fast forward - fast forward up to x32 times faster
Play, pause, stop - start and stop live TV, recordings and On Demand
Colour buttons – gives you more options on screen
AD - turns audio description on or off
On screen icons
ON SCREEN ICONS RECORDING ICONS

may contain material with adult themes

to be deleted soon

subtitles available

kept (won't be deleted)

audio description available

unwatched

shown with sign language

part watched

surround sound available

series recording set

High Definition

recording set

an HD version also available

recording failed

reminder

watch from the start

part of a series

film
Home
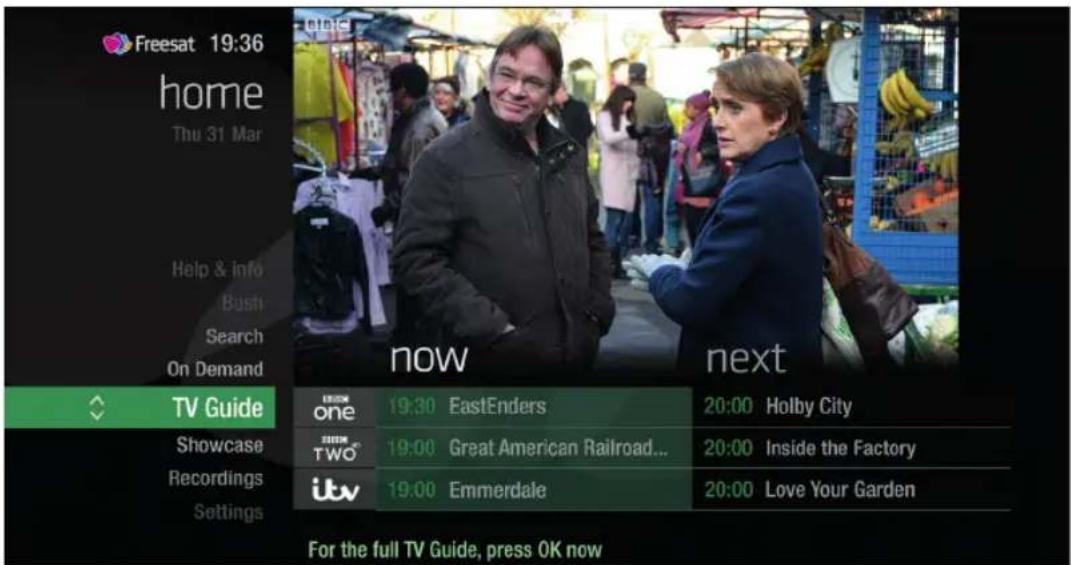
The Home screen will take you anywhere you want to go. Press HOME
Home takes you to:
TV Guide
See what's on Now & Next.
Showcase
The Freesat team's picks of what to watch this week and what's available On Demand.
Recordings
Record a show or entire series at the touch of a button, all easy to find in the Recordings section.
Settings
Manage your settings for language, internet connection, channels, parental control and more. You can also view system information about your box.
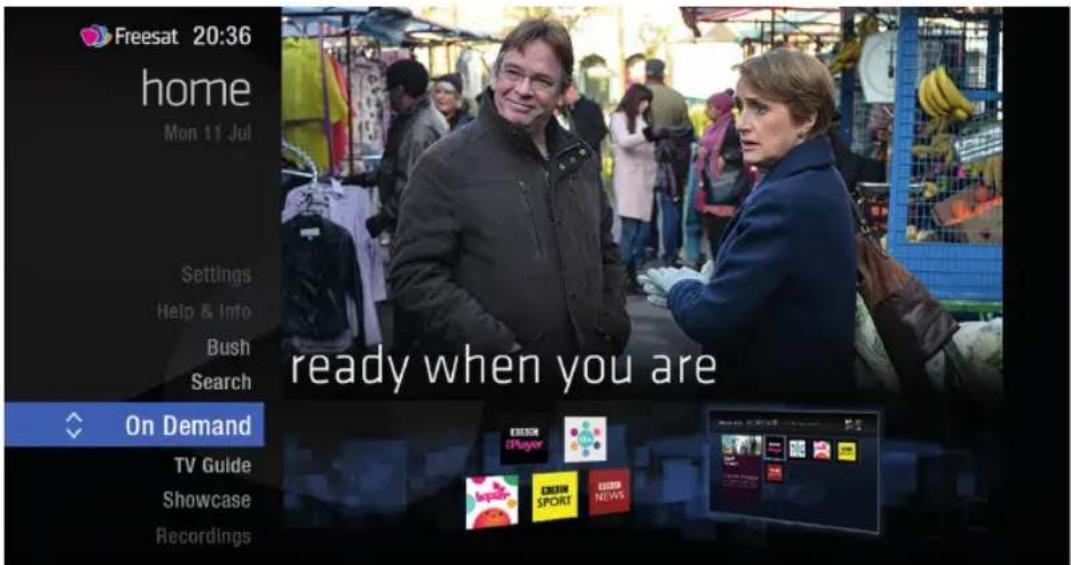
On Demand
The best Catch up TV and On Demand services full of TV favourites ready to watch when you are. Your Freesat box will need to be connected to the Internet. (see page 27).
Search
Quickly find a programme without trawling the TV listings.
Help & info
Tips on making the most of your Freesat box, and info about services for visually impaired and hard of hearing viewers.
The TV Guide

See what's on the minute you sit down with our at a glance 'Now & Next' view.
Press TV GUIDE
Use to explore:
- what's on 'Now & Next'
- what's coming up in the next 7 days
- what's been on already but is available for catch up
later
earlier
Your main controls
These buttons can get you everywhere.
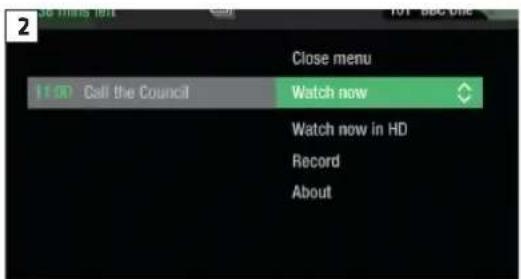
Press OK on a programme in the TV Guide and all the available options for that specific programme will be listed.
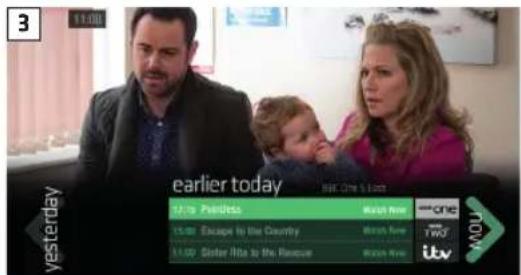
So if a programme is on live TV now, highlight it in the TV Guide, press OK and the Action Menu will look like screen 2.
If the programme is on later, you'll be able to Set reminder, or Record it (Screen 3).
Press 🔊 to scroll through the options and OK to select.

natural_image
Close-up of a remote control knob with 'OK' and 'P' buttons, no readable text or symbols beyond the indicator.

TOP TIP
Pressing OK on a programme brings up all the available options.
Seeing what's on - Now & Next

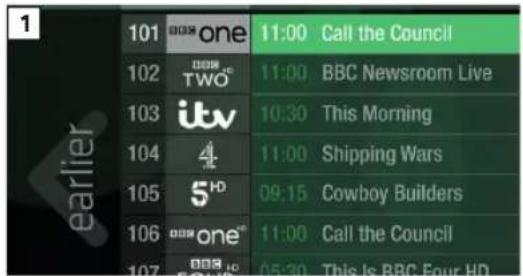
The TV Guide shows what's on now and next in an 'at a glance' view.
Press TV GUIDE
To move through the channels, use
To move through the channels a page at a time, press P and P
To move forward and back 24 hours, press and
As you browse through the guide, you can find out more about a programme and see a full description by pressing i
Highlight a programme and press OK and choose Watch now (Screen 2).
At any stage to go back to watching TV full screen, press EXIT
TOP TIP
If you know the channel number, jump straight to it in the TV Guide with the number buttons.
Watching something on earlier <
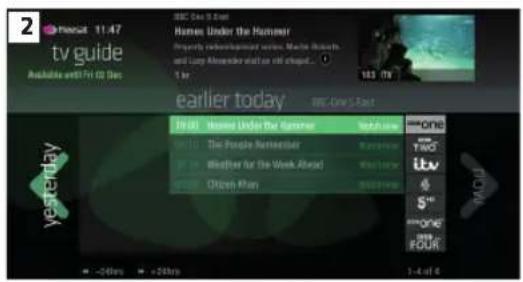
You can catch up on the last 7 days of TV with our Roll Back TV Guide.
This is available on selected channels with On Demand services on Freesat. Look out for earlier highlighted in the TV Guide where this is available.
Press ◆ to see programmes from earlier on today, ready to watch whenever you are (Screen 2).
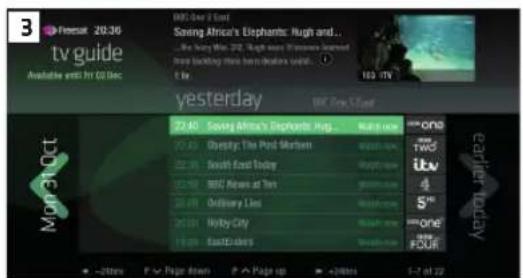
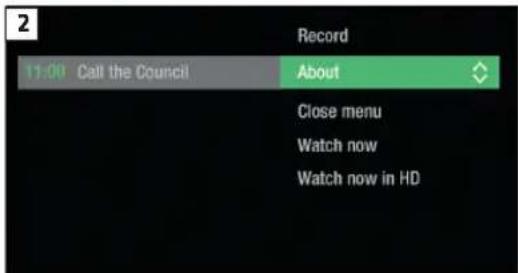
You can go back up to 7 days by continuing to press 📋 (Screen 3).
Highlight a programme you want to watch and press OK
To go back to the live TV Guide, continue to press
To go back to watching TV full screen, press EXIT
Planning what to watch later >
To plan your viewing a bit further ahead, the full TV Guide has listings for the next 7 days.
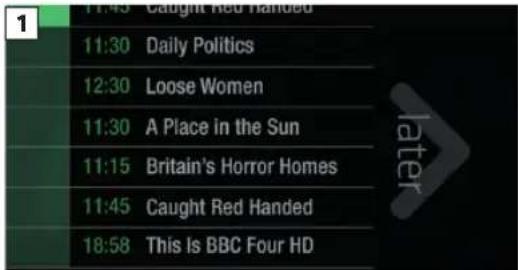
Use to browse programmes that are on 'later' (Screen 1).
For the full TV guide press 📋 again (Screen 2).
To move forward and back 24 hours, press and
You can plan your viewing for up to a week in advance, setting reminders and recordings.
To clear the Guide press EXIT

TOP TIP
To fast scroll through the TV Guide, press and hold
Browsing whilst watching TV

You don't have to stop watching TV to see what else is on. For a quick snapshot of what's on now and next, press any of the buttons.
To see what's on other channels, press (Screen 2).
Browse programmes on earlier today by pressing ⚙ and what's on later by pressing ⚙ (Screen 3).
You can set reminders and recordings here by pressing OK
To go back to watching live TV full screen, press EXIT

TOP TIP
Press INFO to see the programme description.
Set a programme to record with one touch by pressing 📄
Find out more about a programme
Programmes come with extra info to help you decide whether to watch them.
To see the programme info, highlight the programme in the TV Guide. A short description will then show in the info area next to the mini TV (Screen 1). Press the ⓘ button to see a longer description.
To see the full programme description, press OK for the Action Menu (Screen 2).
Select About
Here you'll find more information on the programme including when it is showing again and other episodes (Screen 3).
ON SCREEN ICONS
You may see these in the info area
Definition
an HD version also available
3D 3D
Gay contain material with adult themes
audio description available
reutitles available
SLwn with sign language
surround sound available


Find programmes by channel category

In the mood for a movie, or need your next news fix? Jump straight to that group of channels in the TV Guide by pressing LIST on your remote control (Screen 1).
Use 🔒 to choose the type of channel you're looking for, and press OK (Screen 2). You'll then only see the channels within that category in the TV Guide.

Finding and listening to radio channels

Freesat 11:06
tv guide
ide
Today
BBC Radio 1
The Matt Edmondson Show
Everything you would expect from Scott Mills, just with Matt Edmondson...
38 mins left


Close menu
11:00 The Matt Edmondson S..
Listen now

Record
About
Find the radio channels in the TV Guide
quickly by pressing
LIST, then use

and select Radio.
To listen to a radio programme, highlight it in the TV Guide and press OK
You can choose to
Listen now, Set reminder
or Record just like a TV programme.
TOP TIP
Radio channels start at Channel 700
Setting a reminder

Worried you'll miss a programme? Well worry no more. You can set a reminder from the TV Guide or while watching live TV.
From the TV Guide (Screen 1).
Highlight the programme, you want to set a reminder for, press OK and select
Set reminder
While watching live TV (Screen 2).
Highlight a programme, press OK and select Set reminder
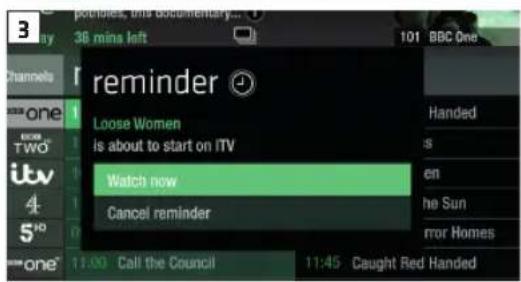
The reminder prompt will appear on screen 30 seconds before the programme starts, and will then auto tune to the channel (Screen 3).

TOP TIP
To cancel a reminder, press
BACK
when the prompt is on screen.
Recordings

Ways to record
1) one touch record from live TV
To record the programme you're watching now, press
2) from the Now & Next banner
Highlight the programme you want to record, press 📄
3) from the TV Guide
Highlight the programme you want to record, press 📐
4) from Showcase
Record any of the upcoming programmes in Showcase by pressing OK and selecting Record
5) from Search
Record straight from the Search results, by pressing OK and selecting Record
Multi tasking
Your Freesat box can record one channel while you watch another. Or you can record two different channels, and play back a recording you made earlier.
The box will need to be connected to the satellite dish with two cables. If you only use one cable, this feature won't be available.
Pressing standby while recording won't stop the recording. Your Freesat box will go into standby when the recording has finished.
Record from when you started watching
Your Freesat box automatically saves up to 30 mins of the channel you're watching, even if you're not recording.
So if you decide that you want to record a programme part way through, press and it will record from the point you tuned to that channel.
Handy auto prompts

Recording a series
If the programme is part of a series, you'll be asked whether to set the whole series to record (Screen 1).
HD alternative
If the programme is also on in HD, you'll be asked whether to record the High Definition version.
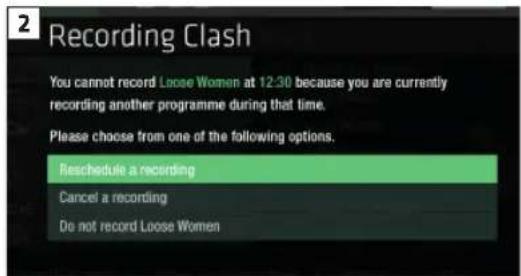
Solving a recording conflict
Your Freesat box can help you solve the recording conflict by trying to find an alternative airing in the TV listings (Screen 2).
See what you've set to record
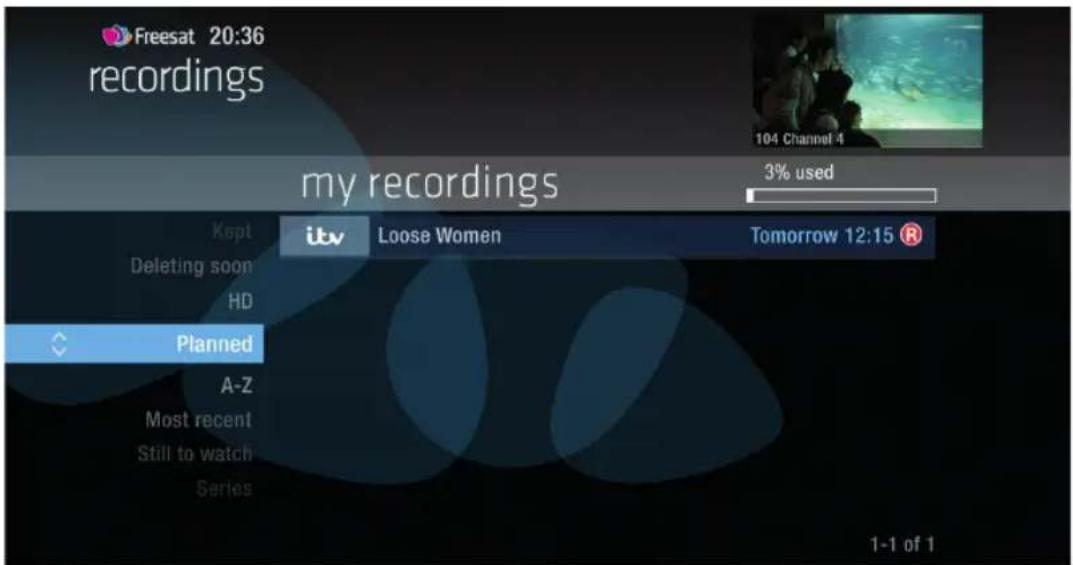
Press RECORDINGS on your remote control and navigate to the 'planned' section.
All the programmes you've set to record are listed chronologically by the recording date.
When a programme is being recorded or is set to record the recording icon R will appear next to it in the TV guide.
R shows the programme is part of a part of a series recording. All episodes will be recorded and stored together.
RECORDING ICONS
to be deleted soon
kept (won't be deleted)
unwatched
part watched
R series recording set
R recording set
recording failed
watch from the start
Find and watch a recording

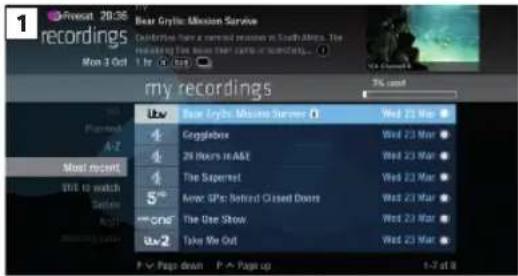
Press RECORDINGS (Screen 1).
All the programmes you've recorded are stored here. You can choose how they're listed, such as by date Most recent alphabetically A-Z or not watched yet Still to watch
Highlight the programme you want to watch, press OK and select Watch now (Screen 2).

Recording playback controls

PLAY
To start watching a recording, highlight the recording, press OK and select Watch now
FAST FORWARD AND REWIND
Press 🏠 or ➕ to shift to a different place in the recording (Screen 1).
You can choose different speeds, up to 32x by pressing or repeatedly.
PAUSE
Press 📄 to freeze the screen while you're playing, fast forwarding or rewinding a programme.
STOP
To return to your Recordings, press
Pick up a recording from where you left off
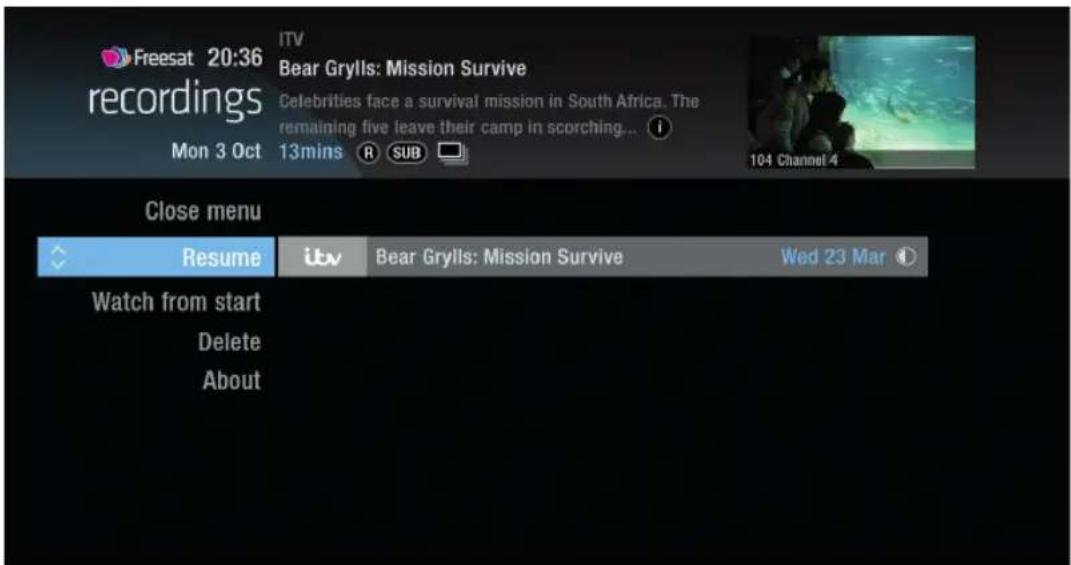
If you want to go back to a recording you stopped halfway through, highlight the recording and press OK
You'll have the option to:
Watch from start or Resume. Resume will play from the point you left off.
Checking your remaining viewing time
See how long you have left to watch by pressing any of the arrow buttons.
Managing your recording space
You can see how much space there is left for new recordings using the bar at the top of the Recordings screen. It's worth remembering that high definition (HD) programmes use more recording space than standard definition (SD) programmes.
Recording space
Your box will automatically delete the oldest watched recording if there's not enough space for a new recording.
Programmes that are next in line to be deleted are shown in the folder 'deleting soon'.
Deleting a recording
Press RECORDINGS
Highlight the recording you want to delete, press OK and select Delete from the list.
If the recording is part of a series you also have the option to delete all recorded episodes.
Keeping your recordings
Press RECORDINGS
Highlight the recording you want to protect from being deleted, press OK and select Keep from the list. The Keep icon K will be added to the recording (Screen 2).
All 'Kept' recordings are shown in their own folder.

Pause and rewind live TV

Pause the action and pick up where you left off, and rewind the best bits again and again.
Pause live TV
To pause the programme you're watching, press Ⓐ
You can pause live TV for up to two hours.
When you're ready to watch again, press ▶
After two hours on pause your box will automatically start to play from the point that you paused the TV.
Rewind live TV
To rewind the programme you're watching, press
To return to live TV from pause playback and rewind playback press EXIT
Connect to the internet
1

Connect to the Internet and open up a whole new part of the TV Guide.
You'll be able to Roll Back through the TV Guide on some channels to catch up on programmes you've missed over the last 7 days. You'll also be able to enjoy the On Demand services on Freesat.
Minimum 2Mbps broadband speed required.
The best way to connect is with an Ethernet cable. Slot one end into the Ethernet port on the back of the box, and the other end into an Ethernet port on your router (Illustration 1). That's it, you're connected.
If your router is too far away to use a cable, you can connect to your home Wi-Fi network. The box will automatically display available Wi-Fi networks and you'll just need to enter your password.
Or, try using a pair of Homeplug Adapters. They're a safe and convenient way to access the Internet around your house using the electrical wiring.
Free
On Demand Players
BBC
iPlayer

BBC
SPORT
BBC
NEWS
Optional Pay
On Demand
Player

On Demand
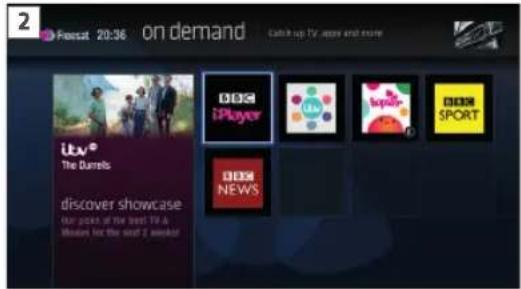
Find hundreds of hours of programmes ready to watch whenever you want.
Press HOME on your remote control.
Go to On Demand, and press OK to see all available On Demand services. (Screen 2).
Use 📋 → 🏠 → to browse through the On Demand services and OK to select.
Whilst watching an On Demand programme, you can use the playback buttons ▶ and □, just like a recording.
On Demand programmes are not available to record.
NEED TO KNOW
Your Freesat box needs to be connected to the Internet.
Showcase
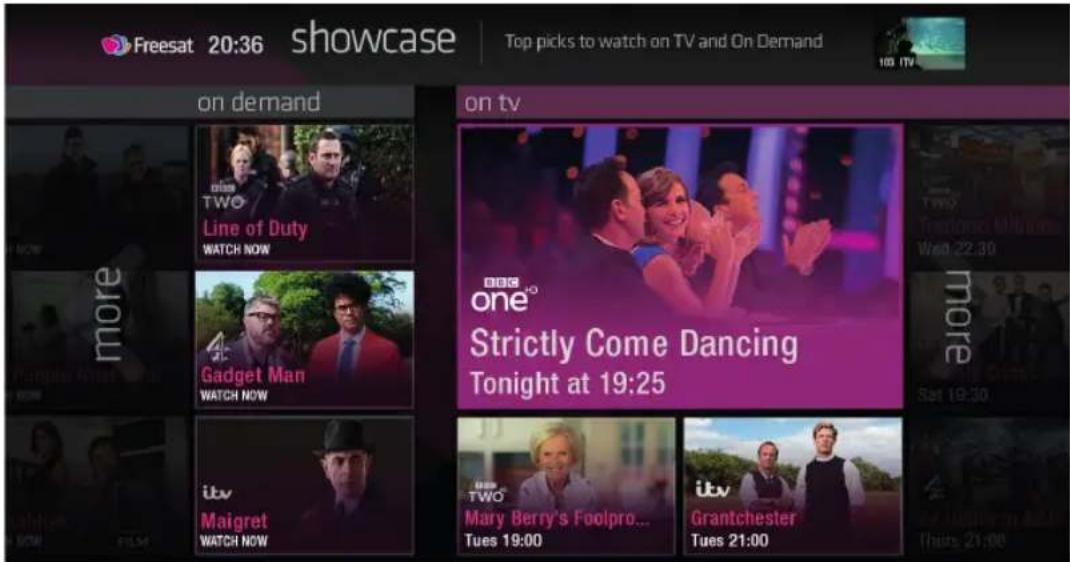
The Freesat team's picks of what to watch this week and what's available On Demand.
To visit Showcase, press HOME on your remote control then select Showcase
Use 📄 🐃 🐃 to explore the Showcase picks. You can also filter the picks using the genre categories.
Select a show and press OK. You'll then have the option to watch a programme from On Demand, or to set a recording from the On TV section.
TOP TIP
Showcase is divided in to two sections.
On the left are programme picks you may have missed and are available to watch On Demand.
On the right are upcoming shows that you may want to watch, or set a recording for.
Search

With so much great TV to choose from, we've made it easy to find what you're looking for.
Press HOME, and then select Search
Use the arrows on your remote control to highlight a letter and to select. Results will appear once you've entered three letters.
You can filter the search results by TV or Radio, or by any channel category.
Once you've found the programme you're looking for, highlight it and press OK. You'll be given all the options available for that specific programme, including
Watch now or Record
TOP TIP
- You can leave out common words from the search, like 'the', 'a', 'an, 'with' 'of'.
There's no need to include hyphens or apostrophes.
■ To clear the search bar and start again, press Back
Controlling your children's viewing

Freesat
20:36
settings
Parental Control
Set up and manage your Freesat PIN and parental control settings.

parental control
Enter new PIN.
Close menu
Enter new PIN:
Change Parental PIN
Set Parental Controls
Confirm new PIN:

Some programmes after the 9pm watershed may not be suitable for children. By setting a four digit PIN you can lock recordings of these programmes to stop them being played back without your permission.
TOP TIP
Once you've set your PIN, you can also block adult channels from appearing in the TV Guide.
Setting your four digit PIN
When you first set up your box, you'll be asked to create your four digit PIN.
You can change your PIN code at any time by selecting HOME, followed by Settings and then Parental Controls
You can restrict viewing of On Demand programmes in the same way.
This can either be done by following the prompts during the first time installation process, or by visiting Home, Settings then going to General Settings
Hiding Adult channels

You can hide all channels classified as 'Adult' from the TV Guide. Press HOME, and then select Settings and then
Parental controls
Here you have the option to hide all Adult channels from the TV Guide.
Turning off all PIN controlled restrictions
You can turn off all PIN restrictions by selecting HOME, followed by Settings and then Parental Controls
Accessibility
These services make programmes available to visually impaired and hard of hearing customers.
Digital subtitles, audio description and signed programmes are provided by the broadcasters, but whenever they are available Freesat customers can use them.
Digital subtitles
Subtitles are a text version of the dialogue in a programme. Look out for SUB in the TV Guide which indicates they are available for that programme.
To turn subtitles on while watching live TV, press SUB. To turn them off, press SUB again.
Audio description
Audio description is an additional audio service which describes what is happening on screen, including language, movements, actions and expressions. Look out for AD icon in the TV Guide which indicates they are available for that programme.
To turn audio description on while watching live TV, press AD. To turn it off, press AD again.
Signed programmes
Some broadcasters provide a signed version of popular programmes for hard of hearing viewers. Look out for SL in the TV Guide which indicates it is a signed programme.
Specifications
General
Power supply for set-top box: 12V DC 4Amp
Preferred DC Adapter 220 - 240 V AC, 50-60Hz
Input Frequency: 950 MHz - 2150 MHz
Frequency Band: Ku band reception: 10.7 - 12.7 GHz
Maximum Power consumption: 40 W
Standby Power Consumption: <0.5 W
Operating temperature: 5°C to +40°C
Storage temperature: -15°C to +55°C
Humidity: 25 to 75 % rel
Physical dimensions: 275 x 213.6 x 47.5 mm
Weight: 1152g
Hardware configuration
Main Processor: BCM7356
Flash Memory: 512 MB
DDRRAM: 1GB (2x256Mx16)
Digital capabilities
Transmission Standards: MPEG2, MPEG4 HD DVB S/S2
Frequency Band: Ku band reception: 10.7 - 12.7 GHz
Demodulation
Modulations: QPSK/8PSK
QPSK rates: 1/4, 1/3, 2/5, 1/2, 3/5, 2/3, 3/4, 4/5, 5/6, 8/9, 9/10
8PSK rates: 3/5, 2/3, 3/4, 5/6, 8/9, 9/10
Video
ALL MPEG-4 (part 10) MP@ML Video Decoder
Aspect Ratio: 4:3, 16:9 with pan vector
Profiles
• H.264/AVC Main and High profile to Level 4.2, 1080p 60 fps
• MVC Level 4.1, two view (L + R)
• VC-1 Advanced Profile @ Level 3
• VC-1 Simple and Main profile
- MPEG-2 Main Profile @ Low Level, Main Level, and High Level - MPEG-4 Part 2 Simple Profile and Advanced Simple Profile
• DivX 3.11, 4.1, 5.X, and 6.X
• AVS1-P2 Jizhun Profile @ Level 6.0
• MPEG-1
• H.263 Profile 0, Level 70
Audio
- AAC LC, AAC LC+SBR Level 2, AAC+Level 2, AAC+Level 4
• Dolby Digital®, Dolby Digital Plus™ – MPEG I Layer 1, 2
• MPEG I Layer 3 (MP3)
• Windows Media Audio (WMA)
- WMA pro - AAC HE 5.1 decode plus DTS 5.1 encode SPDIF output
- AAC HE 5.1 decode plus AC3 5.1 encode SPDIF output
- MP3 encoding
Sampling frequencies supported: 16 kHz, 32 kHz, 44.1 kHz, and 48 kHz
Output can be programmed as STEREO, LEFT only or RIGHT only (on both outputs). This is useful for dual mono channels in order to select the correct sound track, which is stored for every channel.
Remote control
Operating Distance: 7 m Max
Batteries: 2x1.5V Micro (R-03/AAA)
Tuners
2 X LNB IN: F connector, Female (75 ohm)
LNB power supply
• Vertical : 13/14 Volt
• Horizontal : 18/19 Volt
• Max. Output Current : 300mA (Short-circuitprotected)
• 22 kHz Tone: Frequency 22KHz
± 2 KHz: Amplitu de 0.6 Vpp ± 0.2 Vpp
USB Power supply
- 1x USB port
- 5V @ 500mA max
Hard disk
Hard Disk capacity: 500GB
Front panel
Display: 8-digit VFD display
Control Keys: On/ Off, Left, Right, Up, Down
Audio
Output 2 Vrms, 0 dBfs / Z = 10 kohm
Digital audio
Output Optical SPDIF
A / V & data in / out
Analogue Audio Output: Headphone (left and right + CVBS)
Digital Audio Output: Optical output
Wireless LAN Transmitter Specifications
Frequency Ranges & Max Output Power
• 2400 - 2483,5 MHz
(CH1-CH13) < 100 mW
• 5150 - 5250 MHz
(CH36 - CH48) < 200 mW
• 5250 - 5350 MHz
(CH52 - CH64) < 200 mW
• 5470 - 5725 MHz
(CH100 - CH140) < 200 mW
Country Restrictions
This device is intended for home and office use in all EU countries (and other countries following the relevant EU directive) without any limitation except for the countries
Hard disk information
mentioned below.
Bulgaria: General authorisation required for outdoor use and public service
France: In-door use only for 2454-2483.5 MHz
Italy: If used outside of own premises, general authorization is required
Greece: In-door use only for 5470 MHz to 5725 MHz band
Luxembourg: General authorization required for network and service supply (not for spectrum)
Norway: Radio transmission is prohibited for the geographical area within a radius of 20 km from the centre of Ny-Ålesund
Russian Federation: In-door use only
The requirements for any country may change at any time. It's recommended that the user checks with local authorities for the current status of their national regulations for both 2.4 GHz and 5 GHz wireless LAN's.
Important - Hard Disk Information
This box has a built in hard disk (HDD) for recording and playback. Please be aware of the following points when setting up and using the Recorder. Failure to observe these precautions may cause damage to the HDD itself or its content, failure of the disk to operate, or record sound.
- Do not subject the Recorder to any vibration or impact.
- Do not place the Recorder in a cramped location which might block the ventilation port on the back of the Recorder.
- Do not place the Recorder in a location with severe temperature variation.
• If the Recorder is set up in a location with severe temperature variation, condensation may form on and inside the Recorder.
If the Recorder is used when condensation is present it may cause damage to the HDD resulting in malfunction. We recommend keeping variation in room temperature within 10°C per hour.
- Do not place the Recorder in a location with high humidity.
- Place the Recorder horizontally, never at an incline.
- Do not place a magnetic device (magnet etc.) close to the recorder.
- When the power is on, do not unplug the AC adapter from the AC outlet.
- When moving the Recorder, first turn off the power and then unplug the power cord from the AC outlet.
Recording Format
HDD recording is done using the variable bit rate format (VBR) for more efficient recording. The following may occur:
- With the variable bit rate format, the remaining amount of recordable space may increase or decrease relative to the display of the remaining amount of HDD space.
- With auto delete turned on, your box will replace the oldest recordings first when it runs out of recording space, so that you can record new programmes.
- Kept recordings will never be deleted by the auto delete process.
• Even if you delete a programme, the remaining amount may not increase by the amount of deleted time.
Unrecordable Material
In the unlikely event that there is some problem like loss of
recorded video or audio content due to an HDD malfunction, please be aware beforehand that Bush will bear no responsibility to compensate for the content which could not be recorded or edited, for the loss of recorded or edited video, or for other related direct or indirect damages.
If a power failure occurs
• The content being recorded or set to record may not complete if power failure occurs.
• The content being played back may be damaged.
For important recording
NOTE
- If a message indicating an HDD error is displayed (such as "ERROR IN HDD. CANNOT OPERATE.") and the HDD has malfunctioned, you cannot replace the HDD by yourself. If you disassemble the Recorder, the warranty will become void. Also, recovery of data is impossible.
Hard Disk Operation (Recording / Playback / Time Shift Recording)
If the Recorder is used in a cold location, the drive will only allow live viewing after power is turned on until the HDD is ready. During this time, the Recorder will not allow Time Shift Viewing, recording, display of recording lists or playback of recorded programmes. Please wait until the HDD is ready.
EN: Hereby, VESTEL Elektronik Sanayi ve Ticaret A.Ş., declares that the radio equipment type SET TOP BOX is in compliance with Directive 2014/53/EU. The full text of the EU declaration of conformity is available at the following internet address: doc.vosshub.com
This product is guaranteed against manufacturing defects for a period of

Year
This product is guaranteed for twelve months from the date of original purchase. Any defect that arises due to faulty materials or workmanship will either be replaced, refunded or repaired free of charge where possible during this period by the dealer from whom you purchased the unit.
The guarantee is subject to the following provisions:
- The guarantee does not cover accidental damage, misuse, cabinet parts, knobs or consumable items.
- The product must be correctly installed and operated in accordance with the instructions contained in this manual.
- It must be used solely for domestic purpose.
- The guarantee will be rendered invalid if the product is re-sold or has been damaged by inexpert repair.
- Specifications are subject to change without notice.
- The manufacturer disclaims any liability for the incidental or consequential damages.
- The guarantee is in addition to, and does not diminish your statutory or legal rights.
- In the event of a problem with the product with in the guarantee period call the Customer Helpline: 0345 604 0105.
Guarantor: Argos Ltd
489 - 499 Avebury Boulevard
Central Milton Keynes
MK9 2NW
KEEP IN TOUCH

Online
Keep up to date www.freesat.co.uk
Follow us www.twitter.com/Freesat_TV
Find us www.facebook.com/Freesat

Email updates
Sign up to be the first to find out what's on, and hear about new channel and On Demand player launches, competitions and the latest offers.
Register at www.freesat.co.uk/keepintouch
We promise to only send you interesting and entertaining news and TV reviews, and we'll never pass on your personal details to anyone you don't want us to.

Support
For help with installation or using your new Freesat box, call us on 0345 313 0051 (local call rate) or visit www.freesat.co.uk/help
Argos helpline 0345 604 0105 Visit www.argos-support.co.uk
The Freesat App
Plan on the go so you never miss your favourite shows again. Find out more at www.freesat.co.uk/app




Freesat
If you have any questions about set up, installation or Freesat the team are here to help 0345 313 0051 customerteam@freesat.co.uk

For any technical queries the Bush team are here to help 0345 604 0105

- Your
- USER GUIDE
- Welcome to Freesat.
- INCLUDED WITH YOUR SMART TV RECORDER
- NEED A HAND?
- Contents
- Safety precautions
- IMPORTANT - Please read these instructions fully before installing or operating.
- Power Source
- Power Cord
- Position
- Batteries
- Markings on the Product
- WARNING: RISK OF ELECTRIC SHOCK
- Setting up your Freesat box
- How to set up your box
- Connect to your broadband
- On-screen set up
- Software updates
- Enter your postcode
- Protect your children's viewing
- Your remote control
- MAIN CONTROLS
- On screen icons
- ON SCREEN ICONS RECORDING ICONS
- Home
- TV Guide
- Showcase
- Recordings
- Settings
- On Demand
- Search
- Help & info
- The TV Guide
- Your main controls
- TOP TIP
- Seeing what's on - Now & Next
- Press TV GUIDE
- Watching something on earlier <
- Planning what to watch later >
- Browsing whilst watching TV
- Find out more about a programme
- Select About
- Find programmes by channel category
- Finding and listening to radio channels
- Setting a reminder
- From the TV Guide (Screen 1).
- While watching live TV (Screen 2).
- Ways to record
- 1) one touch record from live TV
- 2) from the Now & Next banner
- 3) from the TV Guide
- 4) from Showcase
- 5) from Search
- Multi tasking
- Record from when you started watching
- Handy auto prompts
- Recording a series
- HD alternative
- Solving a recording conflict
- See what you've set to record
- RECORDING ICONS
- Find and watch a recording
- Press RECORDINGS (Screen 1).
- Recording playback controls
- PLAY
- FAST FORWARD AND REWIND
- PAUSE
- STOP
- Pick up a recording from where you left off
- Checking your remaining viewing time
- Managing your recording space
- Recording space
- Deleting a recording
- Keeping your recordings
- Pause and rewind live TV
- Pause live TV
- Rewind live TV
- Connect to the internet
- NEED TO KNOW
- Controlling your children's viewing
- parental control
- Setting your four digit PIN
- Hiding Adult channels
- Parental controls
- Turning off all PIN controlled restrictions
- Accessibility
- Digital subtitles
- Audio description
- Signed programmes
- Specifications
- General
- Hardware configuration
- Digital capabilities
- Demodulation
- Video
- Profiles
- Audio
- Remote control
- Tuners
- LNB power supply
- USB Power supply
- Hard disk
- Front panel
- Digital audio
- A / V & data in / out
- Wireless LAN Transmitter Specifications
- Country Restrictions
- Hard disk information
- Important - Hard Disk Information
- Recording Format
- Unrecordable Material
- If a power failure occurs
- For important recording
- NOTE
- Hard Disk Operation (Recording / Playback / Time Shift Recording)
- KEEP IN TOUCH
- Online
- Email updates
- Register at www.freesat.co.uk/keepintouch
- Support
- The Freesat App
- Freesat
Brand : BUSH
Model : FSFTPVR500
Category : Receiver