
CDVBT2 - Receiver BUSH - Free user manual and instructions
Find the device manual for free CDVBT2 BUSH in PDF.


| Brand | Bush |
| Model | CDVBT2 |
| Product Type | Digital Terrestrial Receiver (Set-top box) |
| Dimensions (approx.) | 150 x 100 x 30 mm |
| Weight (approx.) | 0.5 kg |
| Power Supply | AC 100-240V, 50/60Hz |
| Power Consumption | 5W (typical), <1W in standby |
| Supported Standards | DVB-T2, DVB-T, MPEG-4, MPEG-2 |
| Output Interfaces | HDMI, SCART (if present?), Composite AV |
| Input Interface | RF Antenna Input (F-type) |
| Additional Ports | USB 2.0 for media playback, SD card slot (if applicable) |
| Remote Control | Yes (included) |
| Signal Decoding | Free-to-air channels |
| Timeshift Recording | Supported via USB storage |
| Electronic Program Guide (EPG) | Yes, for 7 days |
| Parental Lock | Yes |
| Maintenance | Keep ventilated; clean with dry cloth; avoid moisture |
| Safety | Do not cover; disconnect during storms; use specified adapter |
| Spare Parts & Repairability | Contact Bush support; no user-serviceable parts inside |
| General Information | Compact design; suitable for most TVs with HDMI or AV input |
Frequently Asked Questions - CDVBT2 BUSH
User questions about CDVBT2 BUSH
0 question about this device. Answer the ones you know or ask your own.
Ask a new question about this device
Download the instructions for your Receiver in PDF format for free! Find your manual CDVBT2 - BUSH and take your electronic device back in hand. On this page are published all the documents necessary for the use of your device. CDVBT2 by BUSH.
USER MANUAL CDVBT2 BUSH
natural_image
Exterior view of a black BUSH Freeview HD DV312 router device (no visible text or symbols on body)You'll soon be enjoying your new Set top box.
It all begins here, with your instructions. Don't worry, there's nothing too technical coming up. Just simple, step-by-step guidance to get you up and running quickly. Sound good? Then let's get started.
Help and Guidance
We're here to help you get the most from your Set top box. Should you require any guidance, a simple solution can often be found online at:
www.argos-support.co.uk
If you still require further assistance, call one of our experts on 0345 604 0105.
Contents
1 Safety information
Safety information 6
2 Getting to know your Set top box
Ready? Let's begin 8
Accessories 8
Functions and features 9
Preperations 11
Connecting a HD TV 11
Connecting a non-HD TV 12
Fitting the remote batteries 12
3 Using your Set top box
First time installation 15
Turning on the set top box 15
Switching between TV and radio 15
Changing channels 15
Using the channel list 16
Channel search 16
Channel banner 16
Adjusting the volume 17
Mute 17
Subtitles and audio descriptions 17
Using the electronic program guide 17
Favourites list 18
Using the favourites list 18
Channel organiser 19
Teletext display 19
Aspect ratio adjustment 19
Audio adjustment 19
3 Using your Set top box
Changing resolution (HDMI only) 19
Advanced menu options 20
System settings 20
language settings 20
Video settings 20
Audio settings 20
Advanced settings 21
Software upgrade 21
System configuration 21
Installation 22
4 Other information
Technical specification 25
Care & maintenance 25
5 Product support
Troubleshooting 28
Help and assistance 30
Disposal 31
Guarantee 32
This page is left intentionally blank
1 Safe

natural_image
Abstract geometric pattern composed of gray triangles and squares on a white background (no text or symbols)
Safety information
Important - Please read these instructions fully before installing or operating
Power source

- This symbol means that this unit is double insulated. An earth connection is not required.
- The appliance must be connected to a 100-240 volt 50/60Hz AC supply by means of a three pin socket.
- Unplug this apparatus during lightning storms or when unused for long periods of time - to prevent damage to this product.
- Opening or removing covers may expose you to dangerous voltages or other hazards.
• To prevent risk of fire or electric shock, avoid overloading wall outlets, extension cords, or integral convenience receptacles. - Use suitable power sources - Plug the product into a suitable power source, as described in the operating instructions or as marked on the product.
- The supply voltage should be the same as that indicated in the technical specifications and the appliance rating plate.
- If the socket outlets in your home are not suitable for the mains adapter supplied with this unit check with a qualified electrician for replacement.
- In order to disconnect the apparatus from the mains completely, switch off the outlet and remove the mains plug completely.
- Do not bend, stretch or pull the supply cable in order to avoid electric shock.
- When installed, the power socket must be within easy reach.
- Do not install the unit in a confined space. Allow adequate ventilation to prevent heat build-up.
- For indoor use only.
Heat build up
- During use the unit will heat up, this is not a malfunction. If the unit is used continuously at high volume levels, the unit temperature will rise considerably. Do not touch the unit to avoid potential burns.
Moisture and water
- Do not use this apparatus near water or moisture.
- Do not use this product near a bathtub, washbowl, kitchen sink, and laundry tub, in a wet basement, near a swimming pool, or anywhere else that water or moisture is present.
Heat sources and flames

- Batteries shall not be exposed to excessive heat such as sun, fire or the like
• To prevent risk of fire or electric shock, avoid overloading wall outlets, extension cords, or integral convenience receptacles.
Servicing and repairs
• Refer all servicing to qualified service personnel
- Servicing is required when the apparatus has been damaged in any way: such as liquid has been spilled or objects have fallen into the apparatus; the apparatus has been exposed to rain or moisture, does not operate normally, or has been dropped.

Getting to know your Set top box 2

natural_image
Abstract geometric pattern composed of gray triangles and squares on a white background (no text or symbols)Getting to know your Set top box
You'll be up and running in no time
Ready? Let's begin...
Please read these instructions carefully. They contain important information which will help you get the best from your Set top box and ensure safe and correct installation and operation.
If you require any further assistance, our technical experts are happy to help. For full details, refer to the product support section at the end of these instructions.
Accessories
- CDVBT2 Set top box
- Remote control
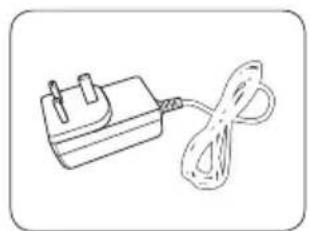
- Mains power adapter
- 2 x AAA batteries
- Instruction manual
- Quick setup guide
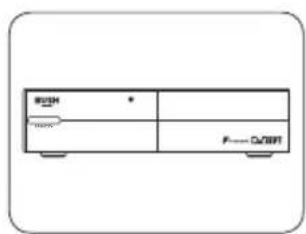
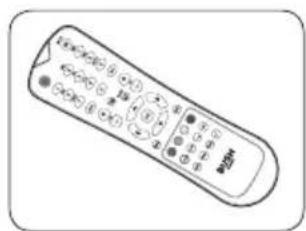
natural_image
Simple line drawing of a power adapter with a cord (no text or symbols)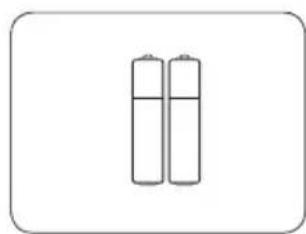
natural_image
Two cylindrical batteries shown in a row, no text or symbols presentCDVBT2 set top box Remote control Mains adapter 2 x AAA batteries
If you require any technical guidance or find that your product is not operating as intended, a simple solution can often be found in the Troubleshooting
Getting to know your Set top box
You'll be up and running in no time

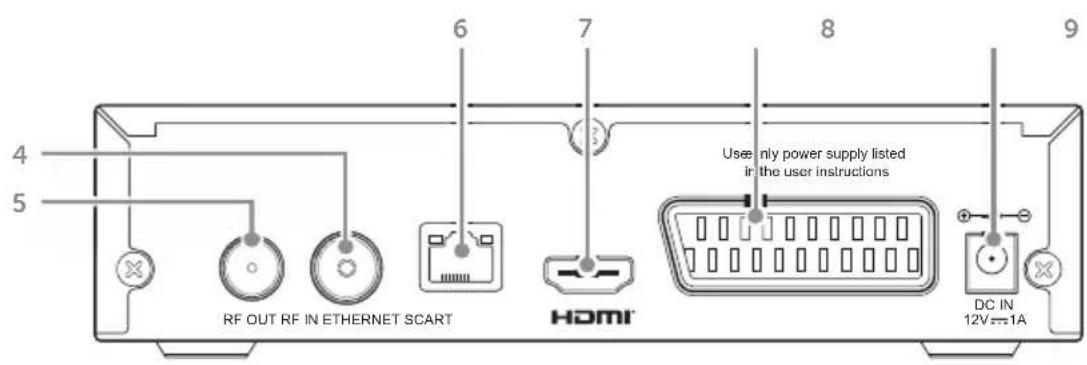
- STANDBY button: Press to switch the Set top box ON or OFF.
- LED POWER indicator: Red: OFF, Green: ON.
- IR sensor: Remote control sensor.
-
RF IN: Coaxial cable from your aerial.
-
RF OUT: Coaxial cable to your TV RF input.
- ETHERNET socket: For service use only.
- HDMI: Output to a HD ready TV.
- SCART: Connection to a non-HD ready TV.
- DC input: Mains adapter input socket.
Getting to know your Set top box
You'll be up and running in no time
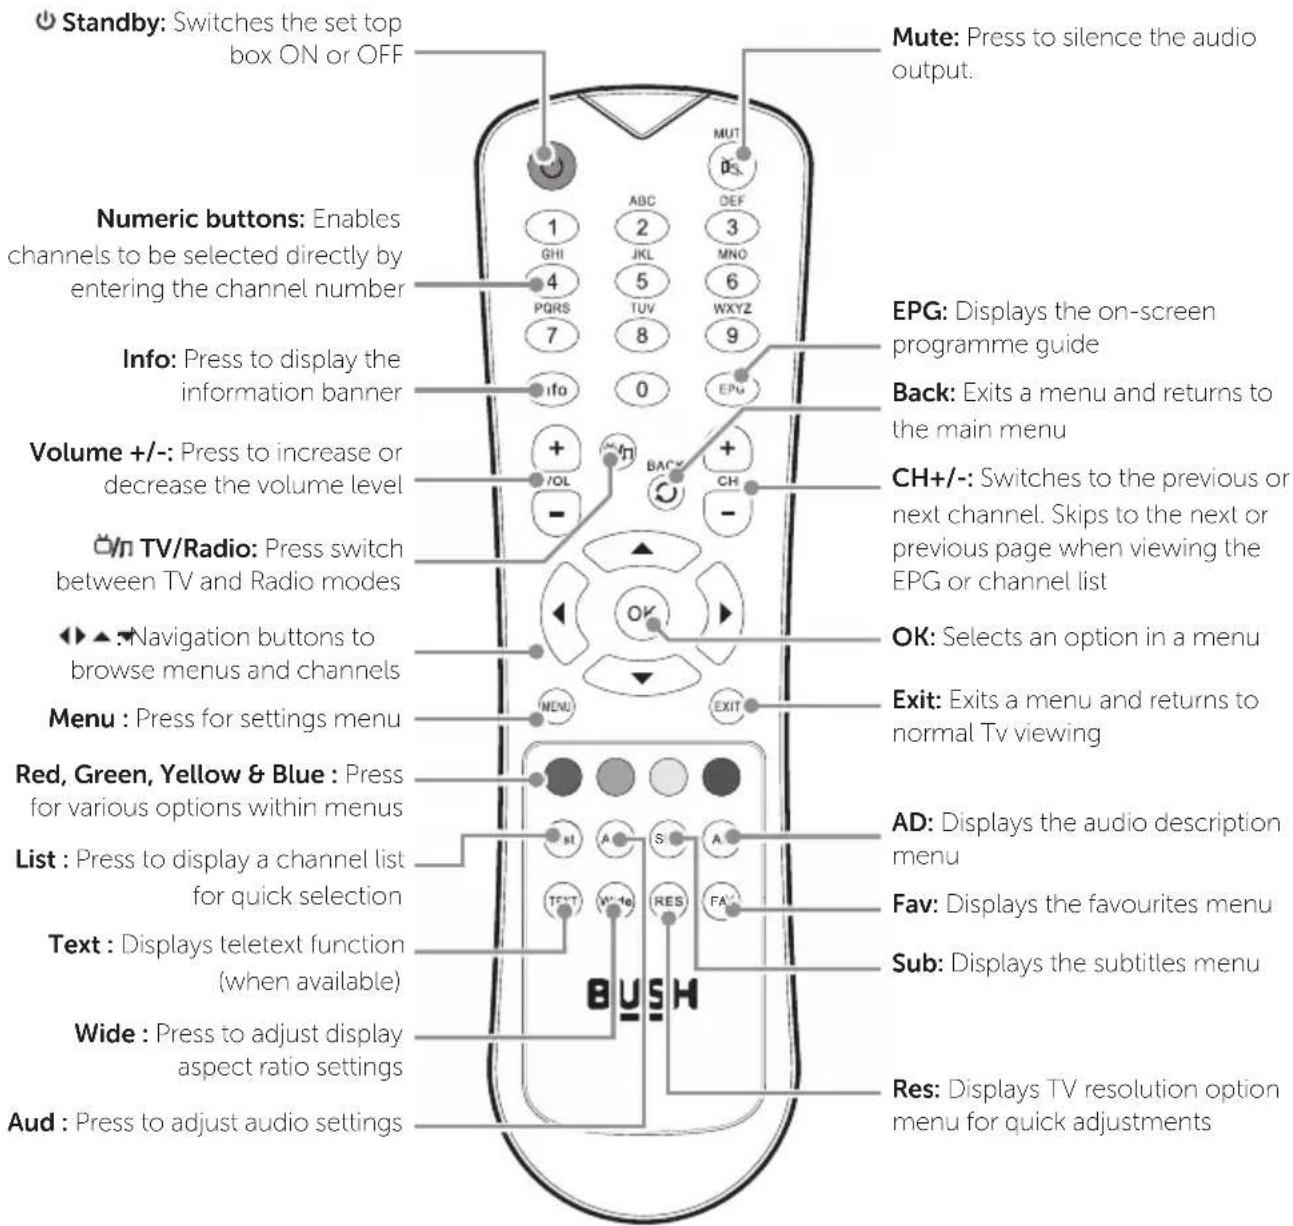
If you require any technical guidance or find that your product is not operating as intended, a simple solution can often be found in the Troubleshooting
Getting to know your Set top box
You'll be up and running in no time
Preperations
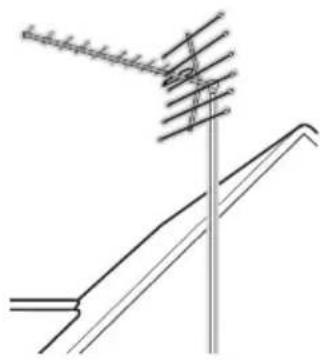
To receive Freeview you must have an appropriate TV aerial installed.
If your current aerial is unable to provide an adequate signal, it may need to be realigned or replaced for a Freeview compatible aerial. Please consult a professional.
natural_image
Technical line drawing of a utility pole with antenna array (no text or symbols)Connecting a HD TV
Follow the below connection guide to connect the Set top box to a TV with an HDMI input.
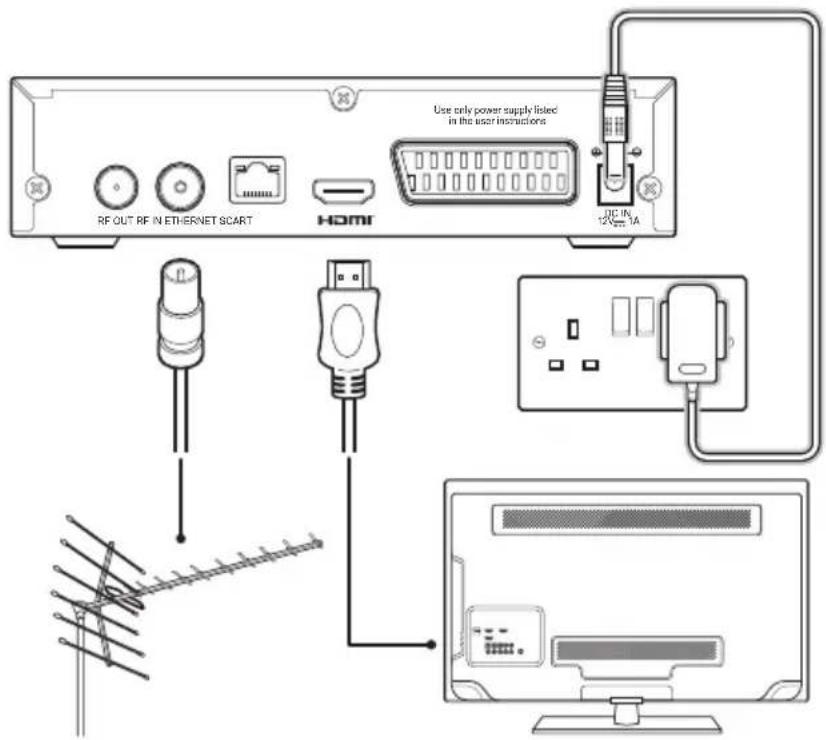
Ensure all devices are switched OFF before attempting any connections.
- Connect the coaxial cable from your aerial to the RF IN socket on the rear of the set top box.
- Connect an HDMI cable (not supplied) to the HDMI output on the rear of the set top box. Connect the other end to a HDMI input on the TV. Refer to the TV manual for details on selecting and viewing the HDMI input.
- Plug the mains adapter into a wall outlet (DO NOT SWITCH ON YET) and insert the jack into the DC INPUT on the rear of the set top box.
- When all the connections are made you can switch the power on for all devices.
section of these instructions, or online at www.argos-support.co.uk If you still require further assistance, call one of our experts on 0345 604 0105.
Getting to know your Set top box
You'll be up and running in no time
Connecting a non-HD TV with a SCART cable
If your TV does not have a HDMI input you can connect using a SCART cable.
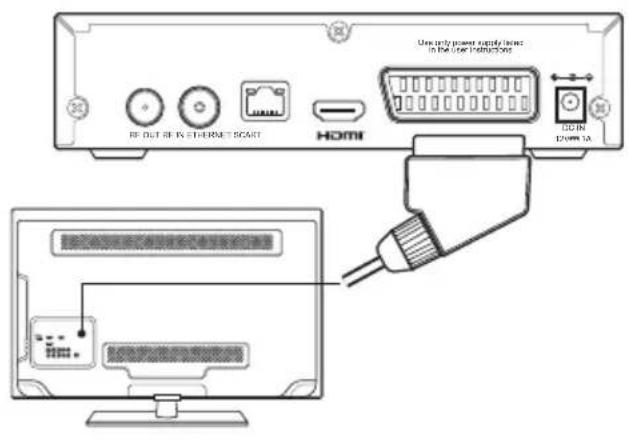
Ensure all devices are switched OFF before attempting any connections.
- Connect the coaxial cable from your aerial to the RF IN socket on the rear of the set top box.
- Connect a SCART cable (not supplied) to the SCART output on the rear of the set top box. Connect the other end to a SCART input on the TV. Refer to the TV manual for details on selecting and viewing the SCART input.
- Plug the mains adapter into a wall outlet (DO NOT SWITCH ON YET) and insert the jack into the DC INPUT on the rear of the set top box.
- When all the connections are made you can switch the power on for all devices.
If you have a TV with an internal tuner you can optionally connect a cable from the RF OUT socket on the rear of the set top box to the appropriate input on your TV.
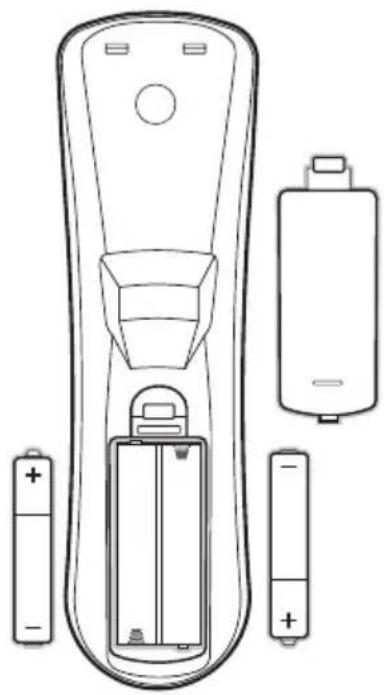
Fitting the remote batteries
natural_image
Line drawing of a remote control device with battery and two batteries (no text or symbols)- Remove the battery cover on the rear of the remote control by pressing the tab downwards towards the bottom of the remote and lifting the cover up.
- Insert 2 AAA batteries (supplied), taking care to match the +/- symbols engraved on the inside of the battery compartment.
- Replace the battery compartment cover.
Battery disposal advice
- Dispose of used batteries with regard to the recycling regulations in your area.
- Do NOT short circuit batteries or throw them into water, the general rubbish or in a fire. Weak batteries can leak and damage the remote control. Replace them in good time!
If you require any technical guidance or find that your product is not operating as intended, a simple solution can often be found in the Troubleshooting
Using your Set top box
3

natural_image
Abstract geometric pattern composed of gray triangles and squares on a white background (no text or symbols)This page is left intentionally blank
Using your Set top box
Let's get started
First time installation
After making the connections and switching everything on, follow the below instructions to get started.
- The following screen will appear allowing you to select which aspect ratio best suits your viewing needs. Use the ▲/▼navigation buttons to select an option and press the OK button to store and proceed.

As you select the options an on-screen diagram shows an example.
- The set top box will then perform an automatic scan of the available channels.
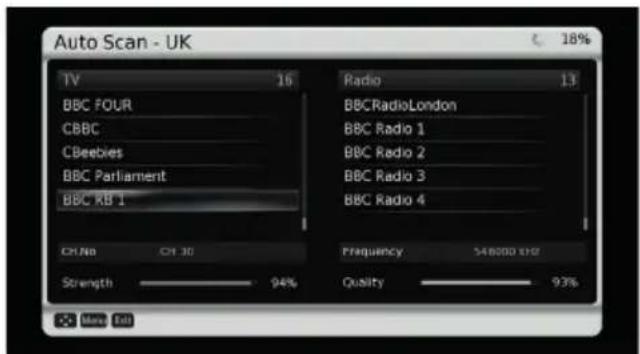
If you encounter any problems when performing the scan. Power off all devices and check the aerial connection. If the problem is the aerial itself seek professional help.
- When the scan has completed the set top box will begin playing the first channel in the stored list.
General usage
The following instructions refer to daily usage, such as changing channels, viewing programme schedules and basic operations.
Turning on the set top box
- Press the 35ANDBY button on the remote or the set top box to power the box on.
- Press the ⏻STANDBY button on the remote or the set top box to power the box off when powered on.
The set top box should be left plugged in and switched on at all times (except for during lightning storms). When the set top box is not in use press the ⏻ STANDBY button to enter standby mode.
By default the set top box is set to enter standby mode when not used for 3 hours. This can be adjusted in the 'Advanced menu options' section.
Switching between TV and Radio
Press the button to switch between TV & Radio modes.
Changing channels
- Advance through the stored channels by pressing the CH+ or CH- buttons on the remote control.
- If you know the channel number you can jump directly to that channel by entering the digits using the NUMERIC buttons on the remote control.
EG: channel '72' would require you to press the '7' and '2' buttons, wait for a second and the channel will change to channel no '72'. If you enter a number that does not exist an 'Invalid Entry' warning will appear on the display.
You will note that in some cases there are gaps between the channel numbers in the list. This is to allow channels to be added at a later date.
Using your Set top box
Let's get started
Using the channel list
You can browse channels quickly in channel order using the on-screen channel list function.
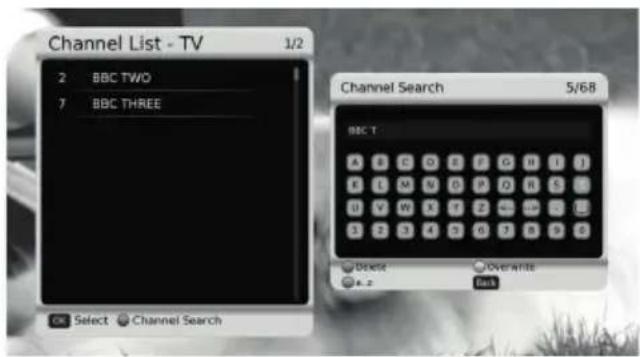
- Press the LIST button on the remote control to display the channel list interface.
- Use the ▲/▼navigation buttons to scroll through the list one by one.
- Use the ◀/▶navigation buttons to scroll in blocks of 9 channels with each press.
- Press the OK button to begin viewing a highlighted channel.
- You can return to normal TV/ radio viewing mode at any time by pressing the EXIT button.
The channel list is also available by pressing the OK button while viewing TV or listening to a radio station.
Channel search
- While viewing the channel list press the BLUE button to display the channel search interface.
- Use the ◀▶▲ navigation and OK buttons to type the name of a channel. As you type the channel list will refine the results.
- Press the BACK button to return to the channel list and press OK to select the channel.
Channel banner
Every time you change a channel whether it be TV or radio the banner appears along the bottom of the screen that contains information relating to the channel and programme. You can press the INFO button at any time to display the banner.
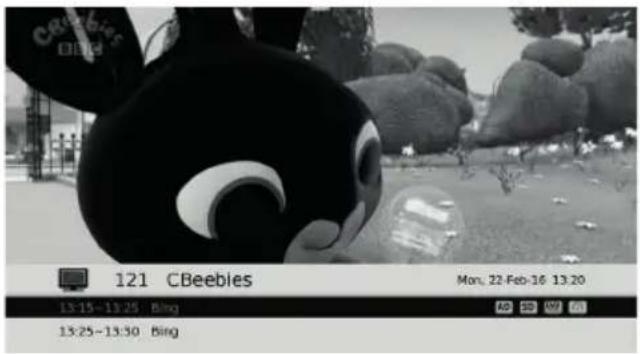
The following details are displayed on the banner.
• Name and number of the selected channel
- The name of the current programme/ radio show you are watching and the name of the next programme or radio show.
- Start and finish time of each programme/ show
- Date and time
There may be other symbols used to supply additional information about the programme/ show.
Additional information such as synopsis can be obtained by pressing the INFO button once more (while the banner is visible).
![Info 130 BBC NEWS 1:00 Hrs 14 00-15:00 BBC News Twenty-four hours a day, the latest national and international stories as they break. Also in HD. [3] New (all) Mon, 22 Feb 16 13:21](/content/2026/05/970626/images/19f56c1fb1103af654950e1433e5d5de13daf3be2aaedb762367bca4f43e4fc4.jpg)
If you require any technical guidance or find that your product is not operating as intended, a simple solution can often be found in the Troubleshooting
Using your Set top box
Let's get started
Adjusting the volume
Adjust the volume level using the VOL+/- buttons.
Mute
Press the MUTE button to silence audio output.
Press again to resume audio output
Subtitles and audio descriptions
A great number of Freeview channels are broadcast with subtitles for the hard of hearing or deaf. If a programme has subtitles available the channel banner will display the SUB symbol.
- Press the SUB button to display the subtitle option.

- Use the ◀/▶navigation buttons to select the language. Then press the OK button.
- To disable subtitles repeat steps 1-2, but select 'OFF' in step 2.
Some programmes have a secondary audio track for people who are partially sighted or blind, to allow them to hear what is happening in the programme. If a programme has an audio description option available the channel banner will display the AD symbol.
- Press the AD button to display the audio description options.
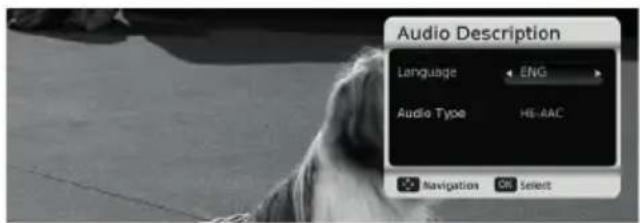
- Use the ◀/▶navigation buttons to select the language. Then press the OK button.
- To disable audio descriptions repeat steps 1-2, but select 'OFF' in step 2.
Using the Electronic Program Guide
Open the guide by pressing the EPG button on the remote.
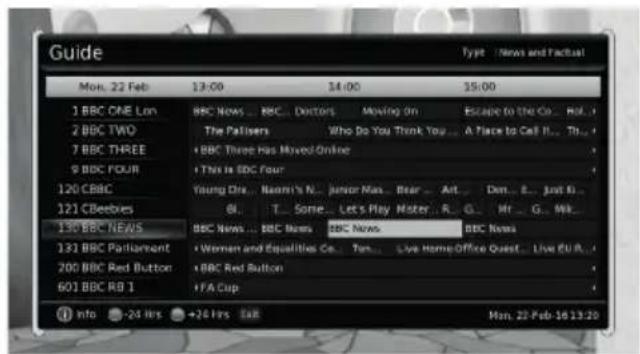
The program guide displays a list of 12 channels along with the program schedule for the next 2 12 hours.
The current channel and program marker is highlighted with a yellow block. The genre displayed along the top right of the guide and the selected day/ date along the top left.
- Use the ▶▲ navigation buttons to highlight any current or future program and press the INFO button for details.
- Pressing the button repeatedly so that the highlight marker proceeds past the displayed 2½ hours will load the next set of programs.
Along the bottom left of the guide is a key showing the usage of the colour buttons found on the remote control.
- Pressing the GREEN button will skip the guide forward 24 hours to the same time the next day.
- Pressing the RED button will jump back 24 hours (only available when the highlight marker has advanced 24 hours+).
- Press the CH+/- buttons to scroll downwards or upwards through the list in blocks of 10 channels for quick viewing.
- Exit the program guide by pressing the EPG button once more.
Using your Set top box
Let's get started
Favourites list
The favourites list allows you to customise channels according to the genre you set. This means that when you view the favourite list you can view only channels you've flagged with the 'Drama' tag for instance.
To program the favourite list follow the below instructions.
- Press the MENU button.
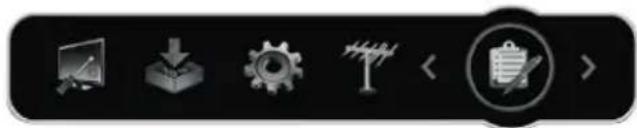
- Use the ◀▶buttons to select the ORGANISER icon from the option bar.
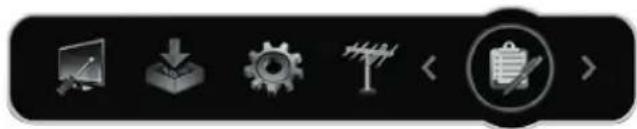
natural_image
Row of six grayscale icons on black background, including monitor, download arrow, gear, tree, clipboard with checkmark, and right-pointing arrow (no text or symbols)- Using the ▲▼buttons select the 'Favourite Set' option and press the OK button.
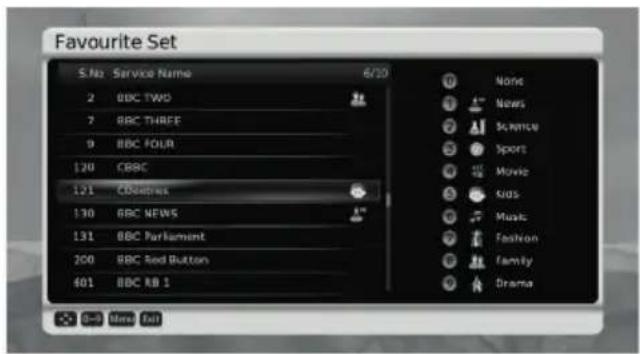
- Along the left is a list of channels in numerical order. To the right is a list of genre's with a reference digit to the left.
- Use the ▲▼buttons to select each channel for which a favourite is to be set and press the relevant digit on the remote to set the genre.
- After setting genre tags for all the channels you require, press the OK button to store the settings. After the 'Successfully saved' message is displayed you can press the EXIT button to return to the menu. Press EXIT once more to exit the menu.
Using the favourite list
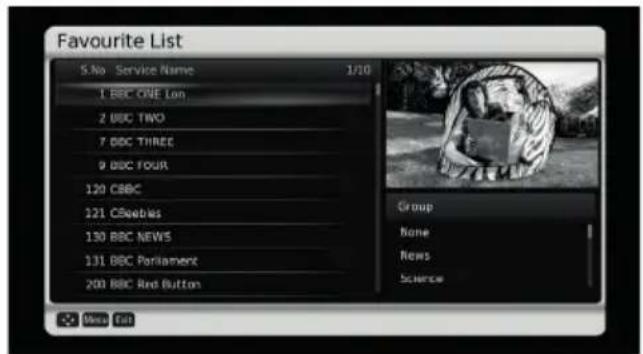
- Press the FAV button to display the Favourite List.
- Along the left is a list of channels in numerical order. To the right is a list of genre's described as 'Groups'. Use the◀▶buttons to navigate between the channel and group lists. The use the▲▼ buttons to scroll.
- As you select a group (genre) the list to the left displays only those channels that match the selected group.
- Highlight the channel you wish to view and press the OK button.
If you require any technical guidance or find that your product is not operating as intended, a simple solution can often be found in the Troubleshooting
Using your Set top box
Let's get started
Channel organiser
The channel organiser allows you to remove the ability to view certain channels. The channels can be added back after performing a scan (see Installation section).
- Press the MENU button.
- Use the ◀▶buttons to select the ORGANISER icon from the option bar.
natural_image
Pure toolbar icons without any text or symbols- Using the ▲▼buttons select the 'Channel Organiser' option and press the OK button. After Pressing the OK button you will be asked for the default password '0000'.
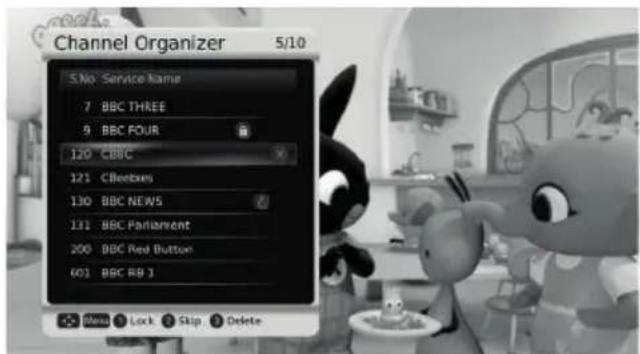
-
The organiser displays the full list of channels in numerical order. Along the bottom of the panel is a key to explain which button operates which function.
-
Lock 1 Prevents a channel from being viewed without the password '0000'
- Skip 2 Skips the channel when using the CH +/- buttons
-
Delete 3 Delete's the channel from being viewed at all. Until a new scan is performed
-
Using the ▲▼buttons select a channel and press one of the option buttons 1,2 or 3. Repeat for any other channels you wish to edit.
- Press the OK button to store the settings.
Teletext display
Press the TEXT button to display the channels teletext options. Not all channels support this feature.
Aspect ratio adjustment
To adjust the screen aspect ratio press the WIDE button and use the ◀▶buttons to change the aspect ratio. Press the OK button to store the setting.
Audio adjustment
To adjust the audio output from Stereo, Left or Right, press the AUD button and use the ◀▶buttons to switch between the modes. Press the OK button to store the setting.
Changing resolution (HDMI only)
If your TV is connected to the set top box with a HDMI cable there are several resolution options you can choose from.
Press the RES button to display the current resolution. Press again to skip to the next resolution. Repeat until you find the resolution you require.
Your TV may not support all resolutions. If the display is blank for longer than a few seconds, press the RES button, wait a few seconds and if the picture does not appear repeat the process until you see a picture once more.
Using your Set top box
Let's get started
Advanced menu options
The following sections cover advanced operations. We recommend you read the relevant information carefully before attempting to make changes.
To access the advanced menu press the MENU button on the remote control.
Use the ◀▶buttons to select each group of settings broken down into System Settings, Software Upgrade, System Configuration, Organiser & Installation.
When a group is highlighted you can use the ▲▼ buttons to scroll through the available options.
Press the OK button to view the settings options.
Leave a menu by pressing the BACK or EXIT buttons.
System settings
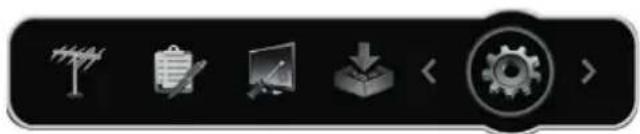
natural_image
Pure icon row with six grayscale icons (no text or symbols)Language settings
Use the ◀▶▲navigation buttons to set a default language for UI language, audio, subtitles and EPG.
Press the OK button to store the settings.
Video settings
Brightness
Adjust the brightness levels from 0-100%. Press the OK button to store the setting.
Contrast
Adjust the contrast levels from 0-100%. Press the OK button to store the setting.
HD Resolution
Adjust the screen resolution. Press the OK button to store the setting.
Aspect ratio
Adjust the screen aspect ratio. Press the OK button to store the setting.
Scart output
Adjust the scart output colour mode from RGB (recommended) or CVBS (only use this for displays that will not accept an RGB signal using a SCART cable).
Only use these functions when connecting to a TV with a SCART cable.
HDCP
Disable HDCP (High Definition Copy Protection). Should you have a need to connect the set top box to a display that does not support HDCP, this function will allow you to view non-HD channels (SD).
Audio settings
Audio description
When enabled programmes with audio descriptions will be activated automatically. Press the OK button to store the setting.
SubAudio MixLevel
Allows adjustments to the mix level of audio descriptions and the standard audio. Press the OK button to store the setting.
Hearing impaired
When enabled programmes with hearing impaired subtitles will be activated automatically in the selected language set in the 'Language settings'. Press the OK button to store the setting.
Digital output mode
Select from uncompressed or compressed digital audio when outputting via HDMI to an AV receiver. Press the OK button to store the setting.
If you require any technical guidance or find that your product is not operating as intended, a simple solution can often be found in the Troubleshooting
Using your Set top box
Let's get started
Advanced settings
OSD time out
Adjust the amount of time any on-screen menus appear for when they are not being used.
LPM in stand-by
Enabling the LPM mode allows less power to be used when the set top box is in standby mode.
when using this function the time for the set top box to wake from standby is slightly longer.
Auto power down
Choose how the set top box behaves when not in use. Enabling a timer from 1-3 hours will force the set top box into standby mode when not used for that period of time.
Select from Off, 1 Hour, 2 Hours or 3 Hours.
Software upgrade

natural_image
Pure toolbar icons for tools and applications without any text or symbolsS/W upgrade via OTA
Select this option to search for available software updates over the air.
No connection is required for these updates other than the aerial used for the set top box.
System configuration
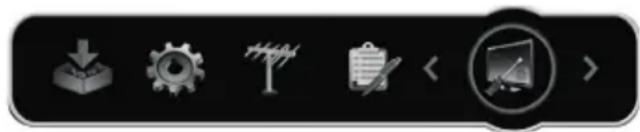
Version
Select this option to display the current software version details. Press MENU to return back to the System Configuration menu.
Factory default
This function will erase all settings and stored channels and reset the set top box back to the default state it arrived in.
Any customised lists or settings will be erased.
When selecting this function, and option box checking you really want to perform this operation will appear. Select Yes and enter the default password '0000'. After a few seconds the set top box will re-start and proceed with the 'First time installation' process described on page 16.
Change password
Should you wish to change the default password from '0000' you can select this option and enter a new code.
The master override code should you forget your code is '3331'.
Diagnostics
Select this option to display diagnostic details. Press MENU to return back to the System Configuration menu.
Service information
Select this option to display service details. Press MENU to return back to the System Configuration menu.
Using your Set top box
Let's get started
Installation

natural_image
Pure black-and-white toolbar with icons for clipboard, monitor, download arrow, gear, and tree symbol (no text or labels)Auto scan
This operation will erase the channel database and any customisation you have made using the channel organiser. All located channels will be added to a fresh database.
After Pressing the OK button you will be asked for the default password '0000' to allow access to the scan function.
You will then be asked if your sure you wish to erase the channel database and perform the scan. Select 'Yes' and press the OK button.
While the set top box is scanning, any channels/stations you where watching/ listening to will stop until the scan is complete.
When complete the installation menu will appear again. Press EXIT to resume viewing.
Smart retune
This operation will not erase the channel database and any customisation you have made using the channel organiser will remain. Any new channels located will be added to the existing database.
After Pressing the OK button you will be asked for the default password '0000' before proceeding with the auto scan.
While the set top box is scanning, any channels/stations you where watching/listening to will stop until the scan is complete.
When complete the installation menu will appear again. Press EXIT to resume viewing.
Manual scan
When using the auto/ smart scan functions the operation can take some time to scan. The manual scan option allows you scan a specific part of the spectrum.
- After Pressing the OK button you will be asked for the default password '0000' before proceeding with the manual scan settings.
- Use the ◀▶buttons to select the 'Channel No' from 21-69.
As you select each channel number the signal strength & quality bars will change.
- Enter a frequency using the numeric buttons
- Select 'Network search' On or Off.
- And scan mode to ALL, FTA or SCRAMBLED.
- Press the OK button to begin the scan from the data you entered.
- Once complete you will be asked if you wish to save the located channels. Select YES and press the OK button.
If you require any technical guidance or find that your product is not operating as intended, a simple solution can often be found in the Troubleshooting
Other information
4

natural_image
Abstract geometric pattern composed of gray triangles and squares on a white background (no text or symbols)This page is left intentionally blank
Other information
Helpful technical information
Technical specification
| Tuner Standard DVBT/T2 | ||
| Input Frequency 474 ~ 858MHz | ||
| Signal Input level -75dBm to | -20 dBm | |
| Input connector IEC 169-2 Female (PAL) | ||
| Loop out connector IEC 169 | -2 Male (PAL) | |
| Input impedance 75 Ω | ||
| Video HDMI Resolution 576i / 576p / 720p / 1080i /1080p | ||
| Audio Standard MPEG-1, MP | PEG-2, MP3, AC3, AAC-LC, WMA, E-AC-3, HE-AAC 5.1 | |
| Output mode Left channel, Right channel, Stereo | ||
| Sampling frequency 32,44.1,48KHZ | ||
| Outputs | 1 x SCART, 1 x HDMI, 1 x RF Loop through, 1 x RF coaxial, 1 x Ethernet | |
| Power requirements | Mains inout voltage | 100 - 240V~0.5 A Max, 50 / 60Hz |
| Power consumption | Max 12W (Standby Less than 0.5W) | |
| Dimensions | Width x Depth x Height | 170mm x 125mm x 40mm |
| Weight | Receiver only | 350 grams |
Care & maintenance
After using the Set top box
Set to Standby.
Switch the unit off at the mains and unplug it if you are leaving it unattended for a long period (holidays etc).
Avoid leaving the batteries fitted in the remote control if you leave the unit unattended for long periods. They may leak and damage the remote control.
Care & cleaning
All care and cleaning operations should be carried out with the unit unplugged from the mains power.
Occasionally wipe the cabinet with a lint free duster. Never clean the unit with liquids or solvents.
This page is left intentionally blank
Product support 5

natural_image
Abstract geometric pattern composed of gray triangles and squares on a white background (no text or symbols)Product support
Help is always at hand
Troubleshooting
No power.
- Ensure the mains adapter is connected to a power supply, and is switched ON.
- Make sure there is power to the mains socket.
No setup screen.
- The set top box may be in standby mode. Press the STANDBY button on the box or remote.
- The HDMI/ SCART cable may be incorrectly connected. Check the connections on the box & the TV.
- The TV may not be set to the correct input for the connection you made. Refer to your TV manual.
No channels where found when searching or channels missing.
- The signal from your aerial may not be strong enough to locate the Freeview channels. Seek professional advice.
Poor quality picture & sound
- The signal from your aerial may not be strong enough to locate the Freeview channels. Seek professional advice.
- Your aerial may be damaged or need realigning. Seek professional advice.
No picture or sound
- The HDMI/ SCART cable may be incorrectly connected. Check the connections on the box & the TV.
- The TV may not be set to the correct input for the connection you made. Refer to your TV manual.
- If using a HDMI connection the resolution may be incorrectly set. Refer to the 'Changing resolution (HDMI only)' earlier in this manual.
The picture is not in high definition
- You may be viewing the SD (standard definition) channel. Tune to the HD channel.
- You are using a SART cable connection to your TV. This is not a High definition connection.
The set top box switches off after 3 hours
- Auto power down is enabled. Refer to the 'Auto power down' section earlier in this manual.
No teletext is available
- The service may not be available for the selected channel.
Cannot view a channel
- You may have opted to delete that channel from viewing. Refer to the 'Channel organiser' section of this manual for details.
If you require any technical guidance or find that your product is not operating as intended, a simple solution can often be found in the Troubleshooting
Product support
Help is always at hand
The set top box does not work after moving house
- The house may be in a different Freeview location and requires re-tuning. See the 'installation' section of this manual for details.
I've changed the password and forgotten it
• The master override password is '3331'
Remote control does not work.
- Reduce the distance between the remote and the set top box
- Check the batteries are installed correctly.
- Replace the batteries
- Aim the remote directly at the Set top box
Product support
Help is always at hand
Help and assistance
If you require any technical guidance or find that your Set top box is not operating as intended, a simple solution can often be found in the Troubleshooting section of these instructions or online at
www.argos-support.co.uk
If you still require further assistance, call one of our experts on 0345 604 0105*. To help give us give you a fast and efficient service please have the following information ready:
| Model Ref. | CDVBT2 | You can find these on the rating plate - a small information panel (usually a sticker or metal plate) on the rear of your product |
| Serial number | ||
| Date of purchase | This will be shown on your receipt |
Local call rates applies*
Lines open 8am-7pm Monday to Saturday and 10am-4pm Sunday.
*Calls to Argos enquiry lines may attract a charge and set up fee from residential lines depending on your call plan/tariff. Mobile and other providers costs may vary, see www.bt.com/pricing for details.
For Security and training purposes, telephone calls to and from customer service centres maybe recorded and monitored. Calls from Republic of Ireland will attract international call charges.
If you require any technical guidance or find that your product is not operating as intended, a simple solution can often be found in the Troubleshooting
Product support
Help is always at hand
Disposal
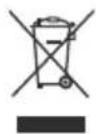
- Disposal of your old product. Your product is designed and manufactured with high quality materials and components, which can be recycled and reused
- When this crossed out wheeled bin symbol is attached to a product it means the product is covered by the European Directive 2002/96/EC.
- Please make yourself aware of the local collection system for electrical and electronic products.
- Please act according to your local rules and do not dispose of your old products with your normal household waste.
- The correct disposal of your old product will help prevent potential negative consequences for the environment and human health.
CE This product is intended for use within the UK. This equipment complies with the essential requirements for the Radio Equipment and Telecommunications Terminal Equipment Directive 1999/5/EC.
This appliance complies with the following EEC directives: 2014/35/EU Low voltage directive / 2014/30/EU EMC directive
Declaration of Conformance
Hereby, Argos Ltd, declares that this Band II LPD device is in compliance with the essential requirements and other relevant provisions of Directive 1999/5/EC. The complete declaration of conformity can be obtained by contacting http://www.argos-support.co.uk/
section of these instructions, or online at www.argos-support.co.uk If you still require further assistance, call one of our experts on 0345 604 0105.
Product support
Help is always at hand
BUSH
Call us now and activate your 12 month guarantee
Thank you for choosing Bush. Your new product is guaranteed against faults and breakdowns for 12 months. Don't forget to register it with us today so we can provide you with our best possible after-sales service and useful updates.
www.bushregistration.co.uk
FREEPHONE*
0800 597 8548
Lines are open 8am - 8pm, 365 days a year. *Calls may be recorded and monitored.
Your Bush Guarantee
This product is guaranteed for twelve months from the date of original purchase. Any defect that arises due to faulty materials or workmanship will be repaired free of charge (or if applicable the product will be replaced or the purchase price refunded) where possible during this period by the dealer from who your purchased the unit.
The guarantee is subject to the following provisions:
- The guarantee does not cover accidental damage, misuse, cabinet parts, knobs or consumable items.
- The product must be correctly installed and operated in accordance with the instructions contained in the manual.
- It must be used solely for domestic purposes. The guarantee will be rendered invalid if the product is
re-sold or has been damaged by inexpert repair.
- Specifications are subject to change without notice.
- Bush disclaim any liability for loss or damage arising from the breakdown of the product.
- This guarantee is in addition to and does not diminish your statutory or legal rights.
Important Data Protection Information
If you provide us with information about another person, you confirm that they have appointed you to act for them, to consent to the processing of their personal data including sensitive personal data and that you have informed them of our identity and the purposes (as set out in the Important Data Privacy notice displayed overleaf) for which their personal data will be processed.
You are entitled to ask for a copy of the information we hold about you (for which we may charge a small fee) and to have any inaccuracies in your information corrected.
For quality control and training purposes, we may monitor or record your communications with us.
If your personal details change, if you change your mind about any of your marketing preferences or if you have any queries about how we use your information, please let us know by contacting our Data Protection Officer, Domestic & General, Leicester House 17 Leicester Street, Bedworth, Warwickshire CV12 8JP.
Guarantor, Arges Limited 463 499 Avcoury Blvd. Milton Keynes MKS 2NW
If you require any technical guidance or find that your product is not operating as intended, a simple solution can often be found in the Troubleshooting
BUSH
Contact:
www.argos-support.co.uk
Helpline: 0345 604 0105
HDMI FreeviewHD

- Help and Guidance
- Contents
- Safety information
- Getting to know your Set top box
- Using your Set top box
- Other information
- Product support
- Safe
- Safety information
- Power source
- Heat build up
- Moisture and water
- Heat sources and flames
- Servicing and repairs
- Getting to know your Set top box 2
- Getting to know your Set top box
- Ready? Let's begin...
- Accessories
- Preperations
- Connecting a HD TV
- Connecting a non-HD TV with a SCART cable
- Battery disposal advice
- Using your Set top box
- 3
- First time installation
- General usage
- Turning on the set top box
- Switching between TV and Radio
- Changing channels
- Using the channel list
- Channel search
- Channel banner
- Adjusting the volume
- Mute
- Subtitles and audio descriptions
- Using the Electronic Program Guide
- Favourites list
- Channel organiser
- Teletext display
- Aspect ratio adjustment
- Audio adjustment
- Changing resolution (HDMI only)
- Advanced menu options
- Language settings
- Video settings
- Brightness
- Contrast
- HD Resolution
- Aspect ratio
- Scart output
- HDCP
- Audio settings
- Audio description
- SubAudio MixLevel
- Hearing impaired
- Digital output mode
- Advanced settings
- Installation
- Auto scan
- Smart retune
- Manual scan
- Other information
- 4
- Care & maintenance
- After using the Set top box
- Care & cleaning
- Product support 5
- Product support
- Troubleshooting
- No power.
- No setup screen.
- No channels where found when searching or channels missing.
- Poor quality picture & sound
- No picture or sound
- The picture is not in high definition
- The set top box switches off after 3 hours
- No teletext is available
- Cannot view a channel
- Help and assistance
- Disposal
- Declaration of Conformance
- BUSH
- Call us now and activate your 12 month guarantee
- www.bushregistration.co.uk
- Your Bush Guarantee
- The guarantee is subject to the following provisions:
- Important Data Protection Information
Brand : BUSH
Model : CDVBT2
Category : Receiver