
BU102ZRH50 - Receiver BUSH - Free user manual and instructions
Find the device manual for free BU102ZRH50 BUSH in PDF.


| Product Type | Stereo Receiver |
| Brand | Bush |
| Model | BU102ZRH50 |
| Dimensions (W x H x D) | 430 x 100 x 310 mm |
| Weight | 5.2 kg |
| Power Consumption | 150 W |
| Standby Power Consumption | 0.5 W |
| Power Supply | AC 230 V, 50/60 Hz |
| Audio Output Power | 2 x 75 W (4 Ohms) |
| Supported Audio Formats | MP3, WMA, FLAC, AAC |
| Radio Tuner | FM, AM with RDS |
| Bluetooth Version | 5.0 |
| HDMI Inputs | 4 (HDMI 2.0, HDCP 2.2) |
| HDMI Output | 1 (ARC compatible) |
| Optical Input | 1 |
| Coaxial Input | 1 |
| Analog Audio Inputs | 2 (RCA) |
| Subwoofer Pre-out | 1 |
| Speaker Terminals | 2 pairs (screw type) |
| Headphone Output | 6.35 mm jack |
| USB Port | 1 (for media playback) |
| Remote Control | Included (batteries not included) |
| Supported Tuner Bands | FM (87.5-108 MHz), AM (520-1710 kHz) |
| Operating Temperature Range | 5°C to 35°C |
| Cleaning Instructions | Wipe with soft dry cloth; do not use solvents |
Frequently Asked Questions - BU102ZRH50 BUSH
User questions about BU102ZRH50 BUSH
0 question about this device. Answer the ones you know or ask your own.
Ask a new question about this device
Download the instructions for your Receiver in PDF format for free! Find your manual BU102ZRH50 - BUSH and take your electronic device back in hand. On this page are published all the documents necessary for the use of your device. BU102ZRH50 by BUSH.
USER MANUAL BU102ZRH50 BUSH
Freeview+ HD Digital TV Recorder
Installation & Operating Instructions
127/8037
ABUSH
BU102ZRH50
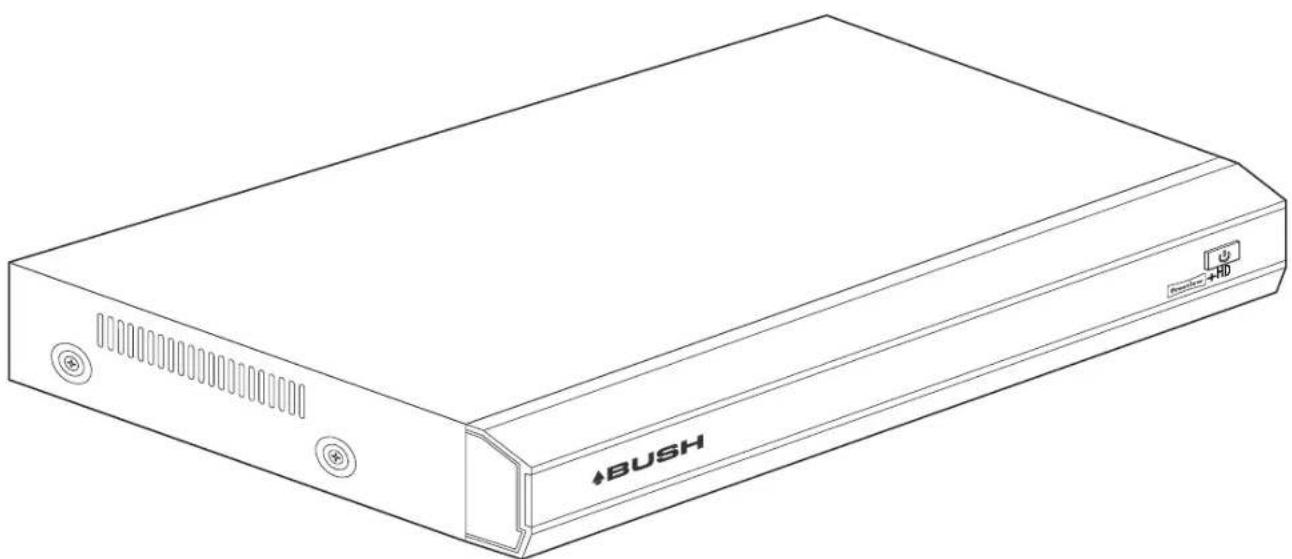
natural_image
Line drawing of a rectangular electronic device labeled 'BUSH' with ventilation slots and ports (no additional text or symbols)
+HD
Important - Please read these instructions fully before installing or operating
These instructions contain important information which will help you get the best from your digital TV recorder and ensure safe and correct installation and operation.
For any help concerning set up and use of your digital TV recorder please call the Customer Helpline: 0845 604 0105
Lines open: 9am - 8pm Monday to Saturday and 10am - 4pm Sunday
BU102ZRH50 - 13/6/13
Contents
Getting Started 4-9
Product Features 4
Accessories included 4
Recording and Playback - Features 4
Your remote control 5
Connecting your digital box to your TV 6
Connecting your digital box to your broadband router 6
Power connection 7
Remote control - inserting batteries 7
Initial set up 8
Parental 24
Recording 25
System 27
Safety Information 29
Product Support 31-34
Argos technical helpline 31
Trouble shooting 32
Disposal information 34
Guarantee 36
Basic Features 10-14
Using your digital box 10
Selecting channels 10
Using the number buttons 10
Using the change channel buttons 10
Using the guide 10
Using the channel list 10
Changing the volume 11
Using mute 11
Pausing live TV 11
Recording a programme 12
Using the library 12
Other remote control buttons 13
Advanced Features 15-22
Main menu 15
Guide 15
Recording 16
Setting a reminder 18
Library 19
BBC iPlayer 21
Channel list 21
Settings Menu 23-28
Using settings 23
Display and audio 23
Language 24
Getting Started
The Argos Technical Helpline is here to help
Technical experts are available 7 days a week
- Simple help and advice on setting up your digital TV recorder.
• Guidance on connecting other devices to your digital TV recorder such as a DVD player. - Order spare parts, including that lost remote control.
- Any other technical issues you may need assistance with.
Call us today: 0845 604 0105
Local call rates applies*
Lines open 9am-8pm Monday to Saturday and 10am-4pm Sunday.
* Calls to Argos enquiry lines may attract a charge and set up fee from residential lines depending on your call plan/tariff. Mobile and other providers costs may vary, see www.bt.com/pricing for details.
For security and training purposes, telephone calls to and from customer service centres may be recorded and monitored. Calls from Republic of Ireland will attract international call charges.
Getting Started
Product Features
- Twin tuners.
- Play, pause, record and rewind live TV.
• 8 day Electronic Programme Guide (EPG). - Watch High Definition (HD) programmes.
- Catch up TV service (BBC iPlayer).
- First time install wizard.
• High definition user interface.
• Less than 0.5 Watt standby power consumption. - Subtilles.
- Audio description.
Recording and Playback - Features
• Hard Disk Drive information.
- Record over 300 hours of your favourite programmes:
312 hours standard definition.
125 hours high definition.
- Simultaneously watch one channel and record another.
Accessories included
Remote control
RF cable
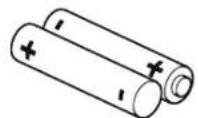
Batteries: 2 x AAA
Instruction Book
Power Adapter
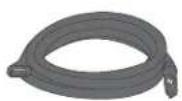
HDMI cable
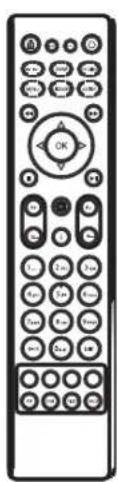
natural_image
Front view of a classic black-and-white remote control with keypad and button (no text or symbols visible)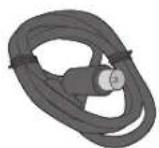

natural_image
Simple line drawing of an open book with no text or symbols visible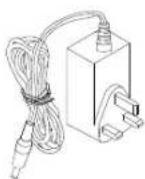
Getting Started
Your remote control
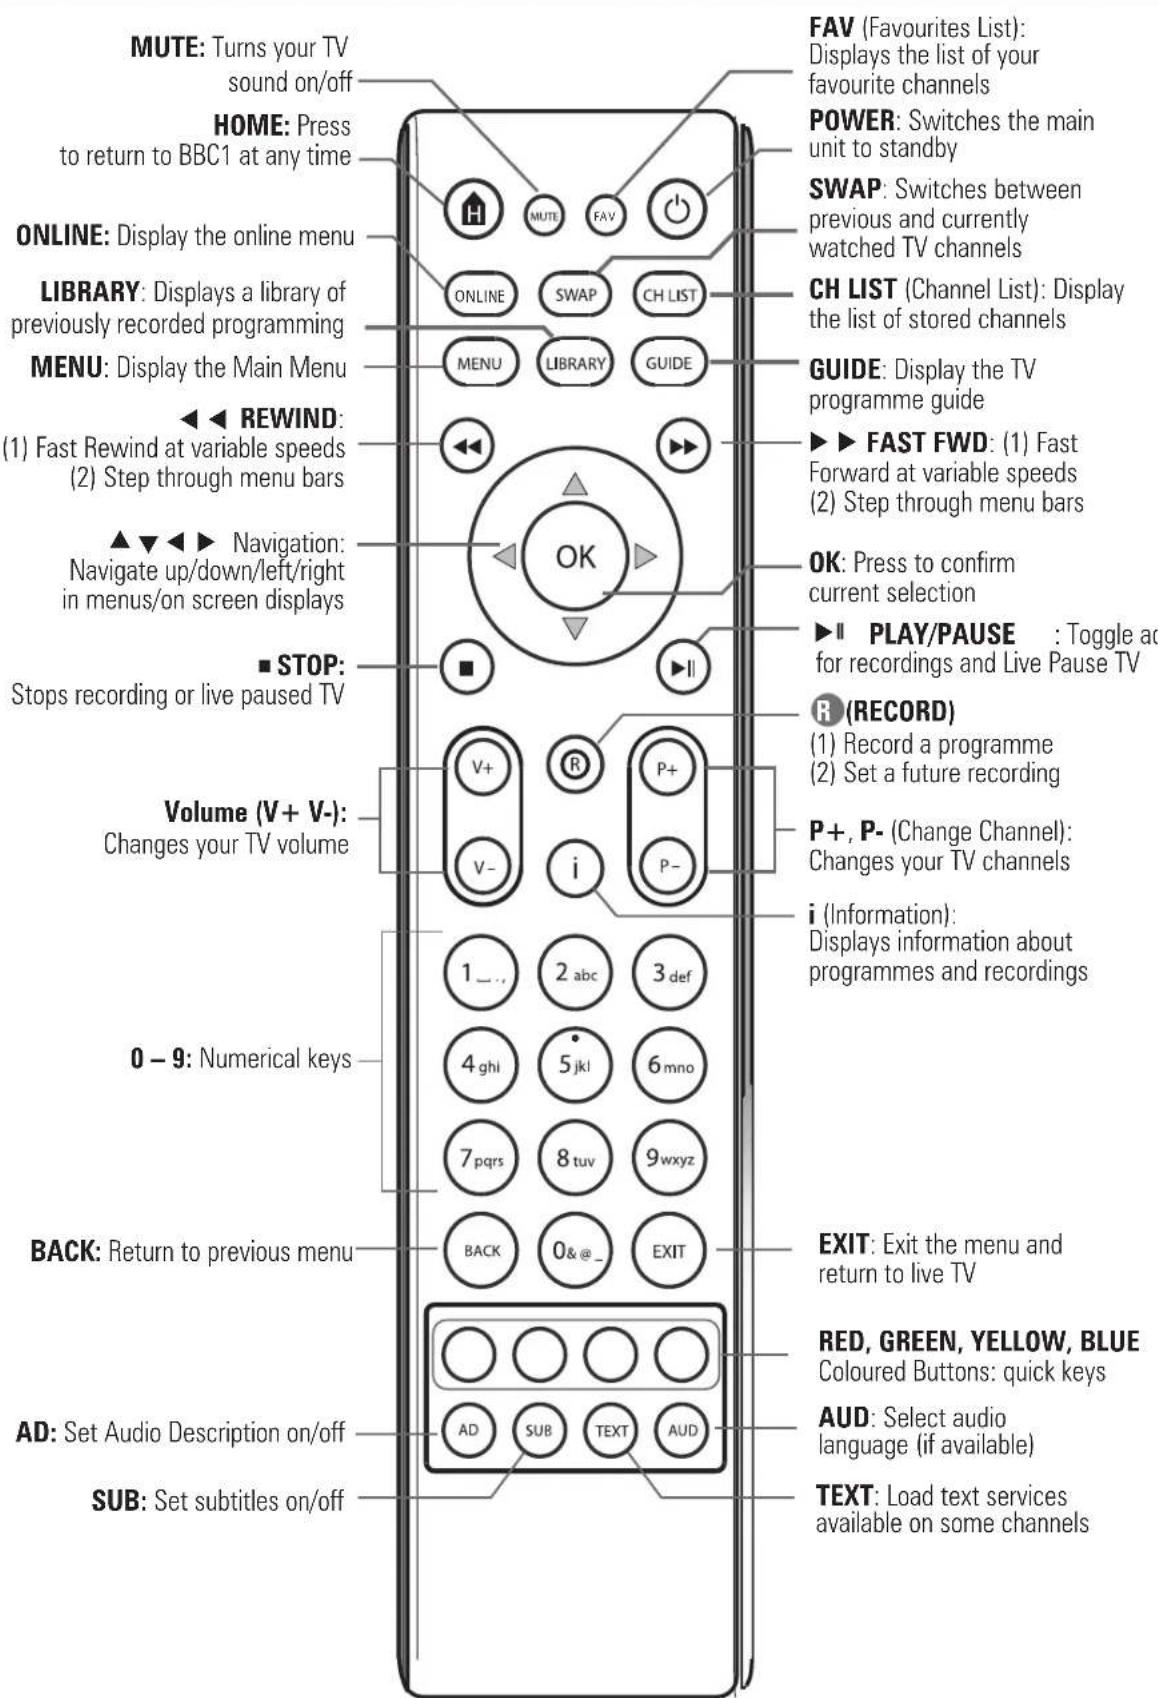
For any help concerning set up and use of your digital TV recorder please call the Customer Helpline: 0845 604 0105
Getting Started
Connecting your digital box to your TV
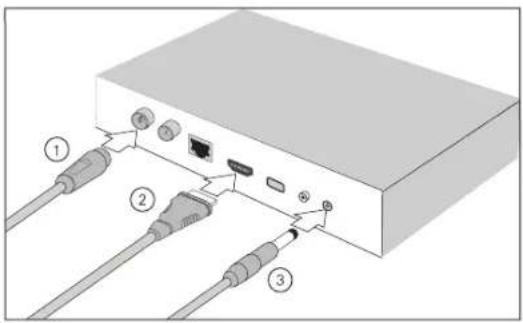
Your digital box connects to your TV via an HDMI connection.
There are three cables to be connected as shown below.
- Cable 1. Connect the aerial cable between the RF IN socket on your digital box and your external aerial wall socket.
- Cable 2. (HDMI). Connect the HDMI cable between the HDMI socket on the back of your digital box and an HDMI socket on your HD Ready TV.
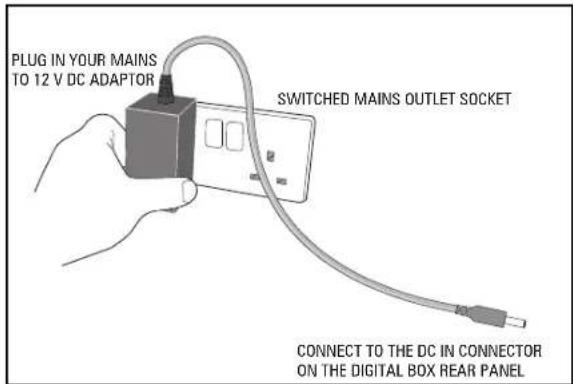
- Cable 3. Connect the power socket on the cable from the power adaptor to the 12V DC IN connection on the back of your digital box.
Connecting your digital box to your broadband router
If you are not ready to complete this stage of the setup at this time, you can skip this step and continue with setting up your digital box. Connecting to the internet enables you to use catch up TV services such as BBC iPlayer.
- Cables 1, 2 and 3. First follow the set up instructions as shown above.
- Cable 4. Connect an Ethernet cable (not included) to the NETWORK connection on your digital box. Connect the other end of the Ethernet cable to a free Ethernet socket on the back of your router.

Getting Started
Power Connection
Before connecting the power to the digital box, check that the mains voltage on the rating plate is the same as the voltage in your area. Plug the power connector on the power supply into the 12V DC IN connector on the rear panel of the digital box. Plug the power adapter into the wall socket and switch on the mains power.
Remote control - inserting batteries
Remove the battery cover on the back of the remote control, gently push down and pull backwards at the same time.
Insert two AAA/R3 or equivalent type batteries. Ensure the batteries are inserted the correct way and replace the battery cover.
Note: When the remote control is not going to be used for long periods of time, the batteries should be removed. Otherwise the remote control may be damaged, caused by battery leakage and corrosion.
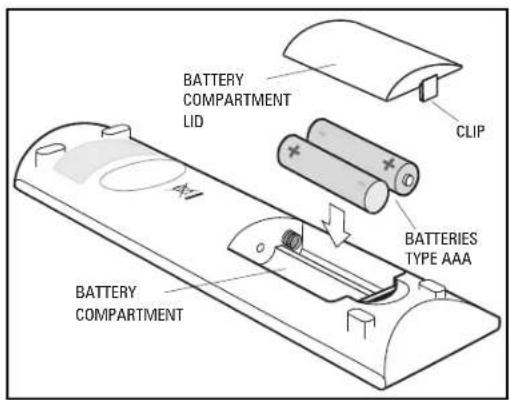
fig.4b
Getting Started
Initial set up
Easy install (recommended)
When you first connect your digital box to a TV and turn it on, the 'First Time Installation' screen will be displayed.
Easy install is the recommended option as it will attempt to find the optimal settings for your TV and digital box.
'First Time Installation' will scan for TV and Radio channels and store the results on the digital box. This process will take approximately 8-10 minutes to complete.
You can press the BACK Button at any time to return to the previous step.
Easy install may not always provide the optimum setting level for your TV. If you know the screen size (aspect ratio) of your display you can set this manually by following the Advanced install set-up process.
- The Installer screen will be displayed. If 'Easy' is not already selected, press the Button on your remote control to select it.
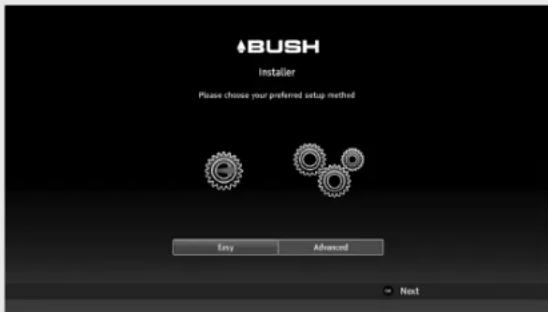
- Press the OK Button to begin.
- The 'Easy Setup' screen will be displayed with the 'TV Setup' function selected.
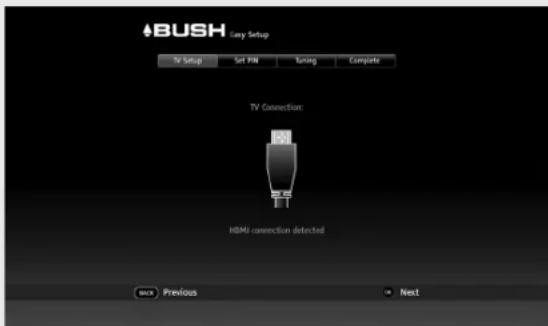
- Press the OK Button.
-
The 'Set PIN' function will run. You can choose a new PIN using the number keys
-
(0 to 9) on the remote control. Press OK to confirm your selection, or
- Press the OK button to skip this stage. The PIN can be set later.
DON'T FORGET! Remember to make a note of your PIN for later use. The default PIN setting is 0000, if you choose to skip the 'Set PIN' stage, this will remain the Parental PIN number until changed.
If you change your PIN, write it here:
......
- The 'Tuning' function will be selected, showing the number of TV and Radio channels currently stored in the digital box. For a first time install, these will both be 0.
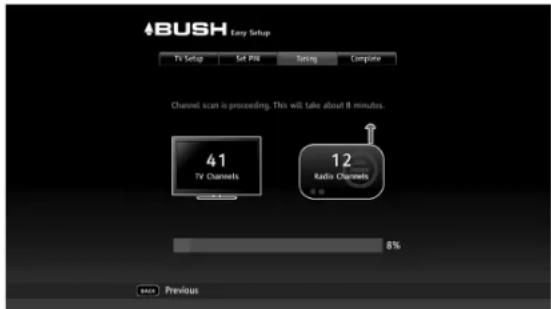
- Press the OK Button. The system will scan for TV and Radio channels and updates the number of channels found. During this time a progress bar advances until complete (100%). This step takes about 8 min.
- When scanning has finished, press the OK button. The screen displays 'Installation complete'.
- Press the OK Button to begin watching the first TV channel stored. If there has not been a button press for 15 seconds, the channel will be displayed automatically.
If multiple TV regions are available in your area, you will be prompted to choose a region during the installation process.
Getting Started
Initial set up
Advanced install
The Easy install is the recommended installation option.
However you may want to choose the 'Advanced' option to manually select the specific aspect ratio or display resolution of your screen.
DON'T FORGET!
You can re-run the install process again at any time.
To carry out an 'Advanced' installation:
- If 'Advanced' is not selected, press the ▶ Button to select it.
- Press the OK Button. The 'Advanced Setup' screen will be displayed with the 'TV Setup' function selected. How your digital box is connected to your TV will also be shown.

- Press the OK Button.
- Repeatedly press the ▶ Button until the screen size (aspect ratio) of your TV appears in the highlighted panel.
- Press the the ▼ Button to highlight the screen resolution panel.
- Repeatedly press the ▶ Button until the resolution of your TV appears in the highlighted panel.

- Press the OK Button. The 'Set PIN' function
will be selected.
- Press the OK Button. The PIN can be set later (see 'Easy' install in box 5).
- The 'Tuning' function will be selected, showing the number of TV and Radio channels currently stored in the digital box. For a first time install, these will both be 0.
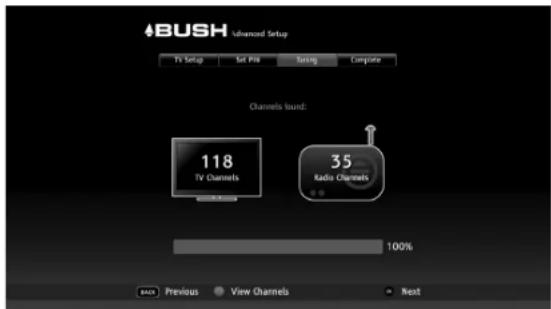
- Press the OK Button. The system will scan for TV and Radio channels and updates the number of channels found. During this time a progress bar advances until complete (100%).
- Press the GREEN Button if you want to view the TV and Radio channels found. Press the GREEN Button again to hide the lists.

- When scanning has finished, press the OK button. The screen displays 'Installation complete'.

- Press the OK button to begin watching the first TV channel stored.
Basic Features
Using your digital box
Your digital box has some functions you will use everyday, and others that you only use occasionally.
You can find commonly used functions in this section so you can get your digital box up and running as quickly as possible.
We suggest you read this section carefully, then use other sections when you need extra information or guidance for settings.
Selecting channels
This can be done in several ways:
- Directly from the numerical buttons (0-9) on the remote control
- Using the channel change buttons (P+ and P-) on the remote control.
• Using the Guide
• Using the Channel List
Using the number buttons
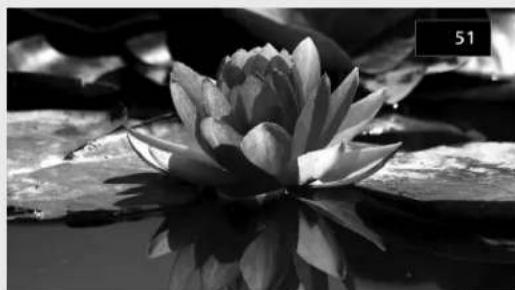
- Enter the channel number using the numerical buttons on the remote control. As they are entered they are displayed in the top right of the screen.
- To enter '51' for example, enter 5 and then soon after, enter 1.
- The TV will switch to channel 51.
natural_image
Black-and-white photo of a water lily flower with visible petals and reflections on water (no text or symbols)Using the channel change buttons
- Press the P+ button to change to the next channel.
- Press the P-Button to change to the previous channel.
Using the guide
The Guide lets you view information about current and scheduled TV and Radio programmes. Here you can select a programme to watch or listen to.
When you open the Guide, the current channel is displayed at the top of the list with the programme being watched highlighted.
![Movie 30 jul 11:24 Mandal Muscat, Jim Kowloon and Care Bolding font as winging events at Joe Durney's the overnight. The next four stars show speed for a heart successive Olympic gold. Also to HP [5] (Sport) MOV 10000000000000000000000000000000000000000000000000000000000000000000000000000000 MOV 30 jul 11:24 1 NBC CHINE 2 NBC WOOL 3 FY1 4 Channel X 5 Channel Y 6 FV2 7 NBC PIRIS 8 NBC PIRIS 9 BIG ZHIJI 11 MUN 11:24 12 MUN 11:24 12:24 12:24 12:24 12:24 12:24 12:24 12:24 12:24 12:24 12:24 12:24 12:24 12:24 12:24 12:24 12:24 12:24](/content/2026/05/970494/images/c290d68c1bb803c7d30d6307c2286c2907ddac0d9063a8fe9b2b03f2f11bed69.jpg)
- Press the GUIDE Button to display the Guide.
- Use the ▼ and ▲ Buttons to select a channel to browse.
- Use the ◀ and ▶ Buttons to move along the channel row to select the desired programme.
Available options for the programme selected will be displayed as well as a brief description.
Using the channel list
The Channel List contains all the channels found during installation and is displayed in a single column format in numerical order. A total of 16 channels are displayed at a time.
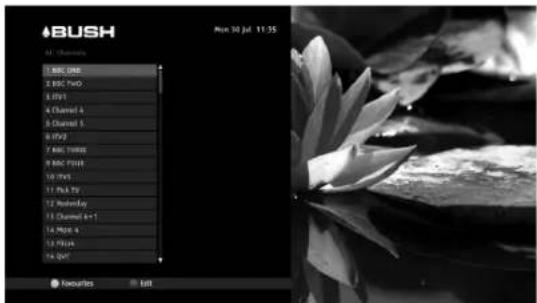
The ▼ and ▲ Buttons are used to scroll down or up the list respectively to show all channels in the list.
- Press the CH LIST Button to open the Channel List.
- Press the ▼ and ▲ Buttons to select the channel required.
- Press the OK Button to watch the channel.
- The Channel List will be removed from the screen and you will be returned to live TV with
Basic Features
Using the channel list (continued)
- The mini information panel displayed along the bottom which will be removed automatically after a set time.
To view additional information about the current programme at this time press the i Button, see 'i-Button'.
Changing the volume
You can change the volume using the V+ and V- buttons on the remote control.
-
Press the V+ Button to increase the volume.
-
Press the V- Button to decrease the volume.
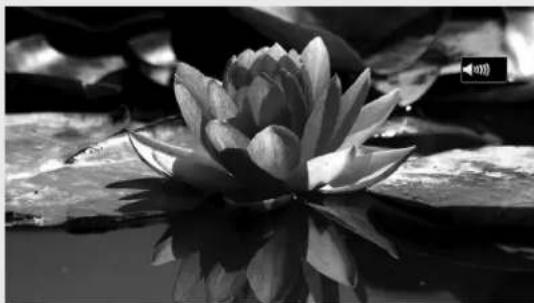
A symbol will be displayed in the top right of the screen to indicate the volume level is being changed.
natural_image
Black-and-white photo of a water lily flower with reflection in water, no text or symbols visibleUsing mute
To turn off the sound:
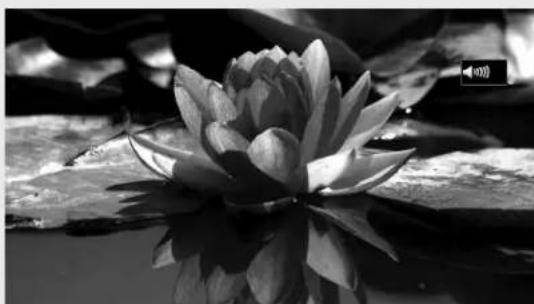
- Press the MUTE button on the remote control. The mute symbol will be displayed in the top right of the screen and the sound will be turned off.
natural_image
Black-and-white photo of a water lily flower with reflection on water surface (no text or symbols)- To restore the sound at its previous level, press the MUTE Button again.
Pausing live TV
You can pause the TV channel you are watching and resume watching it from the paused position (provided you have not changed to another channel during this time).
You can Fast Forward (up to the current time) and Rewind to any time from the time you started viewing the channel.
The amount you can Rewind can be set with the 'Timeshift Amount' option in the 'Recording' menu, see page 31.
To pause a live TV programme
-
Press the PAUSE/PLAY Button.
-
The TV picture will freeze.
To resume play of the TV programme
- Press the PAUSE PLAY Button again to resume playback from the paused time.
To rewind a paused TV programme
-
Repeatedly press the REWIND Button until the desired Rewind speed is displayed in the bottom left of screen. Each press of this button steps through the preset speeds: x2, x4, x8, x16, x32, x64.
-
Press the PAUSE PLAY Button to resume playback at normal speed. The rewind time relative to live TV will be shown in the bottom left corner.
To fast forward a paused TV programme
-
Repeatedly press the FFWD Button until the desired forward speed is displayed in the bottom left of screen. Each press of this button steps through the preset speeds: x2, x4, x8, x16, x32, x64.
-
Press the FFWD Button again to resume playback at normal speed.
Basic Features
Recording a programme
The Record button is used to record programmes while watching Live TV or from within the Guide.
To record a programme:
- While watching live TV, press the RECORD Button.
- If the programme you are watching is not part of a series, the programme will start to record.
- If the programme you are watching is an episode of a series, then a message box will be displayed:
- Record once
- Record series
- Use the ▼ and ▲ Buttons to select one of the options.
- Press the OK Button to start recording.
Future programmes can be scheduled for recording in the Guide.
Using the library
The Library lists the recordings you have made and stored on your digital box. The recordings can be selected and played from here.
![BUSH Tue 30 Jul 11:27 Time: 12:35. Cash in the order Margaret Bell and daughter Suisse Info Otra News and John Gomes into their North London News to look through a Korean Treasure news to save still people or users. [S] [dkey] SUPPORT CODE TIME ORDER NAME Cash In this Auto: 2 BBC ToG Tue 30 Jul 11:45 Revivaler Bayer draft: 2 BBC ToG Tue & Aug 12:15 6 Episodes Delete Salt order](/content/2026/05/970494/images/8d3fe335f08a256e23b83fe5e3791bc6c224be68836b86bf23d1f244fe6642f9.jpg)
Playing a recording
- Press the LIBRARY Button on the remote control to open the Library.
- Use the ▼ and ▲ Buttons to select the recording you wish to play.
- Press the PAUSE/PLAY or the OK Button.
- The recording will start to play from the beginning.
Basic Features
Other remote control buttons
Exit
- Press the EXIT button at any time to exit a menu and return to live TV.
Home
- Press the HOME button at any time to watch the first programme stored (typically BBC1).
Audio description
Some broadcasts have Audio Description (AD) narration added to enhance the programme for visually impaired viewers. The narration describes all significant visual information such as body language, facial expressions, scenery, costumes and anything important to the plot of the story.
Audio Description narrative can be turned on or off using the AD Button on the remote control.
When turned on, the narrative will be heard at the volume set in the 'Settings' / 'Language' menu.
Subtitles
Subtitles, if present, can be set to be displayed (overlay the TV picture) or not displayed.
To turn Subtitles on
- Press the SUB Button.
- 'Subtitle ON' is displayed on the screen for a short time and the subtitles, if available, will be displayed on the screen.
To turn Subtitles off
- Press the SUB Button.
- 'Subtitle OFF' is displayed on the screen for a short time and subtitles will no longer be displayed.
Back
- Press the BACK Button at any time to return to the previous menu or programme display.
Information (i button)
The i Button displays information about the programme you are watching.
To display this information:
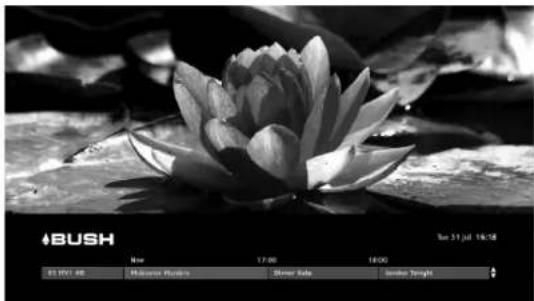
- Press the i Button while watching a programme. Information about the channel,
name, and broadcast times for the next two programmes will be displayed.
natural_image
Black-and-white photo of a lily flower on water lilies, captured in a black and white photo with no visible text or symbols.- Press the i Button again to display an extended information:
• A synopsis of the programme
• Programme start and finish times
- Genre
• Output features such as HD, AD, Audio, Parental Guidance, Split for example
![ABUSH 16:00 - 17:00 Welcome Markets Customs acts of science Deal Man's Drive (Part 2): Conclusion: When a wealthy Lentowner's wife is high-grown to death with a clocked mat. DO Remedy is remembered in a contemporary or calculating murting. [Involved by] [Therap] NEW! NEW! NEW! NEW! How 17:40 18:00 ST. 11/11 192 Rishevel Markets Driver Color Lender Height](/content/2026/05/970494/images/96d23b4864457d20d58509d6da588181c2cfcfabee90e739a6ef9867e2df91ac.jpg)
This information stays on the screen for about 60 seconds.
To remove the information before this time has elapsed:
Basic Features
Other remote control buttons (continued)
Audio
Selects the Audio Language of a broadcast, if available.

To select an audio language:
- Press the AUD Button. The 'Audio Language' menu opens.
- Use the ▼ and ▲ Buttons to select the desired language.
- Press the OK Button to confirm your selection.
If not appropriate (for example when viewing a photograph or any other media type that has no soundtrack), the Audio Language dialogue box will display 'Not available'.
Swap
This button lets you swap between the current and last watched channels. It has a toggle action.
- Press the SWAP Button to change to the previously watched channel.
- Press the SWAP Button again to return to the last channel you were watching.
Text
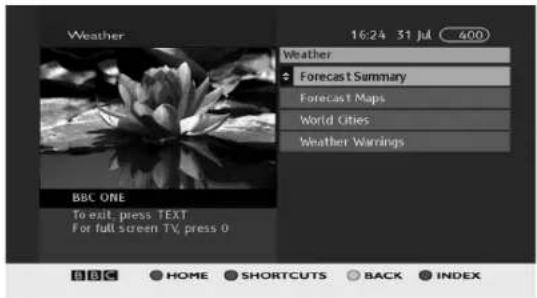
Some channels offer additional services via the digital text button on your remote control. When digital services are available the red button services will be shown in the top right hand part of your TV screen.
- Press the TEXT button to open the menu. An example is shown below.
Advanced Features
Main menu
The Main menu is a list of items arranged in a column located on the left side of the display screen.

This icon menu is displayed when the MENU Button on the remote control is pressed. From here you can access the following items:
- Guide
- Library
- BBC iPlayer
- Channel List
- Settings
DON'T FORGET! The Guide, Library and Channel List functions are also accessible from the remote control buttons.
To open an item in the Main menu,
-
Press the ▼ and ▲ Buttons to select the required item. This will be indicated by a red outline around the icon.
-
Press the OK button to enter.
Guide
The Guide displays current and scheduled TV and Radio programmes. This allows you to select a programme to watch now, set a reminder for a later event, record live programmes or plan a future recording, and view information about selected programmes.
In the Guide you can browse the TV and radio schedules for the next 7 days and you can display any two-hour window over the next 7-days.
You can select programmes to:
- Watch or listen now
- Set reminders for programmes you wish to be alerted about shortly before they are broadcast
• Mark programmes you want to record and store
• View information such as programme content and broadcast features
To display the Guide,
- Press the GUIDE button on the remote control.
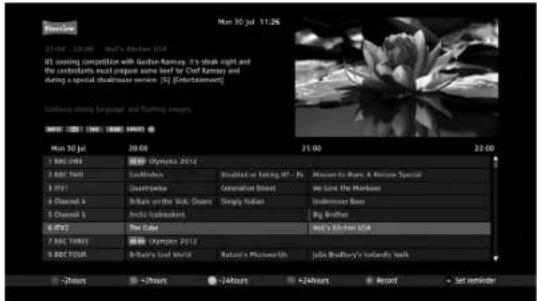
Guide structure
The Guide is made up of sections. These are:
- Header: Provides information specific to the selected programme, including synopsis, scheduled times and the programme name. Also displays the currently selected programme in a preview window
- Guide table: A variable two-hour window in the next 7 days organised by time and date. Shows programme names, times and content information
- Footer: A set of coloured buttons having functions applicable to navigating the Guide table and marking.
The current-time position in the form of a vertical line across the main Guide Table gives a graphical representation of elapsed time and the time remaining before the start of later programmes.
Advanced Features
Guide (continued)
Programme information
This information is displayed in the header section located above the table.
The following information is displayed:
- Start and finish times
• Name of the programme
• A brief programme synopsis
• The programme genre (e.g. Sport, Drama, News) and information regarding stereo and parental guidance for example - Output features (for example, HD and Dolby).
Setting the time window
You can jump forward or backwards to specific times within time range of the Guide (0 to 7 days) as follows:
- To step backward 2 hours, press the RED button. Repeat as required
- To step forward 2 hours, press the GREEN button. Repeat as required
• To step back 24 hours, press the YELLOW button. Repeat as required - To step forward 24 hours, press the BLUE Button. Repeat as required.
Navigate to and watch a programme
To navigate the Guide:
- Use the ▼ and ▲ Buttons to select a channel
- Use the ◀ and ▶ Buttons to move and select a programme
- Press the OK Button to watch the selected programme.
Recording
Record the programme you are watching
To record a programme:
- While watching live TV, press the RECORD Button.
- If the programme you are watching is not part of a series, the programme will start to record.
- If the programme you are watching is an episode of a series, then a message box will be displayed.
![Music 30 Jul 11:24 Margaril Sel and daughter Sproveville Chris Naylor and John Cameron into their North London Name to look through a Newark Trevues from to save 100 packets of music. [5] [Mopyg] Music Genre Award Series Music 30 Jul 11 CD 13 CD 7 BCC GNT 800 Myristica 2012 8 BCC NetD Comedy Tree 3 FV1 Max Running If The Monong 60 Minnie Mokower 4 Channel X Game Bits with Pie 5 Channel Y The Go Comedy Buttons Game Bits with Pie O L River Delta, Annu and Big Ring 6 FV2 Max Newsman of New York Judge July Commentuate Cremation Street 7 BCC HIBB 800 Myristica 2012 8 BCC PISH Five in BCC Power -2-hour -2-hour -2 hours +24 hours Record Set reminder](/content/2026/05/970494/images/43c006dae95709016934a6a56b5fbb3754a7f93b79c8591688c54a1ece4ff5ab.jpg)
- Use the ▼ and ▲ Buttons to select one of these options.
- Press OK to start recording.
- If the programme is available in HD you will be asked if you want to record in standard definition (SD) or in high definition (HD).
DON'T FORGET! HD requires more disk space than SD.
If you selected 'Record once', the programme will start to record and the 'RECORD, icon will be placed next to the programme name in the Guide.
If you selected 'Record series', the programme will start to record and a 'multi-RECORD' icon will be placed next to the programme name in the Guide.
Cancel a recording
To cancel a recording:
- Press the GUIDE Button.
- Use the ▼, ▲, ◀ and ▶ Buttons to navigate to the programme you wish to cancel recording.
- Press the RECORD button as directed in the guide footer.
Advanced Features
Recording (continued)
If the recording was set as 'Record once' it will be immediately cancelled. If the recording was set as 'Record series' then a message box will be displayed:
- Stop recording
-
Stop series
-
Use the ▼ and ▲ Buttons to select one of these options.
-
Press the OK button.
If you selected 'Stop recording' and the programme was part of a 'series' recording, then the current recording will stop but the next episode in the series will be marked with the icon and will be recorded when next broadcast.
If you selected 'Stop series', then the current recording will stop and the icon will be removed from the programme cell in the Guide table.
Recording a future programme
To record a scheduled programme:
- Use the ▼, ▲, ◀ and ▶ Buttons to navigate to the required programme in the guide table.
- Press the RECORD Button on the remote control.
- If the programme you have selected is not part of a series, the programme will start to record.
-
If the programme you are watching is an episode of a series, then a message box will be displayed:
-
Record once
-
Record series
-
Use the ▼ and ▲ Buttons to select one of these options.
- Press OK to start recording.
![Music 12:30 - 13:00 Work Antiques challenge. The teams exit one of the longest ticket outages centres in the country, where exports Anita Meining and CharlesMAN out their expertise. [C] (Entertainment) MON 30 ju6 11:00 12:00 13:00 1 ABC 2011 2 ABC 2012 3 ABC 2013 4 ABC 2014 5 ABC 2015 6 ABC 2016 7 ABC 2017 8 ABC 2018 9 ABC 2019 10 ABC 2020 11 ABC 2021 12 ABC 2022 13 ABC 2023 14 ABC 2024 15 ABC 2025 16 ABC 2026 17 ABC 2027 18 ABC 2028 19 ABC 2029 20 ABC 2030 21 ABC 2031 22 ABC 2032 23 ABC 2033 24 ABC 2034 25 ABC 2035 26 ABC 2036 27 ABC 2037 28 ABC 2038 29 ABC 2039 30 ABC 2040 31 ABC 2041 32 ABC 2042 33 ABC 2043 34 ABC 2044 35 ABC 2045 36 ABC 2046 37 ABC 2047 38 ABC 2048 39 ABC 2049 40 ABC 2050 41 ABC 2051 42 ABC 2052 43 ABC 2053 44 ABC 2054 45 ABC 2055 46 ABC 2056 47 ABC 2057 48 ABC 2058 49 ABC 2059 50 ABC 2060 51 ABC 2061 52 ABC 2062 53 ABC 2063 54 ABC 2064 55 ABC 2065 56 ABC 2066 57 ABC 2067 58 ABC 2068 59 ABC 2069 60 ABC 2070 61 ABC 2071 62 ABC 2072 63 ABC 2073 64 ABC 2074 65 ABC 2075 66 ABC 2076 67 ABC 2077 68 ABC 2078 69 ABC 2079 70 ABC 2080 71 ABC 2081 72 ABC 2082 73 ABC 2083 74 ABC 2084 75 ABC 2085 76 ABC 2086 77 ABC 2087 78 ABC 2088 79 ABC 2089 80 ABC 2090 81 ABC 2091 82 ABC 2092 83 ABC 2093 84 ABC 2094 85 ABC 2095 86 ABC 2096 87 ABC 2097 88 ABC 2098 89 ABC 2099 90 ABC 2100](/content/2026/05/970494/images/742fc0fc05a53ef6ca6ee4d17efd731db44eec5ef78fc527d931c07c4bec158e.jpg)
-
If the programme is available in HD you will be asked if you want to record in standard definition (SD) or in high definition (HD).
-
The 'Record icon' will be placed alongside the programme cell in the table.
The programme will start to be recorded at the set broadcast time.
Cancel a future recording
To cancel a scheduled recording:
- Press the GUIDE Button.
- Use the ▼, ▲, ◀ and ▶ Buttons to navigate to the programme you wish to cancel recording.
- Press the RECORD button as directed in the guide footer.
If the recording was set as 'Record once' the 'Record' icon will be removed and the recording will not take place.
If the recording was set as 'Record series' then a message box will be displayed:
- Stop recording
-
Stop series
-
Use the ▼ and ▲ Buttons to select one of these options.
-
Press the OK button.
If you selected 'Stop recording' and the programme was part of a 'series' recording, then the current recording will stop but the next episode in the series will be marked with the 'multi-RECORD' icon and will be recorded at the next broadcast time.
If you selected 'Stop series', then the current recording will stop and the 'multi-RECORD' icon for this programme will be removed from the guide table.
Resolving recording conflicts
If you try to record two programmes where the broadcast times overlap, the 'Conflict Management' window will be displayed. This allows you to choose a recording to cancel.
Advanced Features
Recording (continued)
![March 30 (Jul. 11:56) Margaret Bell and Daughter Suave Inside-Over Bodies and John Cameron into their North-cation game to look through a human Increase from total 400 points or events. [Q] [Sentinel] Conflict management The following items conflict. Please select the actions to perform to resolve the conflict. Conflict in the Attic BEC TWO 30/07/12 11:00AM Cancel BEC ONE 30/07/12 9:00AM Sister alone BEC ONE 30/07/12 11:00AM Sister alone BEC ONE 30/07/12 9:00AM BEC ONE 30/07/12 11:00AM BEC ONE 30/07/12 9:00AM BEC ONE 30/07/12 11:00AM BEC ONE 30/07/12 9:00AM BEC ONE 30/07/12 11:00AM BEC ONE 30/07/12 9:00AM BFC No information Judge July S Literature Corporation Street BFC SHARE BFC HISTORY 2012 BFC SHARE This is Still Free - Share + 2 Hours - 24 Hours - 24 Hours R Cancel - Watch](/content/2026/05/970494/images/f80cc51905eec1dc383ff764f5a0c0a86ae693c373a3925ea1e3bfa58db52329.jpg)
- Use the ▼ and ▲ Buttons to select the recording(s) you wish to cancel.
DON'T FORGET! All 'recordings' with a Cancel marking will be cancelled when you press the OK Button.
- Use the ◀ and ▶ Buttons to toggle the command between 'Leave alone' and 'Cancel'.
- Press the OK Button to confirm.
If after a minute of being notified you have not made changes to resolve the conflict, the system will cancel one automatically. A notification message will be displayed in the 'Conflict Management' window.
Setting a reminder
If you do not want to miss the start of a programme, you can set your digital box to let you know when the programme is about to start. The 'Reminder' function lets you do this.
![Movie 30 jul 11:25 12:00 - 12:00 3D Minutes Makedown The box are in Windsor to transform health visitor Nicky's home. Most of Four Nicky has the health problems and actor role Straight it was time that the family had a store. [S] (Shimky) MOV 100 MOV 11:00 12:00 13:00 1 SEC 09/1 2 ESC 10/1 3 DV1 4 Channel A 5 Channel S 6 DV2 7 SEC 19/83 8 SEC 20/84 Movie 30 jul 11:00 Movie 30 jul 12:00 Movie 30 jul 13:00 GlycMA 2012 Cash in the Mite Bargus Mart The Room GlycMA Makedown Game Dive with Me O Li River Collar, Anou and Rie King Big Brother Beet�Kawakow of New Y Jidge Judy Econstalay Correaux Street -2 Hours <2 Hours <24 Hours +24 Hours Record Clear reminder](/content/2026/05/970494/images/075ad8839f92754fcf7e95385b9186565f1febf24535d757190cd5295f8c5d35.jpg)
- Use the ▼, ▲, ◀ and ▶ Buttons to navigate to the desired programme in the guide table.
- Press the OK Button on the remote control.
- The 'Reminder' icon will be placed alongside the selected programme in the table.
Cancel a reminder
- Use the ▼, ▲, ◀ and ▶ Buttons to navigate to the programme to be unmarked in the guide table.
- Press the OK Button on the remote control.
- The 'Reminder' icon will be removed from alongside the selected programme in the table.
Advanced Features
Library
![BUSH 12:35 - 13:00 Antiquen challenges. The walls and the Blues Third Big of Anglarya antiques fall. This womeat discourses a very special parainish reflection at anniversary Hall, [%] (Entertainment) Sargan Hunt 1 BBC TwiS Mon 6 Aug 12-15 Scheduled Sargan Hunt 2 BBC TwiS Fri 3 Aug 12-15 Scheduled Sargan Hunt 2 BBC TwiS Thu 2 Aug 12-15 Scheduled Sargan Hunt 3 BBC TwiS Wnt 1 Aug 12-15 Scheduled Sargan Hunt 2 BBC TwiS Ton 31 Jul 12-30 Scheduled Sargan Hunt 2 BBC TwiS Mon 30 Jul 12-15 Scheduled 100% remaining Delete Sort order](/content/2026/05/970494/images/fc69ef291e900bd4620a6bb1f6712525a07beaf4246bcdc68445641ef6fc5cc5.jpg)
The Library lists the recordings you have made and stored on your digital box. The recordings can be selected and played from here, and also deleted.
Accessing the Library
The Library lists recorded programmes and scheduled recordings in a four column list and shows the following information:
- Programme Name
• Channel Number and Name - Date of recording
• Status (Recording, Watched and Recorded)
The Library tools along the bottom of the display allow you to:
- Sort in Date order
The Library has three sections:
- Header: This displays information specific to the selected recording, and includes programme synopsis, broadcast time and the programme name
- Library table: The table lists the recordings and other relevant information
- Footer: Provides a set of coloured buttons to carry out functions used for management and playback of the recordings
Playing a recording
To play a recording:
- Press the LIBRARY Button on the remote control to open the library.
DON'T FORGET! You can also access the Library from the Main menu.
- to navigate to the recording you wish to play.
- Press the OK button.
The recording will start to play from the beginning.
Pausing and resuming play
To pause and resume playback of a recording:
- During play, press the PLAY/PAUSE Button.
- Play will be paused and the screen display will be 'frozen'.
- A progress bar will be displayed at the foot of the screen which shows elapsed play time and total play time.
- Press the PLAY/PAUSE Button on to resume play from the paused position.
'Resume play' and 'Play from start' options
You can set a recording to play from the last viewed position or from the start.
- Press the LIBRARY Button on the remote control to open the library.
- Use the ▼, ▲, ◀ and ▶ Buttons to navigate to the recording you wish to play.
- Press the GREEN Button. The 'Options' menu will be displayed.
- Use the Use the ▼ and ▲ Buttons to select from 'Resume play' or 'Play from start'.
- Press the OK Button.
- The recording will playback now according to the option selected.
'Play from time' option
You may know the time in a recording that you would like to start playback from.
- Press the LIBRARY Button on the remote control to open the library.
- Use the ▼, ▲, ◀ and ▶ Buttons to navigate to the recording you wish to play.
- Press the GREEN Button. The 'Options' menu will be displayed.
- Use the ▼ and ▲ Buttons to select 'Play from time'.
- Press the OK Button.
- A dialogue box will open named 'Play from time'.
- Use the numerical buttons on the remote control
Advanced Features
Library (continued)
to enter the start time in hours and minutes.
- Use the ◀ and ▶ Buttons to switch between the hours and minutes counters in the box.
- Press the OK Button to begin playback at the selected time.
Protecting a recording
To prevent anyone from deleting your recordings, you can lock the recording so that your PIN needs to be entered before the recording can be deleted.
![BUSH Tel: 31 Jul 14:20 Action covers from the bathroom, (beach volleyball), artery and taste benign complications. Sailing gets under way at room and minutes the banks separates in the weightlifting [5] [hour] 96% monitoring Olympia 2012 Tel: 85C MHz Prior 30 Jul 12:41 Recorded Olympia 2012 1 BSC ONE Prior 30 Jul 12:53 Recorded Delete Options Sort order View](/content/2026/05/970494/images/1b58d61b3a9565e51e884f57648b94be67d51940c4dbec48ff2bdfa6b8ba0989.jpg)
- Press the LIBRARY Button on the remote control to open the library.
- Use the ▼, ▲, ◀ and ▶ Buttons to navigate to the recording you wish to play.
- Press the GREEN Button. The 'Options' menu will be displayed.
- Use the ▼ and ▲ Buttons to select 'Protect the recording'.
- Press the OK Button.
- A message box will open named 'Parental control'.
- Use the numerical Buttons on the remote control and enter your four-digit parental control PIN.
- After a brief delay, the box will disappear and a locked padlock symbol will be displayed alongside the recording in the table.
To remove the protection, follow the above procedure and select 'Remove protection' at step 4.
Stop playing a recording
This function will stop playback and close the playback session.
-
During playback, press the button on the remote control.
-
Playback will stop and the Library will be displayed.
Deleting a recording
When you wish to permanently remove a recording from the hard disk:
- Use the ▼, ▲, ◀ and ▶ Buttons to navigate to the recording you wish to delete.
- Press the RED Button (Delete). A message box will open named 'Delete Recording'.
- Use the button to select 'Yes, delete it'.
- Press the OK Button.
The recording will be removed from the list and deleted from the hard-drive.
Fast fwd and fast rewind playback
To playback at higher speeds:
- Press the ▶▶ Button (or◀◀) Button while the recording is playing.
- The recording will play at a higher forward (or reverse) speed.
An information panel opens along the bottom of the screen and now shows playback at a speed of x2. An arrow indicates the direction: for forward and for reverse.
- Press the ▶▶ Button (or◀◀) Button to reach the required playback speed. Each press of the or button steps through the preset speeds: x2, x4, x8, x16, x32, x64.
- Press the PLAY/PAUSE Button to return to normal playback speed in the forward direction.
Advanced Features
BBC iPlayer
BBC iPlayer is a free service that lets you catch up with programmes from the past seven days that you may have missed or want to watch again.
To watch BBC iPlayer, your digital box must have a broadband connection to the internet.
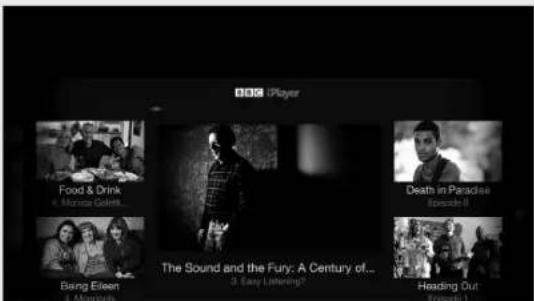
Once you access the BBC iPlayer application, the BBC iPlayer home page is displayed, see above.
Use the ▼, ▲, ◀ and ▶ Buttons to move around the page and select from the displayed options using the OK button.
Channel list
The channel list function displays a list of all the TV and Radio programmes found during installation in channel number order.
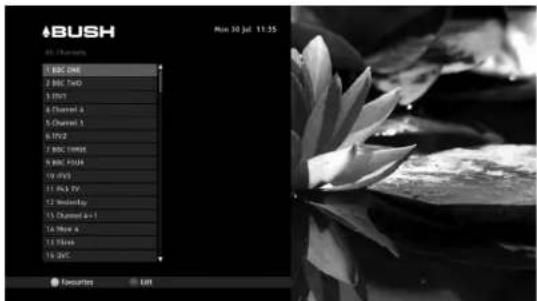
The list is displayed in a single column in numerical order. Sixteen channels are displayed at a time.
You can use the ▼ and ▲ Buttons to scroll up or down the list and to see other channels in the list.
- Press the CH LIST Button to open the channel list.
- Use the ▼ and ▲ Buttons to select the channel required.
- Press the OK Button to watch the channel.
The channel list will be removed from the screen and return to live TV.
Favourites list
You can create a list of your favourite channels, the ones you most frequently watch. The favourites list is created by selecting specific channels from the main channel list and adding them to your favourites list. It will be called and displayed using the FAV Button.
You can create more than one Favourites list. This will be useful when there is more than one user of the digital box.
How to create your favourites list
- Press the CH LIST Button. The Channel List will be displayed.
- Press the BLUE (Edit) Button.
- Use the ▼ and ▲ Buttons to select a channel you want in your Favourites list.
- Press the OK Button to place a mark (tick) alongside the channel in the main list. (Press the button again to unmark unwanted channels).
Advanced Features
Channel list (continued)
- Repeat steps 3 & 4 until you have finished marking all the channels you want to make up your favourites list.
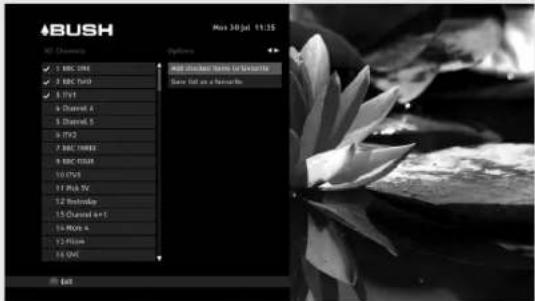
- Use the ▶ Button to move to the 'Options' column.
- Use the ▼ and ▲ Buttons to the 'Add checked items to favourite'.
- Press the OK Button.
- Use the ▼ and ▲ Buttons to select 'New favourite'.
- Press the OK Button.
- Use the ▼, ▲, ◀ and ▶ Buttons to navigate the on-screen keyboard. Enter the name you want to call your favourites list.
- When the name has been entered, use the ▼, ▲, ◀ and ▶ Buttons to select 'Use'.
- Press the OK Button to save the list with this name.
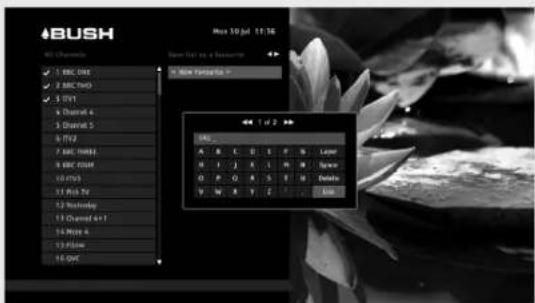
- Press the BLUE Button to exit.
- Press the YELLOW Button to enter the favourites selection screen.
- Select the required Favourites list.
- The limited channel set will now appear in the left column.
- The FAV button will now step through this list.
To display your favourites list
- Press the FAV Button. The Favourites list will be displayed.
- Use the ▼ and ▲ Buttons to select the channel required.
- Press the OK Button to watch the channel.
Settings Menu
Using settings
The Settings Menu functions let you configure your digital box to your optimal viewing preferences.
To open and display the Settings Menu,
- Press the MENU button.
- The Main menu will be displayed on the left side of the screen.
- Press the ▼ and ▲ Buttons to select Settings.
- Press the OK button.
- After a short delay, during which time 'Loading ...' is displayed, the Settings menus will be displayed.
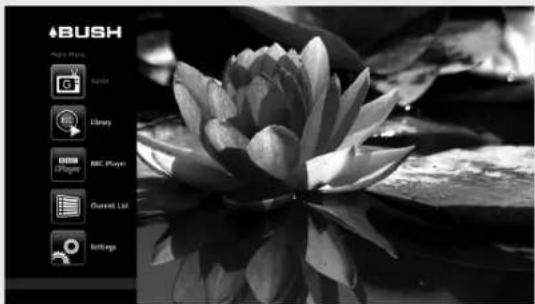
- Use the ◀ and ▶ Buttons to step along the menu bar. (The selected item will be coloured red).
- Press the OK button to access the selected menu and display its functions and their settings.
- Use the ▼ Button to move into the settings list.
- Use the ▼ and ▲ Buttons to move up and down this list to reach the required function to set.
- Use the ◀ and ▶ Buttons to adjust the setting from the available presets, or where the setting is 'Launch', press the OK Button to 'Launch' the function.
- To exit a menu press the ▲ Button until the menu bar is reached.
- To exit and return to the Main menu, press the MENU Button.
- To remove the Main menu, press the MENU Button again.
Display and audio
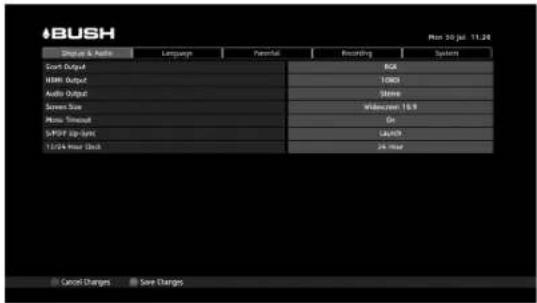
HDMI video output
This is the highest quality video output on your digital box. The output resolution can be set to one of four resolutions.
Select the resolution to match the best HDMI input according to your TV's user manual. Usually the higher the resolution, the better the picture quality.
The available options are 576p, 720p, 1080i and 1080p.
Audio output
This sets the audio output to suit how audio will be heard.
If you have not connected a surround sound system, select 'Stereo'.
If you have connected your digital box to a surround sound system using the S/PDIF output, or to an AV receiver using HDMI then select 'Bitstream'.
Screen size
This allows you to set the aspect ratio output by your digital box to your TV.
The available options are: Letterbox 4:3, Pan and Scan 4:3, Widescreen 4:3 and Widescreen 16:9.
Menu timeout
The menus can remain on the screen until turned off manually, or turn off automatically after a preset time.
The available options are On or Off.
Lip-sync
Sometimes the soundtrack in a broadcast is out of sync with the video. The Lip-Sync option can be used to correct this.
To re-synchronise sound and video:
- Launch the function.
Settings Menu
Display and audio (continued)
- An adjustment bar will be displayed at the bottom of the screen.
- Use the ◀ and ▶ buttons to correct the synchronisation between sound and video. The set level is visible in the adjustment bar.
- Press the OK Button to save the current setting.
12/24 hour clock
The time format used to display start and finish times can be set to be 12 hour or 24 hour format.
Language
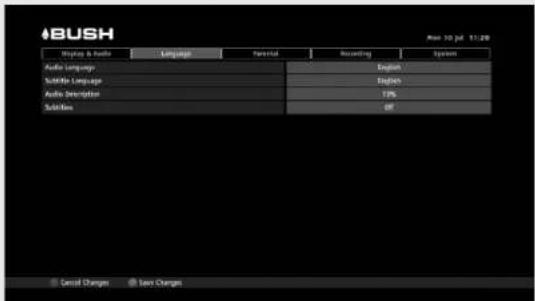
Audio language
The language spoken in a broadcast can be set to one of four languages if available. The programme being watched will be heard in the language set when broadcast.
The available options are: English, Welsh, Gaelic and Old Irish.
Subtitle language
This sets the default subtitle language.
The available options (if broadcasted) are: English, Welsh, Gaelic, Old Irish, English Enhanced, Welsh Enhanced, Gaelic Enhanced and Old Irish Enhanced.
Audio description
This sets the volume of the Audio Description voice in relation to the normal audio as a percentage of the total volume.
The available options are: 10, 20, 30, 40, 50, 60, 70, 80, 90 and 100%.
Subtitles
This option allows you to turn subtitles on or off in a similar manner to the SUB button.
The available options are: On and Off.Parental
Parental

When the settings menu is selected, you must enter the system PIN. Use the numerical buttons on the remote control to enter the PIN.
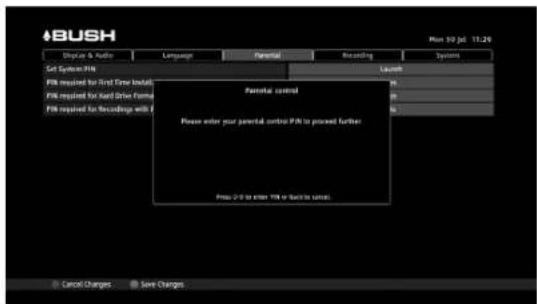
If the entry is correct, it will be recognised and the Parental settings will be available for checking and editing.
If the incorrect PIN has been entered you will be notified and given another opportunity to enter the correct PIN.
Set system PIN
This function lets you choose your own Parental PIN to replace the factory set PIN.
To set a new PIN of your choice:
- Use the ▼ and ▲ Buttons to select 'Set System PIN'. A panel opens asking you to enter your new PIN.
- Press the OK Button.
- Use the numerical buttons on the remote control and enter your new PIN. The message 'Please confirm your new PIN' will be displayed.
- Use the numerical buttons on the remote control and enter your new PIN again. A message 'New PIN confirmed' will be displayed briefly.
- The Parental PIN will now be set to your new number.
Settings Menu
Parental (continued)
PIN required for first time installation
This allows you to prevent a First Time Installation re-run being performed without the correct PIN.
Set to Yes when you require the PIN to be entered before a First Time Installation can be carried out.
PIN required for hard drive format
This prevents the hard drive from being formatted without the correct PIN.
Set to Yes when you require the PIN to be entered before a hard drive format can be carried out.
PIN required for recordings with parental control
You can set your digital box to require the PIN is entered when a programme that has a Parental guidance symbol is being set to recorded.
This symbol appears in the programme descriptor panel to alert you that the programme may be unsuitable for viewing by children' The programme may contain bad language, violence or other adult material.
Set this function to 'Yes' when you require the Parental PIN to be entered when such a programme is being set to record.
Before you can adjust these settings, you must first enter your parental control PIN when requested in the Parental control dialogue box.
Recording
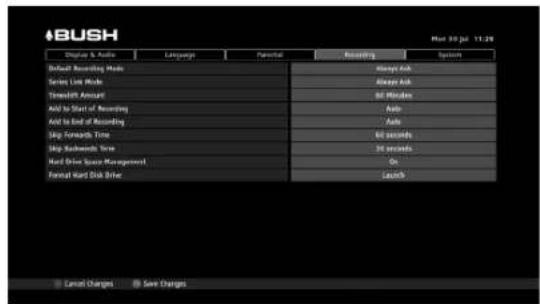
Default recording mode
This lets you set the default recording mode. Note that high definition will use more hard drive space than Standard Definition recordings. If you do not want to specify in advance, Select 'Always Ask' and you will be asked at the time of selecting the recording.
The available options are: High Definition, Standard Definition and Always Ask.
Series link mode
This lets you set the default series link mode (Record once or Record series). If you do not want to specify in advance select 'Always Ask' and you will be asked at the time of selecting the recording.
The available options are: Record Entire Series, Record Single Event Only, Always Ask.
Timeshift amount
Timeshift amount is the amount of time you wish to reserve in order to 'pause' a live programme.
The available options are: 30 minutes, 60 minutes, 90 minutes and 120 minutes.
Add to start of recording
This sets the time added to the beginning of a recording. You are recommended to leave this set to Auto.
The available options are:
Auto, 1 minute, 2 minutes, 3 minutes,
4 minutes and 5 minutes.
Add to end of recording
This sets the time added to the end of a recording. You are recommended to leave this set to Auto.
The available options are:
Auto, 1 minute, 2 minutes, 3 minutes, 4 minutes and 5 minutes.
Settings Menu
Recording (continued)
Skip forwards time
This sets the default time duration while fast forwarding through Paused TV.
The available options are: 5 seconds, 15 seconds, 30 seconds and 60 seconds.
Skip backwards time
This sets the default time duration while fast rewinding through Paused TV.
The available options are: 5 seconds, 15 seconds, 30 seconds and 60 seconds.
Automatic hard drive space management
This sets the default 'Hard Drive Space Management'.
When set to On, the management is performed automatically. When your disk is full and you want to make a new recording, the system will automatically delete the oldest watched recording that is not marked to be kept.
If set to Off, then manual management must be performed by you deleting recordings yourself, to make space for your new recordings. If you don't do this, your new recordings will fail.
DON'T FORGET! If you don't do this your new recordings will fail.
Format hard disk drive
DON'T FORGET! Formatting is permanent and cannot be undone.
This lets you format the hard drive in your digital box, deleting all data and recordings.
To format the drive:
- Use the ▼ and ▲ Buttons to select 'Format Hard Disk Drive'.
- Press the OK Button.
- The 'Format Hard Disk Drive' message box will be displayed informing you that formatting the hard disk drive will delete all recordings from the hard drive.
- Use the ◀ and ▶ Buttons to select 'No' or
'Yes' and press the OK Button.
- If your reply at step 3 is 'No', the function will be exited.
- If your reply at step 3 is 'Yes', and the function in the 'Format Hard Drive' option in the 'Parental' menu has been set to 'Yes' then formatting will begin.
- If the 'Format Hard Drive' option in the 'Parental' menu has been set to 'No', then the 'Parental control' message box now will ask for the Parental PIN to be entered.
- To proceed, enter the PIN and press the OK Button.
- Formatting will begin.
Settings Menu
System
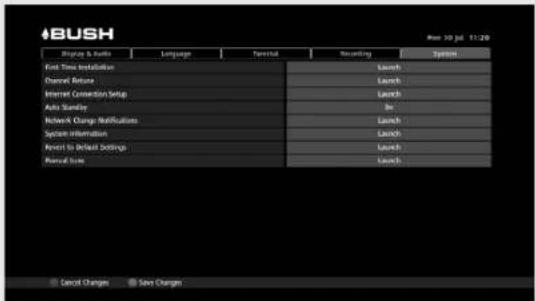
First time installation
This option allows you to perform a First Time Installation re-run. Please refer to Installation in section 2, Getting Started.
Channel retune
Launch this function when you want to scan for channels at any time after First Time Installation, for example if you have moved the digital box to another location where the channel frequencies are different or to another location in the same region, but with a better reception.
DON'T FORGET! Accepting the new scan will overwrite the existing channel information.
Carry out a retune as follows.
- When the System settings menu is selected, use the ▼ and ▲ Buttons to select 'Channel Retune'.
- Press the OK button.
- Enter your parental control PIN (if set) in the 'Parental Control' window that opens using the numerical keys on the remote control.
- The channel scanning window opens displaying TV and Radio channel counters.
- Press the BLUE (Start Scan) Button to begin.
- Scanning will start and the channel counter will increase incrementally for each channel found. This will take several minutes to complete.
- The progress bar grows as the scanning proceeds until finished (100%) and the total number of TV and Radio channels is then displayed.
-
Press the GREEN (View Channels) Button to see the lists of channels found.
-
Press the GREEN (View Channels) Button again to hide the lists.
- To accept the channels found and overwrite the existing channel details, and exit, press the OK Button,
- Or press the BACK Button to exit the function without applying any changes, or press the BLUE (Re-Scan) Button to scan again.
Internet connection setup
When enabled your digital box will automatically set up internet connection settings.
When disabled, you can configure the internet settings for your digital box manually.
Auto standby
If set to 'Yes', your digital box will automatically switch to standby mode after 3 hours in order to reduce power consumption. The available options are: Yes and No.
Network change notification
When a network switch-over event occurs, a notification will be broadcast that informs you that you will need to carry out a retune. If you want to receive this notification, select Yes.
The available options are: Yes and No.
System information
This provides system information including Hardware and Software Versions.
Have this information available if you need to contact the customer helpline.
Revert to default settings
This function allows you to return your digital box to its default factory settings.
Settings Menu
System (continued)
Manual retune
This function allows you to search for a particular channel. This may be used to scan for a channel that should be, but is not, in your channel list.
This function is only expected to be useful for users with knowledge of transmission frequencies.
To perform a Manual tune, carry out the following.
- When the System settings menu is selected, use the ▼ and ▲ Buttons to select 'Channel Retune'.
- Press the OK Button.
- The 'Manual search' window will be displayed.
- Use the ▼, ▲, ◀ and ▶ Buttons to navigate and edit the Channel number and Frequency for the channel you are searching for.
- Press the BLUE (Start Scan) Button to start the search, or press the BACK button to exit without changing any settings.
- If the BLUE Button has been pressed, scanning will start and the channel counter will increase incrementally for each channel found. This will take a few minutes to complete.
- The progress bar grows as the scanning proceeds until finished (100%) and the total number of TV and Radio channels will be displayed.

Safety Information
Important - Please read these instructions fully before installing or operating

CAUTION
RISK OF ELECTRIC SHOCK DO NOT OPEN
WARNING: HIGH VOLTAGE INSIDE. TO PREVENT ELECTRICAL SHOCK, DO NOT REMOVE ANY COVER OR SCREW.

Power source
- The digital TV recorder should be operated only from a 230 V AC, 50 Hz outlet.
- This digital TV recorder has been designed and manufactured to meet European safety standards, but like any electrical equipment, care must be taken if you are to obtain the best results and safety is to be assured.
- Warning: Do not leave the digital TV recorder switched on when it is unattended for long periods of time, unless it is specifically stated that it is designed for unattended operation or has a standby mode.
- Warning: Do not remove any fixed covers as this may expose you to dangerous voltages.
Positioning the digital TV recorder
- Do not block the ventilation openings.
- To prevent damage to the digital TV recorder, do not place any objects on top of the digital TV recorder.
- Only use the digital TV recorder in moderate climates.
Power cord and plug
- Make sure that all electrical connections including the mains plug, extension leads and interconnections between pieces of equipment are properly made in accordance with the manufacturer's instructions.

The lightning flash with arrowhead symbol, within an equilateral triangle, is intended to alert the user to the presence of uninsulated “dangerous voltage” within the products enclosure that may be a risk of sufficient magnitude to constitute a risk of electric shock to persons.

The exclamation point within an equilateral triangle is intended to alert the user to the presence of important operating and maintenance (servicing) instructions in the literature accompanying the appliance.
- The power cord plug should be easily accessible. In case of storms and lightning, when going on holiday, or when the digital TV recorder is not used for a long period of time, disconnect the power cord from the mains power socket.
- Do not place the digital TV recorder, furniture, etc. on the power cord or pinch the cord.
- Handle the power cord by the plug. Do not unplug the digital TV recorder by pulling the power cord.
- Never touch the power cord/plug with wet hands as this could cause a short circuit or electric shock.
- Never make a knot in the power cord or tie it with other cords.
- Power cords should be placed in such a way that they are not likely to be stepped on or driven over.
- A damaged power cord/plug can cause fire or give you an electric shock. When damaged it must be replaced, this should only be done by qualified personnel.
- Switch off and remove the mains plug when making or changing connections.
- Do not continue to operate the digital TV recorder if you are ever in doubt about it working normally, or if it is damaged in any way. Switch it off, unplug the digital TV recorder from the mains and consult your dealer.

Safety Information
Moisture and Water
- Do not use this digital TV recorder in a humid or damp place (avoid bathrooms, the sink in the kitchen, and near the washing machine).
- Do not expose this digital TV recorder to rain or water, as this may be dangerous.
- Do not place objects filled with liquids, such as flower vases, on top of the digital TV recorder. Avoid dripping or splashing.
- If any liquid falls into the digital TV recorder, unplug it and have it checked by qualified personnel before operating it any further.
Ventilation
- The slots and openings on the digital TV recorder are intended for ventilation and to ensure reliable operation.
• To prevent overheating, these openings must not be blocked or covered in any way. Overheating will cause damage and shorten the life of the product.
Heat sources and flames
- Do not expose the digital TV recorder to direct sunlight or other heat sources.
- The digital TV recorder should not be placed near to open flames and sources of intense heat such as an electric heater.
- Ensure that no open flame sources, such as lighted candles, are placed on top of the digital TV recorder.
Cleaning
- Before cleaning, unplug the digital TV recorder from the wall socket.
- Do not use liquid or aerosol cleaners. Only use a soft, dry cloth.
Batteries
- Warning: Incorrect installation of batteries may cause battery leakage and corrosion, resulting in damage to the remote control.
- Do not mix old and new batteries, or batteries of different types.
- Do not dispose of batteries in a fire.
- Do not dispose of batteries with normal household waste, take them to a local recycling centre.

Replacement parts
When replacement parts are required, make sure that the service technician has used replacement parts, which are specified by the manufacturer or have the same specifications as the original one. Unauthorised substitutions may result in fire, electrical shock or other hazards.
Servicing
- Warning: Risk of electric shock, do not attempt to repair, service or modify this digital TV recorder yourself. Contact the manufacturer, their approved service agent or the Customer Helpline: 0845 604 0105.
Product Support
The Argos Technical Helpline is here to help
Technical experts are available 7 days a week
- Simple help and advice on setting up your digital TV recorder.
• Guidance on connecting other devices to your digital TV recorder such as a DVD player. - Order spare parts, including that lost remote control.
- Any other technical issues you may need assistance with.
Call us today: 0845 604 0105
Local call rates applies*
Lines open 9am-8pm Monday to Saturday and 10am-4pm Sunday.
* Calls to Argos enquiry lines may attract a charge and set up fee from residential lines depending on your call plan/tariff. Mobile and other providers costs may vary, see www.bt.com/pricing for details.
For security and training purposes, telephone calls to and from customer service centres may be recorded and monitored. Calls from Republic of Ireland will attract international call charges.
Product Support
Trouble shooting
No Power
If your digital TV recorder has no power, please check the power cord plug is connected to the mains power socket.
Poor or no picture or sound
- No Picture means that your digital TV recorder is not receiving a transmission. Have you selected the correct button on the remote control? Try once more.
- Is the aerial connected properly?
- Is the digital TV recorder or house aerial located too close to a non-earthed audio equipment or neon lights, etc?
- Mountains or high buildings can cause double pictures or ghost images. Sometimes you can improve the picture quality by changing the direction of the aerial. Is the picture unrecognisable?
- Are the plugs connected tightly to the aerial socket?
- Is the aerial cable damaged?
- Are suitable plugs used to connect the aerial?
- Is the aspect ratio set correctly?
- Have you selected the correct TV system?
- Please retune the channels.
- If you are in doubt, consult your dealer.
No sound
- Has the digital TV recorder been set to mute? To cancel mute, press the “▲” button, or increase the volume level.
No channels
- Some TV channels are not available in every area.
- Is the aerial connected properly? Signal boosters or amplifiers are available to improve reception.
Forgotten PIN
- If you have forgotten your PIN, please contact the call centre on 0845 604 0105 for assistance. You will need your system information available.
Wrong information screen and unusual behaviour
- Press STANDBY on the remote control to turn the digital TV recorder off and then on again.
- Try again but wait for 10 seconds before turning it back on again.
- Contact the call centre on 0845 604 0105 for assistance if this doesn't fix the problem. You will need your system information available.
Remote control does not operate
Your digital TV recorder no longer responds to the remote control. The batteries may be exhaust, if so you can still use the buttons on the front of the digital TV recorder to operate some functions.
Product Support
Trouble shooting
Hard Disk Drive (HDD)
This digital TV recorder uses a rewritable electronic storage media called a Hard Disk Drive (HDD) to store any recorded programmes.
Electronic Programme Guide (EPG)
The Electronic Programme Guide (EPG) displays a broadcast schedule for all channels for the next 8 days allowing you to easily select and view programmes. The EPG is capable of displaying additional programme information such as a brief synopsis and if subtitles / audio descriptions are available. Programmes or a series of programmes can easily be selected for recording at the touch of a button through the EPG.
MHEG5
This is an international standard for broadcasting interactive digital content. The digital text received by the digital TV recorder is broadcast using the MHEG5 standard.
Aspect ratio
Depending on the TV connected to your digital TV recorder, you will need to select an appropriate aspect ratio to ensure the picture is displayed correctly. The aspect ratio of the picture is the ratio of its width to its height. This digital TV recorder can display pictures in either 4:3 or 16:9 aspect ratios.
If you have an older TV with a 'square' screen, you should select a 4:3 aspect ratio.
If you have a modern widescreen TV, you should select a 16:9 aspect ratio.
RGB
RGB is short for Red Green Blue. This is used to describe a format of the video signal sent between the digital TV recorder and your TV. If you have selected the RGB video output setting, the signal will be broken down into Red, Green and Blue elements. This ensures a high quality picture.
CVBS
CVBS is short for Composite Video, Blanking and Sync. This is used to describe a format of the video signal sent between the digital TV recorder and your TV. If you have selected the CVBS video output setting, a composite signal will be created. This creates a lower quality picture than RGB.
RF IN
The socket on the rear of your digital TV recorder which is used to receive the signal from your aerial.
RF OUT
The socket on the rear of digital TV recorder which is used to transmit the aerial signal from the digital TV recorder to your TV.
Product Support
Disposal information
Instructions for waste disposal
Packaging and packaging aids are recyclable and should principally be recycled. Packaging materials, such as foil bags, must be kept away from children.
Information for Users on Disposal of old Equipment and Batteries (European Union only)
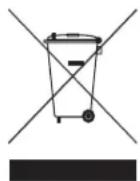
These symbols indicate that the equipment with these symbols should not be disposed of as general household waste. If you want to dispose of the product or battery, please consider the collection systems or facilities for appropriate recycling.
Notice: The sign Pb below the symbol for the batteries indicates that this battery contains lead.
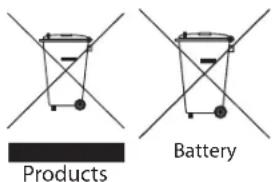
Information for Users in European Union Countries
This symbol on the product or on its packaging means that your electrical and electronic device should be disposed of at the end of its service life separately from your household wastes. There are separate collection systems for recycling in the EU.
For more information, please contact the local
authority or the dealer where you purchased the product.



Guarantee
Argos
Product Guarantee
This product is guaranteed against manufacturing defects for a period of
1
Year
This product is guaranteed for twelve months from the date of original purchase. Any defect that arises due to faulty materials or workmanship will wither be replaced. refunded or repaired free of charge where possible during this period by the dealer from whom you purchased the unit
The guarantee is subject to the following provisions:
- The guarantee does not cover accidental damage, misuse, cabinet parts, knobs or consumable items.
- The product must be correctly installed and operated in accordance with the instructions contained in this manual.
- It must be used solely for domestic purpose.
- The guarantee will be rendered invalid if the product is re-sold or has been damaged by inexpert repair.
- Specifications are subject to change without notice.
- The manufacturer disclaims any liability for the incidental or consequential damages.
- The guarantee is in addition to, and does not diminish your statutory or legal rights.
• In the event of a problem with the product with in the guarantee period call the Customer Helpline: 0845 604 0105
Guarantor: Argos Ltd
489 - 499 Avebury Boulevard
Central Milton Keynes
MK9 2NW

- Freeview+ HD Digital TV Recorder
- ABUSH
- Important - Please read these instructions fully before installing or operating
- For any help concerning set up and use of your digital TV recorder please call the Customer Helpline: 0845 604 0105
- Contents
- Getting Started 4-9
- Safety Information 29
- Product Support 31-34
- Guarantee 36
- Basic Features 10-14
- Advanced Features 15-22
- Settings Menu 23-28
- Getting Started
- Technical experts are available 7 days a week
- Call us today: 0845 604 0105
- Lines open 9am-8pm Monday to Saturday and 10am-4pm Sunday.
- Product Features
- Recording and Playback - Features
- Accessories included
- Your remote control
- Connecting your digital box to your TV
- Connecting your digital box to your broadband router
- Power Connection
- Remote control - inserting batteries
- Initial set up
- Easy install (recommended)
- Advanced install
- DON'T FORGET!
- Basic Features
- Using your digital box
- Selecting channels
- Using the number buttons
- Using the channel change buttons
- Using the guide
- Using the channel list
- Using the channel list (continued)
- Changing the volume
- Using mute
- Pausing live TV
- To pause a live TV programme
- To resume play of the TV programme
- To rewind a paused TV programme
- To fast forward a paused TV programme
- Recording a programme
- Using the library
- Playing a recording
- Other remote control buttons
- Exit
- Home
- Audio description
- Subtitles
- Back
- Information (i button)
- Other remote control buttons (continued)
- Audio
- Swap
- Text
- Advanced Features
- Main menu
- Guide
- Guide structure
- Guide (continued)
- Programme information
- Setting the time window
- Navigate to and watch a programme
- Recording
- Record the programme you are watching
- Cancel a recording
- Recording (continued)
- Recording a future programme
- Cancel a future recording
- Resolving recording conflicts
- Setting a reminder
- Cancel a reminder
- Library
- Accessing the Library
- Pausing and resuming play
- 'Resume play' and 'Play from start' options
- 'Play from time' option
- Library (continued)
- Protecting a recording
- Stop playing a recording
- Deleting a recording
- Fast fwd and fast rewind playback
- BBC iPlayer
- Channel list
- Favourites list
- How to create your favourites list
- Channel list (continued)
- To display your favourites list
- Settings Menu
- Using settings
- Display and audio
- HDMI video output
- Audio output
- Screen size
- Menu timeout
- Lip-sync
- Display and audio (continued)
- 12/24 hour clock
- Language
- Audio language
- Subtitle language
- Parental
- Set system PIN
- Parental (continued)
- PIN required for first time installation
- PIN required for hard drive format
- PIN required for recordings with parental control
- Default recording mode
- Series link mode
- Timeshift amount
- Add to start of recording
- Add to end of recording
- Skip forwards time
- Skip backwards time
- Automatic hard drive space management
- Format hard disk drive
- System
- First time installation
- Channel retune
- Internet connection setup
- Auto standby
- Network change notification
- System information
- Revert to default settings
- System (continued)
- Manual retune
- Safety Information
- Power source
- Positioning the digital TV recorder
- Power cord and plug
- Moisture and Water
- Ventilation
- Heat sources and flames
- Cleaning
- Batteries
- Replacement parts
- Servicing
- Product Support
- Trouble shooting
- No Power
- Poor or no picture or sound
- No sound
- No channels
- Forgotten PIN
- Wrong information screen and unusual behaviour
- Remote control does not operate
- Hard Disk Drive (HDD)
- Electronic Programme Guide (EPG)
- MHEG5
- Aspect ratio
- RGB
- CVBS
- RF IN
- RF OUT
- Disposal information
- Instructions for waste disposal
- Guarantee
- Argos
- Product Guarantee
Brand : BUSH
Model : BU102ZRH50
Category : Receiver