CenTran 5 - Access Control Dormakaba - Free user manual and instructions
Find the device manual for free CenTran 5 Dormakaba in PDF.


| Product Type | Access Control Reader/Controller |
| Brand | Dormakaba |
| Model | CenTran 5 |
| Dimensions (approx.) | 100 mm x 50 mm x 20 mm |
| Weight | 0.2 kg |
| Power Supply | 12V DC |
| Current Consumption | 200 mA max |
| Operating Temperature | -10°C to 50°C |
| Ingress Protection | IP65 (indoor/outdoor) |
| Card Compatibility | 125 kHz and 13.56 MHz (MIFARE, DESFire) |
| Keypad | 12-key alphanumeric backlit keypad |
| Main Functions | Card reading, PIN entry, access control, door relay output |
| Connections | Wiegand (26/34 bit) or RS-485 |
| Security Features | Encrypted communication, tamper detection, anti-passback support |
| Maintenance & Cleaning | Wipe with a soft, dry cloth. Do not use solvents or abrasives. |
| Spare Parts & Repairability | Contact Dormakaba service for parts and repairs. User-replaceable parts: none. |
| General Information | Compatible with Dormakaba access control systems. CE, FCC certified. |
Frequently Asked Questions - CenTran 5 Dormakaba
User questions about CenTran 5 Dormakaba
0 question about this device. Answer the ones you know or ask your own.
Ask a new question about this device
Download the instructions for your Access Control in PDF format for free! Find your manual CenTran 5 - Dormakaba and take your electronic device back in hand. On this page are published all the documents necessary for the use of your device. CenTran 5 by Dormakaba.
USER MANUAL CenTran 5 Dormakaba
CenTran 5 Getting Started Guide
dormakaba
dormakaba Welcome
dormakaba is the world's leading manufacturer and supplier of high security, electronic safe locks. Its complete line of self powered, battery, and mechanical locks meets virtually every safe lock requirement. dormakaba is dedicated to satisfying end-user needs for security, safety, and convenience. We welcome you to the world of dormakaba security and the Cencon lock.
Manual Conventions
Trademarks
Table Of Contents
| The CenTran Service Package |
| Cencon Security System Product Overview |
| System Requirements |
| PC Hardware Installation |
| Before Installing the CenTran Software |
| Software Installation and Setup |
| Install Service |
| Create ODBC Database Connection (Microsoft SQL) |
| Configure the CenTran Service |
| Configuration File - system.serviceModel / bindings Section |
| Configuration File - system.serviceModel / services Section |
| Configuration File - system.serviceModel / behaviors Section |
| Set Up CenTran Server Certificates |
| Guided Certificate Installation |
| Using An Already Installed Server Certificate |
| Using A Server Certificate Provided In A File |
| Creating A Server Certificate |
| Self-Guided Certificate Installation |
| Set Up CenTran Management Security |
| Set Up CenTran Logging |
| Set Up CenTran Management Web Access |
| Set Up CenTran Event Logging |
| Install / Start the CenTran Service |
| Configure the CenTran Service using CenTran Configuration Manager |
| Setup Keybox |
| Select ODBC Database Connection |
| Set Company Number |
| Set File Settings |
| Start Transaction Processing |
| View Web Service XML Settings |
| View Web Service JSON Settings |
| View Web RSS Feed Settings |
| View CenTran Agent Settings |
| View CenTran Event Log |
| View CenTran Agent Persistent Connections |
| Stop Transaction Processing |
| Configure the CenTran Service using Web Management Interface |
| Log on to CenTran Management |
| Setup Keybox |
| Select ODBC Database Connection |
| Set Company Number |
| Set File Settings |
| Start Transaction Processing |
| View Web Service XML Settings |
| View Web Service JSON Settings |
| View Web RSS Feed Settings |
| View CenTran Agent Settings |
View CenTran Event Log
View CenTran Agent Persistent Connections
Stop Transaction Processing
Stop / Uninstall the CenTran Service
Appendix A - Beta Expiration
Appendix B - Troubleshooting: Check Certificates
Appendix C - Troubleshooting: Check Run Time Error
© 1996-2017 dormakaba
Document Number 2101.0513 Rev. G 08/17 CenTran Getting Started Guide
Manual Conventions
This CenTran Getting Started Guide contains information on the installation and set up of the hardware and software required to manage locks. Some conventions that are followed are:
- The Smart Keys needed for a particular operation will be shown beside the flowcharts that describe the operation.
- Input to the PC will be shown in bold type.
• The screen samples may not look exactly as they do on your system depending on which version of the Windows operating system you are using. - Highlighted items:
Note
Indicates a point to consider.
Helpful Hint
Indicates a technique or method that works well.
Caution
Indicates the need for care and caution to be observed during a procedure or process.
Warning
Indicates the possibility of loss of data or system integrity.
Before reading the CenTran Getting Started Guide, you should be familiar with basic Windows concepts and techniques. For detailed information, refer to your Windows documentation.
© 1996-2017 dormakaba
Document Number 2101.0513 Rev. G 08/17 Centra6 Getting Started Guide
Trademarks
The following items are trademarks or registered trademarks of dormakaba in the United States and/or other countries.
• Cencon System 2000
- Cencon
• PowerStar Technology
- Smart Key
Adobe and Adobe Reader are registered trademarks of Adobe Systems Incorporated in the United States and/or other countries.
IBM is a registered trademark of International Business Machines Corporation ("IBM") in the United States and/or other countries.
iButton is a registered trademark of Dallas Semiconductor.
Microsoft, Windows, and Windows Server are registered trademarks or trademarks of Microsoft Corporation in the United States and/or other countries.
Notice: The information in this manual is subject to change without notice and does not represent a commitment on the part of dormakaba. dormakaba shall not be liable for technical or editorial errors or omissions contained herein; nor for incidental or consequential damages resulting from the furnishing, performance or use of this material.
© 1996-2017 dormakaba
Document Number 2101.0513 Rev. G 08/17 CentTrah Getting Started Guide
Introducing CenTran 5
CenTran 5 Getting Started Guide
The CenTran Version 5 Package
The CenTran 5 implementation package includes:
- The CenTran Version 5 Install source (DVD, USB drive, or download)
• CenTran 5 Getting Started Guide - CenTran 5 XML Programming Manual - Included on install source (DVD, USB drive, or download) in electronic format
- CenTran 2 Programming Guide - Included for legacy CenTran use on install source (DVD, USB drive, or download) in electronic format
If you are missing any of the above items, contact dormakaba Customer Service at 1(800) 950-4744
CenTran 5 System Requirements
To use the CenTran program, the following minimum hardware and software requirements must be met:
- IBM® compatible PC that is capable of running the Windows's listed below and has an available USB port for the dormakaba USB Key Box.
Note
The Cencon Key Box requires a fully compliant USB 2.0 connection. Some computers, especially laptops and notebooks, may not provide sufficient power for the Cencon Key Box. In these cases it may be necessary to use a powered USB hub to attach the Cencon Key Box. On laptops or notebooks with "power saving" features that turn off USB power, the computer's Operating System (OS) could disconnect from the Cencon Key Box. In this instance, after awakening the computer and CenTran 5 software, unplug and re-plug the USB cable between the computer and the Cencon Key Box.
Note on Virtual Machines
It is recommended that the CenTran program be installed on a dedicated physical server. However, CenTran will operate correctly when installed in a virtual machine that fully emulates an IBM-compatible PC that meets all of the system requirements detailed in this section.
Important Note: Many virtual hosting services will not allow the attachment of USB devices directly to the physical machine hosting a given virtual machine. When the CenTran program is running under such a host, the Cencon USB Key Box must be attached through a secure, fully USB-2.0-compliant USB-redirection solution.
- 4 GB RAM Minimum (8 GB RAM or higher is recommended.)
- If your install source is a DVD, a DVD Drive is needed. The install source can be a DVD, USB drive, or download.
- Hard Disk Drive with at least 50 megabytes disk space free
- Please note that systems running more than 25,000 locks should run at higher than 4 GB RAM to ensure optimal system performance. (Please refer to Appendix D of the Cencon Reference Manual for more information.)
Important Note
If you are upgrading from a previous version of Cencon and CenTran, you should also allow ample disk space for database growth.
- Windows®7 32/64-bit, 8.1 32/64 bit, 10 32/64 bit, Windows®2008 R2 Server 64-bit, 2012 R2 Server 64 bit, or Windows Server 2016, with 4.5.1 or .NET Framework.
- You must be logged into Windows with Admin authority
• An installed Database Management System (DBMS):
- Either Microsoft® SQL Server® 2008 R2, 2012 R2 Server 64 bit, 2014 R2 Server, 2016, or 2017 (including the SQL Express, Standard, or Enterprise Editions).
- The DBMS installation does not have to be on the same computer as CenTran. You will need to have a valid ODBC connection to the DBMS for CenTran to use.
- The above computer requirements do not include the requirements for the DBMS. If the DBMS is being run on the same computer as CenTran, then the total requirements will be the requirements of CenTran plus those of the DBMS.
- The requirements of the DBMS installation will vary depending on the number of locks and users being used by Cencon and CenTran and the number of Cencon and CenTran installations connected to that DBMS.
- A full installation of SQL Serv ^ typically also requires .NET Framework 3.5; how this is obtained and installed will depend on the version Server ^ being installed and the version of Windows which it is being installed.
Note
If you do not have an existing Microsoft SQL Server database, you can download a free copy of the latest Microsoft Server Express Edition from the Microsoft web site at http://www.microsoft.com/express/sql/default.aspx You should also download and install the SQL Server
Management Studio.
Be sure to read the related Microsoft Information on system requirements and prerequisites for these components. Contact dormakaba Technical Support for additional information.
Note - The screens shown in the CenTran Software manuals were captured on a Windsystem. Your screens may look slightly different.
Important Note
CenTran 5 also requires an operational Cencon 5 system and associated database, either locally or on a network accessible computer. It is not compatible with previous versions of Cencon System 2000 software.
PC Hardware Installation
Note
The Cencon KeyBox is not included with the CenTran 5 program package and must be purchased separately if not already installed on your PC system. See the Cencon 5 Getting Started Guide for Key Box installation instructions.
Important Note
Running the Cencon 5 software and the CenTran 5 software concurrently on a PC system is not recommended.
Before Installing the CenTran 5 Software
Warning
If you have not already contacted dormakaba Customer Service at 1(800) 950-4744 in preparation for your installation of CenTran 5, you must do so at this time to review minimum system requirements and database setup for your installation of CenTran 5, and to perform data validity checks on any current Cencon data.
Warning
During the CenTran 5 configuration process, you will be required to enter a unique four digit Company Number/ID. If you are a branch of a larger company, this ID must be identical to that used for all other Cencon and CenTran installations by your company. It is helpful to determine what the four-digit number is before you begin the installation process.
© 1996-2017 dormakaba
Document Number 2101.0513 Rev. G 08/17 CenTran Getting Started Guide
Cencon ATM Cash Vault Security System Product Overview
CenTran Version 5 Getting Started Guide
The Challenge
While the front of ATMs are accessed by customers with individual cards and PINs, the back of the ATM is often accessed by service personnel from multiple companies all using the same lock combination. Bank employees, cash replenishers, technical service reps, repair personnel all using the same combination to open an ATM safe poses a significant security risk.
The Solution
The Cencon ATM Cash Vault Security System from dormakaba is designed to combat insider theft from ATMs through the combined use of lock hardware, systems software and Smart Keys. The Cencon system offers total access control and accountability with its One Time Combination feature. The One Time Combination is dispatched from a central location and cannot be reused at a later date, thus eliminating temptation.
The Cencon ATM Cash Vault Security System allows locks located anywhere in the world to be controlled and monitored from one central location.
The central location consists of
-
A database describing locks, lock administration personnel, lock service personnel, lock access details and history.
• dormakaba software that -
Manages the creation and distribution of One Time Combinations(OTC).
- Tracks the status of each lock and user.
- Provides audit capability.
- Can be used interactively by a human Dispatcher or programmatically by customer applications such as IVR or Web base interfaces.
The software provided by dormakaba consists of
• Cencon Interactive Application: Interactive Central Point of Control
• Used to create, distribute, manage One Time Combinations (OTC).
• CenTran Service: Background Central Point of Control
• Used by customer, 3rd party applications to create, distribute and manage OTCs.
- CenTran Web Services: Used by customer web applications to communicate with CenTran Service.
- CenTran Agent
- Remote lock management: Allows CenTran Service to communicate with ATM lock, streamlining lock administration.
- Key Box Agent
- Remote key management: Allows CenTran Service to communicate with remote key boxes, supporting decentralized lock personnel.
The Cencon ATM Cash Vault Security System supports three Modes of Operation:
FLM Mode
Designed for First Line Maintenance (FLM) personnel such as cash replenishers, technical service reps, repair personnel, the FLM mode of the Cencon lock permits the dispatch center to give a One Time Combination (OTC) for ATM lock access to a technician "on the fly." FLM personnel are each issued a Smart Key and call their dispatch center to request a One Time Combination. Once used, this combination will not function again, thus ensuring absolute access control. Once the Cencon unit is locked, a Close Seal code is displayed on the lock's LCD. Entering this Close Seal into the dispatch center's computer documents that the Cencon lock is locked and secure.
Route Mode
While permitting the same access control as FLM Mode, Route Mode additionally permits pre-defined routes for armored cash replenishers. Route personnel are each issued a Smart Key. A route of locks, along with an OTC for each lock on the route, may be assigned by a dispatch center permitting route personnel to access a series of locks without contacting their dispatch center at each individual lock. Route personnel can either call their dispatch center at the end of the shift to report the Close Seals, or the Close Seals can be read from the Smart Key by the Cencon software.
Bank Mode
Bank Mode is designed for bank personnel who may need access to the Cencon system lock but do not wish to operate through a dispatch center. Smart Keys and combinations are issued to bank personnel who may unlock the Cencon lock at any time. An internal audit trail tracks all activity of bank personnel just as it does for FLM and Route personnel. dormakaba Cencon software permits bank administrators to manage Bank Mode on site. Bank users may be added or deleted and audit trails may be downloaded from the lock.
High Level Overview of Cencon ATM Cash Vault Security System Component Architecture
The Cencon ATM Cash Vault Security System consists of several components whose method of use will vary depending on the business model of the supported enterprise. Presented here is a brief high level overview of the Cencon ATM Cash Vault Security System components.
Cencon ATM Cash Vault Security System Component Architecture

flowchart
graph TD
    A["Cencon Application"] --> B["Cencon Graphic User Interface"]
    B --> C["USB Driver"]
    B --> D["USB Key Box"]
    E["Cencon Database"] --> F["Data describes"]
    F --> G["locks"]
    F --> H["lock personnel"]
    F --> I["lock access controls"]
    F --> J["lock access history"]
    K["Customer Web Server"] --> L["3rd Party Applications"]
    L --> M["Customer Web Client"]
    M --> N["Web Browser"]
    M --> O["Key Box Agent"]
    M --> P["USB Driver"]
    M --> Q["USB Key Box"]
    R["Customer Application"] --> S["Interactive Voice Response 3rd Party Applications"]
    S --> T["CenTran Web Services"]
    T --> U["CenTran Service"]
    U --> V["USB Driver"]
    U --> W["USB Key Box"]
    X["ATM"] --> Y["ATM Controller"]
    Y --> Z["Door Sense; Bolt Switch and Alarm Status plus Close Seal"]
    Z --> AA["CenTran Agent"]
    AA --> AB["USB Driver"]
    AA --> AC["Gen2 Cencon Lock"]
    AD["CenTran Agent Device"] --> AE["CenTran Agent"]
    AE --> AF["USB Driver"]
    AE --> AG["Gen2 Cencon Lock"]
    AH["Customer Application"] --> AI["Interactive Voice Response 3rd Party Applications"]
    AI --> AJ["HTTP /Web Service"]
    AJ --> AK["ODBC"]
    AJ --> AL["Files"]
Cencon Database:
- Defines locks to be controlled, monitored and audited.
- Defines personnel allowed to access locks.
- Defines Personnel allowed to control access to locks.
- Contains access history for each lock.
Cencon Application:
- Interactive, graphical Windows application used to manage the Cencon Database contents.
- Requires a Cencon Key Box be attached to a USB port of the same computer.
CenTran Service:
• Available for use by customer applications to manage the Cencon Database contents.
- Applications communicate with the service via files or HTTP / Web Services.
- Runs in background as a Windows Service.
CenTran Web Services:
• Available for use by web applications to manage Cencon Database contents.
Customer Application Using CenTran Service Command File:
- The CenTran Service performs actions against the Cencon Database per commands imbedded in files.
• Results of those actions are reported in output files created by the CenTran Service.
Customer Application Using CenTran Web Services:
- The CenTran Service performs actions against the Cencon database per commands received via the CenTran Web Services.
• Results of those actions are reported to the customer application via the CenTran Web Services.
CenTran Agent:
- Allows CenTran Service to monitor lock in a real time manner.
- Runs on the ATM in the background as a Windows Service.
Key Box Agent:
- Allows CenTran Service access to Cencon Key Boxes on remote systems.
- Runs on remote Web Client systems in background as a Windows Service.
Customer Web Client:
- Customer developed web browser based user interface used to manage Cencon Database contents as well as Cencon Smart Keys via the CenTran Web Services.
- Can be located remotely.
Cencon ATM Cash Vault Security System Components and Business Processes
Examples of Business Processes Supported by Cencon ATM Cash Vault Security System Components:
-
FLM (First Line Maintenance) Operations with human Dispatcher:
-
FLM personnel reaches ATM and contacts Dispatcher requesting OTC.
- Dispatcher generates OTC via Cencon interactive application, gives OTC to FLM personnel.
- FLM personnel opens and closes lock, recording the Close Seal.
-
FLM personnel gives Close Seal to Dispatcher who enters it into Cencon database via Cencon interactive application.
-
Route Operations with human Dispatcher:
-
Before starting route, Route personnel contacts Dispatcher and requests OTCs for each lock on route.
- Dispatcher generates OTCs via Cencon interactive application, gives OTCs to Route personnel.
- Route personnel opens and closes each lock on route, recording Close Seals.
-
When the Route has been completed, the Close Seals are given to the Dispatcher who enters them into the Cencon database via Cencon interactive application.
-
FLM Operations with IVR (Interactive Voice Response) system:
-
FLM personnel reaches ATM, calls IVR system and requests OTC.
- IVR system generates OTC via CenTran Command File interface and reports OTC to FLM person.
- FLM personnel opens and closes lock, recording the Close Seal.
- FLM personnel calls IVR system and enters Close Seal.
- IVR system records Close Seal in Cencon database via CenTran Command File interface.
Though business processes will vary between companies there are core lock management tasks that will be used in every enterprise such as:
• Create User and Initialize Smart Key
- Delete User
- Dispatch Lock
- Open / Close physical lock
- Close Lock in Cencon database
- Reassign Lock
- Audit Lock
- Audit Key
• Audit Cencon Database
The following lists describe for a few of the core lock management tasks one possible flow of control through the Cencon ATM Cash Vault Security System components.
Create User and Initialize Smart Key:
- Dispatcher ->
- Customer Web Client ->
• CenTran Web Services ->
• CenTran Service ->
• CenTran Web Services ->
• Key Box Agent (writes KEY) -> - CenTran Service ->
• CenTran Web Services -> - Customer Web Client
Note:
- Customer Web Client & Key Box Agent will probably be on same location but do not have to be
- Customer Web Client does NOT require a Keybox on the same system
Dispatch Lock(s):
- Dispatcher ->
- Customer Web Client ->
• CenTran Web Services -> - CenTran Service ->
- Cencon Database ->
- CenTran Service ->
• CenTran Web Services -> - Customer Web Client ->
- Dispatcher receives OTC
- Dispatcher transmits OTC to FLM/Route personnel
Lock is physically opened and closed:
- Service personnel calls Close Seal in to the Dispatcher who "Closes Lock" in the Cencon Database. The component flow is the same as that described for Dispatch Lock(s).
。OR
- CenTran Agent Service on ATM uses CenTran Web Services to report Closure to CenTran Service and "Closes Lock" in the Cencon Database programmatically:
- Lock is closed ->
- CenTran Agent ->
- CenTran Web Services ->
- CenTran Service ->
- Cencon Database ->
- CenTran Service ->
- CenTran Web Services ->
- CenTran Agent
Introducing CenTran 5
CenTran 5 Getting Started Guide
The CenTran Version 5 Package
The CenTran 5 implementation package includes:
- The CenTran Version 5 Install source (DVD, USB drive, or download)
• CenTran 5 Getting Started Guide - CenTran 5 XML Programming Manual - Included on install source (DVD, USB drive, or download) in electronic format
- CenTran 2 Programming Guide - Included for legacy CenTran use on install source (DVD, USB drive, or download) in electronic format
If you are missing any of the above items, contact dormakaba Customer Service at 1(800) 950-4744
CenTran 5 System Requirements
To use the CenTran program, the following minimum hardware and software requirements must be met:
- IBM® compatible PC that is capable of running the Windows's listed below and has an available USB port for the dormakaba USB Key Box.
Note
The Cencon Key Box requires a fully compliant USB 2.0 connection. Some computers, especially laptops and notebooks, may not provide sufficient power for the Cencon Key Box. In these cases it may be necessary to use a powered USB hub to attach the Cencon Key Box. On laptops or notebooks with "power saving" features that turn off USB power, the computer's Operating System (OS) could disconnect from the Cencon Key Box. In this instance, after awakening the computer and CenTran 5 software, unplug and re-plug the USB cable between the computer and the Cencon Key Box.
Note on Virtual Machines
It is recommended that the CenTran program be installed on a dedicated physical server. However, CenTran will operate correctly when installed in a virtual machine that fully emulates an IBM-compatible PC that meets all of the system requirements detailed in this section.
Important Note: Many virtual hosting services will not allow the attachment of USB devices directly to the physical machine hosting a given virtual machine. When the CenTran program is running under such a host, the Cencon USB Key Box must be attached through a secure, fully USB-2.0-compliant USB-redirection solution.
- 4 GB RAM Minimum (8 GB RAM or higher is recommended.)
- If your install source is a DVD, a DVD Drive is needed. The install source can be a DVD, USB drive, or download.
- Hard Disk Drive with at least 50 megabytes disk space free
- Please note that systems running more than 25,000 locks should run at higher than 4 GB RAM to ensure optimal system performance. (Please refer to Appendix D of the Cencon Reference Manual for more information.)
Important Note
If you are upgrading from a previous version of Cencon and CenTran, you should also allow ample disk space for database growth.
- Windows® 7 32/64-bit, 8.1 32/64 bit, 10 32/64 bit, Windows® 2008 R2 Server 64-bit, 2012 R2 Server 64 bit, or Windows Server 2016, with 4.5.1 or .NET Framework.
- You must be logged into Windows with Admin authority
• An installed Database Management System (DBMS):
- Either Microsoft® SQL Server® 2008 R2, 2012 R2 Server 64 bit, 2014 R2 Server, 2016, or 2017 (including the SQL Express, Standard, or Enterprise Editions).
- The DBMS installation does not have to be on the same computer as CenTran. You will need to have a valid ODBC connection to the DBMS for CenTran to use.
- The above computer requirements do not include the requirements for the DBMS. If the DBMS is being run on the same computer as CenTran, then the total requirements will be the requirements of CenTran plus those of the DBMS.
- The requirements of the DBMS installation will vary depending on the number of locks and users being used by Cencon and CenTran and the number of Cencon and CenTran installations connected to that DBMS.
- A full installation of SQL Serv ^ typically also requires .NET Framework 3.5; how this is obtained and installed will depend on the version Serve ^ being installed and the version of Window ^ which it is being installed.
Note
If you do not have an existing Microsoft SQL Server database, you can download a free copy of the latest Microsoft Server Express Edition from the Microsoft web site at http://www.microsoft.com/express/sql/default.aspx You should also download and install the SQL Server
Management Studio.
Be sure to read the related Microsoft Information on system requirements and prerequisites for these components. Contact dormakaba Technical Support for additional information.
Note - The screens shown in the CenTran Software manuals were captured on a Windsystem. Your screens may look slightly different.
Important Note
CenTran 5 also requires an operational Cencon 5 system and associated database, either locally or on a network accessible computer. It is not compatible with previous versions of Cencon System 2000 software.
PC Hardware Installation
Note
The Cencon KeyBox is not included with the CenTran 5 program package and must be purchased separately if not already installed on your PC system. See the Cencon 5 Getting Started Guide for Key Box installation instructions.
Important Note
Running the Cencon 5 software and the CenTran 5 software concurrently on a PC system is not recommended.
Before Installing the CenTran 5 Software
Warning
If you have not already contacted dormakaba Customer Service at 1(800) 950-4744 in preparation for your installation of CenTran 5, you must do so at this time to review minimum system requirements and database setup for your installation of CenTran 5, and to perform data validity checks on any current Cencon data.
Warning
During the CenTran 5 configuration process, you will be required to enter a unique four digit Company Number/ID. If you are a branch of a larger company, this ID must be identical to that used for all other Cencon and CenTran installations by your company. It is helpful to determine what the four-digit number is before you begin the installation process.
© 1996-2017 dormakaba
Document Number 2101.0513 Rev. G 08/17 CenTran Getting Started Guide
Software Installation and Setup
CenTran 5 Getting Started Guide
Complete the following steps to install the software:
- Check the PC Date and Time Properties (date, time, time zone, DST adjustment setting) from the Control Panel to ensure accuracy. Adjust, if necessary, before proceeding.
- Ensure that no other programs are running.
- If you have a previous version of Cencon installed, you should ensure that data has been archived in accordance with the customer archive requirements and then backup the current Cencon database.
- If your install source is a DVD, insert the Cencon 5 Install DVD in the appropriate drive. The install source can be a DVD, USB drive, or download. If you have autorun enabled on your system, the Cencon 5 Installation screen will be displayed. Otherwise, double click Autorun.exe from the CenTran 5 install source (DVD, USB drive, or download) root directory, and the CenTran 5 Installation screen will be displayed.
The CenTran Version 5 Software Installation dialog is loaded and the Main Menu is displayed:

- From the Main Menu, click on the Install button.
- Depending on your operating system, either the 32 or 64-bit CenTran install page is displayed:

- Install Microsoft SQL Server® 2012 Native Client 11.0 ODBC Driver
Install the Microsoft SQL Server 2012 Native Client 11.0 ODBC Driver on your system if you have not already done so. Using the default SQL ODBC Driver available with Windows will result in slow performance. If you have a more recent SQL installation from Microsoft than SQL Server 2012 use that SQL ODBC Driver. To install the provided SQL ODBC Driver select the SQL ODBC Driver button.
- Install Cencon USB KeyBox and Cencon Lock Adapter Device Drivers
Install the Cencon USB KeyBox and Cencon Lock Adapter device drivers by clicking on the Windows Drivers button. The button will state either Windows 32 Bit Drivers or Windows 64 Bit Drivers depending on if you have a 32 or 64 bit operating system. The Cencon Driver Installer application will be launched by clicking on the button.

Click on Next to begin installing drivers. The Cencon Driver installer will update existing drivers as needed. It will also preinstall the drivers if you do not have a Cencon USB KeyBox or Cencon Lock Adapter attached yet. You will be prompted for Windows operating system authorization several times as the drivers are installed. You will need to select Yes for each one of these approval dialogs. You must have administrative rights on the operating system you are installing drivers to. The driver install can take several minutes, depending on your computer performance.
Once the driver installation is complete, you should see a result page similar to the following:
Cencon Driver Installer 5.2.0.3620 (64-Bit) - Result
Driver package installation successful!
RETURN UpdateDriverForPlugAndPlayDevices.
Installation was successful.
Installing devices with Id "USB\VID_1D16&PID_0101&REV_0101" using INF "D:\Windows\System32\Driver\$
Will force install because driver is not better and force flag is set.
ENTER UpdateDriverForPlugAndPlayDevices...
Driver package installation successful!
RETURN UpdateDriverForPlugAndPlayDevices.
Installation was successful.
Marked Phantom Device with Hardware/Compatible Id 'USB\VID_1D16&PID_0100&REV_0101' for reinstall on
Marked Phantom Device with Hardware/Compatible Id 'USB\VID_1D16&PID_0100&REV_0101' for reinstall on
Phantom Device with Hardware/Compatible Id 'USB\VID_1D16&PID_0100&REV_0101' already has 'D:\Windk
Marked Phantom Device with Hardware/Compatible Id 'USB\VID_1D16&PID_0101&REV_0101' for reinstall on
Marked Phantom Device with Hardware/Compatible Id 'USB\VID_1D16&PID_0101&REV_0101' for reinstall on.
Marked Phantom Device with Hardware/Compatible Id 'USB\VID_1D16&PID_0101&REV_0101' for reinstall on
Phantom Device with Hardware/Compatible Id "USB\VID_1D16&PID_0101&REV_0101" already has 'D:\Wind
Driver package installation successful!
Install completed
RETURN: DriverPackageInstallW (0x0)
Completed setup of Cencon USB Key Box device driver successfully.
Copying driver DLLs to system directories...
Driver installation successful!
Driver install finished.

Close
- Next, click on the CenTran button on the CenTran install page.
Note
CenTran ^® 5 only supports using the Cencon USB KeyBox. Cencon PCI or ISA Cards are no longer supported.
The "Welcome to the CenTran Setup Wizard" screen is displayed. The installer is a Windows program that will take you through the rest of the setup process:

Click on Next> to continue with the installation.
- The Software License Agreement acceptance screen is displayed.

Read the Software License Agreement and then click the I accept the terms in the License Agreement button followed by the Next> button.
- The Destination Folder window is displayed to allow you to select the program folder to which the CenTran 5 program will be added.

Note: The default installation directory is shown. If CenTran 5 is already installed on your system, it is recommended that you install CenTran 5 to a new directory. If you want the CenTran 5 software installed in another directory, click on the Browse button and select the new path.
Click on the Next> button to add the programs to the designated folder.
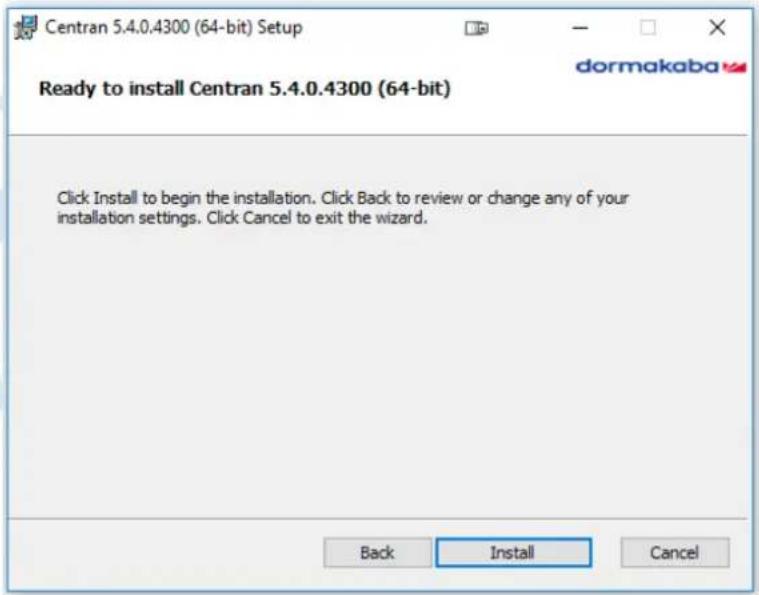
- Confirm Installation - If there is anything you wish to change, click on the
to install the program with the designated settings.
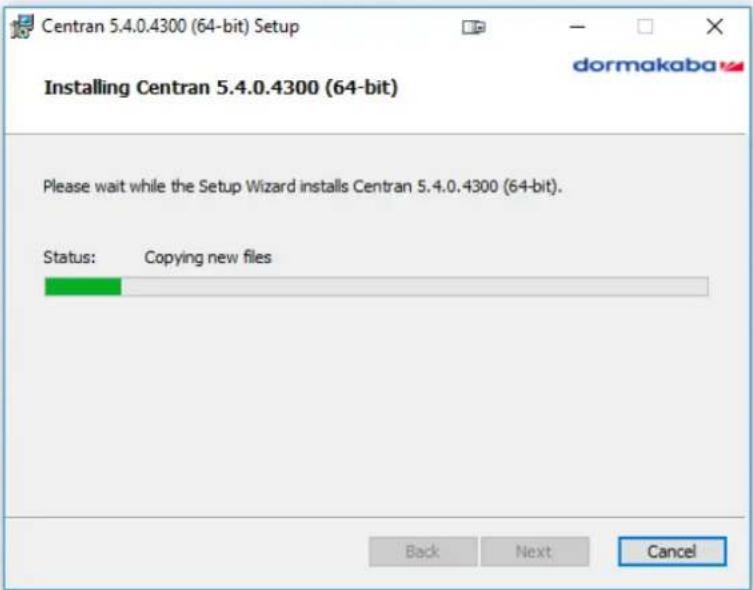
The Setup Status screen displays the status of the installation.
The installation Complete screen is then displayed indicating that the CenTran 5 service has been successfully installed.
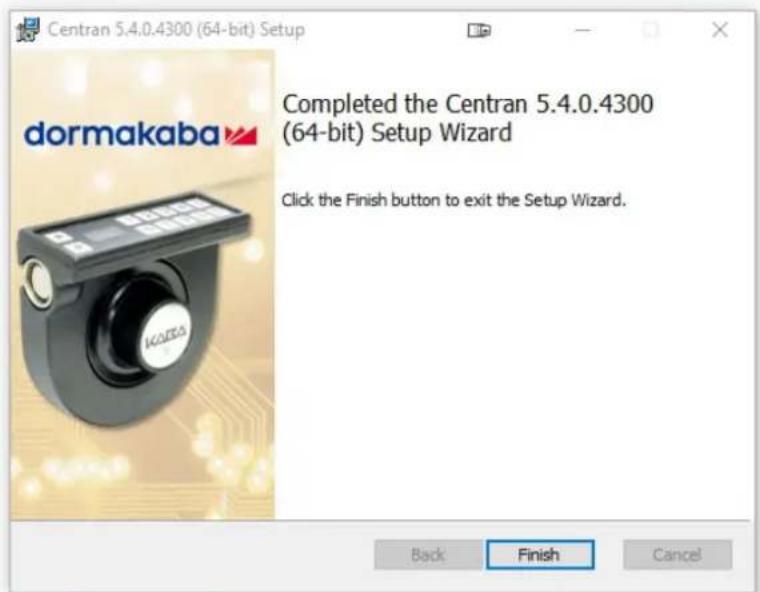
Click Finish to complete the installation process.
ODBC Connection Creation for SQL Server
CenTran Version 5 Getting Started Guide
Note
ODBC (Open Database Connectivity) is a standard C interface for accessing database management systems (DBMS). The designers of ODBC aimed to make it independent of database systems and operating systems. An application can use ODBC to query data from a DBMS, regardless of the operating system or DBMS it uses.
ODBC accomplishes DBMS independence by using an ODBC driver as a translation layer between the application and the DBMS. The application uses ODBC functions through an ODBC driver manager with which it is linked, and the driver passes the query to the DBMS.
- Go to Control Panel/Administration Tools/Data Sources.
- Select the System DSN tab and click Add.
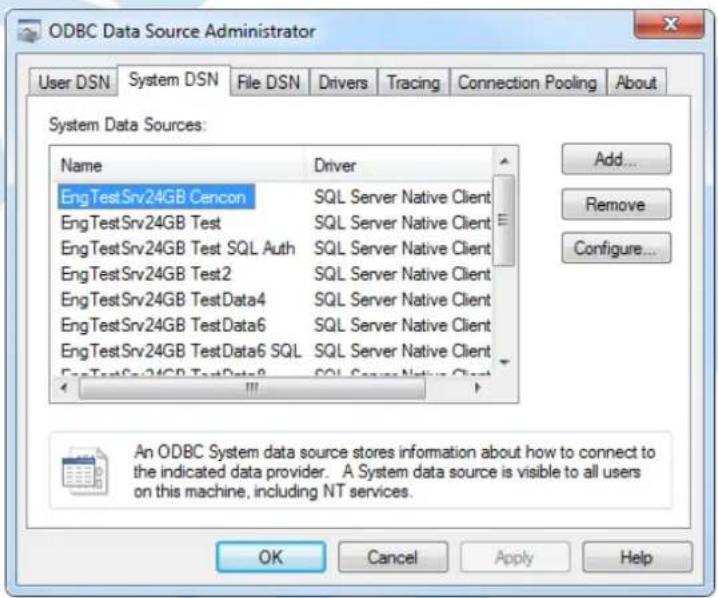
- Select the driver and click Finish.

- Type a name and type or use the drop down to select the server and instance.
- Click Next.

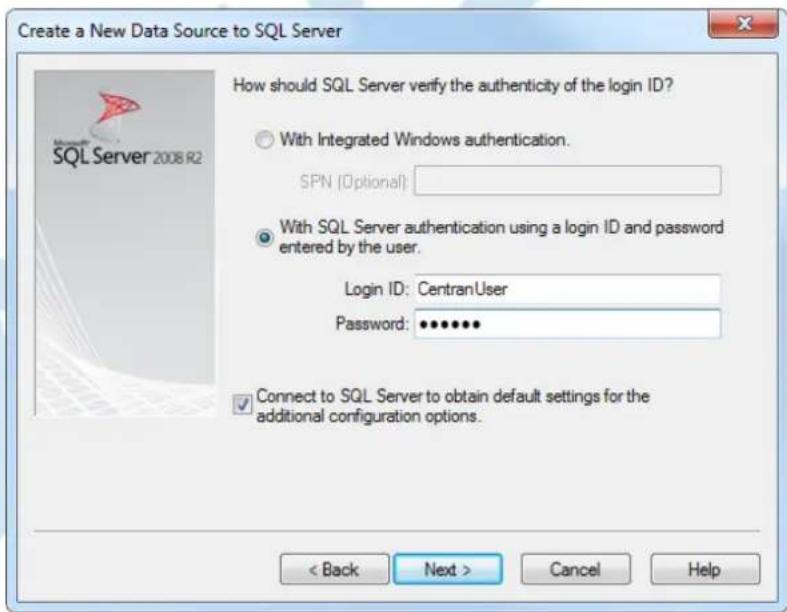
- Select SQL Server Authentication, and enter your SQL user name and password. Click Next.
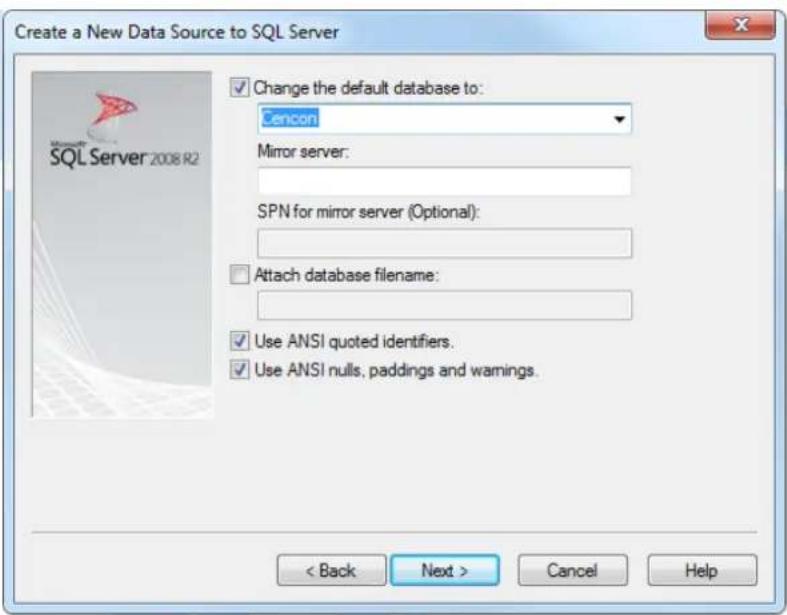
- Make sure the database schema containing the Cencon database set set as default. Click Next.
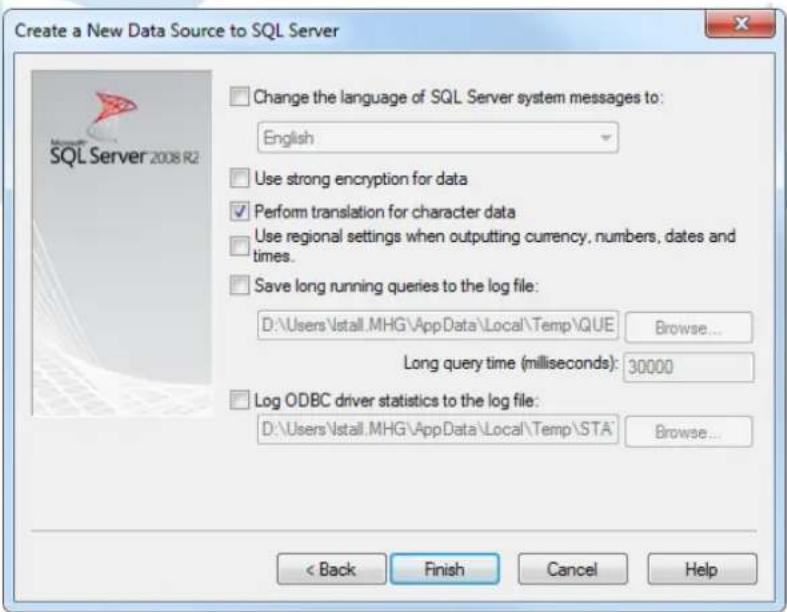
- Click Finish.
- Click OK

© 1996-2017 dormakaba
Document Number 2101.0513 Rev. G 08/17 CenTr&6 Getting Started Guide
Configure the CenTran Service
CenTran Version 5 Getting Started Guide
The CenTran service has some settings that are manually set in the CenTran service configuration file. This file is named Centran.exe.config. Depending on your system settings, the file extension may be hidden.
You can edit the Centran.exe.config file by double clicking on it, and a default editor will be opened. You can also edit it with the Notepad application. The file is an XML formatted text file.
The Centran.exe.config file contains various configuration settings. If you change settings in the CenTran service configuration file, you will need to restart the CenTran service for the settings to take effect.
There are example Centran.exe.config files installed with CenTran. These are contained in the Configuration Files directory installed within the application directory. There is one example file for using Windows authentication with the CenTran web service and one example file for using user ID / password authentication with the CenTran web service.
To use one of the example Centran.exe.config files, copy the file to the CenTran application directory. Any changes to the Centran.exe.config file must be made before starting the CenTran service. If you make changes to the Centran.exe.config file while the CenTran service is already running, the changes will not be read until next time the CenTran service is started.
Warning
When the CenTran service is upgraded from a previous version, the previous configuration file is retained from the previous installation. If new CenTran endpoints or communications methods have been added that the old configuration file does not have support for, those endpoints or communications methods will not be available with the old configuration file.
If new CenTran endpoints or communications methods from an upgrade need to be used, then you will need to replace the previous configuration file with one of the example configuration files and re-set up your CenTran settings.
You may want to retain a copy of your previous configuration file in a different location, to compare to the new settings you apply to CenTran.
appSettings Section
These settings are specific to the CenTran service. Some of these settings are configured manually. A link to an overview of these settings is provided below.
system.serviceModel Section Group
These settings are related to the web service communications provided by CenTran. These entries are defined by the Microsoft Windows Communication Foundation. Detailed information about how these settings are used is beyond the scope of this manual. You can look up Microsoft Windows Communication Foundation documentation for more information. Additional documentation is available at: Windows Communication Foundation Configuration Schema
Links to overviews of these settings is provided below.
Configuration File Section Descriptions:
The following sections can be edited within the CenTran configuration file:
- Configuration File - system.serviceModel / bindings Section
- Configuration File - system.serviceModel / services Section
- Configuration File - system.serviceModel / behaviors Section
© 1996-2017 dormakaba
Document Number 2101.0513 Rev. G 08/17 Centra6 Getting Started Guide
Configuration File - system.serviceModel / bindings Section
CenTran Version 5 Getting Started Guide
The bindings section is part of the system.serviceModel section group used to configure Windows Communication Foundation (WCF) settings. This section defines the various communications settings to be used by the web service endpoints provided by CenTran. The following is a brief overview of this section.
- webHttpBinding:
This subsection contains settings for REST model of web service communications. Each binding listed within this section defines how a web service endpoint does it's communications across HTTP or HTTPS, using standard HTTP GET and POST operations.
This type of web service communications is easily accessed from web browsers and web sites. It does not have the flexibility of operations that SOAP web service communications has.
The security section under each binding defines the type of encryption and user authentication to be used with the web service endpoint.
- wsHttpBinding:
This subsection contains settings for SOAP web service communications. Each binding listed within this section defines how a web service endpoint does it's communications using SOAP (Simple Object Access Protocol).
This type of web service communications is not easily accessible from web browsers and web sites. However, it has a much greater degree of flexibility and possible options than REST web service communications. An example of these options provided by SOAP is WS-ReliableMessaging, which allows support for handling network failures.
The security section under each binding defines the type of encryption and user authentication to be used with the web service endpoint.
There are many other types of web service communication bindings available. These two are given as defaults for use by CenTran, but others could potentially be used.
© 1996-2017 dormakaba
Document Number 2101.0513 Rev. G 08/17 CentTrah Getting Started Guide
Configuration File - system.serviceModel / services Section
CenTran Version 5 Getting Started Guide
The services section is part of the system.serviceModel section group used to configure Windows Communication Foundation (WCF) settings. It is used to define the specific web service endpoints provided by CenTran. The following is a brief overview of this section.
- service:
Each service section defines the web service endpoints provided for a service from CenTran. Within a service section is a set of endpoint entries. Each endpoint entry defines a web service URI and method of communications provided by CenTran.
The service names can be one of the following:
Centran.CentranService
This is the main web service implemented by CenTran, using XML message formatting. Any access to operations of this web service contract must have some form of user authentication, otherwise access will be refused (except for the Version and Hello operations). The default behavior used with this web service is centran_service_behavior already defined in the example CenTran configuration files.
Centran.CentranServiceJSON
This is the main web service implemented by CenTran, using JSON message formatting. Any access to operations of this web service contract must have some form of user authentication, otherwise access will be refused (except for the Version and Hello operations). The default behavior used with this web service is centran_service_json_behavior already defined in the example CenTran configuration files.
Centran.CentranFeedsService
This is the RSS feeds web service implemented by CenTran. The operations provided by this web service contract are intended to support web RSS feeds to query alert information from CenTran. Encryption and user authentication are not needed for this web service contract. Encryption is recommended, however. The default behavior used with this web service is centran_feeds_service_behavior already defined in the example CenTran configuration files.
Centran.CentranAgentService
This is the web service for operations supporting the CenTran Agent Service running on ATM console systems for remote access to Cencon locks. The operations provided by this web service contract are used to update status of locks in response to lock events detected by the CenTran Agent Service. Encryption and user authentication are not needed for this web service contract. Encryption is recommended, however. The default behavior used with this web service is centran_agent_service_behavior already defined in the example CenTran configuration files.
Each endpoint entry has the following items that it defines:
- address
This is the address or URI that is provided by the web service. It can specify localhost to default to the current host server base address or can define a different address. This can also be used to define a different TCP port for the address.
- binding
This is the type of binding used to define the communications used for the web service endpoint. The defaults for CenTran are webHttpBinding or wsHttpBinding.
- bindingConfiguration
This is the specific configuration of binding that is being used by the web service endpoint. This name must match one of the names defined from the matching binding section. This is used to define the encryption and user authentication used for the web service endpoint.
- contract
This is the name of the web service contract implementation calls within CenTran that is to be made accessible through the web service endpoint. The contracts that CenTran provides can be one of the following:
■ Centran.ICentran
This is the main web service contract implemented by CenTran for XML formatted data. It defines access to the Centran.CentranService web service.
■ Centran.ICentranJSON
This is the main web service contract implemented by CenTran for JSON formatted data. It defines access to the Centran.CentranServiceJSON web service.
■ Centran.ICentranFeeds
This is the RSS feeds web service contract implemented by CenTran. It defines access to the Centran.CentranFeedsService web service.
■ Centran.ICentranAgent
This is the web service contract for operations supporting the CenTran Agent Service running on ATM console systems for remote access to Cencon locks. It defines access to the Centran.CentranAgentService web service.
- behaviorConfiguration
This specifies what additional settings are to be used by the web service endpoint. These additional settings are defined by behavior entries under the behaviors / endpointBehaviors section. Default settings for endpoint behaviors are already defined in the example CenTran configuration files.
Configuration File - system.serviceModel / behaviors Section
CenTran Version 5 Getting Started Guide
The behaviors section is part of the system.serviceModel section group used to configure Windows Communication Foundation (WCF) settings. It is used to define additional settings for the web service endpoints provided by CenTran.
The following is a brief overview of this section.
- endpointBehaviors
This section defines endpoint behaviors used by the web service endpoints. This includes if help support is to be generated for a specific endpoint.
- serviceBehaviors
This section defines the web service behaviors for each web service provided by CenTran. This includes what certificate is used for encryption with a web service provided by CenTran, under the serviceCredentials section. The serviceCredentials section has two entries:
- serviceCertificate
This section defines what certificate is used by the web service for communications encryption. It is composed of the following entries:
- findValue
This is the unique value used to find the certificate in the indicated certificate store. The way this value is used is determined by the x509FindType that is set. In the case of FindByThumbprint, this value will be composed of a unique hexadecimal thumbprint value associated with the desired certificate.
storeLocation
This specifies if the certificate is stored associated with the current user account or with a system account. For the CenTran service to access the certificate, this must be set to LocalMachine to indicate a system account.
storeName
This specifies the store name that the certificate is in. For the CenTran service, this must be My to indicate the certificate store for personal certificates.
■ x509FindType
This indicates how the certificate is to be uniquely identifies, based off of various values associated with the certificate. The recommended default is FindByThumbprint.
The CenTran Configuration Manager has support for creating self-signed certificates for use by the CenTran service. You can also use a server certificate as provided by your network certificate authority server. Using a certificate as provided by your network certificate authority server is the preferable way to set up your network security.
Whatever the source of your CenTran server certificate, you can specify the certificate within the configuration file manually, or you can set it using the CenTran Configuration Manager.
The CenTran server certificate must have a name matching the way you are going to address the CenTran web service. If it is by server name, then the certificate name must match the server name. If it is by IP address, then the certificate name must match the IP address.
- userNameAuthentication
This section defines the internal method of support for user names and passwords implemented by CenTran. The default settings for this entry should not be changed from what is provided with the example CenTran configuration files.
© 1996-2017 dormakaba
Document Number 2101.0513 Rev. G 08/17 Centra6 Getting Started Guide
Set Up CenTran Server Certificates
CenTran 5 Getting Started Guide
For a web service to make use of encryption or user authentication, it requires a server certificate to be configured for use by that web service. The operation and concepts behind certificates and the Transport Layer Security Protocol (TLS) are beyond the scope of this manual. The following is a link to describe some of these concepts:
SSL/TLS Strong Encryption: An Introduction
Ideally, your organization will have a server configured to be a certificate authority for managing the security of communications on your network. If you do not have support for managing certificates on your network, you can set up a self-signed certificate and distribute it manually to the systems that are going to be accessing the CenTran web service.
To assist with this process, the CenTran Configuration Manager has support for creating certificates and configuring them in the CenTran configuration file for you.
The CenTran Configuration Manager supports the creation of a self signed certificate authority (CA) certificate. It can then use this CA certificate to create a signed CenTran Web Service Server certificate. The CenTran Configuration Manager can then be used to update the CenTran configuration file with information describing the signed CenTran Web Service Server certificate.
Exported Agent Configuration and CA Certificate Files
When the CenTran configuration file is updated with a CenTran server certificate, the CenTran Configuration Managers exports three files to a directory named AgentConfigurations under the CenTran installation directory:
- A CenTran Agent configuration file, configured for a persistent connection to this CenTran server
• A Cencon Key Box Agent configuration file, configured for a persistent connection to this CenTran server - A Certificate Authority certificate file, containing the public key certificate that issued the CenTran server's server certificate
The CenTran Agent configuration file and the certificate can be imported into an installation of the CenTran Agent Configuration Manager and used to configure agents.
To set up CenTran server certificates, select CenTran Configuration Manager from the CenTran entry under the Windows Start menu. Then select the Certificates tab. You should see the following:

Select Guide Me to be guided through the certificate installation process, or I'll Guide Myself to use the unguided process.
Guided Certificate Installation
The guided certificate installation process takes the user through several common scenarios for installing a server certificate for the CenTran server.
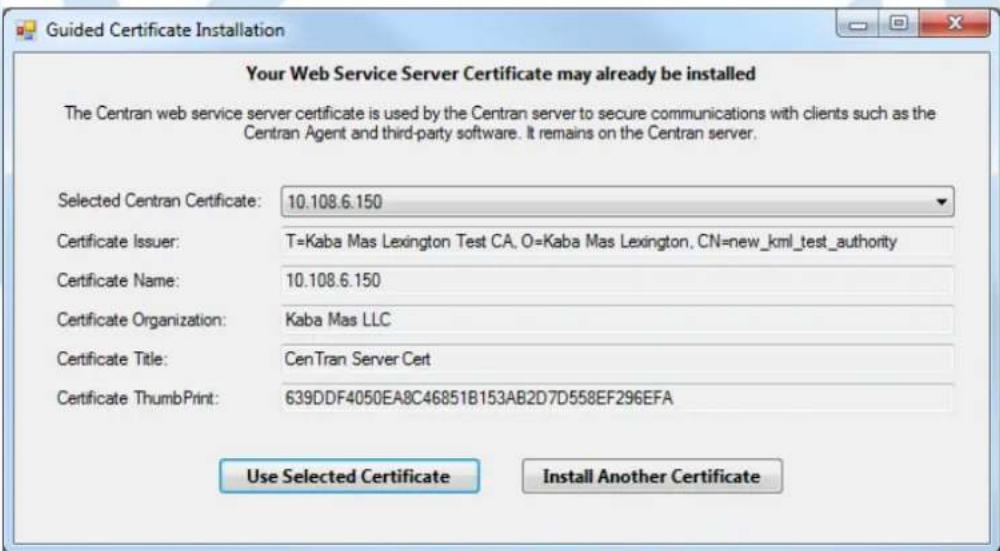
Using An Already Installed Server Certificate
The first of these common scenarios involves using a certificate already created and installed on the server machine:

The pull-down menu is populated with server certificates installed on the local machine that are named with the DNS name of the machine or an IP address assigned to the machine. As an item is selected in the list, the fields describing the certificate are filled in on the form. If the user selects an item and clicks Use Selected Certificate, the certificate will be installed in the configuration file for the CenTran Server, and a message will be displayed indicating the fact:
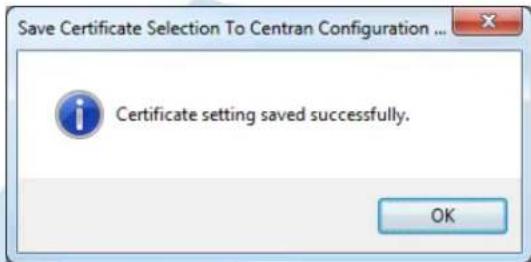
Click OK to close the prompt. Example CenTran Agent and Cencon Key Box Agent configuration files, along with the public key version of the CenTran server certificate, are now exported, and a message is displayed to indicate the fact:

Click OK to close the prompt. The server certificate for the CenTran server is now set up.

Using A Server Certificate Provided In A File
The second common scenario involves the use of a server certificate which has been provided in a certificate file.

In this case, the user selects Install Another Certificate instead of selecting and using an already installed certificate. A message is displayed:

Click Yes to be prompted for the location of the file containing the certificate. This file should be a Personal Information Exchange file with an extension of pfx:
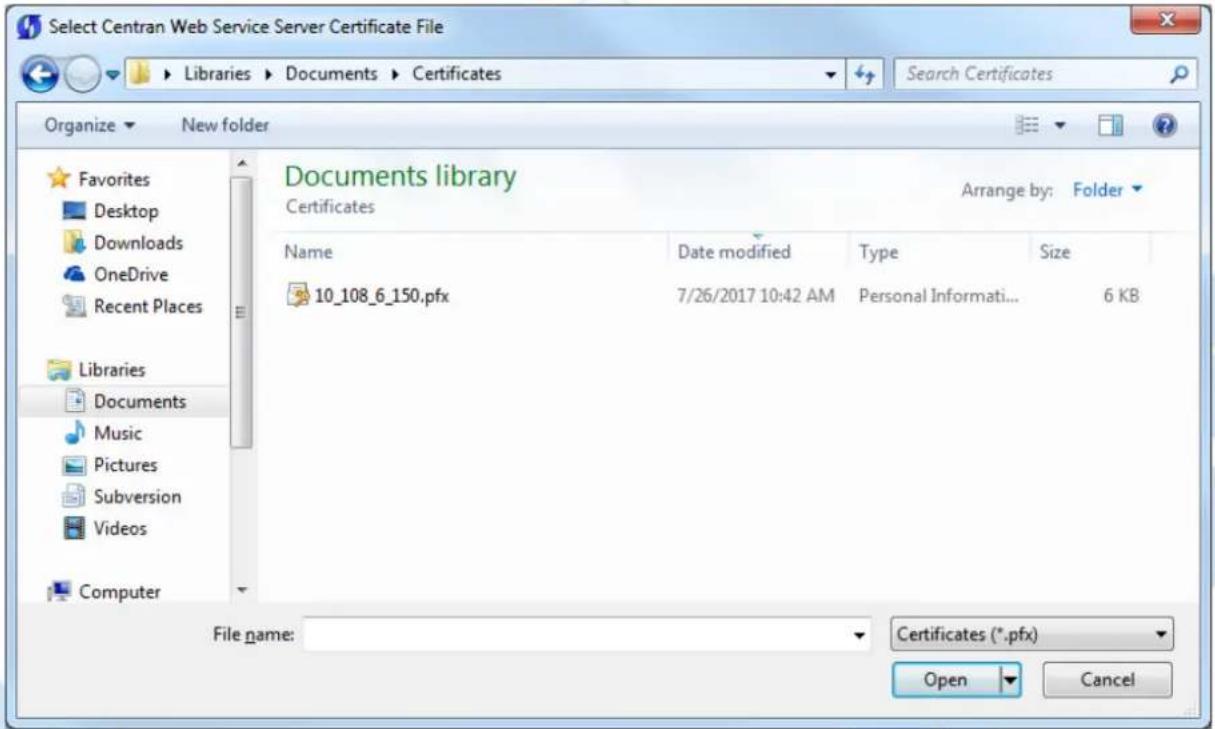
Navigate to the directory containing the file using the Open File dialog, select the file, and click Open. Because this file contains the private key with which the server secures communications, it will be protected by a password, for which a password prompt will be displayed:
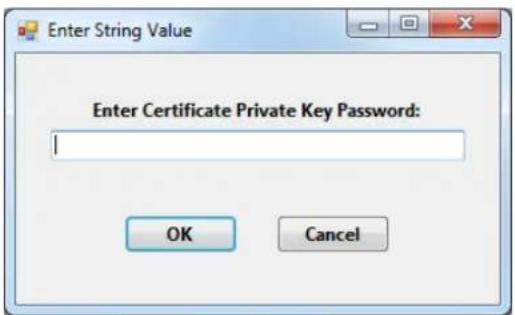
Enter the password and click OK. The certificate in the file will be installed on the system and the the CenTran server configuration will updated to use it. A message will be displayed indicating the fact:
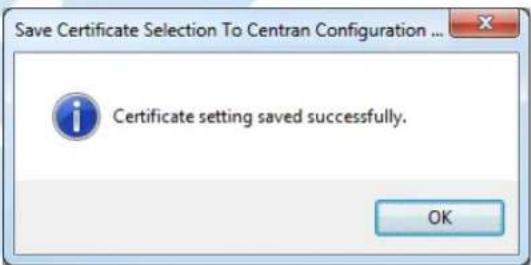
Click OK to close the prompt. Example CenTran Agent and Cencon Key Box Agent configuration files, along with the public key version of the CenTran server certificate, are now exported, and a message is displayed to indicate the fact:

Click OK to close the prompt. The server certificate for the CenTran server is now set up.
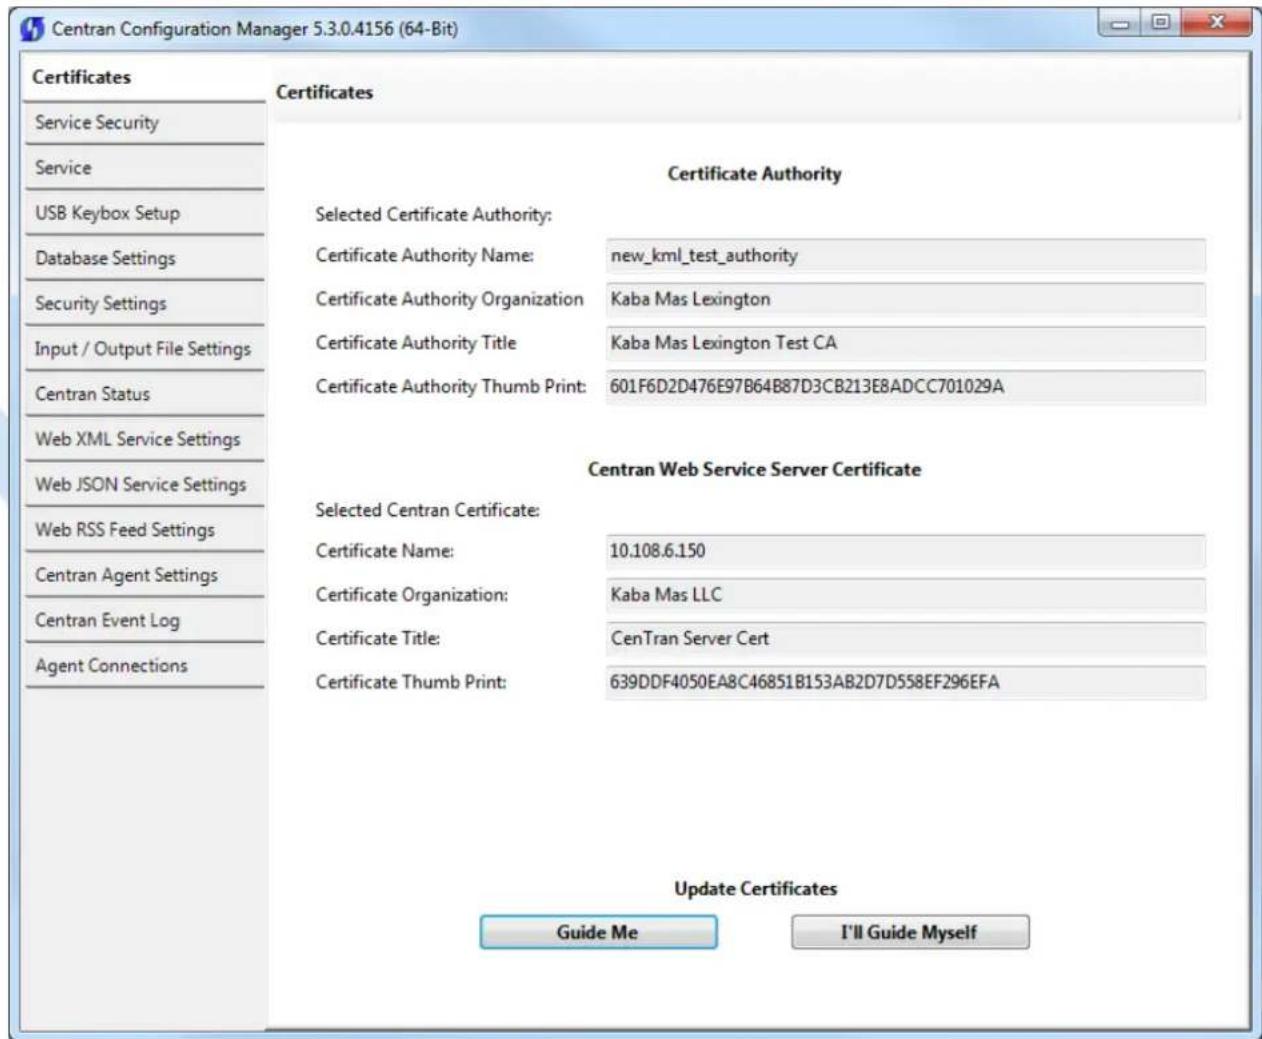
Creating A Server Certificate
The third common scenario for installing the CenTran server certificate involves creating a new, self-signed certificate. This option is provided if the user selects Install Another Certificate in the existing server certificate dialog:
and No when asked if a certificate has been provided in a file:

Before a server certificate can be created, a Certificate Authority certificate must exist. A prompt is provided to check whether a Certificate Authority certificate already exists:

All of the Certificate Authority certificates on the local machine that can be used to create certificates are listed. If one is selected and Use Selected Certificate is clicked, a dialog for entering the information needed to create the server certificate is displayed, with the Certificate Authority certificate's information filled in:
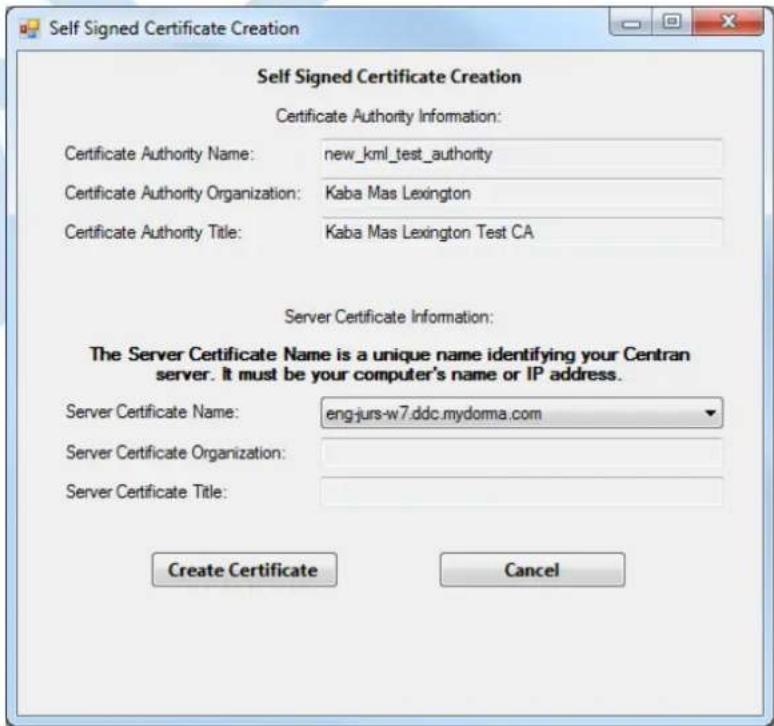
If, instead, Install Another Certificate is clicked, the dialog for entering the information needed to create the server certificate is displayed, with no Certificate Authority certificate's information filled in. In this case, the user must enter information for both a new Certificate Authority certificate and a new CenTran server certificate:

Note that descriptive text is displayed above each field while it is being filled in. Also, the certificate name field for the CenTran server certificate must be a valid name or IP address for the CenTran server machine, so that field is a pull-down menu containing only those values.
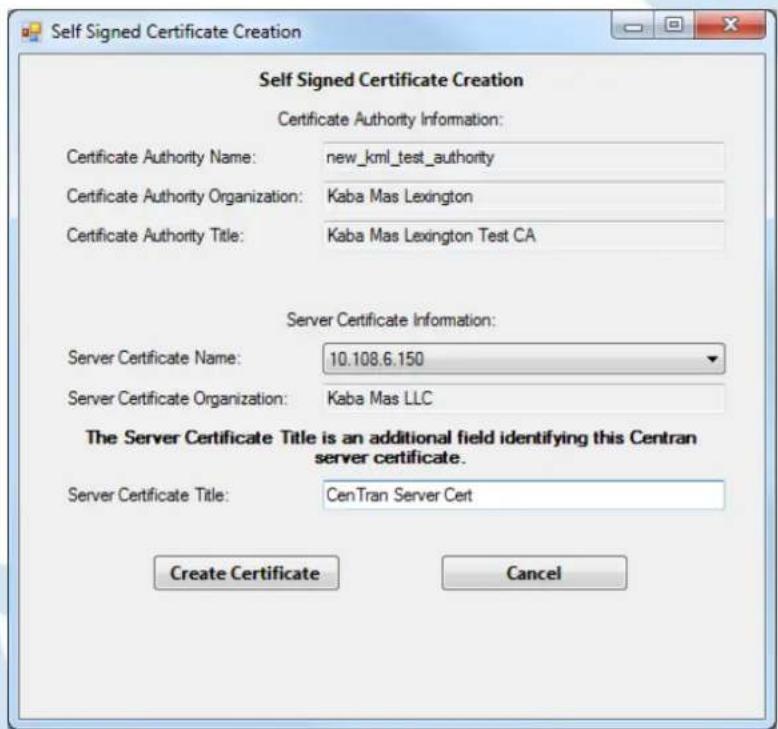
Fill in the fields with the appropriate values and Click Create Certificate. A message will be displayed indicating success. (If the Certificate Authority was also created, a message for that will also be displayed.)

Click OK to close the prompt(s). The CenTran configuration will be updated with the new server certificate, and a message will be displayed indicating the fact:

Click OK to close the prompt. Example CenTran Agent and Cencon Key Box Agent configuration files, along with the public key version of the CenTran server certificate, are now exported, and a message is displayed to indicate the fact:

Click OK to close the prompt. The server certificate for the CenTran server is now set up.

Self-Guided Certificate Installation
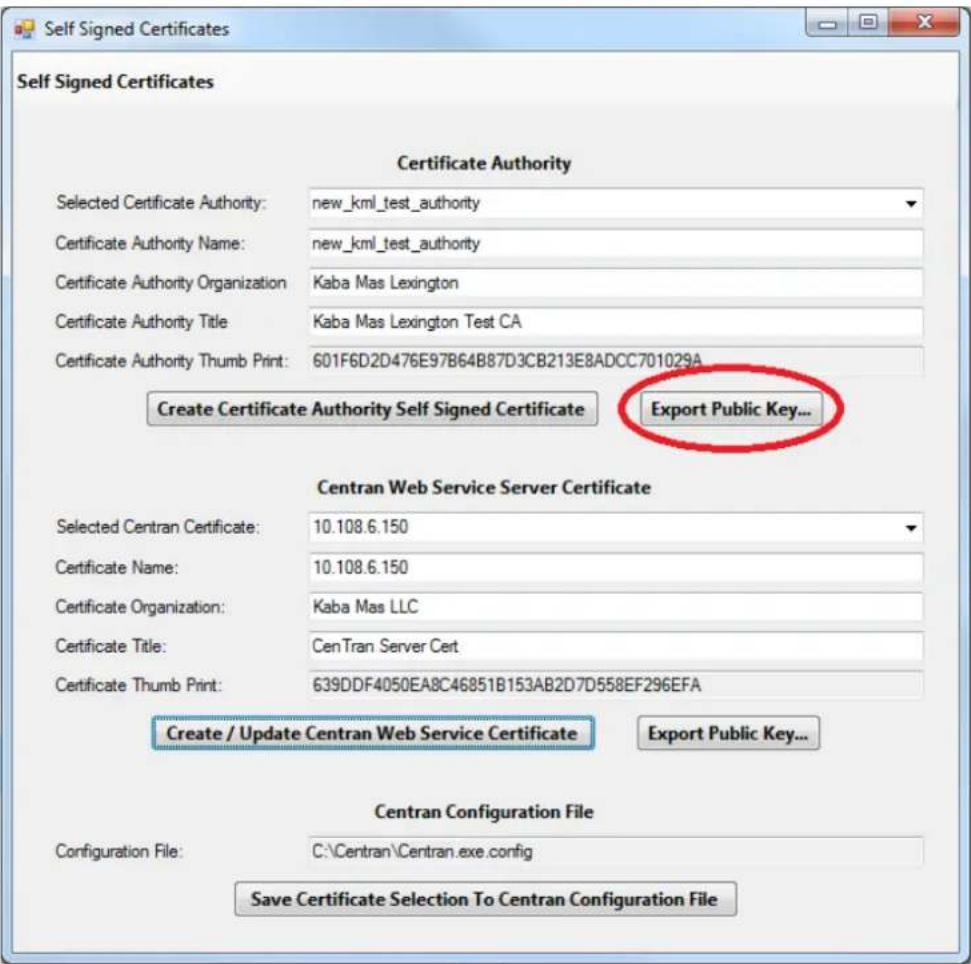
This dialog allows the user to work more freely with certificates. For example, from this dialog it is possible to create server certificates to be used on other machines.

You can select an existing certificate authority certificate to sign with, or create a new one.
To use an existing CA certificate select any certificate in the local machine root authority store that you have a private key for from the dropdown menu labeled Selected Certificate Authority.
To create a new CA certificate complete the Certificate Authority Name, Certificate Authority Organization and Certificate Authority Title fields with the desired data and select Create Certificate Authority Self Signed Certificate.
A new certificate authority (CA) certificate will be created. The Selected Certificate Authority pulldown and the Certificate Authority Thumb Print fields will be filled in. The new CA certificate will also be placed in the local machine trusted root certification authorities store.

An existing signed certificate can be used as the CenTran Web Service Server Certificate or a new signed certificate can be created using the selected certificate authority (CA) certificate.
To use an existing signed CenTran Web Service Server Certificate select from the Selected CenTran Certificate pulldown the desired certificate. All fields, including those in the Certificate Authority section, will be completed with the appropriate data for the selected certificate.
To create a new signed CenTran Web Service Server Certificate first enter the name you will use to access CenTran in the Certificate Name field.
Important Note - CenTran Server Network Address
It is very important that this name matches how you are going to address CenTran in a browser. If this is by server name, then the server name needs to be the name of the certificate. If it is by IP address, then the IP address needs to be the name of the certificate.
If you are accessing the CenTran web service on a company intranet using Windows Active Directory and a Domain Name Server (DNS), it is recommended to use the fully qualified server name for the certificate. This will look like the following: computername.domainname.local
If you are accessing the CenTran web service on a company intranet using Windows Active Directory and a Domain Name Server (DNS) and you do not use the fully qualified computer name, then your proxy server may block network access.
You can find the CenTran server full computer name under the Windows computer properties dialog. This can be accessed by right clicking on Computer in the Start Menu or File Explorer and selecting Properties from the context menu.

If you are going to be accessing the CenTran web service on a network without a Domain Name Server, then you will use the IP address of the CenTran web service. For IPv4 this will look like the following: 192.168.0.111
You can find the CenTran server IP address by opening a command prompt and entering the following command: ipconfig
Look for IPv4 Address in the text returned for the CenTran server address.
If you are accessing the CenTran web service exposed to the internet, then the security certificate used and the name of the certificate will be the same as your web site. Consult with your IT department for the proper certificate configuration in this case.
Important Note - CenTran Server Firewall
If your CenTran server is running either the Windows network firewall software or an antivirus vendor network firewall software, then the following ports (depending on the configuration that you have set) must be made available:
| Default Port | Usage Setting Location | |
| 0 | Web Service HTTP | Configuration File:address property |
| 43 | Web Service HTTPS | Configuration File:address property |
| 3004 | Centran Agent Persistent Connections | Configuration File:key="PersistentAgentConnectionsPort" value="port number" |
Enter the organization name and title as desired, and select Create / Update CenTran Web Service Certificate. The certificate will be created, and selected in the dropdown menu labeled Selected CenTran Certificate.

Lastly, you can have the CenTran Configuration Manager set up the selected certificate in the CenTran configuration file. Select the Save Certificate Selection To CenTran Configuration File. This will update the CenTran configuration file with information for your selected server certificate.
Any systems that are required to trust the CenTran web service through browser access will need to have the selected certificate authority (CA) certificate (not including private key) imported into the systems' local computer trusted root certification authorities store. A set of example steps of one method for accomplishing this on Windows 7 is as follows:
You can export the public keys for the CenTran certificates to certificate files (.cer) using the CenTran Configuration Manager.
Note
You can also manually export the CenTran certificates using the Microsoft Management Console:
Export the selected certificate authority (CA) certificate:
- Open Microsoft Management Console (Start -> Run -> mmc.exe).
- Choose File -> Add/Remove Snap-in.
- Choose the Certificates snap-in, and click Add.
- In the wizard, choose the Computer Account, and then choose Local Computer.
- Press Finish followed by OK to end the wizard.
- Navigate to Certificates (Local Computer).
- Select Trusted Root Certification Authorities.
- Expand Certificates
- Right click the CA certificate specified in CenTran Configuration Manager.
- Select All Tasks -> Export and follow the prompts; Do NOT export the private key, Record the specified target file name.
Note
To import the selected certificate authority (CA) certificates to a system that needs to trust the CenTran Web Services:
- Logon to the system that is to trust the CenTran Web Services.
- Copy the file containing the exported CA certificate onto this system.
- Open Microsoft Management Console (Start -> Run -> mmc.exe).
- Choose File -> Add/Remove Snap-in.
- Choose the Certificates snap-in, and click Add.
- In the wizard, choose the Computer Account, and then choose Local Computer.
- Press Finish followed by OK to end the wizard.
- Navigate to Certificates (Local Computer).
-
Right click Trusted Root Certification Authorities
-
Select All Tasks -> Import and follow the prompts; Provide the name of the file containing the exported CA certificate.
Set Up CenTran Management Security
CenTran 5 Getting Started Guide
The CenTran Management Security Settings tab provides control over various security related attributes of the CenTran web services.
To modify these attributes select CenTran Configuration Manager from the CenTran entry under the Windows Start menu and click on the Service Security tab to access this tab page:

The Save Changes and Discard Changes buttons will be enabled when any data on this tab is changed.
Clicking the Save Changes button will save the tab data to the CenTran configuration file.
Clicking the Discard Changes button will set the tab data to the values currently in the CenTran configuration file.
Clicking either the Save Changes button or the Discard Changes button will disable both buttons.
Note
If changes are saved the CenTran service must be stopped and started for the changes to take effect.
Authentication Method
Select the authentication method of Windows Authentication or Cencon User ID and Password to use to access operations in the main CenTran web services
- Centran.CentranService which uses XML message formatting
- Centran.CentranServiceJSON which uses JSON message formatting
See CenTran Web Service Configuration for CenTran web service information.
When Windows Authentication is selected the CenTran service must be running on a computer that is a member of a Windows logon domain on which the Windows logon user ID to be used is authorized.
When Cencon User ID and Password is selected the user ID and password to be used must be in the Cencon database to which the CenTran service is
connected. The Cencon User ID must be of type dispatcher, supervisor or special supervisor.
Valid Cencon User ID with invalid password in HTTP Credentials
If the Cencon User ID is specified with an incorrect password in 5 consecutive HTTP requests
• The Cencon User ID will be locked out from use in HTTP request credentials for 5 minutes.
- A message to that effect will be placed in the CenTran Event Log and in the Cencon Activity Log.
During the lockout period HTTP requests using this Cencon user ID in the credentials will return a result of "(403) Forbidden".
A user of type special supervisor can end the lockout prematurely via the "Disable User" attribute on the Cencon Client "Edit User" dialog "Access Control" tab.
Invalid Cencon User ID in HTTP Credentials
Each HTTP request in which the credentials contain an invalid Cencon User ID will be rejected returning to the sender a result of "(403) Forbidden".
If an excessive number of HTTP requests with an invalid Cencon User ID are received a message will be recorded in the CenTran Event Log and the Cencon Activity Table (CENAUD) warning of a possible denial of service attack.
CenTran Management Web Access
Define the user name and password that must be provided when accessing the CenTran Configuration Manager via a web browser.
See Log on to CenTran Management in Configure the CenTran Service using Web Management Interface for more information on the access process.
The default user name is admin.
The default password is password.
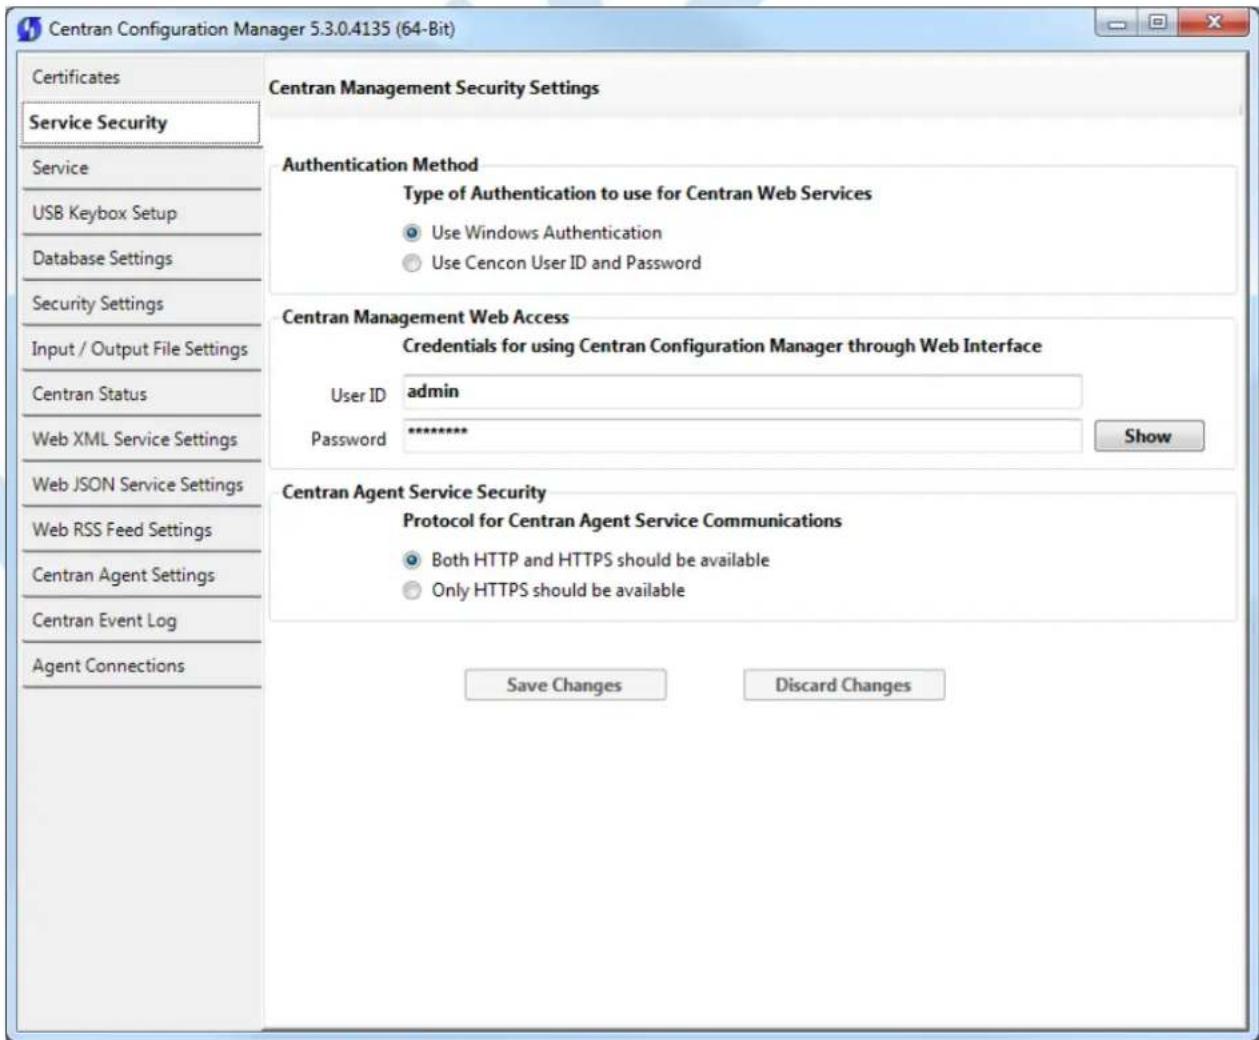
The button to the right of the Password field toggles between Show and Hide.
Click the Show button to display the password characters as they are typed.
Click the Hide button to hide the password characters as they are typed.

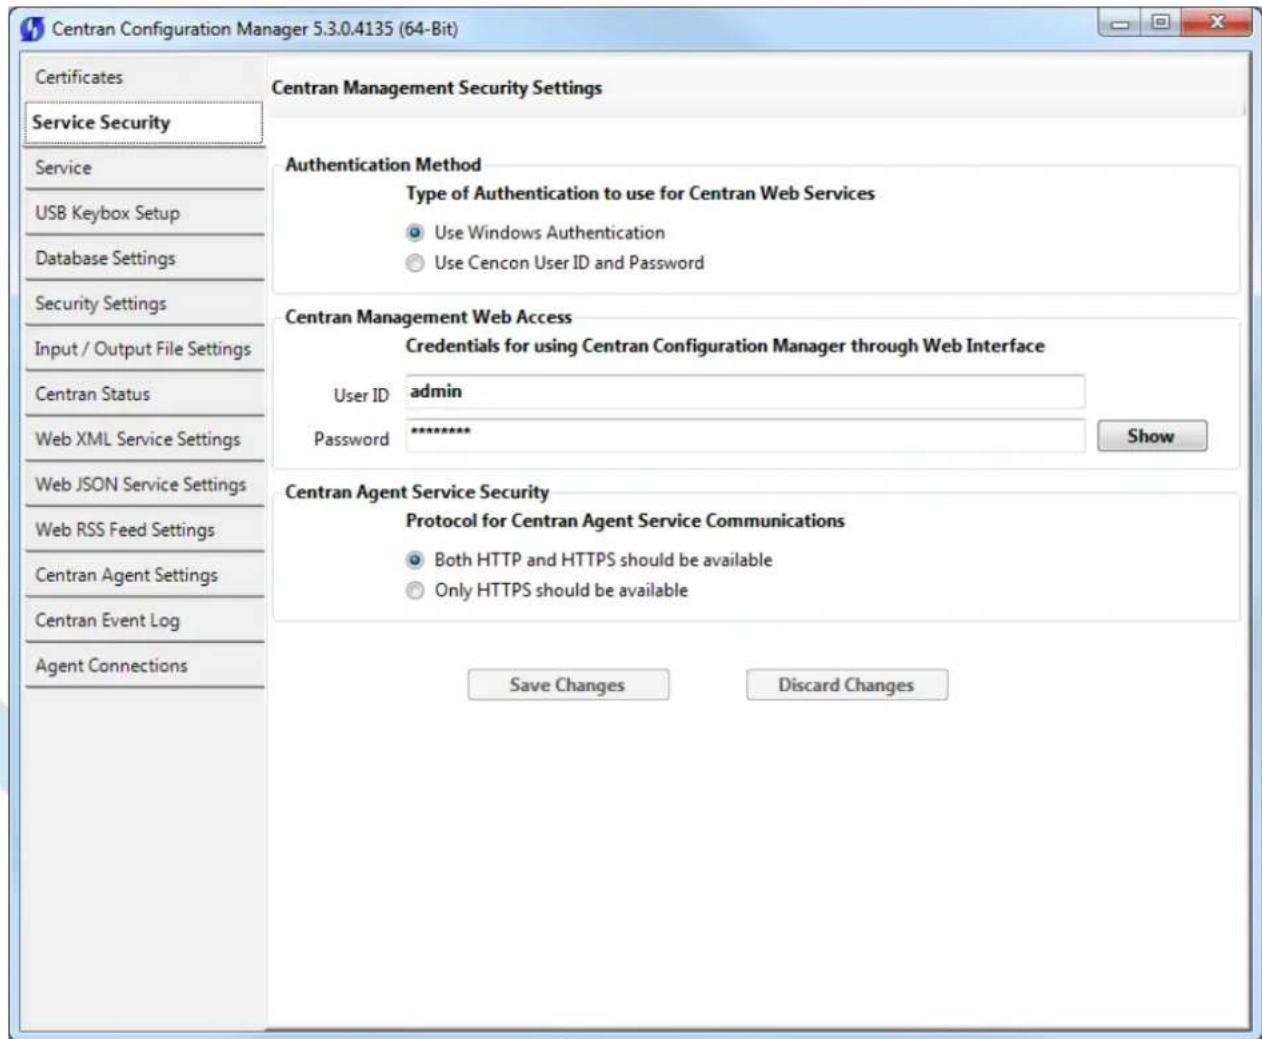
CenTran Agent Service Security
Specify whether or not the CenTran Agent web service operations can be accessed using HTTP (hypertext transfer protocol) which is not encrypted, as well as with HTTPS (Hypertext Transfer Protocol Secure) which is encrypted.
© 1996-2017 dormakaba
Document Number 2101.0513 Rev. G 08/17 CenTrah Getting Started Guide
Set Up CenTran Diagnostics / Logging
CenTran 5 Getting Started Guide
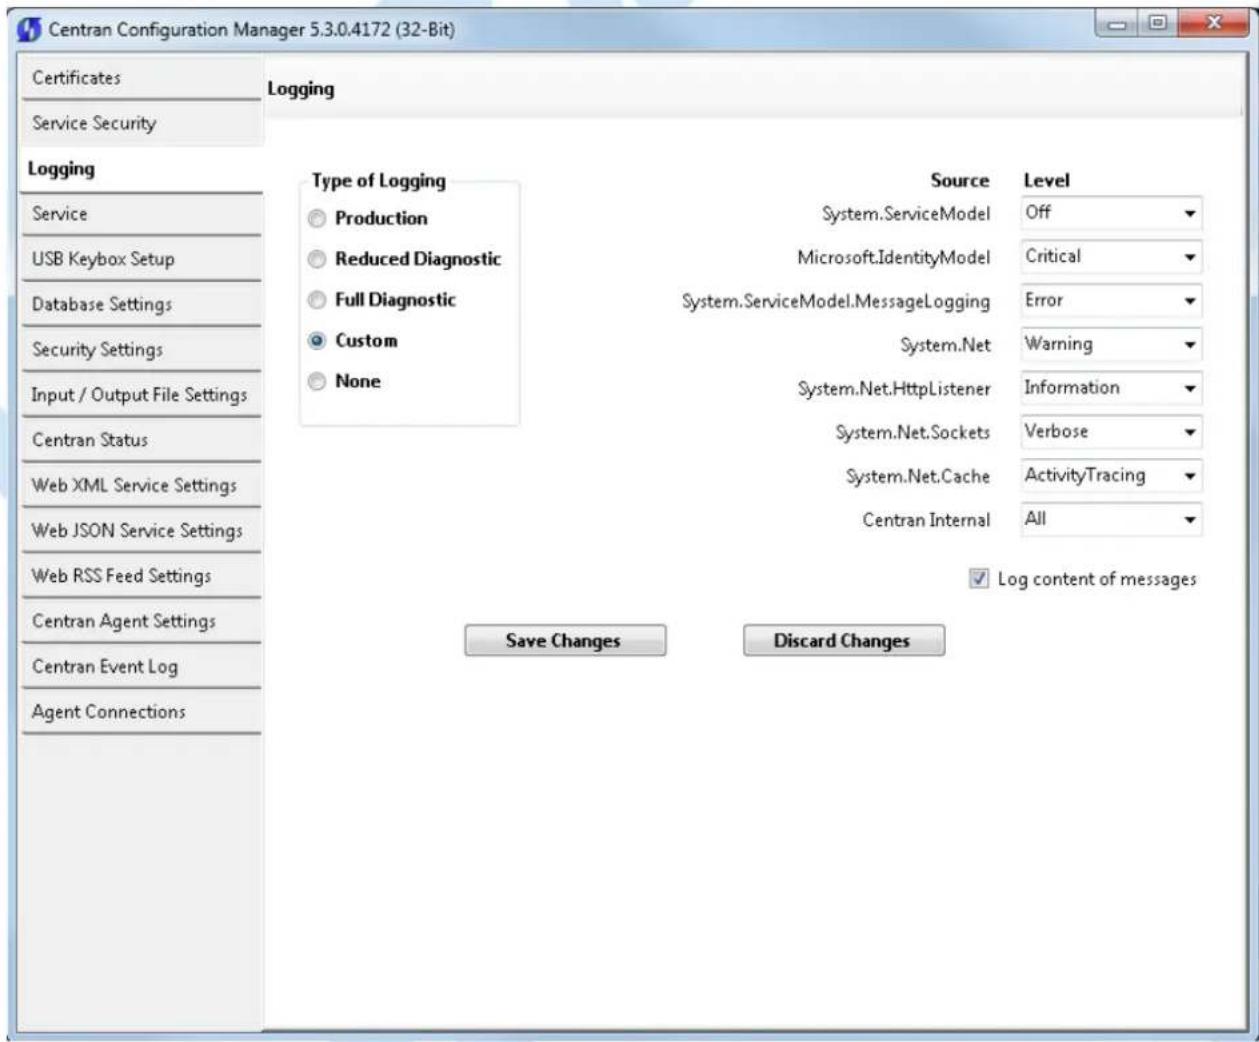
The Logging tab provides control over the output of Windows Communication Foundation (WCF) diagnostic output for tracing operations. This may be useful for diagnosing issues with communications with the CenTran web service.
To modify these attributes select CenTran Configuration Manager from the CenTran entry under the Windows Start menu and click on the Logging tab to access this tab page:

The Save Changes and Discard Changes buttons will be enabled when any data on this tab is changed.
Clicking the Save Changes button will save the tab data to the CenTran configuration file.
Clicking the Discard Changes button will set the tab data to the values currently in the CenTran configuration file.
Clicking either the Save Changes button or the Discard Changes button will disable both buttons.
Note
If changes are saved the CenTran service must be stopped and started for the changes to take effect.
Type of Logging
The radio buttons shown under Type of Logging allow for quick selection of pre-defined logging settings.
• Production: initial / default setting. Captures limited information for diagnostics in order to maintain performance.
- Reduced Diagnostic: Additional information is captured. May be useful in initial problem diagnosis.
• Full Diagnostic: Detailed information is captured. May be useful in diagnosis of more difficult issues.
- Custom: Detailed information for selected WCF components is captured. May be useful in diagnosis of more difficult issues. Selecting this radio button does not change the loggers that are enabled, nor the log levels. It is used to indicate that the enabled loggers or log levels do not match any of the other predefind settings.
- None: No information is captured. This setting disables the capturing of any WCF diagnostic information.
Any diagnostic information for WCF events is recorded in a file named WcfServiceTrace.svclog. This file will be created within the application directory in
which the CenTran service is installed. The file can be viewed using the Microsoft Service Trace Viewer (SvctraceViewer.exe). Double clicking on the file will automatically open the file in the Microsoft Service Trace Viewer.
The Microsoft Service Trace Viewer is available as a free download within the Windows Platform SDK.
Logging Sources and Logging Levels
The logging sources indicate the various WCF components or modules for which diagnostic information can be recorded. The logging level indicates the types of events for which diagnostic information will be recorded. The Log Levels are:
- Off: No information for the associated source is captured.
• Critical: Captures unexpected processing conditions. - Error: Captures severe error conditions.
- Warning: Captures error conditions.
• Information: Captures events that mark successful processing. - Verbose: Captures detailed information concerning successful processing.
• ActivityTracing: Captures flow between components. - All: Captures all events. This may degrade application performance.
As log levels change from "Off" to "All" the event information at all prior levels is also recorded. Example: at a log level of "Warning", events that would be recorded at either the "Critical" or "Error" levels are also recorded.
For more information about WCF logging, look at the documentation provided online by Microsoft.
See Appendix C - Troubleshooting: Check Run Time Error for more information on viewing the Windows Communication Foundation (WCF) Trace log.
Message Content Logging
Once logging is enabled for System.ServiceModel.MessageLogging, an option is provided to also record the contents of the messages. If the "Log content of messages" checkbox is checked, then the content of WCF messages will be recorded.
Set Up CenTran Management Web Access
CenTran 5 Getting Started Guide
The Service tab provides the ability to Install, Start, Stop and Uninstall the CenTran Service.
The Service tab also provides control over the URL endpoint for managing the CenTran Service over the network; as well as the ability to provide a localized (translated) web page for managing the CenTran Service.
This tab provides the information for customizing the URL endpoint for accessing the CenTran Management via the web browser and localization of the web page presented in the browser when access CenTran Management.
See Install / Start the CenTran Service for details on installing or starting the CenTran Service.
See Stop / Uninstall the CenTran Service for details on stopping or uninstalling the CenTran Service.
To modify the configuration settings for controlling web access to the Centran Management application: select Centran Configuration Manager from the Centran entry under the Windows Start menu and then click on the Service tab to access this tab page within the application (the actual page may vary slightly based on the state of the CenTran Service):

Click on the Settings button to access the controls for modifying the configuration settings for the web connection to the Centran Management application. The page will look like:

The Save Changes and Discard Changes buttons will be enabled when any data on this tab is changed.
Clicking the Save Changes button will save the tab data to the CenTran configuration file.
Clicking the Discard Changes button will set the tab data to the values currently in the Centran configuration file.
Clicking either the Save Changes button or the Discard Changes button will disable both buttons.
Note
If changes are saved the CenTran service must be (re)started for the changes to take effect.
CenTran Management URL
The Centran Management URL shows the URL used to connect to the server's Centran Management application using the Web Browser. There are two parts to this URL that can be modified: the port and the path.
- The Port: the port number to fully designate the network connection to the server's Centran Management application using the web browser. The default port is 443.
- The Path: Default value is CentranManagement.
As the Port and Path are changed the resulting URL is updated as long as the values are valid. A warning messages will indicate if / when an invalid value is entered.
You will NOT be able to save invalid settings.
These settings change the URL used to access the Centran Management application in the browser.
Localization Folder
The Localization folder allows you to translate (or localize) the CentranManagement web page.
To localize the CenTran Management web application:
- Make a copy of the original CentranManagement folder. The original CentTran Management folder is named 'CentranManagement' and is in the Centran service install folder.
- Edit the index.html in the copy folder.
- Select the copy folder by clicking on the Localization Folder link, and
- Navigate to the copy folder, select it, and then click on the OK button.
This setting does NOT change the URL used to access the CenTran Management application in the browser. It does change where the application loads the files used to display the CenTran Management application in the browser.
© 1996-2017 dormakaba
Document Number 2101.0513 Rev. G 08/17 CentTrah Getting Started Guide
Set Up CenTran Event Logging
CenTran 5 Getting Started Guide
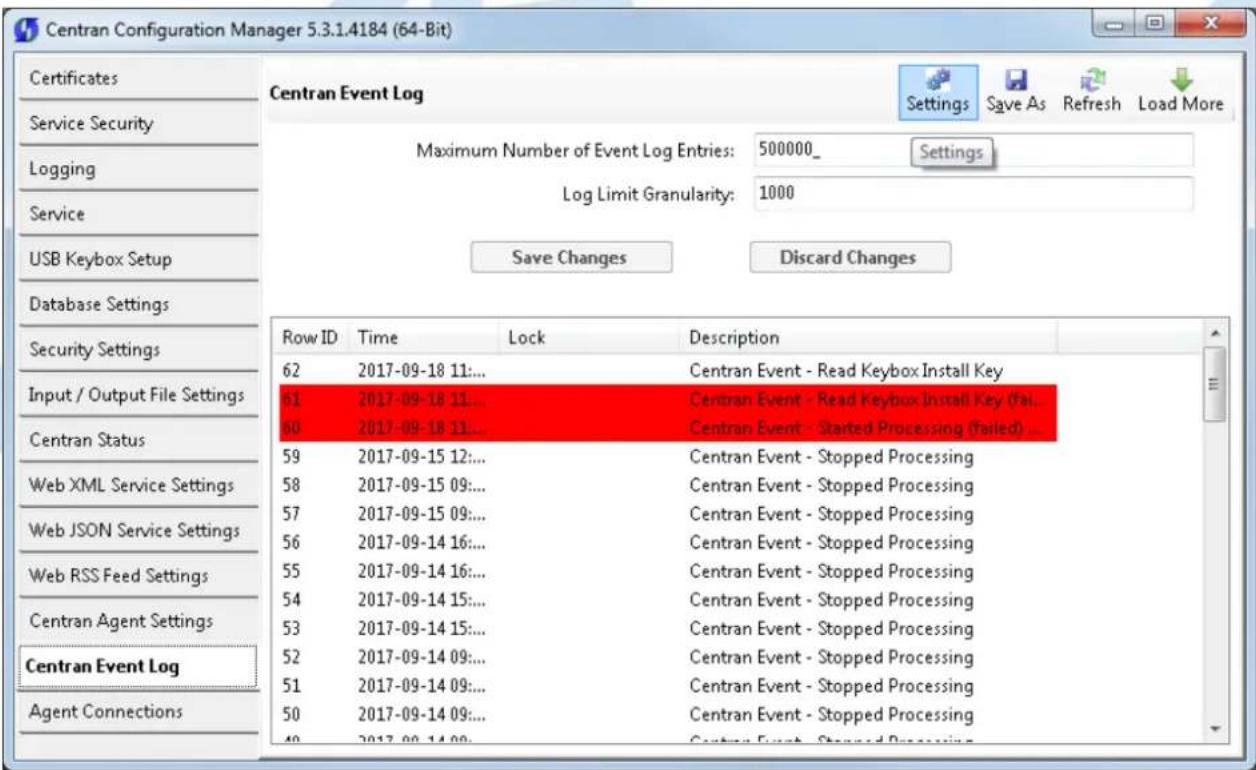
The Centran Event Log tab provides a view of the most recent events that have been processed by the Centran Service, and the means to refresh, save, and to load additional (older) events.
The Centran Event Log tab also provides control over the settings to configure the maximum number of events audited and the granularity with which that maximum limit is checked.
See View CenTran Event Log for details on viewing the Audit trail.
To modify these settings select CenTran Configuration Manager from the CenTran entry under the Windows Start menu and click on the Centran Event Log tab to access this tab page:

Click on the Settings button to access the controls for modifying the configuration settings for the web connection to the Centran Management application. The page will look like:
The Save Changes and Discard Changes buttons will be enabled when either setting on this tab is changed.
Clicking the Save Changes button will update these settings in the CenTran configuration file.
Clicking the Discard Changes button will set the tab data to the values currently in the CenTran configuration file.
Clicking either the Save Changes button or the Discard Changes button will disable both buttons.
Note
If changes are saved the CenTran service must be stopped and started for the changes to take effect.
Maximum Number of Event Log Entries
This setting controls the total number of most recent audit events that are recorded. It limits the size of the Centran Event Log. Once the log reaches the set limit, it will delete the oldest audits to remain within the limit. The check for the limit size is controlled by this setting and the Log Limit Granularity. The event log may grow slightly larger than the set limit based upon the granularity. The lowest valid value for this setting is 10,000. The highest valid value for this setting is 1,000,000. The default value for this setting is 500,000.
Log Limit Granularity
The Log Limit Granularity determines the number of new events that must be added before the number of event log entries is checked against the limit. This "granularity" minimizes the impact on performance. The lowest valid value for this setting is 100. The highest valid value for this setting is 5,000. The default value for this setting is 1000.
© 1996-2017 dormakaba
Document Number 2101.0513 Rev. G 08/17 CenTran6 Getting Started Guide
Install / Start the CenTran Service
CenTran 5 Getting Started Guide
To install and start the CenTran service, select CenTran Configuration Manager from the CenTran entry under the Windows Start menu. Click on the Service tab. You should see the following tab page:
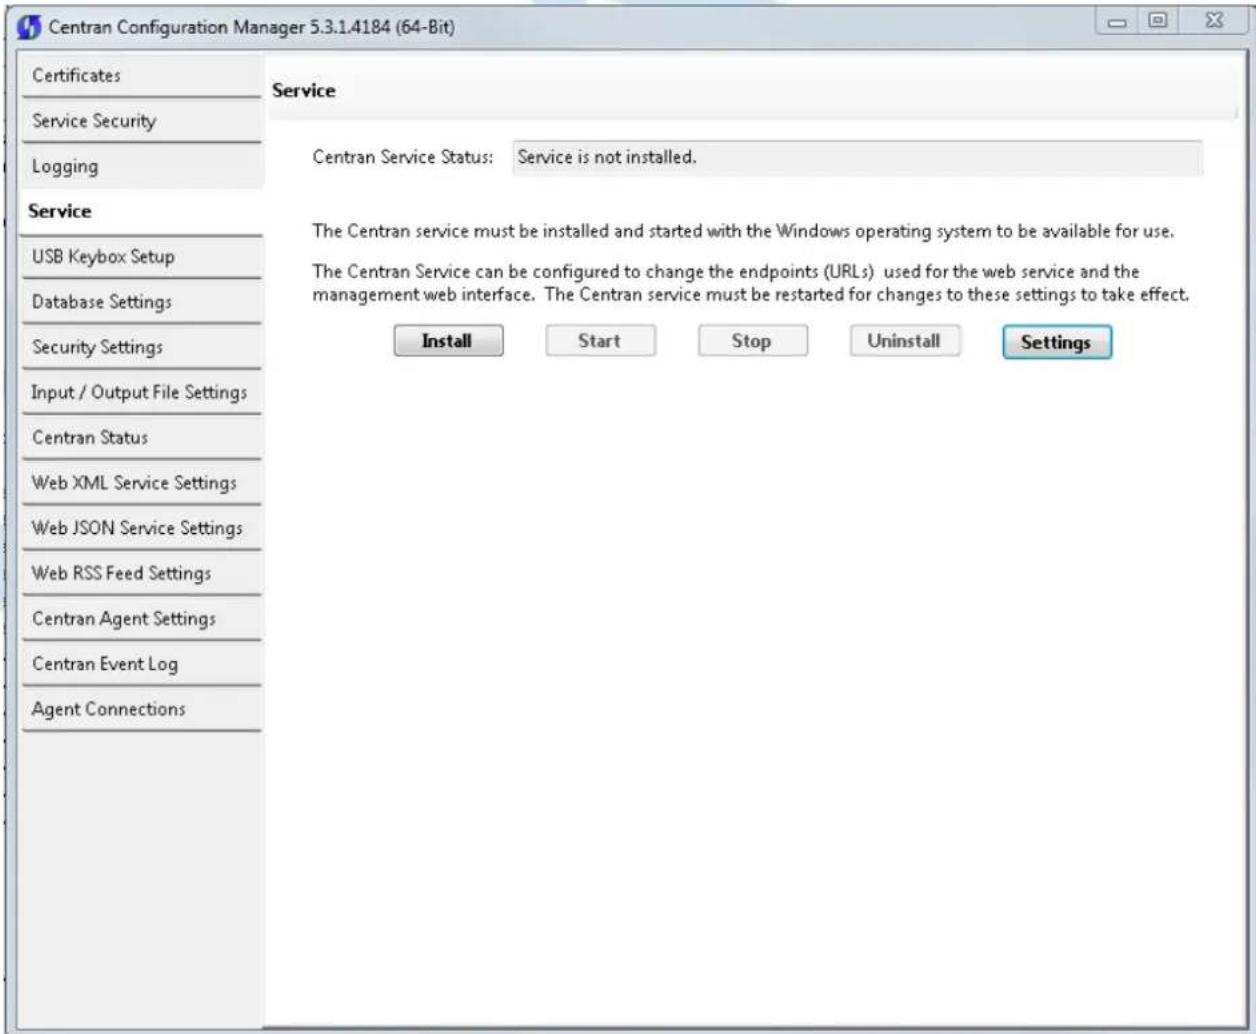
Select the Install button to install the CenTran service with the operating system.

Make sure you have completed any changes to the CenTran service configuration file. Select the Start button to start the CenTran service with the operating system.

You will now have a link available to open the CenTran Management interface in your default web browser. Your web browser must support HTML5 and CSS3. This includes the following browsers:
- Internet Explorer 9 or higher
- Firefox 10 or higher
- Google Chrome 16 or higher
- Apple Safari 5 or higher
If you are using Internet Explorer, you must have compatibility mode for intranet sites turned off under the Tools menu. Press Alt-T to open the tools menu in Internet Explorer to get to this setting.
You can now manage CenTran settings either directly through the CenTran Configuration Manager or through the web browser CenTran Management interface. You will now need to set up the CenTran settings using one of these two methods, and then you can start processing lock transactions using CenTran.
© 1996-2017 dormakaba
Document Number 2101.0513 Rev. G 08/17 Centra6 Getting Started Guide
Configure the CenTran Service using CenTran Configuration Manager
CenTran 5 Getting Started Guide
The CenTran Configuration Manager supports directly managing a running CenTran service on the same computer. It does not support managing a CenTran service running on a different computer. To manage a running CenTran service, you must have already set up the appropriate CenTran configuration file settings and certificates. You must have also installed and started the CenTran service.
Managing the CenTran service:
The following sections describe setting up and managing the CenTran service using the CenTran Configuration Manager:
- Setup Keybox
- Select ODBC Database Connection
- Set Company Number
- Set File Settings
• Start Transaction Processing
• View Web Service XML Settings
• View Web Service JSON Settings
• View Web RSS Feed Settings
• View CenTran Agent Settings
• View CenTran Event Log
• View CenTran Agent Persistent Connections - Stop Transaction Processing
© 1996-2017 dormakaba
Document Number 2101.0513 Rev. G 08/17 CenTra6 Getting Started Guide
Setup Keybox
CenTran 5 Getting Started Guide
Click on the USB Keybox Setup tab on the CenTran Configuration Manager:
You should see the following tab page displayed by the CenTran Configuration Manager:

Place your Keybox install key in the first port of the keybox: (This will be the port farthest away from the USB connection.)

Click on the Read USB Keybox Install Key button on the USB Keybox Setup tab page.
You should see the following in the USB Keybox Setup tab page.

Click on the OK button on message box.
You should see the following in the USB Keybox Setup tab page.
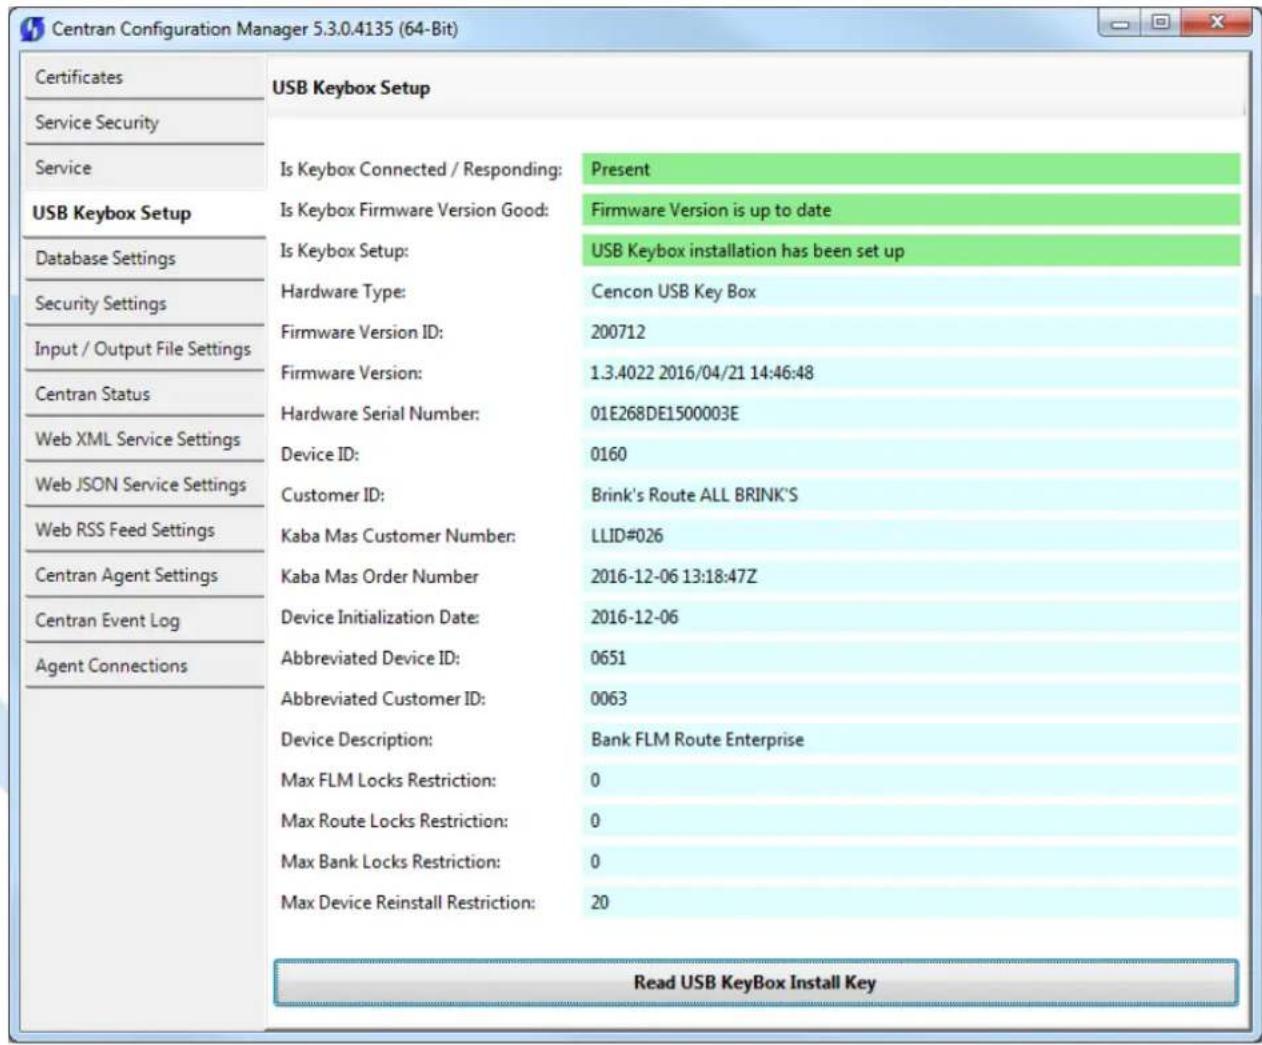
© 1996-2017 dormakaba
Document Number 2101.0513 Rev. G 08/17 Centra6 Getting Started Guide
Select ODBC Database Connection
CenTran 5 Getting Started Guide
Important Note
CenTran no longer runs under the permissions of the logged on user. It has been changed to run as a background service on the host server you install it on, and is independent of who is logged on. The CenTran service will run in the background even if no one is logged onto the host server.
By default, the CenTran service runs logged on under a Local System account. This gives it access to resources and settings on the host server you install it on. However, the Local System account only has access to the host server, not to resources on your network.
If the CenTran service is configured to run logged onto the default Local System account, you will need to use SQL authentication for CenTran to access the SQL Server database.
If the CenTran service is configured to run logged onto an account configured for it on your network domain, then that account must have administrative privileges on the host server CenTran is on.
If you use Windows authentication for CenTran's database authentication, then the account CenTran is logged onto must be a network domain account and have authorization to access the SQL Server database.
You can view and edit the CenTran service settings from the Microsoft Management Console:
- Open the Start Menu.
• Right click on Computer. - Select Manage from the displayed context menu. You must have administrative privileges.
• The Computer Management console will be displayed. Expand the Services and Applications section on the left side. - Select Services from the Services and Applications section.
- Locate Centran from the list of services. Right click on Centran and select Properties from the context menu.
- A service Properties dialog will be displayed. Select the Log On tab to examine the account the service is set up to log on as.
Click on the Database Settings tab on the CenTran Configuration Manager:
You should see the following tab page displayed by the CenTran Configuration Manager:
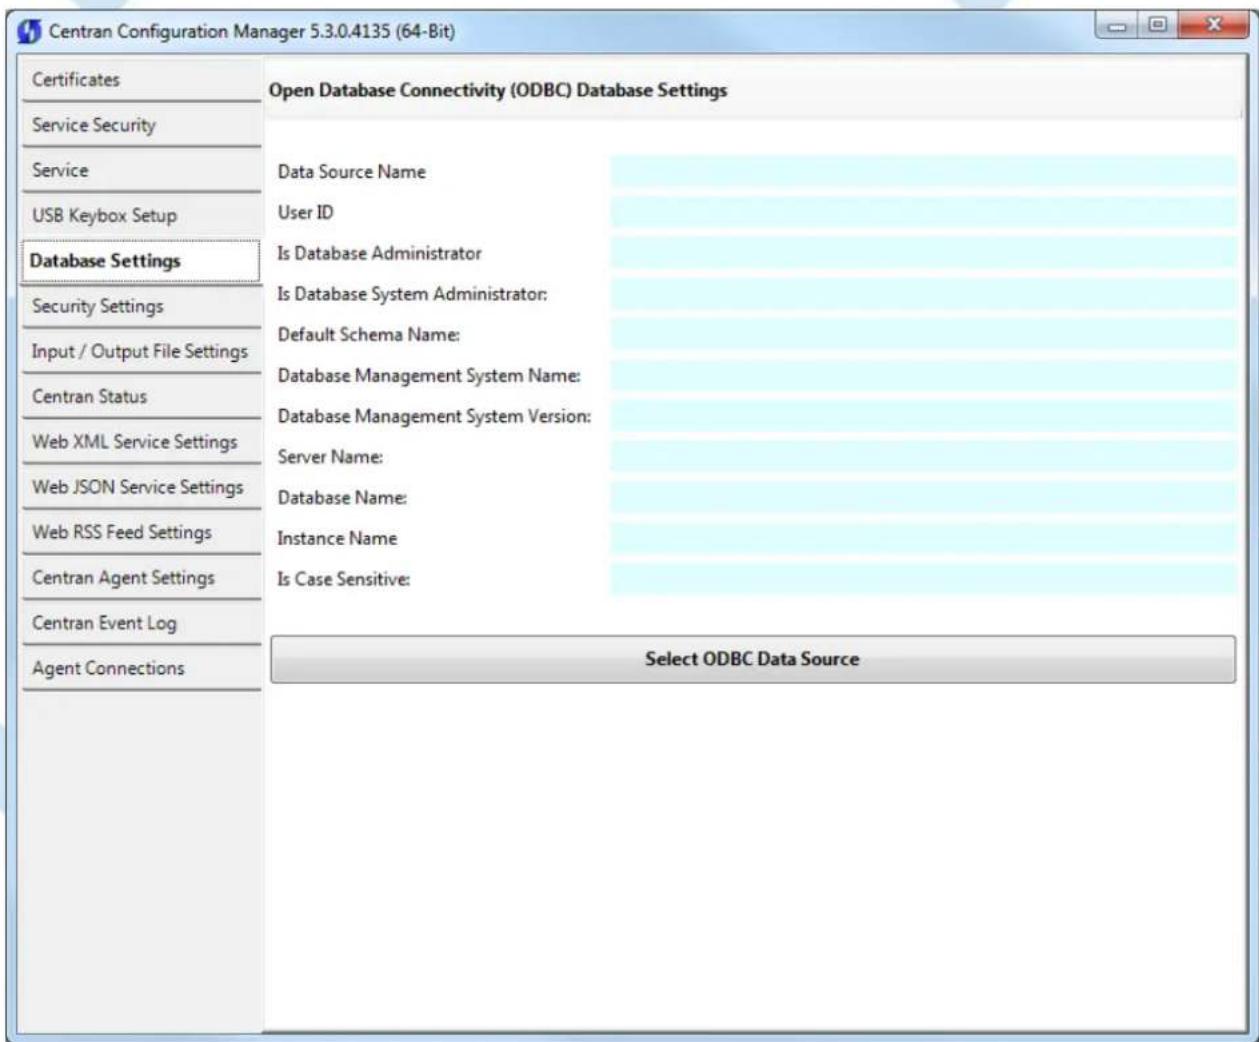
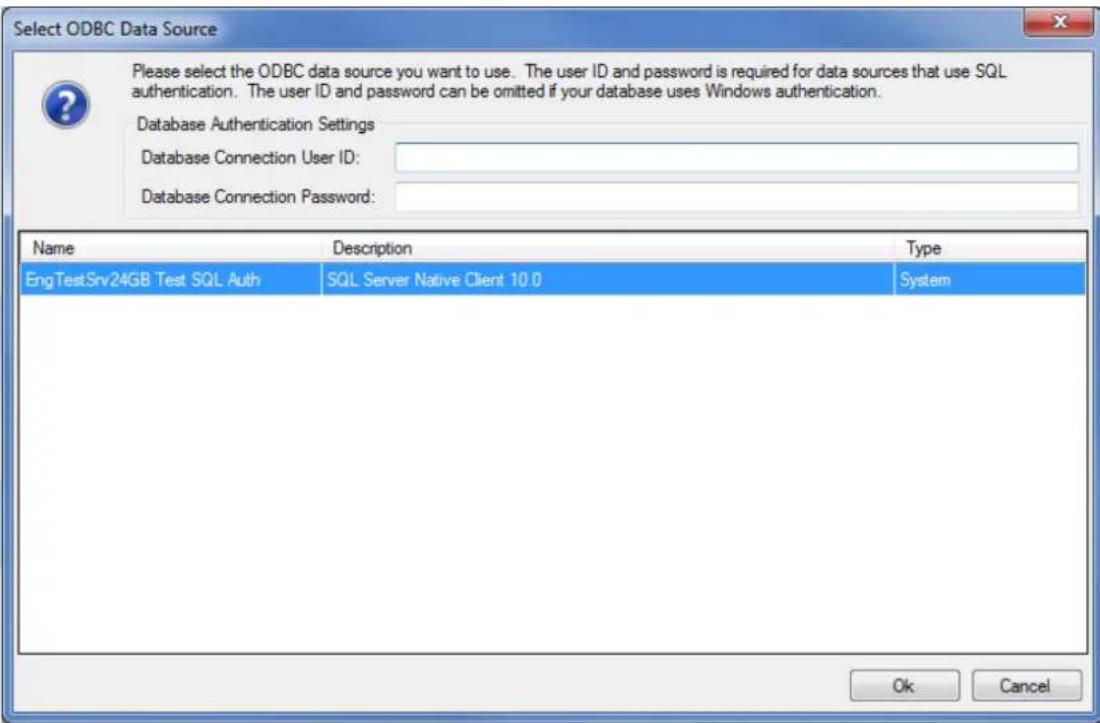
Select the ODBC database connection you want to use. For SQL authentication, you will also need to enter a user name and password for the CenTran service to use with the database connection.
You should see the following tab page displayed by the CenTran Configuration Manager:
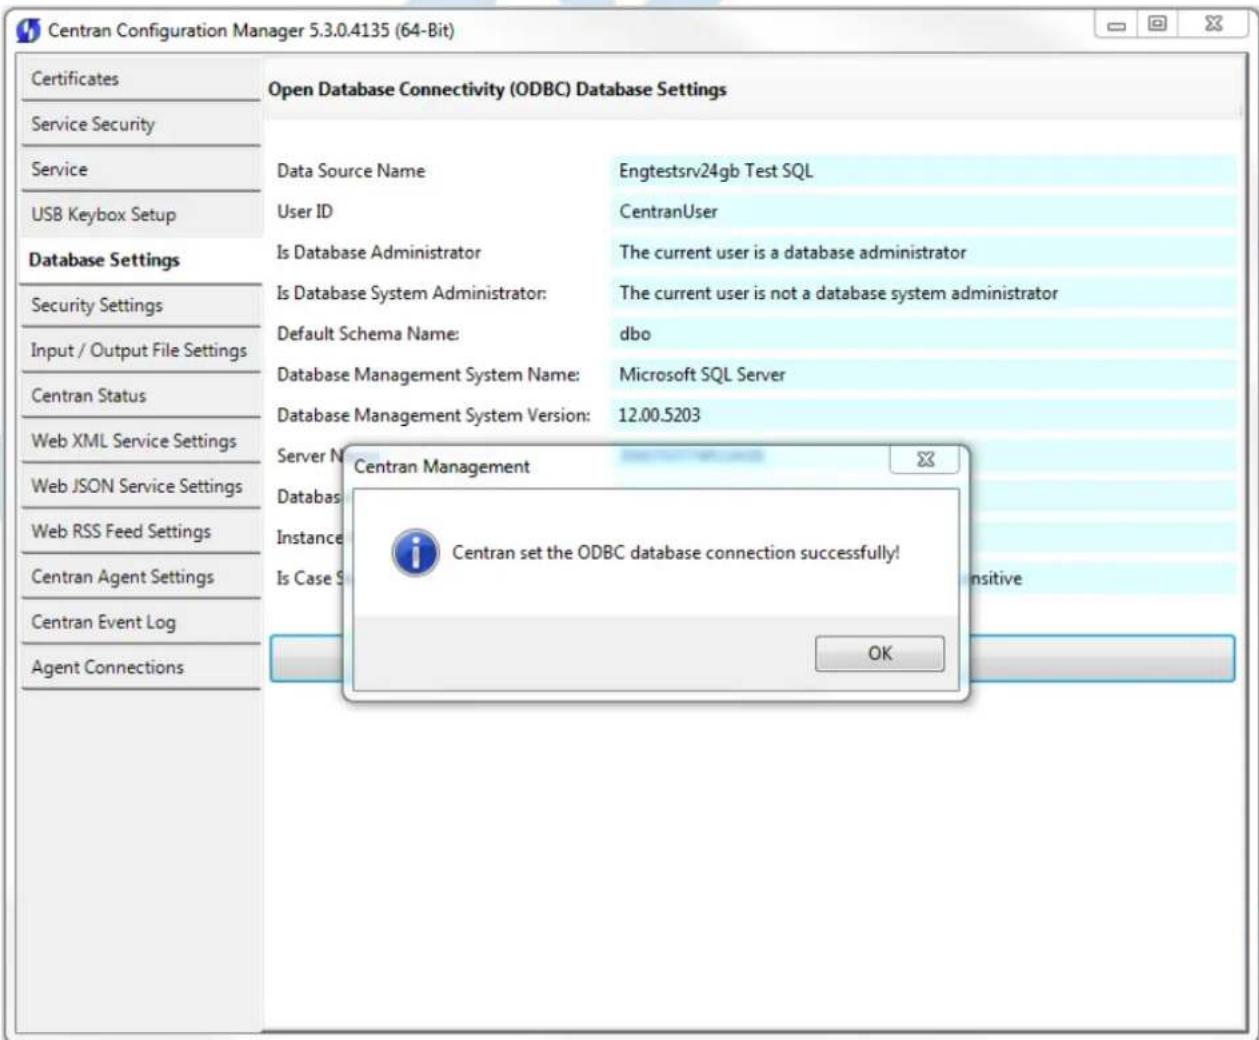
Click on the OK button on message box.
You should see something similar to the following tab page displayed by the CenTran Configuration Manager, depending on your database configuration:

© 1996-2017 dormakaba
Document Number 2101.0513 Rev. G 08/17 CenTrab6 Getting Started Guide
Set Company Number
CenTran 5 Getting Started Guide
Click on the Security Settings tab on the CenTran Configuration Manager.
You should see the following tab page displayed by the CenTran Configuration Manager:

Click on the Set Company Number button. You should see the following dialog displayed:
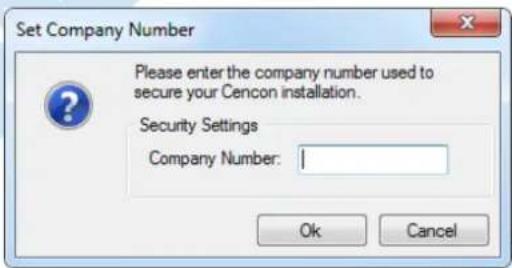
Enter the 4 digit company number you are using with Cencon. This is a sensitive piece of security information that is part your security with the Cencon system. You should record it and keep it in a secure place. The company number you enter for use by the CenTran service must match the one you are using with Cencon.
You should see the following tab page displayed by the CenTran Configuration Manager:

Click on the OK button on message box.
You should see the following tab page displayed by the CenTran Configuration Manager:
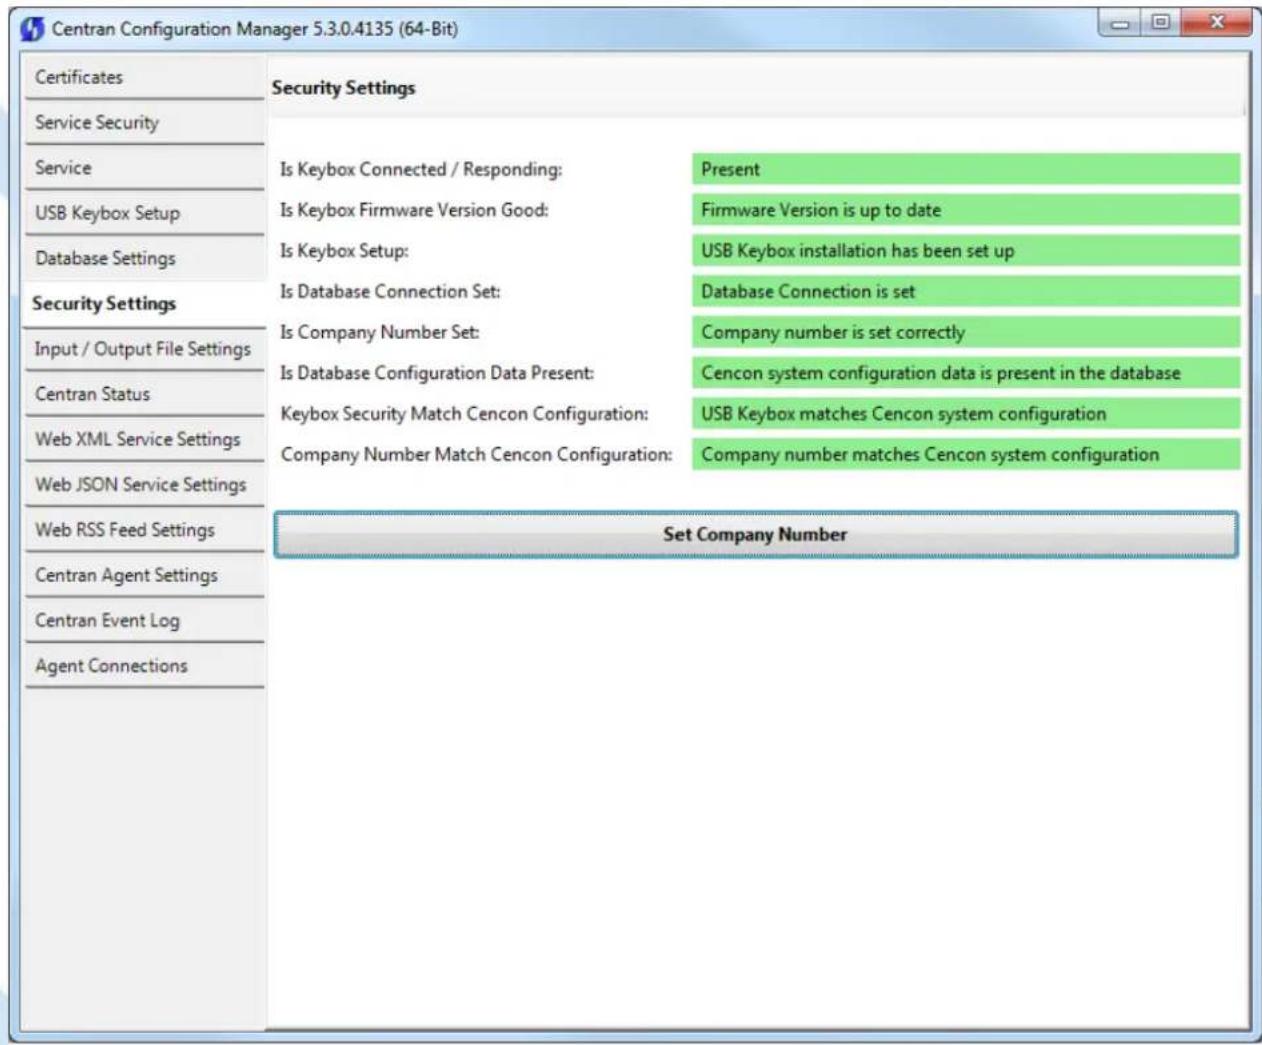
© 1996-2017 dormakaba
Document Number 2101.0513 Rev. G 08/17 CenTra6 Getting Started Guide
Set File Settings
CenTran 5 Getting Started Guide
Important Note
CenTran no longer runs under the permissions of the logged on user. It has been changed to run as a background service on the host server you install it on, and is independent of who is logged on. The CenTran service will run in the background even if no one is logged onto the host server.
By default, the CenTran service runs logged on under a Local System account. This gives it access to resources and settings on the host server you install it on. However, the Local System account only has access to the host server, not to resources on your network.
If you are configuring CenTran to access a shared file location on your network, not on the host server, then you will need to set up CenTran with a network domain account.
The account you set up CenTran to run logged onto must have administrative privileges on the host server CenTran is on. It must also have read / write access to the directories you are using for file input / output.
In this case, the file directories must be identified by UNC (Universal Naming Convention) paths: "\server\share\path"
You can not use mapped drive letters for network paths for a service. Mapped drive letters for network paths are specific to an account. They are not accessible from other accounts. If you set up a mapped drive letter for your logged on account, that does not mean that CenTran can access it from its account.
You can view and edit the CenTran service settings from the Microsoft Management Console:
- Open the Start Menu.
• Right click on Computer. - Select Manage from the displayed context menu. You must have administrative privileges.
- The Computer Management console will be displayed. Expand the Services and Applications section on the left side.
- Select Services from the Services and Applications section.
- Locate Centran from the list of services. Right click on Centran and select Properties from the context menu.
- A service Properties dialog will be displayed. Select the Log On tab to examine the account the service is set up to log on as.
1. Click on the Input / Output File Settings tab on the CenTran Configuration Manager:
You should see the following tab page displayed by the CenTran Configuration Manager:

-
You will need to setup an input directory and an output directory for CenTran to receive file transactions and return the response.
-
Input Directory - The input directory is the directory where CenTran reads transactions being sent to it. It looks in this directory for files representing lock transactions to be processed. You will need to create an input directory that you want to use for CenTran to listen for incoming file transactions.
- Input File Extension - The input file extension defined here is the file extension CenTran looks for when attempting to find transaction input files in the input directory that has been identified. If an input file extension is not set, then the CenTran service will attempt to read any file placed in the input directory.
- Input File Delay - The delay before reading next input transaction file setting is intended to allow a delay after detecting a file and before reading it. It is possible for an error in reading the input file to occur if it has not been completely written to the input directory yet. This delay allows the write of the input file to complete before the CenTran service reads the file. This delay begins when a transaction file is detected in the input directory by CenTran.
- Output Directory - The output directory is the directory where CenTran places the output files containing the results of processed transactions. This directory can be the same directory as the one used to contain input files. If the two directories are the same, then the files must have different extensions assigned. You will need to create an output directory that you want to use for CenTran to write output files to.
- Output File Extension - The output file extension is the file extension placed by CenTran at the end of output file names. The file names will be the same as the input file names, except for the file extension. If an output file extension is set, then that extension will be placed at the end of output files produced by CenTran.
Note
CenTran has been validated against the SuperSpeed RamDisk Plus software. This software allows you to use a ram disk as the file location used for transferring CenTran transaction files. This improves performance and speed of transferring CenTran transaction files, and eliminates hard drive wear from transferring CenTran transaction files. This software is available at http://www.superspeed.com/desktop/ramdisk.php. SuperSpeed RamDisk is a Microsoft Certified software.
- Click on the Set File Settings button. You should see the following dialog displayed:
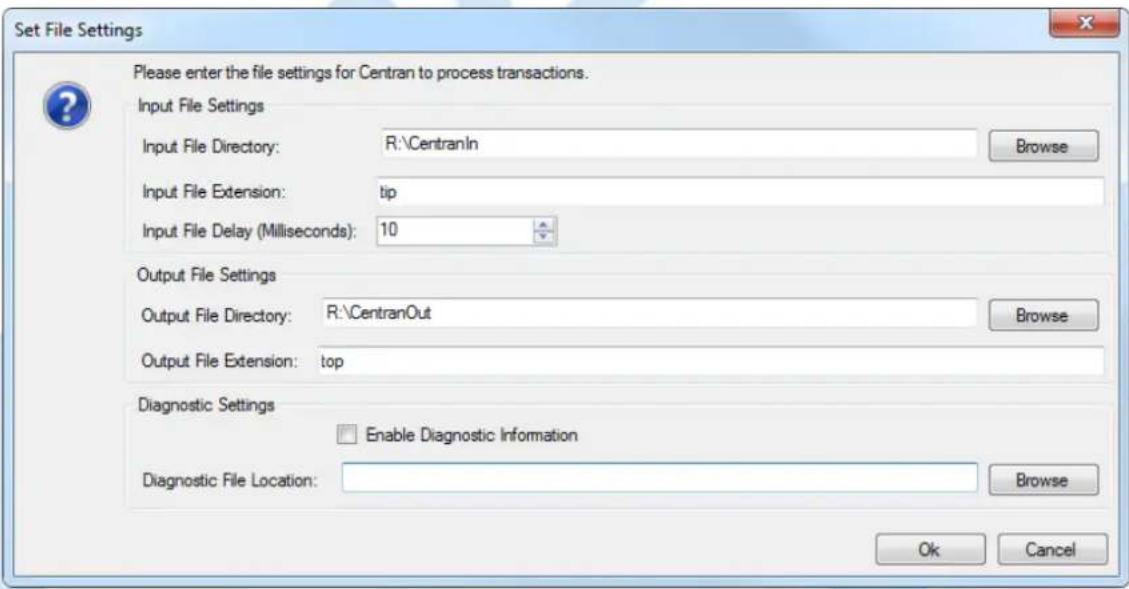
- Enter the input and output directories and extensions for the CenTran service to process files. Optionally, you can enable CenTran to record diagnostic output to a file, but this slows down performance. Once you have entered the settings you want to use, click on the OK button.
You should see the following tab page displayed by the CenTran Configuration Manager:

- Click on the OK button on message box.
You should see the following tab page displayed by the CenTran Configuration Manager:

- You will also need to set the default dispatcher ID to be used for the CenTran service when a dispatcher ID is not available for a transaction being processed. Optionally, you can force this dispatcher ID to be used instead of the dispatcher ID associated with a transaction. Click on the Set Default Dispatcher Settings button. You should see the following dialog displayed:
You should see the following dialog displayed:
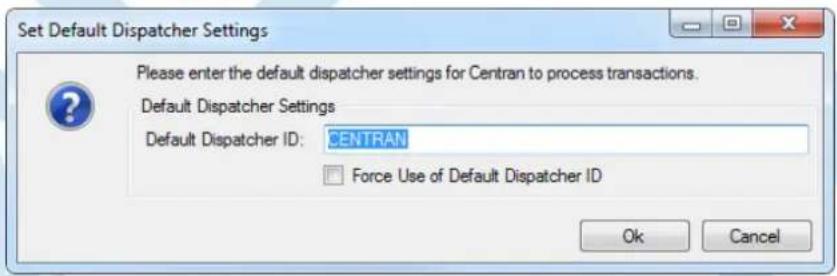
- Enter the default dispatcher ID you want to use. This default dispatcher ID must have been already set up under Cencon, and be present in the database. The role that the default dispatcher is assigned to will effect what authorizations the default dispatcher has. Once you have entered the default dispatcher ID you want to use, click on the OK button.
You should see the following message displayed by the CenTran Configuration Manager:

© 1996-2017 dormakaba
Document Number 2101.0513 Rev. G 08/17 CenTran Getting Started Guide
Start Transaction Processing
CenTran 5 Getting Started Guide
Click on the CenTran Status tab on the CenTran Configuration Manager:
You should see the following tab page displayed by the CenTran Configuration Manager:
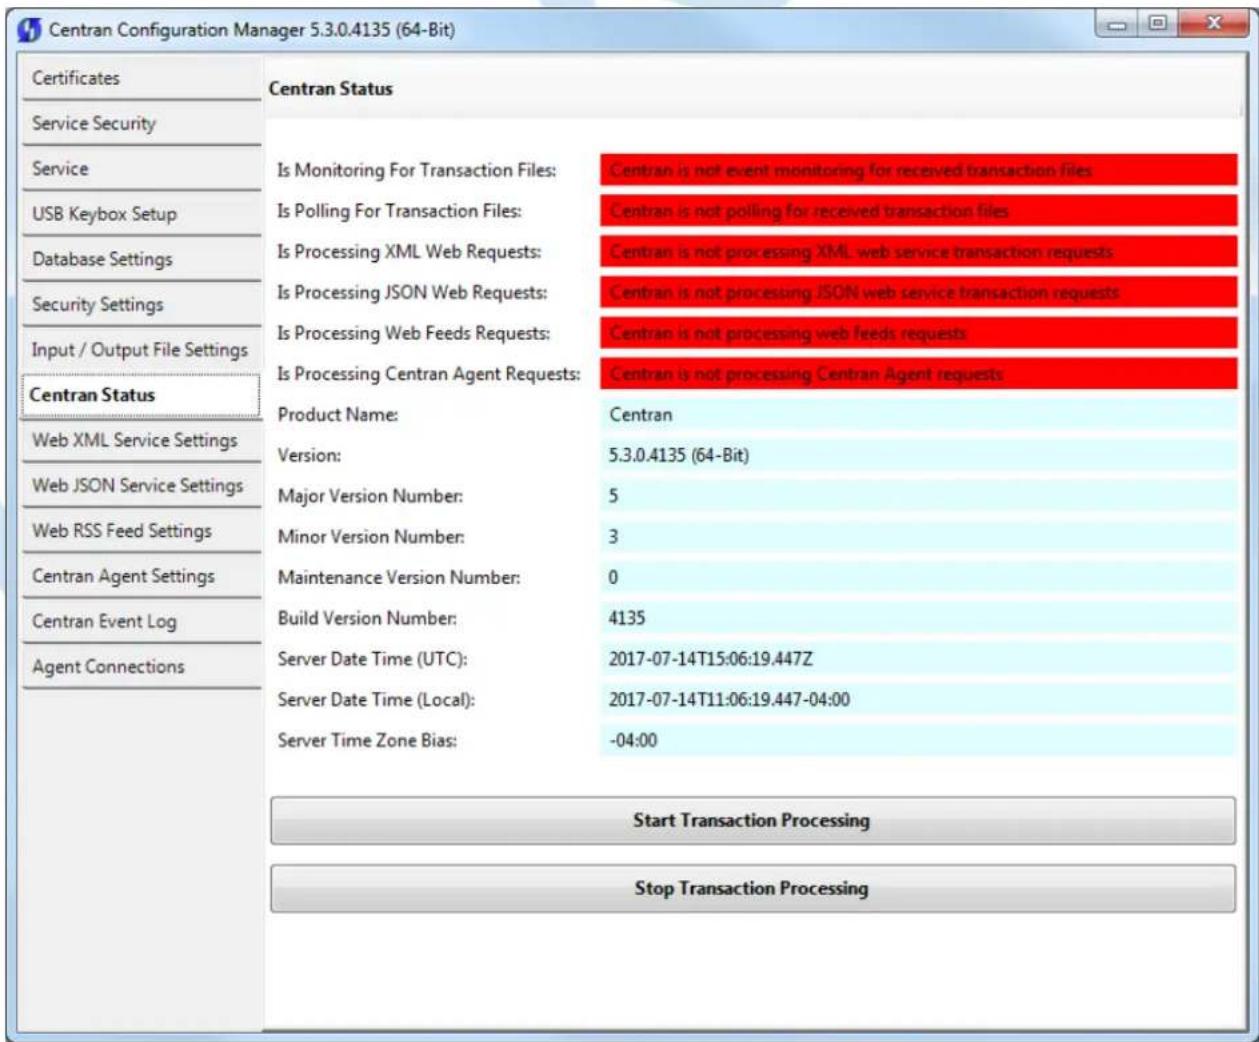
Click on the Start Transaction Processing button. You should see the following message dialog displayed:

Click on the message dialog OK button.
You should see the following tab page displayed by the CenTran Configuration Manager:

© 1996-2017 dormakaba
Document Number 2101.0513 Rev. G 08/17 CenTra6 Getting Started Guide
View Web Service XML Settings
CenTran 5 Getting Started Guide
The web service settings are configured in the sytem.serviceModel section of the CenTran service configuration file. The resultant web service based on the settings can be viewed while the CenTran service is processing transactions.
Click on the Web XML Service Settings tab on the CenTran Configuration Manager.
You should see the following tab page displayed by the CenTran Configuration Manager:
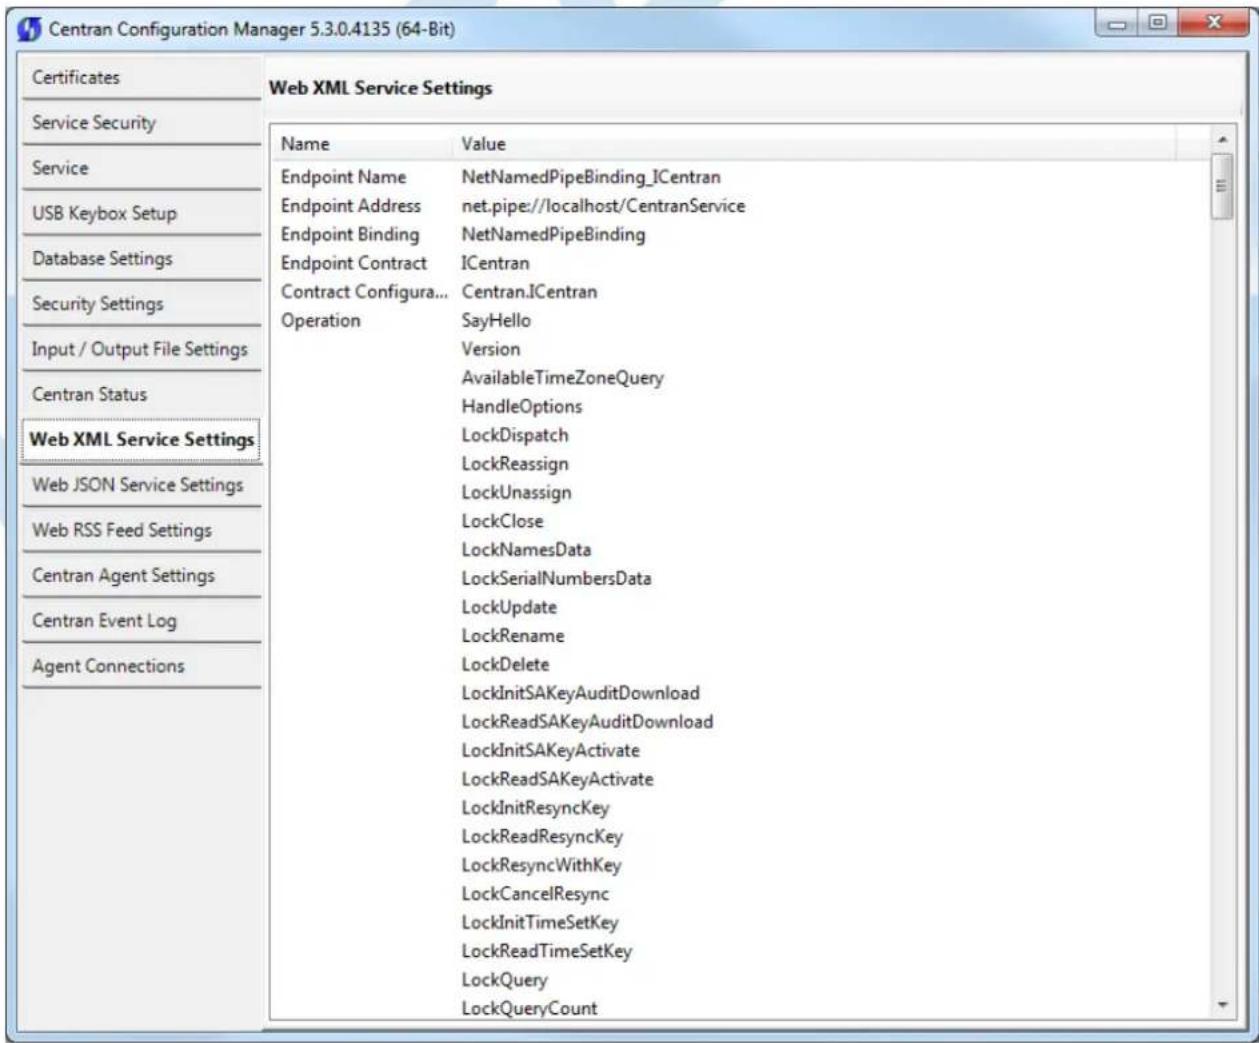
© 1996-2017 dormakaba
Document Number 2101.0513 Rev. G 08/17 CenTran Getting Started Guide
View Web Service JSON Settings
CenTran 5 Getting Started Guide
The web service settings are configured in the system.serviceModel section of the CenTran service configuration file. The resultant web service based on the settings can be viewed while the CenTran service is processing transactions.
Click on the Web JSON Service Settings tab on the CenTran Configuration Manager.
You should see the following tab page displayed by the CenTran Configuration Manager:

© 1996-2017 dormakaba
Document Number 2101.0513 Rev. G 08/17 CenTran Getting Started Guide
View Web RSS Feed Settings
CenTran 5 Getting Started Guide
The web rss feed settings are configured in the sytem.serviceModel section of the CenTran service configuration file. The resultant web rss feeds based on the settings can be viewed while the CenTran service is processing transactions.
Click on the Web RSS Feed Settings tab on the CenTran Configuration Manager:
You should see the following tab page displayed by the CenTran Configuration Manager:

© 1996-2017 dormakaba
Document Number 2101.0513 Rev. G 08/17 CenTran Getting Started Guide
View CenTran Agent Settings
CenTran 5 Getting Started Guide
The CenTran Agent settings are configured in the sytem.serviceModel section of the CenTran service configuration file. The resultant web service based on the settings can be viewed while the CenTran service is processing transactions.
Click on the CenTran Agent Settings tab on the CenTran Configuration Manager.
You should see the following tab page displayed by the CenTran Configuration Manager:

© 1996-2017 dormakaba
Document Number 2101.0513 Rev. G 08/17 CenTran Getting Started Guide
View Event Log
CenTran 5 Getting Started Guide
Click on the CenTran Event Log tab on the CenTran Configuration Manager:
You should see the following tab page displayed by the CenTran Configuration Manager:
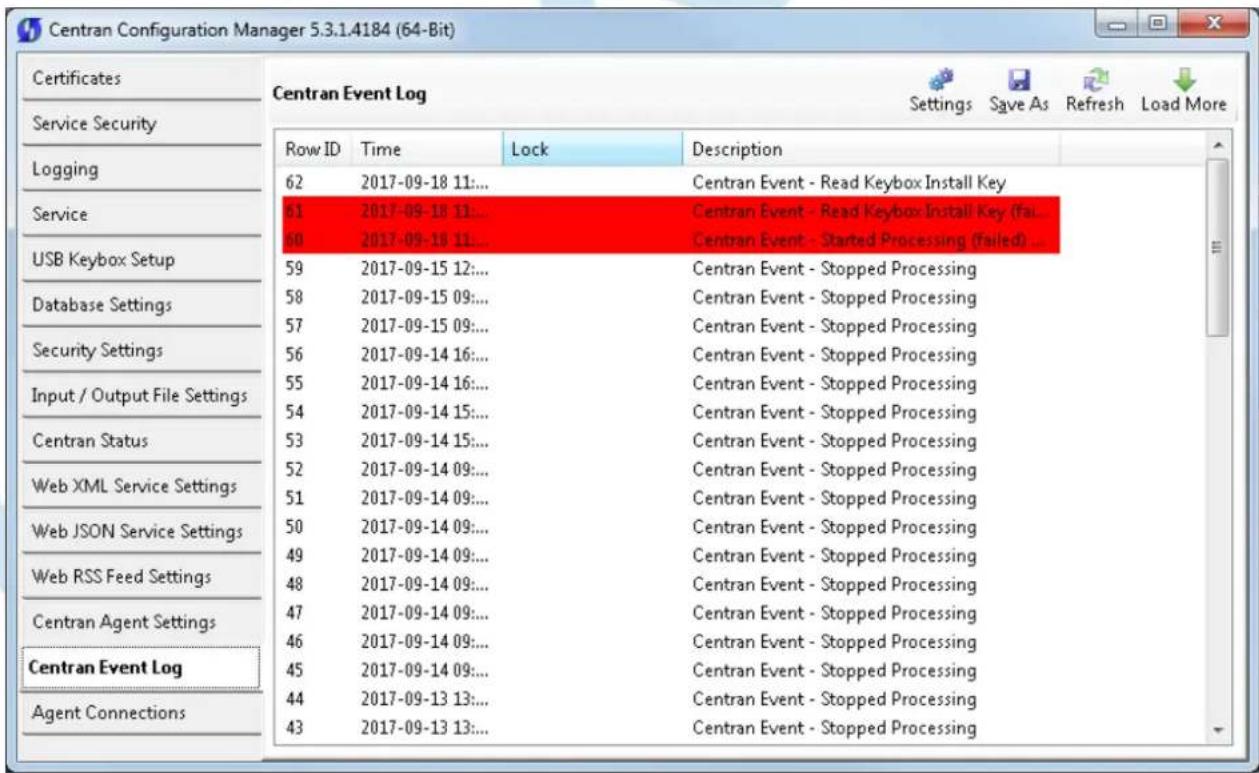
The CenTran Management interface loads event log audits 100 at a time. To load additional audits for viewing, click on the Load More button.
You can also save the CenTran event log to an HTML file. Click on the Save As button to save the event log. This will display a save file dialog to allow you to choose the file to save to. The entire event log will be saved to the file.
The CenTran event log is limited in size based on the settings you made in the CenTran service configuration file. Once the event log reaches the limit you set, it will delete the oldest audits to remain within the limit when new audits are added. This occurs based off of the granularity you set in the configuration file. The event log will be allowed to grow slightly larger than the set limit based off of the granularity size used to regulate how often the check is made. Click on the Settings button to change these settings.
See Setup CenTran Event Logging for information on changing these settings.
Additional information is available in the CenTran event log registered with the operating system. Service start and stop events are recorded there. Additionally, if internal errors occur within CenTran, the description of the error is recorded there also. This can be accessed by opening the administrative tools section of the control panel for your computer. Under that is an item labeled Event Viewer. Open the Event Viewer, and you will see a CenTran event log under the application and services event logs section.
Also, additional information is available in the Windows Communiction Foundation (WCF) diagnostic output set up from the CenTran configuration file. The default settings from the CenTran configuration file creates a diagnostic output file for Windows Communication Foundation (WCF) events, named WcfServiceTrace.svclog. This file will be created within the application directory the CenTran service is installed to. This file can be viewed using the Microsoft Service Trace Viewer (SvctraceViewer.exe). Double clicking on the file will automatically open the file under the Microsoft Service Trace Viewer.
The Microsoft Service Trace Viewer is available as a free download within the Windows Platform SDK.
View CenTran Agent Persistent Connections
CenTran 5 Getting Started Guide
Click on the Agent Connections tab on the CenTran Configuration Manager.
You should see the following tab page displayed by the CenTran Configuration Manager:

The CenTran agents use persistent connections from each agent to CenTran to avoid issues with network firewalls. Connections from client systems to a server are generally permitted by firewalls, however connections initiated from outside the firewall are denied. To allow CenTran to do network operations with an agent service, the agent services set up persistent connections that are identified by the lock or keybox. CenTran can be commanded to do an operation with a lock or keybox using these identifiers.
If you are not running any firewalls between your client systems (either ATMs or Host PCs) and CenTran, then the CenTran address does not have to be configured with the client system agent services. In this case, the agent services will default to using a direct network address for operations.
© 1996-2017 dormakaba
Document Number 2101.0513 Rev. G 08/17 CentTrah Getting Started Guide
Stop Transaction Processing
CenTran 5 Getting Started Guide
Click on the CenTran Status tab on the CenTran Configuration Manager:
You should see the following tab page displayed by the CenTran Configuration Manager:

Click on the Stop Transaction Processing button. You should see the following message dialog displayed:

Click on the message dialog OK button.
You should see the following tab page displayed by the CenTran Configuration Manager:

© 1996-2017 dormakaba
Document Number 2101.0513 Rev. G 08/17 CenTra6 Getting Started Guide
Configure the CenTran Service using Web Management Interface
CenTran 5 Getting Started Guide
The web browser CenTran Management interface supports remotely managing a running CenTran service. To manage a running CenTran service, you must have already set up the appropriate CenTran configuration file settings and certificates. You must have also installed and started the CenTran service.
Managing the CenTran service:
The following sections describe setting up and managing the CenTran service using the web browser CenTran Management interface:
• Log on to CenTran Management
- Setup Keybox
- Select ODBC Database Connection
- Set Company Number
- Set File Settings
• Start Transaction Processing
• View Web Service XML Settings
• View Web Service JSON Settings
• View Web RSS Feed Settings
• View CenTran Agent Settings
• View CenTran Event Log
• View CenTran Agent Persistent Connections
- Stop Transaction Processing
© 1996-2017 dormakaba
Document Number 2101.0513 Rev. G 08/17 CentTr6 Getting Started Guide
Log on to CenTran Management
CenTran 5 Getting Started Guide
Note: To access the CenTran Management interface in a web browser, the CenTran service must be installed and started.
Your web browser must support HTML5 and CSS3. This includes the following browsers:
- Internet Explorer 9 or higher
- Firefox 10 or higher
- Google Chrome 16 or higher
- Apple Safari 5 or higher
If you are using Internet Explorer, you must have compatibility mode for intranet sites turned off under the Tools menu. Press Alt-T to open the tools menu in Internet Explorer to get to this setting.
The URL of the CenTran web management interface is of the form:
https://centran_host_server_name/CentranManagement/index.htm
You will need to replace the centran_host_server_name in the URL with the name you gave the CenTran Web Service Certificate you created earlier.
Open the URL in your preferred web browser, and you should see a dialog similar to the following:

Enter the user name and password specified in the CenTran Management Web Access section of the Service Security tab in the CenTran Configuration Manager and select OK. The default user name is admin. The default password is password.
You should see the following in your web browser:

© 1996-2017 dormakaba
Document Number 2101.0513 Rev. G 08/17 Centra6 Getting Started Guide
Setup Keybox
CenTran 5 Getting Started Guide
You will need to have already logged onto the CenTran Management interface in your web browser. Click on the USB Keybox Setup tab on the left side: You should see the following in your web browser:
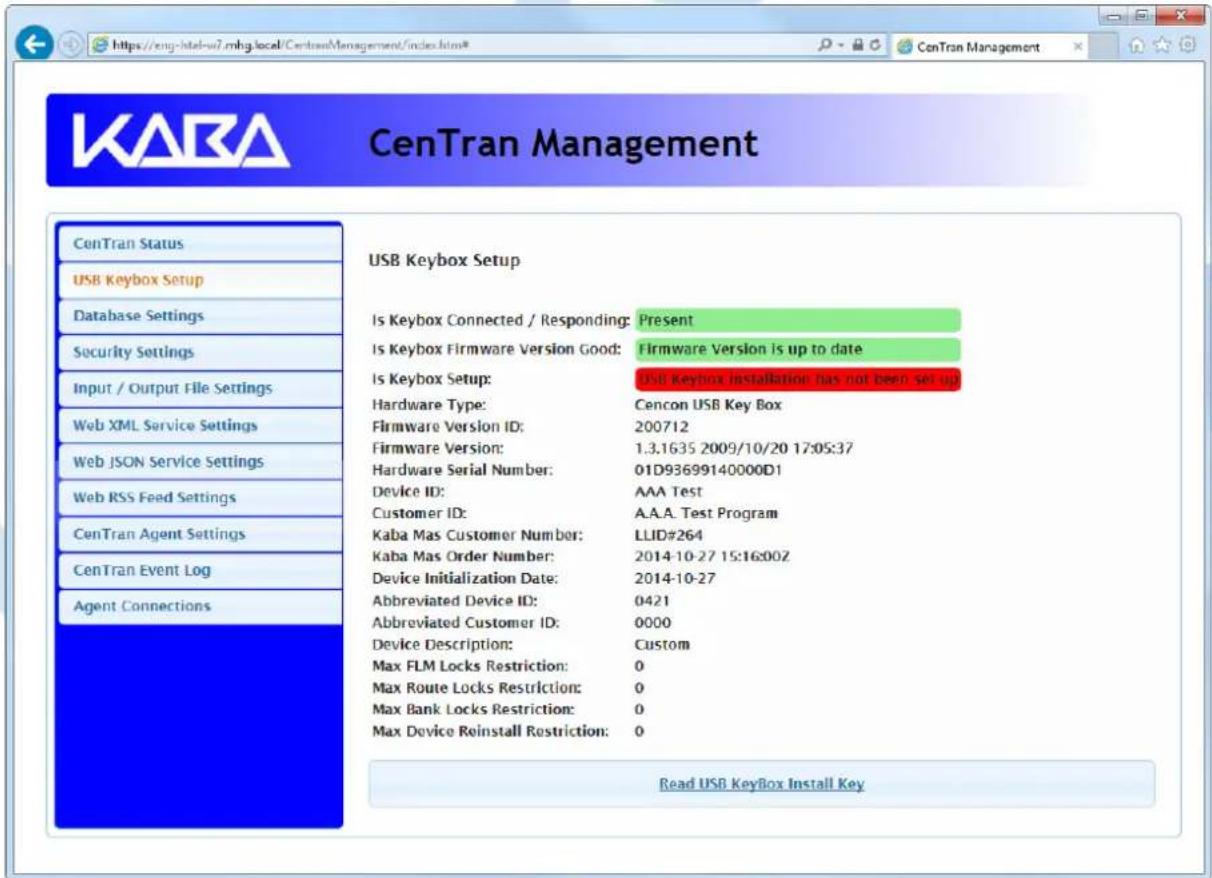
Place your Keybox install key in the first port of the keybox: (This will be the port farthest away from the USB connection.)

natural_image
Black KARA 202201 electronic device with blue and orange buttons, connected to a cable (no readable text or symbols beyond branding)Click on the Read USB Keybox Install Key button on the USB Keybox Setup web page.
You should see the following in your web browser:

Click on the OK button on message box.
You should see the following in your web browser:

Select ODBC Database Connection
CenTran 5 Getting Started Guide
Important Note
CenTran no longer runs under the permissions of the logged on user. It has been changed to run as a background service on the host server you install it on, and is independent of who is logged on. The CenTran service will run in the background even if no one is logged onto the host server.
By default, the CenTran service runs logged on under a Local System account. This gives it access to resources and settings on the host server you install it on. However, the Local System account only has access to the host server, not to resources on your network.
If the CenTran service is configured to run logged onto the default Local System account, you will need to use SQL authentication for CenTran to access the SQL Server database.
If the CenTran service is configured to run logged onto an account configured for it on your network domain, then that account must have administrative privileges on the host server CenTran is on.
If you use Windows authentication for CenTran's database authentication, then the account CenTran is logged onto must be a network domain account and have authorization to access the SQL Server database.
You can view and edit the CenTran service settings from the Microsoft Management Console:
- Open the Start Menu.
• Right click on Computer. - Select Manage from the displayed context menu. You must have administrative privileges.
• The Computer Management console will be displayed. Expand the Services and Applications section on the left side. - Select Services from the Services and Applications section.
- Locate Centran from the list of services. Right click on Centran and select Properties from the context menu.
- A service Properties dialog will be displayed. Select the Log On tab to examine the account the service is set up to log on as.
You will need to have already logged onto the CenTran Management interface in your web browser. Click on the Database Settings tab on the left side:
You should see the following in your web browser:

Click on the Select ODBC Data Source button. You should see the following dialog displayed:
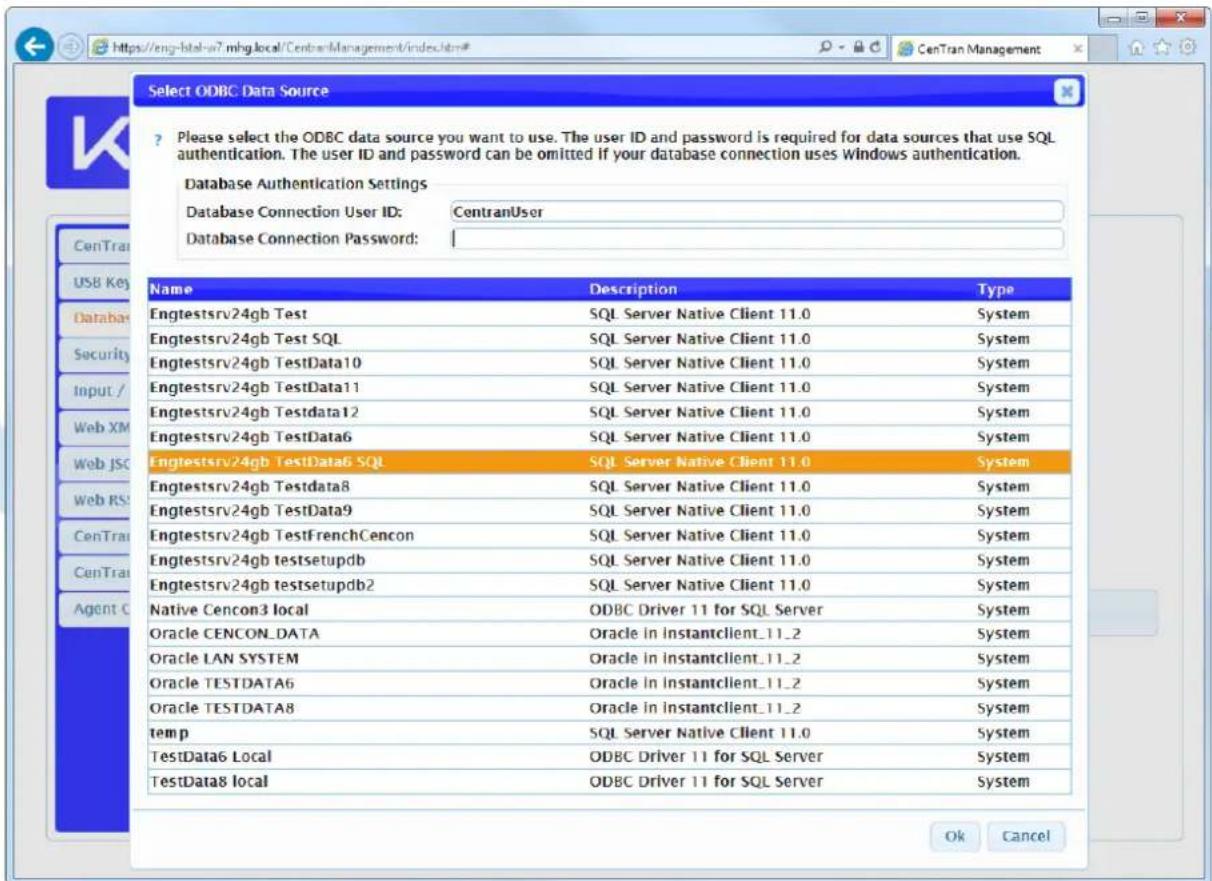
Select the ODBC database connection you want to use. If you are using SQL authentication, you will also need to enter a user name and password for the CenTran service to use with the database connection.
You should see the following in your web browser:

Click on the OK button on message box.
You should see the following in your web browser:

© 1996-2017 dormakaba
Document Number 2101.0513 Rev. G 08/17 CentTrah Getting Started Guide
Set Company Number
CenTran 5 Getting Started Guide
You will need to have already logged onto the CenTran Management interface in your web browser. Click on the Security Settings tab on the left side: You should see the following in your web browser:

Click on the Set Company Number button. You should see the following dialog displayed:

Enter the 4 digit company number you are using with Cencon. This is a sensitive piece of security information that is part your security with the Cencon system. You should record it and keep it in a secure place. The company number you enter for use by the CenTran service must match the one you are using with Cencon.
You should see the following in your web browser:
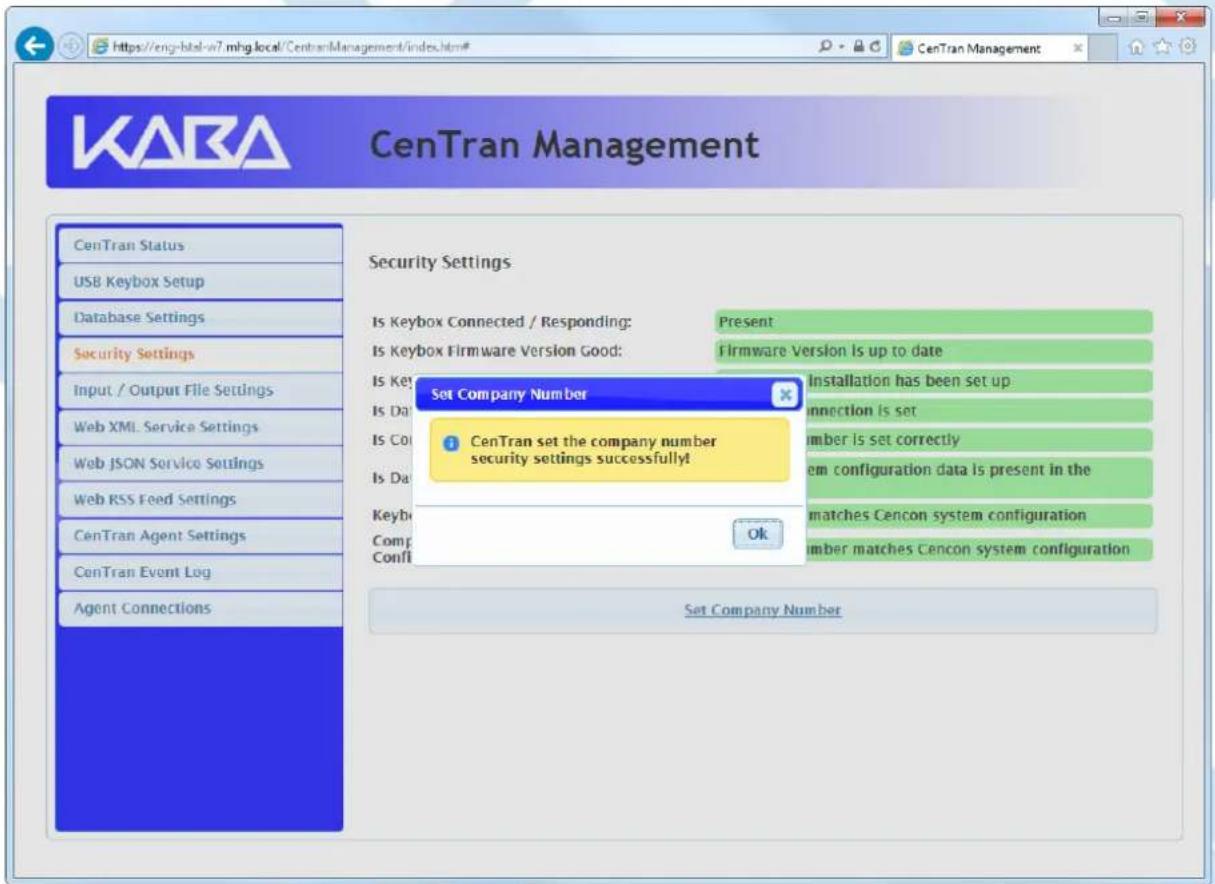
Click on the OK button on message box.
You should see the following in your web browser:

Set File Settings
CenTran 5 Getting Started Guide
Important Note
CenTran no longer runs under the permissions of the logged on user. It has been changed to run as a background service on the host server you install it on, and is independent of who is logged on. The CenTran service will run in the background even if no one is logged onto the host server.
By default, the CenTran service runs logged on under a Local System account. This gives it access to resources and settings on the host server you install it on. However, the Local System account only has access to the host server, not to resources on your network.
If you are configuring CenTran to access a shared file location on your network, not on the host server, then you will need to set up CenTran with a network domain account.
The account you set up CenTran to run logged onto must have administrative privileges on the host server CenTran is on. It must also have read / write access to the directories you are using for file input / output.
In this case, the file directories must be identified by UNC (Universal Naming Convention) paths: "\server\share\path"
You can not use mapped drive letters for network paths for a service. Mapped drive letters for network paths are specific to an account. They are not accessible from other accounts. If you set up a mapped drive letter for your logged on account, that does not mean that CenTran can access it from its account.
You can view and edit the CenTran service settings from the Microsoft Management Console:
- Open the Start Menu.
• Right click on Computer. - Select Manage from the displayed context menu. You must have administrative privileges.
• The Computer Management console will be displayed. Expand the Services and Applications section on the left side. - Select Services from the Services and Applications section.
- Locate Centran from the list of services. Right click on Centran and select Properties from the context menu.
-
A service Properties dialog will be displayed. Select the Log On tab to examine the account the service is set up to log on as.
-
You will need to have already logged onto the CenTran Management interface in your web browser. Click on the Input / Output File Settings tab on the left side:
You should see the following in your web browser:
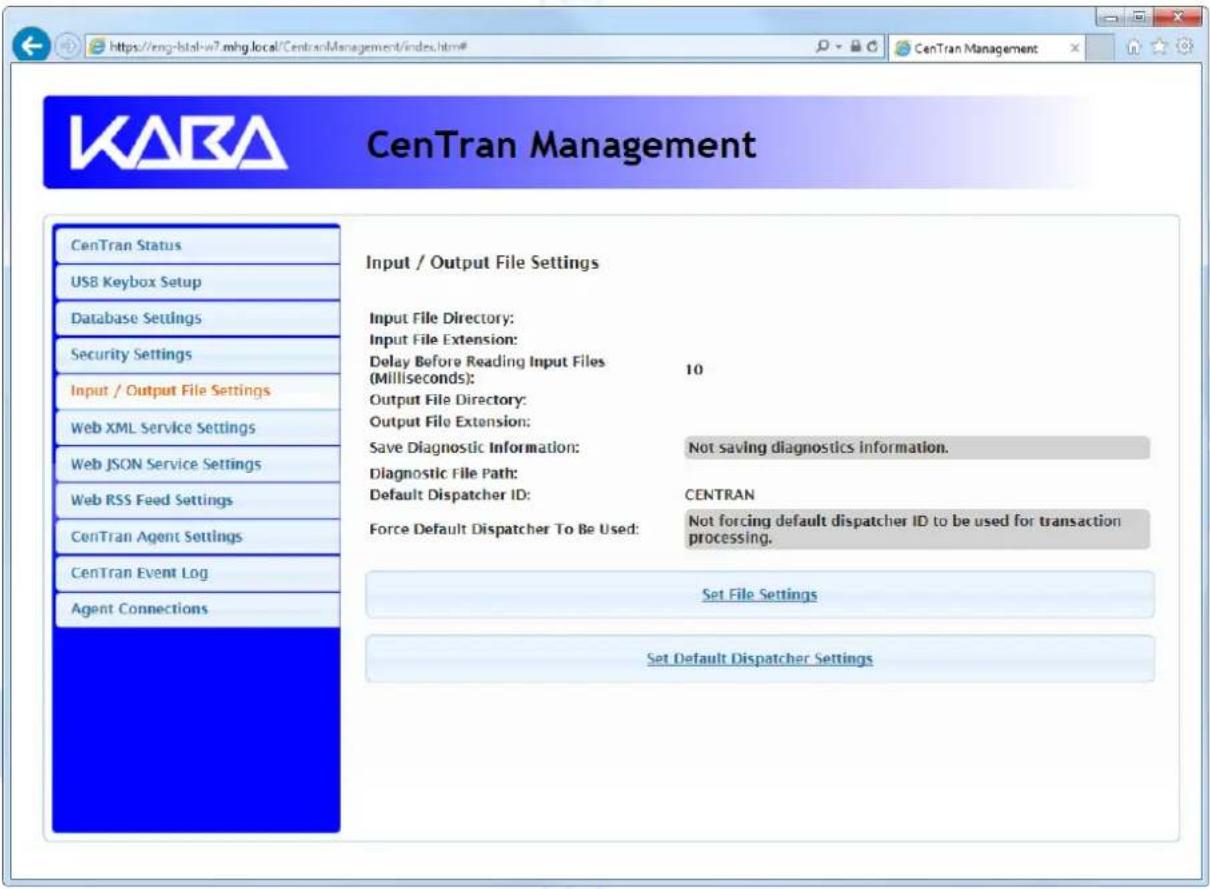
-
You will need to setup an input directory and an output directory for CenTran to receive file transactions and return the response.
-
Input Directory - The input directory is the directory where CenTran reads transactions being sent to it. It looks in this directory for files representing lock transactions to be processed. You will need to create an input directory that you want to use for CenTran to listen for incoming file transactions.
- Input File Extension - The input file extension defined here is the file extension CenTran looks for when attempting to find transaction input files
in the input directory that has been identified. If an input file extension is not set, then the CenTran service will attempt to read any file placed in the input directory.
- Input File Delay - The delay before reading next input transaction file setting is intended to allow a delay after detecting a file and before reading it. It is possible for an error in reading the input file to occur if it has not been completely written to the input directory yet. This delay allows the write of the input file to complete before the CenTran service reads the file. This delay begins when a transaction file is detected in the input directory by CenTran.
Note
CenTran can also be used with an input file delay of zero. In this case, CenTran will attempt to detect file events for when the file is finished being written. CenTran will then immediately process the transaction file without a delay. If your file server supports CenTran detecting the file events, then an input file delay of zero can improve your CenTran performance.
- Output Directory - The output directory is the directory where CenTran places the output files containing the results of processed transactions. This directory can be the same directory as the one used to contain input files. If the two directories are the same, then the files must have different extensions assigned. You will need to create an output directory that you want to use for CenTran to write output files to.
- Output File Extension - The output file extension is the file extension placed by CenTran at the end of output file names. The file names will be the same as the input file names, except for the file extension. If an output file extension is set, then that extension will be placed at the end of output files produced by CenTran.
Note
CenTran has been validated against the SuperSpeed RamDisk Plus software. This software allows you to use a ram disk as the file location used for transferring CenTran transaction files. This improves performance and speed of transferring CenTran transaction files, and eliminates hard drive wear from transferring CenTran transaction files. This software is available at http://www.superspeed.com/desktop/ramdisk.php. SuperSpeed RamDisk is a Microsoft Certified software.
3. Click on the Set File Settings button. You should see the following dialog displayed:

- Enter the input and output directories and extensions for the CenTran service to process files. Optionally, you can enable CenTran to record diagnostic output to a file, but this slows down performance. Once you have entered the settings you want to use, click on the OK button.
You should see the following in your web browser:
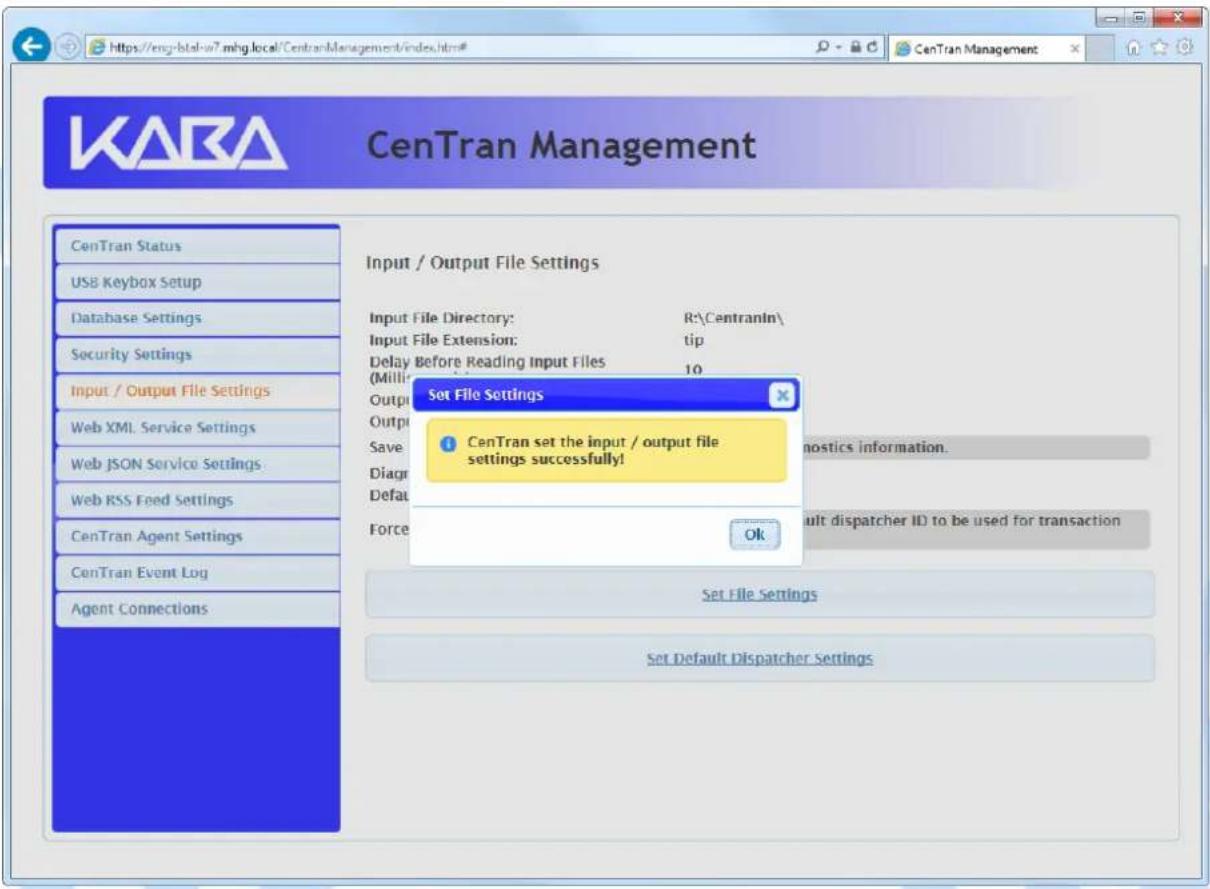
- Click on the OK button on message box.
You should see the following in your web browser:

- You will also need to set the default dispatcher ID to be used for the CenTran service when a dispatcher ID is not available for a transaction being processed. Optionally, you can force this dispatcher ID to be used instead of the dispatcher ID associated with a transaction.
You should see the following in your web browser:

- Enter the default dispatcher ID you want to use. This default dispatcher ID must have been already set up under Cencon, and be present in the database. The role that the default dispatcher is assigned to will effect what authorizations the default dispatcher has. Once you have entered the default dispatcher ID you want to use, click on the OK button.
You should see the following in your web browser:

Start Transaction Processing
CenTran 5 Getting Started Guide
You will need to have already logged onto the CenTran Management interface in your web browser. Click on the CenTran Status tab on the left side: You should see the following in your web browser:
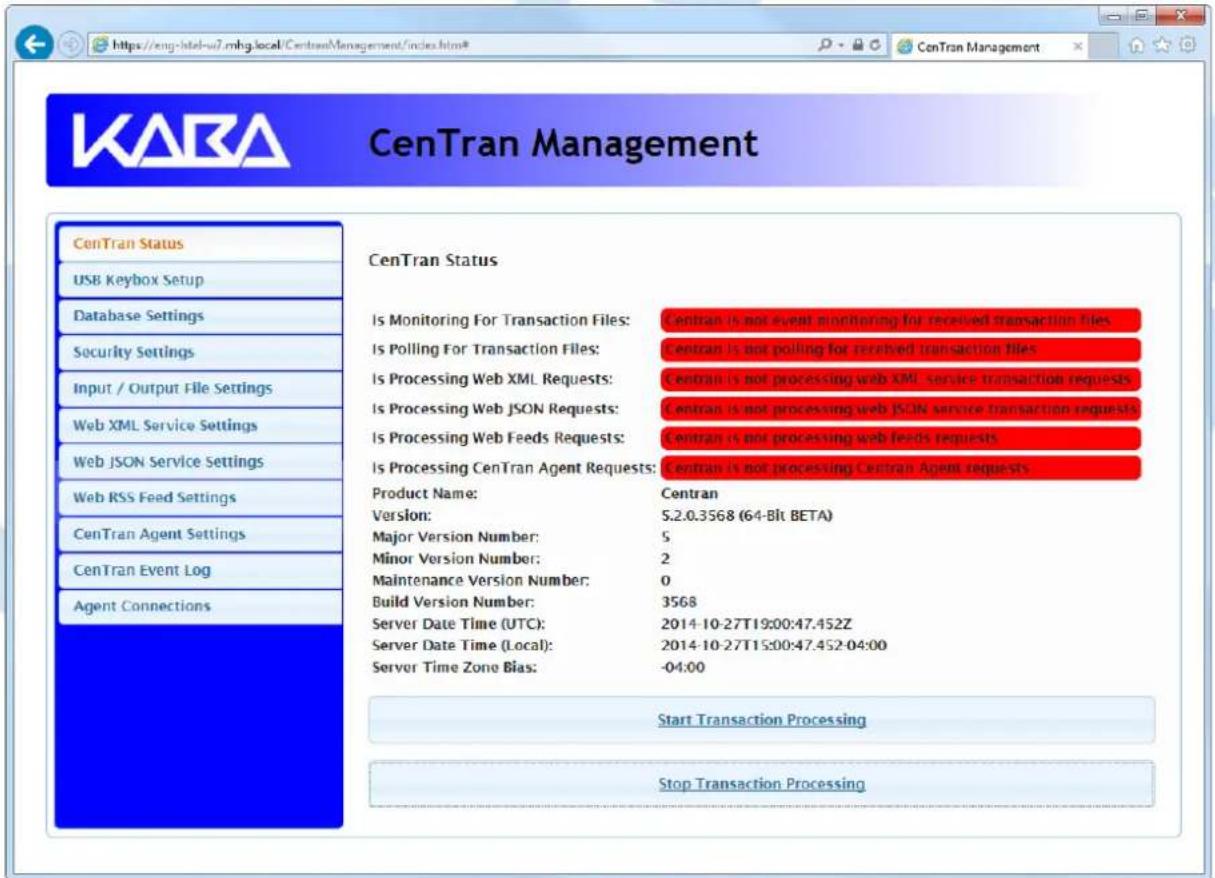
Click on the Start Transaction Processing button. You should see the following message dialog displayed:


© 1996-2017 dormakaba
Document Number 2101.0513 Rev. G 08/17 CentTrah Getting Started Guide
View Web Service XML Settings
CenTran 5 Getting Started Guide
The web service settings are configured in the sytem.serviceModel section of the CenTran service configuration file. The resultant web service based on the settings can be viewed while the CenTran service is processing transactions.
You will need to have already logged onto the CenTran Management interface in your web browser. Click on the Web XML Service Settings tab on the left side:
You should see the following in your web browser:

© 1996-2017 dormakaba
Document Number 2101.0513 Rev. G 08/17 CenTr6 Getting Started Guide
View Web Service JSON Settings
CenTran 5 Getting Started Guide
The web service settings are configured in the system service Model section of the CenTran service configuration file. The resultant web service based on the settings can be viewed while the CenTran service is processing transactions.
You will need to have already logged onto the CenTran Management interface in your web browser. Click on the Web JSON Service Settings tab on the left side:
You should see the following in your web browser:

© 1996-2017 dormakaba
Document Number 2101.0513 Rev. G 08/17 CentTr6 Getting Started Guide
View Web RSS Feed Settings
CenTran 5 Getting Started Guide
The web rss feed settings are configured in the sytem.serviceModel section of the CenTran service configuration file. The resultant web rss feeds based on the settings can be viewed while the CenTran service is processing transactions.
You will need to have already logged onto the CenTran Management interface in your web browser. Click on the Web RSS Feed Settings tab on the left side:
You should see the following in your web browser:
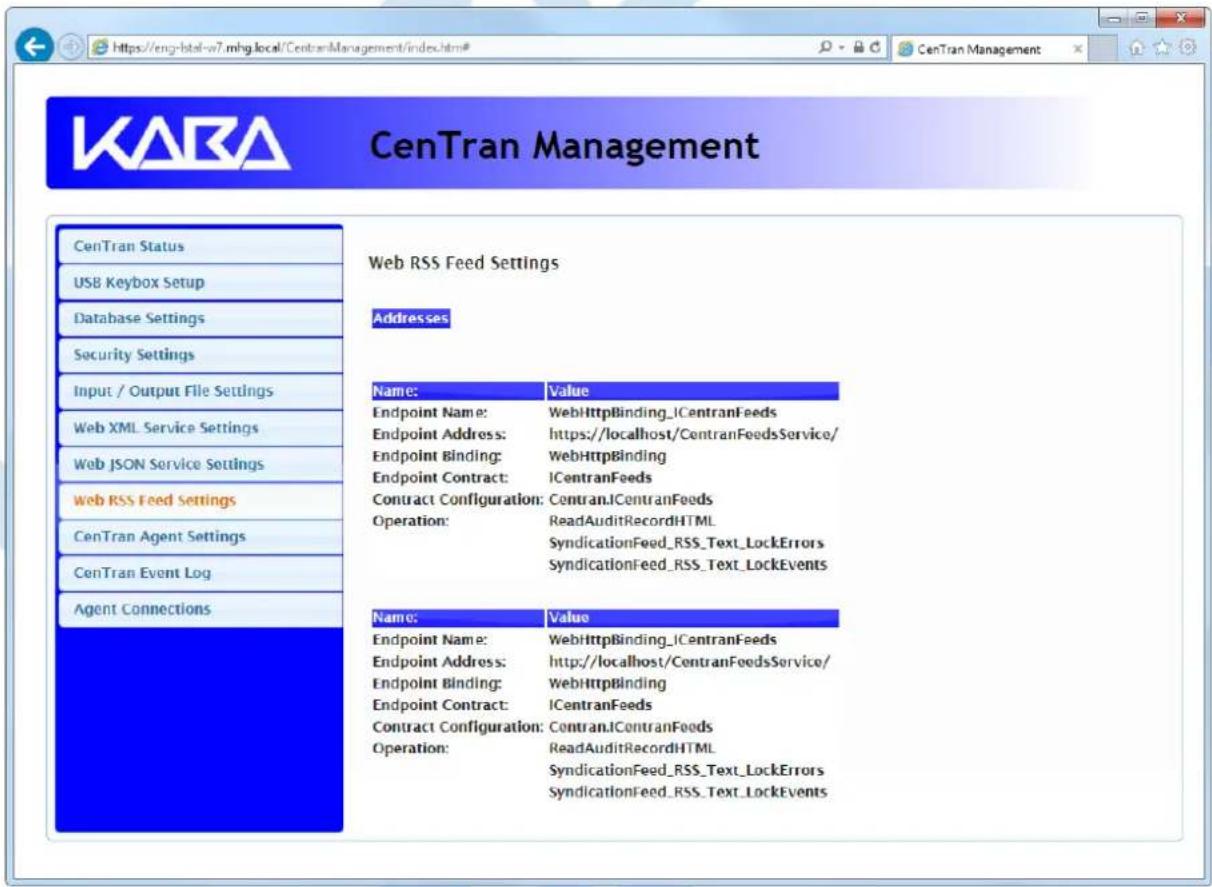
© 1996-2017 dormakaba
Document Number 2101.0513 Rev. G 08/17 CentTrah Getting Started Guide
View CenTran Agent Settings
CenTran 5 Getting Started Guide
The CenTran Agent settings are configured in the sytem.serviceModel section of the CenTran service configuration file. The resultant web service based on the settings can be viewed while the CenTran service is processing transactions.
You will need to have already logged onto the CenTran Management interface in your web browser. Click on the CenTran Agent Settings tab on the left side:
You should see the following in your web browser:
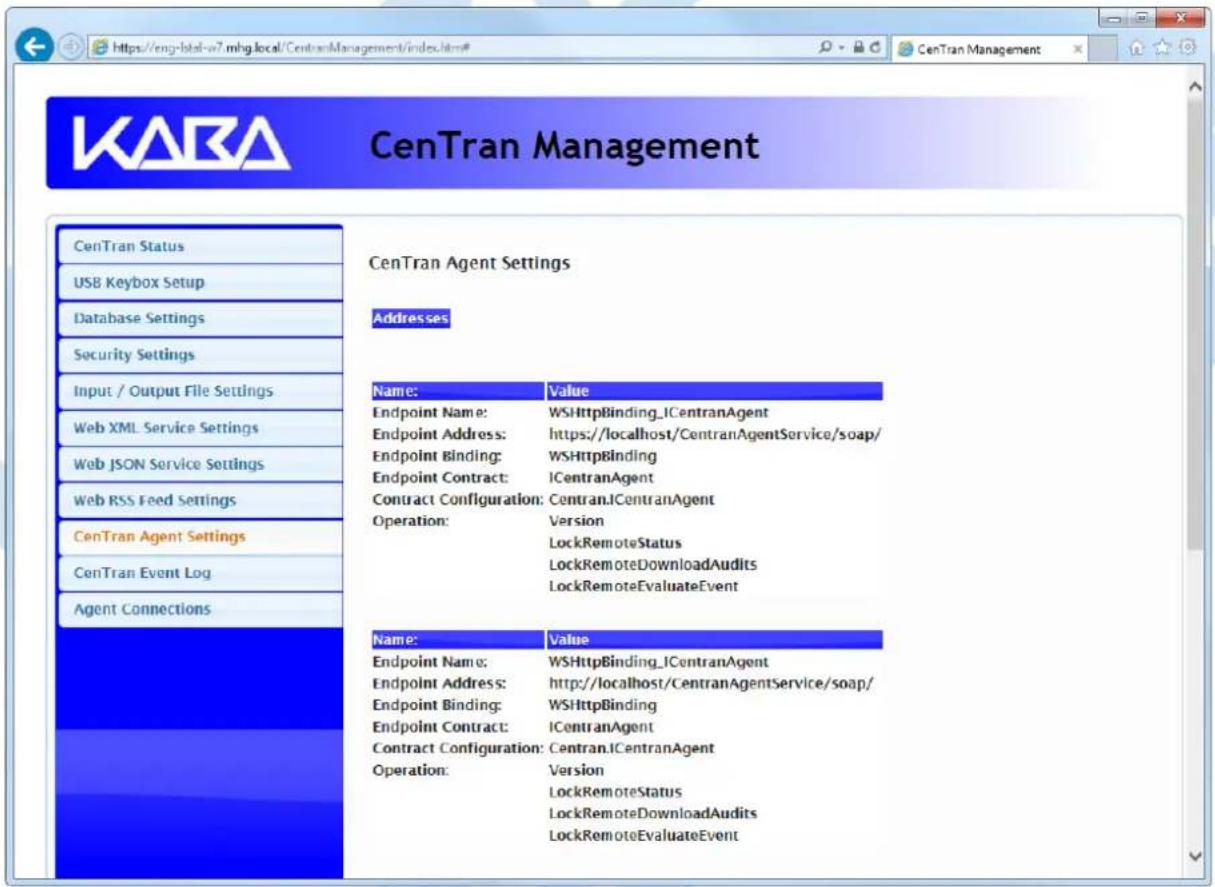
© 1996-2017 dormakaba
Document Number 2101.0513 Rev. G 08/17 CentTrah Getting Started Guide
View Event Log
CenTran 5 Getting Started Guide
You will need to have already logged onto the CenTran Management interface in your web browser. Click on the CenTran Event Log tab on the left side:
You should see the following in your web browser:
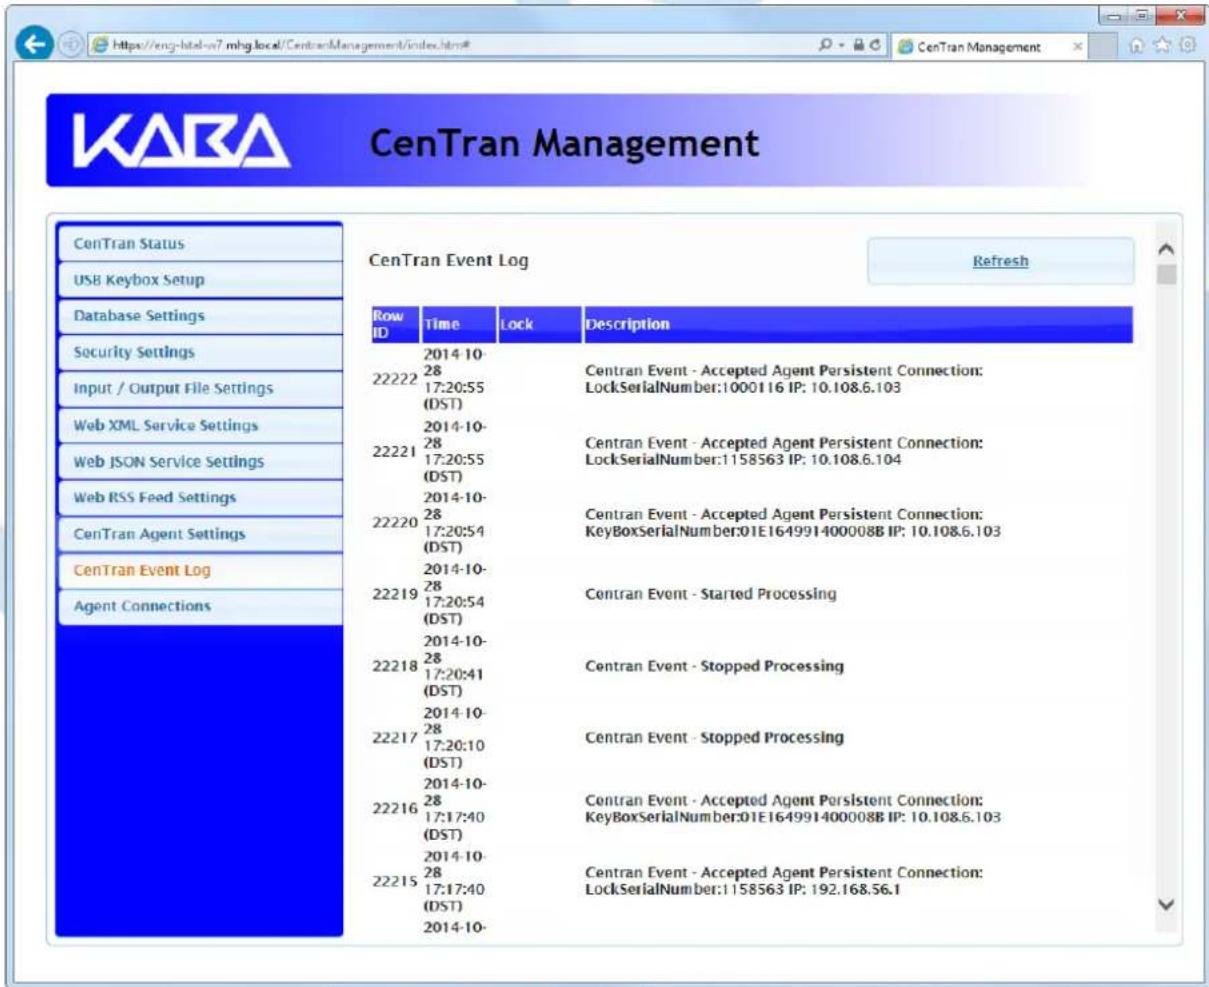
The CenTran Management interface loads event log audits 100 at a time. To load additional audits for viewing, scroll to the bottom of the current audits. Additional audits will be loaded automatically, and the scroll position will be moved up.
The CenTran event log is limited in size based on the settings you made in the CenTran service configuration file. Once the event log reaches the limit you set, it will delete the oldest audits to remain within the limit when new audits are added. This occurs based off of the granularity you set in the configuration file. The event log will be allowed to grow slightly larger than the set limit based off of the granularity size used to regulate how often the check is made.
Additional information is available in the CenTran event log registered with the operating system. Service start and stop events are recorded there. Additionally, if internal errors occur within CenTran, the description of the error is recorded there also. This can be accessed by opening the administrative tools section of the control panel for your computer. Under that is an item labeled Event Viewer. Open the Event Viewer, and you will see a CenTran event log under the application and services event logs section.
Also, additional information is available in the Windows Communiction Foundation (WCF) diagnostic output set up from the CenTran configuration file. The default settings from the CenTran configuration file creates a diagnostic output file for Windows Communication Foundation (WCF) events, named WcfServiceTrace.svclog. This file will be created within the application directory the CenTran service is installed to. This file can be viewed using the Microsoft Service Trace Viewer (SvctraceViewer.exe). Double clicking on the file will automatically open the file under the Microsoft Service Trace Viewer.
The Microsoft Service Trace Viewer is available as a free download within the Windows Platform SDK.
View CenTran Agent Persistent Connections
CenTran 5 Getting Started Guide
CenTran maintains persistent network connections with CenTran Agent installations configured to connect with your current CenTran installation. These connections can be displayed.
You will need to have already logged onto the CenTran Management interface in your web browser. Click on the Agent Connections tab on the left side:
You should see a similar list to the following in your web browser:

You can refresh the display of current CenTran Agent persistent connections by clicking on the Refresh button.
© 1996-2017 dormakaba
Document Number 2101.0513 Rev. G 08/17 CenTr&6 Getting Started Guide
Stop Transaction Processing
CenTran 5 Getting Started Guide
You will need to have already logged onto the CenTran Management interface in your web browser. Click on the CenTran Status tab on the left side: You should see the following in your web browser:

Click on the Stop Transaction Processing button. You should see the following message dialog displayed:
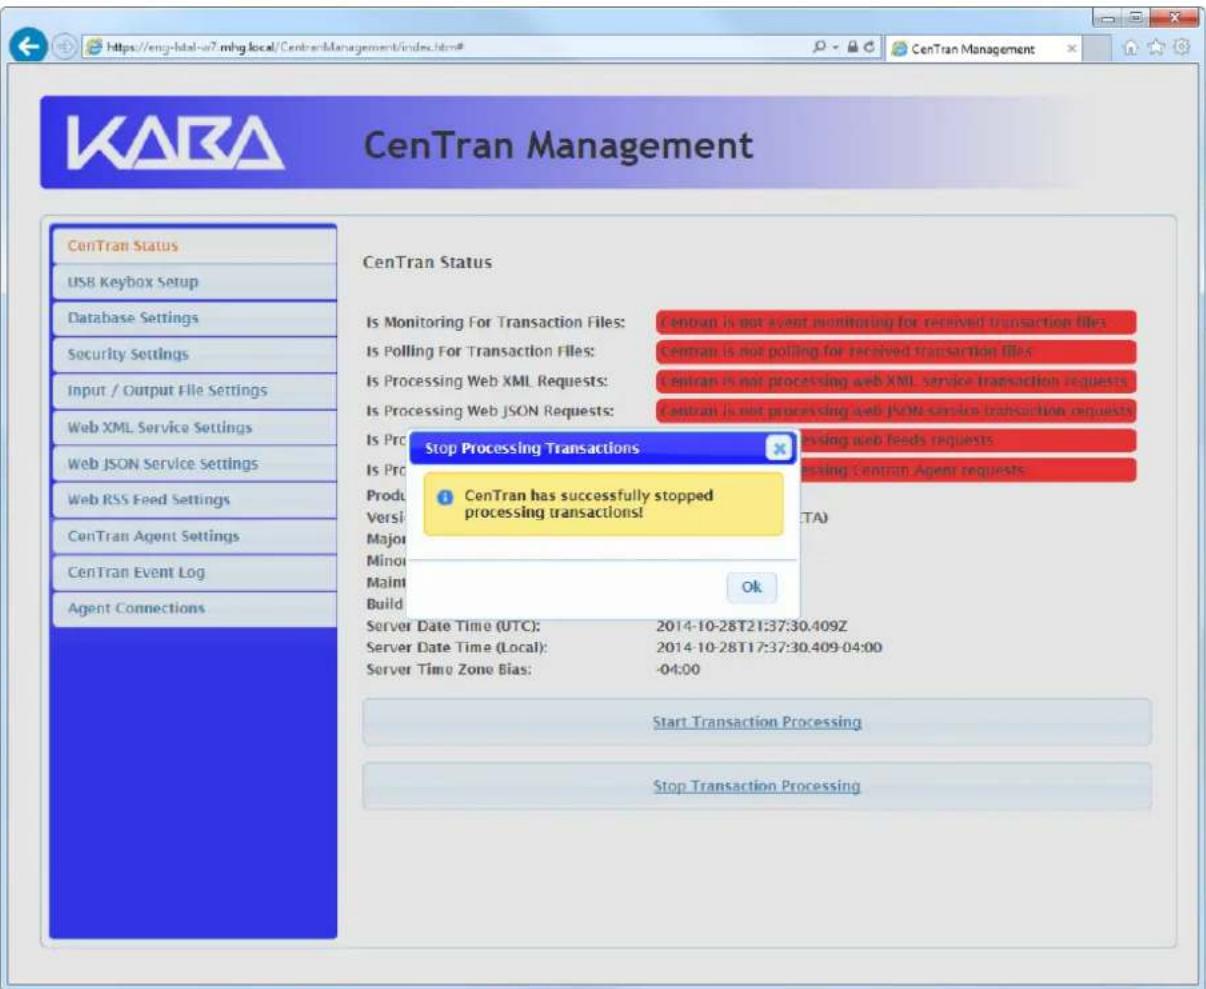
Click on the message dialog OK button.
You should see the following in your web browser:

Stop / Uninstall the CenTran Service
CenTran 5 Getting Started Guide
To stop and uninstall the CenTran service, select CenTran Configuration Manager from the CenTran entry under the Windows Start menu. You should see the following application:

Select the Stop button to stop the CenTran service with the operating system.

Select the Uninstall button to uninstall the CenTran service from the operating system.
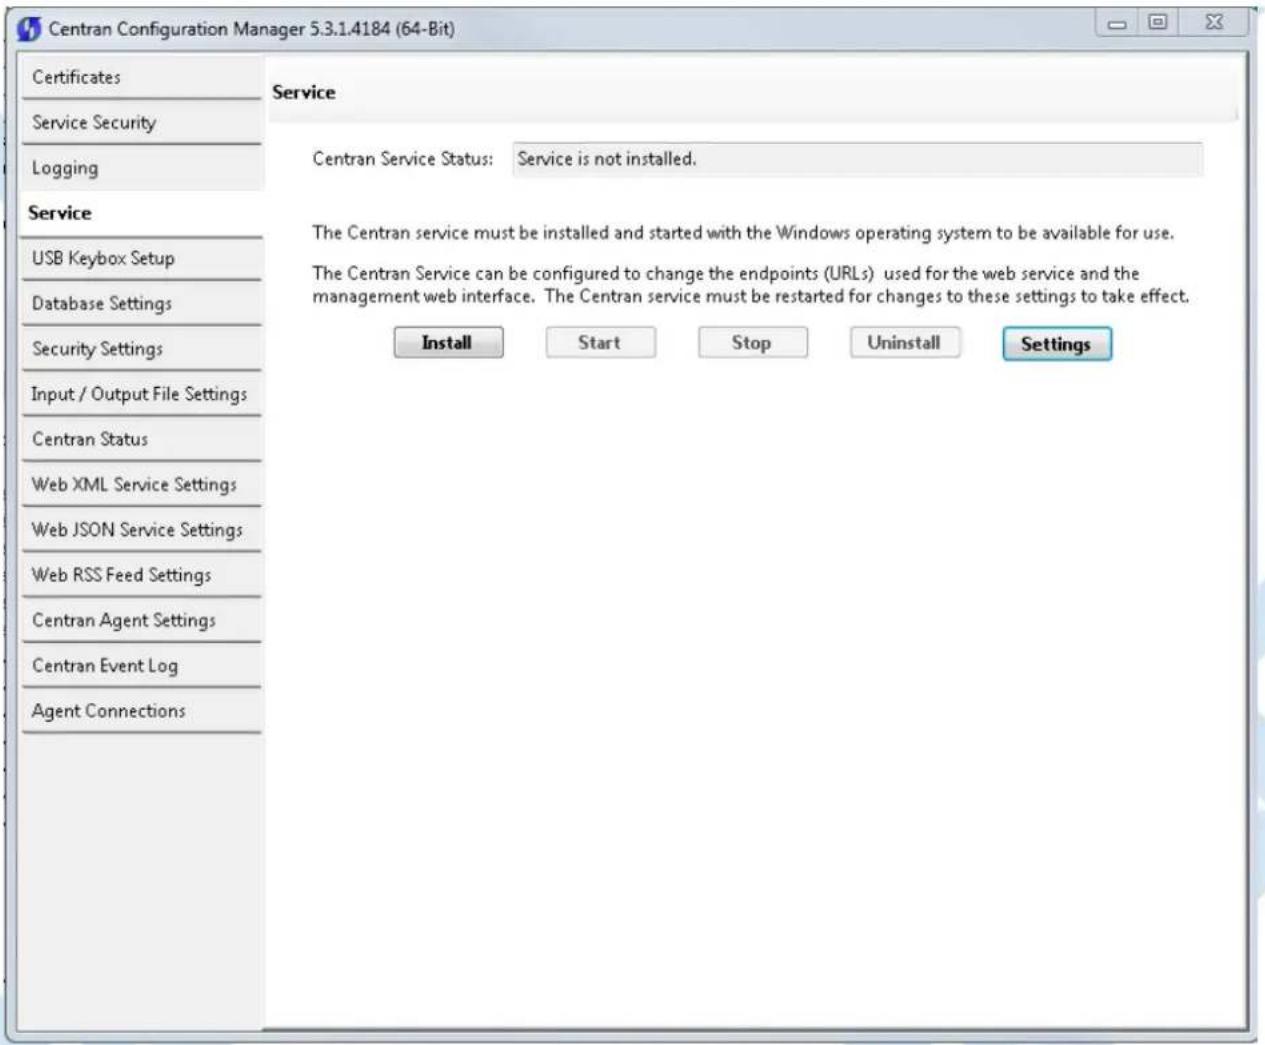
© 1996-2017 dormakaba
Document Number 2101.0513 Rev. G 08/17 CentTrah Getting Started Guide
Appendix A - Beta Expiration
CenTran 5 Getting Started Guide
The beta versions of CenTran, the ATM Agents and the Keybox Agents will be assigned an initial expiration date of 180 days after the date of creation by dormakaba.
When CenTran or an agent is within 60 days of its expiration date entries will be posted to the database audit log documenting the situation. CenTran and the agents will continue to function.
When CenTran expires an entry will be posted to the database audit log identifying the event. An expired CenTran will not process transaction requests but will return an error condition to the transaction requestor. An entry will be posted to the database audit log documenting the transaction that failed due to an expired CenTran.
In a future Beta release the customer will be provided with the ability to reset the expiration date, and the date on which the warnings begin, for CenTran and the Agents with help from dormakaba Technical Support.
© 1996-2017 dormakaba
Document Number 2101.0513 Rev. G 08/17 CentTr&6 Getting Started Guide
Appendix B - Troubleshooting: Check Certificates
CenTran Version 5 Getting Started Guide
The following items can be checked for CenTran Certificates:
• CenTran Configuration File:
The CenTran configuration file section for behaviors >> serviceBehaviors >> serviceCertificate. has the entries for what certificate is going to be used by CenTran. See serviceCertificate of serviceCredentials for a detailed description of these values.
The certificate can be identified by name or by thumbprint. By default it is set up by the CenTran Configuration Manager by thumbprint.
• CenTran Configuration Manager:
Open the CenTran Configuration Manager.
Check the Self Signed Certificates tab.
The CenTran Web Service Server Certificate will show a certificate name. This name must exactly match how the web browser is being used to access CenTran, or the certificate will not match.
• Certificate Source:
The certificate can be self signed, or from a certificate authority. If the certificate for the CenTran web service is from a network certificate authority, any clients will automatically trust the CenTran certificate.
If the certificate is self signed, then to establish a chain of trust, that certificate or certificate authority must be installed manually with client systems.
If the certificate is self signed and created on Windows Server 2003, the level and size of the encryption of the certificates do not match the requirement for SSL. To do SSL off of Windows Server 2003, you will need to generate proper certificates from a system running Windows 7 or higher, or get certificates from a network certificate authority.
- Exporting CenTran Certificate:
From the start menu, select Accessories and right click on Command Prompt. Select Run as administrator.
The command prompt should have the title Administrator: Command Prompt.
Type mmc at the administrator command prompt.
You should see a window that says Console1 - [Console Root]
Click File >> Add / Remove Snap In... A dialog labeled Add or Remove Snap-ins should be displayed.
Select Certificates and click Add. Select Computer account and then Local Computer from the dialogs that are displayed. Click Finished.
Click OK in the Add or Remove Snap-ins dialog.
Under Certificates (Local Computer), expand Trusted Root Certification Authorities, and expand Certificates.
Select the certificate matching the Certificate Authority used to generate the self signed certificate used for CenTran. Right click on the certificate and select All Tasks >> Export...
The Certificate Export Wizard is displayed. Export the certificate without the private key. Use the default settings to export the certificate to a .CER file.
- Client System Self Signed Certificate Install:
Open up a console with the Certificates snap in as administrator as described above, on the client computer system that is going to be accessing the CenTran web service.
Under Certificates (Local Computer), expand Trusted Root Certification Authorities, and expand Certificates.
Right click on Certificates and select All Tasks >> Import....
Import the certificate .CER file you exported from the CenTran server.
Appendix C - Troubleshooting: Check Run Time Error CenTran Version 5 Getting Started Guide
The following places can be checked to determine the nature of a run time error from a transaction with CenTran:
• CenTran Configuration Manager:
Open the CenTran Configuration Manager.
Check if the CenTran service is installed and running under the Service tab. If the service is not installed and running, go to the Getting Started Guide to set up CenTran.
Check if the CenTran service is processing transactions under the CenTran Status tab. If CenTran is properly set up but processing has stopped, attempt stopping and restarting the service.
Check the CenTran Event Log for indications of the nature of the error.
- System Event Log:
Open Control Panel >> Administrative Tools.
Select Event Viewer, right click and select Run as administrator.
Look for the section labeled Summary of Administrative Events. Expand the category that called Error. Look for for an entry with a Source labeled CenTran Service, and double click it.
Examine the errors list there. If CenTran has had internal exceptions, the details should be listed as entries here.
• Windows Communications Foundation (WCF) Trace Log:
Open the CenTran install directory. Look for a file named WcfServiceTrace.svclog. Double click on this file to open it using the Microsoft Service Trace Viewer.
See Service Trace Viewer Tool (SvcTraceViewer.exe) on the Microsoft web site for details. This tool is available with the Microsoft SDK install.
Examine the trace for errors. This will let you know if CenTran received a web service request and what processing occurred. If the web service request was not received, then a browser or network configuration issue is blocking the requests.
© 1996-2017 dormakaba
Document Number 2101.0513 Rev. G 08/17 CentTrah Getting Started Guide
- CenTran 5 Getting Started Guide
- dormakaba
- dormakaba Welcome
- Manual Conventions
- Note
- Helpful Hint
- Caution
- Warning
- Trademarks
- Introducing CenTran 5
- The CenTran Version 5 Package
- CenTran 5 System Requirements
- Note on Virtual Machines
- Important Note
- PC Hardware Installation
- Before Installing the CenTran 5 Software
- Cencon ATM Cash Vault Security System Product Overview
- CenTran Version 5 Getting Started Guide
- The Challenge
- The Solution
- FLM Mode
- Route Mode
- Bank Mode
- High Level Overview of Cencon ATM Cash Vault Security System Component Architecture
- Cencon Database:
- Cencon Application:
- CenTran Service:
- CenTran Web Services:
- Customer Application Using CenTran Service Command File:
- Customer Application Using CenTran Web Services:
- CenTran Agent:
- Key Box Agent:
- Customer Web Client:
- Cencon ATM Cash Vault Security System Components and Business Processes
- Create User and Initialize Smart Key:
- Dispatch Lock(s):
- Lock is physically opened and closed:
- Software Installation and Setup
- ODBC Connection Creation for SQL Server
- Configure the CenTran Service
- appSettings Section
- system.serviceModel Section Group
- Configuration File Section Descriptions:
- Configuration File - system.serviceModel / bindings Section
- - webHttpBinding:
- - wsHttpBinding:
- Configuration File - system.serviceModel / services Section
- Configuration File - system.serviceModel / behaviors Section
- Set Up CenTran Server Certificates
- Exported Agent Configuration and CA Certificate Files
- Guided Certificate Installation
- Using A Server Certificate Provided In A File
- Creating A Server Certificate
- Important Note - CenTran Server Network Address
- Important Note - CenTran Server Firewall
- Set Up CenTran Management Security
- Authentication Method
- Valid Cencon User ID with invalid password in HTTP Credentials
- Invalid Cencon User ID in HTTP Credentials
- CenTran Management Web Access
- CenTran Agent Service Security
- Set Up CenTran Diagnostics / Logging
- Type of Logging
- Logging Sources and Logging Levels
- Message Content Logging
- Set Up CenTran Management Web Access
- CenTran Management URL
- Localization Folder
- Set Up CenTran Event Logging
- Maximum Number of Event Log Entries
- Log Limit Granularity
- Install / Start the CenTran Service
- Configure the CenTran Service using CenTran Configuration Manager
- Managing the CenTran service:
- Setup Keybox
- Select ODBC Database Connection
- Set Company Number
- Set File Settings
- Click on the Input / Output File Settings tab on the CenTran Configuration Manager:
- Start Transaction Processing
- View Web Service XML Settings
- View Web Service JSON Settings
- View Web RSS Feed Settings
- View CenTran Agent Settings
- View Event Log
- View CenTran Agent Persistent Connections
- Stop Transaction Processing
- Configure the CenTran Service using Web Management Interface
- Log on to CenTran Management
- Click on the Set File Settings button. You should see the following dialog displayed:
- Stop / Uninstall the CenTran Service
- Appendix A - Beta Expiration
- Appendix B - Troubleshooting: Check Certificates
- Appendix C - Troubleshooting: Check Run Time Error CenTran Version 5 Getting Started Guide
Brand : Dormakaba
Model : CenTran 5
Category : Access Control