C 715 DAB - Audio Receiver NAD - Free user manual and instructions
Find the device manual for free C 715 DAB NAD in PDF.
| Product type | Audio receiver with CD player, AM/FM/DAB tuner and USB port |
| Brand | NAD |
| Model | C 715 DAB |
| Dimensions (W x H x D) | 213 x 103 x 324 mm (net) |
| Net weight | 4.5 kg |
| Power supply | AC mains via power cord |
| Output power (stereo mode) | 25 W (6 ohms, 1 kHz) |
| Total harmonic distortion | 0.15% (at rated power) |
| Signal-to-noise ratio | 95 dB (A-weighted, ref. rated power) |
| Frequency response | 10 Hz – 80 kHz (+1/-3 dB) |
| Main functions | CD/CD-R/CD-RW player, USB (MP3/WMA), AM/FM/DAB tuner with RDS, USB recording, timer, shuffle mode, repeat, programming |
| Inputs | AUX, TAPE, VCR, MP (3.5 mm headphone jack), USB (front) |
| Outputs | Speakers (binding posts), subwoofer (RCA), optical digital, TAPE OUT, VCR OUT |
| Supplied antennas | AM loop antenna, FM wire antenna, DAB type F antenna |
| Cleaning | Disconnect and clean with a damp cloth; do not use liquid or aerosol cleaners |
| Maintenance | Refer all servicing to qualified personnel; use replacement parts specified by the manufacturer |
| Safety | Do not expose to rain or moisture; leave ventilation space (10 cm sides, 50 cm above); do not block openings |
| Standby consumption | Amber LED indicator in standby |
Frequently Asked Questions - C 715 DAB NAD
User questions about C 715 DAB NAD
0 question about this device. Answer the ones you know or ask your own.
Ask a new question about this device
Download the instructions for your Audio Receiver in PDF format for free! Find your manual C 715 DAB - NAD and take your electronic device back in hand. On this page are published all the documents necessary for the use of your device. C 715 DAB by NAD.
USER MANUAL C 715 DAB NAD
- Read instructions - All the safety and operating instructions should be read before the product is operated.
- Retain instructions - The safety and operating instructions should be retained for future reference.
- HeedWarnings - All warnings on the product and in the operating instructions should be adhered to.
- Follow Instructions - All operating and use instructions should be followed.
- Cleaning - Unplug this product from the wall outlet before cleaning. Do not use liquid cleaners or aerosol cleaners. Use a damp cloth for cleaning.
- Attachments - Do not use attachments not recommended by the product manufacturer as they may cause hazards.
- Water and Moisture - Do not use this product near water-for example, near a bath tub, wash bowl, kitchen sink, or laundry tub; in a wet basement; or near a swimming pool; and the like.
- Accessories - Do not place this product on an unstable cart, stand, tripod, bracket, or table. The product may fall, causing serious injury to a child or adult and serious damage to the product. Use only with a cart, stand, tripod, bracket, or table recommended by the manufacturer, or sold with the product. Any mounting of the product should follow the manufacturer's instructions, and should use a mounting accessory recommended by the manufacturer.

Cart - A product and cart combination should be moved with care. Quick stops, excessive force, and uneven surfaces may cause the product and cart combination to overturn.
- Ventilation - Slots and openings in the cabinet are provided for ventilation to ensure reliable operation of the product and to protect it from overheating. These openings must not be blocked or covered. The openings should never be blocked by placing the product on a bed, sofa, rug, or other similar surface. This product should not be placed in a built-in installation such as a bookcase or rack unless proper ventilation is provided or the manufacturer's instructions have been adhered to.
- Power Sources - This product should be operated only from the type of power source indicated on the marking label and connected to a MAINS socket outlet with a protective earthing connection. If you are not sure of the type of power supply to your home, consult your product dealer or local power company.
- Power-Cord Protection - Power-supply cords should be routed so that they are not likely to be walked on or pinched by items placed upon or against them, paying particular attention to cords at plugs, convenience receptacles, and the point where they exit from the product.
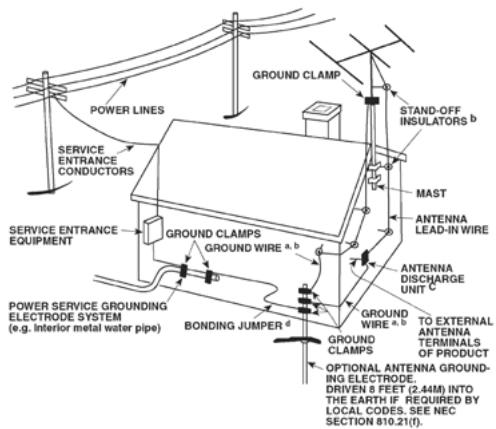
13.Mains Plug - Where the mains plug or an appliance coupler is used as the disconnect device, the disconnect device shall remain readily operable. - Outdoor Antenna Grounding - If an outside antenna or cable system is connected to the product, be sure the antenna or cable system is grounded so as to provide some protection against voltage surges and built-up static charges. Article 810 of the National Electrical Code, ANSI/NFPA 70, provides information with regard to proper grounding of the mast and supporting structure, grounding of the lead-in wire to an antenna discharge unit, size of grounding conductors, location of antenna discharge unit, connection to grounding electrodes, and requirements for the grounding electrode.
NOTE TO CATV SYSTEM INSTALLER
This reminder is provided to call the CATV system installer's attention to Section 820-40 of the NEC which provides guidelines for proper grounding and, in particular, specifies that the cable ground shall be connected to the grounding system of the building, as close to the point of cable entry as practical.
- Lightning - For added protection for this product during a lightning storm, or when it is left unattended and unused for long periods of time, unplug it from the wall outlet and disconnect the antenna or cable system. This will prevent damage to the product due to lightning and power-line surges.
- Power Lines - An outside antenna system should not be located in the vicinity of overhead power lines or other electric light or power circuits, or where it can fall into such power lines or circuits. When installing an outside antenna system, extreme care should be taken to keep from touching such power lines or circuits as contact with them might be fatal.
- Overloading - Do not overload wall outlets, extension cords, or integral convenience receptacles as this can result in a risk of fire or electric shock.
- Flame Sources - No naked flame sources, such as lighted candles, should be placed on the product.
- Object and Liquid Entry - Never push objects of any kind into this product through openings as they may touch dangerous voltage points or short-out parts that could result in a fire or electric shock. Never spill liquid of any kind on the product.
- Headphones - Excessive sound pressure form earphones and headphones can cause hearing loss.
- Damage Requiring Service - Unplug this product from the wall outlet and refer servicing to qualified service personnel under the following conditions:
a. When the power-supply cord or plug is damaged.
b. If liquid has been spilled, or objects have fallen into the product.
c. If the product has been exposed to rain or water.
d. If the product does not operate normally by following the operating instructions. Adjust only those controls that are covered by the operating instructions as an improper adjustment of other controls may result in damage and will often require extensive work by a qualified technician to restore the product to its normal operation.
e. If the product has been dropped or damaged in any way.
f. When the product exhibits a distinct change in performance—this indicates a need for service.
-
Replacement Parts - When replacement parts are required, be sure the service technician has used replacement parts specified by the manufacturer or have the same characteristics as the original part. Unauthorized substitutions may result in fire, electric shock, or other hazards.
-
Battery Disposal - When disposing of used batteries, please comply with governmental regulations or environmental public instruction's rules that apply in your country or area.
- Safety Check - Upon completion of any service or repairs to this product, ask the service technician to perform safety checks to determine that the product is in proper operating condition.
- Wall or Ceiling Mounting - The product should be mounted to a wall or ceiling only as recommended by the manufacturer.
WARNING

The lightning flash with arrowhead symbol, within an equilateral triangle, is intended to alert the user to the presence of uninsulated "dangerous voltage" within the product's enclosure that may be of sufficient magnitude to constitute a risk of electric shock to persons

The exclamation point within an equilateral triangle is intended to alert the user to the presence of important operating and maintenance (servicing) instructions in the literature accompanying the appliance.

WARNING: TO REDUCE THE RISK OF FIRE OR ELECTRIC SHOCK, DO NOT EXPOSE THIS APPARATUS TO RAIN OR MOISTURE AND OBJECTS FILLED WITH LIQUIDS, SUCH AS VASES, SHOULD NOT BE PLACED ON THIS APPARATUS.
THE APPARATUS SHOULD BE INSTALLED NEAR TO AN EASILY ACCESSIBLE SOCKET-OUTLET.
CAUTION
The C 715 employs a Laser System. To ensure proper use of this product, please read this owner's manual carefully and retain for future reference. Should the unit require maintenance, contact an authorized service location. Use of controls, adjustments or the performance of procedures other than those specified may result in exposure to laser radiation. To prevent direct exposure to laser beam, do not try to open the enclosure. Visible laser radiation when the enclosure is opened.
DO NOT STARE INTO BEAM.
FCC NOTICE
This equipment has been tested and found to comply with the limits for a Class B digital device, pursuant to part 15 of the FCC Rules. These limits are designed to provide reasonable protection against harmful interference in a residential installation.
This equipment generates, uses and can radiate radio frequency energy and if not installed and used in accordance with the instructions, may cause harmful interference to radio communications. However, there is no guarantee that interference will not occur in a particular installation. If this equipment does cause harmful interference to radio or television reception, which can be determined by turning the equipment off and on, the user is encouraged to try to correct the interference by one or more of the following measures
Reorient or relocate the receiving antenna.
- Increase the separation between the equipment and receiver.
- Connect the equipment into an outlet on a circuit different from that to which the receiver is connected
- Consult the dealer or an experienced radio/TV technician for help.
FCC WARNING
Changes or modifications not expressly approved by the party responsible for compliance could void the user's authority to operate the equipment.
INDUSTRY CANADA REQUIREMENT
This Class B digital apparatus meets all requirements of the Canadian Interference-Caising Equipment Regulations.
CAUTION REGARDING PLACEMENT
To maintain proper ventilation, be sure to leave a space around the unit (from the largest outer dimensions including projections) than is equal to, or greater than shown below.
Left and Right Panels: 10 cm
Rear Panel: 10 cm
Top Panel: 50 cm
IMPORTANT INFORMATION TO UK CUSTOMERS
DO NOT cut off the mains plug from this equipment. If the plug fitted is not suitable for the power points in your home or the cable is too short to reach a power point, then obtain an appropriate safety approved extension lead or consult your dealer. If nonetheless, the mains plug is cut off, REMOVE THE FUSE and dispose of the PLUG immediately, to avoid possible shock hazard by inadvertent connection to the mains supply. If this product is not provided with a mains plug, or one has to be fitted, then follow the instructions given below:
IMPORTANT
DO NOT make any connection to the larger terminal which is marked with the letter 'E' or by the safety earth symbol or colored GREEN or GREEN AND YELLOW. The wires in the mains lead on this product are colored in accordance with the following code:
BLUE-NEUTRAL
BROWN-LIVE
As these colors may not correspond with the colored markings identifying the terminals in your plug, proceed as follows:
- The BLUE wire must be connected to the terminal marked with the letter 'N' or colored BLACK.
- The BROWN wire must be connected to the terminal marked with the letter 'L' or colored RED
- When replacing the fuse, only a correctly rated and approved type should be used, and be sure to re-fit the fuse cover.
IF IN DOUBT CONSULT A COMPETENT ELECTRICIAN.

This product is manufactured to comply with the radio interference requirements of EEC DIRECTIVE 2004/108/EC.
NOTES ON ENVIRONMENTAL PROTECTION

At the end of its useful life, this product must not be disposed of with regular household waste but must be returned to a collection point for the recycling of electrical and electronic equipment. The symbol on the product, user's manual and packaging point this out.
The materials can be reused in accordance with their markings. Through re-use, recycling of raw materials, or other forms of recycling of old products, you are making an important contribution to the protection of our environment.
Your local administrative office can advise you of the responsible waste disposal point.
RECORD YOUR MODEL NUMBER (NOW, WHILE YOU CAN SEE IT)
The model and serial number of your new C 715 are located on the back of the cabinet. For your future convenience, we suggest that you record these numbers here:
Model number:
Serial number:
IMPORTANT SAFETY INSTRUCTIONS 2
INTRODUCTION
GETTING STARTED 6
UNPACKING AND SETUP 6
QUICK START 6
DEALING WITH HUM AND NOISE. 6
FACTORY DEFAULT SETTINGS 6
IDENTIFICATION OF CONTROLS
FRONT PANEL. 7
REAR PANEL 9
SR 7 REMOTE CONTROL 10
OPERATION
USING THE C 715 - CD MODE. 11
CD-R AND CD-RW AUDIO DISCS 11
PLAYING MP3/WMA FILES 11
PROGRAMMING 11
USING THE C 715 - USB MODE. 13
LISTENING TO USB DEVICE 13
SELECTING DIRECTORIES OR FILES 13
RECORDING 13
SETTING THE RECORD MODE. 13
RECORDING TO USB. 14
DELETE A FILE FROM USB 14
DISCONNECT EXTERNAL USB DEVICE 14
USING THE C 715-TUNER MODE 15
LISTENING TO AM/FM 15
ABOUT ANTENNAS 15
ASSEMBLING THE LOOP ANTENNA 15
TUNING MODE 15
SETTING RADIO PRESETS (AM / FM / DAB). 15
CHOOSING THE FM MODES 16
RDS OPERATION 16
RDS MODE OPTIONS 16
PROGRAM TYPE (PTY) 17
LISTENING TO DAB 18
ABOUT DAB ANTENNA 18
DAB OPERATION 18
AUTOTUNE 18
CHANNEL LIST. 18
FUNCTION CONTROL 19
STATION ORDER 19
PRESET TUNE 19
DRC VALUE 19
MANUAL TUNE 20
INFORMATION SETTINGS. 20
USING THE C 715 - EXTERNAL SOURCES AND TIMER .21
LISTENING TO EXTERNAL SOURCES 21
SETTING THE CLOCK 21
SETTING THE ON/OFF TIMER 21
ACTIVATE TIMER OPERATION 22
USING THE C 715-OTHER FEATURES 23
TONE/BALANCE/DIMMER 23
OTHER SR 7 FEATURES. 23
NUMERIC KEY PAD 23
REPEAT 23
REPEAT A-B. 23
RANDOM PLAY 24
TIME. 24
TEXT 24
MUTE. 24
SLEEP 24
REFERENCE
TROUBLESHOOTING 25
NOTES ON DISCS. 25
SPECIFICATIONS 26
THANK YOU FOR CHOOSING NAD
The C 715 DAB CD Receiver is a technologically advanced and highly capable product-yet we have invested great effort in making it simple and easy to use. The C 715 delivers a range of genuinely useful options for stereo listening using powerful digital signal processing and superbly accurate digital-audio circuitry. However, we have also been careful to ensure that the C 715 is as musically transparent and spatially accurate as possible, incorporating much of what we've learned from a quarter-century's experience designing audio and home-theatre components. As with all our products, NAD's "Music First" design philosophy guided the C 715's design, such that it can confidently promise you both state-of-the-art and audiophile-quality music listening for years to come.
We encourage you to take a few minutes now to read right through this manual. Investing a little time here at the outset might save you a good deal of time later, and is by far the best way to ensure that you make the most of your investment in the C 715.
One more thing: We urge you to register your C 715 ownership on the NAD Worldwide Web site:
http://NADelectronics.com/warranty
For warranty information contact your local distributor.
GETTING STARTED
UNPACKING AND SETUP WHAT'S IN THE BOX
Packed with your C 715 you will find:
An AM loop antenna.
- A FM lead-type antenna.
A F-type DAB antenna.
The SR 7 remote control with 2 (two) AAA batteries.
This owner's manual.
SAVE THE PACKAGING
Please save the box and all of the packaging in which your C 715 arrived. Should you move or otherwise need to transport your C 715, this is by far the safest container in which to do so. We've seen too many otherwise perfect components damaged in transit for lack of a proper shipping carton, so please: Save that box!
CHOOSING A LOCATION
Choose a location that is well ventilated (with at least several inches to both sides and behind), and that will provide a clear line of sight, within 23 feet/7 meters, between the C 715's front panel and your primary listening/viewing position. This will ensure reliable infrared remote control communications. The C 715 generates a modest amount of heat, but nothing that should trouble adjacent components. It is perfectly possible to stack the C 715 on top of other components.
QUICK START
In case you simply cannot wait to experience the performance of your new NAD C 715 CD Receiver, we provide the following "Quick Start" instructions to get you underway.
Please make all the connections to your C 715 with the unit unplugged. It is also advisable to power-down or unplug all associated components while making or breaking any signal or AC power connections.
PLAY A CD
- Connect your left and right front speakers to the C 715's "L" and "R" outputs. Make sure to connect red to red ("+") and black to black ("-") with care to avoid stray wires or strands crossing between terminals. If your system includes a powered subwoofer, connect the C 715's "SUBWOOFER OUT" jack to its line input.
- Plug the AC mains plug into the AC outlet; the LED on the front panel will be illuminated amber indicating the C 715 is in standby mode ready to accept commands from either the front panel power switch or the SR 7 remote.
- To start CD playback, toggle [SOURCE] button in the front panel until "CD" mode or press directly SR 7's [CD] source key. Press for the disc tray to draw open.
- Insert the media and press the button to start playback.
DEALING WITH HUM AND NOISE
Hum and noise sometimes may prove a challenge in audio systems. Note these considerations to help prevent hum and noise problems:
- Power all your system's audio component from AC outlets originating from the same circuit of your house wiring. As far as possible, power all audio components from the same outlet, or adjacent outlets on the same circuit. It may be useful to power video displays (and computers!) from outlets on another circuit, especially if that circuit is supplied from the other "leg" of the house wiring.
- Do not bundle analog audio cables with AC power cables, or with coaxial digital-audio cables. It is best if they cross at right angles if they must be in close proximity.
- Employ high-quality, well-shielded audio cable throughout, and ensure that all connections are secure.
- A pencil-eraser can be used to burnish copper- and gold-plated contacts to ensure good, low-resistance contact; specialized contact-cleaners can also be useful. Avoid unnecessary unplugging and re-plugging since the gold (or copper) contact plating of typical cable connectors, even very high-quality ones, is very thin and easily worn.
Track down hum/noise problems one component at a time, working backwards from the C 715. That is
1 Connect the speakers to the C 715 only, and check for hum.
2 Then connect one component only (a CD player, for example) alone, with no other components connected and check for hum.
3 Connect additional components, one at a time, to the C 715 and check for hum.
At each stage, if hum/noise appears, examine the audio cabling and AC-power routing of the new component. In some cases, moving the new component's AC cord to a different outlet, or installing a ground-lift (3-to-2-prong adapter) on its power cord, will eliminate the hum.
FACTORY DEFAULT SETTINGS
Sometimes power spikes and drop-outs may from time to time cause some inadvertent functionality. The procedure below will set the C 715 to factory default settings
1 Turn OFF C 715 by pressing the power button in the front panel or SR 7 remote control's [OFF] key.
2 Press and hold front panel's [FM MODE /II] key for more than two seconds. The C 715 will switch itself back ON and all the settings are restored to factory default settings.
Please note that setting the C 715 to factory default will delete all AM, FM and DAB presets.

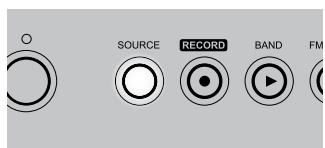
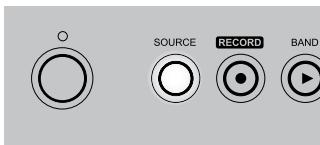
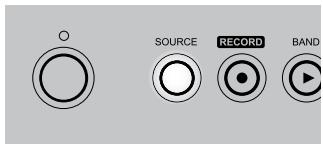
1 POWER: Press this button to switch ON the C 715. The Standby LED indicator will turn from amber to blue and illuminate the Vacuum Fluorescent Display (VFD). Pressing the power button again turns the unit back to standby mode.
If the disc tray is open and the C 715 is powered OFF, the disc tray will draw close and the unit powered OFF.
2 INDICATOR: This indicator will light up amber when the C 715 is in standby state. When the C 715 is at ON state, this indicator will illuminate blue.
3 DISC TRAY: With the DISC TRAY open, insert a compatible media disc face down onto the tray.
"No Disc" appears on the C 715's VFD if the disc is placed upside down.
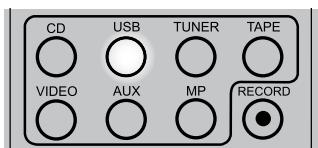
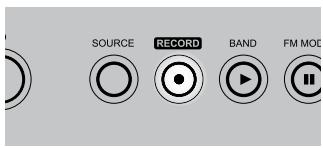
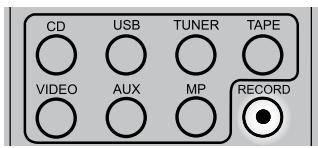
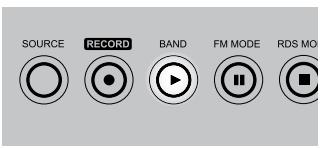
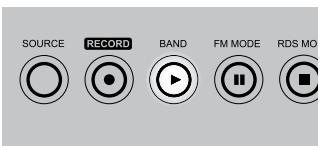
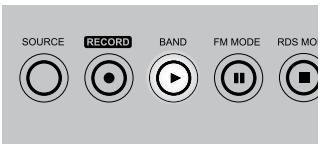
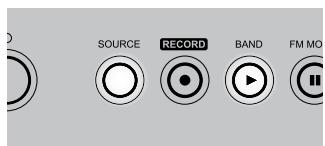
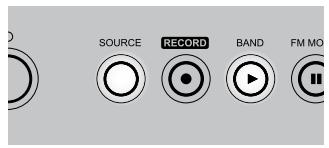
4 SOURCE: Toggle this button to select through the following sources:

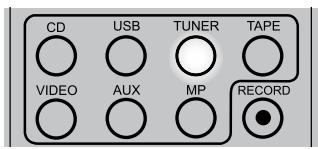
5 RECORD: Use this button to start recording to a USB device.
6 BAND / (PLAY) [▶]: In CD or USB mode, press this button to start playback. If the disc tray is open, press this button to automatically close the tray and start playback if a disc is loaded.
In AM/FM/DAB mode, toggle this button to select AM, FM or DAB mode.
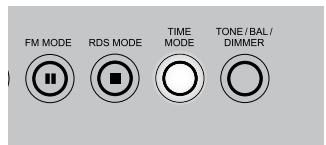
7 FM MODE/ (PAUSE) [II]: In FM mode, this button will toggle between FM Stereo and FM Mono. The front panel [FM MODE] key is a dual-purpose control. In the normal position, ("STEREO" and "TUNED" icons are illuminated in the VFD) only the stations with a strong signal can be listened to and the noise between stations is muted.
Pressing the [FM MODE] button again ("STEREO" icon is extinguished; only "TUNED" is illuminated) allows distant and potentially noisy stations to be received. Noise is reduced if the FM station signal level is less than the FM stereo threshold (since mono FM is inherently less noise-prone) though at the sacrifice of stereo effect.
In CD or USB mode, press this button to toggle between Pause and Play of a compatible media disc.
8 RDS MODE/ (STOP) [■]: When tuned to a RDS station, toggle this button to cycle through the following RDS modes:
Refer to the section "RDS MODE OPTIONS" for a description of the above modes.
In CD or USB mode, press this button to stop playback and re-set the pickup to the beginning of the disc. The display reverts to showing the total number of tracks and total playing time of an audio disc or total number of WMA/MP3/Audio files. If the C 715 was programmed to play a selection of tracks, the program will be retained in the memory.
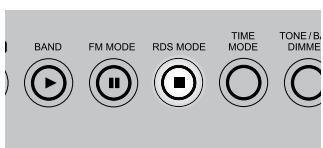
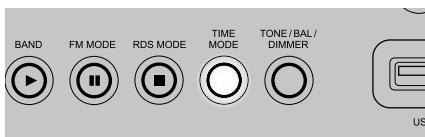
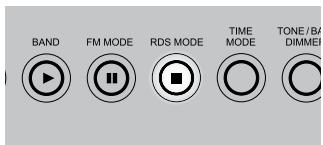
FRONT PANEL
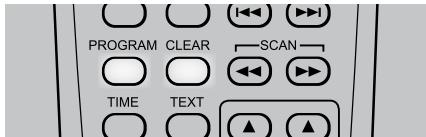
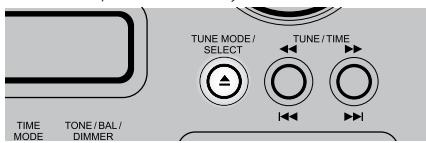
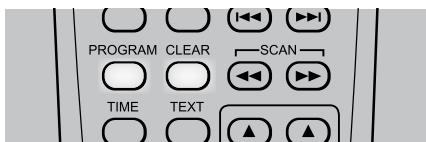
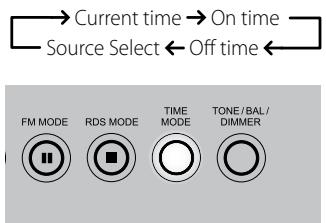
9 TIME MODE: In conjunction with [TUNE/TIME] keys, toggle this button to cycle through the following timer modes:

Refer to the sections "SETTING THE CLOCK" and "SETTING THE ON/OFF TIMER" for a description of the above modes.
10 TONE/BAL/DIMMER: Toggle this button to adjust tone, balance and dimmer settings in combination with [VOLUME] knob.
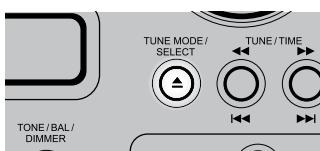
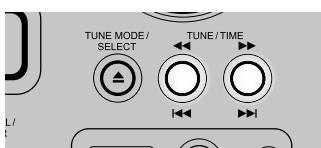
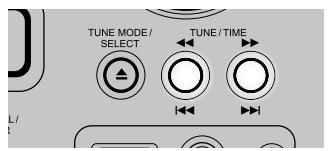
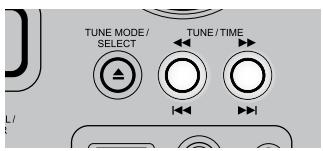
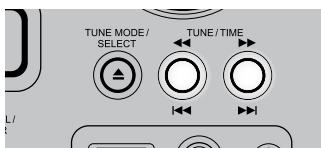
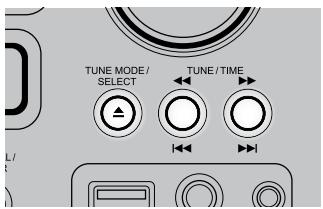
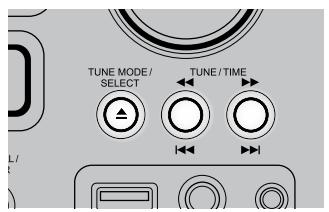
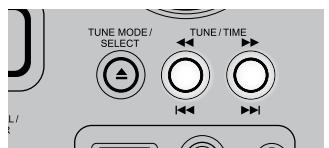
11 TUNE MODE/SELECT/ [OPEN / CLOSE ]: In FM/AM mode, toggle this button to cycle through the following tuning modes:

In CD mode, press this button to open and close the disc tray.
Use this button in combination with other relevant keys to setup timer settings.
When in standby mode, this button will also power ON the C 715 and at the same time open the disc tray.
12 USB: Connect an external USB device into this input.
13 PHONES: Accepts stereo headphone using a standard 1/8-inch stereo phone plug. Plugging in headphones automatically mutes output from the speakers; however, subwoofer output will not be cutoff.
14 MP: Connect your MP3's standard stereo phone jack to this input.
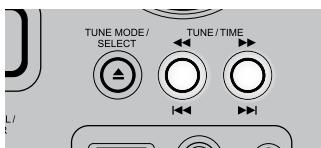
15 TUNE / TIME / [←/→] / [I←/→I]: In AM/FM mode, press to step up or down stored presets. Press these buttons for manual or auto scanning of AM/FM band.
In CD or USB mode, press▶▶to skip forward or▶ to skip backward a track or file. Press and hold▶ or▶ for more than 2 seconds to search up or down a track or file. Release the button to resume normal playback.
Use these buttons in combination with other relevant keys to setup timer settings.
These buttons are also used to step or scroll through applicable options either independently or in combination with other buttons.
16 REMOTE SENSOR: Point the SR 7 remote control at the remote sensor and press the buttons. Do not expose the remote sensor of the C 715 to a strong light source such as direct sunlight or illumination. If you do so, you may not be able to operate the C 715 with the remote control.
Distance: About 23ft (7m) from the front of the remote sensor.
Angle: About 30o in each direction of the front of the remote sensor.
17 Vacuum Fluorescent Display (VFD): Provides visual information about the unit's important modes, settings, functions, status of the current source like disc playback time and other indicators.
18 VOLUME: Turn clockwise to increase the volume setting; counter clockwise to lower it. The VFD shows the VOLUME setting displayed as increments between 1 through to 62. "VOLUME MIN" will be displayed when volume setting is at its lowest level and "VOLUME MAX" when volume is at its highest level.
In conjunction with the [TONE/BAL/DIMMER] button, turn [VOLUME] clockwise or counterclockwise to adjust the tone, balance and dimmer functions.
ATTENTION!
Please make sure that the C 715 is powered off or unplugged before making any connections. It is also advisable to power down or unplug all associated components while making or breaking any signal or AC power connections.
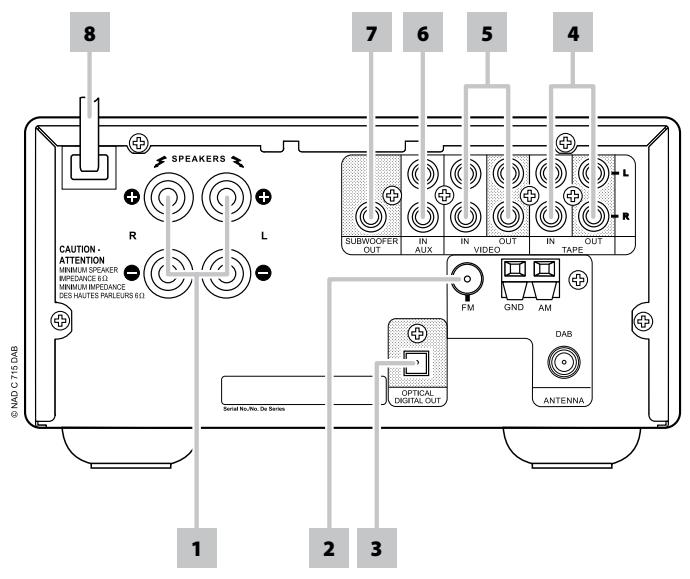
1 SPEAKERS: Connect the left and right terminals to the corresponding loudspeakers. Make sure that the "+" (red) terminal and "-" (black) terminal are connected to the corresponding "+" and "-" terminals of the loudspeaker. Use extra care to ensure that no stray wires or strands cross between posts or terminals at either end.
NOTES
- Use stranded wire of at least 16-gauge (AWG); specialized speaker cable may be valuable (consult your NAD audio specialist). Connections to the C 715 can be made with banana-type plugs, or using bare wire, or pins, by loosening the terminal's plastic nut, making a clean, neat connection, and re-tightening carefully. To minimize the danger of short-circuits, ensure that only 1/2-inch of exposed wire or pin is employed in connecting.
- This unit is designed to produce optimum sound quality when connected to speakers with impedances within the receiver's operating range. Please check that speakers are rated to be 6 ohms minimum per speaker.
2 FM / AM / DAB ANTENNA INPUT: Connect the supplied lead-type FM antenna to the FM antenna input. Extend the lead. Experiment freely with your antenna placement and orientation until you get the clearest sound and lowest background noise. Fix the antenna in the desired position by using thumb tacks, push pins or any suitable means.
The AM loop antenna supplied with the C 715 (or a suitable replacement) is required for AM reception. Open the clip terminal lever; insert the wire making sure to match the color-coded (white and black) ends of the wire to that of the terminal and close the lever ensuring that the lever locks the wire in place. Testing different positions for the antenna may improve reception; vertical orientation will usually produce the best results. Antenna proximity to large metal objects (appliances, radiators) may impair reception, as will attempts to lengthen the wire to the loop.
Connect the supplied F-type DAB antenna to the DAB antenna input.
3 OPTICAL DIGITAL OUT: Connect the OPTICAL DIGITAL OUT port to the corresponding S/PDIF digital input of a compatible device such as CD recorders, receivers, computer soundcard or other digital processors.
4 TAPE IN/OUT: Connections for analog recording and playback to an audio tape recorder of any type. Using twin RCA-to-RCA leads, connect the left and right "Audio Output" of the tape machine to the C 715's TAPE IN sockets for playback and tape monitoring. Connect the left and right "Audio Input" of the tape machine to C 715's TAPE OUT sockets for recording.
NOTE
There will be no output at TAPE OUT when TAPE is selected. Likewise, there will be no output at VIDEO OUT when VCR is the active source input. This prevents feedback through the recording component thereby preventing possible damage to your speakers.
5 VCR IN/OUT: VCR may be used with recording components such as a cassette deck. Connect analog stereo audio from such source components into the C715's VCR IN. Connect the C 715's VCR OUT to the source components' record-input. Note that VCR may freely be used for play-only components, in which case the OUT jacks would remain unconnected.
6 AUX IN: Input for additional line level input such as another CD player. Use a twin RCA-to-RCA lead to connect the auxiliary unit's left and right "Audio output" to this input.
7 SUBWOOFER OUT: Connect this output to a powered ("active") subwoofer (or to a power amplifier channel driving a passive system).
8 AC LINE CORD: Plug the AC power cord into a live AC wall socket. Make sure all connections have been made before connecting to mains.
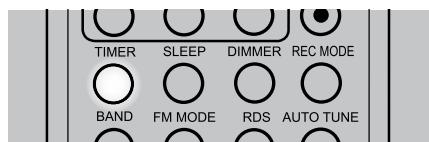
SR 7 REMOTE CONTROL

1 ON:Power ON C 715.
2 LED indicator: Flashes when a command is sent.
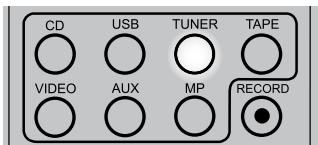
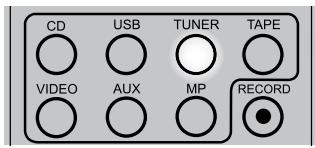
3 CD, USB, TUNER, TAPE, VIDEO, AUX, MP : Select a Source.
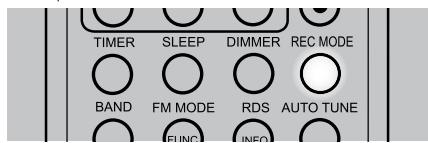
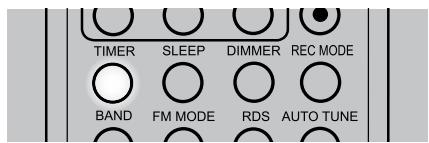
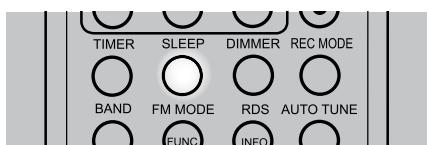
4 TIMER: Access timer modes.
SLEEP: Set sleep mode timer.
DIMMER: Toggle to either reduce or restore normal VFD brightness.
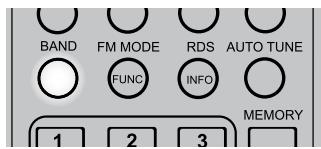
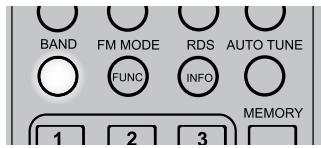
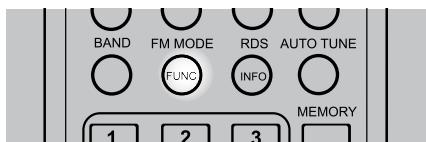
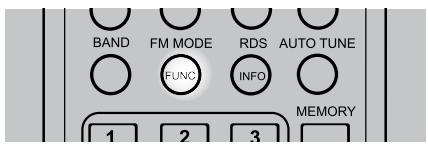
5 BAND: Select AM, FM or DAB mode. FM MODE/FUNCTION: Switch between FM stereo and FM Mono mode; Select DAB function modes. RDS/INFO: Access RDS modes; Display DAB information. AUTO TUNE: Automatic scanning of DAB stations.
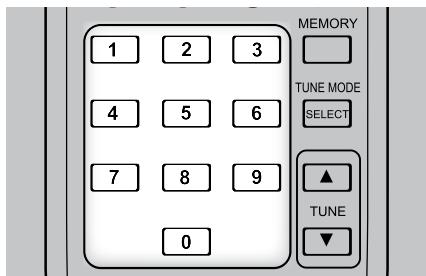
6 0-9 number buttons : Direct-entry of track or file number.
7 MUTE:Mute audio. VOLUME / : Adjust volume level.
8 TIME: Show playback time display.
TEXT: Display file information.
9 OFF:Power OFF C 715.
10 RECORD: Start recording.
REC MODE: Select desired record mode.
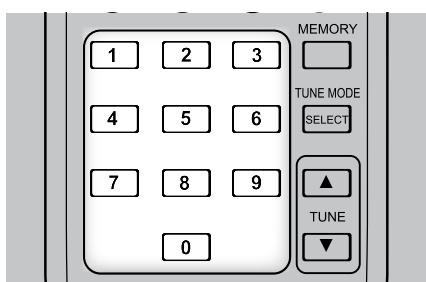
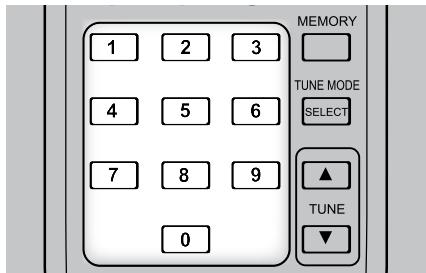
11 MEMORY: Save current station into preset memory.
12 SELECT: Select tuning mode.
13 TUNE / : Step/tune up or down the selected tuning mode.
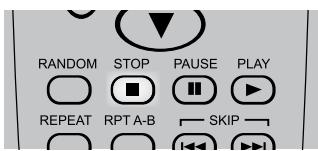
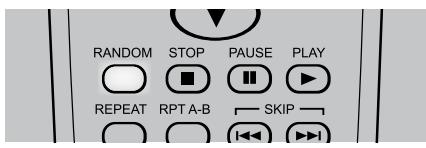
14 RANDOM: Play tracks/files in random order.
STOP: Stops playback.
PAUSE: Pause playback temporarily.
PLAY: Starts playback.
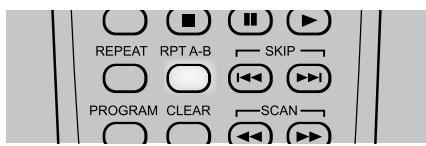
REPEAT: Repeat track, file or folder.
RPT A-B: Repeat sequence.
SKIP▶I: Go to next track or file.
SKIP▶K: Go to beginning of current track/file or to previous track/file.
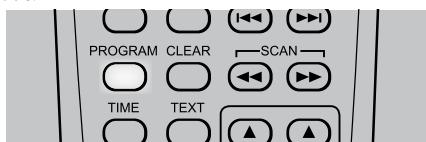
PROGRAM: Enter or exit program mode.
CLEAR: Remove a track or file number on the program list.
SCAN▶: Press for fast forward search.
SCAN: Press for fast reverse search.
15 FOLDER / : Select through folder lists. FILE / : Select through WMA/MP3 files. ENTER: Select desired folder or WMA/MP3 file.
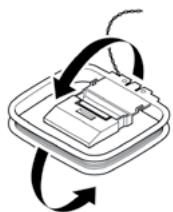
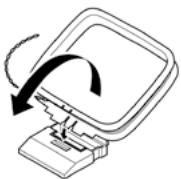
Press in and lift tab to remove battery cover out of recess.
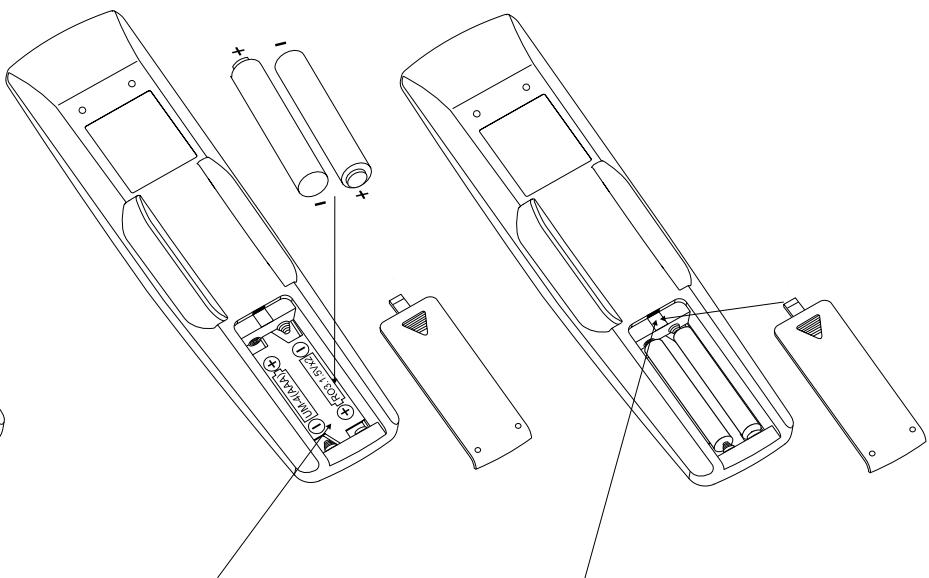
Press batteries into opening. Ensure correct fitting is observed.
Replace battery cover by aligning and inserting the two tabs into the holes. Press battery cover into place until ' clicks' closed.
CD-R AND CD-RW AUDIO DISCS
Aside from normal CD audio discs, the C 715 can play back CD-R or CD-RW audio discs that have been recorded on a computer or CD recorder. The quality of CD-R, CD-RW audio discs varies widely which may affect playability. Some factors that affect playability:
- The quality of the disc itself. Generally speaking, CD-R, CD-RW blanks from well-renowned companies give better results than unbranded ones.
- The quality of CD-recorder or computer CD re/writer. Some recorders and writers produce better results than others.
- The CD-R and CD-RW were created with high-speed writing. In general, the quality of a CD-R or CD-RW is better when produced at a lower speed against a higher speed on the same recorder or re/writer.
PLAYING MP3/WMA FILES
The C 715 can play MP3/WMA formatted recordings on CD-R or CD-RW discs. You may mix any of the file types on the disc. Using the SR 7 remote control, one can select through the MP3/WMA folders and files as well as start playback through the following steps
1 Load the applicable disc.
2 Press [FOLDER / ] to select desired folder. Press [ENTER].
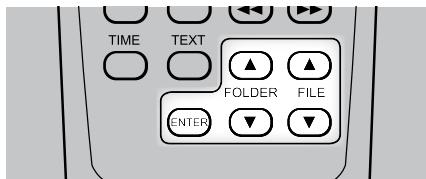
3 Press [FILE / ] to select desired file number. Press [ENTER] to start playback.
NOTES
- Access to folders and files can be made at STOP or playback mode.
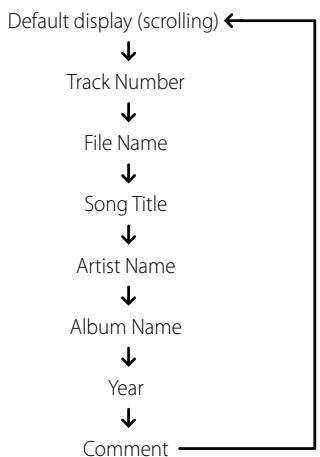
Information about the Song Title, Album and Artist name, if available, will scroll through the VFD during playback. - The file number is recognized per disc, not per folder – that is, the number assigned to each file corresponds to their sequence in the disc.
- If you want to select file number "9" in a disc where there are 100 or more MP3/WMA files, press "0" twice and then "9."
PROGRAMMING
The program function enables you to organize your favorite songs according to your preference. When programming a sequence of tracks, the C 715 must be in STOP mode. Using the SR 7 remote control, enter your desired program sequence through the following steps
1 Press [PROGRAM]. The display indicates "P00 T00".
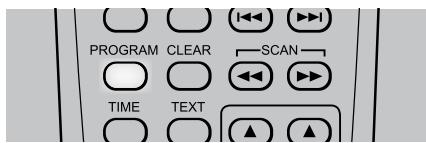
2 Use the Direct-Entry numeric keypad buttons to enter the first track in your planned sequence. For example, to enter track number "1", press "0" and then "1". Note that the as the digit "0" is keyed-in, "T___" is blinking indicating that it is waiting for the second digit to be entered. Upon entering the second digit (i.e., number "1"), the track section in VFD will stop blinking and show "P-01 T01." This indicates that the first program entry is completed.
3 The C715 is now ready for your second program entry. Key-in the second track you desire to program. As in step 2, the track section will keep on blinking until the second digit is entered. As soon as the track number is fully entered, the blinking stops and the program sequence completed.
4 Repeat steps 2 and 3 to select and store other track numbers in memory, up to a maximum of 30 entries. If you attempt to program more than 30 tracks or files, "P-FULL" will be displayed in the VFD.
5 Press [PROGRAM] to end or finalize the program - the VFD will show "P-End".
6 Press [▶] to start program playback.
NOTES
- The procedure for programming MP3/WMA files and USB files are the same as above.
- At CD mode, the programmed sequence/contents will not be lost even though the C715 is powered OFF (standby) or the SOURCE mode changed. It will only be lost if the disc tray is opened.
To recall the program sequence, press [PROGRAM] and then [▶] to playback the program.
USING THE C 715 - CD MODE
REVIEW PROGRAM LIST
1 Initiate review of your programmed entries by pressing [PROGRAM] at STOP mode.

2 The VFD will show the first Program Number.
3 Press [PROGRAM] repeatedly to step through the program sequence. You will have reached the end of the program sequence when "P-End" is displayed at the VFD.
EDIT PROGRAM LIST
1 Initiate editing of your programmed entries by pressing [PROGRAM] at STOP mode.
2 The VFD will show the first Program Number.
3 Press [PROGRAM] repeatedly to step through the program sequence. Stop at the program sequence you want to edit.
4 To change the programmed track/file of a particular sequence, use the Direct-Entry numeric keypad buttons to overwrite the current track/file.
5 Press [PROGRAM] again to continue with other program track changes or press [STOP] to end the editing.
DELETE PROGRAM
1 To delete a particular programmed track/file, press repeatedly [PROGRAM] key in STOP mode until the desired programmed sequence is reached. Press SR 7's [CLEAR] key once and the track/file in the particular sequence is deleted. The program sequence will adjust accordingly as a programmed track/file is deleted.
2 To clear the program memory, perform any of the following steps
Press [OPEN] to open the disc tray.
- Press [PROGRAM] at stop mode and then press and hold SR 7's [CLEAR] key until the unit reverts to the default display, i.e. total track number and playback time.
The C 715 can play back MP3/WMA files stored in external USB (Universal Serial Bus) devices. The following are the C 715's capabilities with respect to USB device playability.
- Playback of MP3/WMA files recorded in various USB devices such as USB flash memory, MP3 or HDD. The HDD must be formatted FAT 16 or FAT 32, but not NTFS.
2 Support USB 1.1 full speed (12Mbps).
3 When more than 2000 files are recorded in the USB device, the C 715 may not be able to play the files correctly.
LISTENING TO USB DEVICE
1 Toggle [SOURCE] button to select "USB" mode. If no external USB device is connected to the front panel's USB input, "Not connected" will be displayed in the VFD.
2 Plug-in the external USB device to the USB input - "USB reading" will be blinking in the VFD and then the total number of files will displayed. When an HDD device is connected to this unit, it may take several minutes to display the number of files.
3 Press [▶] to start playback.
SELECTING DIRECTORIES OR FILES
The following are steps on how to select a desired directory and MP3 or WMA file during playback or stop mode.
1 Connect the external USB device to the front panel's USB input.
2 Press [FOLDER▲/▼] to select desired folder. Press [ENTER]
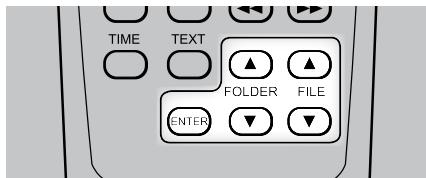
3 Press [FILE / ] to select desired file number.
4 Press [ENTER] to start playback. Information about the Song Title, Album and Artist name, if available, will scroll through the VFD during playback.
RECORDING
With external USB devices, the C 715 can also record music from CDs, cassette tapes and tuners as well MP3 or WMA files.
BEFORE RECORDING
The following are useful tips before you start recording
1 Prior to recording, verify with the use of your computer if your USB device has enough remaining capacity to record your desired audio selection.
2 Adjust the volume level of the external audio source to suitable level before recording. If not, the recording quality becomes poor.
SETTING THE RECORD MODE
RECORD mode can be setup through the following steps
1 At USB mode, press SR 7's [REC MODE] button.
2 Toggle [FOLDER / ] to step through the following modes:

3 To select desired RECORD MODE for MP3, press [ENTER] (within 3 seconds) when you have arrived at the desired setting. Repeat the same for WMA.

BIT RATE
[64K], [96K], [128K] or [192K] are bit rate values indicating the amount of data compression progress per second. The higher the bit rate, the larger the amount of data; this does not mean however that the sound quality is better. [128K] setting is recommended for listening enjoyment.
USING THE C 715 - USB MODE
RECORDING TO USB
With an external USB device, the following procedures will allow you to record as MP3/WMA file a source of CD, MP3/WMA disc, cassette deck, radio broadcast or other auxiliary devices.
1 Connect the external USB device to the front panel's USB input.
2 Press [SOURCE] to select the source you want to record.


3 Press [RECORD] button and recording starts.
4 To stop or end recording, press [STOP] button.
NOTES
- Do not disconnect the USB storage device or power cord during recording. It may cause damage to the C 715.
- The recorded files are saved in the AUDIO folder. The file names are automatically saved sequentially as AUDIO001.MP3, AUDIO002.MP3....
DELETE A FILE FROM USB
1 At USB mode, press [FOLDER ▲/▼] to select a folder. Press [ENTER].

2 Press [FILE / ] to select desired file number.
3 Press and hold [CLEAR] button until the VFD shows [USB/DELETE?] AUDIO001.MP3

4 Press [CLEAR] button again within 3 seconds; otherwise delete mode will be cancelled.
DISCONNECT EXTERNAL USB DEVICE
1 Press and hold [TIME MODE] until the VFD shows a blinking "Pls, remove USB."
2 Unplug the external USB device from the front panel's USB input.
LISTENING TO AM/FM
The C 715's internal AM/FM tuner offers very high quality sound from radio broadcasts. The reception and sound quality will always be dependent to a degree however on the type of antenna(s) used as well as proximity to the broadcast origin, geography and weather conditions.
SELECTING AM/FM
Press [SOURCE] button repeatedly until AM/FM/DAB mode.
Toggle the [BAND] button to select AM or FM band.
ABOUT ANTENNAS
Connect the supplied lead-type FM antenna to the FM antenna input. Extend the lead. Experiment freely with your antenna placement and orientation until you get the clearest sound and lowest background noise. Fix the antenna in the desired position by using thumb tacks, push pins or any suitable means. In areas of poor FM reception, an exterior FM antenna can improve performance dramatically. If radio listening is important to you, consider consulting an antenna installation professional to optimize your system.
The supplied AM 'loop' antenna will usually provide adequate reception. However, an exterior AM antenna can be used to improve reception. Consult an antenna professional for more information.
ASSEMBLING THE LOOP ANTENNA
1 Rotate the outer frame of the antenna.
2 Insert the bottom edge of the outer frame into the groove on the stand.
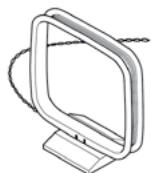
3 Extend the antenna cord.
TUNING MODE
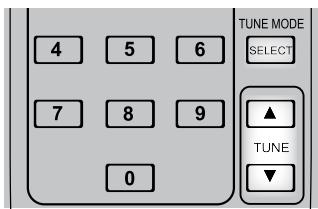
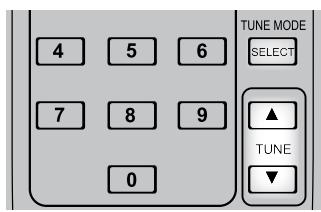
Toggle front panel's [TUNE MODE/SELECT] button (or SR 7's [MEMORY/ SELECT] key) and the upper display will show [Manual Tune], [Auto tune] and [Preset tune].
MANUAL TUNE
Press [▶/▶/■/▶] on the front panel (or SR 7's [TUNE▲/▼]) momentarily to step up or down between AM or FM frequencies. Release the button when you find your desired station.
AUTO TUNE
Press [▶/▶/TUNE ▲/▼] (or SR 7's [TUNE ▲/▼] key) - the C 715 will stop at the next sufficiently strong signal it encounters. Pressing [▶/▶/H▶/▶] during the search process will stop the search.
PRESET TUNE
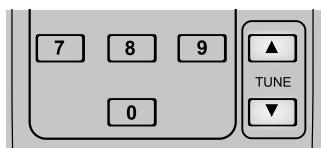
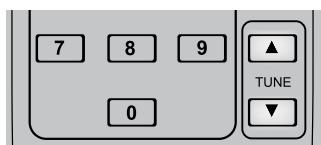
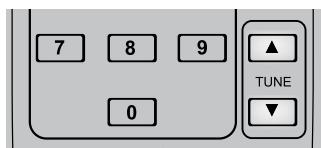
Use the [▲/▲] on the front panel to step up or down between presets. Press and hold [▲/▲] to scroll continuously up or down. The SR 7's [TUNE ▲/▼] key work similarly. Empty presets will be skipped during tuning.
SETTING RADIO PRESETS (AM / FM / DAB)
The C 715 can store up to 30 FM, 30 AM and 10 DAB stations for immediate recall.
MANUAL PRESET
1 Toggle the [BAND] button to select AM, FM or DAB.
2 To store a radio preset, first tune the desired frequency (see above), then press SR 7's [MEMORY] key.
"CH __" starts blinking indicating that it is waiting for you to enter your desired preset number allocation. Use the Direct-Entry numeric keypad buttons to enter the desired preset number. For example, to enter Preset number "1", press "0" and then "1". Note that the as the first digit "0" is keyed-in, "CH0" is blinking indicating that it is waiting for the second digit to be entered. Upon entering the second digit (i.e., number "1"), "CH01" stops blinking. This indicates that the first preset entry is completed.
The same condition applies for DAB mode with "01" of the displayed "PRESET MEMORY 01" blinking also.
3 Repeat steps 2 and 3 to store up to 30FM, 30AM and 10 DAB stations.
NOTE
A new station can be directly entered into an existing programmed Memory Preset. The new station will overwrite all the data previously held on that Preset number.
USING THE C 715 - TUNER MODE
AUTOMATIC PRESET (AM/FM ONLY)
Preset stations may also be programmed automatically for the entire FM (or AM) band.
1 Toggle the [BAND] button to select AM or FM band.

2 Press and hold SR 7's [MEMORY] key. Release [MEMORY] key when "Auto Memory" starts to blink in the VFD. Up to 30 of the best received FM stations (or 30 AM stations) will be automatically stored.
CHOOSING THE FM MODES
In FM mode, the front panel [FM MODE] key is a dual-purpose control. In the normal position, ("STEREO" and "TUNED" icons are illuminated in the VFD) only the stations with a strong signal can be listened to and the noise between stations is muted.
Pressing the [FM MODE] button again ("STEREO" icon is extinguished; only "TUNED" is illuminated) allows distant and potentially noisy stations to be received. Noise is reduced if the FM station signal level is less than the FM stereo threshold (since mono FM is inherently less noise-prone) though at the sacrifice of stereo effect.
RDS OPERATION
Radio Data System (RDS) transmits station call signs or network information, station program type, text messages about the station or specifics of a musical selection and the time.
Not every FM station incorporates RDS in its broadcast signal. In most areas you will find from one to several RDS-enabled stations, but it is by no means impossible that your favorite stations will not be broadcasting RDS data.
RDS MODE OPTIONS
When an RDS-enabled FM broadcast is tuned, a "RDS" icon will illuminate in the C 715's VFD.
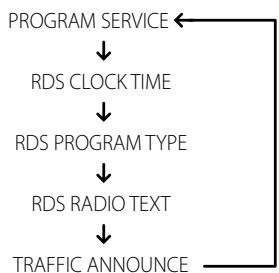
Toggle [RDS MODE] to show the following:
PROGRAM SERVICE
"Program Service" will blink for about 3 seconds and then the program service name or a station's name will be displayed. "P S" which stands for "Program Service" will be displayed in the upper left side of the VFD. If there is no program service data, the frequency will be displayed.
RDS CLOCK TIME
The current time of the day will be displayed as transmitted by the station. It will take 3-5 seconds for the time to appear. In the meantime, the word "RDS CLOCK" will flash in the display. When available, the time is then displayed. Note that the accuracy of the time message is set by the radio station, not by the C 715. "CT" which stands for "Clock Time" will be displayed in the upper left side of the VFD. If there is no time data supplied, "00:00" will be displayed".
RDS PROGRAM TYPE
Program Type (PTY) allows users to find similar programming by genre. Please find the section below about "PROGRAM TYPE (PTY)" for more information about RDS Program Type.
RDS RADIO TEXT
A Radio Text message containing special information from the RDS station will scroll through the VFD (up to 64 symbols can be displayed). It will take 3 takes seconds for the text message to appear. In the meantime, the word "RDS RADIO TEXT" will flash in the display. When available, the Radio Text is then displayed. "RT" which stands for "Radio Text" will be displayed in the upper left side of the VFD. If no Radio Text is available, the display will show the Program Service.
TRAFFIC ANNOUNCE
When selected, "TRAFFIC ANNOUNCER" will blink for 3 seconds. After 3 seconds, the C 715 will scan (SEARCH and a blinking >^ is displayed) the FM band searching for available traffic announcements. "T A" which stands for "Traffic Announce" will be displayed in the upper left side of the VFD.
"TRAFFIC ANNOUNC (T A)" mode is switched to Program Service (P S) mode when a traffic program is found. Once a station transmitting traffic program signal is selected, the C 715 will stop searching for traffic program and then switch to "Program Service" mode.
PROGRAM TYPE (PTY)
A major benefit of RDS is its ability to encode broadcasts with Program Type (PTY) codes that indicate the type of material being broadcast.
1 Toggle the [BAND] button to select FM band.
2 Press and hold [RDS MODE] until 'RDS PROGRAM TYPE" is shown in the VFD.
3 Use the [TUNE/TIME/] front panel buttons (or SR 7's [TUNE / ] ) to select the desired RDS PROGRAM TYPE.
4 Once you have found the program type you would like to listen, press [TUNE MODE/SELECT].
5 Press the [TUNE/TIME/] front panel buttons (or SR 7's [TUNE▲/▼]) to start the PTY search (the Program Type and "SEARCH >" will interchangeably blink in the VFD).
6 When a compatible station is tuned, the search will stop and the display will show the tuned station's corresponding PTY information.
NOTE
To abort PTY search, press [RDS MODE] button..
The following is a list of available Program Type selections.
| News | News. |
| Current Affairs | Current Affairs. |
| Information | Information. References such as consumer guides, medical assistance and so on. |
| Sport | Sport. |
| Education | Educational and cultural information. |
| Drama | Drama. |
| Cultures | National and local culture including religious events, philosophy, theater and so on. |
| Science | Programs on natural science and technology. |
| Varied Speech | Popular programs such as quiz, entertainment, comedy, satire and so on. |
| Pop Music | Program on commercial, practical and popular songs |
| Rock Music | Practical modern music generally composed and played by young musicians. |
| Easy Listening | Easy listening music. |
| Light Classics M | Classical Music, instrumental music, chorus and light music. |
| Serious Classics | Orchestra including great operas, symphony, chamber music and so on. |
| Other Music | Other music styles (rhythm and blues, reggae, etc.) |
| Weather & Metr | Weather reports, forecast. |
| Finance | Financial reports, commerce, trading. |
| Children's Progs | Children's Programs |
| Social Affairs | Social Affairs |
| Religion | Religious programs |
| Phone In | Program in which public expresses its view by phone. |
| Travel & Touring | Travel reports |
| Leisure & Hobby | Programs concerning recreational activity. |
| Jazz Music | Jazz Music |
| Country Music | Country Music |
| National Music | National Music |
| Oldies Music | Music from the so-called golden years of popular music. |
| Folk Music | Folk Music |
| Documentary | Documentaries |
| Alarm Test | Alarm test |
| Alarm-Alarm! | A program notifying an emergency or a natural disaster. |
USING THE C 715 - TUNER MODE
LISTENING TO DAB
Until now, analogue radio signals such as FM or AM have been subject to numerous kinds of interference on their way from the transmitter to your radio. These problems were caused by mountains, high-rise buildings and weather conditions. With Digital Audio Broadcast (DAB), you can now receive CD-like quality radio programs without any annoying interference and signal distortion. You get far more robust reception and virtually hiss or crackle free sound with DAB as long as you are within a good coverage area.
With DAB, the listener can scroll through a list of available stations - then instantly tune to the station of his choice. There is no need either to remember channel frequencies. All broadcasts are selected by simply selecting the service name.
ABOUT DAB ANTENNA
Connect the supplied F-type DAB antenna to the DAB antenna input. The supplied antenna is for internal use only. Extend the lead. Fix it to the wall in a vertical direction. The strength of the incoming signal can be shown on the VFD by pressing the [TUNE MODE/SELECT] button. The more segments are visible in the lower display line, the stronger the signal. By changing the position of the antenna, you can increase the signal strength. You can also opt for an external antenna. Consult an antenna professional for more information.
DAB OPERATION
Follow the steps below to tune in to DAB broadcast.
1 Press [SOURCE] button repeatedly until FM/AM/DAB mode.
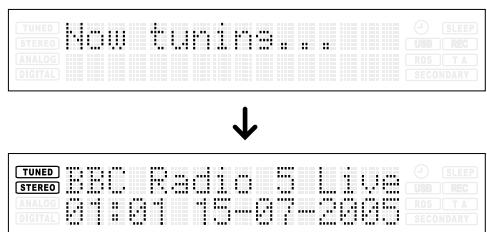
2 Toggle [BAND] button to select DAB mode. The C 715 will initialize. The VFD will show the following messages.

3 After the initialization process, the C 715 will perform an automatic scan for available local broadcast services. This sequence cannot be interrupted. During the sequence, the following message will be visible on the VFD.

The arrows show the progress of the sequence. On the right top side, you will see how many digital stations have been found.
4 After broadcast services are found, the channels are listed in alphanumeric order.
If no broadcast services can be found, please check that the DAB antenna is connected correctly and if your area is covered by DAB.
AUTO TUNE
For quick scanning of available broadcast services, you can scan new channels automatically by pressing SR 7's [AUTO TUNE] key.
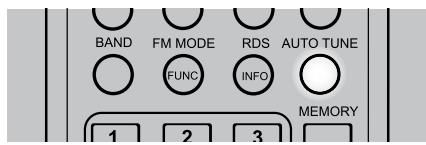
Press and hold [AUTO TUNE] for more than 2 seconds to activate international search.
CHANNEL LIST
Follow the steps below to tune in and listen to the channels found by the C 715.
1 Press [SOURCE] button repeatedly until FM/AM/DAB mode.
2 Toggle [BAND] button to select DAB mode.
3 Press [TUNE/TIME] button to scroll through the list of available channels. The upper display line of the VFD will display the current channel. The lower display line shows the next station.

4 Press [TUNE MODE/SELECT] to select the desired channel. The channel is tuned in and channel information is displayed.
NOTE
It can occur that one of the channels in your list is temporarily not available. A "?" symbol will be visible in the front of the station name to indicate such station. If you select this channel, "No stations Available" will be displayed in the VFD.
SECONDARY SERVICE
Secondary service is a part-time program transmitted as a side channel of the primary station. Check broadcasting schedule if you want to listen to secondary stations.

When you listen to primary stations that include secondary services (stations), "SECONDARY" blinks in the VFD. When you listen to the secondary station, the "SECONDARY" icon is illuminated in the VFD.

FUNCTION CONTROL
In DAB mode, there are four system options for FUNCTION control namely Station order, Preset tune, DRC value and Manual tune.
STATION ORDER
Use station order to set the sequence in which the stations are listed. There are three orders - Favorite Station, Alphanumeric and Active station.
1 While listening to DAB broadcast, press [FUNCTION/FM MODE].

2 Toggle [TUNE/TIME] until "Station order" is shown in lower line of the VFD.

3 Press [TUNE MODE/SELECT] – the current option is shown in the upper line of the VFD.

4 Toggle [TUNE/TIME] until the desired option is shown in lower line of the VFD. Press [TUNE MODE/SELECT].
FAV STATION
The C 715 memorizes the top ten stations you listen as you tune in stations. They will be listed at the top of the channel list. A favorite station in the channel list has a heart-shaped icon [♥] illuminated after the station name on the upper line of the VFD.
ALPHANUMERIC
This is the default setting. Channels are listed by name with numbers first and then alphabetically by letters in the channel name.
ACTIVE STATION
Active stations are listed at the top of the channel list. Those channels that are in list but have no service in the area will be displayed last in the channel list.
♥→PRESET
This option takes your top ten Favorite channels and assigns them to preset numbers 1-10. This option is available only when "Fav Station" option is selected.
PRESET TUNE
Use this option to select a DAB preset station.
1 While listening to a DAB broadcast, press [FUNCTION/FM MODE].
2 Toggle [TUNE/TIME] until "Preset tune" is displayed in the lower line of the VFD.

3 Press [TUNE MODE/SELECT]. The current tuned station is shown.
4 Toggle [TUNE/TIME] until the desired preset station is displayed. "Preset Memory" is shown - " " is the preset number allocation while "Memory" indicates that there is a stored DAB station for the particular preset number. If there is no stored DAB station in a preset number, "Preset Empty" will be shown instead.

5 Press [TUNE MODE/SELECT].
DRC VALUE
The level of compression of stations can be set to eliminate the differences in dynamic range or sound level between radio stations. Popular music would normally be more compressed than classical music, resulting in possible different audio levels when changing from one station to the other. Setting the DRC to "0" means no compression, "1/2" indicates medium compression and "1" shows maximum compression. No compression is recommended, especially for classical music.
1 While listening to a DAB broadcast, press [FUNCTION/FM MODE].
USING THE C 715 - TUNER MODE
2 Toggle [TUNE/TIME] until "DRC value" is displayed in the lower line of the VFD. Press [TUNE MODE/SELECT].


3 Toggle [TUNE/TIME] until the desired DRC level is displayed.

4 Press [TUNE MODE/SELECT].
MANUAL TUNE
This option allows you to manually tune in a channel and view a continuously updated display of the strength of the signal. You can also use manual tuning to assist in positioning the antenna for best reception of a specific station.
1 While listening to a DAB broadcast, press [FUNCTION/FM MODE].
2 Toggle [TUNE/TIME] until "Manual tune" is displayed in the lower line of the VFD. Press [TUNE MODE/SELECT].

3 Toggle [TUNE/TIME] until the desired channel is displayed.
4 Press [TUNE MODE/SELECT].The signal strength indicator is displayed.
While viewing the indicator, adjust or reposition the DAB antenna until the best reception is indicated.

5 Press [TUNE MODE/SELECT] to cancel Manual tune and resume normal reception.
INFORMATION SETTINGS
While listening to a DAB broadcast, the type of information displayed in the lower line of the VFD can be varied. Toggle [INFO/RDS MODE] to step through the following display options:
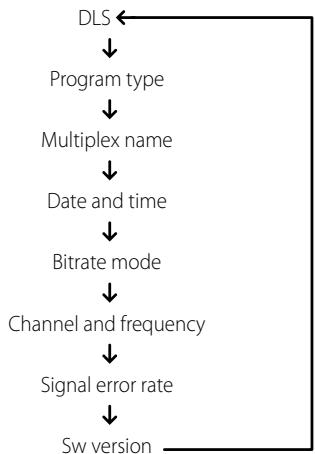
DLS
Dynamic Label Segment (DLS) is the scrolling text supplied by the broadcasting station. It may contain information on music titles or details regarding the program or station.
PROGRAMTYPE
This is a description of the type of broadcast supplied by the station, such as Pop, Rock, Drama and the likes.
MULTIPLEX NAME
The name of the Multiplex that is broadcasting the program is displayed.
DATE AND TIME
The current time and date as supplied by the DAB station are displayed – the time should always be accurate. The C 715's clock will automatically adjust according to the time supplied by the DAB station.
IMPORTANT NOTICE
The C 715 clock will automatically adjust to the tuned DAB station's supplied clock time data. If the DAB station time is incorrect, the C 715's clock will also be inaccurately adjusted; the timer operation will also get affected as it will follow the adjusted but inaccurate time. To prevent the C 715 clock from automatically re-adjusting to a DAB station time, press and hold [RDS MODE] for at least 3 seconds - "DAB time off" will be shown in the VFD. To automatically synchronize the C 715's clock to a DAB station time, press and hold [RDS MODE] button again for at least 3 seconds - "DAB time on" will be shown in the VFD.
BITRATE MODE
This displays the bitrate of the currently tuned DAB broadcast.
CHANNEL AND FREQUENCY
The channel and frequency of the currently tuned DAB broadcast are displayed.
SIGNAL ERROR RATE
This displays the digital error rate (0 to 99) of the currently tuned channel - the lower the figure, the better the quality of the received broadcast.
SW VERSION (SOFTWARE VERSION)
The version number of the installed software is displayed.
LISTENING TO EXTERNAL SOURCES
When appropriately connected to the applicable C 715 input, one can listen to external sources such as a VCR, Media Player (MP), Tape Recorder and other auxiliary components.
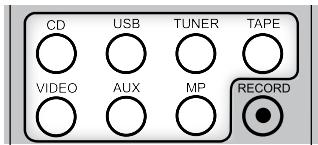
Toggle the [SOURCE] button to select [TAPE], [VIDEO], [AUX] or [MP] mode. Refer to the above sections about "Identification of Controls - Front Panel" and "Identification of Controls - Rear Panel" for additional information on these external sources.
SETTING THE CLOCK
1 Press the [TIME MODE] button. Toggle [TIME MODE] to step through the following modes:
2 At "Current time" mode, toggle [TUNE /TIME] to set the current hour - "hour" value blinks. Press [TUNE MODE/SELECT].
3 "Minute"value blinks. Press [TUNE/TIME] to set the current minute. Press [TUNE MODE/SELECT]. The clock starts from "00" seconds.
NOTES
The C 715 uses the 24 hour "military" clock.
- When no action is taken for 1 minute, the time adjust mode is cancelled.
To cancel time mode setting, press [STOP].
SETTING THE ON/OFF TIMER
Adjust the clock before setting the timer.
1 Toggle [TIME MODE] until "On time" is displayed in the VFD. At "On time" mode, "hour" value blinks.
2 Toggle [TUNE/TIME] to set the desired "hour" setting. Press [TUNE MODE/SELECT].
3 "Minute" value blinks. Press [TUNE/TIME] to set the desired "minute" setting. Press [TUNE MODE/ SELECT].
4 "Off time" appears on the VFD and "hour" value blinks. Repeat steps 2 and 3 above to set desired "Off time".
5 Press [TUNE/TIME] to select the SOURCE where these timer settings will be applied.
6 Press [TUNE MODE/SELECT]. Timer settings are now stored in the memory.
USING THE C 715 - EXTERNAL SOURCES AND TIMER
When pressed, the TIMER button in the SR 7 remote control will activate several timer modes. Toggle [TIMER] to step through the following modes:

TIMER DAILY
1 After setting up "On time" and "Off time" values, toggle [TIMER] button until "Timer Daily" appears. A timer indicator (red "clock face" icon) will illuminate in the VFD.
2 Prepare for the timer playback by adjusting the volume, tune in to a station, load a disc and other applicable setup conditions.
3 Turn OFF the C 715 by pressing the POWER button.
NOTE
When timer is activated and the C 715 at standby mode, the indicator above the POWER button interchangeably blinks from amber to blue. Everyday when the preset "On time" is reached, the C 715 will turn ON. When the "Off time" is reached, the C 715 will return to standby.
TIMER RECORDING
You can set up the C 715 to record a program via an external USB device at a desired time. Make sure to connect the external USB device into the front panel's USB input beforehand.
1 After setting up "On time" and "Off time" values, toggle [TIMER] button until "Timer REC once" or "Timer REC daily" appears. Timer indicator and "RECORD" will illuminate in the VFD.

2 Prepare for the timer recording by tuning to the desired station.
3 Turn OFF the C 715 by pressing the POWER button.
NOTE
When timer is activated and the C 715 at standby mode, the indicator above the POWER button interchangeably blinks from amber to blue. One minute before the preset "On time" is reached, the C 715 will turn ON and then starts recording when the "On time" is reached. When the "Off time" is reached, the C 715 will return to standby.
TIMER OFF
Toggle [TIMER] to select "Timer Off" if you do not want to activate timer operations. The timer indicator will be extinguished from the VFD.
TONE/BALANCE/DIMMER
Toggle this button to adjust tone, balance and dimmer settings in combination with [VOLUME] knob. Toggle [TONE/BAL/DIMMER] to step through the following modes:
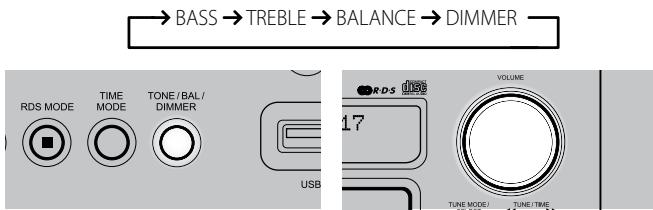
Select the feature you want to adjust and within 3 seconds, turn [VOLUME] clockwise or counterclockwise to change the level settings.
TONE CONTROLS - TREBLE AND BASS
Treble and bass controls only affect the low bass and high treble leaving the critical midrange frequencies free of coloration.
These controls allow one to tweak on-the-fly, the frequency response of the source during playback.
Maximum and minimum values for both Tone Control levels are + / - 10dB
BALANCE
The BALANCE control adjusts the relative levels of the left and right speakers. The "BALANCE CENTER" position provides equal level to the left and right channels. Rotating the control clockwise moves the balance towards the right. Rotating the control anti-clockwise moves the balance to the left.
DIMMER
Toggle to either reduce or restore normal VFD brightness.
OTHER SR 7 FEATURES
Most of the buttons on the remote control handset have the same effect as the corresponding buttons on the front panel of the C 715. In addition, the handset is equipped with some extra buttons like the following function keys.
NUMERIC KEY PAD
Using the direct-entry numeric keypad (0 to 9) causes the C 715 to jump directly to the beginning of a numbered track and commence play. Thus, to play Track 5, simply press "5". To play Track 20, press "2" and "0".
REPEAT
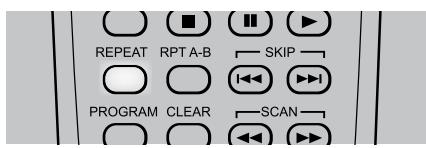
To repeat the playback of a particular track or file, press the SR 7's [REPEAT] key once. Toggle the [REPEAT] key to repeat all the tracks, files, folders or until repeat mode is turned OFF.

REPEAT A-B
To repeat a sequence, implement the following procedures:
1 Press [RPT A-B] at your chosen starting point - "RPT A-B" is shown in the VFD. "B" is blinking as it awaits the end point of the repeat sequence.
2 Press [RPT A-B] again at your chosen end point. The repeat sequence begins.
3 Press [RPT A-B] again to cancel the sequence.
USING THE C 715 - OTHER FEATURES
RANDOM PLAY
Press [RANDOM] key during playback or stop mode. "Random Play" is shown in the VFD. Playback of the first randomly selected track or file automatically begins. Press [RANDOM] again to return to normal playback.
TIME
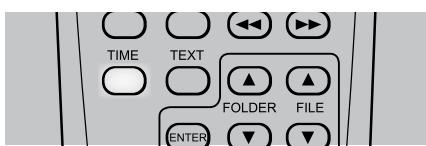
During playback mode, toggle [TIME] button to alternatively display the elapsed time or remaining time of the current track/file.
TEXT
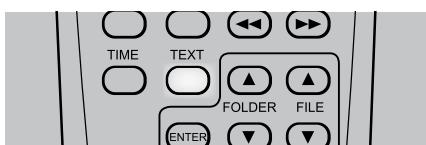
During MP3/WMA playback mode, toggle [TEXT] to display information (if available) about the current file.
DEFAULT DISPLAY (SCROLLING)

INFORMATION DISPLAY
MUTE
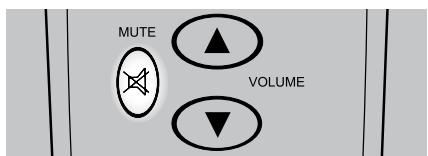
Use the [Mute] key to silence all channels completely. Muting is always available regardless of the source selections.
Adjusting the VOLUME via the SR 7 or the front-panel knob automatically releases the mute function. Pressing [MUTE] again will also resume the current volume level.
SLEEP
The Sleep Mode timer will switch the C 715 to Standby mode automatically after a preset number of minutes.
1 Toggle the SR 7's [SLEEP] button to select desired Sleep time - each press decreases the sleep time in 10-minute increments from 90 to 10 minutes.
2 To cancel the sleep mode, continue pressing SR 7's [SLEEP] button until "Sleep" display is turned OFF in the VFD.
NOTES
The VFD is dimmed when you set the Sleep timer.
- To check remaining sleep time, press [SLEEP] once – the remaining time will be displayed for 3 seconds and then return to normal display.
| CONDITION | POSSIBLE CAUSES | POSSIBLE SOLUTIONS |
| No power. | ·The power cord is disconnected. | ·Plug the power cord into the wall outlet securely. |
| No sound. | ·Power AC lead unplugged or power not switched on. | ·Check if AC lead is plugged in and power switched on. |
| ·Mute on. | ·Switch off Mute. | |
| ·Headphones inserted. | ·Unplug the headphones. | |
| No sound one channel. | ·Balance not centered. | ·Center balance control. |
| ·Speaker not properly connected or damaged. | ·Check connections and speakers. | |
| Weak bass/diffused stereo image. | ·Speakers wired out-of-phase. | ·Check connections to all speakers in the system. |
| The C 715 does not start playback. | ·No disc is inserted. | ·Insert a disc. |
| ·The disc is loaded upside down. | ·Reload the disc with the label side UP. | |
| ·The disc is too dirty. | ·Clean the disc. | |
| ·For external USB source, no WMA/MP3 files loaded. | ·Check if there are MP3/WMA files loaded in the external USB device. | |
| Disc playback sound inadvertently skips. | ·The C 715 is subject to vibration or physical shock from external sources. | ·Change the installation location. |
| ·Disc has too many scratches or has some unwarranted imperfections/deformation. | ·Replace disc. | |
| Noisy reception, hiss. | ·Weak signal. | ·Check station tuning. Adjust or replace antenna. |
| Reception with whistling, buzzing noise. | ·Interference from other computers, games consoles. | ·Check station tuning. Switch off or move the source of electrical noise. |
| C 715 does not respond to SR 7 remote control. | ·Batteries are flat or incorrectly inserted. | ·Check batteries. |
| ·IR transmitter window on remote or IR receiver window on C 715 is obstructed. | ·Check IR windows and ensure clear line-of-sight from remote to C 715. | |
| ·C 715 front panel is in very bright sunlight or ambient light. | ·Reduce sunlight/room lighting. |
NOTES ON DISCS
HANDLING DISCS
Do not touch the playback side of the disc. Hold the disc by the edges so that fingerprints do not get on the surface. Never stick paper or tape on the disc.


STORING DISCS
After playing, store the disc in its case. Do not expose the disc to direct sunlight or sources of heat and never leave it in a parked car exposed to direct sunlight.
CLEANING DISCS
Fingerprints and dust on the disc can cause poor picture quality and sound distortion. Before playing, clean the disc with a clean cloth. Wipe the disc from the center out.
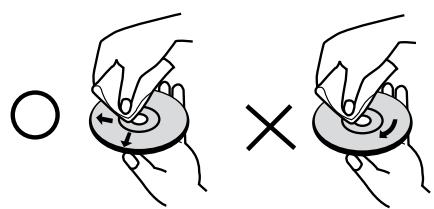
Do not use strong solvents such as alcohol, benzine, thinner, commercially available cleaners, or anti-static spray intended for older vinyl records.
SPECIFICATIONS
AMPLIFIER SECTION
| Power output Stereo Mode | 25W (6 ohms within rated distortion, 1kHz) | |
| IHF dynamic power (6 ohms) | 28W | |
| Total harmonic distortion at rated power | 0.15% | |
| Damping factor (6 ohms) | >102 | |
| Input sensitivity and impedance (Tape IN) | 370mV/27kΩ | |
| Frequency response | +1 dB/-3dB (Ref. 1 kHz, 10Hz - 80kHz) | |
| Signal/noise ratio | 95dB (Ref. rated power/ 6 ohms A-WTD) | |
| Signal/noise ratio | 80dB (Ref. 1W / 6 ohms A-WTD) | |
| TUNER SECTION | ||
| AM SECTION | ||
| Tuning range | 520kHz -1710kHz (North America version, 10kHz steps) | |
| 522kHz -1629kHz (Europe version, 9kHz steps) | ||
| Usable sensitivity | 60dBuV | |
| S/N ratio | 40dB | |
| Total Harmonic Distortion | 1.5% | |
| Selectivity | 25dB | |
| Frequency response | -6dB (Ref. 400Hz, 80Hz - 2.2kHz) | |
| FM SECTION | ||
| Tuning range | 87.50MHz - 108MHz (50kHz steps) | |
| Usable sensitivity, MONO | 10dBuV | |
| S/N Ratio MONO | 60dB | |
| S/N Ratio STEREO | 55dB | |
| Total Harmonic Distortion, MONO | 0.3% | |
| Total Harmonic Distortion, STEREO | 0.5% | |
| Frequency response | -3dB (Ref. 1 kHz, 30Hz - 12kHz) | |
| Channel Separation | 35dB | |
| RDS decode sensitivity | 29dBuV | |
| DAB SECTION | ||
| Tuning range | Band III 174MHz - 240MHz | |
| Maximum signal | -3dBm | |
| Sensitivity | -96dBm | |
| Adjacent Channel Rejection | -35dB | |
| Audio Output Stereo | 2.5Vp-p | |
| Optical S/PDIF | 24 bit sample resolution | |
| 48kHz sample rate | ||
| CD SECTION | ||
| Output level | 1.16V | |
| Frequency response (ref. 0dB 1kHz, 20Hz-20kHz) | +1dB | |
| Total harmonic distortion (ref. 1kHz,VIDEO OUT) | 0.04% | |
| Signal/Noise ratio (A-weighted, ref. 1kHzVIDEO OUT) | 100dB | |
| Channel balance (ref. 0dB 1kHz) | 0.5dB | |
| Dynamic range (A-WTD,VIDEO OUT) | 82dB | |
| Channel separation | 78dB (1kHz) | |
| 78dB (10kHz) | ||
| PHYSICAL SPECIFICATIONS | ||
| Dimensions (W x H x D) | 213 x 103 x 324 mm (Net) | |
| 213 x 116 x 362 mm (Gross) | ||
| Net weight | 4.5kg | |
| Shipping weight | 6.0kg | |
Note: Gross dimensions include feet, extended buttons and rear panel terminals.
Specifications are subject to change without notice. For updated documentation and features, please log onto www.NADelectronics.com for the latest information about C 715 DAB.

www.NADelectronics.com
©2007 NAD ELECTRONICS INTERNATIONAL
A DIVISION OF LENBROOK INDUSTRIES LIMITED