
T532 - Media player NAD - Free user manual and instructions
Find the device manual for free T532 NAD in PDF.
User questions about T532 NAD
0 question about this device. Answer the ones you know or ask your own.
Ask a new question about this device
Download the instructions for your Media player in PDF format for free! Find your manual T532 - NAD and take your electronic device back in hand. On this page are published all the documents necessary for the use of your device. T532 by NAD.
USER MANUAL T532 NAD
WARNING : TO REDUCE THE RISK OF FIRE OR ELECTRIC SHOCK, DO NOT EXPOSE THIS PRODUCT TO RAIN OR MOISTURE
CAUTION
THIS DVD RECEIVER EMPLOYS A LASER SYSTEM.
TO ENSURE PROPER USE OF THIS PRODUCT, PLEASE READ THIS OWNER'S MANUAL CAREFULLY AND RETAIN FOR FUTURE REFERENCE, SHOULD THE UNIT REQUIRE MAINTENANCE, CONTACT AN AUTHORIZED SERVICE LOCATION-SEE SERVICE PROCEDURE.
USE OF CONTROLS, ADJUSTMENTS OR THE PERFORMANCE OF PROCEDURES OTHER THAN THOSE SPECIFIED MAY RESULT IN HAZARDOUS RADIATION EXPOSURE.
TO PREVENT DIRECT EXPOSURE TO LASER BEAM, DO NOT TRY TO OPEN THE ENCLOSURE. VISIBLE LASER RADIATION WHEN OPEN THE ENCLOSURE. DO NOT STARE INTO BEAM.
THE APPARATUS SHALL NOT BE EXPOSED TO DRIpping OR SPLASHING AND THAT NO OBJECTS FILLED WITH LIQUIDS, SUCH AS VASES, SHALL BE PLACED ON THE APPARATUS.
WARNING : CHANGES OR MODIFICATIONS NOT EXPRESSLY APPROVED BY THE PARTY RESPONSIBLE FOR COMPLIANCE COULD VOID THE USER'S AUTHORITY TO OPERATE THE EQUIPMENT.
RECORD YOUR MODEL NUMBER (NOW, WHILE YOU CAN SEE IT)
The model and serial number of your new DVD player are located on the back of the DVD player cabinet. For your future convenience, we suggest that you record these numbers here:

MODEL NO.
SERIAL NO.

This product is manufactured to comply with the radio interference requirements of EEC DIRECTIVE 89/336/EEC, 93/68/EEC and 73/23/EEC.
INTRODUCTION
Safety Precautions 2
Table of Contents 3
Identification of Controls 4-7
Front Panel/Display window 4
Rear Panel 5
Remote Control 6
Preparing the Remote Control 7
Operating with the Remote Control 7
Notes on Discs 8
CONNECTIONS
Connecting to Surround Sound System. 9-11
Enjoying Dolby Digital Sound 9
Enjoying Dolby Pro Logic Surround Sound 10
Enjoying 2 Channel Digital Stereo Sound 11
Enjoying DTS Sound 11
Connecting to an Stereo System 12
Connecting to a TV 13
INITIAL SETTINGS
Selection of initial settings 14
Selecting disc Languages 15
Selecting rating level and password 16-17
Selecting Country Code 17
Selecting TV Aspect. 18
Selecting Menu Language 19
Selecting Digital Audio Output 20
Others 21
Table of Languages and Their Abbreviations 22
Table of Country Codes and Their Abbreviations 22
BASIC OPERATIONS
BasicPlayback 23-24
Special Playback 25-26
Still Picture 25
Frame Advance 25
Skipping chapters and tracks forward or back 25
Scanning at High Speed 26
Playing in Slow-Motion 26
OPERATION USING (GRAPHICAL USER INTERFACE) MENU ICONS
General Information about GUI menu icons 27
Detailed description of each GUI menu icon 28
ADVANCED OPERATION
Using a title menu 29
Using a DVD menu 29
Memorizing Settings for Viewed DVDs (Last Condition Memory) 30
Changing subtitle language 31
Changing audio soundtrack language 31
Viewing from another angle 32
Producing a 3D Surround effect 32
Repeat Play 33
Storing markers in memory to be viewed (listened to) again 34
Zoom Feature 35
Random Play 35
Program Play 36
Playback with MP3 37-38
REFERENCE
Disc Requirements/Copyright Information 39
Before Calling Service Personnel 40
Specifications 41

VIDEOn

DIGITAL AUDIO

DIGITALVIDEO


DIGITAL OUT

Surround
Sound

DOLBY
D L G
ITALAL
IDENTIFICATION OF CONTROLS
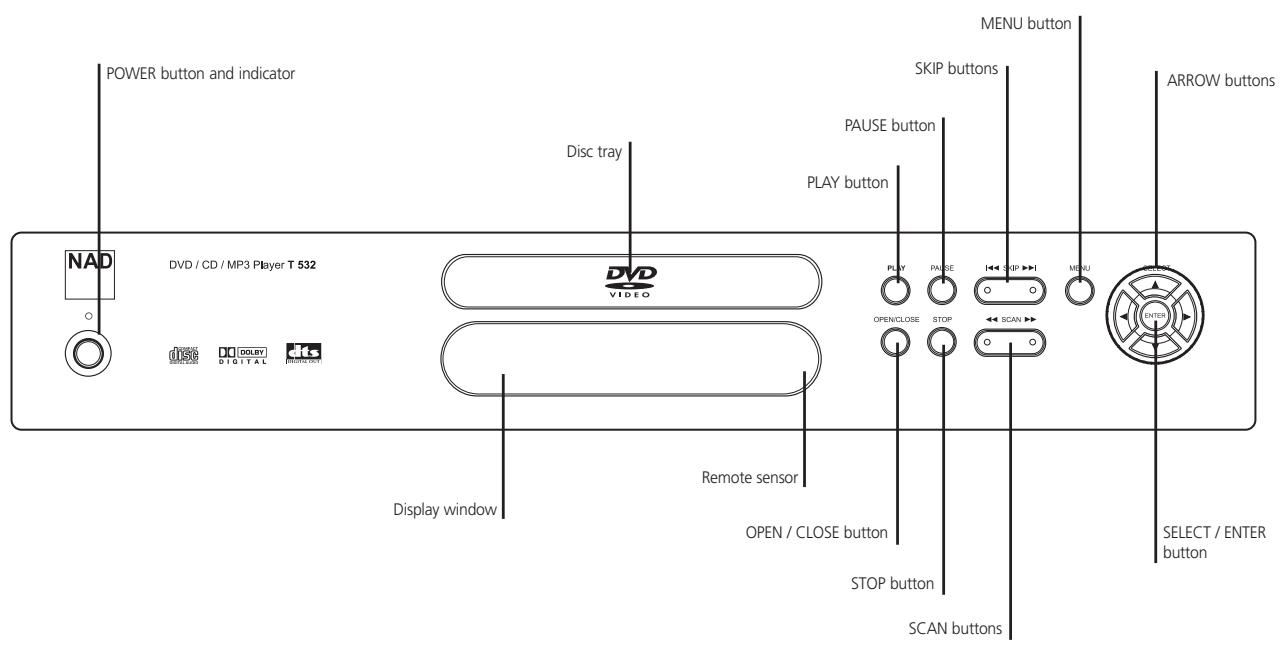
FRONT PANEL
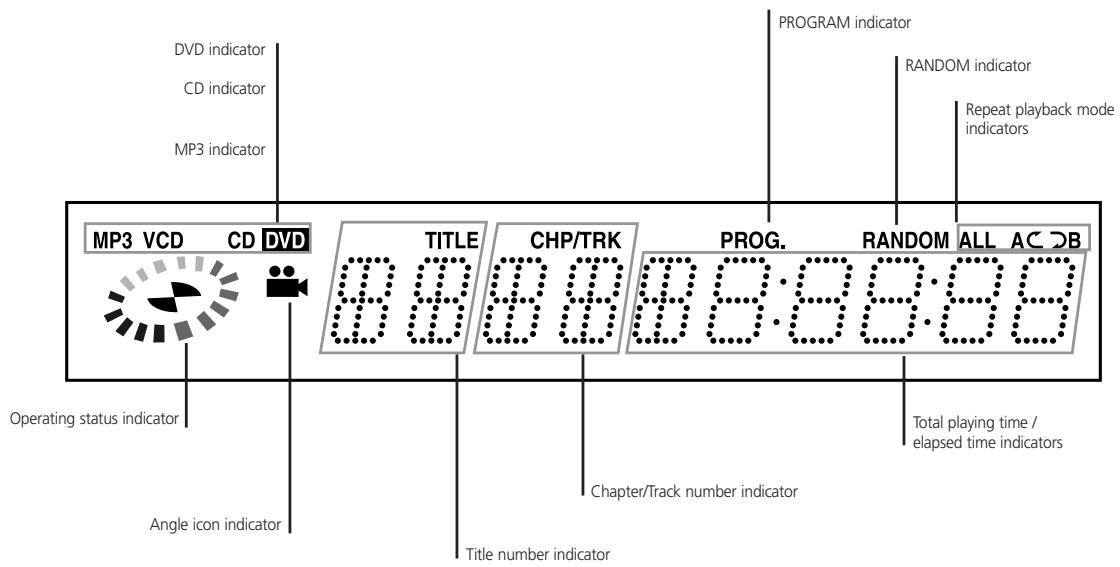
DISPLAY WINDOW
GB
REAR PANEL
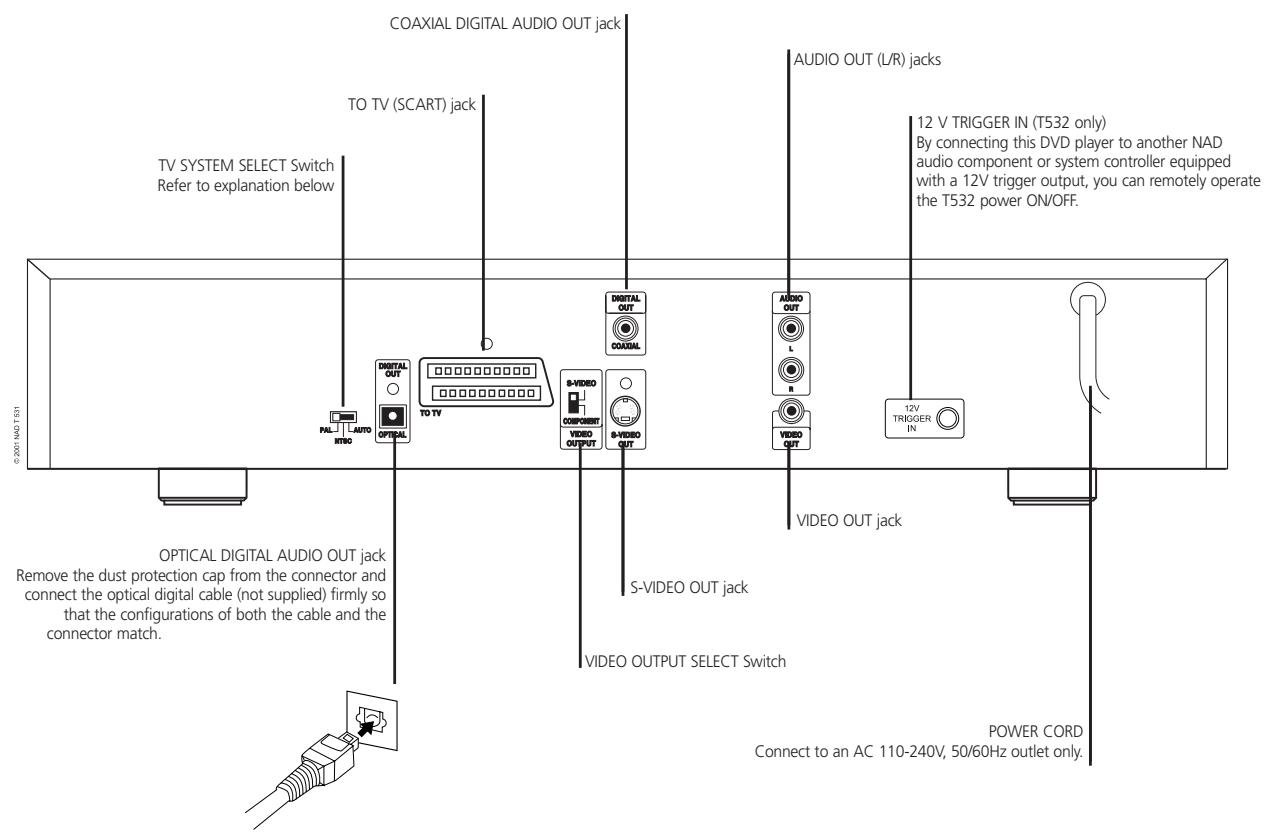
TV SYSTEM SELECT
You can enjoy NTSC or PAL discs by using your TV SYSTEM SELECT switch to choose the appropriate system.
If you try to play back PAL disc with NTSC-TV. The player will not playback the disc.
When the selected TV SYSTEM SELECT switch does not coincide with the system of your TV, normal colour picture may not be displayed.
Select the TV SYSTEM SELECT switch when the power is turned off.
When you playback NTSC disc with PAL-TV, some discs may produce black bands at the top and bottom of the screen.
| Position of TV SYSTEM SELECT switch | Connected TV | Available disc |
| PAL | PAL | NTSC/PAL DVD disc |
| NTSC | NTSC | NTSC DVD disc |
| AUTO | MULTI SYSTEM TV | NTSC/PAL DVD disc |
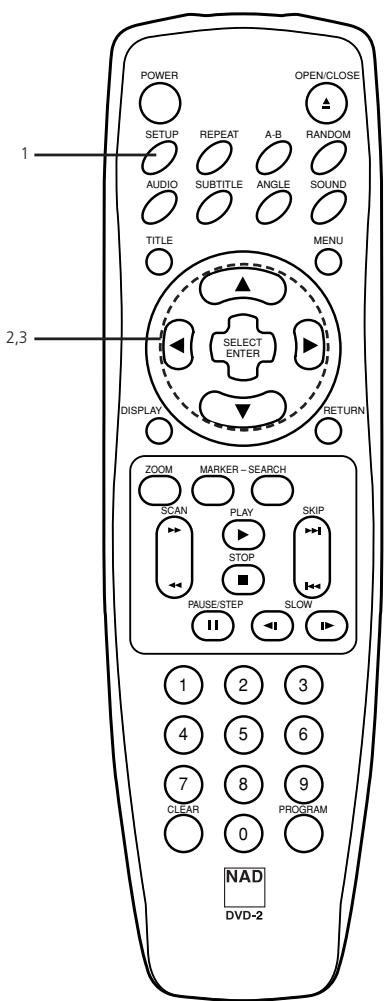
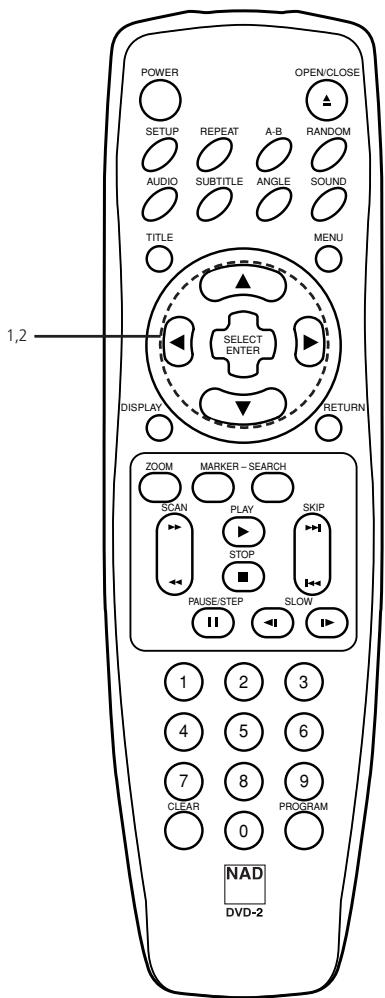
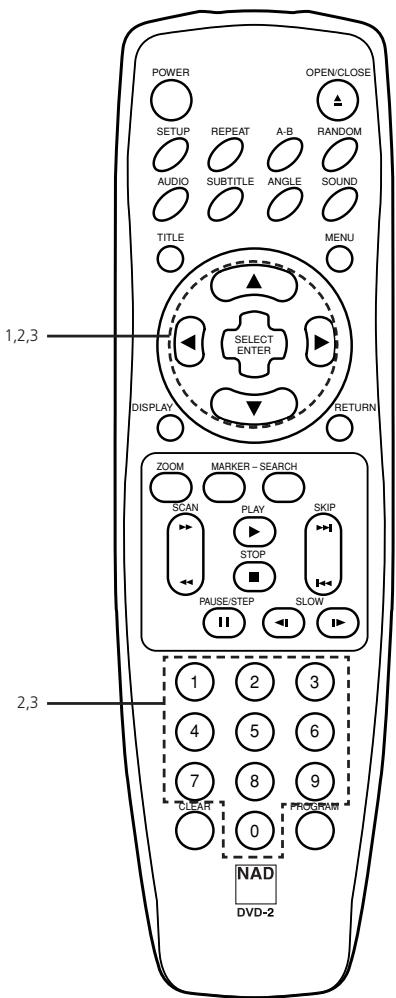
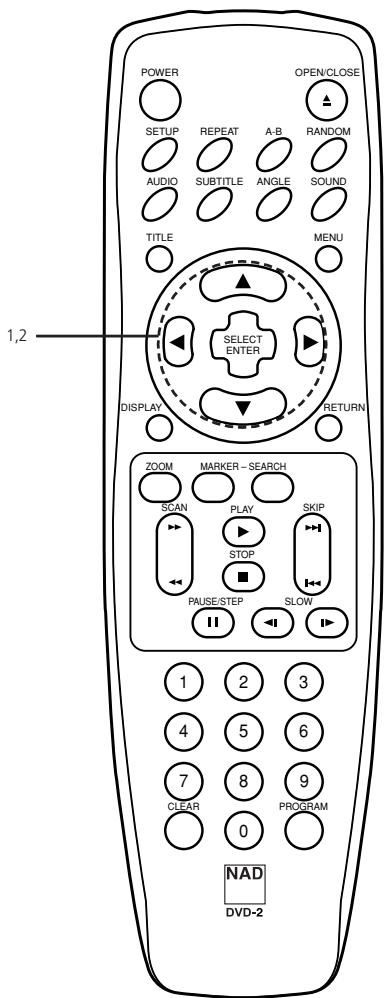
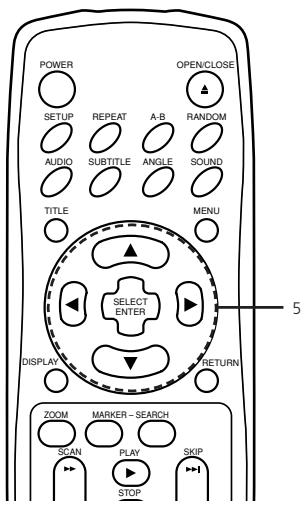
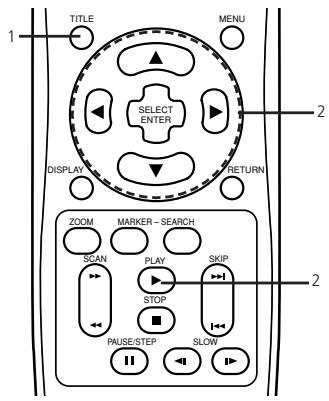
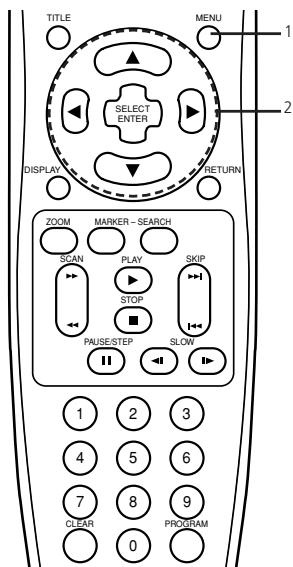
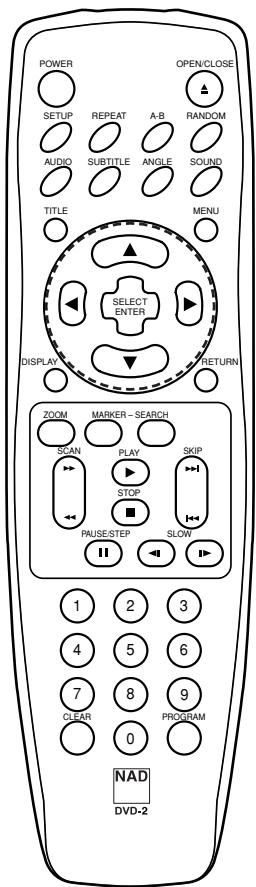
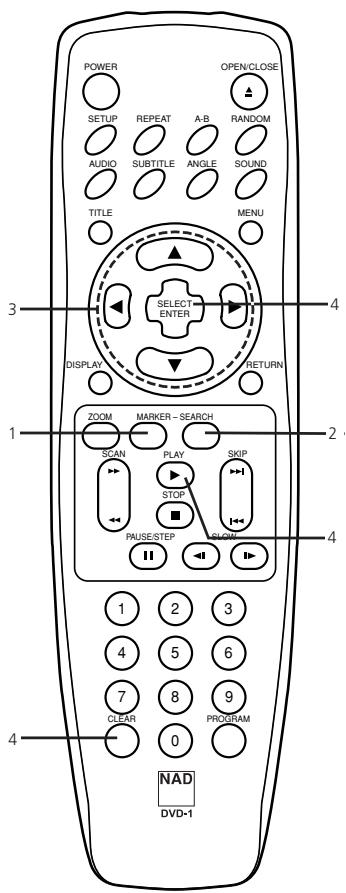
REMOTE CONTROL
You will find instructions for each of the remote control function in the appropriate sections of this instruction manual
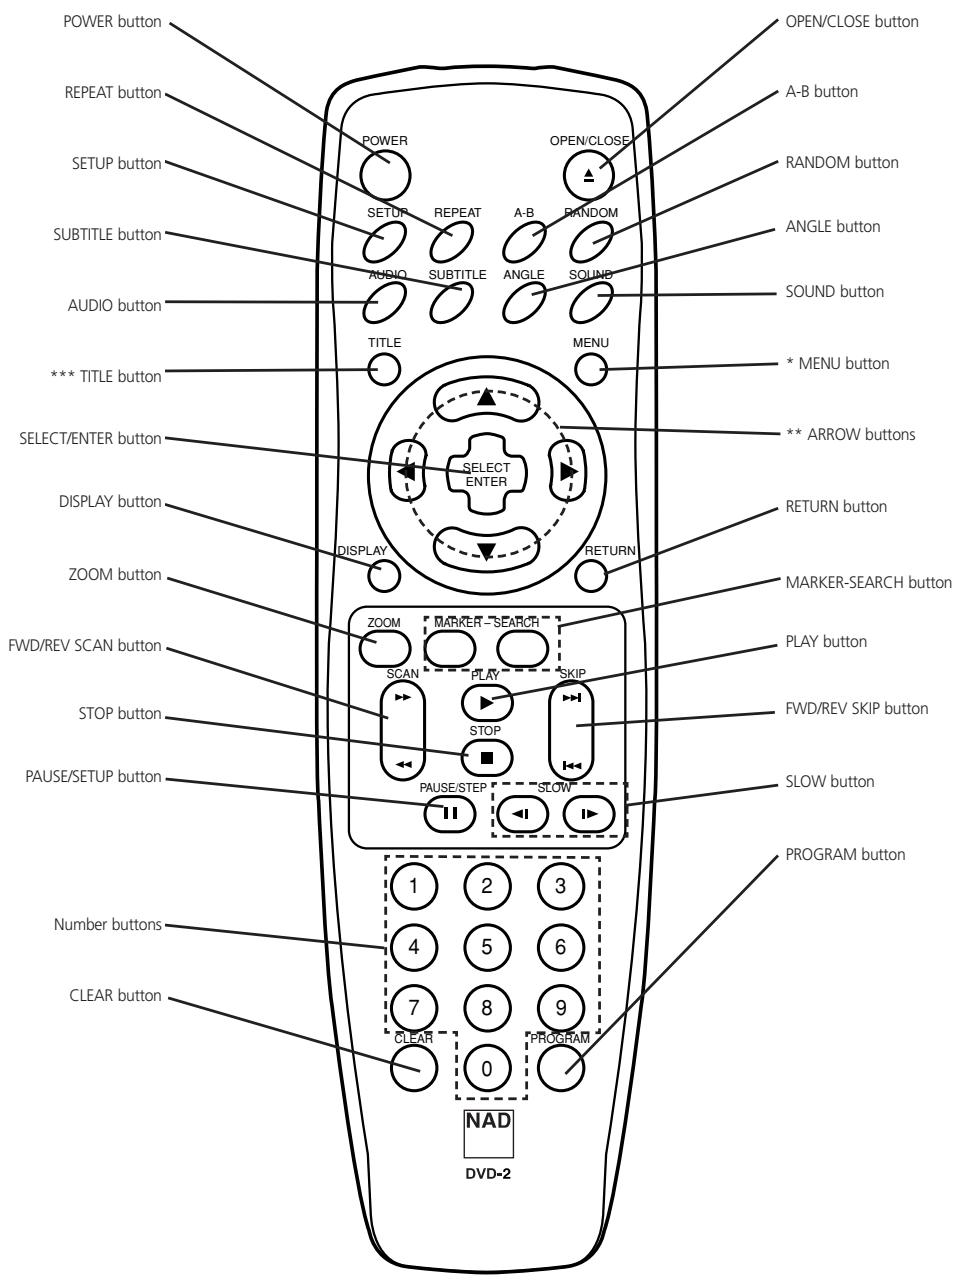
*MENU BUTTON
Use the MENU button to display the menu screen included on DVD video discs. To operate a menu screen, follow the instructions in Using a DVD Menu (page 29).
** DIRECTIONAL ARROW BUTTONS
(up, down, left, right) for use in high-lighting a selection on a GUI menu screen, TITLE and MENU screen.
***TITLE BUTTON
Use the TITLE button to display the title screen included on DVD video discs. To operate a menu screen, follow the instructions in Using a Title Menu (page 29).
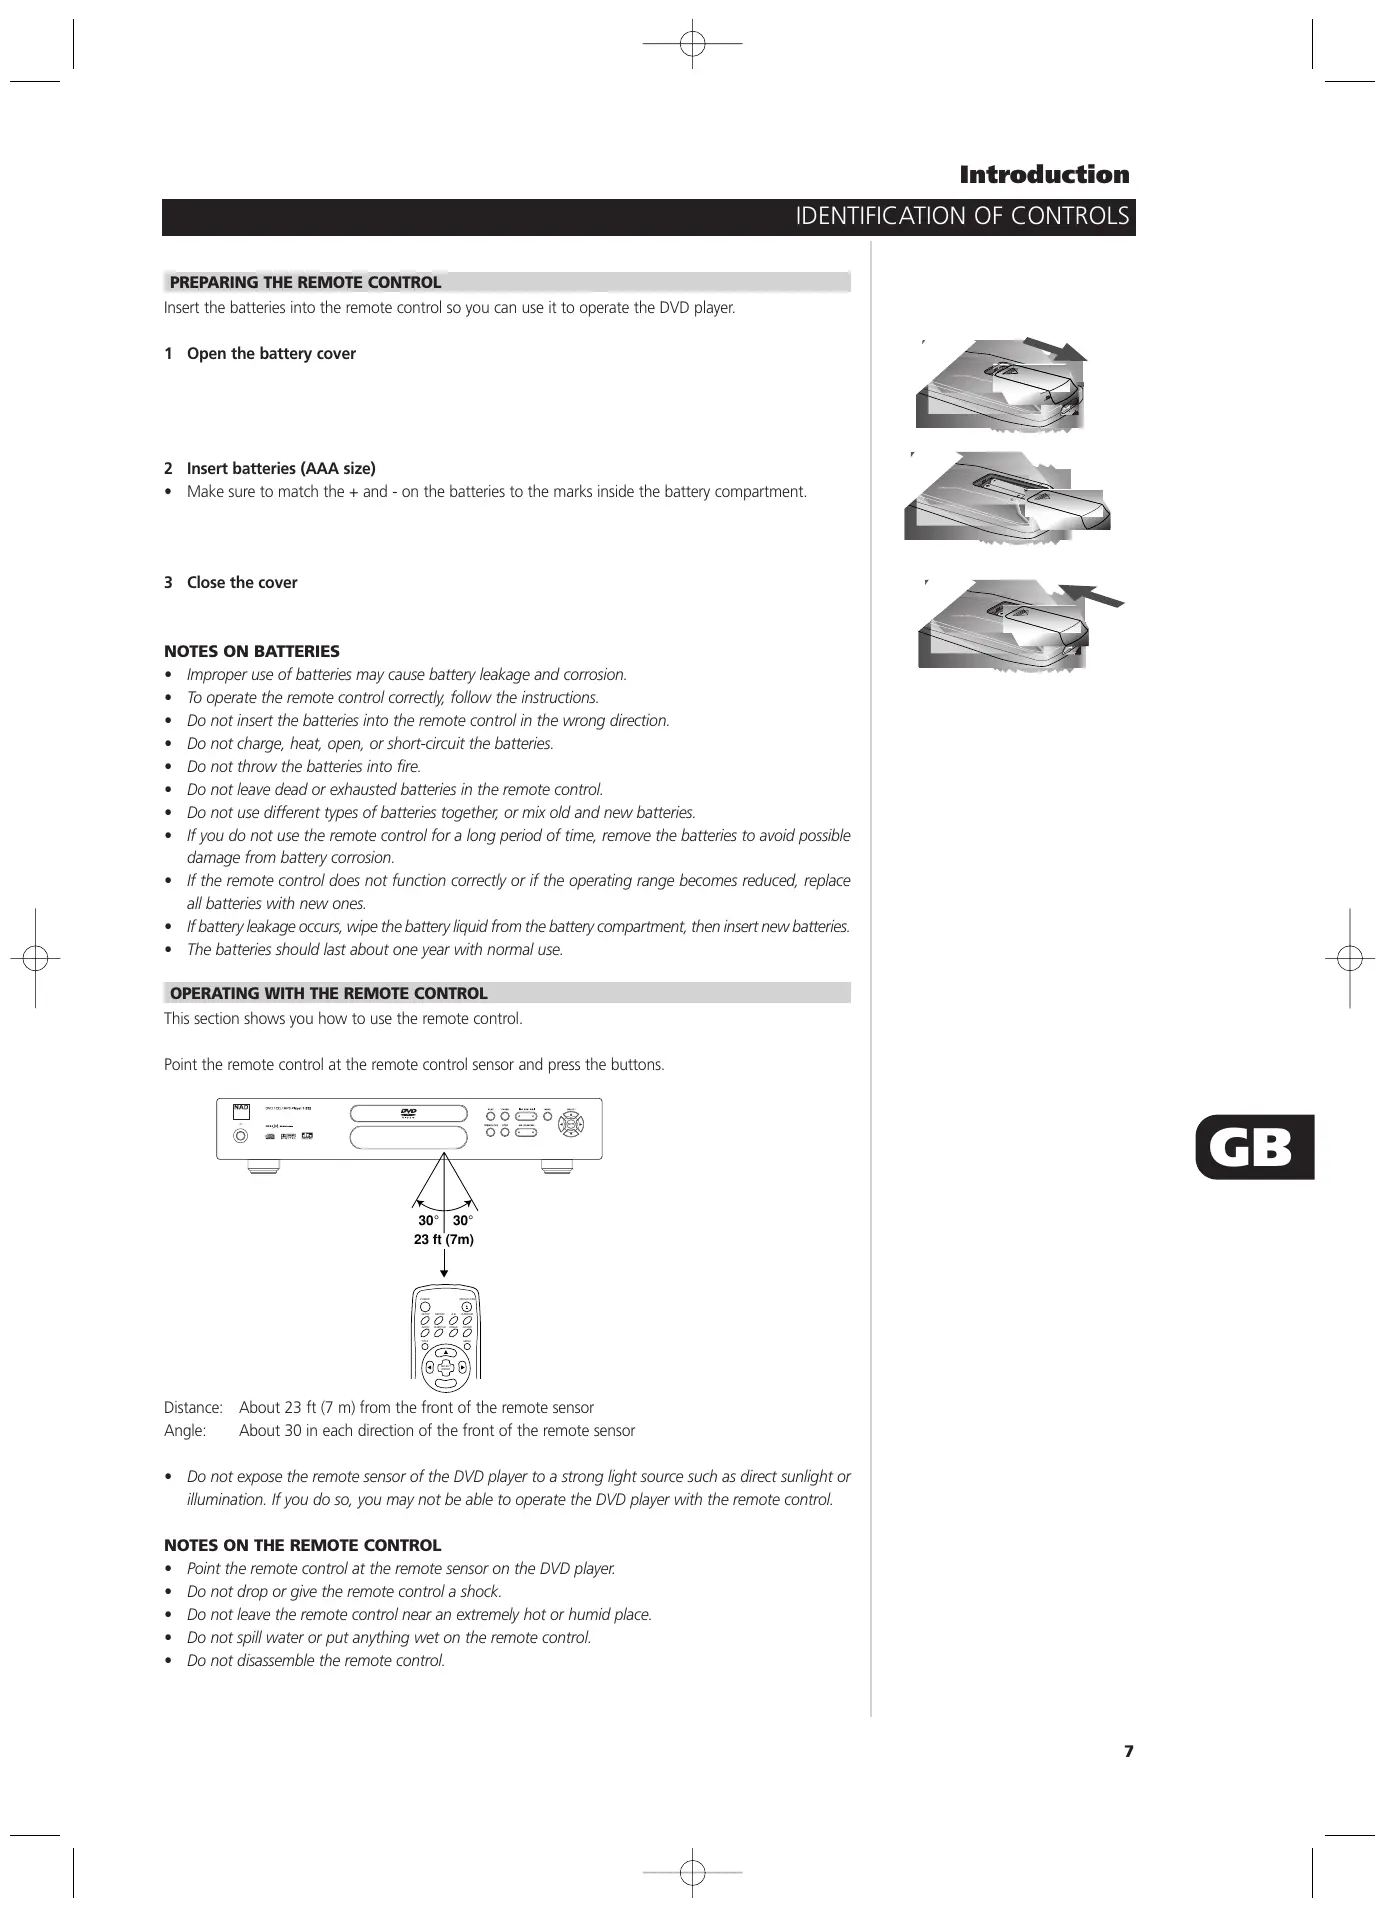
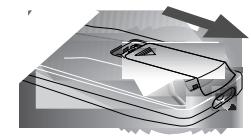
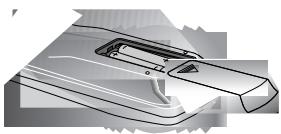
PREPARING THE REMOTE CONTROL
Insert the batteries into the remote control so you can use it to operate the DVD player.
1 Open the battery cover
2 Insert batteries (AAA size)
- Make sure to match the + and - on the batteries to the marks inside the battery compartment.
3 Close the cover
NOTES ON BATTERIES
- Improper use of batteries may cause battery leakage and corrosion.
- To operate the remote control correctly, follow the instructions.
- Do not insert the batteries into the remote control in the wrong direction.
- Do not charge, heat, open, or short-circuit the batteries.
- Do not throw the batteries into fire.
- Do not leave dead or exhausted batteries in the remote control.
- Do not use different types of batteries together, or mix old and new batteries.
- If you do not use the remote control for a long period of time, remove the batteries to avoid possible damage from battery corrosion.
- If the remote control does not function correctly or if the operating range becomes reduced, replace all batteries with new ones.
- If battery leakage occurs, wipe the battery liquid from the battery compartment, then insert new batteries.
- The batteries should last about one year with normal use.
OPERATING WITH THE REMOTE CONTROL
This section shows you how to use the remote control.
Point the remote control at the remote control sensor and press the buttons.
Distance: About 23 ft (7 m) from the front of the remote sensor
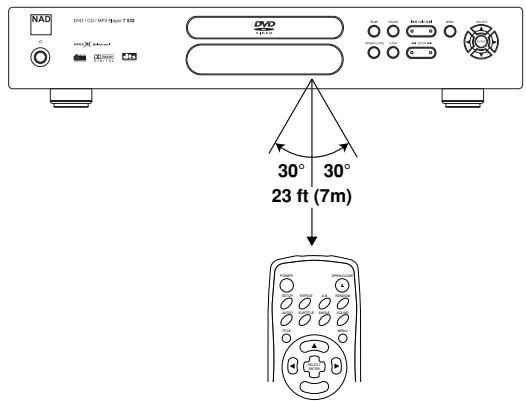
Angle: About 30 in each direction of the front of the remote sensor
- Do not expose the remote sensor of the DVD player to a strong light source such as direct sunlight or illumination. If you do so, you may not be able to operate the DVD player with the remote control.
NOTES ON THE REMOTE CONTROL
- Point the remote control at the remote sensor on the DVD player.
- Do not drop or give the remote control a shock.
- Do not leave the remote control near an extremely hot or humid place.
- Do not spill water or put anything wet on the remote control.
- Do not disassemble the remote control.

NOTES ON DISCS

O

X
This section shows you how to handle, clean and store discs.
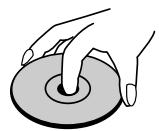
ON HANDLING DISCS
- Do not touch the playback side of the disc.
- Do not attach paper or tape to discs.
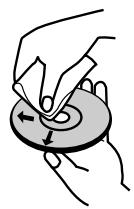
ON CLEANING DISCS
- Fingersprints and dust on the disc cause picture and sound deterioration. Wipe the disc from the centre outward with a soft cloth. Always keep the disc clean.
- If you cannot wipe off the dust with a soft cloth, wipe the disc lightly with a slightly moistened soft cloth and finish with a dry cloth.
- Do not use any type of solvents such as thinner, benzine, commercially available cleaners or anti-static spray for vinyl LPs. They may damage the disc.
ON STORING DISCS
- Do not store discs in a place subject to direct sunlight or near heat sources.
- Do not store discs in places subject to moisture and dust such as a bathroom or near a humidifier.
- Store discs vertically in a case. Stacking or placing objects on discs outside of their case may cause warping.
ABOUT THIS OWNER'S MANUAL
This owner's manual explains the basic instructions of this DVD player.
Some DVD video discs have functions that may not be explained in this owner's manual. Therefore, some instructions may differ from this owner's manual, and there may be extra instructions. In this case, follow the instructions displayed on the TV screen or package.
may appear on the TV screen during operation. This icon means the function explained in this owner's manual is not available on that specific DVD video disc.
ENJOYING DOLBY DIGITAL SOUND
You can enjoy the high quality dynamic sound of Dolby Digital, Dolby Pro Logic and 2 Channel Digital Stereo.
DOLBY DIGITAL
Dolby Digital is the surround sound technology used in theatres showing the latest movies, and is now available to reproduce this realistic effect in the home. You can enjoy motion picture and live concert DVD video discs by connecting the DVD player to a 5.1 channel receiver equipped with a Dolby Digital decoder or Dolby Digital processor.
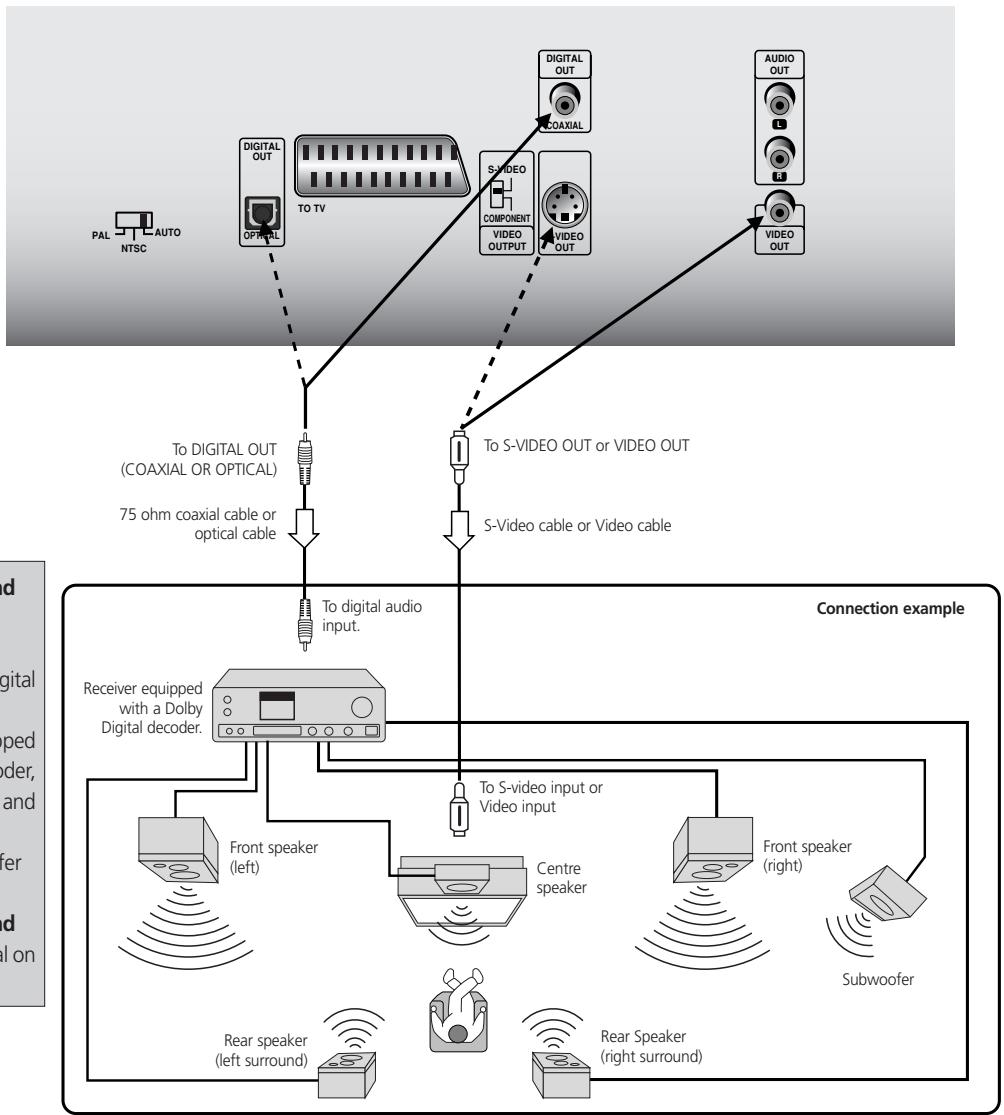
To enjoy Dolby Digital sound from this DVD player you need the following:
DVD recorded in Dolby Digital 5.1
5.1 channel receiver equipped with a Dolby Digital decoder, or Dolby Digital processor and power amplifier
- 5 speakers and 1 subwoofer
To enjoy Dolby Digital sound
You need to select Dolby Digital on the SETUP menu
NOTES
Refer to the owner's manual of your audio equipment as well.
- When you connect the DVD player to other equipment, be sure to turn off the power and unplug all of the equipment from the wall outlet before making any connections.
- The output sound of the DVD player has a wide dynamic range. Be sure to adjust the receiver's volume to a moderate listening level. Otherwise, the speakers may be damaged by a sudden high volume sound.
- Turn off the receiver before you connect or disconnect the DVD player's power cord. If you leave the receiver power on, the speakers may be damaged.
If your AV receiver has a Dolby Pro Logic decoder, refer to the following connection diagram.

WITH A RECEIVER EQUIPPED WITH DOLBY DIGITAL
Connect the equipment the same way as described in Enjoying Dolby Digital Sound on page 9. Refer to that receiver's owner's manual and set the receiver so you can enjoy Dolby Pro Logic Surround sound.
WARNING
Do not set the Digital Audio Output of this DVD player to Dolby Digital unless you are connecting the DIGITAL OUT jack of this DVD player to an AV decoder that has the Dolby Digital decoding function. High volume sound may damage your hearing as well as the speakers (Refer to Selecting Digital Audio Output on page 20).
ENJOYING 2 CHANNEL DIGITAL STEREO SOUND
You can enjoy the dynamic sound of 2 Channel Digital Stereo by connecting this DVD player to a receiver equipped with a digital audio input and speaker system (right and left front speakers).

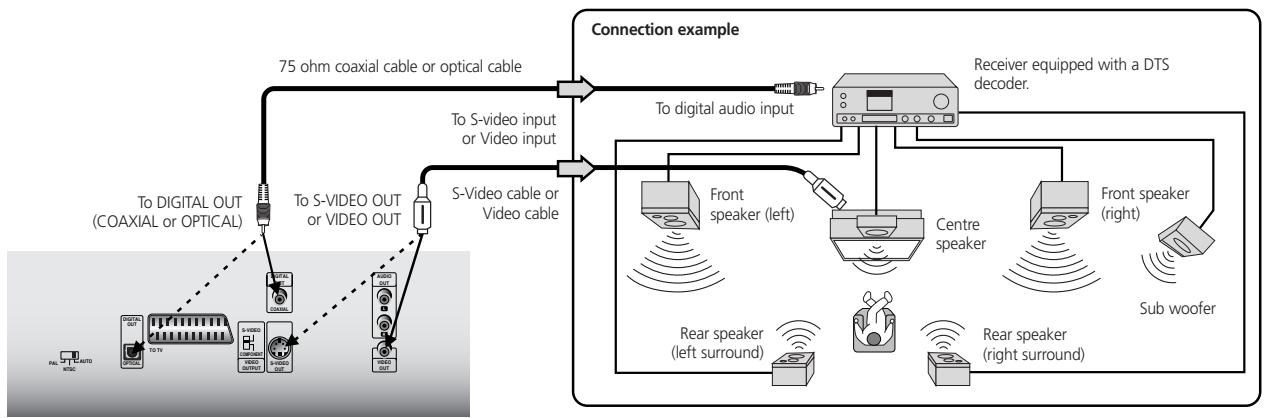
ENJOYING DTS SOUND
Your AV Receiver or processor must be equipped with a DTS Decoder
The digital output (see selecting digital output page 20) must be set to "stream".
The disc must have a DTS soundtrack
NOTES
Refer to the owner's manual of your receiver as well.
- Before you connect the DVD player to other equipment, be sure to turn off the power and unplug all of the equipment from the wall outlet before making any connections.
- The output sound of the DVD player has a wide dynamic range. Be sure to adjust the receiver's volume to a moderate listening level. Otherwise, the speakers may be damaged by a sudden high volume sound.
- Turn off the receiver before you connect or disconnect the DVD player's power cord. If you leave the receiver power on, the speakers may be damaged.
CONNECTING TO A STEREO SYSTEM
Audio system
NOTES
Refer to the owner's manual of your audio system as well.
Before you connect the DVD player to other equipment, be sure to turn off the power and unplug all of the equipment from the wall outlet before making any connections.
If you place the DVD player near a tuner or radio, the radio broadcast sound might be distorted. In this case, move the DVD player away from the tuner and radio.
- The output sound of the DVD player has a wide dynamic range. Be sure to adjust the receiver's volume to a moderate listening level. Otherwise, the speakers may be damaged by a sudden high volume sound.
- Turn off the receiver before you connect or disconnect the DVD player's power cord. If you leave the receiver power on, the speakers may be damaged.
WARNING
Do not set the Digital Audio Output of this DVD player to Dolby Digital unless you are connecting the DIGITAL OUT jack of this DVD player to an AV decoder that has the Dolby Digital decoding function. High volume sound may damage your hearing as well as the speakers (Refer to Selecting Digital Audio Output on page 20).
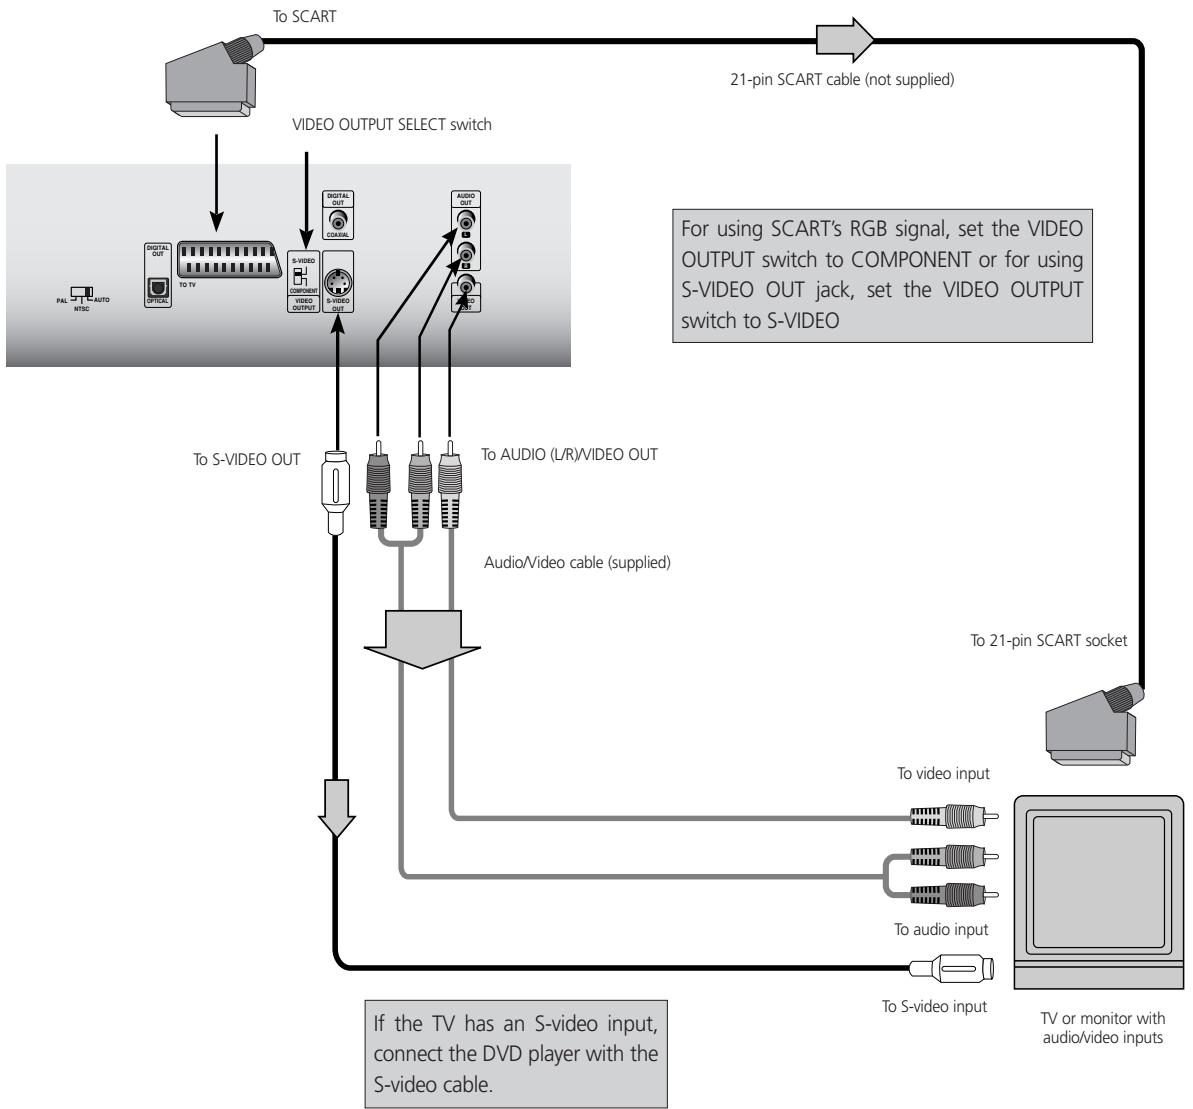
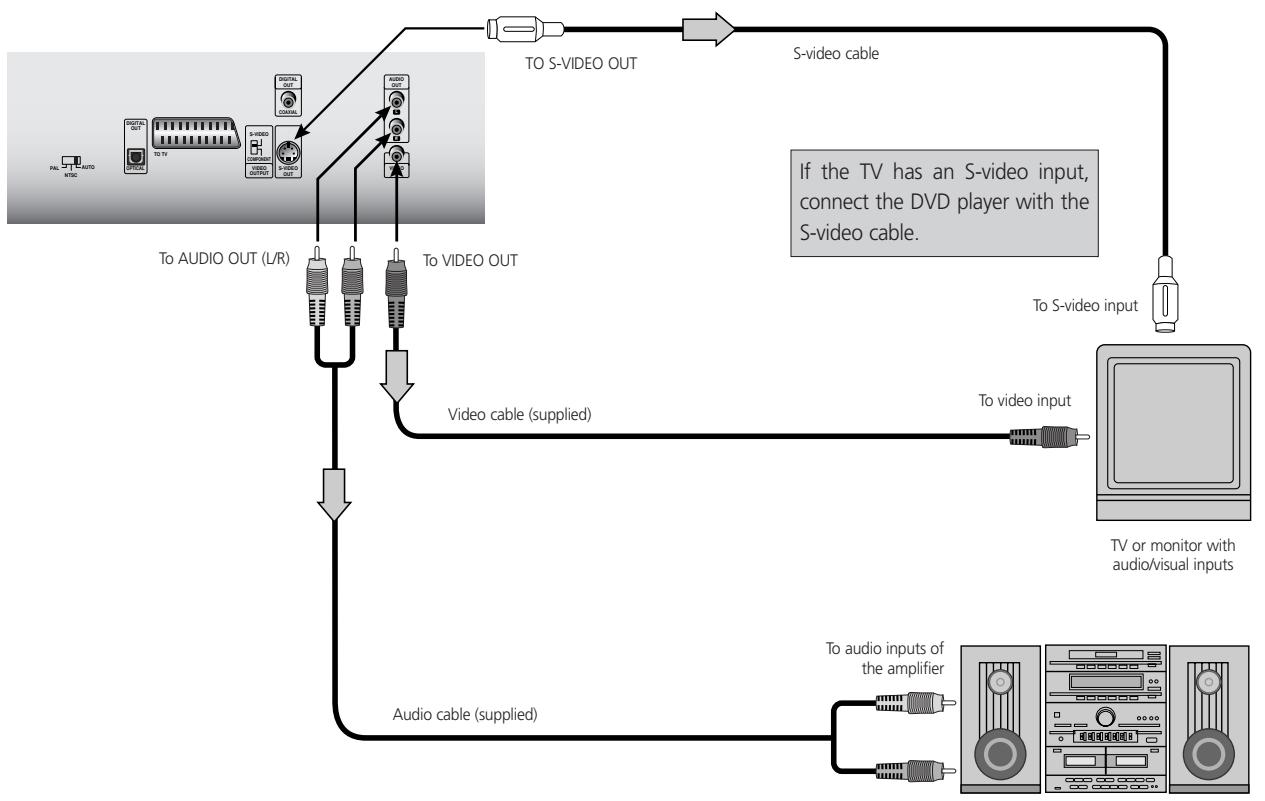
NOTES
Refer to the owner's manual of your TV as well.
- Before you connect the DVD player to your TV, be sure to turn off the power and unplug both units from the wall outlet before making any connections.
- Connect the DVD player to your TV directly. If you connect the DVD player to a VCR, the playback picture will be distorted because DVD video discs are copy protected.
- In case of the TV set corresponding to RGB signal, the RGB signal is automatically selected in the TV (Only when the VIDEO OUTPUT Switch is set to COMPONENT on the Rear Panel).
WARNING
Do not set the Digital Audio Output of this DVD player to Dolby Digital unless you are connecting the DIGITAL OUT jack of this DVD player to an AV decoder that has the Dolby Digital decoding function. High volume sound may damage your hearing as well as the speakers (Refer to Selecting Digital Audio Output on page 20).
Once the initial settings have been completed, the player can always be operated under the same conditions (especially with DVD discs). The settings will be retained in the memory until they are changed, even if the power is switched off.
SELECTION OF INITIAL SETTINGS
1 Press SETUP in the stop or playback mode. The SETUP menu is displayed.
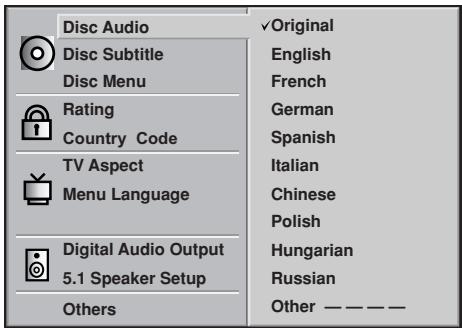
2 Press / to select the desired item. The screen will show the current setting for the selected item, and the alternate setting(s).
Disc Audio (see page 15.)
Disc Subtitle (see page 15.)
Disc Menu (see page 15.)
Rating (see page 16.)
Country Code (see page 17.)
TV Aspect (see page 18.)
Menu Language (see page 19.)
Digital Audio Output (see page 20.)
Others (see page 21.)
3 Press and then / to select the desired setting and press SELECT/ENTER. Some items require additional steps. (See the respective page.)
When the alternate setting is selected the screen returns to the Initial Settings display.
To exit SETUP menu
Press SETUP, RETURN or PLAY.
This is to select the audio soundtrack language, subtitle language and the language used in title menus or DVD menus which will always be used for every disc to be played back.
When you play back a DVD video disc, the DVD player automatically displays the pre-selected subtitle language if it is included on the disc.
1 At the setup screen, press / to select "Disc Audio" and press
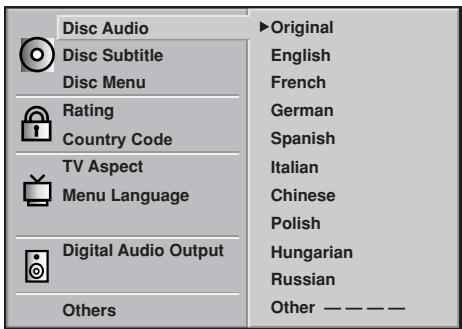
2 Press / to select the desired language and then press SELECT/ENTER
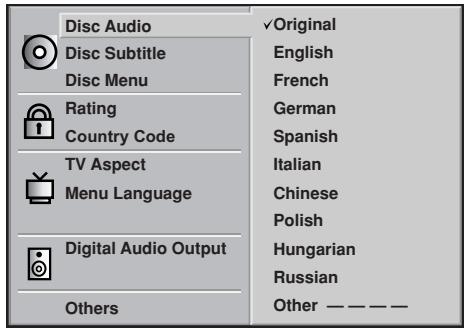
Original : The original language of each disc will be selected.
English : The English will be Selected.
Other : Another language can be selected. You can input 4-digit language code. (Refer to the language codes on page 22. Press CLEAR if an incorrect language code is entered.)
The Disc Subtitle and Disc Menu are selected by the same method.
When you play back a DVD videodisc, the DVD player automatically displays the pre-selected subtitle language if it is included on the disc.
NOTE
- If the language selected is not available on the disc, the original language designated by each disc will be selected.
This is to prohibit the playing of specified DVDs which are unsuitable for children.
- Some DVD discs contain a restriction level which enables parents to remove scenes or prevent playback of discs by children. DVD players are equipped with a password designed to prevent children from changing the level.
SELECTING RATING LEVEL (DVD ONLY)
1 At the SETUP screen, press / to select "Rating" and press . To add a password for the first time, you will be prompted to enter a "New" 4-digit password, press SELECT/ENTER, and then "Verify" the same 4-digit password and press SELECT/ENTER.
Example: 1234
Do not forget your password.

2 Press / to select the desired level and press SELECT/ENTER
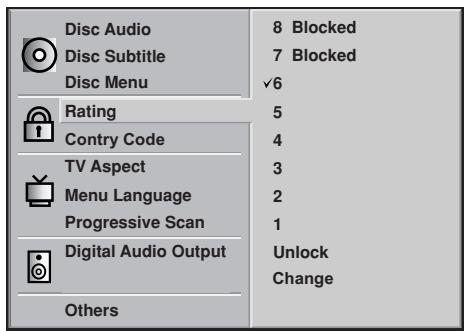
You cannot play DVD video discs rated higher than the level you selected unless you cancel the parental lock function.
For example, when you select level 7, discs rated higher than level 7 are blocked and cannot be played.
The parent lock level is equivalent to the following USA movie ratings.
Level 7: NC-17
Level 6: R
Level 4: PG 13
Level 3: PG
Level 1: G
Some titles do not match with the rating level described as above.
If you change the level and enter a password, playback of all DVDs with ratings higher than your selection will be blocked, unless the correct password is entered again. For example: if you change the level to 5, the DVD player will not play discs with ratings of 6, 7 or 8 unless the correct password is entered on the remote control.
TO CHANGE/CLEAR MEMORIZED PASSWORD
1 At the SETUP screen, press / to select "Password" and press
2 Input your password and press SELECT/ENTER
3 To change or clear your password, press / to select "Change" and press SELECT/ENTER. To change the rating level/password, follow the preceding steps.
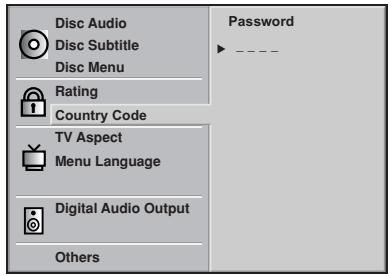
TO CLEAR YOUR 4-DIGIT PASSWORD
If you forget your password, to clear the current password, follow the procedure below.
At the SETUP screen
Enter 6-digit number "210499" and then press SELECT/ENTER The 4-digit password is cleared. "P CBr" will show up in the DVD's fluorescent display as your confirmation.
SELECTING COUNTRY CODE (T532 ONLY) (DVD ONLY)
1 At the SETUP screen, press / to select "Country Code" and press
2 Enter your password then a cursor will be shown under the letters to be changed.
3 Press and to toggle through the letters for your geographical area
NOTE
Refer to the Country Code table found on page 22 for the appropriate code

Select the appropriate screen type according to your TV set; conventional size screen (4:3) or wide-screen (16:9).
1 At the SETUP screen, press / to select "TV Aspect" and press
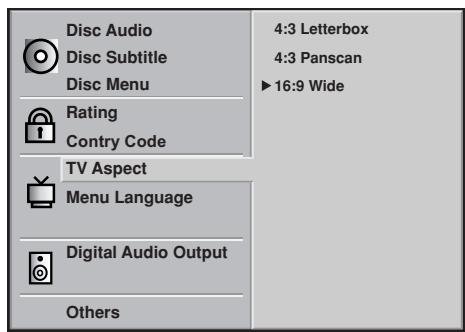
2 Press / to select the desired Aspect and press SELECT/ENTER
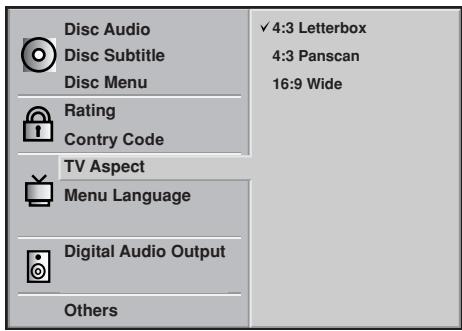
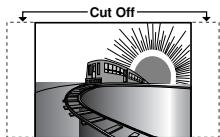
43 Letterbox : The video material not formatted in the Pan & Scan style is played back in the letterbox style (black bands appear at top and bottom of screen).
43 Panscan : Select when a conventional TV set is connected. The video material formatted in the Pan & Scan style is played back in that style (the left and right edges are cut off).
16 9 Wide : Select when a wide-screen TV set is connected. Played in FULL size. (Setting the wide-screen TV to FULL mode is also necessary.)

4:3 Letterbox
4:3 Panscan

16:9 Wide
Each screen shows an example when the video material for a wide-screen is played. (This setting does not affect the video material for conventional size.)
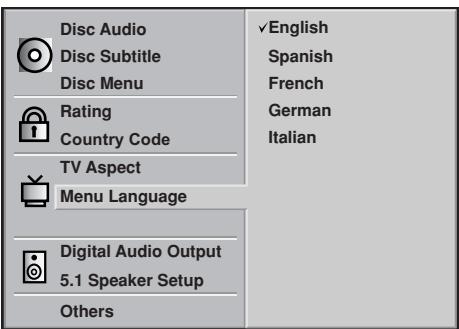
Selects language for SETUP menus and displays on the TV..
1 At the SETUP screen, press / to select "Menu Language" and press
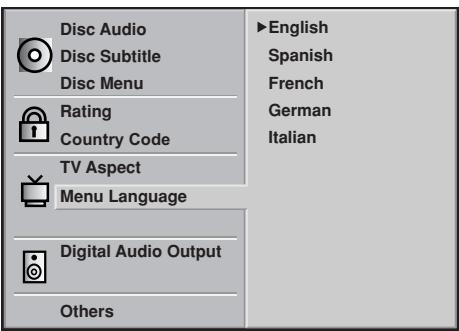
2 Press / to select the desired Language and SELECT/ENTER

| Playback Disc | OUTPUT | ||
| Stream/PCM | Dolby Digital/PCM | PCM only | |
| 48 & 96 kHz Linear PCM DVD | PCM | PCM | PCM |
| DTS DVD | DTS bit Stream | Not Output | Not Output |
| Dolby Digital DVD | Dolby Digital bit Stream | Dolby Digital bit Stream | PCM |
| MPEG DVD | MPEG bit Stream | PCM | PCM |
| Audio CD | PCM | PCM | PCM |
| DTS Audio CD | DTS bit Stream | DTS bit Stream | DTS bit Stream |
Each DVD disc has a variety of audio output options. Set the player's Digital Audio Output according to the type of audio system you use.
1 At the SETUP screen, press / to select Digital Audio Output and press
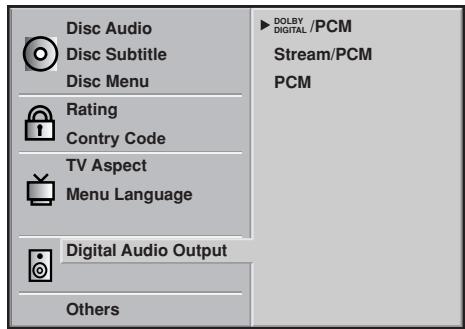
2 Press / to select the desired output and press SELECT/ENTER
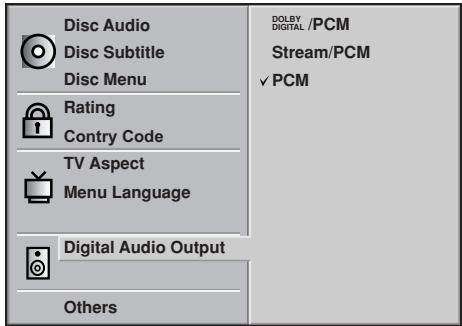
DOLBY DIGITAL/PCM : Select DOLBY DIGITAL/PCM if an active digital output is supplied to a Dolby Digital decoder, (or an amplifier or other equipment with Dolby Digital decoder). In this mode, the T531 will automatically switch between Dolby Digital and Stereo PCM depending on the program encoded on the disc, with Dolby Digital given priority. DTS is not possible with this setting.
Stream/PCM : Select Stream/PCM if an active digital output is supplied to an amplifier or other
equipment with DTS decoder, Dolby Digital decoder and MPEG decoder.
PCM : Select PCM if an active digital output is supplied to an amplifier or other equipment with linear PCM only (or MD recorder or DAT deck).
5.1 Surround Sound modes are not possible with this setting.
NOTES
- When you are not using the player's digital audio output, don't select any of the options.
- If an active digital audio output signal is supplied to a receiver or other equipment without a corresponding digital decoding capability, a very loud noise may be produced which could permanently damage the speakers.
- The DTS DVD disc sound is played back only when the DVD player is connected to a receiver with a DTS decoder.
The DRC and PBC settings can be changed.
1 At the SETUP screen, press / to select "Others" and press
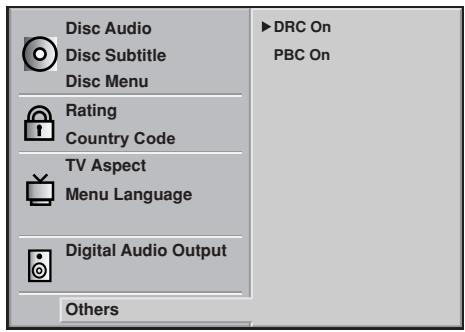
2 Press / to select the desired items and press SELECT/ENTER. The setting of the selected items are changed between On and Off.
DRC (DYNAMIC RANGE COMPRESSION) ON/OFF
On : Select this option to turn on the Dynamic Range Compression circuitry so that the dialogue remains clear even at low volume levels.
Off : Select this option to turn off the Dynamic Range Compression and have the soundtrack presented exactly as it was created.
PBC ON/OFF
SetPlaybackControl(PBC)toOnorOff
On : Video CDs with PBC are played back according to the PBC.
Off : Video CDs with PBC are played back in the same way Audio CDs.
NOTE
PBC is only available for the T532
ABOUT DRC (DYNAMIC RANGE COMPRESSION)
With the DVD format you have the opportunity to hear a programs soundtrack in the most accurate and realistic presentation possible, thanks to the use of digital audio technology. However, in certain instances you may wish to slightly compress the dynamic range of the audio output (the difference between the loudest sounds and the quietest ones) so that you may listen to a movie at a lower volume without losing dialogue intelligibility.
NOTES
- The DRC function works only during playback of Dolby Digital recorded discs.
- The level of Dynamic Range Compression may differ depending on the DVD disc.
- When playing karaoke, connect appropriate audio equipment (such as an amplifier) to the DVD video player.
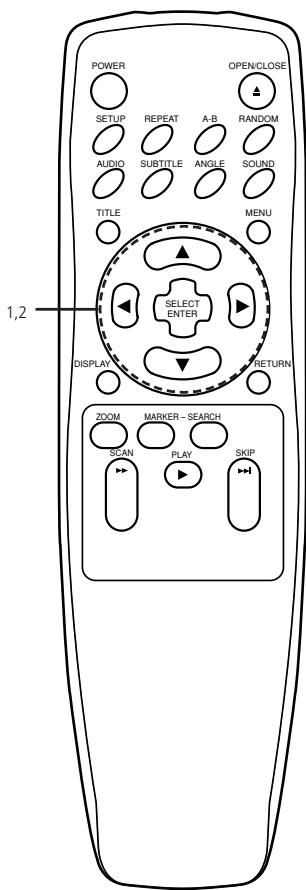
TABLE OF LANGUAGES AND THEIR CODES
Enter the appropriate code number for the initial settings "Audio", "Subtitle" and/or "Menu" (see page 15)
| Code | Language |
| 6565 | Afar |
| 6566 | Abkhazian |
| 6570 | Afrikaans |
| 6577 | Ameharic |
| 6582 | Arabic |
| 6583 | Assamese |
| 6588 | Aymara |
| 6590 | Azerbaijani |
| 6665 | Bashkir |
| 6669 | Byelorussian |
| 6671 | Bulgarian |
| 6672 | Bihari |
| 6678 | Bengali; Bangla |
| 6679 | Tibetan |
| 6682 | Breton |
| 6765 | Catalan |
| 6779 | Corsican |
| 6783 | Czech |
| 6789 | Welsh |
| 6865 | Danish |
| 6869 | German |
| 6890 | Bhutani |
| 6976 | Greek |
| 6978 | English |
| 6979 | Esperanto |
| 6983 | Spanish |
| 6984 | Estonian |
| 6985 | Basque |
| 7065 | Persian |
| 7073 | Finnish |
| 7074 | Fiji |
| Code | Language |
| 7079 | Faroese |
| 7082 | French |
| 7089 | Frisian |
| 7165 | Irish |
| 7168 | Scotts Gaelic |
| 7176 | Galician |
| 7178 | Guarani |
| 7185 | Gujarati |
| 7265 | Hausa |
| 7273 | Hindi |
| 7282 | Croatian |
| 7285 | Hungarian |
| 7289 | Armenian |
| 7365 | Interlingua |
| 7378 | Indonesian |
| 7383 | Icelandic |
| 7384 | Italian |
| 7387 | Hebrew |
| 7465 | Japanese |
| 7473 | Yiddish |
| 7487 | Javanese |
| 7565 | Georgian |
| 7575 | Kazakh |
| 7576 | Greenlandic |
| 7577 | Cambodian |
| 7578 | Kannada |
| 7579 | Korean |
| 7583 | Kashmiri |
| 7585 | Kurdish |
| 7589 | Kirghiz |
| 7665 | Latin |
| Code | Language |
| 7678 | Lingala |
| 7679 | Laothian |
| 7684 | Lithuanian |
| 7686 | Latvian, Lettish |
| 7771 | Malagasy |
| 7773 | Maori |
| 7775 | Macedonian |
| 7776 | Malayalam |
| 7778 | Mongolian |
| 7779 | Moldavian |
| 7782 | Marathi |
| 7783 | Malay |
| 7784 | Maltese |
| 7789 | Burmese |
| 7865 | Nauru |
| 7869 | Nepali |
| 7876 | Dutch |
| 7879 | Norwegian |
| 7982 | Oriya |
| 8065 | Panjabi |
| 8076 | Polish |
| 8083 | Pashto, Pushto |
| 8084 | Portuguese |
| 8185 | Quechua |
| 8277 | Rhaeto-Romance |
| 8279 | Rumanian |
| 8285 | Russian |
| 8365 | Sanskrit |
| 8368 | Sindhi |
| 8372 | Serbo-Croatian |
| 8373 | Singhalense |
| Code | Language |
| 8375 | Slovak |
| 8376 | Slovenian |
| 8377 | Samoan |
| 8378 | Shona |
| 8379 | Somali |
| 8381 | Albanian |
| 8382 | Serbian |
| 8385 | Sudanese |
| 8386 | Swedish |
| 8387 | Swahili |
| 8465 | Tamil |
| 8469 | Telugu |
| 8471 | Tajik |
| 8472 | Thai |
| 8473 | Tigrinya |
| 8475 | Turkmen |
| 8476 | Tagalog |
| 8479 | Tonga |
| 8482 | Turkish |
| 8484 | Tatar |
| 8487 | Twi |
| 8575 | Ukrainian |
| 8582 | Urdu |
| 8590 | Uzbek |
| 8673 | Vietnamese |
| 8679 | Volapuk |
| 8779 | Wolof |
| 8872 | Xhosa |
| 8979 | Yoruba |
| 9072 | Chinese |
| 9085 | Zulu |

TABLE OF COUNTRY CODES
AD Andorra
AE United Arab Emirates
AF Afghanistan
AG Antigua and Barbuda
Al Anguilla
AL Albania
AM Armenia
AN Netherlands Antilles
AO Angola
AQ Antarctica
AR Argentina
AS American Samoa
AT Austria
AU Australia
AW Aruba
A7 Azerbaidian
BA Bosnia-Herz
BB Barbados
BD Bangladesh
BF Belgium
BF Burkina Easo
BG Bulgaria
BH Bahrain
Bl Burundi
BJ Benin
BMBermuda
BN Brunei Darussalam
BO Bolivia
BR Brazil
BS Rahamas
BT Bhutan
BV Bouvet Island
RW Rotswana
RYBelarus
B7 Bolzano
BZ BZLZE CA Canada
CA Canada CC Cases /K
CE Cocos (Keciling) Islands CF Central African Republic
C Central African Republic CC Confluent
CG Congo
CH SWITZENLAND
GRI CHINA GOST
Cl Moly Coast
CK Cook Islands
CL Chile
CM Cameroon
CN China
CO Colombia
CR Costa Rica
CS Former Czechoslovakia
CU Cuba
CV Cape Verde
CX Christmas Island
CY Cyprus
CZ Czech Republic
DE Germany
DJ Dijbouti
DK Denmark
DM Dominica
DO Dominican Republic
D7 Algeria
EC Ecuador
EE Estonia
EG Egypt
FH Western Sahara
ER Eritrea
ES Spain
FT Ethiopia
Fl Finland
Fiji
FK Falkland I
EM Micronesia
FO Faroe Islands
FR France
FX France (European Territory)
GA Gabon
GB Great Britain
GD Grenada
GE Georgia
GF French Guyana
GH Ghana
Gj Gibraltar
GI Greenland
GM Gambia
GN Guinea
GP Guadeloupe (French)
GO Equatorial Guinea
GR Greece
GS S Georgia & S. Sandwich Isls.
GT Guatemala
GU Guam (USA)
GW Guinea Bissau
GY Guyana
HK Hong Kong
HM Heard and McDonald IsIs.
HN Hondur
HR Croatia
HTHaiti
HU Hungary
ID Indonesia
IE Ireland
IL Israel
IN India
IO British Indian Ocean
T6
IO rag
IR Iran
IS Iceland
IT Italy
IMlamaica
JO Jordan
JP Japan
KE Kenya
KG Kyrgyzstan
KH Cambo
KI Kiribati
KM Comoros
KN Saint Kitts & Nevis Anquilla
KP North Korea
KR South Korea
KW Kuwait
KY Cayman
K7 Kazakhstan
LA Laos
LB Lebanon
LcSaint Lucia
II Liechtenstein
LK Sri Lanka
LR Liberia
US Lesotho
IT Lithuania
LU Luxembourg
LV Latvia
LYLibya
MA Morocco
MC Monaco
MD Moldavia
MG Madagascar
MH Marshall
MK Macedonia
ML Mali
MM Myanmar
MN Mongolia
MO Macau
MP Northern Mariana Islands
MO Martinique (French)
MR Mauritania
MS Montserrat
MT Malta
MU Mauritius
MV Maldives
MW Malawi
MX Mexico
MY Malaysia
MZ Mozambique
NA Namibia
NC New Caledonia (French)
NF Niger
NE Norfolk Island
NG Nigeria
Ni Nicaragua
NI Netherlands
NO Norway
NP Nenal
NR Naurlu
NII Niue
NZ New Zealand
OM Oman
PA Panama
PE Peru
PF Polynesia (French)
PG Papua New Guinea
PH Philippines
PK Pakistan
PI Poland
PM Saint Pierre and Miquelon
PN Pitcairn Island
PR Puerto R
PT Portugal
PW Palau
PY Paraguay
QA Qatar
RE Reunion (French)
RO Romania
RU Russian Federation
RW Rwanda
SA Saudi Arabia
SB Solomon Islands
SC Seychelles
SD Sudan
SE Sweden
SG Singapore
SH Saint Helena
SI Slovenia
SJ Svalbard and Jan Islands
SK Slovak R
SL Sierra Leone
SM San Marino
SN Senegal
SO Somalia
SR Suriname
ST Saint Tome
SU Former USSR
SV El Salvador
SY Syria
SZ Swaziland
TC Turks and Caicos
TD Chad
TF French Southern Territories
TG Togo
TH Thailand
TJ Tadjikistan
TK Tokelau
TM Turkmenistan
TN Tunisia
TO Tonga
TP East Timor
TR Turkey
TT Trinidad and Tobago
TV Tuvalu
TWTaiwan
Tanzania
U.A Ukraine
UG Uganda
UK United Kingdom
UM USA Minor Outlying Islands
US United States
UY Uruguay
UZ Uzbekistan
VA Vatican City State
VC Saint Vincent & Grenadines
VE Venezuela
VG Virgin Islands
VI Virgin Islands
VN Vietnam
VU Vanuatu
WF Wallis and Futuna
WSSamoa
YF Yemen
CY Marotte
YU Yungoslavia
7A South Africa
ZM Zambia
ZB Zaire
ZWBzimbabwe
This section shows you the basics on how to play back a DVD video disc
PREPARATIONS
- When you want to play back DVD video discs, turn on the TV and select the video input source connected to the DVD player.
- When you want to enjoy the sound of DVD video discs or audio CDs from the audio system, turn on the audio system and select the input source connected to the DVD player.
For connection details, see pages 9-11. - Set the playback picture size according to the aspect ratio of the connected TV at the SETUP menu (TV Aspect).
- If you do not have the necessary equipment to enjoy Dolby Digital sound, set the Digital Audio Output at the SETUP menu to PCM.
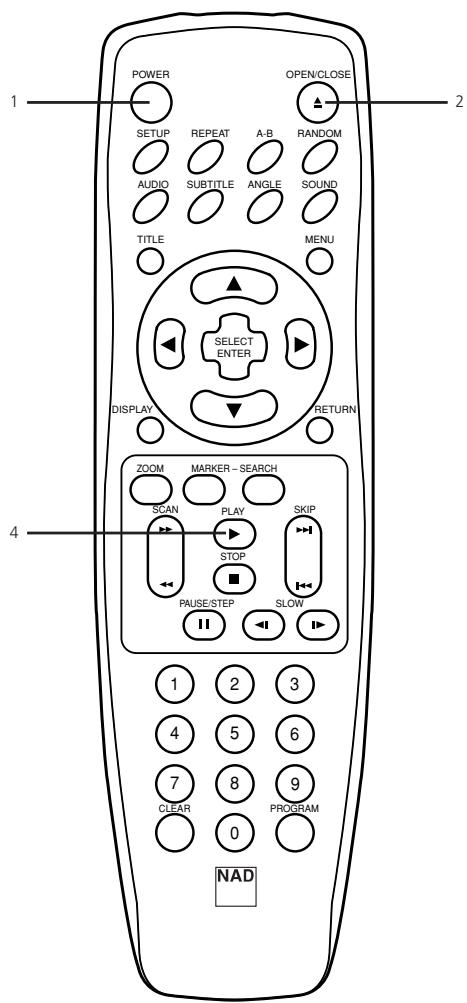
1 Press POWER. The DVD player turns on and the power indicator lights.
2 Press OPEN/CLOSE. The disc tray opens.
- You can open the disc tray by pressing this button even if the DVD player is in standby mode.
3 Place a disc on the disc tray with the playback side down.
- There are two different disc sizes. Place the disc in the correct guide on the disc tray. If the disc is out of the guide, it may damage the disc and cause the DVD player to malfunction.
- Do not place anything except 3 discs or 5 discs on the disc tray.
4 Press PLAY. The disc tray is automatically closed and playback begins.
- If the disc is placed in upside down (and it is a single sided disc), NO DISC or DISC ERROR appears on the TV screen.

Operating Status indicator
- If you insert an audio CD, the CD indicator lights up in the DVD display. The title number does not appear.
- After playing back all of the chapters in the title, the DVD player automatically stops and returns to the menu screen.
3
WHEN A MENU SCREEN APPEARS ON THE TV SCREEN
In case of interactive DVDs with control, a menu screen appears on the TV screen. Perform step 5 on page 24 to start play.
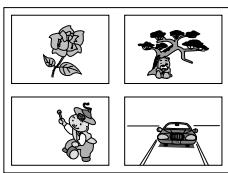
Example of interactive DVD on-screen menu
5 Press / / and press SELECT/ENTER, or press the numeric button(s), to select the desired item.
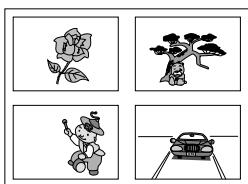
Play of the selected item now begins.
- For further information, also refer to the jacket or case of the disc you are playing.
AFTER OPERATION
When the unit is not in use, remove the disc and press POWER to turn off the power.
NOTES
- Do not move the DVD player during playback. Doing so may damage the disc and the DVD player.
- Use the OPEN/CLOSE button on the remote control or DVD player to open and close the disc tray. Do not push the disc tray while it is moving. Doing so may cause the DVD player to malfunction.
- Do not push up the disc tray or put any objects other than discs on the disc tray. Doing so may cause the DVD video player to malfunction.
- Keep your fingers well clear of the disc tray as it is closing. Be especially careful with children's fingers around the closing disc tray as there is a risk of personal injury.
- When appears on the TV screen while a button is pressed, it means that this function is not available on the disc you are playing.
- Depending on the DVD disc, some operations may be different or restricted. Refer to the jacket or case of the disc you are playing.
Screen Saver
SCREENSAVER
The screen saver is useful to prevent your display from becoming damaged. The screen saver picture appears when you leave the DVD player in stop mode for about 5 minutes.
AUTOMATIC POWER OFF FUNCTION
After the Screen Saver has been engaged for about 5 minutes, the DVD player will automatically turn itself off.
STOPPING PLAY
Press STOP during playback
RESUME PLAY
When play is stopped, the unit records the point where STOP was pressed (RESUME function).
Press PLAY and play will resume from this point.
NOTES
- Resume function will be cleared when the STOP is pressed on the STOP mode.
- Resume function will be cleared when the power is turned off and then on.
- Opening the disc tray cancels Resume function.
- The Resume function may not be available on some DVD discs.
STILL PICTURE (PAUSE)
Press PAUSE/STEP during playback
DVD The player will be placed in the still picture mode.
CD The player will be placed in the pause mode.
FRAME ADVANCE (DVD ONLY)
Press PAUSE/STEP during still playback. (Each time you press PAUSE/STEP, the picture advances one frame)
To resume normal playback, press PLAY
SKIPPING CHAPTERS AND TRACKS
Skipping forward
Press SKIP during playback
A chapter (DVD) or a track (CD) is skipped each time the button is pressed.
Skipping back
Press SKIP during playback
When the button is pressed once midway through a chapter/track, the player returns to the start of that chapter/track. When it is pressed again, a chapter/track is skipped each time the button is pressed.

You can play back discs at various speeds.
TO SCAN AT FAST FORWARD OR FAST REVERSE PLAYBACK
Press the SCAN or button during playback
[TV screen]
- The speed of advance (reverse) is relatively slow at first. When the button is pressed again, the speed becomes faster. (Each time the button is pressed, the speed increases up to 4 steps (DVD) or 1 step (CD).)
- The speed will be retained even after the button is released.
To return to normal playback, press PLAY
NOTE
- The DVD player does not play back sound during the high speed reverse and forward playback of DVD video discs. However, the DVD player plays back sound during fast forward or fast reverse playback of audio CDs.
Press SLOW or during playback
The playback speed becomes 1/16 of the normal speed.
[TV screen]


- The speed of slow-motion is slow at first. When the button is pressed again, the speed becomes faster. Each time the button is pressed, the speed increase up to 4 steps.
- The speed will be retained even after the button is released.
To return to normal playback, press PLAY
NOTES
- The sound is muted during slow-motion playback.
- Subtitles do not appear on the screen during slow motion playback.
- The SLOW buttons do not work with Audio CDs.
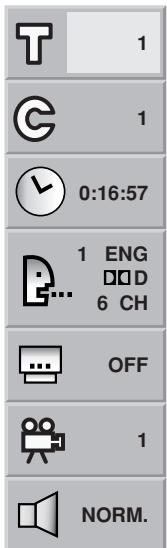
This unit features GUI Menu Icons showing disc information (title/chapter/track number, elapsed playing time, audio/subtitle language, angle, and sound) and player information (repeat play, play mode, marker, etc.). Some icons only show the indicated information. Other icons allow the settings to be changed.
COMMON PROCEDURES
1 Press DISPLAY during playback.
- Title function can be accessed from the stop mode.
2 Press / to select the desired item.
- The current selected item is indicated by a yellow frame on its GUI menu icons.
3 Press / to select the desired setting.
- When numbers are displayed (e.g. title number), the numeric buttons can also be used for setting instead of
- For some functions, the setting will be registered immediately; for others, SELECT/ENTER must be pressed.
To clear the GUI Menu Icons, press DISPLAY again
EXAMPLES OF GUI MENU ICONS
(The screens may differ depending on the disc contents.)
DVD GUI
CD GUI
DVD and CD GUI


Press DISPLAY during playback
[TV screen] DVD GUI
FUNCTION
(Press / to select desired item)
SELECTION METHOD
| T | 1 |
| G | 1 |
| 0:16:57 | |
| E... | 1 ENG D/D 6 CH |
| OFF | |
| NORM. | |
FUNCTION
| To show the current title number, and to jump to the desired title number. | < /▶ or Numeric SELECT/ENTER |
| To show the current chapter number and to jump to the desired chapter number. | < /▶ or Numeric SELECT/ENTER SKIP |
| To show the elapsed time and directly select scenes by the desired time. | Numeric SELECT/ENTER |
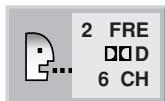
| To show the current audio soundtrack language, encoding method, channel number and to change the setting. | < /▶ AUDIO |
| To show the current subtitles language and to change the setting. | < /▶ SUBTITLE |
| To show the current angle number and to change the angle. | < /▶ ANGLE |
| To show the current sound (NORMAL or 3D SURROUND) and to change the setting. | < /▶ |
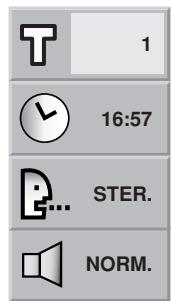
Press DISPLAY during playback
[TV screen] CD GUI
(Press / to select desired item)
SELECTION METHOD
| T | 1 |
| 16:57 | |
| STER. | |
| NORM. |
| To show the current track number and to jump to the desired track number. | <or Numeric SELECT/ENTER SKIP |
| To show the elapsed time. (Display only) | - |
| To show the current audio (STEREO, LEFT, RIGHT) and to select to the desired audio channel. | <▶ AUDIO |
| To show the current sound (NORMAL or 3D SURROUND) and to change the setting. | <▶ |
NOTES
Some DVD discs may not provide all of the above GUI menu icons.
Some movie discs may contain two or more titles. If the disc has a title menu recorded on it, the TITLE button can be used to select the movie title. (The details of operation differ depending on the disc used.)
- Selecting a title may not be possible on certain DVD discs.
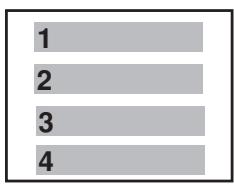
1 Press TITLE.
A list of the titles on the disc is displayed.
Pressing TITLE again to resume play from the scene when TITLE was first pressed.
2 Press / / and press ENTER or PLAY, or press the numeric button(s), to select desired title.
The selected title now starts playing.
DVD USING A DVD MENU
Some DVDs have unique menu structures called DVD menus. For example, DVDs programmed with complex contents provide guide menus, and those recorded with various languages provide menus for audio and subtitle language. Although the DVD menu's contents and operation differ from disc to disc, the following explains the basic operation when this feature is used.
1 Press MENU during play.
The DVD menu available on the disc is now displayed.

Pressing MENU again resumes play from the scene when MENU was first pressed.
- Resume play may not be possible on certain discs.
2 Press / / and press ENTER, or press the numeric button(s), to select desired item.
The selected item is now executed.
This unit will memorize settings for the last DVD you watched. Settings remain in memory even if you remove the disc from the player, or switch power to the player OFF. Settings are stored in memory for use any time automatically.
NOTES
- Settings are stored in memory for use any time.
- This unit does not store settings in memory, if you remove the disc from the player or switch power to the player OFF when DVD or title menu is displayed on the TV screen.
GB
It is possible to change the subtitle language to a different language from the one selected at the initial settings. (See page 15 for further info.)
This operation works only with discs on which multiple subtitle languages are recorded.
1 Press SUBTITLE during playback. When no subtitles are recorded, "OFF" will be displayed instead of the language number.

2 Press SUBTITLE repeatedly until the desired language is selected. Number of the subtitle language being played back is shown

To eliminate the On Screen Subtitles.
Press SUBTITLE repeatedly to select OFF at step 2.
NOTES
- In some cases, the subtitle language is not changed to the selected one immediately.
- When a disc supporting the closed caption is played, the subtitle and the closed caption may overlap each other on the TV screen. In this case, turn the subtitle off.
- When the desired language is not selected even after pressing the button several times, it means that the language is not available on the disc.
- When the power is turned on or the disc is removed, subtitles appear in the language selected at the initial settings. If this language is not recorded on the disc, the disc's priority language appears.

DVD
CONMART DIS C
CHANGING AUDIO SOUNDTRACK LANGUAGE
It is possible to change the audio soundtrack language to a different language from the one selected at the initial settings in case of DVD disc. (See page 15 for further info.) This operation works only with discs on which multiple audio soundtrack languages are recorded.
And it is possible to change the audio channel in case of audio CD.
DVD
1 Press AUDIO during play. Number of the audio soundtrack language being played back.

2 Press AUDIO repeatedly until the desired language (or encoding method, channel number) is selected.
CD
1 Press AUDIO during play.

2 Press AUDIO repeatedly until the desired sound is selected.

NOTES
- When the desired language is not selected even after pressing the button several times, it means that the language is not available on the disc.
- When the power is turned on or the disc is removed, the language heard is the one selected at the initial settings. If this language is not recorded on the disc, only the available language on the disc will be heard.
Some discs may not respond to Audio feature.

VIEWING FROM ANOTHER ANGLE

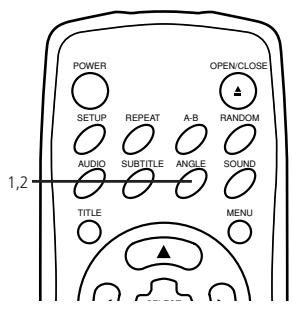
Some DVDs may contain scenes which have been shot simultaneously from a number of different angles. For these discs, the same scene can be viewed from each of these different angles using the ANGLE button. (The recorded angles differ depending on the disc used.)
1 Press ANGLE during playback. Number of angle being played back.
2 Press ANGLE repeatedly until the desired angle is selected.


FOR YOUR REFERENCE
The ANGLE indicator will blink in the DVD display window at scenes recorded at different angles to indicate that angle switching is possible. The angle number can be programmed beforehand; the angle will be switched to the selected number when the ANGLE indicator blinks.
NOTE
- This function only works for discs having scenes recorded at different angles.
PRODUCING A 3D SURROUND EFFECT


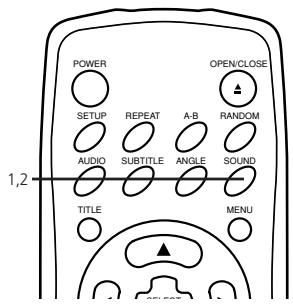
This unit can produce a 3D Surround effect, using Spatializer technology, which simulates multi-channel audio playback from two conventional stereo speakers instead of the five or more speakers normally required to listen to multi-channel audio from a home theatre. This feature works with DVD discs encoded with Dolby Pro Logic and Dolby Digital audio tracks.
1 Press SOUND during playback. Each time this button is pressed, the TV screen displays changes.
2 Press SOUND repeatedly until the desired sound is selected.


NOTE
- This 3D Surround effect may not be available on some DVD discs, such as those recorded with a mono audio sound-track.
- Turn off the TV surround sound and other surround effects when using this 3D surround effect.
- For best 3D Surround effect using only two speakers it is recommended that the two speakers be positioned approximately 2m to 2.5m apart, and the listening position should be 2m to 2.5m away from the speakers.
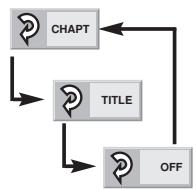
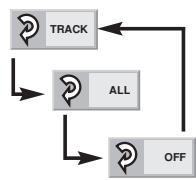
REPEATING VIEWING (LISTENING)
Press REPEAT during playback
Each time this button is pressed, the TV screen changes as shown below and the disc will repeat a chapter or title (DVD) or a track (CD).
DVD
Repeat of chapter being played
Repeat of title being played
Cancel repeat mode
(normal play)
CD
Repeat of track being played
Repeat of entire disc contents
Cancel repeat mode
(normal play)
To enjoy program repeat play (CD)
If REPEAT is pressed during program play, repeat play is operated as below.
Repeat of the current programmed track
Repeat of all programs
Cancel repeat mode
(Program play)
To return to normal play
Press REPEAT several times until OFF is displayed.
REPEATING SECTIONS BETWEEN TWO SPECIFIC POINTS (A-B REPEAT)
1 Press A-B during play at the point where repeat play is to start (A). You can select OFF at this step by pressing CLEAR.
2 Press A-B during play at the point where repeat play is to be concluded (B). Repeat play of the selection between points A and B starts.
To return to normal play
Press A-B once OFF is displayed.
NOTES
- Repeat play works only with discs for which the elapsed playing time appears in the DVD display window during playback.
- Repeat play may not work correctly with some DVDs.
- A-B repeat play works only within a title DVD or a track CD.
- Some subtitles recorded around point A or B may fail to appear (DVD).
- Repeat and Play may not work with MP-3 encoded CD-R and CD-RW.


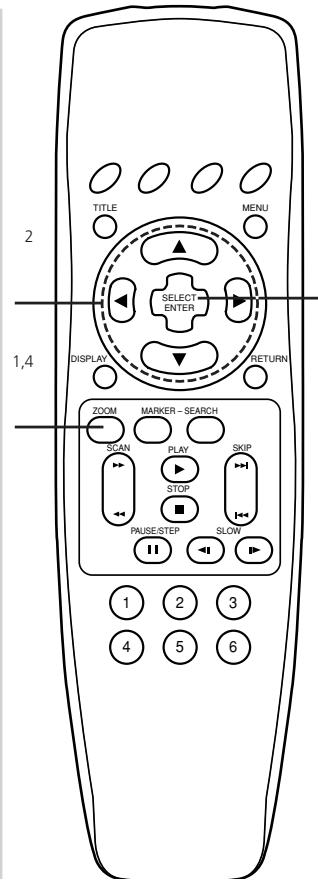
Storing a MARKER in the DVD memory is similar to marking your page in a book. It allows you to quickly return to any point on the disc.
STORING A MARKER IN THE MEMORY
1 Press MARKER during play at the starting point to be viewed (listened to) again

Indicates 1/5 is stored in the memory. Up to 5 markers can be stored in the memory.
RECALLING/CLEARING A MARKER
2 Press SEARCH during playback
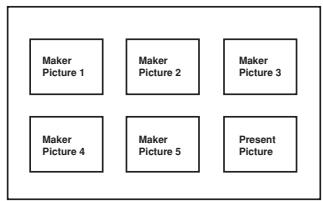
3 Press / / to select the marker to be recalled/cleared.
4 Press PLAY or SELECT/ENTER to recall a marker. Or press CLEAR to clear a marker.
Play resumes from the point corresponding to the selected marker, or the selected marker is cleared.
The Present Picture is not cleared.
NOTE
- These operations work only with discs for which the elapsed playing time appears in the DVD display window during playback or stop.
- Some subtitles recorded around the marker may fail to appear (DVD).
- All the markers are cleared when the power is turned off or the disc is removed and when TV Aspect mode is changed on the SETUP menu.
- The marker is not stored when the DVD or title menu is displayed on the TV screen.
ZOOM FEATURE
The Zoom feature allows you to ZOOM-IN and enlarge the picture on the screen from normal size to six times normal size.
1 Press ZOOM during normal playback or still playback.
2 If you press / / buttons, the zoom point shifts
3 Press SELECT/ENTER. The selected frame is displayed in full size on the TV screen.
4 To resume normal playback. Press ZOOM repeatedly until the normal picture is restored.
NOTE
Some discs may not respond to the Zoom feature.
- Zoom does not work on subtitles or menus included on DVD video discs.
NOTE
- This function only works with audio CD discs. Random does not work with DVD movies.
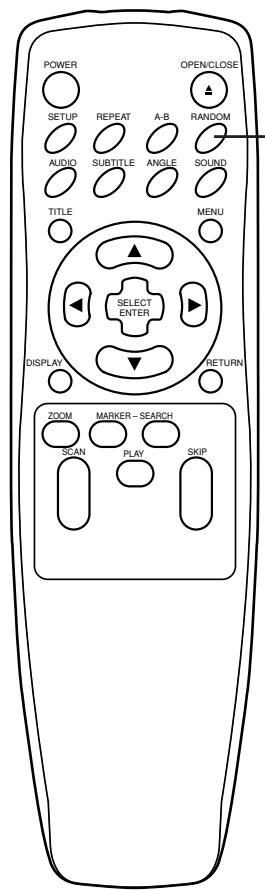
DISC RANDOM PLAY
You can playback titles or tracks in random order. (Random playback)
RANDOM PLAY (CD)
1 Press RANDOM during normal playback or stop mode. The DVD player automatically starts random playback and the RANDOM indicator in the DVD display window appears.
2 To resume normal playback, press RANDOM. The RANDOM indicator in the DVD display lights up
NOTE
- Random playback may not be possible on certain discs.
- If you press the SKIP [▶or▶] button during random playback, the DVD player goes to another track randomly and starts playback.

GB
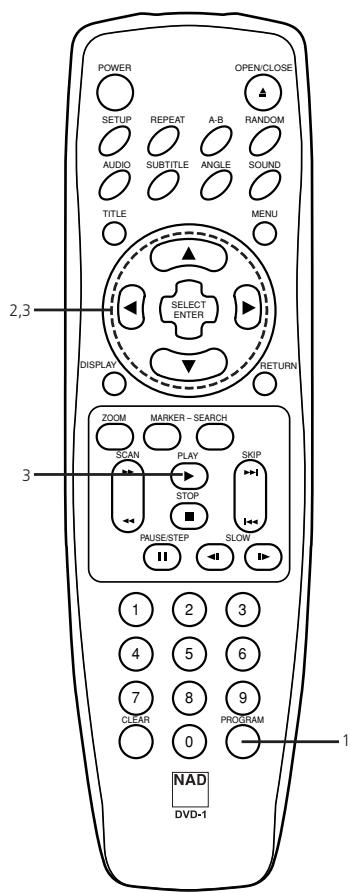
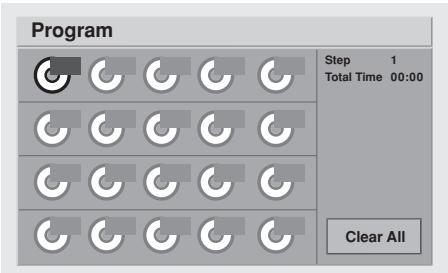
The player plays the tracks on the disc in the order you specify.
NOTE
- Program play function is possible only with audio CDs. It does not work with DVD movie discs
1 Press PROGRAM during playback or stop mode. The program playback screen appears on the TV screen.
To exit the screen, press PLAY or PROGRAM.
2 Press / / and press the numeric button(s)to select the desired track number.
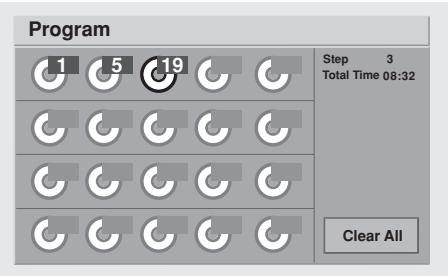
Repeat step 2 to select another track.
Up to 20 tracks can be programmed.
3 Press PLAY or SELECT/ENTER to exit the screen. The selected track is stored in the memory and play now begins in the programmed sequence.
- If you press PROGRAM to exit the screen, the selected tracks are not memorized.
After playback of all tracks programmed
Play is stopped.
CLEARING THE PROGRAM
To clear the programmed tracks one by one
Press / / to select the unwanted number and then press CLEAR.
To clear all programmed tracks
Press / / / to select Clear All and then press SELECT/ENTER. Press PLAY or SELECT/ENTER to exit the screen. If you press PROGRAM to exit the screen, the programs are not cleared. (The programs are also cleared when the power is turned off or the disc removed.)
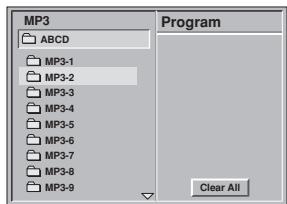
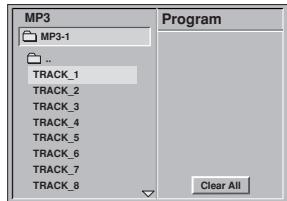
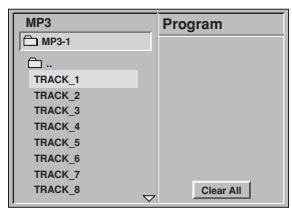
TO PLAY AN MP3 DISC
1 Load an MP3 disc. The MP3 menu is displayed.
2 Press / buttons to select the directory where MP3 files that you want to play are located and then press SELECT/ENTER
3 Press / button to select the desired MP3 file of the selected directory of your disc
If you want to return to the previous menu, press the RETURN button.
4 Press SELECT/ENTER or PLAY to start playback of the file
FOR YOUR REFERENCE
Press SKIP or SKIP to play the next file or previous file during playback.
- Press TITLE to move to 1st page of current directory during playback and press TITLE again to move to the next page within 5 seconds.
- Press MENU to move to the Root Directory during playback.
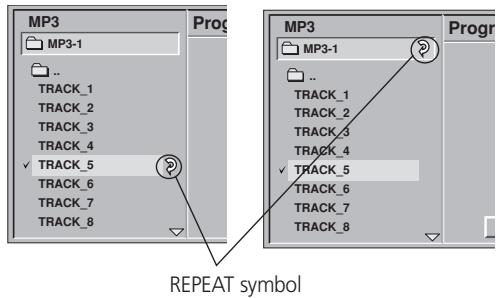
TO PLAY AN MP3 FILE REPEATEDLY
- If you press REPEAT button once during play, the current MP3 file will play repeatedly.
- If you press REPEAT button twice during play, the directory will play repeatedly.
- If you press REPEAT button three times, the repeat play will be cancelled.
NOTES
- The directory and file name is only displayed in English.
- If there is an impossible code to display, it will be displayed underlined ( ) instead of English.
- If a directory has no MP3 file, the is displayed with the directory name.
This unit can play up to 256 files per disc. A disc recorded with more than 256 files cannot be played. - The maximum allowable depth of nested directory is 50.
- Disc format is compatible with ISO9660 only.
- If you record mp3 files using the software which cannot create a FILE SYSTEM, for example Direct-CD etc., it is impossible to playback mp3 files. We therefore recommend that you use Easy-CD Creator, which creates an ISO9660 file system.
- A single session disc requires mp3 files in the first track. If there is no mp3 file in the 1st track, it cannot playback mp3 files. If you wish to playback mp3 files, format all the data in the disc or use a new one.
- If there are already data files which are not mp3 files on the CD-R disc, please, do not use that disc; use a new one instead. However, if the disc is a CD-RW disc, this does not apply.
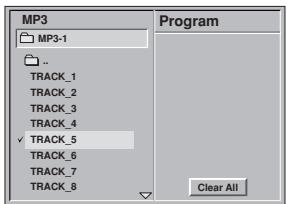
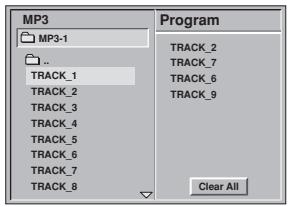
TO PROGRAM PLAY AN MP3 FILE
1 Follow steps 1 and 2 on previous page.
2 Select an MP3 file to program with /
3 Press PROGRAM button to add an MP3 file to the program list. Repeat steps 2 - 3 to select another track. Up to 60 files can be programmed.
4 Press button and select the desired MP3 file and press SELECT/ENTER or PLAY button to play. If you want to enter the main menu, press button.
CLEARING THE PROGRAM
To clear the programs one by one
Press / / to select the unwanted MP3 file on the program list and then press CLEAR.
To clear all the programs
Press / / to select the Clear All and press SELECT/ENTER.
TO PLAY AN MP3 PROGRAM REPEATEDLY
- If you press REPEAT button once during play, the current MP3 file will play repeatedly.
- If you press REPEAT button twice during play, the all MP3 files on the program list will play repeatedly.
- If you press REPEAT button three times, the repeat play will be cancelled.
REPEAT symbol

PLAYABLE DISCS
This DVD player can play back the following discs.
| Disc Mark | Contents | Disc size | Maximum playback time | |
| DVD video discs | VIDEO VIDEO COMPACT DISC DIGITAL VIDEO | Audio+ Video (moving pictures) | 12 cm | Approx. 4 hours (single sided disc) |
| Approx. 8 hours (double sided disc) | ||||
| 8 cm | Approx. 80 minutes (single sided disc) | |||
| Approx. 160 minutes (double sided disc) | ||||
| Audio CDs | COMPACT DISC DIGITAL AUDIO | Audio | 12 cm | 74 minutes |
| 8 cm | 20 minutes |
In addition this unit can play back a CD-R or CD-RW that contains audio titles or MP3 files
You cannot playback discs other than those listed above. (Video CD CD-ROM, CD-Extra, CD-G, photo CD, and CD-i discs cannot be played on this DVD player.)
REGION MANAGEMENT INFORMATION
Region Management Information: This DVD Player is designed and manufactured to respond to the Region Management Information that is recorded on a DVD disc. If the Region number described on the DVD disc does not correspond to the Region number of this DVD player, this DVD player cannot play that disc.
The Region number of this DVD player is 2.

NOTES ON UNAUTHORIZED DISCS
You may not be able to play back some DVD video discs on this player if they were purchased from outside your geographic area or made for business purposes. When you try to play back an unauthorized disc, "Check Regional Code" appears on the TV screen.
NOTES ON COPYRIGHT
It is forbidden by law to copy, broadcast, show, broadcast on cable, play in public, and rent copyrighted material without permission.
DVD video discs are copy protected, and any recordings made from these discs will be distorted.
This product incorporates copyright protection technology that is protected by method claims of certain U.S. patents and other intellectual property rights owned by Macrovision Corporation and other rights owners. Use of this copyright protection technology must be authorized by Macrovision Corporation, and is intended for home and other limited viewing uses only, unless otherwise authorized by Macrovision Corporation. Reverse engineering or disassembly is prohibited.
BEFORE CALLING SERVICE PERSONNEL
SYMPTOMS AND CORRECTION
Check the following guide for the possible cause of a problem before contacting service.
| SYMPTOM | CAUSE | CORRECTION |
| No power | ·The power cord is disconnected | ·Plug the power cord into the wall outlet securely. |
| The power is on, but the DVD player does not work. | ·No disc is inserted. | ·Insert a disc (Check that the DVD or, audio CD indicator in the DVD display is lit). |
| No picture | ·The TV is not set to receive DVD signal output. | ·Select the appropriate video input mode on the TV so that the picture from the DVD player appears on the TV screen. |
| ·The video cable is not connected securely. | ·Connect the video cable into the jacks securely. | |
| ·The connected TV power is turned off. | ·Turn on the TV. | |
| No sound | ·The equipment connected with the audio cable is not set to receive DVD signal output. | ·Select the correct input mode of the audio receiver so you can listen to the sound from the DVD player. |
| ·The audio cables are not connected securely. | ·Connect the audio cable into the jacks securely. | |
| ·The power of the equipment connected with the audio cable is turned off. | ·Turn on the equipment connected with the audio cable. | |
| ·The Digital Audio Output is set to the wrong position. | ·Set the Digital Audio Output to the correct position, then turn on the DVD player again by pressing the POWER button. | |
| The playback picture is poor | ·The disc is dirty. | ·Clean the disc. |
| The DVD player does not start playback | ·No disc is inserted. | ·Insert a disc (Check that the DVD, or audio CD indicator in the DVD display is lit). |
| ·An unplayable disc is inserted. | ·Insert a playable disc (Check the disc type, color system and Regional code). | |
| ·The disc is placed upside down. | ·Place the disc with the playback side down. | |
| ·The disc is not placed within the guide. | ·Place the disc on the disc tray correctly inside the guide. | |
| ·The disc is dirty. | ·Clean the disc. | |
| ·A menu is on the TV screen. | ·Press the SETUP button to turn off the menu screen. | |
| ·The Rating level is set. | ·Cancel the Rating function or change the rating level. | |
| The remote control does not work properly. | ·The remote control is not pointed at the remote sensor of the DVD player. | ·Point the remote control at the remote sensor of the DVD player. |
| ·The remote control is too far from the DVD player. | ·Operate the remote control within about 23 ft (7 m). | |
| ·There is an obstacle in the path of the remote control and the DVD player. | ·Remove the obstacle. | |
| ·The batteries in the remote control are exhausted. | ·Replace the batteries with new ones. |
DVD PLAYER / OUTPUTS / SUPPLIED ACCESSORIES
DVD PLAYER
| Power supply | AC 110-240V, 50/60Hz |
| Power consumption | 14 W |
| Mass | 2.8 kg |
| External dimensions (W X H X D) | 430 x 75.6 x 242 mm |
| 16.9 x 3.0 x 9.5 inches | |
| Signal system | PAL 625/50, NTSC 525/60 |
| Laser | Semiconductor laser, wavelength 650 nm |
| Frequency range (audio) | DVD: (PCM 96 kHz) 4 Hz to 22 kHz |
| DVD: (PCM 96 kHz) 4 Hz to 44 kHz | |
| CD: 4 Hz to 22 kHz | |
| Signal-to-noise ratio (audio) | More than 100 dB (EIAJ) (ANALOGUE OUT only) |
| Dynamic range (audio) | DVD: More than 100 dB (EIAJ) (ANALOGUE OUT only) |
| CD: More than 95 dB (EIAJ) (ANALOGUE OUT only) | |
| Harmonic distortion (audio) | 0.008 % |
| Operating conditions | Temperature: 5°C to 35°C, Humidity 5% to 90% |
| Operation status | Horizontal |
OUTPUTS
| Video output | 1.0 V (p-p), 75Ω, negative sync., RCA jack x 1/SCART |
| S-video output | (Y) 1.0 V (p-p), 75Ω, negative sync., Mini DIN 4-pin x 1(C) 0.3 V (p-p), 75Ω |
| Audio output (digital audio) | 0.5 V (p-p), 75Ω, RCA jack x 1 |
| Audio output (optical audio) | Optical connector x 1 |
| Audio output (analog audio) | 2.0 Vrms (1 kHz, 0 dB), 330Ω, RCA jack (L, R) x 1/SCART |
SUPPLIED ACCESSORIES
| Video cable | 1 |
| Audio cable | 1 |
| Remote control | 1 |
| Batteries | 2 |
- Designs and specifications are subject to change without notice.
Manufactured under license from Dolby Laboratories. "Dolby", and the double-D symbol are trademarks of Dolby Laboratories. Confidential unpublished works. Copyright 1992-1997 Dolby Laboratories. All rights reserved.
"DTS" and "DTS Digital Out" are trademarks of Digital Theater Systems, Inc.

www.NADelectronics.com
©2002 NAD ELECTRONICS INTERNATIONAL A DIVISION OF LENBROOK INDUSTRIES LIMITED