USER MANUAL S170I NAD
The lightning flash with arrowhead symbol, within an equilateral triangle, is intended to alert the user to the presence of uninsulated "dangerous voltage" within the product's enclosure that may be of sufficient magnitude to constitute a risk of electric shock to persons.
The exclamation point within an equilateral triangle is intended to alert the user to the presence of important operating and maintenance (servicing) instructions in the literature accompanying the appliance.
PRECAUTIONS
Read the Operating Instructions carefully and completely before operating the unit. Be sure to keep the Operating Instructions for future reference. All warnings and cautions in the Operating Instructions and on the unit should be strictly followed, as well as the safety suggestions below.
INSTALLATION
1 Water and Moisture - Do not use this unit near water, such as near a bathtub, washbowl, swimming pool, or the like.
The unit is moved from a cold spot to a warm spot.
The unit is used in a very humid room.
When this unit has condensation inside, it may not function normally. Should this occur, leave the unit for a few hours, then try to operate again.
8 Wall or ceiling mounting - The unit should not be mounted on a wall or ceiling, unless specified in the Operating Instructions.
WARNING! TO REDUCE THE RISK OF FIRE OR ELECTRONIC SHOCK, DO NOT EXPOSE THIS APPLIANCE TO RAIN OR MOISTURE
This product is manufactured to comply with the radio interference requirements of EEC DIRECTIVE 89/68/EEC and 73/23/EEC
ELECTRIC POWER
1 Power Sources - Connect this unit only to power sources specified in the Operating Instructions, and as marked on the unit.
2 Polarization - As a safety feature, some units are equipped with polarized AC power plugs which can only be inserted one way into a power outlet. If it is difficult or impossible to insert the AC power plug into an outlet, turn the plug over and try again. If it still does not easily insert into the outlet, please call a qualified service technician to service or replace the outlet. To avoid defeating the safety feature of the polarized plug, do not force it into a power outlet.
3 AC power cord - When disconnecting the AC power cord, pull it out by the AC power plug. Do not pull the cord itself.
Never handle the AC power plug with wet hands, as this could result in fire or shock.
Power cords should be routed to avoid being severely bent, pinched, or walked upon. Pay particular attention to the cord from the unit to the power socket.
Avoid overloading AC outlets and extension cords beyond their capacity, as this could result in fire or shock.
4 Extension cord - To help prevent electric shock, do not use a polarized AC power plug with an extension cord, receptacle, or other outlet unless the polarized plug can be completely inserted to prevent exposure of the blades of the plug.
CAUTION
Modifications or adjustments to this product, which are not expressly approved by the manufacturer, may void the user's right or authority to operate this product.
MAINTENANCE
Clean the unit only as recommended in the Operating Instructions.
DAMAGE REQUIRING SERVICE
Have the unit serviced by a qualified service technician if
The AC power plug has been damaged.
DO NOT ATTEMPT TO SERVICE THE UNIT YOURSELF
OWNER'S RECORD
For your convenience, record the model number and serial number (you will find them on the rear of your set) in the space provided below. Please refer to them when you contact your dealer in case of difficulty.
Model No.:
Serial No.:
Safety Information 2-3
Getting the Most from the NAD S170i 5
Unpacking and Setup 6
What's in the Box. 6
Choosing a Location. 6
About the S170i .7-8
E.A.R.S. 7
About THX. 7
Ease of Use 7
Integration 7
Upgradability 8
About the HTR 2 System Remote Control 8
About the ZR 2 Zone 2 Multi Source Remote Control 8
Quickstart 9
Play a DVD Movie (or Music CD) 9
Front Panel 10
Rear Panel 11
Setting up the S170i 12
Getting Started. 12
Using the HTR 2 Remote. 12
Dealing With Hum and Noise 12
About the On-Screen Displays (OSD) and Front-Panel Readout 13
Displaying the Menus 13
Configuring the S170i 14-20
Display setup 14
Audio setup 15
Speaker Setup 17
Level setup 17
Delay setup 18
Source Setup 19
Trigger setup 20
Using the S170i 22-30
Selecting Sources 22
Adjusting the Volume 23
Setting Listening Modes 23
Adjusting Channel Levels 26
Adjusting the Tone Controls 27
Front Panel Operations 28
Listening in a Remote Zone (MultiSource) 29
NAD Link 29
System Integration (RS-232) 30
Using the HTR 2 Remote Control 31-38
Overview of the HTR 2 31
Learning Codes From Other Remotes 32
Library Mode 32
Punch-Through 33
Copy a Command From Another Key 33
Macro Commands 34
Recording Macros. 34
Executing Macros 34
Key-Illumination Time-out 34
Factory Reset 35
Delete Mode 35
Summary of HTR 2 modes 36
HTR 2 Tables. 36
Troubleshooting 37
Specifications 38
THANK YOU FOR CHOOSING NAD.
The S170i AV Surround Sound Preamplifier is one of the most technologically advanced surround-processor/preamplifiers yet devised, incorporating advanced, ultra-high-speed 32-bit digital signal processing, an architecture that is fully upgradeable (in both hardware and software), and extraordinarily precise 24-bit precision/96 kHz-sampling digital-to-analog conversion for all channels.
More importantly, it is among the most musically transparent and spatially accurate designs available, the culmination of everything we've learned, over a quarter-century, about music and home-theater reproduction. With our company's "Music First" design philosophy as its guiding design principle, we're confident that the S170i will make good our promise to you of delivering both a state-of-the-art surround home-theater experience, and a genuinely audiophile-quality music listening, for many years to come.
We urge you to take a few minutes now to read right through this manual. Investing a little time now, at the outset, might save you a good deal of time later, and is by far the best way to ensure that you make the most of your investment in the NAD S170i, and get the most from this powerful and flexible home theater component.
One more thing: We urge you to register your S170i ownership on the NAD Worldwide Web site:
HTTP://NADELECTRONICS.COM/M/REGISTRATION.HTML
This is by far the best way to ensure that we at NAD world headquarters can inform you of possible future software and firmware updates, changes that might significantly enhance the performance and utility of your S170i. Please also send in your warranty card, so that your local NAD organization will have a record of your purchase, and save your original purchase receipt. This will assure you of warranty service in your area.
WHAT'S IN THE BOX
Packed with your S170i preamplifier you will find:
A removable AC cable (if you wish, any IEC-standard AC cable of suitable wattage may be substituted)
The ZR 2 second zone remote controller with battery (1 x CR2025)
A pair of white cotton gloves-for handling your S170i during setup without fear of scratches or fingerprints
SAVE THE PACKAGING
Please save the box and all of the packaging in which your S170i arrived. Should you move or otherwise need to transport your preamplifier, this is by far the safest container in which to do so. We've seen too many otherwise perfect components damaged in transit for lack of a proper shipping carton, so please: Save that box!
CHOOSING A LOCATION
We hope you will agree that the S170i's finish-quality and appearance earn it pride of place in any home theater or music system. Choose a location that is well ventilated (with at least several inches to both sides and behind), and that will provide a clear line of sight, within 25 feet/8 meters, between the preamp's front panel and your primary listening/viewing position to ensure reliable infrared remote control communications. Due to the S170i's high-speed DSP hardware and high-current audio circuits it generates a modest amount of heat, but nothing that should trouble any adjacent components. It is perfectly safe to stack additional components atop the S170i, or vice versa, but it is probably preferable (and considerably more handsome) if the S170i stands alone.
Though the S170i AV preamp is among the most powerful and sophisticated digital-surround decoder/processors available, we worked hard to make it one of the most musically transparent home theater components as well; this is what we mean by NAD's "Music First" design philosophy. Here are just a few examples:
The S170i employs the latest, most sonically pure high-performance FET components throughout its analog audio circuits
Exceedingly low output impedance from all channels (long an NAD hallmark) eliminates sonic impact from cables and amplifier input-impedances
Output mating is via reliable, sonically transparent gold-contact relays rather than sound-coloring electronics
Gold-surfaced connectors are employed throughout both internally and externally to ensure unimpeded signal transfer.
E.A.R.S.
A key element of the S170i's unique musicality is NAD's proprietary Enhanced Ambience Recovery System (EARS). In sharp contrast to many "ambience-synthesis" music-surround modes, EARS exploits the S170i's substantial DSP power to route the ambient content that is "encrypted" in virtually all natural-acoustic recordings to the appropriate main, center and surround speakers, without resorting to artificially generated reflections or regeneration. EARS' natural ambience yields a subtle but extraordinarily effective surround mode that naturally enhances the spatial presentation in a fashion suitable for serious music listening.
On the digital side, the S170i combines ultra-high-speed DSP processing employing one of the most advanced high-speed DSP "engines" available, with fully 24-bit, 96 kHz-sampling-capable D/A converters for all channels. A single, high-precision master clock runs all digital circuits to eliminate the timing errors ("jitter") that otherwise occur between digital stages, compromising sonics. The result is legitimately state-of-the-art surround decoding from Dolby Digital and DTS sources in both 5.1-channel and 6.1-channel/7.1-output modes, and genuinely superior sound quality in all modes.
ABOUT THX
The S170i preamplifier is certified by THX Ltd as meeting the rigorous requirements of its home THX/Ultra 2 program for surround controllers. This means that it is capable of delivering an audio experience equal to that of the finest commercial cinemas when its superb fundamental performance is combined with the surround enhancements mandated by the THX/Ultra 2 program.
EASE OF USE
We invested no less effort in making the S170i powerfully easy to use than that expended in making its sonic performance second to none. Its design is unusually simple for so sophisticated a component, and the HTR 2 remote controller is uniquely self-prompting and intuitive to use, as are the S170i's own front-panel and on-screen displays. A powerfully simple system of presets will permit you to fine-tune your listening setup for different conditions, and recall these multiple parameters with two key presses
INTEGRATION
The S170i preamplifier offers extensive, flexible system-integration options through its three configurable DC triggers outputs, as well as via NAD's proprietary NAD Link inter-component communications protocol. Additionally, an RS-232 serial port stands ready to integrate the preamp with still more sophisticated controllers such as touch-screen systems and whole-house automation installations.
UPGRADABILITY
A unique feature of the S170i is its modular construction. All of the S170i's "intelligence" is located on a single plug in module. This sophisticated architecture simplifies servicing, and makes future upgrading a possibility. Because of the extraordinary processing speed and power of the S170i, we frankly do not foresee the possible need for hardware upgrades at this time. Never-the-less, it's nice to know that the S170i is not likely to become obsolete anytime soon.
We have made the more likely scenario of software upgrades easy to accomplish via the high speed RS-232 port on the rear panel of the S170i. Owners who register their S170i on our international web site www.NADelectronics.com will be advised of updates. Some of these may be free of charge, and some may require royalty payments depending on the type of upgrade. The advanced user will be able to perform these upgrades by downloading files from our web site via e-mail, and installing them by connecting the S170i to a PC. Alternatively the dealer from whom you purchased your S170i should be able to assist in performing these upgrades.
ABOUT THE HTR 2 LEARNING REMOTE CONTROL
Packed with your S170i is the NAD HTR 2 multi-component learning remote control. This handy device can control a total of 8 different components, such as your DVD Player, TV set, and Satellite control box, dramatically simplifying the operation of your entire Home Theatre while reducing the "coffee table clutter" of multiple remotes. The HTR 2's buttons illuminate when any button is pressed, making operation under low light conditions easier and more enjoyable.
To operate the HTR 2, you must first select which of the 8 components or the "device" you wish to control, such as AMP, TV, DVD, etc. The remaining 46 buttons are now set to control the selected device. This can be a little confusing at first, but once understood, the power of using just one remote handset to control any device in your system makes the operation of your Home Cinema far more enjoyable.
Code tables for all NAD components are included, and other manufacturer codes are easily learned from the units' remote to any button on the HTR 2 remote. Additionally, "macros" or strings of commands that perform all the individual steps required to "play a DVD" can easily be created and stored for instant recall. This advanced functionality makes even complex AV systems easy to operate.
Please read the HTR 2 section of this manual for complete, step-by-step instructions on using all the features of this remarkable Home Theatre Remote handset.
ABOUT THE ZR 2 SECOND ZONE REMOTE CONTROL
You will also find a small remote called the ZR 2 that has the specialized function of controlling the MultiSource or Zone 2 audio output. This allows completely independent source selection and volume in a remote area of your home. Using aftermarket (Xantech) remote sensors and the NAD Link feature of the S170i, you can control the MultiSource output from the remote location with the ZR 2.
Read the section of this manual "Listening in a Remote Zone" for more information.
In case you simply cannot wait to experience the performance of your new S170i preamplifier, we provide the following "quickstart" instructions to get you underway. They assume that the DVD/CD player is connected to the VIDEO1 input and that the appropriate audio and video connections have been made.
PLAY A DVD MOVIE (OR MUSIC CD)
From the HTR 2 Press the [AMP] device key first (this selects the S170i) then press the power [ON] key, then the [DVD] key (also labeled with the numeral "1") Use the HTR 2 remote's [VOLUME up/down] keys to adjust the volume.
Start playback of the DVD/CD player. Pressing the [SURR. MODE] key of the HTR 2 (located nest to the VOLUME DOWN key) end then pressing the [Cursor ] key you can cycle through all the S170i listening modes that are available for the current input signal type (see "About the S170i's Listening Modes," below).
Depending on the signals format and connections you have made, some listening modes may not yet be available; see "Setting up the S170i" below. You may need to use the DVD player's on-screen menu system to select a surround-capable signal format.
Enjoy the movie or music, but be sure to set aside time to read this manual thoroughly and to set up, calibrate, and configure your S170i carefully.
1 POWER: Switch off to disconnect the S170i from all AC power and exit the Standby mode. Switching POWER on both reconnects the AC and actively power-up the preamp. menu on the front panel readout, and to select parameters using the using the VOLUME (SETUP) knob and subsequent presses of the SPEAKERS key (see "Configuring Your S170i," and "Front Panel Operations," below). menu on the front-panel readout, and to select parameters using the using the VOLUME (SETUP) knob and subsequent presses of the DELAY key (see "Configuring Your S170i," and "Front Panel Operations," below).
9 LEVELS : Press to access the menu on the front-panel readout, and to select parameters using the using the VOLUME (SETUP) knob and subsequent presses of the LEVELS key (see "Configuring Your S170i," and "Front Panel Operations," below).
ATTENTION!
Please make all connections to your S170i preamplifier with the unit powered off or unplugged. (It is equally wise to power-down or unplug all associated components while making or breaking any signal or AC power connections.)
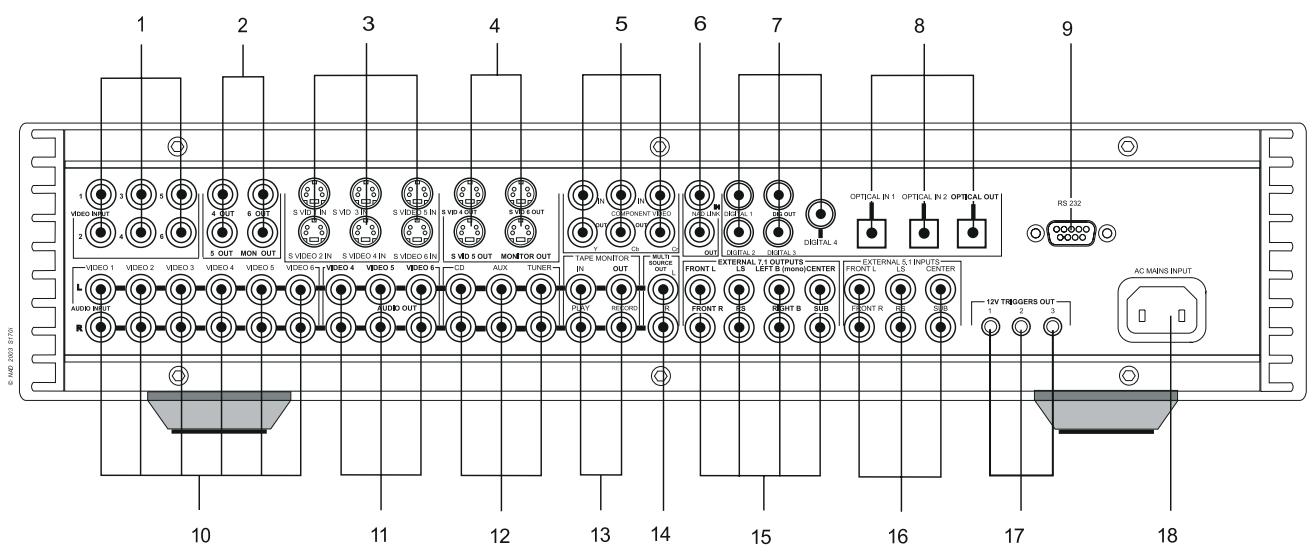
1 COMPOSITE VIDEO IN 1-6: Connect Video Inputs 1-6 to composite video from source components (see "Source Setup," below).
11VIDEO ANALOG RECENT 4-6:Connect to stereo analog inputs of recording audio-video components such as videocassette recorders.
GETTING STARTED
Before you make the first connection to your S170i, you should have the arrangement of your listening room/home theater components and furniture mapped out, at least initially. Unfortunately, a discussion of the vital questions of loudspeaker placement and listening/viewing positions is beyond our scope here. Suffice it to say that these two questions will influence your system's ultimate performance every bit as powerfully as your selection of electronics and speakers. Your NAD audio specialist dealer will be happy to advise you, and to recommend reference materials.
DEALING WITH HUM AND NOISE
The S170i requires a grounded (3-prong) AC outlet. Employing a 3-to-2 adapter to eliminate the ground prong will not compromise electrical safety, but it may increase susceptibility to hum and noise. Hum and noise sometimes prove a challenge in complex, multichannel audio systems. Note these considerations to help prevent hum and noise problems:
Power all your system's audio component from AC outlets originating from the same circuit of your house wiring. As far as possible, power all audio components from the same outlet, or adjacent outlets on the same circuit. It may be useful to power video displays (and computers!) from outlets on another circuit, especially if that circuit is supplied from the other "leg" of the house wiring.
Do not bundle analog audio cables with AC power cables, or with coaxial digital-audio cables.
Employ high-quality, well-shielded audio cable throughout, and ensure that all connections are secure.
A pencil-eraser can be used to burnish copper- and gold-plated contacts to ensure good, low-resistance contact; specialized contact-cleaners can also be useful. Avoid unnecessary unplugging and re-plugging, since the gold (or copper) contact-plating of typical cable connectors, even very high-quality ones, is very thin and easily worn.
Track down hum/noise problems one component at a time, working backwards from the power amplifier(s). That is: Connect the speakers to the power amplifier only, and check for hum. Then connect the preamplifier alone (with no other components connected to the preamp) to the power and check for hum. Then connect one source component (a CD player, for example) to the preamplifier, and check for hum. At each stage, if hum/noise appears, examine the audio cabling and AC-power routing of the new component. In some cases, moving the new component's AC cord to a different outlet, or installing a ground-lift (3-to-2-prong adapter) on its power cord, will eliminate the hum.
The S170i preamplifier employs a simple, self-explanatory system of on-screen display "menus" that will appear on the system's video monitor/TV, useful both during setup and in day-to-day operation. While the OSDs are always helpful, it is also perfectly possible to operate (or even set up) the S170i without them, because the same basic data is always shown, though sometimes in shortened format, on the preamp's own front-panel readout.
Once a video monitor (TV) is connected to the Monitor Output of the S170i, pressing the left or right / cursor keys of the HTR 2 remote will access the S170i's OSD (On Screen Display) where all system setup parameters can be easily adjusted using the up and down / and [ENTER] keys.
If the OSD does not appear, check your Monitor Out connections, and/or the settings of the and items of the menu (see below) using the S170i's front-panel readout.
NAVIGATING THE OSD AND MAKING CHANGES
Use the remote's [Cursor / ] keys to move up or down among any OSD menu's list of items; use the [Cursor / ] keys to change the value (setting) of any item; use remote's [Enter] key to select an OSD menu item. Selecting <Exit> from the Menu Page saves any changes you have made and departs that menu for the next "higher" level (or, from the Main Menu, turns the OSD off).
You may set up your S170i's levels, modes, and options in any order; it is not necessary to follow the order employed here. However, it is advisable to begin by configuring the S170i's on-screen display options, since certain of these will affect the options made available to other setup routines.
DISPLAY SETUP
From the S170i OSD's Main menu, select the item using the remote's [Cursor /▼], and [Enter] keys. Using the [Cursor ] keys, set: to "NTSC" for North American use, or "PAL." for European use.
Using the same remote keys, set:
to "On" or "Off. When "Off" is selected, on-screen menus will appear against a blue background, obscuring the current video program (if any); when "On" is selected menus will appear in white text superimposed upon the current video program (if any). to "Full," "Simple, or "Off." This controls how much information the S170i will display, monetarily, in on-screen text whenever powering on, selecting or changing a source or listening mode, or changing types of input signals. In "Full" mode a complete screen of data including input-name, audio-signal input, type, format, and listening mode, and video-signal type and input; in "Simple" mode, only input-name will appear. In "Off" mode no temporary on-screen info will be displayed. to "Auto," "SVideo," or "Compos." (composite-video). This controls which S170i video outputs will be active when a video input is selected; in "Auto" mode, the output mode will be selected according to the format of the incoming signal, with S-Video taking precedence where a source is connected via both formats. Note that the S170i preamplifier passes video signals even when it is switched to "Standby." This permits video sources such as TeleText or Web-TV devices to be used even when the balance of the system is off. to "Both," "SVideo," "Compos." (composite-video), or "Off." This controls which video outputs will carry the S170i's on-screen displays and menus. When "Both" is selected OSDs will be present on both the S-Video and composite-video Monitor Outputs; selecting "SVideo" or "Compos." confines on-screen displays to each output alone, and "Off" disables on-screen displays altogether. (In all cases, basic data remains readable via the S170i's front-panel readout, so you can, for example, see what you're doing even with OSDs set to "Off.")
NOTE THAT:
OSDs do not appear on the component-video output
Enabling OSD for a video output causes the video source signals in that format to "pass through" the OSD circuitry. Critical videophiles may wish to disable the OSD on the SVideo output for the most critical viewing/recording functions.
to "Feet" or "Meters." This selects by which measurement units you will enter your speaker-setup dimensions on the S170i's menu page (see below).
AUDIO SETUP
The menu enables you to modify tone-control settings and other listening options. Modifications you make on this menu will remain in affect until changed again, or until a Preset containing different settings is recalled (see below).
DOLBY/DTS SETUP
From the menu, select the item using the remote's [Cursor ▼] keys, then press [Enter], this will show a sub menu with the following choices to adjust the music modes of the Dolby and DTS surround decoders:
select or
When selected <On> the Panorama setting wraps the sound of the Front Left and Right speakers around you for an exciting effect.
select <1> <2> <3> <4> <5> <6>
Center Width allows you to gradually spread the Center channel sound into the Front Left and Right speakers. At the widest <Max.> setting all the Center speaker sound is mixed to the Left and Right speakers. This control may help achieve a more spacious sound, or a better blend of the front image.
select <0> <1> <2> <3>
Dimension adjusts the front/back balance to taste.
select <1> <2> <3> <4>
Center Image allows you to gradually spread the Center channel sound into the Front Left and Right speakers.
PRESET SETUP
The S170i incorporates five "Presets," memory locations in which you may store five different combinations of tone-control and relative center/surround/subwoofer channel levels to suit different requirements. For example: You might configure Preset 1 for movie-surround with tone controls set to zero and relative channel levels left at their calibrated points, but set Preset 2 for music-surround listening with slightly elevated surround- and subwoofer-channel levels, slightly reduced center-channel levels, and modified bass or treble. Presets may be configured in any way, for any purpose you see fit.
CONFIGURING PRESETS
From the menu, use the remote's [Cursor / ] and [Enter] keys to select the item. Using the same keys, select the Preset to be configured on the item; then invoke the bass and treble settings desired for that preset using the same keys. With the same keys again, set the relative levels of Center, Surround, and Subwoofer channels for that preset.
NOTE THAT:
If surround-back speaker(s) are configured as present in the OSD menu (below), their levels will be controlled along with the surround-channels levels.
Once configured, a Preset remains unchanged until you edit it via the OSD menu.
A Preset applies regardless of what source is selected, or what listening mode is in operation
Cycling the S170i through its Standby mode will cancel any previously selected Preset, reverting both tone and all level settings to those set on the HTR 2 remote's LEVELS or MODE/MULTI.S screens (below), or via the S170i preamp's (above) OSD menu. If you would like to be able to set all channel-levels and tone-control values to zero without cycling through Standby, set one Preset to "all zeroes."
Channel levels stored in presets (are added to the setup levels established on the S170i preamp's OSD menu. For example: if your establishes at “-3 dB” and you dial in a Preset center-channel level of +2 dB, the net overall effect will be a center-channel level of -1 dB. By contrast, tone-control settings override tone levels entirely.
RECALLING PRESETS
To implement the preset at any time, sequentially press the HTR 2's [AV PRESET] key and the corresponding numeral key <1 - 5> . Cycling the S170i through Standby mode will release the preset. the number of the preset invoked will appear briefly on the OSD and the S170i's front-panel display. (See also Using Presets, below)
BASS/TREBLE
From the menu, select the or item using the remote's [Cursor / ], keys. Using the [Cursor / ] keys, you may increase or decrease Bass or Treble settings by ± 12 dB by 1 dB steps.
Bass/treble settings affect only the front channels (left, center, and right), and are active in all listening modes
It is often better to "cut" (a minus setting) than boost (a plus setting); for a "warmer" overall sound try reducing Treble by a few dB instead of boosting Bass, and vice versa.
If you frequently find yourself selecting large tone control settings, you may be better served by reexamining your choice of loudspeakers, and your loudspeaker and listening-position locations to better exploit your room's acoustics.
LFE CHANNEL
The Low-Frequency Effects channel—the “point-one” channel in “5.1/6.1”—is active only with Dolby Digital or DTS multichannel sources. LFE is employed most often as a supplementary channel to enhance the dynamic range of very low-frequency sounds; it should not be confused with the S170i's Subwoofer output-channel, which may carry most or all bass information from some or all channels, depending on the configuration of the menu page.
From the menu, select the item using the remote's [Cursor / ], keys. Using the [Cursor / ] keys, you may decrease the LFE channel setting by as much as 10 dB in 1 dB decrements.
In most systems the LFE channel setting may be left at 0 dB (no change), because the S170i's Bass Limiter (see below) will be set to prevent subwoofer overload. However, if your subwoofer's headroom is known to be limited, or if the low-frequency effects of film soundtracks generally seem excessive in your system, you might profitably try decreasing the setting by a modest degree.
SPEAKER SETUP
Every surround-sound system requires "bass-management" to direct low-frequency content from any or all channels to the speakers best able to reproduce it. In order for this function to operate correctly, it is very important that you correctly identify your speakers' capabilities.
We use the terms "Small" and "Large" (and "No"), but note that physical size may be irrelevant.
A "Small" speaker is any model without significant deep-bass response, that is, below about 80Hz .
A "Large" speaker is any full-range model, that is, one with deep-bass response
A "No" speaker is one that is not present in your system. For example, you might not have any Back speakers installed; in that case, you would set the setup item to "No."
CONFIGURING SPEAKERS
From the OSD Main menu, select the item using the remote's [Cursor /▼], and [Enter] keys. Using the [Cursor ] keys, set to "Large" or "Small." Using the same remote keys, set the , , and to "Large," "Small," or "No," according to your system's loudspeaker population. Set to "Yes" only if you have a subwoofer connected to the S170i's SUB preamp analog output jack.
NOTE
The S170i permits you to set Subwoofer to "Yes" even with "Large" front speakers: In this case, bass content from any channels you set to "Small" will be routed to both the subwoofer and to the front speakers. You might want to try this arrangement way if your front speakers roll off naturally at about the 80Hz crossover frequency and can handle strong bass signals without distortion or damage. In most systems using a subwoofer, setting front speakers to "Small" is usually the best option.
There are three additional features in the menu:
Adjustable Crossover Frequency selectable in 10Hz increments from 40Hz to 140Hz . This adjusts both the High Pass (2nd order, 12 dB/octave) feed to the loudspeaker, and the Low Pass (4th order, 24dB/octave) feed to the subwoofer.
Defeatable Subwoofer Filter. This allows you to use your powered subwoofer's internal crossover. This can be beneficial to tame difficult room acoustics problems by setting the subwoofer crossover to a different frequency than the S170's High Pass filter to create a notch or an overlap in the response.
Enhanced Bass, when selected, always has the subwoofer active, regardless of speaker settings, for maximum boom.
LEVEL SETUP
Setting the relative balance of your system's loudspeakers is perhaps the most important single function of setting up your S170i. First, this process ensures that surround-sound recordings, whether music or film soundtracks, will play back with the balance of effects, music, and dialog that the artists intended. Second, if your system incorporates a subwoofer, it establishes a correct relationship between the volume of the subwoofer and the other speakers, and thus of low-frequencies (bass) to other sonic elements.
USING AN SPL METER
It is perfectly possible to perform the S170i Level setup routines "by ear," and an experienced ear will usually produce acceptably accurate results. However, the timbral differences among front, center, and surround speakers can make accurate level-matching difficult. Therefore, we strongly recommend the use of an inexpensive sound-pressure level (SPL) meter, such as Radio Shack part number 33-2050, for this task. It is quick, repeatable, and reliable. Ownership of such a meter may prove a very useful audio tool, or your NAD audio specialist may be able to help you with temporary use of a meter. Calibrating your system with an SPL meter also permits you to set its overall level so that, when the S170i's Master Volume control is set to -0 ("reference level"), the playback in your home theater matches the loudness of the same film projected in a well-set-up commercial cinema. (Of course, you can still set the Master Volume wherever you like from day to day.)
The SPL meter should be placed at the primary listening position, at approximately the height of the seated listener's head. A tripod is very useful, but with a little duct-tape almost anything—a pole lamp, music-stand, or ladder-backed chair, for example—can do as well. Just be sure that no large acoustically reflective surfaces obstruct or are near the microphone element. Orient the meter with its microphone (usually at one end) pointing straight up toward the ceiling (not forward toward the speakers) and make sure that its "C" weighting scale is selected. To calibrate your system to play at the same objective loudness as a high-quality commercial cinema, set the meter to display 75 dB SPL. (On Radio Shack meters this necessitates either setting the meter to its 80 dB range and taking your readings at the -5 point, or selecting the 70 dB range and reading at the +5 point.
This 75 dB SPL point is the "official" cinema (and THX) reference level. However, we note that no law requires you to use this level, and in fact this reference seems too loud for some users for home cinema playback. Many people find that calibrating to 70 dB SPL instead turns out just about right.
CONFIGURING LEVELS
From the OSD Main menu, select the item using the remote's [Cursor / ], and [Enter] keys. Activate the test-noise signal with the remote's [Test] key (next to the [Volume up] key); you will here a "surf" noise that cycles through your speakers, beginning with the left-front. (If you do not hear the test-noise, check your Audio Connections (above), and your OSD menu settings, (above.)
On the left-most column of the OSD you'll see an > pointing toward Left (if the is at some other line, use the remote's [Cursor / ] keys to move it to Left .) Now use the remote's [Cursor / ] keys to adjust the noise output from the Left (left-front) speaker; the test-noise will automatically move there and the "level offset" reading on the right will change by 0.5 dB increments. If you are using an SPL meter, adjust the Left output to produce a reading of 75 dB SPL C-weighted (or whatever other reference level you have chosen to adopt)
If you are balancing levels "by ear" you will have to choose one speaker—usually the center—as a reference and adjust each of the others so that is "sounds as loud" as the reference.
Using the remote's [Cursor / ] and [Cursor / ] keys, adjust each speaker in turn to produce the same SPL meter reading (or subjective loudness), within ± 1 dB or better; the S170i's ability to calibrate outputs by 0.5 dB steps should facilitate this precision.
NOTE THAT:
All speakers must be in their final locations before level-setting.
Your subwoofer (if any) should be set with its integral crossover defeated, or set to its highest-possible frequency.
Due to the effects of room acoustics, matched-pair speakers (front; surround; back) will not always calibrate to exactly the same level offset readings.
If you are particularly meticulous, you may wish to come back and re-check your level setup after completing the Delay setup routine (below).
DELAY SETUP
Your system's channel-delay settings are a subtle but important refinement of your setup. By informing the S170i of the loudspeaker-to-listener dimensions of each speaker, it will automatically impose the correct delays for each channel, optimizing imaging, intelligibility, and surround-sound ambience. Enter your dimensions with precision within about 1 foot/30 cm.
CONFIGURING DELAYS
From the OSD Main menu, select the item using the remote's [Cursor ▼], and [Enter] keys. Using the [Cursor ▶] keys, set to the distance between your principal listening position and the front surface of the front-right loudspeaker.
Using the same remote keys, set the remaining speakers, each to the distances of your system layout. Where a particular speaker is not present in your system, "None" will be displayed and no distance setting will be possible.
SOURCE SETUP
The S170i is equipped with nine total inputs: six audio-video inputs (labeled on the rear panel VIDEO1-6), and 3 audio-only inputs (labeled CD, AUX, and TUNER). There is also an audio-only TAPE MONITOR loop. For each input position of the S170i, you may select a digital input to become active whenever that input is selected, and you may assign a 7-character name which will be displayed on the front-panel display and momentarily on the on-screen display whenever that input is selected.
CONFIGURING SOURCES
From the OSD Main menu, select the menu item using the remote's [Cursor / ], and [Enter] keys. Using the [Cursor / ] keys, call up the source you wish to configure. Sources are numbered 1-9, which correspond in order to Video01-6, CD, AUX, and TUNER on the rear panel (the TAPE MONITOR loop is not configurable, and will not appear in the rotation). Use the [Cursor] (down) key to move to the menu item, and press the [Enter] key. You may now edit the default title ("Video 1", "CD," etc.) to a more meaningful name, up to 7 characters. The [Cursor up/down] keys scroll through the complete list of available characters, while the [Cursor / ] keys move left and right across the six characters (you may back up and change characters freely). When you are finished with the title, press [Enter] to return to the <Source setup> menu</p>
<p>Using the [Cursor] (down) key scroll down to the <Digital input> menu item. Use the [Cursor ] keys to assign a digital input to the current source. The digital inputs will appear in order: Coax1-4, OPT 1, and Opt 2, followed by Off. You would set a source's <Digital input> to "Off" if you wished to ensure that that source would not play an incoming digital bitstream.</p>
<h1 id="note-2">NOTE</h1>
<p>You may freely assign any digital input to any source position, and you may assign a digital input to two or more source positions. For example, with your DVD/CD player connected to the COAX1 digital input, you might choose to assign COAX1 to both the "CD" and "VIDEO1" inputs, renaming Video1 to "DVD."</p>
<p>The following characters are available:</p>
<p>ABCDEFGHIJKLMNOPQRSTUVWXYZ0123456789</p>
<p>abcdefghijklmnopqrstuwxyz*-:/</p>
<p>Using the [Cursor] (down) key scroll down to the <Component video> menu item. Use the [Cursor / ] keys to set Component video to "On" or "Off." When a source is set to Component video "On," the video signal present at the S170i's COMPONENT VIDEO IN (Y-Cb-Cr) jacks will be sent to its COMPONENT VIDEO OUT jacks whenever that input is selected.</p>
<ul>
<li>OSDs do not appear on the component-video output.</li>
</ul>
<h1 id="trigger-setup">TRIGGER SETUP</h1>
<p>The S170i is equipped with 3 12-volt trigger outputs that may be used to turn on, activate, or otherwise control ancillary components or systems, such as power amplifiers, projector-lifts, lighting systems, and more. Their function could be as simple as powering up and down your NAD S250 power amplifier, or as complex as readying an entire home-theater room for use. For more technical information on the S170i's 12-volt trigger outputs, see Appendix 1, or consult your installing NAD audio specialist.</p>
<h1 id="simple-12-volt-trigger-configuration-example-powering-the-nad-s250-power-amplifier">Simple 12-Volt Trigger Configuration Example: Powering the NAD S250 Power Amplifier</h1>
<p>The following example employs the S170i's 12V Trigger #1 to turn the S250 amplifier on and off in concert with the preamplifier.</p>
<ul>
<li>Using the 12V Trigger cable supplied with the S170i connect the S170i's rear panel 12V Triggers jack marked #1 to the 12V Trigger input jack on the power amplifier. Note that this custom cable provides an 1/8th-inch mini-plug on one end for the S170i, and a special, DC-style plug on the other to fit the S250 amplifier's trigger input. </li>
<li>From the OSD Main menu, select the <Trigger setup> item using the remote's [Cursor / ], and [Enter] keys. The <Trigger 1> listings should appear as follows (these are the defaults):</li>
</ul>
<p>polarity Posit.</p>
<p>delay No</p>
<p>duration Infin.</p>
<p>If any other settings are in place, use the remote's [Cursor ] and [Cursor ] keys to change them to the above conditions.</p>
<h1 id="thx-audio-setup">THX AUDIO SETUP</h1>
<p>THX Surround EX creates a sixth, "center-back" channel intended for reproduction by one or more loudspeakers located behind the listening area. With recordings bearing the Dolby Surround EX mark, this delivers a specifically engineered center-back channel that is encoded into the left/right surround channels-precisely as the center channel was encoded into the left/right front channels in matrix-encoded Dolby Surround mixes. However, the THX Surround EX processing will often produce a useful center-back effect even from software that was not, originally, deliberately encoded for EX playback.</p>
<h1 id="bass-limiter">BASS LIMITER</h1>
<p>The S170i incorporates a Bass Limiter that you can set to eliminate any chance of your subwoofer producing audible distortion. You will do this by auditioning a built-in test-noise signal the S170i sends to your subwoofer, and increasing the Bass Limiter's "headroom" setting to the point of audible distortion. The Bass Limiter now prevents any program-material signals exceeding this level from being sent to the subwoofer.</p>
<h1 id="configuring-the-bass-limiter">CONFIGURING THE BASS LIMITER</h1>
<p>From the <THX Audio setup> menu, use the remote's [Cursor / ] and [Enter] keys to select the <Bass limiter setup> item. Using the same keys, set <Bass limiter> to "On" and <Limiter noise> to "On"; you will hear a soft rumbling from your subwoofer. (If you do not hear sound from the sub, check your subwoofer audio and power connections, check Speaker Setup, below, and/or check the subwoofer's own "hardware" control settings)</p>
<p>Now use the remote's [Cursor ] keys to move to the <Limiter level> item, and [Cursor ] to decrease the limiter setting by 1 dB increments. As you do, the test-noise from the subwoofer will increase in level. Listen for the point at which audible distortions (harshening, "clacking," "chuffing," or other extraneous elements) become evident, then use [Cursor ] to return (increase) the limiter level by 1 or 2 dB until the distortion ceases. This establishes the "distortion-free" limit for your current subwoofer setup. It is advisable to return and re-check your Bass Limiter setup after you have completed the Level Setup routines (see below).</p>
<ul>
<li>Even after the Bass Limiter is set you may usefully engage its test-noise to "search and destroy" the room-rattles that are inevitably excited by high-level subwoofer output. (Window-treatments, electrical wall-plates, and hanging artwork are three common sources.) </li>
<li>Should you ever change subwoofoers, or reposition your current subwoofer or listening position, you should repeat the Bass Limiter setup routine. </li>
<li>With a high-performance subwoofer, this routine can get rather loud. It is often best to await an opportune moment when spouses/children/pets are not at home to perform Bass Limiter setup fully.</li>
</ul>
<h1 id="boundary-gain-compensation">BOUNDARY GAIN COMPENSATION</h1>
<p>This THX Ultra 2 feature compensates for the audio gain (level increase) when the subwoofer is placed against a wall or near a room corner.</p>
<h1 id="note-3">NOTE</h1>
<p>This feature is only applicable when using a THX Ultra 2 certified subwoofer for which the frequency response and sensitivity are part of the specification.</p>
<p>Select <THX Ultra2 Sub> using the remote's [Cursor / ] keys, then select <Yes> or <No> using the remote's [Cursor / ] keys. Then using the remote's [Cursor / ] keys select <Boundary gain comp.>, then select <On> or <Off> using the remote's [Cursor / ] keys.</p>
<h1 id="note-4">NOTE</h1>
<p>Boundary gain compensation can only be selected if the <THX Ultra2 Sub> menu item is selected to <Yes>.</p>
<h1 id="asa">ASA</h1>
<p>This THX feature adjusts the gain and delay of the Back Surround speakers to compensate for their physical location in the listening room. Choose from three possible locations: together, close, or apart.</p>
<h1 id="note-5">NOTE</h1>
<p>You must have two (7.1) Back Surround speakers for this feature to work.</p>
<p>Select <Back speakers> using the remote's [Cursor ] keys, then select <Together> or <Close> or <Apart> using the remote's [Cursor ] keys.</p>
<p>You may operate the S170i preamplifier equally from its front panel or via the HTR 2 remote controller. Since the remote will be the primary controller for most cases, we will focus on remote-controlled operations. Be sure to read the section, "Front Panel Operations," below.</p>
<h1 id="selecting-sources">SELECTING SOURCES</h1>
<p>From the HTR 2 select[AMP]; then use the numeric keys [1 - 10+] also labelled in the same color red as the [AMP] key for [DVD], [SAT], [VCR], [VIDEO], etc. to select directly those sources.</p>
<h1 id="note-that-4">NOTE THAT:</h1>
<ul>
<li>When an audio-only source is selected, the most recently-selected video signal remains selected, until another audio-video input is selected </li>
<li>When you change sources, the OSD will, depending on the Display setup settings (above) momentarily show information about the new input. The level of detail depends on the setting of the <Temporary disp.> item: "Full" will show all information about the newly selected input's audio, digital, and video signals; "Simple" will show only the new input name, and "Off" will prevent any display from appearing. </li>
<li>A newly selected input's listening mode (Stereo, EARS, Dolby Digital, etc.) will revert to the mode that was employed the last time that input was chosen, except that a multi-channel digital source (Dolby Digital or DTS) source will automatically switch to 5.1/6.1-channel surround, even if the input was last used in another mode such as Stereo or EARS. </li>
<li>The Ext5.1 input participates in the S170i's source "rotation" like any other audio-only source. However, since the Ext5.1 input is a "straight-through" source it does not receive bass-management, tone-control, or any other preamp functions; signals appearing at the rear panel's EXTERNAL 5.1 INPUTS pass directly to the corresponding six of the PREAMP ANALOG 7.1 OUTPUTS jacks with no processing other than master-volume control. Bass-management and any other desired processing should be performed by the multichannel external source component.</li>
</ul>
<p>There is an adjustable INPUT LEVEL CONTROL for the analog sources with an INPUT LEVEL METER to make adjustment easy and accurate. This circuit will automatically adjust the individual input to prevent overload of the A/D converter (converter of analog signals to digital, for surround processing) and does not require the user to make any adjustments. But you may want to adjust the input level manually so that each source plays at the same subjective loudness level. Since the automatic adjustment only looks at peak signals, sources with a wide dynamic range (classical music CDs) will sound subjectively softer than sources with a narrow or compressed dynamic range (rock music radio broadcasts).</p>
<p>To adjust INPUT LEVEL, first enter the OSD (On Screen Display) by pressing the RIGHT CURSOR KEY and scroll down to SOURCE SETUP with the DOWN ARROW KEY and press ENTER.</p>
<p>From the SOURCE SETUP MENU select ANALOG SENSITIVITY and use the RIGHT/LEFT CURSOR KEY to adjust the INPUT LEVEL. The range of adjustment is -5dB to +10dB. You can also select ANALOG MON to view a vertical bar graph display (with Peak Hold function) of input level. In this mode use the UP/DOWN CURSOR KEY to expand the meter scale from -20dB to 0dB, to -40dB to 0dB.</p>
<h1 id="adjusting-the-volume">ADJUSTING THE VOLUME</h1>
<p>Use the HTR 2 remote's <Volume up/down> keys to adjust the "master volume" of the S170i, raising or lower all channels together.</p>
<h1 id="note-that-5">NOTE THAT:</h1>
<ul>
<li>A momentary keypress will change the master volume by 1 dB increments; if you hold down <Volume up/down> the master-volume change will "run-on" until the key is released. </li>
<li>The S170i's OSD will show the volume setting as a line graphic relative to the reference level (the "+" mark on the line), with a numeric display above in dB relative to the reference level. (If the <Display setup> <Temporary disp.> item is set to "Off" the momentary volume indication will NOT appear.)</li>
</ul>
<p>Since recordings vary considerably in overall average level, there is no imperative to listen at the reference level or any other particular setting. A setting of -20 may sound "as loud" from one CD as -10 does from another.</p>
<ul>
<li>If muting has been activated (below), increasing the master-volume via the HTR 2 remote's [Volume up/down] keys or the front-panel knob automatically releases the mute function; decreasing volume retains muting. </li>
<li>The S170i will power-up/return from Standby mode at whatever master volume setting was last used; however, if the prior setting was greater than -20 dB the S170i will power up to -20 dB. This prevents inadvertently beginning a session at excessive volume.</li>
</ul>
<h1 id="muting-the-sound">MUTING THE SOUND</h1>
<p>Use the HTR 2 remote's <Mute> key to silence all channels completely. Muting is always available, regardless of source or listening mode selections.</p>
<h1 id="note-that-6">NOTE THAT:</h1>
<ul>
<li>Cycling through Standby or powering off releases muting; the S170i will always power up or return from Standby with muting off. </li>
<li>Changing input or listening-mode selections does not release muting. </li>
<li>Increasing the master-volume via the HTR 2 remote's [Volume up/down] keys or the front-panel knob automatically releases the mute function; decreasing volume retains muting.</li>
</ul>
<h1 id="setting-listening-modes">SETTING LISTENING MODES</h1>
<h1 id="about-the-s170is-listening-modes">ABOUT THE S170i'S LISTENING MODES</h1>
<p>The S170i preamplifier offers seven distinct listening modes, tailored for different types of recordings or program material.</p>
<h1 id="mono">MONO</h1>
<p>All output is directed to the center channel or left and right channels if there is no center channel present or selected; low frequencies are directed to the subwoofer if one is present in the Speaker setup</p>
<p>Mono mode is best selected for monaural recordings originally produced in single-channel format, including classic films and historic music recordings. It ensures a stable, clear monaural presentation with correct bass management.</p>
<h1 id="stereo">STEREO</h1>
<p>Stereo recordings, whether in PCM/digital or analog form and wither surround-encoded or not encoded, are reproduced as recorded; multichannel digital recordings (Dolby Digital and DTS) are reproduced via the left- and right-front channels only, as Lt/Rt (left/right-total or "Downmixed") signals.</p>
<p>Select Stereo mode for listening to stereo recordings when you do not wish surround-sound to be in effect, or for multichannel recordings when only two-channel playback is possible (or desired).</p>
<h1 id="direct-dolby-digitaldts-sources-only">DIRECT (DOLBY DIGITAL/DTS SOURCES ONLY)</h1>
<p>Multichannel digital recordings (Dolby Digital or DTS) are reproduced via only the channels employed in the original recording. For example, a "5.1-channel" Dolby Digital 3/2/1 recording will reproduce via the front left-center-right, surround-left/right, and subwoofer speakers; a Dolby Digital 2/0/0 recording will reproduce via only the front-left and -right speakers (and he subwoofer if these were set to "Small" on the <Speaker setup> OSD menu.</p>
<h1 id="dolby-ex-dts-es-thx-ex-surround-61">DOLBY EX, DTS ES, THX EX, SURROUND 6.1</h1>
<p>Multichannel digital recordings (Dolby Digital or DTS) are reproduced via the full suite of front, surround, and one or two "back"-channel speakers (if selected in <Speaker Setup>). If Dolby Digital EX/DTS ES encoding is present in the original recording its logic is used to derive the back channels; otherwise, the S170i preamplifier derives a single back-channel signal from the left/right surround channels.</p>
<h1 id="dolby-pro-logic">DOLBY PRO LOGIC</h1>
<p>Surround-encoded recordings (and stereo recordings that are not encoded) are reproduced with Pro Logic Dolby Surround decoding, with output to left, center-, and right-front channels and a single monaural surround signal sent to both surround-channel speakers; the surround channel's response is rolled off above 7 kHz to discourage localization of surround-speaker locations in DPL mode).</p>
<p>Pro Logic mode is best reserved for surround-encoded recordings intended for Dolby Surround or compatible-system reproduction. These include most films on videotape and many on LaserDisc, television/cable programming produced for surround-sound, and most older LaserDiscs. Most DVD recordings, even those that do not exploit multichannel surround, include a Dolby Digital and/or DTS soundtrack in 1- or 2-channel modes; where available, this will usually deliver better performance. With rare exceptions, NAD's proprietary EARS listening mode will produce superior results from stereo music recordings than will Pro Logic.</p>
<h1 id="dolby-pro-logic-ii-movie">DOLBY PRO LOGIC II MOVIE</h1>
<p>Similar to Dolby Pro Logic, this improved algorithm applies logic after the matrix decoding, rather than before as in Pro Logic, improving image stability and the precision of signal steering. Surround channels are also run full range.</p>
<h1 id="dolby-pro-logic-ii-music">DOLBY PRO LOGIC II MUSIC</h1>
<p>Fine tuned for listening to music, in this mode the surround channels response is rolled off to simulate the acoustic absorption of a typical room. In addition, there are several adjustments that can be made to enhance the listening experience:</p>
<p>PL II Panorama When selected the Panorama setting wraps the sound of the Front Left and Right speakers around you for an exciting effect.</p>
<p>PL II Center Width Center Width allows you to gradually spread the Center channel sound into the Front Left and Right speakers. At the widest setting all the Center speaker sound is mixed to the Left and Right speakers. This control may help achieve a more spacious sound, or a better blend of the front image.</p>
<p>PL II Dimension Dimension adjusts the front/back balance to taste.</p>
<h1 id="dts-neo6-cinema">DTS NEO:6 CINEMA</h1>
<p>Surround-encoded recordings (and stereo recordings that are not encoded) are reproduced with DTS Neo:6 Surround decoding, with output to left, center-, and right-front channels, and surround and surround back channels (if selected).</p>
<h1 id="dts-neo6-music">DTS NEO:6 MUSIC</h1>
<p>This music surround mode can be used to create a convincing surround sound experience using front, center, and all selected surround speakers from any 2 channel stereo source. Neo:6 allows the user to adjust the Center Image in six steps. Center Image allows you to gradually spread the Center channel sound into the Front Left and Right speakers.</p>
<h1 id="ears-2">EARS</h1>
<p>Stereo recordings (and surround-encoded stereo recordings), whether in PCM/digital or analog form, are reproduced with proprietary NAD surround processing with output to left, center-, and right-front channels and both surround-channel speakers. EARS extracts the natural ambience present in nearly all well-produced stereo recordings. It does not synthesize any ambience or other sonic elements and thus remains far truer to the sound of the original musical performance than most other music-surround options.</p>
<p>Select EARS for listening to stereo music recordings and broadcasts. EARS produces a subtle but highly natural and believable ambience from nearly all "natural-acoustic" stereo recordings; typically, these include classical, jazz, and folk genres as well as numerous examples from others. It's virtues include a realistic, stable "front-stage" sonic imaging and spacious but unexaggerated ambient "virtual acoustics" that remain faithful to the original recording.</p>
<h1 id="note-6">NOTE</h1>
<p>When listening to FM broadcasts, "multi-path distortion" may be more clearly revealed by the EARS circuit. This can be used to advantage in optimally orienting an FM antenna for a given FM station.</p>
<p>EARS cannot be applied to multichannel digital recordings (Dolby Digital/DTS); these recordings carry their own surround and ambience in their multichannel nature. However, EARS may be applied to these recordings when they are played back via the analog stereo outputs of a DVD or other player, or when the DVD or other recording's soundtrack selection is set to "stereo/PCM" rather than "5.1" or equivalent.</p>
<h1 id="analog-bypass">ANALOG BYPASS</h1>
<p>Stereo or monaural recordings from any S170i source's analog input jacks are routed directly to the left-right-front outputs with no processing whatsoever.</p>
<p>Use Analog Bypass to reproduce minimal-signal-path "audiophile" conditions for critical listening of two-channel (or monaural) sources.</p>
<p>No bass management is performed in Analog Bypass mode, so signals are reproduced by the left- and right-front channels "full-range," regardless of the settings entered on the S170i's Speaker setup page.</p>
<p>The table below indicates which listening modes are available with the three possible types of signal sources: digital-input 2-channel (whether the actual signal is monaural, stereo or surround-encoded); analog-input 2-channel (mono, stereo or surround-encoded), or digital-multichannel (Dolby Digital or DTS). Where a listening mode is not available to a given signal source, it will not appear in the <Mode> selection rotation.</p>
<table><tr><td>2-ch. PCM</td><td>2-ch. analog</td><td>Multi-ch. (DD/DTS)</td></tr><tr><td>Mono</td><td>Mono</td><td>Mono</td></tr><tr><td>Stereo</td><td>Stereo</td><td>Stereo</td></tr><tr><td>Pro Logic</td><td>Dolby Pro Logic</td><td>Direct</td></tr><tr><td>EARS</td><td>EARS</td><td>Surround 6.1*</td></tr><tr><td>—</td><td>Analog Bypass</td><td>—</td></tr></table>
<p>*If setup with "Back" speaker(s)</p>
<h1 id="selecting-listening-modes">SELECTING LISTENING MODES</h1>
<h1 id="note-that-7">NOTE THAT:</h1>
<ul>
<li>You must re-key [Mode] if a few seconds pass since your last use of the [Cursor ] to change listening modes </li>
<li>Neither changing the selected input, cycling the S170i through Standby or powering down, nor engaging mute will change the selected listening mode. </li>
<li>Changing the type of signal will change the listening mode if the new signal is a digital-multichannel recording, or is incompatible with the selected mode. For example: After listening to a CD played on a DVD/CD player via the EARS listening mode, you remove the CD and replace with a 5.1-channel multichannel DTS CD recording. The S170i will automatically engage DTS/5.1 playback.</li>
</ul>
<h1 id="about-the-thx-mode">ABOUT THE THX MODE</h1>
<p>In addition to certifying very high fundamental multichannel audio performance from components awarded the THX/Ultra logo, THX Ltd's Home THX program also mandates that Ultra components include the THX mode. This incorporates three fundamental surround-audio enhancements:</p>
<ul>
<li>Re-equalization contours high frequencies from the front channels to better match the tonal balance of the original film soundtrack as reproduced on the "dubbing stage" on which the director and sound-mixers auditioned the film during its production. </li>
<li>Timbre-matching compensates for the lateral/rearward placement of surround loudspeakers in a correctly deployed surround home theater system, achieving a more consistent tonal characteristic from sounds originating from any point around the audience positions. </li>
<li>Decorrelation mitigates the monaural surround channel delivered by all Pro Logic recordings (and some Dolby Digital and DTS sources), yielding more spacious, natural reproduction of a film's ambience and "virtual acoustics."</li>
</ul>
<h1 id="engaging-thx">ENGAGING THX</h1>
<p>From the HTR 2 remote, press the [AMP] key first, then press the [THX ] key; THX surround will be engaged. Subsequent presses of the [THX ] key will "toggle" between standard-THX and THX Surround EX modes (if available) then back to non-THX mode.Note that:</p>
<ul>
<li>THX modes are only available to digital-input sources: Dolby Digital; DTS; PCM </li>
<li>For PCM sources, the Dolby Pro Logic listening mode must previously have been engaged. </li>
<li>"Incompatible Source" will appear on the OSD and front-panel readout when THX is invoked for an analog source, when Pro Logic is not the current listening mode, or when THX Surround EX is invoked for a PCM source or a Dolby Digital or DTS non-discrete-surround source (2/0/0, 2/1/0, 3/1/1, etc.).</li>
</ul>
<h1 id="adjusting-channel-levels">ADJUSTING CHANNEL LEVELS</h1>
<p>You may make temporary changes to the relative levels of center, surround, and subwoofer outputs without abandoning the permanent levels calibrated from the OSD's Level setup item. This may prove useful in a number of circumstances, for example: to increase (or tone down) a film's dialog clarity by raising (lowering) the center channel; to enhance (or inhibit) subjective ambience from a music recording reproduced via EARS by raising (lowering) the surround-channels level; to mitigate excessive deep bass (or enhance deep bass) by lowering (raising) the subwoofer level.</p>
<h1 id="changing-channel-levels">CHANGING CHANNEL LEVELS</h1>
<p>From the HTR 2 remote Use the three vertically paired up/down key-pairs, [Surr.], [Center], and [Sub] to adjust Surround, Center-channel, or Subwoofer -channels relative levels; the changing levels will be displayed on the OSD and the front-panel readout.</p>
<h1 id="note-that-8">NOTE THAT:</h1>
<ul>
<li>Level settings are added to the setup levels established on the S170i preamp's <Levels setup> OSD menu (above). For example: If your <Level setup> establishes <Center> at "-3 dB" and you manipulate [Center up/down] level to +2 dB, the net overall effect will be a center-channel level of -1 dB. <br />
Changes made on the [LEVELS] page are canceled by cycling the S170i through its Standby mode. </li>
<li>If a Preset was is in force (previously selected), the levels from which [LEVELS] page's three controls "start" will reflect any levels stored by the preset. (See Configuring Presets, above.) </li>
<li>The [LEVELS] page will show and permit adjustment of a channel that is not present in the <Speaker setup> OSD menu. For example: Even if you have set <Center> to "No" on the <Speaker setup> OSD menu, the [Center up/down] keys will appear on the [LEVELS] page; they will have no effect, even upon the "phantom center channel" when listening in any of the surround modes. </li>
<li>If one or two surround-back channels are configured as present in the <Speaker setup> OSD menu, their levels will be raised and lowered by the [LEVELS] page's [Surr up/down] keys in lockstep with the surround channels.</li>
</ul>
<h1 id="adjusting-the-tone-controls">ADJUSTING THE TONE CONTROLS</h1>
<p>Press the [ Tone] key; "Treble" appears on the OSD and the front-panel readout. Use the remote's [Cursor Left/Right] to boost or cut treble by 1 dB increments. Press [ Tone] again to adjust bass, similarly using the [Cursor Left/Right] keys; "Bass" appears on the OSD and readout. Press [ Tone] again to exit the tone-control function.</p>
<p>FRONT PANEL TONE BUTTON: Press to toggle between Bass, Treble, and TONE ON. The VOLUME knob is used to adjust the Bass and Treble levels.</p>
<h1 id="note-that-9">NOTE THAT:</h1>
<ul>
<li>Bass/treble settings affect only the front channels (left, center, and right), and are active in all listening modes </li>
<li>Bass/treble settings imposed via the HTR 2 remote's [ Tone] will override those stored on the <Audio setup> menu, but they are temporary: Cycling through the S170i's Standby mode (or recalling the <Audio setup> menu), or recalling a Preset, will override them and revert to the settings selected by <Audio setup> or the recalled Preset.</li>
</ul>
<h1 id="using-presets">USING PRESETS</h1>
<p>From the HTR 2 select [AV Preset]; then press the [1] through [5] numerical key to select the desired Preset.</p>
<h1 id="note-that-10">NOTE THAT:</h1>
<ul>
<li>The selected Preset remains in force until you select a different Preset, or cycle the S170i through its Standby mode. </li>
<li>A Preset applies regardless of what source is selected, or what listening mode is in operation. </li>
<li>Cycling the S170i through its Standby mode cancels any selected Preset, reverting both tone and all level settings to those set on the HTR 2 remote's LEVELS or MODE/MULTI.S screens, or the S170i preamp's <Audio setup> OSD menu (above). </li>
<li>A Preset's channel levels are added to the setup levels established on the S170i preamp's <Levels setup> OSD menu; a Preset's tone-control settings override those established on the <Audio setup> OSD menu (or the MODE/MULTI.S remote page) entirely.</li>
</ul>
<h1 id="front-panel-operations">FRONT PANEL OPERATIONS</h1>
<p>It is possible to perform every function directly from the S170i Preamplifier's front panel, without the HTR 2 remote controller.</p>
<ul>
<li>To change input sources or listening modes, press AUDIO or Video or MODE; the VOLUME (SETUP) knob will now cycle, bi-directionally, through all audio-video or audio-only sources, or listening modes. The source or mode names appear on the OSD as well as the front-panel readout. After five seconds of inactivity, the display and the knob will return to their normal functions. </li>
<li>Press TAPE MONITOR to hear the component or signal connected to the rear-panel TAPE MONITOR IN/OUT jacks; press Tape MONITOR again to bypass the tape monitor loop. <Tape Monitor On> and <Tape Monitor Off> appears on the OSD. </li>
<li>To adjust the treble, press TONE once and use the VOLUME (SETUP) knob to raise or lower the setting; press TONE a second time to adjust bass; the new tone settings appear on both the OSD and the front-panel readout. Press TONE a third time to return the readout and VOLUME (SETUP) knob to their normal functions. </li>
<li>Press BRIGHTNESS once to dim the front-panel readout, press the key again to return the readout to its normal brightness. </li>
<li>The SPEAKERS key accesses the same functions as the <Speaker setup> OSD menu (see Speaker Setup, above). The OSD will not appear, but the necessary information will display on the front-panel readout. Each subsequent press of SPEAKERS moves through Main, Center, Surround, Back, and Subwoofer options; while any is selected the VOLUME (SETUP) knob cycles bi-directionally through the available options, such as "No/Small/Large" for the Center position. Press the SPEAKERS key one more time (beyond Subwoofer) to return the readout and knob to their normal functions. </li>
<li>The DELAY key works similarly, adjusting channel-delays for each channel present. See the paragraph directly above. </li>
<li>The LEVELS key works similarly, adjusting channel-levels for each channel present. See the paragraphs directly above. </li>
<li>You can adjust the remote room's audio using the MULTISOURCE key. Press MULTISOURCE once to adjust remote-room volume using the VOLUME (SETUP) knob; press MULTISOURCE a second time to cycle the source sent to the REMOTE ROOM rear-panel jacks through the audio-only sources using the VOLUME (SETUP) knob, bi-directionally. Press MULTISOURCE a third time to return the readout and knob to their normal functions; the normal functions will also return automatically after five seconds of inactivity.</li>
</ul>
<h1 id="listening-in-a-remote-zone-multisource">LISTENING IN A REMOTE ZONE (MULTISOURCE)</h1>
<p>The S170i can provide stereo, line-level signals to a second room or zone via its rear-panel MULTISOURCE OUT jacks. These jacks may output a source completely independent from (or the same as) the one currently selected at the S170i's main output jacks, and they enjoy entirely independent volume control. The remote room or zone enjoys independent remote control of signal source and volume, even if the S170i is being operated simultaneously from the primary listening room/ home theater.</p>
<h1 id="note-that-11">NOTE THAT:</h1>
<p>This is a line level output, requiring a power amplifier to be attached between the MultiSource output and the loudspeakers in the remote zone.</p>
<h1 id="selecting-the-multisource">SELECTING THE MULTISOURCE</h1>
<p>From the ZR 2 remote control, select the desired source input. Or from the front panel: Press the MULTISOURCE key twice; the front-panel readout's top line will show "Zone: CD" (for example). Then use the VOLUME (SETUP) knob to cycle, bi-directionally, through all nine audio-video or audio-only sources available to the MULTISOURCE OUT jacks; source names appear on the front-panel readout. After five seconds of inactivity, the display and the knob will return to their normal functions.</p>
<h1 id="controlling-multsource-volume">CONTROLLING MULTSOURCE VOLUME</h1>
<p>From the ZR 2 remote, use the [Volume up/down] keys to adjust the volume. Or from the front panel: Press the MULTISOURCE key once; the Then use the VOLUME (SETUP) to adjust the volume. The front-panel readout's bottom line will show "Z.v: -40" (for example) to indicate the volume setting. After five seconds of inactivity, the display and the knob will return to their normal functions.</p>
<h1 id="note-that-12">NOTE THAT:</h1>
<ul>
<li>The EXT5.1 input is not available to the MULTISOURCE OUT jacks. </li>
<li>A source may be available to the S170i's main and MultiSource outputs simultaneously </li>
<li>Signals at the MULTISOURCE OUT jacks are always in stereo mode, regardless of the listening mode selected, even for the same source, for the main outputs </li>
<li>MultiSource commands and functions do not appear on the OSD. </li>
<li>It is possible to use the composite-video MON OUT jack to send video to the MultiSource remote room for casual viewing and OSDs, though over long runs a certain amount of video loss must be expected. It is not recommended to use the S-Video monitor output over such long runs.</li>
</ul>
<h1 id="nad-link">NAD LINK</h1>
<p>NAD Link OUT allows remote control commands to be relayed from the S170i Preamp/Processor to other products equipped with an NAD Link (or compatible) input. It transmits the IR (infra red) control codes the S170i receives from the HTR 2 remote handset via the front panel IR sensor. The NAD Link creates a "hard wired" connection to another NAD component. The cable format is a standard coaxial cable terminated with RCA Jacks.</p>
<p>This also allows the S170i to receive external control commands from a multi-room controller or remote relay system (or from the NAD Link OUT jack on another NAD product). Commands received will control the S170i and also be relayed to the NAD Link OUT jack. This can be very helpful if you are using the MultiSource feature with a "hard wired" keypad or IR repeater system (such as Xantech, Russound, Niles, etc.) allowing you to control an NAD Link equipped FM Tuner or CD Player, as well as the S170i from the remote location. By "daisy chaining" the NAD Link OUT from one component to the NAD Link IN on another component the signal can be passed along to each component.</p>
<h1 id="note-that-13">NOTE THAT:</h1>
<p>If a component receives the same command simultaneously from the front panel IR sensor AND the NAD Link INPUT the microprocessor control system may not recognize the command, resulting in the command being ignored. To prevent this, do not link components that receive the same IR remote command at the same time (as would be the case if two components are placed very close together).</p>
<h1 id="system-integration-rs-232">SYSTEM INTEGRATION (RS-232)</h1>
<p>The S170i's RS-232 port offers extensive integration to sophisticated media-system and home-automation control, and permits full control of all of the S170i's features. Using this port, the S170i can be connected to any other device with an RS-232 port, such as a personal computer or a home automation system. Any command or function that can be issued from the front panel or the HTR 2 remote controller can be performed via the RS-232 port, and information feedback of the S170i's current settings, including MultiSource status, is transmitted from the preamp's RS-232 port to the connected PC or device. The S170i's MultiSource features are thus also fully controllable via RS-232 command.</p>
<h1 id="technical-details">TECHNICAL DETAILS</h1>
<p>The RS-232 port uses the following standard pin-out arrangement:</p>
<table><tr><td>DB-9 Pin #</td><td>Function</td></tr><tr><td>2</td><td>Transmit Data</td></tr><tr><td>3</td><td>Receive Data</td></tr><tr><td>5</td><td>Signal Ground</td></tr></table>
<h1 id="note-that-14">NOTE THAT:</h1>
<ul>
<li>A standard, "straight-through" serial cable (not a null modem cable) must be employed to connect the S170i to a PC or other serial device. </li>
<li>S170i serial communications must employ 8 data bits, no parity, and 1 stop bit; the data rate is 12000 bps (baud). (Some serial devices are unable to communicate at 12000 bps; a bit-rate converter to convert S170i communications to 9600 bps is available as a separate accessory; contact your installing NAD audio specialist.</li>
</ul>
<p>A Windows 95/98/ME-compatible application for serial control of the S170i from a PC, as well as complete details of the S170i's serial-communications protocols, are available for download from the NAD website:</p>
<h1 id="httpwwwnadelectronicscom">HTTP://WWW.NADELECTRONICS.COM</h1>
<p>See your NAD installing specialist for more information.</p>
<h1 id="overview-of-the-htr-2">OVERVIEW OF THE HTR 2</h1>
<p>Controls up to 8 devices. <br />
44 function keys. <br />
- Learns up to 352 commands. <br />
- Records up to 44 macros with a maximum of 64 commands each. <br />
- Configurable punch-through function. <br />
Key illumination with programmable time-out. <br />
- Contains pre-programmed library of NAD remote codes.</p>
<p>The NAD HTR 2 is ready to operate NAD components right out of the box, but it is really eight remotes in one. Each of the 8 Device Selector keys at the top of the handset can call up a new "page" of remote-control codes to be transmitted by the remaining 44 keys. The HTR 2 can "learn" codes from virtually any infrared-remote-controlled component, regardless of brand, to any or all of these Device Selector keys. When setting up the HTR 2 to operate your entire Home Theatre system, the most logical approach is to teach the codes from your DVD player to the [DVD] Device Selector key, your television's codes to the [TV] key, and so on. But there is no required scheme: You may load any commands to any key on any page (see "Learning Codes From Other Remotes," below).</p>
<p>The HTR 2 is already preprogrammed with a full complement of NAD commands on its [AMP] Device Selector page, and with library commands to operate most NAD DVD, CD, TUNER, or TAPE components on the corresponding Device Selector keys. These default commands are permanent: Even if you teach the HTR 2 new commands to take their place, the underlying library commands remain in place and can easily be recalled should you add an NAD component to your system later (see "Delete Mode," below).</p>
<h1 id="getting-familiar-with-the-htr-2">GETTING FAMILIAR WITH THE HTR 2</h1>
<p>The HTR 2 is divided into two main sections. The Device Selector section at the top of the handset, and the remaining 44 Control keys.</p>
<p>Eight Device Selector keys at the top-[AMP], [DVD,] [TV,] and so on - determine which component the remaining 44 Control keys will operate. A Device Select key determines only what component the HTR 2 will command; it does not perform any function on the receiver. The Device Selector keys are organized into two vertical rows of 4 buttons each; the row on the left are all Audio devices, the row on the right are all Video devices.</p>
<p>Control keys are function keys that can "learn" control codes from virtually any infrared remote controller, allowing you to teach the codes of your equipment, regardless of brand, to the HTR 2. All of the Control keys on the [AMP] Device Selector are preprogrammed to control NAD amps, preamps, and receivers. (The HTR 2 can also command many other NAD components, from its [DVD,][CD,][TUNER,][and [TAPE] pages.)</p>
<p>Since HTR 2 Control keys can perform different functions, depending on the selected Device Selector key, the HTR 2 uses colour coding to indicate the function of the Control keys when different Device keys are chosen. Thus, the colour of the Device Selector key-labelling corresponds to the labelling of the function keys (similar to a scientific calculator). For example, the red-orange [AMP] Device Selector key label corresponds to the red-orange input-select labelling adjacent to the numeric keys: When the HTR 2's [AMP] Device Selector page is active, these keys select the amp or receiver inputs. Similarly, the purple [DVD] Device Selector key label corresponds to several purple labels, the green [TV] Device key to green labels, and so on.</p>
<h1 id="learning-codes-from-other-remotes">LEARNING CODES FROM OTHER REMOTES</h1>
<p>Begin by positioning the HTR 2 "nose-to-nose" with the source remote so the two devices' infrared windows are about 2 inches apart.</p>
<ul>
<li>Enter Learning Mode: On the HTR 2, simultaneously press-and-hold for 3 seconds both a Device Selector key and the "record" key (just below the [DISP] key), until the Learn LED at the centre of the HTR 2 turns steady green. </li>
<li>Press the HTR 2's Control key you wish to teach a command; the Learn LED will turn amber. </li>
<li>Press-and-hold the control function key on the source remote: The HTR 2's Learn LED will flicker amber for a second or two, then turn solid green. The command is learned. Repeat this process for all commands you wish to learn under the selected Device Selector key. </li>
<li>Press the HTR 2's Device Selector key again to exit the learning mode after you have completed learning all commands for that Device.</li>
</ul>
<h1 id="note-7">NOTE</h1>
<p>If the Learn LED does not flicker amber you may need to vary the distance between the remotes or try fresh batteries in both remotes. If the Learn LED turns red rather than green, that particular command of that source remote command has not been learned. Try again. In rare instances there may be some IR format that is not compatible with the HTR 2.</p>
<h1 id="cancel-operation">CANCEL OPERATION</h1>
<p>You can cancel configuring a key, by pressing the active Device Selector key before the learn is complete; the Learn LED will turn red.</p>
<h1 id="example-learning-dvd-pause">Example: Learning "DVD Pause":</h1>
<p>Position the HTR 2 and your DVD player's remote as described above.</p>
<ul>
<li>On the HTR 2, simultaneously press-and-hold [DVD] and ; the Learn LED turns steady green. </li>
<li>Press the HTR 2's (pause) key; the Learn LED turns amber. </li>
<li>Press-and-hold the DVD player's remote's pause key; the HTR 2's Learn LED flickers amber and then turns solid green. The command is learned. <br />
Press [DVD] again to exit the learning mode.</li>
</ul>
<h1 id="library-mode">LIBRARY MODE</h1>
<p>To enter the library mode, press and hold a device selector key and the AV Preset key for 3 seconds until the status LED turns green. While in Library mode you can cycle through and test the different preprogrammed tables in the remote to find if there is an appropriate table for your device. The several ways of navigating the Library tables are described below. The Learn LED will flash twice when all available tables have been transmitted.</p>
<h1 id="digit-keys">DIGIT KEYS</h1>
<p>The digit keys (0 - 9) can be used to directly select one of the tables. Enter the 3 digit table number. After pressing the third digit the HTR 2 will automatically transmit the Power Off command as a test to be sure you have selected the correct table.</p>
<h1 id="cursor-up-cursor-down">CURSOR UP / CURSOR DOWN</h1>
<p>The Cursor Up / Cursor Down keys can be used to cycle through the available tables. The HTR 2 will transmit a test (Power Off) command after each press of the Cursor key. Holding down one of the Cursor keys will cycle through all the available library tables at the rate of two per second, allowing you to quickly find the correct table from the available tables.</p>
<h1 id="note-8">NOTE</h1>
<p>You can change the command transmitted for the test. If you press a key that is not used for anything else in library mode, that command will be transmitted. Any subsequent test commands resulting from changing tables will then use that command which you last pressed. This can be helpful with some devices that do not have a standby mode, in which case the code searches do not work. For example some CD players may not have a power off command, and you may want to use Play as your test command instead.</p>
<h1 id="enter">ENTER</h1>
<p>Press the enter key when in the Library Mode will make the currently selected table become active and will exit the Library Mode.</p>
<h1 id="note-9">NOTE</h1>
<p>Making a table active will deactivate any currently learned commands and active Punch-through functions. Deactivated learned commands can be restored again (without having to relearn them) as described in the Copy Mode section of this manual.</p>
<h1 id="display">DISPLAY</h1>
<p>The Display key can be used to determine the reference number for the table you have currently selected. After pressing the Display key, the table number will be displayed by flashing the Tape, VCR, and Macro keys, corresponding to the first, second, and third digits of the command table. For example: if the table number is 103, then the TAPE key would flash once, followed by the Macro key flashing three times.</p>
<h1 id="punch-through">PUNCH-THROUGH</h1>
<p>The HTR 2's "punch-through" function allows you to retain a function key from one Device Select "page" on another, so that, for example, the AMP [SURR MODE] function might still control the S170i when the DVD Device Selector page is active</p>
<h1 id="note-10">NOTE</h1>
<p>The HTR 2's [VOL] and [MUTE] keys are pre-programmed as "punched-through" for all Device Select pages (except TV): [VOL] and [MUTE] will operate the NAD's master-volume regardless of the currently selected device. The [SURR.] [CENTER,] and [SUB] Channel Volume controls similarly are pre-programmed as punched-through for all devices.</p>
<p>To set a punch through, after entering the Learning Mode, and pressing the desired key to be punched through, simply press the device key twice of the device to punch through to. The status LED will turn green; press the Device Selector key again to exit Learning Mode.</p>
<h1 id="example-punch-through-to-the-dvd-page-from-the-amp-surr-mode-key">Example: Punch-through to the DVD "page" from the AMP [SURR MODE] key:</h1>
<ul>
<li>On the HTR 2, simultaneously press-and-hold [DVD] and (record); the Learn LED turns steady green. <br />
Press [SURR MODE]; the Learn LED turns amber. </li>
<li>Press [AMP] twice; the Learn LED turns green. <br />
Press [DVD] again to exit the learning mode.</li>
</ul>
<h1 id="copy-a-command-from-another-key">COPY A COMMAND FROM ANOTHER KEY</h1>
<p>You may copy a command from any HTR 2 key to any other. To copy a Control key function, after entering the Learning Mode, and pressing the desired key to be copied to, simply press the device key from which you wish to copy, having first pressed its Device Selector key if it resides under another Device key. The status LED will turn green; press the Device Selector key again to exit Learning Mode.</p>
<h1 id="example-copy-the-pause-command-from-the-cd-key-to-the-amp-key">Example: Copy the Pause command from the CD key to the AMP key:</h1>
<ul>
<li>On the HTR 2, simultaneously press-and-hold [AMP] and (record); the Learn LED turns steady green. <br />
Press (pause); the Learn LED turns amber. </li>
<li>Press [CD]; press [II] (pause); the Learn LED turns green. </li>
<li>Press [AMP] again to exit the learning mode.</li>
</ul>
<h1 id="note-11">NOTE</h1>
<ul>
<li>The copy and punch-through functions are similar. However, if you copy a command and then subsequently delete, or over-write the original (source-key) command, the copied-to key's command remains unchanged. If you punch-through to a command and then delete or over-write the original key, the punched-through functions also change accordingly. </li>
<li>If the source function, and destination function are the same, the HTR-2 will restore a previously deleted learned command if one exists. So, if you accidentally deleted a learned command or loaded a library table over learned commands, this is a quick way to restore them without having to relearn them.</li>
</ul>
<h1 id="macro-commands">MACRO COMMANDS</h1>
<p>A "macro" command is a series of two or more (up to 64) remote codes issued automatically from a simple two key-press procedure. You might use a macro to automate a simple command sequence, such as, "Turn on the DVD player and then press 'play.' Or you might compile an elaborate macro to power up an entire system, select a source, choose a Listening Mode, and begin playback-again, all from a single key-press. The HTR 2 can store one macro on each of its function keys (these exclude the Device Selector keys).</p>
<h1 id="note-12">NOTE</h1>
<p>Macros are independent of the currently selected device.</p>
<h1 id="recording-macros">RECORDING MACROS</h1>
<p>To record a macro, simultaneously press-and-hold for 3 seconds both the [MACRO] key and the HTR 2 function key to which you wish to assign the macro; the status LED turns green. The macro button will also light up. Now, press the sequence of Control function keys to be recorded into the macro, being sure to first press the requisite Device Selector key for each function (you may switch devices while recording the macro as many times as necessary). This allows you to create a macro containing commands from more than one Device. When you have finished entering the desired command sequence, press [MACRO] again to store the macro; the Learn LED and [MACRO] key illumination will turn off.</p>
<h1 id="note-13">NOTE</h1>
<p>Each macro can store a maximum of 64 command steps. If you exceed this number, the macro will be stored automatically after the 64th command is added.</p>
<h1 id="example-record-a-macro-to-the-0-key-to-turn-on-the-nad-receiver-turn-on-the-dvd-player-select-the-dvd-input-and-commence-playback">Example: Record a Macro to the [0] key to Turn on the NAD receiver, Turn on the DVD player, Select the DVD Input, and Commence Playback:</h1>
<ul>
<li>On the HTR 2, simultaneously press-and-hold [MACRO] and [0] (numeric zero); the Learn LED turns steady green. </li>
<li>Press [AMP]; press [ON]; press [DVD]; press [ON]; press [AMP]; press [1] (red "DVD"); press [DVD]; press [play] (the Device Key blinks as each step is added). </li>
<li>Press [MACRO] again to exit the macro-record mode.</li>
</ul>
<p>To clear a macro, perform the above steps without entering any functions.</p>
<h1 id="executing-macros">EXECUTING MACROS</h1>
<p>To execute a macro, press and release [MACRO]; its key illumination lights for 5 seconds. While it remains lit, press an HTR 2 key to which a macro has previously been stored ([0] as in the case illustrated above). The corresponding macro will run; as each step executes, its "parent" Device Selector's key flashes lights briefly; when execution is finished, the [MACRO] key illumination goes out. Pressing any other HTR 2 key while a macro is executing will abort the macro. Remember that you must hold the HTR 2 so that its infrared emitter can activate the target components.</p>
<h1 id="note-14">NOTE</h1>
<p>When a macro executes, a 1 second delay is automatically inserted between its commands. If you need more than a 1 second delay between particular commands—for example, to permit a component to power up completely—you can record "empty" steps into the macro. For example, if the [TITLE] key is not used for your CD player, you could record that command into the macro to insert a delay.</p>
<h1 id="key-illumination-time-out">KEY-ILLUMINATION TIME-OUT</h1>
<p>The HTR 2's key-illumination can be set to remain lit for 0-9 seconds. The default value is 5 seconds.</p>
<p>To set the illumination time-out, simultaneously press-and-hold for 3 seconds both the HTR 2's [DISP] and the [0-9] key, with the digit corresponding to the desired time-out duration; the Learn LED will flash twice to confirm the new setting. When set to zero, the illumination will not turn on at all.</p>
<h1 id="note-15">NOTE</h1>
<p>Key illumination is the biggest drain on the HTR 2's batteries. A short key-illumination time-out will extend battery life appreciably; turning it off altogether (set it to 0 seconds) will lengthen it still further.</p>
<h1 id="factory-reset">FACTORY RESET</h1>
<p>The HTR 2 can be reset to its factory state, deleting all learned commands, copied and punched-trough keys, macros, and other setup information, reverting all keys to their pre-programmed library commands. To perform a factory reset simultaneously press-and-hold for 10 seconds the HTR 2's [ON] and [RTN] keys; the Learn LED will start to flash green. Release [ON] and [RTN] before the second flash is complete; the Learn LED will turn red, indicate the remote has been reset.</p>
<h1 id="note-16">NOTE</h1>
<p>You must release [ON] and [RTN] before the second flash goes out, otherwise the unit will not reset; should this occur, repeat the full procedure.</p>
<h1 id="delete-mode">DELETE MODE</h1>
<p>The HTR 2 can store learned, copied, and "default library" commands on any single key. (The default library commands are the pre-programmed NAD codes, such as the native NAD receiver commands on the [AMP] "page.") You can delete commands by layers back "down" to the default library command on any key, removing learned commands, punched-through functions, and copied keys.</p>
<h1 id="note-17">NOTE</h1>
<p>The default library commands cannot be deleted, so you need not worry that using Delete Mode might cause irreparable changes.</p>
<p>To enter Delete Mode, simultaneously press-and-hold for 3 seconds both the desired key's Device Selector key and the [RTN] key, until the Learn LED turns green. Press the function key whose command you wish to delete; the Learn LED flashes; the number of times indicates which type of function has become active-see the table below. Press the active Device Selector key again to exit Delete Mode.</p>
<h1 id="flashes">Flashes</h1>
<p>1</p>
<h1 id="command-type">Command Type</h1>
<p>Default Library Command</p>
<p>2</p>
<p>Copied Library Command</p>
<p>3</p>
<p>Learned Command</p>
<h1 id="summary-of-htr-2-modes">SUMMARY OF HTR 2 MODES</h1>
<h1 id="mode">Mode</h1>
<p>Learn/Copy/Punch Through</p>
<p>Delete Mode</p>
<p>Macro Record</p>
<p>Library Mode</p>
<p>Back Light Timeout</p>
<p>Factory Reset</p>
<h1 id="keys-to-press-for-3-seconds">Keys To Press (for 3 seconds)</h1>
<p>Device Key + OPEN/CLOSE Key</p>
<p>Device Key + Return Key</p>
<p>Macro Key + Function Key</p>
<p>Device Key + Program Key</p>
<p>Display Key + Digit Key</p>
<p>(see "Factory Reset," above)</p>
<h1 id="htr-2-tables">HTR 2 TABLES</h1>
<h1 id="table">Table</h1>
<p>100 <br />
101 <br />
102 <br />
103 <br />
104</p>
<p>200 <br />
201<br />
300 <br />
301 <br />
400 <br />
401 <br />
500 <br />
501 <br />
502 <br />
600 <br />
601 <br />
602 <br />
602 <br />
Receiver with Discrete On/Off <br />
Receiver with Toggle On/Off <br />
S170,S170i <br />
L75 L76 <br />
2nd Zone <br />
CD Player <br />
CD Player (old) <br />
Tuner <br />
L75, L76 Tuner <br />
Tape Deck B <br />
Tape Deck A <br />
TV 270 <br />
MR13<br />
MR20 <br />
T562 <br />
T550,L55,L56 <br />
T531, T571 <br />
T512, T532, T572</p>
<h1 id="description">Description</h1>
<table><tr><td>CONDITION</td><td>POSSIBLE CAUSE(S)</td><td>POSSIBLE SOLUTIONS(S)</td></tr><tr><td>NO SOUND FROM ALL CHANNELS</td><td>AC power unpluggedpower not switched onoutlet is un-poweredTape Monitor is engaged</td><td>Check AC cable, connection, and outletdisengage Tape Monitor</td></tr><tr><td>NO SOUND FROM SOME CHANNELS</td><td>Faulty/missing cables<Speaker setup> channel(s) set to “No”power-amp or speaker-connections faulty</td><td>Check cablescheck<Speaker setup> menucheck power amp, cabling, and speakers</td></tr><tr><td>NO SOUND FROM SURROUND CHANNELS</td><td>No surround listening mode is engagedsurround-channels set to “No” on <Speaker setup> menusurround-channels level set too low on <Levels setup> menu</td><td>Select appropriate listening modecorrect<Speakers setup> or <Levels setup> settings</td></tr><tr><td>NO SOUND FROM SUBWOOFER</td><td>Subwoofer is off, unpowered, or improperly connectedsubwoofer set to “No” on <Speaker setup> menusub level set too low on <Levels setup> menu</td><td>Power-up subwoofer, check sub's AC outlet or check connectionscorrect<Speakers setup> or <Levels setup> settings</td></tr><tr><td>NO SOUND FROM CENTER CHANNEL</td><td>Source is a 2/0 (etc.) Dolby Digital or DTS recording without center channelcenter set to “No” on <Speaker setup> menucenter level set too low on <Levels setup> menu</td><td>Play a known 5.1-channel recording or select Dolby Pro Logic or Mono mode correct<Speakers setup> or <Levels setup> settings</td></tr><tr><td>NO DOLBY DIGITAL/DTS</td><td>Source's digital output is not connected to an S170i digital input</td><td>Check connections</td></tr><tr><td>S170I DOES NOT RESPOND TO HTR 2 REMOTE</td><td>Batteries are flat or incorrectly insertedIR transmitter window on remote, or IR receiver window on S170i is obstructedS170i front panel is in very bright sunlight or ambient light</td><td>Check batteriescheck IR windows and ensure clear line-of-sight from remote to S170ireduce sunlight/room lighting</td></tr><tr><td>S170I DOES NOT RESPOND TO FRONT-PANEL COMMANDS</td><td>Microprocessor error</td><td>Power-down the S170i via the front-panel Power key and unplig it from the AC outletwait five minutes, re-connect and power up</td></tr></table>
<p>Decoding formats Dolby Digital, Dolby Digital EX, Dolby Pro Logic,</p>
<p>Dolby Pro Logic II, DTS, DTS ES, DTS Neo:6</p>
<p>THX Surround EX, THX Ultra 2</p>
<p>Sampling rates 32kHz, 44.1kHz, 48kHz, 96kHz</p>
<p>Modes EARS,Party</p>
<h1 id="stereo-analog-bypass">STEREO (ANALOG BYPASS)</h1>
<p>Analog input impedance 16kΩ / 100pF</p>
<p>Analog frequency response 20Hz - 20kHz +/- 0.2dB</p>
<p>Maximum input level 3V rms</p>
<p>THD + N 0.005%</p>
<p>Signal/noise ratio >90dB</p>
<p>Dynamic range 95dB</p>
<p>Analog channel separation >95dB</p>
<p>Crosstalk >90dB</p>
<p>Maximum output level 6V rms</p>
<h1 id="output-impedance">OUTPUT IMPEDANCE</h1>
<p>Main pre-out 56Ω</p>
<p>Tape out 470Ω</p>
<p>Multi room output 470Ω</p>
<h1 id="tone-control">TONE CONTROL</h1>
<p>Bass (@20Hz) +/- 12dB</p>
<p>Treble (@20kHz) +/- 12dB)</p>
<h1 id="digital-input-performance">DIGITAL INPUT PERFORMANCE</h1>
<p>THD+N (Bandwidth 10Hz - 20kHz) 0.005%</p>
<p>Digital input impedance 75Ω</p>
<h1 id="video">VIDEO</h1>
<p>Input and output impedance 75Ω</p>
<h1 id="physical-specifications">PHYSICAL SPECIFICATIONS</h1>
<p>Size(WxHxD) 173/4x37/8x111/4"</p>
<p>450 × 97 × 285 mm</p>
<p>Net weight 11 lbs (4.99kg)</p>
<p>Shipping weight 13 lbs (5.89kg)</p>
<p><img alt="" src="images/9ca494bc201e8b50813fb6bcd08c16e8d6eed27abd69590ccd9361e08e4106af.jpg" /></p>
<p>www.NADelectronics.com</p>
<p>©2003 NAD ELECTRONICS INTERNATIONAL A DIVISION OF LENBROOK INDUSTRIES LIMITED</p>
<p><img alt="" src="images/7b8fe6ed25f753d80684a7d3b07f132c21e6f59c6917fd20b28a4e2f034a106f.jpg" /></p>
<p>Manuel d'Installation</p>
<p><img alt="" src="images/6e5d2cb6788852a7f023f542d16f9caa3e1aa5d339d138a26b1ce8efcfa8527a.jpg" /></p>
<h1 id="explication-des-symboles-graphiques">EXPLICATION DES SYMBOLES GRAPHIQUES</h1>
<p><img alt="" src="images/115edb8582ec1568a274c83956495bf527802f06894f9a9c1f950ca8e03ea812.jpg" /></p>
<p>Le symbole de l'éclair avec une flèche à son extrémité, dans un triangle équilatéral, a pour but d'avertir l'utilisateur de la présence d'une "tension électrique dangereuse" à l'intérieur de l'enceinte de l'appareil, qui peut être suffisamment puissant pour constituer un risque de chocolélectrique pour les personnes.</p>
<p><img alt="" src="images/b20a1c36b65e99e991ae339860d1a0ad37d1fdf5b751ebe8715b085e678e63b2.jpg" /></p>
<p>Le point d'exclamation dans un triangle équilateral a pour but d'avertir l'utilisateur que la documentation livrée avec l'appareil contient des instructions importantes concernant l'utilisation et l'entretien.</p>
<h1 id="precautions-2">PRECAUTIONS</h1>
<p>Lisez attentivement l'ensemble des Instructions d'Utilisation avant de faire fonctionner l'appareil. Conservez les Instructions d'Utilisation afin de pouvoir vous y reférer à une date ultérieure. Tous les avertissements et toutes les mises en garde imprimés dans les Instructions d'Utilisation et sur l'appareil lui-même doivent être respectés. Il en est de même pour les commandations suivantes concernant la sécurité.</p>
<h1 id="installation-2">INSTALLATION</h1>
<p>1 Eau et Humidité - Cét appareil ne doit pas être utilisé à proximité de l'eau, par exemple près d'une baignoire, d'un lavabo, d'une piscine, etc ... <br />
2 Chaleur - N'utilisez pas cet apparéil à proximé d'une source de chaleur comme une bouche de chauffage, une cusinière ou tout autre apparéil dégaignant de la chaleur. L' apparéil ne doit pas été mis en présence de températures inférieures à 5^ ou supérieures à 35^ . <br />
3 Support - Posez l'appareil sur une surface plane et horizontale. <br />
4 Aération - L'appareil doit être installé dans un endroit où l'air peut circuler librement autour, afin de bien evacuer la chaleur dégagée. Prévoyez un dégagement de 10 cm derrière et au dessus de l'appareil et de 5 cm de chaque côte. - Ne posez pas l'appareil sur un lit, un tapis ou une surfacesemblable, car cela boucherait les ouvertures d'aération sur la face inférieure. - N'installez pas l'appareil dans une bibliothèque fermée ou dans un rack hermétique, car la ventilation de l'appareil ne serait pas assurée correctement. <br />
5 Pénétration de corps étrangers ou de liquides - Veiliez à ce qu'aucun object ni aucun liquide ne pénétre à l'intérieur de l'appareil à travers les ouvertures d'aération. <br />
6 Chariots et supports - Si vous placez ou installez l'appareil sur un support ou sur un chariot, les déplacements doivent être effectués en faisant très attention. Les arrêts brusques, les efforts excessifs ou les sols accidentés risqueraient de reverser le chariot et l'appareil. <br />
7 Condensation - De l'humidité peut se déposer sur la lentille de lecture des CD lorsque :</p>
<ul>
<li>Vous déplacez l'appareil d'un endroit frais à un endroit plus chaud. </li>
<li>Vous venez d'allumer le chauffage. </li>
<li>Vous utilisez l'appareil dans une piece très humide. </li>
<li>L'appareil est refroidi par un climatisationur.</li>
</ul>
<p>Si de la condensation s'est formée à l'intérieur de cet apparéil, cela peut en perturber le fonctionnement. Si cela arrive, attendez quelques heures puis essayez à nouveau.</p>
<p>8 Fixation au mur ou au plafond - L'appareil ne doit pas etre fixe au mur ou au plafond, a moins que cela ne soit prevu dans les Instructions de l'Utilisateur.</p>
<h1 id="attention-danger-pour-éviter-tout-risque-dincendie-ou-de-choc-électrique-nexposez-jamais-cet-appareil-a-la-pluie-ou-a-lhumidité">ATTENTION DANGER. POUR ÉVITER TOUT RISQUE D'INCENDIE OU DE CHOC ÉLECTRIQUE, N'EXPOSEZ JAMAIS CET APPAREIL A LA PLUIE OU A L'HUMIDITÉ.</h1>
<p>Ce produit a eté fabriqué de manière à être conforme aux exigences concernant les interférence radio des DIRECTIVES CEE 89/68/EEC et 73/23/EEC.</p>
<p><img alt="" src="images/5277dcffb5bf72950608380dd794081acae377192b84d3d78ff3dd61dda63bf4.jpg" /></p>
<h1 id="alimentation-électrique">ALIMENTATION ÉLECTRIQUE</h1>
<p>1 Sources d'alimentation - Ce produit doit obligatoirement etre alimentete par une source du type indiquedans les Instructions d'Utilisation et sur I'appareil lui-meme. <br />
2 Polarité - Pour des raisons de sécurité, il se peut que cet apparéil soit équipé d'une prise secteur alternatif avec système de détrompage interdisant tout branchement dans le "mauvais sens". Si la fiche n'entre pas (ou pas complètement) dans la prise murale, essayez de la brancher dans l'autre sens. Si elle n'entre toujours pas,appelez un électricien qualifié pour faire réparer ou replacer votre prise murale. Afin de ne pas déterminer le dispositif de sécurité de la prise détrompée, n'essayez pas de la brancher de force dans la prise murale. <br />
3 Cordon d'alimentation secteur - Lorsque vous débranchez le cordon d'alimentation secteur, tirez sur la fiche secteur et non sur le cordon.</p>
<ul>
<li>Ne touchez jamais la fiche ou la prise secteur si vous avez les mains mouillées, car vous risqueriez de subir un choc électrique ou de provoquer un incendie. </li>
<li>Les câbles d'alimentation ne doivent pas passer dans des endroits ou ils risquent d'être piétinés ou pincés ou tordus excessivement. Faites particulièrement attention à ces détails pour ce qui concerne le cable entre l'appareil et la prise murale. </li>
<li>Évitez de surcharger les prises de secteur murales et/ou les rallonges, car cela risquerais d'entrainer un incendie ou de provoquer un chic électrique.</li>
</ul>
<p>4 Rallonge électrique - Afin de contribuer à éviter les chocs électriques, ne branchez jamais une fiche secteur détrompée sur une rallonge électrique, une embase ou une qualconque autre source de courant si la fiche ne peut pas être complètement enforcée dans la prise : les broches de la fiche doivent être inaccessibles. <br />
5 Lorsque l'appareil n'est pas utilisé - Débranchez le cordon secteur de la prise murale si l'appareil ne va pas été utilisé pendant plusieurs mois. Lorsque le cordon reste branché, un courant faible est débité par l'appareil, même s'il est hors tension.</p>
<h1 id="attention-2">ATTENTION</h1>
<p>En cas de réglage ou de modification dont la conformité n'aura pas été expressément approuvée par le fabricant, le droit de l'utilisateur de faire fonctionner l'appareil risque d'être retire.</p>
<h1 id="entretien">ENTRETIEN</h1>
<p>Nettoyez cet apparéil conformément aux recommendations données dans les Instructions de l'Utilisateur.</p>
<h1 id="déteriorations-nécessitant-une-intervention">DÉTERIORATIONS NÉCESSITANT UNE INTERVENTION</h1>
<p>Dans les cas suivants, faites réparer l'appareil par un technicien de service après vente qualifié :</p>
<ul>
<li>Détérioration de la fiche d'alimentation secteur. </li>
<li>Pénetration de corps étrangers ou de liquides à l'intérieur de l'appareil. </li>
<li>L'appareil a eté exposé à la pluie ou à l'humidité - L'appareil semble ne pas fonctionner correctement. </li>
<li>Les performances de l'appareil se sont sensiblement détiériées. <br />
L'appareil a subi une chute, ou le boitier a ete endommagé.</li>
</ul>
<h1 id="ne-tentez-aucune-réparation-vous-même">NE TENTEZ AUCUNE RÉPARATION VOUS-MÊME.</h1>
<h1 id="informationsparticulieres">INFORMATIONSPARTICULIERES</h1>
<p>Pour simplifier vos démarches, notez ci-dessous le numéro de modulo et le numéro de série de votre apparéil (vous les trouvez à l'arrière de l' apparéil lui-même). Veuillez les rappeler lorsque vous contactez votre revendeur, en cas de problème.</p>
<p>N° de Modèle :</p>
<p>N° de Série :</p>
<p>Consignes de Sécurité Importantes 2</p>
<p>Pour profiter au maximum du NAD S170i 5</p>
<p>Déballage et configuration 6</p>
<p>Ce que vous trouverez dans le carton 7</p>
<p>Choix d'un emplacement 7</p>
<p>A propos du S170i 7</p>
<p>E.A.R.S. 8</p>
<p>A propos du THX 8</p>
<p>Facilité d'utilisation 8</p>
<p>Intégration 8</p>
<p>Évolutivité 9</p>
<p>A propos de la Telecommande Programmable HTR 2 9</p>
<p>A propos de la Telecommande de Deuxieme Zone ZR 2 9</p>
<p>Mise en route rapide 9</p>
<p>Lire un film sur DVD (ou un CD musique) 10</p>
<p>Face parlante 10</p>
<p>Panneau Arriere 11</p>
<p>Configuration du S170i 12</p>
<p>Pour commencer 13</p>
<p>Résolution des problèmes de bourdonnement et de bruits 13</p>
<p>A propos des incrustations à l'écran (OSD) et des indications sur la Face Parlante 13</p>
<p>Affichage des menus 14</p>
<p>Paramétrage de la somme S170i 14</p>
<p>Configuration de l'Affichage 15</p>
<p>Configuration audio 16</p>
<p>Configuration des Haut-Parleurs 18</p>
<p>Configuration des niveaux 19</p>
<p>Configuration du retard 20</p>
<p>Configuration des sources 21</p>
<p>Configuration des asservissements 22</p>
<p>Utilisation du S170i 23</p>
<p>Choix des Sources 24</p>
<p>Réglage du Volume 25</p>
<p>Configuration des modes d'écoute 25</p>
<p>Réglage du niveau des voies 28</p>
<p>Réglage des Commandes de Tonalité 30</p>
<p>Fonctionnement de la Face Parlante 31</p>
<p>Écoute dans un endroit éloigné (MultiSource) 32</p>
<p>Liaison NAD [NAD Link] 33</p>
<p>Intégration Systeme (RS-232) 33</p>
<p>Utilisation de la télécommande HTR 2 33</p>
<p>Vue d'ensemble de la HTR 2 34</p>
<p>Apprentissage des Codes d'Autres Telecommandes 35</p>
<p>Mode Bibliothèque 35</p>
<p>Acces Direct 36</p>
<p>Copied'unecommandedepuisuneautore touche 37</p>
<p>Macro-commandes 37</p>
<p>Enregistrement de Macros 38</p>
<p>Execution des Macros 38</p>
<p>Temps d'éclairage des touches 38</p>
<p>Rétabillisement des valeurs d'origine (remise à zéro) 39</p>
<p>Mode d'Effacement 39</p>
<p>Résumé des Fonctions 40</p>
<p>Tableaux de la HTR 2 40</p>
<p>Dépannage 40</p>
<p>Caracteristiques 41</p>
<h1 id="nous-vous-remercions-davoir-choisi-nad">NOUS VOUS REMERCIONS D'AVOIR CHOISI NAD.</h1>
<p>Le Préamplificateur AV/ Ambiophonique S170i est l'un des processeurs / préamplificateurs ambiophoniques les plus technologiquement avances conçus à ce jour, doté d'un système d'avant-garde de traitement numérique ultrarapide des signaux sur 32 bits, d'une architecture totalement évolutive (autant pour le côte matériel que pour le côte logiciel) et d'une conversion numérique-analogique sur 24-bits / 96 kHz dont la précision est extraordinaire sur toutes les voies.</p>
<p>Plus important encore, il fait partie des conceptions les plus musicalement transparentes et spatialement précises que l'on puisse tracer aujourd'hui, cumul de tout ce que nous avons appris, en un quart de siècle d'activité dans le domaine de la reproduction de la musique et du son de cinéma à domicile. Grac à la philosophie "La Musique d'abord" adoptée comme ligne directrice par notre société, nous sommes confiants que le S170i honorera la promesse que nous vous faisons de vous faire profiter à la fois d'une expérience de cinéma à domicile ambiophonique à la pointe du progrès et d'une écouteusicale de qualité audiophile, et que ce prise durera de nombreuses années.</p>
<p>Nous vous conseillons vivement de consacrer tout de suite quelques minutes à la lecture de l'intégrité de ce manuel. Si vous investissez un petit peu de temps maintainant, en amont, vous en economiserez beaucoup ultérieurement ; de plus, vous apprendrez à tirer tous les avantages de votre achat d'un NAD S170i et à profiter pleinement de ce puissant et flexible élément de système de cinema à domicile.</p>
<p>Une dernière chose : Nous vous conseillons d'enregistrer votre achat du S170i sur le site Web de NAD :</p>
<h1 id="httpnadelectronicscomwregistrationhtml">HTTP://NADELECTRONICS.COM/W/REGISTRATION.HTML</h1>
<p>C'est la(Meilleure façon de nous permettre, au siège mondial de NAD, de vous informer sans faute de la disponibilité des eventuelles mises à jour des logiciels et propciels, car elles pourraient composer des évolutions permettant d'améliorer sensiblement les performances et la fonctionnalité de votre S170i. Veuillez nous envoyer aussi votre carte de garantie, de manière à ce que l'organisation NAD ait une trace de votre achat. Conservez aussi votre facture d'origine. Ennantant ces précautions, vous serez sur d'avoir accès au service après vente sous garantie dans votre région.</p>
<h1 id="ce-que-vous-trouverez-dans-le-carton">CE QUE VOUS TROUVEREZ DANS LE CARTON</h1>
<p>Dans l'emballage de votre préamplificateur S170i vous trouverez aussi :</p>
<ul>
<li>Un cable secteur déconnectable (si vous le souhaitez, vous pourrez replacer le cable fourni par n'importe quel autre cable secteur aux normes CEI, d'une puissance appropriée) <br />
1 cable "asservissement" CC <br />
La Telekomande Programmable HTR 2 avec ses piles (4 x AAA) </li>
<li>La télécommande de deuxieme zone ZR 2 avec sa pile (1 x CR2025) </li>
<li>Une paire de gants blancs en coton. Ces gants vous permettront de manipuler votre S170i pendant la configuration sans craindre de le rayer, de l'abimer ou d'y laisser des empreintes de doigts </li>
<li>Ce manuel d'utilisation</li>
</ul>
<h1 id="conservez-lemballage">CONSERVEZ L'EMBALLAGE</h1>
<p>Veuillez conserve le carton ainsi que tous les éléments de calage et de protection utilisés pour vous livrer chez S170i. Si vous déménagez ou si vous avez besoin de transporterer votre préamplificateur, c'est de loin le moyen le plus fiable pour le protégér. Trop souvent nous avons constaté que des éléments en parfaitment état ont été endommagés lors du transport à cause d'un carton inapproprié. S'il vous plaît, pensez à conservative l'emballage !</p>
<h1 id="choix-dun-emplacement">CHOIX D'UN EMPLACEMENT</h1>
<p>Nous espérons que vous pensez, comme nous, que la qualité de finition et l'esthétique du S170i lui valent une place deCHOIS dans n'importe qu'elle chaine de cinema à domicile ou dans n'importe qu'elle chaine hi-fi. Choisissez un emplacement bien aéré (avec un dégagement d'au moins 7 à 10 cm sur les cotés et derrière) et assurez vous que la ligne de visée entre la face parlante du préampli et l'endroit principal d'écoute est dégagée et que la distance est inférieure ou égale à 8 mètres, de manière à garantir le bon fonctionnement de la télécommande infrarouge. Le matériel informatique haut débit DSP intégré au S170i, ainsi que les courants forts circulant dans ses circuits audio, font que l'appareil dégage un peu de chaleur - mais rien de suffisant pour nuire au bon fonctionnement des éléments situés à proximité. Vous pouvez, en toute sécurité, empiler d'autres éléments de votre chaine sur le S170i, ou l'inverse, mais il est probablement préféable (et bien plus esthétique) de placer le S170i seul dans un endroit qui lui est spécifique réservé.</p>
<p>Si le préamplificateur S170i AV fait partie des décodeurs / proceseurs numériquesambiophoniques les plus puissants et elaborés que l'on puisse acheter, nous avons aussi investi beaucoup de travail pour en faire l'un des éléments de cinéma à domicile les plus musicalement transparents ; c'est cela que nous voulons dire quand nous parlons de la philosophie de conception "La Musique d'abord" de NAD. Voici quelques exemple des très nombreuses qualités du S170i :</p>
<ul>
<li>Les circuits audio analogiques du S170i sont constitués exclusivement des tous derniers composants FET, dont les performances et la pureté sonore sont exceptionnelles. </li>
<li>Une impédance de sortie extrémement faible sur toutes les voies (pendant longtemps une exclusivité NAD) élimine l'impact sonore d'aux cables et à l'impédance d'entrée des amplificateurs </li>
<li>La fonction "muet" des sorties est assurée par des relais à contacts en or, dont la transparence sonore est parfaite, et non par des circuits électroniques qui altermènt la qualité sonore. </li>
<li>La connectique utilisée, aussi bien à l'intérieur qu'à l'extérieur, compte des surfaces en or afin de garantir un transfert des signaux sans aucune impédance.</li>
</ul>
<h1 id="ears-3">E.A.R.S.</h1>
<p>L'un des éléments clés de la musicalité unique du S170i est le Systeme de Reproduction Améliorée de l'Ambiance [Enhanced Ambience Recovery System (EARS)], dont NAD est titulaire du brevet. À l'opposé de la plupart des modes ambiophoniques de type "synthese d'environnement", le système EARS exploite la grande puissance DSP du S170i pour canaliser le contenu ambiance, qui est "code" dans presque tous les enregistements d'acoustique naturel, vers les haut-parleurs appropriés (principaux, central et ambiophoniques), sans avoir recours à des réverbérations ou à des régénérations créées artificiellement. L'ambiance naturelle d'EARS donne un mode ambiophonique subtil mais extraordinairement efficace, qui améliore naturellement la représentation spatiale pour satisfaire au moins l'auditeur exigeant lorsqu'il écoute de la musique.</p>
<p>Côté numérique, le S170i allie un traitement DSP à des vitesses extrément élevées grâce à l'un des "moteurs" DSP les plus évolués du marché et doté, sur toutes les voies, de convertisseurs N/A capables d'un échantillonnage sur 24 bits, à 96 kHz. Une seule et même horloge maitresse, de haute précision, pilote tous les circuits numériques afin d'éliminer les erreurs de synchronisation ("instabilités") qui se produit souvent entre les étages numériques et promottent la sonorité. Résultat : un décodage ambiophonique réalisément à la pointe du progrès, à partir de sources Dolby Digital et DTS aussi bien en mode 5.1 voies de sortie qu'en mode 6.1 voies / 7.1 voies de sortie, avec une qualité sonore réalisément supérieure dans tous les modes.</p>
<h1 id="à-propos-du-thx">À PROPOS DU THX</h1>
<p>Le préamplificateur S170i est certifié par THX Ltd. comme étant conforme aux exigences très rigoureuses de son programme THX/Ultra 2 à domicile pour les contrôleurs ambiophoniques. Cela peut dire qu'il est capable de donner une expérience audio égale à celle des meilleures salles de cinéma, lorsque ses superbes performances fondamentales sont alliées aux améliorations ambiophoniques générées par le programme THX/Ultra 2.</p>
<h1 id="facilité-dutilisation">FACILITÉ D'UTILISATION</h1>
<p>Si le S170i particulièrement facile à utiliser, c'est le fruit d'un travail considérable de la part de NAD, mais nous n'avons pas non plus ménagé nos peines pour que ses performances sonores soient inégalées. Sa conception est d'une simplicité peu commune pour un apparéil si sophistique, et la télécommande HTR 2 est unique pour sa convivialité et son intuitivité, comme le sont la face parlante du S170i lui-même et les incrustations à l'écran. Un système de configurations prêrgées, puissant simple, vous permettra demettre au point votre configuration d'écoute en fonction de différentes conditions ambiantes, et de rappeler ces paramétrages multiples en appuyant seulement sur deux boutons.</p>
<h1 id="integration-2">INTEGRATION</h1>
<p>Le préamplificateur S170i compte de nombreuses options très couples d'intégration à votre chaine, grâce à ses trois sorties CC asservisement paramétrables, ou encore via le protocole de communications inter-modules Liaison NAD [NAD Link], breveté par NAD. De plus, un port série RS-232 est prévu pour relier le préamplificateur à des contrôleurs encore plus sophistiqués tels que les systèmes à écran tactile, ou encore aux installations domotiques.</p>
<h1 id="évolutivite">ÉVOLUTIVITE</h1>
<p>Une caractéristique unique du S170i : sa construction modulaire. Toute "l'intelligence" du S170i est implantée sur un module enchachievable unique. Cette architecture d'avant-garde facile les réparations et permettra, le cas échéant, de faire évoluer le matériel dans l'avenir. Grace à la vitesse de traitement et la puissance extraordinaires du S170i, nous pensons pas, à l'heure actuelle, qu'il sera nécessaire de faire évoluer le matériel. Il est néanmoins/agréable d'avoir la certitude que le S170i ne risque pas de revenir obsoilè dans un avenir proche.</p>
<p>Pour ce qui concerne les mises à jour logicielles, qui sont des scénarios plus probables, nous avons fait en sorte qu'elles soient plus facies à réaliser grâce au port RS-232 haut débit, qui se trouve sur la face arrière du S170i. Les propriétaires ayant enregistré leur S170i sur notre site web international www.NADelectronics.com serontAVIS des mises à jour. Certaines mises à jour pouraient être gratuites, alors que d'autres seraient disponibles en contrepartie du paiement de royalties, suivant le type d'évolution. L'utilisateur averti pourra effectuer ces mises à jour en se connectant à notre site web. Il receva les fichiers par e-mail et n'aura plus qu'à les installer en reliant le S170i à son PC. Sinon, le revendeur qui vous a vendu votre S170i devrait pouvoir vous aider à réaliser ces mises à jour.</p>
<h1 id="à-propos-de-la-télecommande-programmable-htr-2">À PROPOS DE LA TÉLECOMMANDE PROGRAMMABLE HTR 2</h1>
<p>Dans l'emballage de votre préamplificateur S170i vous trouvez aussi la télécommande multi-produits programmable NAD HTR 2. Ce combiné très utile est capable de commander huit apparèils différents, comme par exemple votre lecteur DVD, votre téléviseur, votre décembreur satellite, etc..., ce qui va également faciliter l'utilisation de votre chaîne de Cinema à Domicile toute entière, tout en réduisant le nombre de télécommandes sur votre table basse. Chaque fois que vous appuyez sur une touche du HTR 2, le clavier tout entier s'allume afin que son utilisation dans la semi-obscurité soit plus facile et plus/agréable.</p>
<p>Pour utiliser votre HTR 2, vous devez d'abord sélectionner l'un des huit "appareils" que vous souhaitez commander, c'est à dire, par exemple, un amplificateur [AMP], un téléviseur [TV], un lecteur de DVD [DVD], etc... Les 46 autres touches sont aussiôt configurées pour commander l'appareil besoin. Au début, vous aurez peut-être l'impression que c'est un peu "compliqué", mais une fois que vous aurez compris le principe de base, vous vous rendrez compte de la puissance et de la capacité avec laquelle vous pourrait commander tous les apparciels de votre chaîne de Cinéma à Domicile.</p>
<p>Les tableaux de codes sont fournis pour tous les apparèils NAD. Vous pourrez aussi enregistrer, dans n'importe qu'elle touche de la télécommande HTR 2, les commandes correspondant aux apparèils d'autres fabricants à partir des télécommandes concernées. Il est, en outre, facile de creator et d'enregistrer des "macros", c'est à dire des suites de commandes permettant d'executer toutes les opérations nécessaires pour "lire un DVD" par exemple, que vous pourrez rappeler instantanément. Grâce à cette fonctionnalité d'avant garde, même le fonctionnement des chaînes AV les plus complexes devient un jeu d'enfant.</p>
<p>Lisez attentivement le paragraphe HTR 2 de ce manuel, où vous trouvrez des instructions complètes et détaillées concernant ce remarquable combiné Télecommande de Cinéma à Domicile, que vous apprendrez à utiliser grâce à un guide d'utilisation pas à pas.</p>
<h1 id="à-propos-de-la-télécommande-de-deuxième-zone-zr-2">À PROPOS DE LA TÉLÉCOMMANDE DE DEUXIÈME ZONE ZR 2</h1>
<p>Vous trouvez aussi une petite télécommande appelée ZR 2, spécialement prévue pour commander la sortie MultiSource ou Zone 2. Elle permet d'écouter une source totalement indépendante dans un autre endroit de votre domicile, et d'en régler le volume sonore indépendamment de la partie principale de votre chaîne. Grâce à des capteurs de télécommande tiers (Xantech) et à la fonctionnalité Liaison NAD [NAD Link] du S170i, vous pourrez commander la sortie MultiSource à partir d'un autre endroit à l'aide de la télécommande ZR 2.</p>
<p>Lisez bien le paragraphe "Écoute dans un endroit éloigné" de ce manuel pour des informations plus détaillées.</p>
<p>Si vous ne pouvez également pas attendre avant d'essayer les performances de votre nouveau préamplificateur S170i, voici quelques instructions de "mise en route rapide" pour vous permettre de vous lancer. Ces instructions partent du principe que le lecteur de DVD/CD est relié à l'entrée VIDEO1 et que vous avez déjà effectué les branchements audio et video appropriés.</p>
<h1 id="lire-un-film-sur-dvd-ou-un-cd-musique">LIRE UN FILM SUR DVD (OU UN CD MUSIQUE)</h1>
<p>Sur la télécommande HTR 2, appuyez d'abord sur la touche de Sélection d'Appareil d'amplificateur [AMP] (pour sélectionner le S170i), puis appuyez sur la touche Marche [ON], puis sur la touche [DVD] (aussi repérée par le chiffre "1"). Utilisez les touches de réglage du volume sonore [VOLUME haut/bas] du HTR 2 pour régler le volume.</p>
<p>Démarrez la lecture sur le lecteur DVD/CD. Si vous appuyez sur la touche de Mode Ambiophonique [SURR. MODE] de la HTR 2 (située à côté de la touche de DIMINUTION du VOLUME), puis sur la touche Fléchée [< >] , vous ferez défilier tous les modes d'écoute disponibles sur le S170i pour le type de signal d'entrée actuellément sélectionné (reportez-vous au paragraphe "À propos des modes d'écoute du S170i" ci-après).</p>
<p>En fonction du format des signaux et des connexions que vous avez réalisées, certains modes d'écoute ne seront peut-être pas encore disponibles; reportez-vous au paragraphe "Paramétrage du S170i" ci-après). Vous aurez peut-être besoin d'utiliser le système de menus affichés à l'écran du lecteur de DVD pour sélectionner un format de signal compatible avec l'ambiophonie.</p>
<p>Profitez du film ou de la musique, mais n'oubliez pas de prévoir un peu de temps pour生存 l'intégrality de ce manuel et pour connecter, calibrer et paramétre soignement avec S170i.</p>
<p><img alt="" src="images/bd543e58f4573147cab09a18785e51421b44c971c82870ad512fe246b58960be.jpg" /></p>
<p>1 ALIMENTATION [POWER]: Coupe l'alimentation si vous souhaitez déconnecter le S170i de toute alimentation secteur et quitter le mode Veille. En rétablissant l'alimentation grâce à cette commande, vous reconnectez l'alimentation secteur et vous mettez le préampli sous tension. <br />
2 VEILLE [STANDBY]: S'allume lorsque le S170i est en mode Veille ou Marche (éteinte lorsque le S170i est sous tension ou lorsque l'alimentation secteur est coupée). <br />
3 AUDIO: Appuyez sur ce bouton pour sélectionner les différentes entrées audio à tour de role, en l'associant au bouton de "VOLUME (CONFIGURATION)" [VOLUME (SETUP)] (reportez-vous au paragraphe "Fonctionnement de la Face Parlante" ci-après). <br />
4 VIDEO: Appuyez sur ce bouton pour sélectionner les différentes entrées audio à tour de role, en l'associant au bouton de "VOLUME (CONFIGURATION)" [VOLUME (SETUP)] (reportez-vous au paragraphe "Fonctionnement de la Face Parlante" ci-après). <br />
5 MONITEUR DE BANDE [TAPE MONITOR] : Appuyez sur ce bouton pour activer la boucle Moniteur de Bande. Le signal présente sur les jacks d'ENTREE MONITEUR DE BANDE [TAPE MONITOR IN] sur la face arrêté sera entendu (reportez-vous au paragraph "Fonctionnement de la Face Parlante" ci-après). <br />
6 MULTISOURCE: Appuyez sur ce bouton pour sélectionner le signal de sortie liéven sur les jacks de SORTIE MULTISOURCE [MULTISOURCE OUT], en l'associant au bouton de "VOLUME (CONFIGURATION)" [VOLUME (SETUP)] (reportez-vous au paragraphe "Écoute dans un endroit éloigné" ci-après). <br />
7 HAUT-PARLEURS [SPEAKERS] : Appuyez sur ce bouton pour acceder au menu de "<Configuration des Haut-parleurs> [<Speaker setup>] sur l'affichage de la face parlante, et aussi pour selectionner les paramètres en l'associant au bouton de "VOLUME (CONFIGURATION)" [VOLUME (SETUP)] et en appuyant à plusieurs reprises sur la Touche HAUT-PARLEURS [SPEAKERS] (reportez-vous aux paragraphs "Paramétrage de votre S170i" et "Fonctionnement de la Face Parlante" ci-après). <br />
8 RETARD [DELAY] : Appuyez sur ce bouton pour acceder au menu "<Configuration du Retard>" [<Delay setup>] sur l'affichage de la face parlante, et aussi pour sélectionner les paramètres en l'associant au bouton de "VOLUME (CONFIGURATION)" [VOLUME (SETUP)] et en appuyant à plusieurs reprises sur la touche "RETARD" [DELAY] (reportez-vous aux paragraphs "Paramétrage de votre S170i" et "Fonctionnement de la Face Parlante" ci-après).</p>
<p>9 NIVEAUX [LEVELS]: Appuyez sur ce bouton pour acceder au menu <Configuration des Niveaux> [<Level setup>] sur l'affichage de la face parlante, et aussi pour selectionner les paramètres en l'associant au bouton de "VOLUME (CONFIGURATION)" [VOLUME (SETUP)] et en appuyant à plusieurs reprises sur la touche "NIVEAUX" [LEVELS] (reportez-vous aux paragraphs "Paramétrage de votre S170i" et "Fonctionnement de la Face Parlante" ci-après). <br />
10 LUMINOSITE [BRIGHTNESS]: Appuyez sur ce bouton pour baisser la luminosité de l'affichage sur la face parlante du S170i. Appuyez à nouveau pour rétablier la luminosité normale. <br />
11 TONALITE [TONE] : Appuyez sur ce bouton pour acceder au réglage des aigus, en l'associant au bouton de "VOLUME (CONFIGURATION)" [VOLUME (SETUP)]; appuyez une deuxième fois pour acceder au réglage des graves, puis une troisième fois pour quitter le mode de réglage de la tonalité. <br />
12 MODE : Appuyez sur ce bouton pour sélectionné séquientiellement les différents modes d'écoute, en association avec le bouton de "VOLUME (CONFIGURATION)" [VOLUME (SETUP)] (reportez-vous aux paragraphs "Configuration des Modes d'Écoute" et "Fonctionnement de la Face Parlante" ci-après). <br />
13 VOLUME (CONFIGURATION [SETUP]): Tournze ce bouton en sens horaire pour augmenter le volume général, ou en sens anti-horaire pour le diminuer. Le réglage est visualisé sur l'affichage VFL ainsi que sur l'incrustation à l'écran, en décibels; les valeurs possibles vont de -90 à + 16. Le bouton Volume (Configuration [Setup]) permet aussi de régler, par incrémentes / décrémentes, le volume individuel des différentes voies ainsi que les autres paramètres réglibres. <br />
14 AFFICHAGE EL: L'affichage EL fournit des informations visuelles sur tous les modes, fonctions, régles importants du S 170i pour les emplacements principale et deuxieme zone.</p>
<p><img alt="" src="images/6a576d321e702a5f78fe907c2413d53a1e2ce94778086e944355484abf00b9b7.jpg" /></p>
<h1 id="attention-3">ATTENTION!</h1>
<p>Avant d'effectuer tout branchement de votre Préamplificateur S170i, veuillez couper l'alimentation secteur ou débrancher l'appareil. (Il est prudent, aussi, de désalimenter ou de débrancher tous les-appareils associés lors de la connexion ou de la déconnexion d'unquelconque signal ou des alimentations secteur).</p>
<p>1 ENTRÉE VIDEO COMPOSITE 1-6 [COMPOSITE VIDEO IN 1-6]: Branchez les Entrées Video 1 à 6 (vers la video composite) à vos différents apparèls source (reportez-vous au paragraphe "Configuration des Sources" ci-après). <br />
2 SORTIE VIDEO COMPOSITE SORTIE 4-6 [COMPOSITE VIDEO OUT 4-6 OUT]; SORTIE MON [MON OUT] : À brancher aux entrées d'enregistrement videoe composite des appareils enregistrleurs ; branche la SORTIE MON [MON OUT] à entrée videoe composite du moniteur video / TV. <br />
3 ENTRÉE S VID1 - ENTRÉE S VID 6 [S VID1 IN - S VID6 IN] : Connectez les Entrees Video 1-6 à la sortie S-Video des appareils source (reportez-vous au paragraphe "Configuration des Sources" ci-après). <br />
4 SORTIE SVID4S-SORTIE SVID6 [VID4 OUT-SVID6 OUT];SORTIE MON [MON OUT] : A brancher aux entrées d'enregistrement S-Video des apparéels enregistrleurs; branchez la SORTIE MON [MON OUT] à entrée S-Video du monitateur video / TV. <br />
5 ENTRÉE VÉDÉ COMPOSANTE [COMPONENT VIDEO IN] (connecteur supérieur), SORTIE VÉDÉ COMPOSANTE [COMPONENT VIDEO OUT] (connecteur inférieur): Branchez les entrées à un signal video composante or video composante large bande d'un apparéil source, comme par exemple un lecteur DVD ou un tuner HDTV; branchez les sorties aux entrées video composante du monitreur video / TV. Faites attention à l'homogénéité des connexions lorsque vous branchez les jacks Y, CB, et CR aux sources / entrées correspondantes (reportez-vous au paragraph "Configuration des Sources" ci-après). <br />
6 ENTRÉE/SORTIE LIAISON NAD [NAD LINK IN/OUT]: À brancher aux jacks NAD LINK correspondants (entree sur sortie et inversement) des apparéils compatibles NAD components (reportez-vous au paragraphe “NAD Link” ci-après). <br />
7 NUMÉRIQUE 1-3 [DIGITAL 1-3]; ENTRée NUMÉRIQUE [DIGITAL IN]; SORTIE NUMÉRIQUE [DIGITAL OUT]: Branchez NUMÉRIQUE 1-3 [DIGITAL 1-3] aux sources numériques coaxiales au format S/PDIF, comme par exemple les lecteurs CD ou DVD; branchez l'ENTREE NUMÉRIQUE [DIGITAL IN] à une source de grande qualité au format S/PDIF, en utilisant du câblage BNC; branchez la SORTIE NUMÉRIQUE [DIGITAL OUT] à l'entrée numérique S/PDIF coaxiale d'un apparéil d'enregistrement comme par exemple ungraveur CD recorder, une platine DAT ou la carte son d'un ordinateur (reportez-vous au paragraph "Configuration des Sources" ci-après). <br />
8 ENTRÉE NUMÉRIQUE OPTIQUE 1-2 [OPTICAL DIGITAL IN 1-2]; ENTRÉE NUMÉRIQUE [DIGITAL IN]; SORTIE NUMÉRIQUE OPTIQUE [OPTICAL DIGITAL OUT]: Branchez NUMÉRIQUE OPTIQUE 1-2 [OPTICAL DIGITAL 1-2] à des sources numériques optiques au format S/PDIF, comme par exemple des lecteurs CD ou DVD; branchez la SORTIE NUMÉRIQUE OPTIQUE [OPTICAL DIGITAL OUT] à l'entrée numérique optique S/PDIF d'un apparéil enregistrreur comme par exemple ungraveur CD recorder, une platine DAT ou la carte son d'un ordinateur.</p>
<p>9 RS-232 : À brancher au port série RS-232 d'un système domotique ou d'un ordinateur PC (reportez-vous au paragraphe "Intégration Système" ci-après). <br />
10 Entrées Audio Analogiques VIDÉO 1-6 [VIDEO 1-6] : À brancher aux sorties analogiques stéreo des sources audio-video (reportez-vous au paragraphe "Configuration des Sources" ci-après). <br />
11 SORTIE ENREG ANALOGIQUE VIDEO 4-6 [VIDEO ANALOG REC OUT 4-6] : À brancher aux entrées analogiques stéréophoniques des apparèils d'enregistrement audio-video, comme par exemple les magnétoscopes. <br />
12 Entrées CD, AUX, TUNER : À brancher aux sorties analogiques stéreophoniques des apparèils audio. <br />
13 ENTRÉE/SORTIE MONITEUR DE BANDE [TAPE MONITOR IN/OUT] : Branchez la SORTIE [OUT] aux entrées analogiques stéropheoniques et l'ENTREE [IN] aux sorties d'un apparil d'enregistrement audio, comme par exemple une platine à cassettes ou un graveur CD, ou d'un proceseur audio analogue comme par exemple un égaliseur graphique stéropheonique. <br />
14 SORTIE MULTISOURCE [MULTISOURCE OUT] : À brancher aux entrées de l'amplificateur stéreophonique (ampli intégré, récepteur) devant piloter les haut-parleurs de l'endetroit éloigné (reportez-vous au paragraphe "Écoute dans un endroit éloigné" ci-après). <br />
15 SORTIES ANALOGIQUES 7.1 PREAMPLI [PREAMP ANALOG 7.1 OUTPUTS]: Branchez G, D et CENTRE [L, R, et CENTER] aux entrées des voies du ou des amplificateur(s) de puissance pilotant les voies correspondant à l'avant; branchez GE et DE [LS et RS] à l' amplificateur de puissance pilotant les haut-parleurs ambiophoniques et brancher AR GAUCHE et AR DROIT [LEFT B] et [RIGHT B] à celui pilotant les haut-parleurs ambiophoniques arrêté (s'ils existent); branchez SUB à l'entrée ligne d'un subwoofer actif ou à l' amplificateur pilotant un subwoofer passif (s'ils existent). <br />
16 ENTRÉES EXTERNES 5.1 [EXTERNAL 5.1 INPUTS] : À brancher aux sorties audio analogiques d'une source multi-voies comme par exemple un lecteur DVD-Audio ou un lecteur SACD multi-voies. Aucune gestion des graves ni aucun另一种 type de traitement ne sont associés à ces entrées ; reportez-vous au paragraph "Choix des Sources" ci-après. <br />
17 ASSERVISSEMENTS 12 V [12V TRIGGERS] : À brancher aux entreés 12 V asservissement d'appareils compatibles, comme par exemple les amplificateurs de puissance ou les projecteurs ; reportez-vous au paragraph "Configuration des Asservissements" ci-après. <br />
18 Entrée d'alimentation secteur [AC power inlet] : À brancher au cable secteur déconnectable fourni, conforme aux normes CEI, ou à un cordon secteur compatible.</p>
<h1 id="pour-commencer">POUR COMMENCER</h1>
<p>Avant de commencer à brancher votre S170i, vous devez d'abord faire un plan de disposition (ne serait-ce que rudimentaire) des éléments de votre auditorium / salle de cinema à domicile, ainsi que de votre mobilier. Le début concernant ces questions vitales que sont le positionnement des haut-parleurs et les places qu'occuperont les auditeurs / spectateurs dépasse malheureusement le cadre de ces instructions. Precisons néanmoins que ces deux questions auront une influence toute aussi grande sur les performances de votre chaine que vos choix d'appareils électroniques et de haut-parleurs. Notre revendeur spécialiste audio NAD se fera un plaisir de vous conseiller et de vous recommender des ouvrages de référence à ce sujet.</p>
<h1 id="résolution-des-problemes-de-bourdonnement-et-de-bruits">RÉSOLUTION DES PROBLEMES DE BOURDONNEMENT ET DE BRUITS</h1>
<p>Le S170i nécessite une alimentation secteur par prise de terre (3 broches). Si vous utilisez un adaptateur 3/2 pour eliminer la broche de terre, vous neompromptez pas la sécurité electrique mais vous risquez d'augmenter la sensibilité de l'appareil aux problèmes de bourdonnement et de bruits. L'élimination du bourdonnement et des bruits constitue parfois un vérable défi sur les chaînes audio complexes à plusieurs voies. Prenez note des points suivants, qui vous aidont à éviter les problèmes de bourdonnement et de bruits :</p>
<ul>
<li>Alimentez tous les éléments de votre chaîne en utilisant des prises secteur reliées au même circuit de cablage de votre domicile. Dans la mesure du possible, alimentez tous les éléments audio en utilisant la même prise ou des prises adjacentes sur le même circuit. Il est parfois utile d'alimenter les moniteurs video (et les ordinateurs!) à partir d'un autre circuit, rundout si le circuit concerné est connecté à une autre phase de l'alimentation générale. </li>
<li>Ne faites pas passer les câbles audio analogiques à côté des câbles d'alimentation secteur, ou à côté des câbles audionumeriques coaxiaux. </li>
<li>Utilisez exclusivement des cables audio de très bonne qualité, avec un très bon blindage électrique. Assurez-vous aussi que toutes les connexions sont bien solides. </li>
<li>Vous pourrez utiliser unegomme à crayon pour nettoyer les contacts en cuivre ou plaqués or, de manière àobtenir un bon contact et une résistance très faible ; il existe aussi de bons produits spécialement destinés au nettoyage des contacts. Evitez de débrancher et de rebrancher inutillement les connecteurs, car le plaquage en or (ou en cuivre) de la plupart des connecteurs (meme de très bonne qualité) est très mince et s'use rapidement.</li>
</ul>
<p>Dépistez les problèmes de bourdonnement/bruit un apparéil à la fois, en remontant progressivement les voies à partir du/des amplificateur(s) de puissance. Pour cela : Branchez d'abord les haut-parleurs sur l'amplificateur de puissance seul et vérifie l'absence de bourdonnement. Raccordez ensuite le préamplificateur seul (sansaucun autre apparéil connecté) à l'amplificateur de puissance et vérifie l'absence de bourdonnement. Branchez ensuite un apparéil source (un lecteur CD par exemple) au préamplificateur et vérifie l'absence de bourdonnement. A chaque étape, si vous constazez un bourdonnement ou des bruits, vérifie le cheminement du câblage audio et de l'alimentation secteur de l' apparéil qui vient d'être connecté. Dans certains cas, le fait de brancher le cable d'alimentation secteur du nouvel apparéil sur une autre prise murale ou d'isoler son cordon d'alimentation de la terre (utilisation d'un adaptateur 3/2 broches) permet d'éliminer le bourdonnement.</p>
<p>Le préamplificateur S170i utilise un système simple et intuitif de "menu" affichés ou incrustés à l'écran du moniteur video ou du télévisuer de la chaine, ce système étant utile à la fois lors de la configuration et pour l'utilisation courante. Les incrustations sont bien utiles, vous pouvez néanmoins utiliser (et même configurer) le S170i sans y avoir recours, puisque les mêmes données de base sont toujours affichées, quoi dans un format abrégé dans certains cas, sur l'afficheur de la face parlante du préampli.</p>
<h1 id="affichage-des-menus">AFFICHAGE DES MENUS</h1>
<p>Une fois que vous aurez connecté un moniteur video (TV) à la Sortie Moniteur [Monitor Output] du S170i, il vous suffira d'appuyer sur les touches curseur gauche ou croite de la télécommande HTR 2 pour acceder aux menus incrustés OSD (Affichage à l'Écran) du S170i, grâce auxquels vos pourrez régler tous les paramètres de configuration de la chaîne en utilisant tout simplement les touches haut, bas et Entrée [ENTER].</p>
<ul>
<li>Si l'incrustation n'apparait pas, vérifie vos branchements de Sortie Moniteur [Monitor Out] et/ou le paramétrage des éléments <Format video> [<Video format>] et <Incrustations> [<OSD display>] du menu "Configuration de l'Affichage" <Configuration de l'affichage> [<Display setup>] (voir plus bas), en vous servant de l'afficheur sur la face parlante du S170i.</li>
</ul>
<h1 id="navigation-dans-le-système-dincrustations-et-modification-des-paramétres">NAVIGATION DANS LE SYSTème D'INCRUSTATIONS ET MODIFICATION DES PARAMÉTRES</h1>
<p>Utilisez les touches Curseur haut/bas [Cursor ] pour vous déplacer dans les éléments de n'importe quel menu incrusté ; utilisez les touches Curseur [Cursor ] pour modifier la valeur (paramétrage) de n'importequel élément ; utilisez la touche Entrée [Enter] de la télécommande pour sélectionner un élément d'un menu incrusté. Sélectionnez <Quitter> [<Exit>] à partir de la page Menu pour sauvegarder les modifications que vous avez faites et pour "remonter" d'un niveau dans l'arborescence des menus (si vous étés déjà dans le Menu Principal, le fait de sélectionner <Quitter> fait disparaitre les menus incrustés).</p>
<p>Vouss pouvez configurer les niveaux, modes et options de votre S170i dans n'importe quel ordre ; il n'est pas nécessaire de proceder dans l'ordre établi ci-après. Il est néanmoins conseilé de commencer par paramétrer les options d'affichage incrusté du S170i, car certaines incrustations affecteront les options disponibles dans d'autres procédures.</p>
<h1 id="configuration-de-laffichage">CONFIGURATION DE L'AFFICHAGE</h1>
<p>À partir du Menu Principal Incrusté du S170i,CHOISSEZ I'élément <Configuration de l'affichage> [<Display setup>] en vous servant des touches Curseur haut/bas [Cursor up/down] et Entrée [Enter] de la télécommande. À l'aide des touches Curseur [Cursor ], réglez: <Système TV> [<TV system>] sur "NTSC" si vous étés en Amérique du nord, ou sur "PAL" si vous étés en Europe.</p>
<p>À l'aide des mêmes touches sur la télécommande, réglez :</p>
<ul>
<li><Menus superposés> [<Superimpose>] sur "Activés" ["On"] ou sur "Déactivés" ["Off"]. En mode "Déactivé" ["Off"], les menus à l'écran sont affichés sur un fond bleu, ce qui a pour effet de cacher tout programme video déjà affchéé à l'écran; en mode "Activé" ["On"], les menus sont affichés comme du texte blanc superposé sur tout programme video déjà affchéé à l'écran. </li>
<li><Affich.-temporaire> [<Temporary disp.>] sur "Complet" ["Full"], "Simple", ou "Sans" ["Off)]. Cela permet de définir la quantité d'informations affichées momentanément à l'écran par le S170i sous forme de texte incrusté, lors de chaque mise sous tension, sélection ou modification d'une source ou d'un mode d'écoute, ou lors d'une modification des types de signaux d'entrée. En mode "Complet" ["Full"], le système affiche un écran complet d'informations y compris la désignation de l'entrée; le type, le format le mode d'écoute et l'entrée du signal audio, ainsi que le type et l'entrée du signal video. En mode "Simple", le système n'affiche que la désignation de l'entrée. En mode "Sans" ["Off"], aucune information temporaire n'est affichée à l'écran. </li>
<li><Format video> [<Video format>] sur "Auto", "SVideo," ou "Compos." (video composite). Ces options définissant les sorties video du S170i qui seront actives lors de la sélection d'une entrée video; en mode "Auto", le mode de sortie sera selectionné suivant le format du signal d'entrée, S-Video étant prioritaire dans le cas où une source est connectée à l'aide des deux formats de liaison. À noter que le préamplificateur S170i relaye les signaux video même lorsqu'il est en mode "Veille ["Standby"]. De cette manière, il est possible d'utiliser les sources video telles que les apparciels de TéleTexte ou de Web-TV même lorsque le reste de la chaîne est étèint. </li>
<li><Sortie affichage à l'écran> [<OSD output>] sur "Les deux" ["Both"], "SVideo", "Compos." (video composite) ou "Sans" ["Off"]. Cette fonction définit la ou les sortie(s) video devant relayer les affichages et menus à l'écran du S170i. Si vous sélectionnez "Les deux" ["Both"], les menus incrustés / à l'écran serontopsis simultanément sur les Sorties pour moniteurs S-Video et video composite; si vous sélectionnez "SVideo" ou "Compos.", les affichages sont limités à la sortie可以选择; "Sans" ["Off"] désactive complètement les affichages à l'écran. (Dans tous les cas, les données de base restent lisibles via l'afficheur de la face parlante du S170i, ce qui vous permet de savoir ce que vous faites même lorsque les affichages à l'écran sont en mode "Sans" ["Off ]).</li>
</ul>
<h1 id="il-est-à-noter-que">IL EST À NOTER QUE:</h1>
<ul>
<li>Les affichages à l'écran ne sont pas prênts sur la sortie video composante. </li>
<li>Le fait de valider l'affichage à l'écran sur une sortie video fait "transiter" les signaux de la source video par les circuits d'intrustation. Les videophiles puristes souhaiteront peut-être désactiver l'affichage des menus à l'écran sur la sortie SVideo pour les fonctions de lecture / enregistrement les plus critiques. </li>
<li><Unités de distance> [<Distance units>] sur "Pieds" ["Feet"] ou "Mètres" ["Meters"]. Cette fonction permet de selectionner les unités de mesure utilisées pour entrer les cotes de configuration de vos haut-parleurs dans la page menu "<Configuration du Retard>" [<Delay setup>] du S170i (voir plus bas).</li>
</ul>
<h1 id="configuration-audio">CONFIGURATION AUDIO</h1>
<p>Le menu de <configuration audio> [<Audio setup>] vous permet de modifier le paramétrage des commandes de tonality et les autres options d'écoute. Les modifications que vous effectuez grâce à ce menu resteront en mémoire tant que vous ne les modifiez pas à nouveau et tant que vous n'activez pas un mode Prédéfini [Preset] contenant un paramétrage différent (voir plus bas).</p>
<h1 id="configuration-dolbydts">CONFIGURATION DOLBY/DTS</h1>
<p>À partir du menu de <Configuration Audio> [<Audio Setup>], Sélectionnez l'élément <Configuration Dolby/DTS setup> [<Dolby/DTS setup>] en vous servant des touches Curseur haut/bas [Cursor up/down], puis appuyez sur Entrée [Enter]; vous obtiendarez un sous-menu affichtant les choix suivants pour vous permettre d'ajuster les modes musicaux des décodeurs ambiophoniques Dolby et DTS:</p>
<h1 id="pl-ii-panorama-2"><PL II Panorama></h1>
<h1 id="choisissez-désacté-off-ou-activé-on">choisissez <Désacté> [<Off>] ou <Activé> [<On>]</h1>
<p>Lorsque le paramètre Panorama est sélectionned (<actif>), il enveloppe l'auditorium du son destiné aux haut-parleurs Avant Gauche et Droit, pour donner un effet stimulant.</p>
<h1 id="pl-ii-center-width-largeur-de-la-bande-centrale"><PL II Center Width> (largeur de la bande centrale)</h1>
<h1 id="choisissez-textmin-1-2-3-4-5-6-textmax">choisissez < Min.> < 1> < 2> < 3> < 4> < 5> < 6> < Max.></h1>
<p>La largeur de la bande centrale [Center Width] vous permet d'étaler progressivement le son de la voie Centrale dans les haut-parleurs Avant Gauche et Droit. Pour la largeur maximale <Max.>, la totalité du son destiné au haut-parleur central est mélangée au son des haut-parleurs Gauche et Droit. Cette commande peut contribuer à atteoir une sonorisation plus spacieuse, ou un meilleur fondu de l'image frontale.</p>
<h1 id="pl-ii-dimension-2"><PL II Dimension></h1>
<p>choisissez < 0> <1> <2> <3></p>
<p>Le réglage de la Dimension permet d'ajuster la balance avant / arrêté suivant votre goût.</p>
<h1 id="neo6-center-image-image-centrale"><Neo:6 Center Image> (image centrale)</h1>
<p>choisissez < Min. > < 1 > < 2 > < 3 > < 4> <Max.></p>
<p>Le réglage de l'image centrale [Center Image] vous permet d'étaler progressivement le son de la voie Centrale dans les haut-parleurs Avant Gauche et Droit.</p>
<h1 id="définition-des-configurations-préréglees">Définition DES CONFIGURATIONS PRÉRÉGLEES</h1>
<p>Le S170i comporte cinq "Configurations Prérgliées, c'est à dire des emplacements mémoire dans lesquels vous pouvez stocker cinq combinaisons différentes de réglages de tonalité et de niveaux relatifs des voies centrale / ambiophoniques / subwoofer pour correspondre à différentes situations. Par exemple : Vous pourriez paramétrer la Configuration 1 [Preset 1] pour des films avec ambiophonie en réglant la tonalité à zéro et en laissant les niveaux relatifs des voies à leurs valeurs par défaut, mais définir la Configuration 2 [Preset 2] pour écouter de la musique avec ambiophonie en augmentant légissement le niveau des voies ambiophoniques et subwoofer et en diminuant légissement le niveau des voies centrales, et aussi en effectuant des réglages spécifique pour les graves et les aigus. Les configurations prérgliées peuvent être paramétrées comme vous le souhaitez, pour n'importe quel besoin.</p>
<h1 id="définition-des-configurations-préréglées">Définition DES CONFIGURATIONS PRÉRÉGLÉES</h1>
<p>À partir du menu de <configuration audio> [<Audio setup>], utilisez les touches Curseur haut/bas [Cursor up/down] et Entrée [Enter] de la télécommande pour sélectionner l'objet <Paramétrage des configurations prérégées> [<Preset setup>]. À l'aide des mêmes touches, sélectionnez la Configuration [Preset] à paramétrer sur l'objet <Configuration prérégée> [<Preset>] ; utilisez ensuite les mêmes touches pour définir les niveaux des graves et des aigus que vous souhaitez pour cette configuration. Encore à l'aide des mêmes touches, définissez les niveaux relatifs des voies Centrales, Ambiophoniques, et Subwoofer que vous souhaitez pour cette configuration.</p>
<h1 id="il-est-à-noter-que-2">IL EST À NOTER QUE :</h1>
<ul>
<li>Si vous avez paramétré la présence de haut-parleur(s) abiophique(s) arrêté, dans le menu incrusté de <Configuration des haut-parleurs> [<Speaker Setup>] (voir ci-après), leurs niveaux respectifs seront commandés en même temps que les niveaux des voies abiophoniques. </li>
<li>Une fois paramétrée, une Configuration Prédéfinie reste inchangée jusqu'à ce que vous la modifiez à nouveau grâce au menu incrusté <Paramétrage des configurations préréglées> [<Preset setup>] </li>
<li>Une Configuration Prédéfinie [Preset] est appliquée qu'elle que soit la source Sélectionnée et quel que soit le mode d'écoute actif. </li>
<li>Si vous faites passer le S170i par son mode Veille, cela a pour effet d'annuler toute Configuration Prédéfinie précédemment sélectionnée, rétablissant à la fois la tonalité et tous les régliages de niveau aux valeurs définies sur les écrons de NIVEAUX [LEVELS] ou de MODE/MULTI.S de la télécommande HTR 2 (voir ci-après), ou définitions grâce au menu incrusté de <Configuration audio> [<Audio setup>] du préampli S170i (voir ci-dessus). Si vous souhaitez pouvoir régler à zéro les niveaux de toutes les voies ainsi que les valeurs de tonalité, sans passer par le mode de Veille [Standby], réglez l'une des Configurations Prédéfinies [Preset] avec des "zéros partout". </li>
<li>Les niveaux des voies stockés dans les Configurations Prédéfinies sont ajoutés aux niveaux de configuration définis à l'aide du menu incrusté <Configuration des Niveau> [<Level setup>] du préampli S170i. Par exemple : si vous menu <Configuration des Niveau> [<Level setup>] définit <Centre> [<Center>] à "-3 dB" et que vous entrez un niveau de voie centrale de +2 dB grâce à une configuration prédéfinie, l'effect net global sera un niveau de -1 dB pour la voie centrale. A l'inverse de ce qui précède, les réglages des commandes de tonalité replacent purement et simplement les réglages de tonalité des "<configurations audio>" [<Audio setup>].</li>
</ul>
<h1 id="rappel-des-configurations-préréglees">RAPPEL DES CONFIGURATIONS PRÉRÉGLEES</h1>
<p>Pour appeler une configuration prééglée à un moment ou à un autre, appuyez successivement sur la touche [AV PRESET] et sur la touche numérique correspondante < 1 - 5> de la télécommande HTR 2. Si vous faites passer le S170i par le mode Veille [Standby], cela aura pour effet d'annuler la configuration prééglée.</p>
<p>Le numero de la configuration prérgée que vous avons appelée apparait brièvement en incrustation à l'écran et s'affiche aussi sur l'affichage de la face parlante du S170i. (Reportez-vous aussi au paragraphe "Utilisation des Configurations Prérgées [Presents]" ci-après).</p>
<h1 id="graves-aigus">GRAVES / AIGUS</h1>
<p>À partir du menu de <configuration audio> [<Audio setup>], désissez l'élément <Graves> [<Bass>] ou <Aigus> [<Treble>] à l'aide des touches Curseur haut/bas [Cursor up/down] de la télécommande. En vous servant des touches Curseur ⇌ [Cursor ⇌], vous pouez augmenter ou diminuer le réglage des Graves ou des Aigus de ± 12 dB, par incrémentes/décréments de 1 dB.</p>
<ul>
<li>Les réglages des Aigus/Graves n' affectent que les voies avant (gauche, centre et droite), mais ils sont actifs dans tous les modes d'écoute. </li>
<li>Il est souvent mistré "d'attenuer" (effectuer un réglage vers le "moins") que "d'augmenter" (effectuer un réglage vers le "plus"); pour un son globalement plus "chaud", essayez de diminuer les aigus de quelques dB只不过 que d'augmenter les graves, et inversement. </li>
<li>Si vous trouvez qu'il vous est souvent nécessaire d'effectuer d'importants réglages au moyen des commandes de tonalité, vous aurez peut-être interet à revoir le choix de vos haut-parleurs et de leurs emplacements, ainsi que l'endetroit où vous avez l'habitude de vous asseoir pour écouter, de manière à adapter le tout à l'acoustique de la pierce.</li>
</ul>
<h1 id="voie-lfe">VOIE LFE</h1>
<p>La voie des Effets Basses Fréquences (c'est à dire la voie ".1" dans les chaînes "5.1 / 6.1") n'est active que pour les sources multi-voies DTS ou Dolby Digital. La voie EBF est utilisé le plus souvent comme voie supplémentaire pour améliorer la plage dynamique dessons très BASSE fréquence ; elle ne doit pas être confondu avec la voie de sortie Subwoofer du S170i, utilisée pour la plupart (voire la totalité) des informations graves de certaines voies ou de toutes les voies, suivant le paramétrage adopté à l'aide de la page menu de "<Configuration des Haut-parleurs>[<Speaker setup>].</p>
<p>À partir du menu de <configuration audio> [<Audio setup>], Sélectionnez l'élement <Voie EBF> [<LFE channel>] à l'aide des touches Curseur haut/bas [Cursor up/down] de la télécommande. En vous servant des touches Curseur [Cursor ], vous pourrez alors diminuer le réglage de la voie EBF par décrêments de 1 dB, pour une atténuation maximum de -10 dB.</p>
<p>Sur la plupart des chaînes, le paramétrage de la voie EBF peut rester à 0 dB (valeur par défaut), car le Limiteur de Graves du S170i (voir plus loin) sera régèle de manière à éviditer la surcharge des subwoofoers. Par contre, si vous savez que la plage dynamique de votre subwoofer est limitée, ou si les effets basses fréquences de la bande sonore de vos filmssemblant presque toujours excessifs sur cette châne, il sera peut-être avantageux d'essayer une légère atténuation du paramétrage de la <Voie EBF> [<LFE channel>].</p>
<h1 id="configuration-des-haut-parleurs">CONFIGURATION DES HAUT-PARLEURS</h1>
<p>Toute chaîne ambiophonique nécessite une "gestion des graves" pour diriger le contenu BASSE fréquence d'une ou plusieurs voies vers les haut-parleurs les plus à même de le produit. Pour que cette fonction marche correctement, il est très important que vous identifièez les capacités de vos haut-parleurs.</p>
<p>Nous utilisons les termes "Petit" et "Grand" (et aussi "Aucun"), mais il est à noter que laaille physique peut n'avoir aucun rapport avec ces désignations.</p>
<ul>
<li>Un "Petit" haut-parleur correspond à tout modele n'ayant pas une réponse significative dans les fréquences très graves, c'est à dire en dessous d'environ 80 Hz. </li>
<li>Un "Grand" haut-parleur est n'importe quel modele avec une plage de fréquences complète, c'est à dire avec une bonne réponse dans les fréquences très graves. </li>
<li>"Aucun" haut-parleur correspond à un haut-parleur non liént sur votre chaîne. À titre d'exemple, votre chaîne peut être dépourvue de haut-parleurs Arrière ; dans ce cas, vous configureriez l'élement <haut-parleurs arriere> [Back speakers] pour "Aucun" ["No"].</li>
</ul>
<h1 id="configuration-des-haut-parleurs-2">CONFIGURATION DES HAUT-PARLEURS</h1>
<p>À partir du Menu Principal incrusté, Sélectionné l'élement <Configuration des haut-parleurs> [<Speaker Setup>] à l'aide des touches Curseur haut/bas [Cursor up/down] et Entrée [Enter] de la télécommande. En vous servant des touches Curseur <> [Cursor <>], règlez <Haut-parleurs principaux> [<Main speakers>] sur "Grand" ["Large"] ou "Petit" ["Small"]. En vous servant des mêmes touches sur la télécommande, règlez le <Haut-parleur central> [<Center speaker>], les <Haut-parleurs ambiophoniques> [<Surround speakers>], et les <Haut-parleurs arrêté [<Backspeakers>] sur "Grand" ["Large"], "Petit" ["Small"] ou "Aucun" ["No"] suivant les haut-parleurs connectés à votre chaine. Ne règlez <Subwoofer> sur "Oui" ["Yes"] que si vous avez un subwoofer connecté au jack de sortie analogique SUB du préampli S170i.</p>
<h1 id="nota">NOTA</h1>
<p>Le S170i vous permet de configurer Subwoofer sur "Oui" ["Yes"] même si vous avez validé "Grand" ["Large"] pour les haut-parleurs avant : Dans ce cas, le contenu grave de toutes les voies que vous avez régliées sur "Petit" ["Small"] sera envoyé à la fois au subwoofer et aux haut-parleurs avant. Vous pouvez essayer cette configuration si vos haut-parleurs filtrent naturellement les fréquences en dessous de la fréquence de séparation d'environ 80 Hz, et qu'ils sont donc capables de receiveoir les signaux graves forts sans distorsion ni déterioration. Pour la plupart des chaînes équipées d'un subwoofer, la(Meilleure solution consiste néanmoins à configurer les haut-parleurs avant sur "Petit" [Small].</p>
<p>Le menu de <Configuration des Haut-Parleurs> [<Speaker Setup>] comporte désormais trois fonctionnalités supplémentaires :</p>
<ul>
<li>Une Fréquence de Séparation Régable [Adjustable Crossover Frequency], qu'il est possible de modifier par incréments de 10 Hz entre 40 Hz et 140 Hz. Cette fonction règle à la fois l'alimentation du haut-parleur par le filtrte Passe-Haut (2ème ordre, 12 dB/octave) et l'alimentation du subwoofer par le filtrte Passe-Bas (4ème ordre, 24 dB/octave) </li>
<li>Filtre Subwoofer Déconnectable [Defeatable Subwoofer Filter]. Cette fonction vous permet d'utiliser le filtre interne de votre subwoofer actif. Cette fonction est utile pour maîtriser l'acoustique dans les pieces difficiles, car elle vous permit de régler la fréquence de séparation du subwoofer à une fréquence différente de cette du filtre Passe-Haut du S170i afin de créé un décalage ou un recouvrement de la réponse. </li>
<li>Graves Améliorés [Enhanced Bass]. Lorsque cette fonction est sélectionnée, le subwoofer reste actif qu'elle que soit la configuration des haut-parleurs, de manière à Obtir un "boom" maximum.</li>
</ul>
<h1 id="configuration-des-niveaux">CONFIGURATION DES NIVEAUX</h1>
<p>Le réglage de la balance relative des haut-parleurs de votre chaine est probablement la plus importante fonction spécifique pour la configuration de votre S170i. Tout d'abord, ce processus garantit que les enregistements avec ambiophonie, qu'il s'agisse de musique ou de bandes sonores de films, seront produits avec l'équilibre prévu par les artistes pour la musique, les effets et les dialogues. Deuxiemelement, si votre chaine compte un subwoofer, il définit le rapport correct entre le volume du subwoofer et celui des autres haut-parleurs, donc le rapport correct entre les basses fréquences (graves) et les autres éléments sonores.</p>
<h1 id="utilisation-dun-sonométure">UTILISATION D'UN SONOMÉTURE</h1>
<p>Il est tout à fait possible d'effectuer les opérations de Configuration des Niveauurs du S170i "à l'oreille" et vous obtiendaç des résultats d'une précision acceptable pour autant que vous ayez un peu "d'oreille". Ceci dit, les différences de timbre entre les haut-parleurs avant, centraux et abiophique peuvent rendre difficile un réglage précis des niveaux. Nous vous conseillons donc viviment d'utiliser un sonomètre (ou mesureur de "pression sonore" [SPL]), comme par exemple le sonomètre Récurrence 33-2050 de Radio Shack, pour effectuer le réglage. La méthode est rapide, reproducible et fiable. Vous risquez de trouver qu'un apparil de ce type vous rendra de nombreux services en tant qu'otil audio, mais votre spécialiste audio NAD sera peut-être en mesure de vous en préter un si vous ne souhaitez pas l'acheter. Si vous utilisez un sonomètre pour effectuer le réglage de votre chaire, vous serez aussi en mesure de régler le niveau global de volume sonore de manière à ce que, lorsque la commande de Volume Global de votre S170i est réalisée sur -0 ("niveau de référence"), vous, dans votre cinema à domicile, puissiez retrouver le même niveau sonore que celui d'une bonne salle de cinéma projetant le même film. (Vous pourrez, bien évidemment, régler la commande de Volume Global à n'importe toute valeur qui vous convient à un moment donné).</p>
<p>Le sonomètre doit être positionné à l'endroit d'écoute principal, approximativement à la hauteur de la tête de l'auditeur en position assise. L'idéal est de disposeur d'un trépied, mais en vous servant d'un rouleau de ruban adhésiF large vous pourrez utiliser à peu pres n'importe quoi comme support (une lampe sur pied, un pupitre ou une chaise avec un dossier "en échelle"). La seule précaution à prendre est de s'assurer qu'aucune surface importante refléchissant les sons ne se trouve devant ou a proximé du microphone. Orientez l'appareil en pointant le microphone (qui se trouve généralement à l'extrémité du microphone). directement vers le plafond (et non vers l'avant, vers les haut-parleurs), puis vérifie que son échelle de pondération "C" a été sélectionnée. Pour étalonner votre chaîne pour qu'elle reproduise le même niveau sonore qu'une bonne salle de cinema, réglez le sonomètre pour afficher une pression sonore de 75 dB. (Sur les sonomètres Radio Shack, vous pourrez soit caler le sonomètre sur le calibre 80 dB et régler le niveau à -5 points, soit le caler sur le calibre 70 dB et régler le niveau à +5 points.</p>
<p>Cette valeur de pression sonore de 75 dB est le niveau de reférence "officiel" pour les cinémas (et pour le THX). Nous précisons néanmoins qu'il n'este aucune loi vous obliguant à utiliser ce niveau. En fait, pour beaucoup d'utilisateurs de cinéma à domicile, ce niveau leur semble trop fort pour le cinema à domicile. De nombreuses personnes trouvent qu'en réglant le niveau de reférence à 70 dB de pression sonore, le résultat obtenu est bien.</p>
<h1 id="configuration-des-niveaux-2">CONFIGURATION DES NIVEAUX</h1>
<p>À partir du Menu Principal incrusté, Sélectionnez l'élement <Configuration des Niveau> [<Level setup>] à l'aide des touches Curseur haut/bas [Cursor up/down] et Entrée [Enter] de la télécommande. Activez le signal bruit de test en appuyant sur la touche [Test] de la télécommande (elle se trouve à côté de la touche d'augmentation du volume); vous entendrez un bruit de chuimentement qui passé d'un haut-parleur à l'autre, en commençant par le haut-parleur avant gauche. Si vous n'entendez pas le bruit de test, vérifie vos connexions audio (voir ci-dessus) ainsi que le paramétrage du menu incrusté <Configuration des haut-parleurs> [<Speaker Setup>] (voir ci-dessus).</p>
<p>Dans la colonne la plus à gauche du menu incrusté, vous verrez une tête de flèche en face du mot <gauche> [<Left>] (si la tête de flèche se désigne une autre ligne, servez-vous des touches Curseur haut/bas [Cursor up/down] de la télécommande pour la mesure en face du mot <gauche> [<Left]). Servez-vous maintainant des touches Curseur [Cursor ] de la télécommande pour régler le niveau de bruit produit par le haut-parleur Gauche (avant gauche); le bruit de test ira automatiquement dans ce haut-parleur et l'indication de "décalage de niveau" ["level offset"] à droite changera par increments de 0,5 dB. Si vous utilisez un sonomètre, réglez la sortie Gauche pour obtenir une valeur de pression sonore égale à 75 dB, pondération C (ou tout autre niveau de référence que vous avez choisi d'adopter).</p>
<p>Si vous effectuez l'équilibrage "à l'oreille", il vous sera nécessaire de désirir l'un des haut-parleurs (en principe le haut-parleur central) comme reférence, puis de régler les autres de manière à ce que leur niveau sonore "semble aussi fort" que le haut-parleur de reférence.</p>
<p>En vous servant des touches Cursor haut/bas [Cursor up/down] et Cursor / [Cursor / ] de la télécommande, reglez chaque haut-parleur individuellement pour obtenir la meme indication sur le sonomètre (ou le même volume sonore subjectivement apprecié), avec une précision inférieure ou égale à ±1 dB; le fait que le S170i soit capable d'étalonner les sorties par pas de 0,5 dB devantrendre une telle précision possible.</p>
<p><h1 id="il-est-à-noter-que-3">IL EST À NOTER QUE :</h1></p>
<ul>
<li>Tous les haut-parleurs doivent se couver à leur emplacement définitif avant de procéder au réglage des niveaux. </li>
<li>Voiture subwoofer (si vous en avez un) doit être configuré en mettant son filtré séparateur interne hors circuit, ou alors il doit être régle à sa plus haute fréquence. </li>
<li>A cause des effets acoustiques de la pierce, l'étalonnage des haut-parleurs appariés par paires (avant, ambiophoniques, arrière) ne sera pas toujours obtenu en affichtant exactement les mêmes valeurs de décalage. </li>
<li>Si vous étés particulièrement pointilleux, vous souhaitez peut-être re-controller votre Configuration des Niveauts après avoir effectué l'opération de Configuration du retard (voir ci-après).</li>
</ul>
<h1 id="configuration-du-retard">CONFIGURATION DU RETARD</h1>
<p>Le paramétrage du retard des voies de votre chaine constitue un perfectionnement subtil mais important pour votre installation. En indiquant au S170i les distances entre l'auditeur et chaque haut-parleur, celui-ci intégrerà automatiquement les retardes corrects pour chaque voie, de manière à optimiser l'image sonore, l'intelligibilité et l'ambiance ambiophique. Entrez vos distances avec une précision d'environ 30 cm.</p>
<h1 id="paramétrage-des-retards">PARAMÉTRAGE DES RETARDS</h1>
<p>À partir du Menu Principal incrusté, sélectionnez l'élement "Configuration du Retard" ["<Delay setup>] à l'aide des touches Curseur haut/bas [Cursor up/down] et Entrée [Enter] de la télécommande. En vous servant des touches Curseur [Cursor ], réglez la valeur pour le haut-parleur <Droit> [<Right>] de manière à ce qu'elle correspondé à la distance entre votre position d'écoute principale et la surface avant du haut-parleur avant droit.</p>
<p>En vous servant des mêmes touches de la télécommande, réglez les valeurs respectives pour les autres haut-parleurs de manière à ce qu'elles correspondant aux distances réelles des éléments de votre chaîne. Si un haut-parleur donné n'est pas present, le mot "Aucun" ["None"] sera affché et dernier réglage de la distance ne sera possible.</p>
<h1 id="configuration-des-sources">CONFIGURATION DES SOURCES</h1>
<p>Le S170i comaporte neuf entrées complètes : six entrées audio-video (repérezes VIDEO 1 à 6 sur la face arrrière), et 3 entrées audio simple (repérezes CD, AUX, et TUNER). Le préampli comaporte aussi une boucle audio simple MONITEUR DE BANDE [TAPE MONITOR]. Pour chaque position d'entrée du S170i, vous pouvez désirir une entrée numérique qui s'activera chaque fois que cette entrée sera sélectionnée ; vous pouvez aussi affecter une désignation de 7 caractères qui sera affichée sur l'afficheur de la face parlante (et brievement en incrustation sur l'écran) chaque fois que cette entrée sera sélectionnée.</p>
<h1 id="configuration-des-sources-2">CONFIGURATION DES SOURCES</h1>
<p>À partir du Menu Principal incrusté, sélectionnez l'objet <Configuration des Sources> [<Source setup>] à l'aide des touches Cursor haut/bas [Cursor up/down] et Entrée [Enter] de la télécommande. En vous servant des touches Cursor [Cursor ], sélectionnez la source que vous souhaitez paramétrer. Les sources sont numéroétées de 1 à 9 et correspondent respectivement aux sources VIDEO 1 à 6, CD, AUX, et TUNER sur la face arrête (la boucle MONITEUR DE BANDE [TAPE MONITOR] n'est pas paramétrable et n'apparaître pas dans la série). Utilise la touche Cursor (bas) [Cursor (down)] pour sélectionner l'objet <Titre> [<Title>] menu item, puis appuyez sur la touche Entrée [Enter]. Vous pouvez maintainant modifier la désignation par défaut ("Video 1", "CD," etc...) et inscrite une désignation personalisée compteant jusqu'à 7 caractères. Les touches Cursor haut/bas [Cursor up/down] permettent de faire défiler la liste complètes des caractères disponibles, alors que les touches Cursor [Cursor ] permettent de déplacer le cursor à gauche et à droite sur les six caractères (vous pouvez librement revenir sur n'importe quel caractère pour le modifier). Quand vous ave mentionné, appuyez sur Entrée [Enter] pour revenir au menu de <Configuration des Sources> [<Source setup<].</p>
<p>En vous servant de la touche Cursor (bas) [Cursor (down)], faites défilier le menu vers le bas jusqu'à l'élement <Entrée numérique> [<Digital input>]. Utilisez les touches Cursor [Cursor ] pour affercer une entrée numérique à la source actuelle. Les entrées numériques apparaîtront dans l'ordre suivant: Coax 1 à 4, OPT 1, puis Opt 2, suivis de Désactivée [Off]. Vous configurerz l'<Entrée numérique>[<Digital input>] d'une source comme "Désactivée" ["Off"] pour empêcher cette source de dire un flux de données qui seprésentait à l'entrée.</p>
<h1 id="nota-2">NOTA</h1>
<p>Vous estes libre d'afacter n'importe quelle entree numerie a n'importe quel emplacement source ; vous pouze meme afferer une entree numerie a deux positions sources ou plus encore. A titre d'example, si vous ave branché votre lecteur de DVD/CD a l'entree numerie COAX 1, vous souhaiterez peut-etre afferctcoAX1a la fois a I'entree "CD" et a I'entree "VIDEO 1" auquel cas vous pourriez renomer VIDEO 1 en I'appelet "DVD".</p>
<p>Les caractères suivants sont disponibles :</p>
<p>ABCDEFGHIJKLMNOPQRSTUVWXYZ0123456789<br />
abcdefghijklmnopqrstuvwxz*-/.</p>
<p>En vous servant de la touche Curseur (bas) [Cursor (down)], faites défilier le menu vers le bas jusqu'à l'objet <Video composante> [<Component video>. Utilisez les touches Cursor / [Cursor / ] pourmettre la Video composante sur "Marche" ["On"] ou sur "Arrêt" ["Off"].Lorsqu'une source est configurée sur Video composante sur Marche" ["On"] le signal video的前提 sur les jacks d'ENTREEVIDEO COMPOSANTE(Y-Cb-Cr)[COMPONENTVIDEO IN(Y-Cb-Cr)]du S170i sera envoye sur ses jacks de SORTIE VIDEO COMPOSANTE [COMPONENTVIDEO OUT] chaque fois queyou sélectionnerez cette entree.</p>
<ul>
<li>Les menus incrustés ne sont pas prênts sur la sortie video composante.</li>
</ul>
<h1 id="configuration-des-asservissements">CONFIGURATION DES ASSERVISSEMENTS</h1>
<p>Le S170i est équipé de 3 sorties Asservissement 12-volts, que vous pouvez utiliser pourmettre sous tension, activer ou commander des éléments ou systèmes de servitude, comme par exemple les amplificateurs de puissance, les projecteurs, les systèmes d'éclairage, et bien plus encore. Leur fonction peut tout simplement consister à mesure sous tension et à étéindre votre amplificateur de puissance NAD S250, ou peut être très complexe et préparer toute une salle de cinema à domicile avant de projeter un film. Pour des informations à caractère plus technique concernant les sorties asservissement 12 volts du S170i, reportez-vous à l'Annexe 1 ou consultez votre installerateur audio spécialiste NAD.</p>
<h1 id="exemple-de-paramétrage-en-asservissement-12-volts-simple-alimentation-de-lamplificateur-de-puissance-nad-s250">Exemple de paramétrage en Asservissement 12 Volts Simple : Alimentation de l'Amplificateur de Puissance NAD S250</h1>
<p>L'exemple suivant met en œuvre l'Asservissement 12 V N° 1 du S170i pourmettre l'amplificateur de puissance S250 sous tension et hors tension en même temps que le préamplificateur.</p>
<ul>
<li>En vous servant du cable d'Asservissement 12 V fourni avec le S170i, reliez le jack Asservissements 12 V [12V Triggers] repéré #1 sur la face arrière du S170i au jack d'entrée Asservissement 12 V [12V Trigger] de l'amplificateur de puissance S250. À noter que ce cable spécifique comporte un mini-connecteur 1/8'' (3,2 mm) à une extrémité, pour le S170i, et un connecteur spécial de type Courant Continu à l'autre extrémité, qui s'adapte à l'entrée asservissement de l'amplificateur S250. </li>
<li>À partir du Menu Principal incrusté, Sélectionnez l'élement <Configuration des Asservissements> à l'aide des touches Curseur haut/bas [Cursor up/down] et Entrée [Enter] de la télécommande. La liste des paramètres de la <Asservissement 1> [<Trigger 1>] devrait apparaitre comme suit (il s'agit des valeurs par défaut):</li>
</ul>
<p>polarité [polarity] Posit.</p>
<p>retard [delay] No</p>
<p>durée [duration] Infin.</p>
<p>Si les paramètres affichés sont différents de ceux définis ci-dessus, utilisez les touches Curseur haut/bas [Cursor up/down] et Curseur / [Cursor / ] de la télécommande pour les modifier afin qu'ils correspondent aux valeurs ci-dessus.</p>
<h1 id="configuration-audio-thx">CONFIGURATION AUDIO THX</h1>
<p>L'ambiophonie THX Surround EX cree une sixieme voie, "arriere centrale", pour piloter un ou plusieurs haut-parleurs situés derrière la zone d'écoute. Pour les enregistements portant la marque Dolby Surround EX, cela constitue une voie arriere centrale spécialement conque codée dans les voies ambiophoniques gauche/droite, exactement de la meme maniere que la voie centrale etait codée dans les voies avant gauche/droite sur les mixages Dolby Surround à codage matriel. Mais le traitement ambiophonique THX Surround EX cree biensoon un bon effet central arriere, meme si le logiciel n'a pas ete specifquement codé à l'origine pour une lecture EX.</p>
<h1 id="limiteur-de-graves">LIMITEUR DE GRAVES</h1>
<p>Le S170i comaporte un Limiteur de Graves que vous pouvez utiliser pour éliminer tout risque de reproduction d'une distorsion audible par votre subwoofer. Pour cela, vous écoutez un signal de "bruit test" incorpore dans le S170i et que celui-ci envoie à votre subwoofer ; en écouteant ce signal, vous augmenterez progressivement la "plage dynamique" du Limiteur de Graves jusqu'à ce que vous entendiez une distorsion audible. Le Limiteur de Graves empêche alors tout signal enregistré envoyé au subwoofer de dépasser ce niveau.</p>
<h1 id="configuration-du-limiteur-de-graves">CONFIGURATION DU LIMITEUR DE GRAVES</h1>
<p>À partir du menu de <configuration audio THX> [<Audio setup>] , utilisez les touches Curseur haut/bas [Cursor up/down] et [Enter] de la télécommande pour selectionner l'objet <Configuration du limiteur de graves> [<Bass limiter setup>] . A I'aide des mêmes touches, configurez le <Limueur de graves> [<Bass limiter>] sur "Actif" ["On"] et le <Bruit limiteur> [<Limiter noise>] sur "Actif" ["On"] ; vous entendrez un léger grondement dans votre subwoofer. (Si vous n'entendez pas ce son dans le subwoofer, vérifie les branchements audio et alimentation du subwoofer, vérifie la Configuration des haut-parleurs, (voir plus loin), et/ou vérifie le réglage des commandes sur le subwoofer lui-même).</p>
<p>Maintenant utilisez les touches Cursor / [Cursor / ] de la télécommande pour aller a l'objet <Niveau de limiteur> [<Limiter level>] , puis la touche Cursor [Cursor ] pour diminuer le réglage du limiteur par décrêments de 1 dB. Au fur et à mesure que vous réduisez le limiteur, le bruit test dans le subwoofer augmente. Écoutez pour rechercher le point au-delà duquel vous entendez des distorsions audible (son reche, "claquements", "halètements" ou tout autre son anormal); utilisez alors la touche Cursor [Cursor ] pour ramener (augmenter) le niveau limiteur d'une valeur de 1 ou 2 dB, afin de faire cesser la distorsion. Vous avez défini la limite "sans distorsions" de votre configuration subwoofer actuelle. Il est conseilé de réverifier la configuration du Limiteur de Graves après avoir procédé à la Configuration des Niveauux (voir plus loin).</p>
<ul>
<li>Meme après avoir reglé le Limiteur des Graves, il est parfois utile d'utiliser le bruit test pour "recherche et éliminer" les résonances dans la piece, qui sont inévitablement excitees par les fortes sonorités du subwoofer. (Le traitement des vitres, les plaques électriques murales et les objets d'art suspendus sont trois sources de vibrations très féquent). </li>
<li>Si vous changez de subwoofer, ou si vous déplacez votre subwoofer actuel ou votre position d'écoute, vous devrez refaire l'opération de configuration du Limueur des Graves. </li>
<li>Si vous disposez d'un subwoofer très performant, ce programme peut atteindre des niveaux sonores assez forts. Il est donc conseilé d'attendre que femme, enfants et animaux domestiques soient sortis avant de configurer au maximum le Limiteur des Graves.</li>
</ul>
<h1 id="compensation-du-gain-en-périph-boundary-gain-comp">COMPENSATION DU GAIN EN PÉRIPH. [BOUNDARY GAIN COMP.]</h1>
<p>Cette fonctionnalité du THX Ultra 2 corrige le gain audio (augmentation de niveau) lorsqu'un subwoofer est placé contre un mur ou pres d'un coin de la pierce.</p>
<h1 id="nota-3">NOTA</h1>
<p>Cette fonctionnalité n'est disponible que si vous utilisez un subwoofer homologué THX Ultra 2, pour lequel la réponse de fréquence et la sensibilité font partie des specifications.</p>
<p>Choisissez <THX Ultra2 Sub> en vous servant des touches Curseur ▲/▼ [Cursor ▲/▼] de la télécommande, puis sélectionnez <Oui> ou <Non> [<Yes> ou <No>] en vous servant des touches Curseur ▲/▶ [Cursor ▲/▶]. Utilisez ensuite les touches Curseur ▲/▼ [Cursor ▲/▼] de la télécommande pour sélectionner <Comp. gain périph.> [<Boundary gain comp.>] , puis choisissez <Activé> ou <Déactivé> [<On> ou <Off>] en vous servant des touches Curseur ▲/▶ [Cursor ▲/▶].</p>
<h1 id="nota-4">NOTA</h1>
<p>La compensation du gain en périhérie ne peut être SéLECTIONNée que si vous avez besoin <Oui> [<Yes>] pour l'objet <THX Ultra2 Sub> du menu.</p>
<h1 id="asa-2">ASA</h1>
<p>ette fonctionnalité THX permet de régler le gain et le retard des haut-parleurs Ambiophoniques Arrière, de manière à tener compte de leur localisation dans la pierce. Vous avez le choix entre trois emplacements possibles: ensemble, à proximé, ou séparés.</p>
<h1 id="nota-5">NOTA</h1>
<p>Pour pouvoir utiliser cette fonctionnalité, votre chaine doit composer deux haut-parleurs Ambiophoniques Arrière (7.1).</p>
<p>Choisissez <Haut-parleurs arrrière> [Back speakers>] en vous servant des touches Curseur ▲/▼ [Cursor ▲/▼] de la télécommande, puis sélectionnez <Ensemble> ou <À proximé> ou <Séparés> [Together> ou <Close> ou <Apart>] en vous servant des touches Curseur ▲/▶ [Cursor ▲/▶] keys.</p>
<p>Voussoupiezcommanderle preamplificateurS170iaussibiena partirde sa face parlantequ'enutilisant latelecommandeHTR2.Comme latelecommandeconstituera,dansla plupartdescas,le principal disposifedecommande,nousnousconcentreronssurlefonctionnementenutilisantlatelecommande. Lisez bienla section“Fonctionnementde laFaceParlante”ci-apres.</p>
<h1 id="choix-des-sources">CHOIX DES SOURCES</h1>
<p>En vous servant de la télécommande HTR 2, Sélectionnez AMPLI [AMP]; utilisez ensuite les touches numériques [1 à 10+], repêées de la même couleur rouge que la touche [AMP] pour [DVD], [SAT], MAGNETOSCOPE [VCR], [VIDEO], etc... pour sélectionner ces sources directement.</p>
<h1 id="il-est-à-noter-que-4">IL EST À NOTER QUE :</h1>
<ul>
<li>Lorsqu'une source uniquement audio est selectionnée, le dernier signal videoptionné reste actif jusqu'à ce qu'une autre source audio-video soit selectionnée. </li>
<li>Lorsque vous changez de source, le menu à l'écran affichera momentarily des informations concernant la nouvelle entrée, en fonction du paramétrage de la Configuration de l'Affichage (voir ci-dessus). Le niveau de détaill dépend du paramétrage de l'élement <Affich.-temporaire> [<Temporary disp.>] : Le mode "Complet" ["Full"] affiche toutes les informations concernant les signaux audio, numérique et videoe de l'entrée qui vient d'être sélectionnée ; mode "Simple" n'affiche que la désignation de l'entrée qui vient d'être sélectionnée et mode "Sans" ["Off"] empêche tout affichage. </li>
<li>Le mode d'écoute (Stereó, EARS, Dolby Digital, etc.) d'une entrée qui vient d'être sélectionnée revienda au mode utilisé lors de la dernière'utilisation de cette entrée, excepte que la source numérique multi-voies (Dolby Digital ou DTS) se mettra automatiquement en mode ambiophique 5.1/6.1 voies, même si l'entrée était réglée sur un autre mode (Stereó ou EARS, par exemple) lors de sa démarche selection. </li>
<li>L'entrée Ext5.1 fait partie du "défilament circulaire" des sources du S170j, comme n'importe qu'elle autre source audio seule. Néanmoins, comme l'entrée Ext5.1 est une source "traversante", elle n'est affectée par aucune fonction de préamplification comme par exemple la gestion des graves, les commandes de tonalité; les signaux entrant par les ENTRÉES EXTERNES 5.1 [EXTERNAL 5.1 INPUTS] sur la face arrêté passent directement dans les six jacks correspondants de SORTIE PREAMPLI ANALOGIQUE 7.1 [PREAMP ANALOG 7.1 OUTPUTS] sans autre traitement que celui de la commande de volume principale. La gestion des graves ou tout autre traitement souhaïte doit être assurée par l'élement source externe multi-voies.</li>
</ul>
<p>Une COMMANDE DE NIVEAU D'ENTREE [INPUT LEVEL] est prévue pour les sources analogiques, grâce à un INDICATEUR DE NIVEAU D'ENTREE qui permet un réglage facile et précis. Ce circuit ajusté automatiquement l'entrée concernée afin d'empêcher toute surcharge du convertisseur A/N (convertisseur assurant la transformation des signaux analogiques en signaux numériques pour les besoin de l'ambiophonie), ce qui peut dire que l'utiliseur n'a pas besoin d'en effectuer le réglage. Mais il se peut vous ayez envie de régler le niveau d'entrée manuelle, da manière à ce que chaque source soit reproductive au même niveau sonore subjectif. comme le réglage automatique ne s'occupe que des niveaux crête du signal, les sources ayant une plage dynamique importante (les CD de musique classique) vous donneront l'impression d'être plus faibles que les sources sonores ayant une plage dynamique étroite ou comprimée (émissions de musique rock à la radio).</p>
<p>Pour régler le NIVEAU D'ENTREE [INPUT LEVEL], activez d'abord les INCRUSTATIONS À L'ÉCRAN [OSD] en appuyant sur le BOUTON CURSEUR DROIT puis faites défilier le menu à l'aide de la FLÉCHE BAS jusqu'à l'options CONFIGURATION SOURCES [SOURCE SETUP], puis appuyez sur la touche ENTRÉE [ENTER].</p>
<p>Dans le MENU DE CONFIGURATION DES SOURCES [SOURCE SETUP],CHOISSEZ SENSIBILITÉ ANALOGIQUE [ANALOG SENSITIVITY] et utilisez les touches CURSEUR DROIT ET GAUCHE pour regler le NIVEAU D'ENTREE [INPUT LEVEL]. La plage de réglage va de -5 dB à +10 dB. Vous pouvez aussi sélectionner MONITEUR ANALOGIQUE [ANALOG MON] pour afficher une barre verticale (avec fonction Limitation de Crête) représentant le niveau d'entree. Dans ce mode, utilisez les touches CURSEUR HAUT/BAS pour augmenter l'échelle de l'indicateur de "-20 dB à 0 dB", à "-40 dB à 0 dB".</p>
<h1 id="réglage-du-volume">RéGLAGE DU VOLUME</h1>
<p>Utilisez les touches <Volume haut/bas> [<Volume up/down>] de la télécommande HTR 2 pour régler le "volume principal" du S170i, en augmentant ou en baissant toutes les voies en même temps.</p>
<h1 id="il-est-à-noter-que-5">IL EST À NOTER QUE :</h1>
<ul>
<li>Une ou des impulsion(s) momentanée(s) sur la touche correspondante permettent d'augmenter ou de diminuer le volume principal par pas de 1 dB; si vous maintainez enforcée la touche <Volume haut/bas> [<Volume up/down>], l'augmentation ou la diminution du volume se fait de façon "continue" jusqu'à ce que vous relâchiez la touche. </li>
<li>L'incrustation à l'écran du S170i affichera le volume sonore sous forme de graphisme linéaire dont la longueur part du niveau de référence (le repère "+" sur la ligne), au dessus duquel un affichage numérique donne la valeur en dB par rapport au niveau de référence. (Si l'élement <Affich.temporaire> [<Temporary disp.>] du menu <Configuration de l'affichage> [<Display setup>] est sur "Off", l'indication temporaire de volume ne sera PAS affichée).</li>
</ul>
<p>Comme le niveau moyen des enregistements varie considérablement, il n'y a aucune raison de se contraindre à écouter au niveau de référence ou à un autre réglage quelconque. Un niveau de -20 peut sembler tout à fait aussi "fort" pour un CD qu'un niveau de -10 pour un autre.</p>
<ul>
<li>Si la fonction Coupure du son a été activée (voir ci-après), le fait d'augmenter le volume principal à l'aide de la touche <Volume haut> [<Volume up>] de la télécommande HTR 2 ou du bouton sur la face parlante a pour effet d'annuler automatiquement la coupure; si, par contre, vous diminuiez le volume, la coupure du son est maintainue. </li>
<li>La mise en mode veille et la remise sous tension du S170i ne modifie pas le réglage du volume sonore; si, par contre, le réglage avant la mise en veille était supérieur à -20 dB, le S170i se remettra sous tension à -20 dB. Cela évite de commencer avec un volume sonore trop élevé.</li>
</ul>
<h1 id="coupure-du-son">COUPURE DU SON</h1>
<p>Utilisez la touche <Muet> [<Mute>] de la télécommande HTR 2 pour couper complètement le son de toutes les voies. La fonction de coupure du son est toujours disponible, quel que soit lechioïx de source ou de mode d'écoute.</p>
<h1 id="il-est-à-noter-que-6">IL EST À NOTER QUE :</h1>
<ul>
<li>Le fait de passer en mode Veille ou d'eteindre le S170i a pour effet d'annuler le mode muet ; le S170i se met toujours sous tension sans le mode muet. </li>
<li>Le fait de changer de mode d'écoute ou d'entrée n'annule pas le mode muet. </li>
<li>le fait d'augmenter le volume principal à l'aide de la touche <Volume haut> [<Volume up>] de la télécommande HTR 2 ou du bouton sur la face parlante a pour effet d'annuler automatiquement la coupure; si, par contre, vous diminuez le volume, la coupure du son est maintainue.</li>
</ul>
<h1 id="configuration-des-modes-découte">CONFIGURATION DES MODES D'ÉCOUTE</h1>
<h1 id="à-propos-des-modes-découte-du-s170i">À PROPOS DES MODES D'ÉCOUTE DU S170i</h1>
<p>Le préamplificateur S170i offre sept modes d'écoute distincts, adaptations aux différents types d'enregistrement ou de programme.</p>
<h1 id="mono-2">MONO</h1>
<p>Toute la sortie est envoyée sur la voie centrale, ou sur les voies gauche et droite si aucun subwoofer n'est branché ou selectionné; les basses fréquences sont envoyées sur le subwoofer, si la Configuration des haut-parleurs en comporte un.</p>
<p>Le mode Mono est le meilleur mode pour les enregistements monophoniques créé à l'origine sous forme monovoie, y compris les films classiques et les enregistements musicaux historiques. Ce mode garantit une représentation monophonique claire avec une gestion correcte des graves.</p>
<h1 id="steréo">STERÉO</h1>
<p>Les enregistements stéreo, qu'ils soient sous forme PCM ou analogique et qu'ils aient ou non un codage ambiophique, sont produits comme ils ont été enregistrés; les enregistements numériques multi-voies (Dolby Digital et DTS) sont produits uniquement via les voies gauche et droite, sous forme de signaux Gt/Dt [Lt/Rt] (gauche/droit total ou "Combinés-mixés).</p>
<p>Choisissez le mode Stéreo pour écouter les enregistements stéreophoniques, lorsque vous ne souhaitez pas utiliser l'ambiophonie, ou pour les enregistements multi-voies lorsque seule la lecture à deux voies est possible (ou souhaitée).</p>
<h1 id="direct-sources-dolby-digitalcts-uniquement">DIRECT (SOURCES DOLBY DIGITAL/CTS UNIQUEMENT)</h1>
<p>Les enregistements numériques multi-voies (Dolby Digital ou DTS) sont produits via les voies utilisées pour l'enregistrement original. À titre d'exemple, un enregistrement "5.1-voies" Dolby Digital 3/2/1 sera produit via les haut-parleurs avant gauche/centre/droit, ambiophoniques gauche/droite et subwoofer; Un enregistrement Dolby Digital 2/0/0 sera produit uniquement via les haut-parleurs avant gauche et droit (et via le subwoofer si les autres haut-parleurs ont été paramétrés comme "Petits" ["Small"] à l'aide du menu incrusté <Configuration des haut-parleurs> [<Speaker Setup>].</p>
<h1 id="dolby-ex-dts-es-thx-ex-surround-61-2">DOLBY EX, DTS ES, THX EX, SURROUND 6.1</h1>
<p>Les enregistements numériques multi-voies (Dolby Digital ou DTS) sont produits via tous les haut-parleurs : avant, ambiophoniques et un ou deux haut-parleurs de voie "arrière" (à condition qu'ils aient été activés dans le menu <Configuration des haut-parleurs [<Speaker Setup>]). Si un codage Dolby Digital EX/DTS ES estprésent dans l'enregistrement d'origine, sa logique est utilisé pour générer les voies arrrière; sinon, le préamplificateur S170i génére un signal unique de voie arrrière unique à partir des voies ambiophoniques gauche/droite.</p>
<h1 id="dolby-pro-logic-2">DOLBY PRO LOGIC</h1>
<p>es enregistements avec codage abiophique (et les enregistements stéreo non codés) sont produits avec décodage Pro Logic Dolby Surround, avec sorties vers les voies avant gauche, centre et droite et un seul signal monophonique envoyé aux haut-parleurs des deux voies abiophoniques; La réponse de la voie abiophique est éliminée au dessus de 7 kHz afin d'éviter le repérage des emplacements des haut-parleurs abiophoniques en mode DPL.</p>
<p>Il est moyen de réserver le mode Pro Logic aux enregistements codés en ambiophonie destinés à la reproduction par des chaînes Dolby Surround ou compatibles. Ces enregistements incluent la plupart des films sur cassette video et beaucoup de films sur LaserDisc, les programmes de télévision/cable produits pour ambiophonie et la plupart des LaserDiscs anciens. La plupart des enregistements DVD, y compris ceux qui n'exploitent pas les possibités ambiophoniques multi-voies, incluant une piste sonore Dolby Digital et/ou DTS dans les modes 1 voie ou 2 voies; si ces modes sont disponibles, ils seront généralement de更好地 performances. À quelques exceptions près, le mode d'écoute EARS breveté par NAD donnera de更好地 résultats que le mode Pro Logic quand il s'agit d'enregistements musicaux en stéreo.</p>
<h1 id="dolby-pro-logic-ii-movie-2">DOLBY PRO LOGIC II MOVIE</h1>
<p>Cet algorithme amélioré est semble à celui du mode Dolby Pro Logic, mais il applique la logique après le décodage de la matrice au lieu de le faire avant, contrairement au mode Pro Logic simple ; on obtient ainsi une catégorie stabilité de l'image et une catégorie précision de la répartition des signaux. Les voies ambiophoniques sont pilotées sur la totalité de leur plage de fonctionnement.</p>
<h1 id="dolby-pro-logic-ii-music-2">DOLBY PRO LOGIC II MUSIC</h1>
<p>Ce mode est réglé pour l'écoute de la musique : la réponse de fréquence des voies ambiophoniques est progressivement attenuée afin de simuler l'absorption acoustique d'une piece typique. Vous disposez, en outre, de plusieurs réglages vous permettant d'améliorer le.Plaisir de votre écoute :</p>
<p>PL II Panorama Lorsque le paramètre Panorama est selectionné, il enveloppe l'auditorium du son destiné aux haut-parleurs Avant Gauche et Droit, pour donner un effet stimulant.</p>
<p>PL II Center Width La largeur de la bande centrale [Center Width] vous permet d'étaler progressivement le son de la voie Centrale dans les haut-parleurs Avant Gauche et Droit. Pour la largeur maximale, la totalité du son destiné au haut-parleur central est mélangée au son des haut-parleurs Gauche et Droit. Cette commande peut contribuer à Obtir une sonorisation plus spacieuse, ou un meilleur fondu de l'image frontale.</p>
<p>PL II Dimension Le réglage de la Dimension permet d'ajuster la balance avant / arrêté suivant votre goût.</p>
<h1 id="dts-neo6-cinema-2">DTS NEO:6 CINEMA</h1>
<p>Les enregistements avec codage ambiophique (et les enregistements stéreo non codés) sont produits avec décodage Ambiophonique DTS Neo:6, avec sorties vers les voies avant gauche, centre et droite, ainsi que vers les voies ambiophoniques et ambiophoniques arrêté (à condition que ces voies soient actives).</p>
<h1 id="dts-neo6-music-2">DTS NEO:6 MUSIC</h1>
<p>Ce mode ambiophonique musical vous permettra de créé, à partir de n'importe qu'elle source stéreophonique 2-voies, une expérience sonore très réalisée mettant en œuvre les haut-parleurs avant et centre, ainsi que tous les haut-parleurs ambiophoniques activés. Neo:6 permet à l'utilisateur d'ajuster l'image centrale en six opérations. Le réglage de l'image centrale [Center Image] vous permet d'établer progressivement le son de la voie Centrale dans les haut-parleurs Avant Gauche et Droit.</p>
<h1 id="ears-4">EARS</h1>
<p>Les enregistements stéreophoniques (ainsi que les enregistements avec codage ambiophique), qu'il soient en format PCM / numérique ou analogique, sont produits avec traitement ambiophique breveté NAD, les signaux étant envoyés aux haut-parleurs avant gauche, centre et droit et aux haut-parleurs des deux voies ambiophoniques. EARS extrait l'ambiance naturelle présente dans presque tous les enregistements stéreophoniques de bonne qualité. Il n'effectue aucune synthèse d'ambiance ou d'unquelconque autre élément sonore et reste donc bien plus proche du son produit par la performance musicale originelle que la plupart des autres options d'ambiophonie musicale.</p>
<p>Choisissez EARS pour écouter les enregistements et émissions de musique en stéreo. EARS produit une ambiance subtile mais très naturelle et crédible, à partir de quasiment n'importe quel enregistrement stéropheonique "acoustique naturel"; des exemples de ce type d'enregistrement sont la musique classique, le jazz et le folk et bien d'autres encore. Parmi ses qualités on peut citer une image sonore du devant de scène réalisée et stable, avec une "acoustique virtuelle" ambiente spacieuse mais non exagérée, qui reste fidèle à l'enregistrement d'origine.</p>
<h1 id="nota-6">NOTA</h1>
<p>Lorsque vous écoutez les émissions FM, la "distorsion due à la réception sous plusieurs angles" est parfoids plus clairément révélée par le circuit EARS. Cette particularité est utile pour trouver l'orientation optimale d'une antenné FM pour une station donnée.</p>
<p>EARS ne peut pas être utilisé pour les enregistements numériques multi-voies (Dolby Digital/DTS); ces enregistements contiennent, de par leur nature multi-voies, leur propre ambiance et leur propre ambiophonie. EARS peut néanmoins être utilisé sur ces enregistements lorsqu'ils sont lus via les sorties analogiques stéreophoniques d'un lecteur de DVD ou un另一种 type de lecteur, ou encore lorsque l'enregistrement DVD ou autre est régle sur "stéreo/PCM"只不过 que sur "5.1" ou équivalent.</p>
<h1 id="contourn-analogique-analog-bypass">CONTOURN. ANALOGIQUE [ANALOG BYPASS]</h1>
<p>Les enregistements stéréophoniques ou monophoniques provenant de tous les jacks d'entrée analogiques Stéreo des sources du S170i sont diriges directement aux sorties avant gauche et droite, sans aucun traitement.</p>
<p>Utilisez la fonction de contournement analogique pour reproductive des conditions "audiophiles", c'est à dire un parcours minimum pour le signal, lorsque vous souhaitez écouter les sources à deux voies (ou monophoniques) avec une très grande précision.</p>
<p>Aucune gestion des graves n'est effectuee en mode Contournement Analogique [Analog Bypass], dont les signaux sont produits par les voies avant gauche et droite "sur le spectre complet des fréquences",quel que soit le paramétrage effectué grâce à la page "Configuration des haut-parleurs" du S170i.</p>
<p>Le tableau ci-dessous indique les modes d'écoute disponibles pour les trois types de source de signal: 2 voies entrée numérique (que le signal réel soit monophonique, stéréophonique ou code avec ambiophonie), 2 voies entrée analogique (mono, stéreo ou code avec ambiophonie), ou multi-voies numérique (Dolby Digital ou DTS). Lorsqu'un mode d'écoute n'est pas disponible pour une source donnée, il n'apparait pas dans le défilament circulaire <Mode>.</p>
<table><tr><td>2 voies PCM</td><td>2 voies analogue</td><td>Multivoies (DD/DTS)</td></tr><tr><td>Mono</td><td>Mono</td><td>Mono</td></tr><tr><td>Stéréo</td><td>Stéréo</td><td>Stéréo</td></tr><tr><td>Pro Logic</td><td>Dolby Pro Logic</td><td>Direct</td></tr><tr><td>EARS</td><td>EARS</td><td>Ambiophonie [Surround] 6.1*</td></tr><tr><td>—</td><td>Contourn. Analogique [Analog Bypass]</td><td>—</td></tr></table>
<p>*Si configuré avec un/des haut-parleur(s)</p>
<p>"Arrière" ["Back"]</p>
<h1 id="selection-des-modes-découte-il-est-à-noter-que">SELECTION DES MODES D'ÉCOUTE IL EST À NOTER QUE :</h1>
<ul>
<li>Vous doivent appuyer à nouveau sur [Mode] si vous avez laissé passer quelques secondes depuis cette dernière impulsion sur les touches Curseur I [Cursor I ] pour changer de mode d'écoute. </li>
<li>Le mode d'écoute sélectionné reste actif même si vous changez d'entrée sélectionnée, si vous mettez le S170i en mode Veille ou si vous le mettez hors tension, ou si vous activez le mode muet. </li>
<li>Par contre, si vous changez de type de signal, le mode d'écoute changera si le nouveau signal est un enregistrement numérique multi-voies, ou s'il n'est pas compatible avec le mode sélectionné. Par exemple : ÀpRES avoir écoutedé un CD lu sur un lecteur DVD/CD, en utilisant le mode d'écoute EARS, vous retirez le CD et vous le remplacez par un autre CD compteant un enregistrement multi-voies DTS 5.1 voies. Le S170i se mettra automatiquement en mode de lecture DTS/5.1.</li>
</ul>
<h1 id="à-propos-du-mode-thx">À PROPOS DU MODE THX</h1>
<p>Le programme "Home THX" de THX Ltd. garantit de très haute performances fondamentales lorsque vous utilise des éléments certifiés par le logo THX/Ultra logo, et il exige aussi que les éléments Ultra incluent le mode THX. Ce mode comporte trois améliorations fondamentales de l'audio ambiophonique:</p>
<ul>
<li>La re-égalisation adapte les haute fréquences reproduites par les voies avant, afin de mistrés les faire correspondre à l'équilibre tonal de la bande sonore du film d'origine, telle qu'elle a été réalisée dans le "studio de post-synchronisation" où le metteur en scene et les ingénieurs du son ont écoute le film pendant la production. </li>
<li>La mise en correspondence des timbres compensate la localisation latérale / arrêté des haut-parleurs ambiophoniques dans une châne de cinema à domicile ambiophonique correctement déployée, de manière à atteoir une caractéristique tonale plus homogène pour lessons provenant d'un endroit quelconque autour des spectateurs. </li>
<li>La décorrélation atténue la voie monophonique ambiophique présente dans tous les enregistements Pro Logic (et dans certaines sources Dolby Digital et DTS), ce qui permet une reproduction plus spacieuse et naturelle de l'ambiance et de "l'acoustique virtuelle" du film.</li>
</ul>
<h1 id="activation-du-mode-thx">ACTIVATION DU MODE THX</h1>
<p>À l'aide de la télécommande HTR 2, appuyez d'abord sur la touche [AMP], puis sur la touche [THX] ; l'ambiophonie THX est activée. Des impulsions successives sur la touche [THX] seront défilier les modes THX Standard et THX Surround EX (si disponibles), suivis du mode sans THX. Il est à noter que :</p>
<ul>
<li>Les modes THX ne sont disponibles que sur les sources d'entrée numériques : Dolby Digital ; DTS ; PCM. </li>
<li>Pour certaines sources PCM, le mode d'écoute Dolby Pro Logic doit avoir été préalablement activé. </li>
<li>Le message "Source Incompatible" ["Incompatible Source"] apparaître en incrusté et sur l'afficheur de la face parlante si vous appelez le mode THX pour une source analogue, si le mode d'écoute en cours n'est pas Pro Logic, ou si vous appelez le mode THX Surround EX pour une source PCM ou une source ambiophonique non discrète Dolby Digital ou DTS (2/0/0, 2/1/0, 3/1/1, etc ...).</li>
</ul>
<h1 id="réglage-du-niveau-des-voies">RéGLAGE DU NIVEAU DES VOIES</h1>
<p>Il vous est possible d'effectuer des modifications temporaires sur les niveaux relatifs des sorties centre, ambiophoniques et subwoofer, sans pour autant abandonner les niveaux permanents étalandnés en utilisant l'élement Configuration des Niveau [Level setup] des menus incrustés. Cela peut s'avérer utile dans de nombreuses circonstances. Exemples : augmenter (ou diminuier) la clarté du dialogue d'un film, en augmentant (ou en diminuant) le volume de la voie centrale ; améliorer (ou inhiber) l'ambiance subjective d'un enregistrement musical reproduit avec EARS, en augmentant (ou en diminuant) le volume des voies ambiophoniques ; atténuer des graves profonds excessivement forts (ou augmenter les graves profonds) en diminuant (ou en augmentant) le volume de la voie subwoofer.</p>
<h1 id="réglage-du-niveau-des-voies-2">RéGLAGE DU NIVEAU DES VOIES</h1>
<p>Sur la télécommande HTR 2, utilisez les trois paires de touches de réglage Ambiophonique [Surr], Centre [Center] ou Subwoofer [Sub.W] pour régler les niveaux relatifs des Voies Ambiophoniques, de la Voie Centrale ou du Subwoofer; les niveaux en cours de réglage seront affichés en incrustation et sur l'afficheur de la face parlante.</p>
<h1 id="il-est-à-noter-que-7">IL EST À NOTER QUE :</h1>
<ul>
<li>Les régles de niveau s'ajoutent aux valeurs de configuration définies à l'aide du menu incrusté <Configuration des Niveau> [<Level setup>] du préampli S170i (voir ci-dessus). Par exemple : Si vous <Configuration des Niveau> [<Level setup>] définit le niveau pour le <Centre> [<Center>] à “-3 dB” et que vous ajustez le niveau (Centre haut/bas [Center up/down]) +2 dB, l'effect global obtenu sera celui d'une voie centrale régée à -1 dB. </li>
<li>Les modifications effectues grâce à la page des NIVEAUX [LEVELS] s'annulent lorsque vous mettez le S170i en mode Veille. </li>
<li>Si une Configuration Prééglée [Preset] est déjà active (c'est à dire si vous l'avez scélectionné auparavant), alors les niveaux des trois ensembles de haut-parleurs (Subwoofer, Centre et Ambiophoniques) que vous reglez à l'aide de la page NIVEAUX [LEVELS] seront relatifs aux niveaux déjà définis par la configuration prééglée. (reportez-vous au paragraphe “Paramétrage des Configurations Prééglées” ci'avant.) </li>
<li>La page NIVEAUX [LEVELS] affichera et permettra le réglage du niveau d'une voie qui n'est pas présente dans le menu incrusté <Configuration des haut-parleurs> [<Speaker Setup>]. Par exemple: Meme si vous avez paramétré <Centre> [<Center>] en précisant "Aucun" ["None"] dans le menu incrusté <Configuration des haut-parleurs> [<Speaker Setup>], les touches Centre haut/bas [Center up/down] seront affichées sur la page des NIVEAUX [LEVELS]; ces touches n'auront aucun effet, même sur la "voie centrale fantôme, lorsque vous écoutez dans l'un des modes ambiophoniques. </li>
<li>Si une ou deux voies arrirée ambiophique sont presentses sur le menu incrusté <Configuration des haut-parleurs> [<Speaker Setup>], il est possible d'augmenter ou de diminuer leurs niveaux respectifs à l'aide des touches ambiophon. haut/bas [Surr up/down] de la page NIVEAUX [LEVELS], en parallèle avec les voies ambiophoniques.</li>
</ul>
<h1 id="réglage-des-commandes-de-tonalite">RéGLAGE DES COMMANDES DE TONALITE</h1>
<p>Appuyez sur la touche de •Tonalité [ Tone] ; Le mot "Aigus" ["Treble"] apparaît en incrustation et sur l'affichage de la face parlante. Utilisez les touches Curseur / [Cursor / ] de la télécommande pour augmenter ou diminuer les aigus par pas de 1 dB. Appuyez à nouveau sur la touche •Tonalité [ Tone] pour acceder aux graves ; le mot "Graves" ["Bass"] apparaît en incrustation et sur l'afficheur de la face parlante. Utilisez les touches / [Cursor / ] pour effectuer le réglage. Appuyez à nouveau sur la touche •Tonalité [ Tone] pour quitter la fonction de réglage de la tonalité.</p>
<p>BOUTON DE TONALITÉ SUR LA FACE PARLANTE : Appuyez sur ce bouton pour permuter entre Graves [Bass], Aigus [Treible] et TONALITÉ ACTIVE [TONE ON]. Utilisez le bouton de VOLUME pour régler les niveaux des graves et des aigus.</p>
<h1 id="à-noter-que">À NOTER QUE :</h1>
<ul>
<li>Les réglages des Aigus/Graves n' affectent que les voies avant (gauche, centre et croite), mais ils sont actifs dans tous les modes d'écoute. </li>
<li>Les réglages des Aigus/Graves effectuels à l'aide de la touche Tonalité [Tone] de la télécommande HTR 2 outrepassent les réglages effectuels à l'aide du menu de <Configuration audio> [<Audio setup>] mais ils ne sont que provisoires : Ils s'annulent si vous mettez le S170 en mode Veille (ou si vous réaffichez le menu de <Configuration audio> [<Audio setup>]), ou si vous rappelez une Configuration Prédéfinie [Preset], auquel cas ce sont les réglages correspondant à la <Configuration audio> [<Audio setup>] ou à la Configuration Prédéfinie [Preset] appelée qui seront rétablis.</li>
</ul>
<h1 id="utilisation-des-configurations-preréglees-presets">UTILISATION DES CONFIGURATIONS PRERÉGLEES [PRESETS]</h1>
<p>Sur la télécommande HTR 2, Sélectionnez Configurations Prérgélées AV [AV Preset] ; appuyez ensuite sur une touche numérique [1] à [5] pour désirar la configuration prérgélée que vous souhaitez.</p>
<h1 id="il-est-à-noter-que-8">IL EST À NOTER QUE :</h1>
<ul>
<li>La Configuration Prérgée [Preset] Sélectionnée reste active jusqu'au moment où vous Sélectionnez une autre Configuration Prérgée [Preset], ou que vous mettez le S170i en mode Veille. </li>
<li>Une Configuration Prérgélee [Preset] est applicable qu'elle que soit la source seLECTIONnée ou le mode d'écoute actif. </li>
<li>Le fait demettre le S170i en mode Veille annule toute Configuration Prerégée [Preset] sélectionnée, ce qui a pour effet de rétablier aussi bien les réglages de tonality que ceux des niveaux effectuels à l'aide des écrans NIVEAUX [LEVELS] ou MODE/MULTI.S de la télécommande HTR 2, ou à l'aide du menu incrusté <configuration audio> [<Audio setup>] du préampli S170i (voir ci-dessus). </li>
<li>Les niveaux des différentes voies définies dans une Configuration PréRéglée [Preset] s'ajoutent aux niveaux de configuration définis dans le menu incrusté <Configuration des Niveau> [<Level setup>] du préampli S170i ; les réglages de tonalité d'une Configuration PréRéglée outrepassent complètement ceux définis dans le menu incrusté <configuration audio> [<Audio setup>] (ou sur la page MODE/MULTI.S de la télécommande).</li>
</ul>
<h1 id="fonctionnement-de-la-face-parlante">FONCTIONNEMENT DE LA FACE PARLANTE</h1>
<p>Il est possible de réaliser toutes les fonctions directement à partir de la face parlante su S170i, sans utiliser la télécommande HTR 2.</p>
<ul>
<li>Pour changer de source d'entrée ou de mode d'écoute, appuyez sur AUDIO or VIDEO ou MODE; le bouton de VOLUME (CONFIGURATION) [VOLUME (SETUP)] permettra alors de faire défilier, dans les deux sens, toutes les sources audio-video ou audio seule, ainsi que tous les modes d'écoute. Les désignations des sources ou des modes apparaissent aussi bien sur en incrustation que sur l'afficheur de la face parlante. Àprous un-delai de cinq secondes sans aucune action, l'affichage et le bouton retrouvent leurs fonctions normales. </li>
<li>Appuyez sur Moniteur de bande [Tape Monitor] pour écouter la composante ou le signal relié(e) aux jacks d'ENTRÉE/SORTIE MONITEUR DE BANDE [TAPE MONITOR IN/OUT] de la face arrêté ; appuyez sur Moniteur De Bande [Tape Monitor] pour contourner la boucle de moniteur de bande. L'affichage incrusté à l'écran indique <Moniteur de Bande Activé> [<Tape Monitor On>] ou <Moniteur de Bande désactivé> [<Tape Monitor Off>] , suivant le cas. </li>
<li>Pour régler les aigus, appuyez une fois sur TONALITE [TONE] puis utilisez le bouton de VOLUME (CONFIGURATION) [VOLUME (SETUP)] pour augmenter ou diminuer la valeur; appuyez une deuxième fois sur TONALITE [TONE] pour régler les graves; les nouveaux réglages de tonalité s'affichent à la fois en incrustation et sur l'afficheur de la face parlante. Appuyez une troisième fois sur TONALITE [TONE] pour que l'affichage et le bouton de VOLUME (CONFIGURATION) [VOLUME (SETUP)] retrouvent leurs fonctions normales. </li>
<li>Appuyez une fois sur LUMINOSITE [BRIGHTNESS] pour diminuer la luminosité de l'afficheur de la face parlante; appuyez une deuxième fois sur la même touche pour rétablier la luminosité normale de l'afficheur. </li>
<li>La touche HAUT-PARLEURS [SPEAKERS] permet d'acceder aux mêmes fonctions que sur le menu incrusté <Configuration des haut-parleurs> [<Speaker Setup>] (reportez-vous au paragraphe "Configuration des haut-parleurs" ci'avant). L'incrustation à l'écran n'apparaître pas, mais les informations nécessaires s'afficheront sur l'afficheur de la face parlante. Chaque impulsion successive sur la touche HAUT-PARLEURS [SPEAKERS] fait défilier les options Principales [Main], Centre [Center], Ambiophoniques [Surround], Arrière [Back] et Subwoofer ; lorsque l'une de ces options est sélectionnée, le bouton de VOLUME (CONFIGURATION) [VOLUME (SETUP)] fait défilier, dans les deux sens, les options disponibles comme par exemple "Aucun/Petit/Grand" ["No/Small/Large"] pour la position Centre [Center]. Appuyez une dernière fois sur la touche HAUT-PARLEURS [SPEAKERS] (après l'options Subwoofer) pour rétablier les fonctions normales de l'afficheur et du bouton. </li>
<li>La touche RETARD [DELAY] fonctionne de la même manière et permet de régler le retard des différentes voies générées. Reportez-vous au paragraphe précédent. </li>
<li>La touche NIVEAUX [LEVELS] fonctionne de la même manière et permet de régler le niveau des différentes voies générées. Reportez-vous aux paragraphs précédents. </li>
<li>Vous pouvez régler l'audio dans lapiece éloignée, en vous servant de la touche MULTISOURCE. Appuyez une fois sur MULTISOURCE pour pouvoir régler le volume sonore dans la piece éloignée, à l'aide du bouton VOLUME (CONFIGURATION) [VOLUME (SETUP)]; appuyez une deuxième fois sur MULTISOURCE pour faire défilier les sources envoyées aux jacks PIECE ÉLOIGNEE [REMOTE ROOM] de la face arriré à l'aide du bouton VOLUME (CONFIGURATION) [VOLUME (SETUP)]; les sources défileront dans un sens ou dans l'autre, suivant le sens dans lequel vous tournerez le bouton; il ne s'agira que des sources audio seule. Appuyez une troisième fois sur MULTISOURCE pour rétablier les fonctions normales de l'afficheur et du bouton; les fonctions normales seront rétablies, de toute façon, après un-delai de cinq secondes sans aucune intervention.</li>
</ul>
<h1 id="écoute-dans-un-endroit-éloigné-multisource">ÉCOUTE DANS UN ENDROIT ÉLOIGNÉ (MULTISOURCE)</h1>
<p>Le S170i peut fournir des signaux de niveau ligne, en stéreo, pour une autre piece ou une autre zone via ses jacks de SORTIE MULTISOURCE [MULTISOURCE OUT] qui se trouvent sur la face arrrière. Ces jacks peuvent générer une source entièrement indépendante de la source Sélectionnée au niveau des jacks de sortie principaux du S170i (sachant que la même source peut évidemment être Sélectionnée pour les deux sorties si vous le souhaitez ; les deux sorties ont chacune leur propre commande de volume sonore indépendante. Il est always possible de modifier le volume sonore et/ou la source pour la piece ou la zone éloignée, à l'aide de la télécommande, même si le S170i est utilisé en même temps dans la piece d'écoute principale ou dans la salle de cinema à domicile.</p>
<h1 id="il-est-à-noter-que-9">IL EST À NOTER QUE :</h1>
<p>Il s'agit d'une sortie de niveau ligne qui nécessite la connexion d'un amplificateur de puissance entre la sortie MultiSource et les haut-parleurs de la zone éloignée.</p>
<h1 id="selection-de-la-multisource">SELECTION DE LA MULTISOURCE</h1>
<p>Sur la télécommande ZR 2,CHOISSEZ I'ENTRE de la source souhaitee. Ou sinon, sur la face parlante Appuyez deux fois sur la touche MULTISOURCE ; la première ligne de l'afficheur de la face parlante indique "Zone : CD" (par exemple). Servez-vous ensuite du bouton VOLUME (CONFIGURATION) [VOLUME (SETUP)] pour faire defiler, dans les deux sens, les neuf sources audio-video ou audio seule disponibles sur les jacks de SORTIE MULTISOURCE [MULTISOURCE OUT] ; les designations des sources apparaissent sur I'afficheur de la face parlante. Apre s un delai de cinq secondes sans aucune action, I'affichage et le bouton retrouvent leurs fonctions normales.</p>
<h1 id="réglage-du-volume-de-la-sortie-multisource">RéGLAGE DU VOLUME DE LA SORTIE MULTISOURCE</h1>
<p>Sur la télécommande ZR 2, utilisez les touches Volume haut/bas [Volume up/down] pour régler le volume. Ou sinon, sur la face parlante : Appuyez une fois sur la touche MULTISOURCE ; servez-vous ensuite du bouton VOLUME (CONFIGURATION) [VOLUME (SETUP)] pour régler le volume. La dernière ligne de l'afficheur de la face parlante indiquera "Z.v : -40" (par exemple), pour indiquer le réglage du volume. Àpres un-delai de cinq secondes sans aucune action, l'affichage et le bouton retrouvent leurs fonctions normales.</p>
<h1 id="il-est-à-noter-que-10">IL EST À NOTER QUE :</h1>
<ul>
<li>L'entrée EXT5.1 n'est pas disponible sur les jacks de SORTIE MULTISOURCE [MULTISOURCE OUT]. </li>
<li>Une source peut être disponible simultanément sur les sorties principales du S170i et sur les sorties MultiSource. </li>
<li>Les signaux sur les jacks de SORTIE MULTISOURCE [MULTISOURCE OUT] sont toujours en mode stéreo, quel que soit le mode d'écoute sélectionné au niveau des sorties principales du S170i, et même s'il s'agit de la même source. </li>
<li>Les commandes et fonctions MultiSource ne sont pas affichées en incrustation à l'écran. </li>
<li>Il est possible d'utiliser le jack de sortie video composite MON OUT pour envoyer un signal video vers la piece éloignée MultiSource, pour une utilisation occasionnelle et pour voir les menus incrustés à l'écran, mais il faut s'attendre à une perte du signal video si le cable de liaison est long. Il est déconseilé d'utiliser la sortie monitateur S-Video pour de telles connexions longues.</li>
</ul>
<h1 id="liaison-nad-nad-link">LIAISON NAD [NAD LINK]</h1>
<p>La SORTIE Liaison-NAD [NAD-Link OUT] permet de relayer les commandes de la télécommande depuis le Préampli / Proesseur S170i vers d'autres appareils équipés d'une entrée Liaison NAD [NAD Link] (ou compatible). Elle retransmet les codes de commande IR (infrarouges) reçues par le capteur IR sur la face parlante du S170i depuis la télécommande HTR 2. La Liaison NAD constitue une liaison filaire vers un autre apparéil NAD. Le format de cable est un cable coaxial standard équipé de connecteurs de type Jack RCA.</p>
<p>La liaison permet aussi au S170i de receiveoir des commandes externes en provenance d'une commande multisalles ou d'un système de relayage de telecommandes (ou depuis le jack de SORTIE Liaison NAD [NAD Link OUT] d'un autre produit NAD). Les commandes reçues permetront e commander le S170i et seront aussi relayées par le jack de SORTIE Liaison NAD [NAD Link OUT]. Cette fonctionnalité est très utile si vous utilise la fonctionnalité MultiSource avec un clavier "cable" ou avec un système repétiteur IR (Xantech, Russound, Niles, etc...) vous permettant de commander un Tuner FM ou un Lecteur CD équipés d'une Liaison NAD, en même temps que le S170i, depuis la zone éloignée. En reliant en chaîne la SORTIE LIAISON NAD [NAD LINK OUT] d'un élément à l'ENTREE LIAISON NAD [NAD LINK IN] d'un autre, et ainsi de suite, il est possible de relayer le signal à chaque élément de la chaîne.</p>
<h1 id="il-est-à-noter-que-11">IL EST À NOTER QUE :</h1>
<p>Si un apparéil recoit simultanément la même commande via le capteur IR de sa face parlante ET via l'ENTREE LIAISON NAD [NAD LINK IN], il est possible que le système de commande du microprocesseur ne reconnaissée pas la commande, auquel cas la commande serait ignorer. Pour éviter ce problème, le reliéz pas les apparéils qui reçoivent la même télécommande IR en même temps (ce qui serait le cas pour deux apparéils situés très pres l'un de l'autre).</p>
<h1 id="intégration-système-rs-232">INTÉGRATION SYSTème (RS-232)</h1>
<p>Le port RS-232 du S170i offre d'importantes possibilites d'integration de commande par des systèmes multimédia évolués ou par un système domotique ; toutes les fonctionnalités du S170i peuvent être commandées à partir de ce port. Grâce à ce port, le S170i peut être relié à n'importe quel autre dispositif qui possède, lui aussi, un port RS-232, comme par exemple un ordinateur PC ou un système domestique. Toute commande ou fonction accessible depuis la face parlante ou la télécommande HTR 2 peut être réalisée via le port RS-232 ; de plus, le retour d'informations concernant la configuration actuelle du S170i, y compris l'état de la fonction MultiSource, se fait depuis le port RS-232 du préampli vers le PC ou autre dispositif connecté. Les fonctionnalités MultiSource du S170i sont donc totalement accessibles par des commandes via le port RS-232.</p>
<h1 id="informations-techniques">INFORMATIONS TECHNIQUES</h1>
<p>Le port RS-232 utilise le brochage standard suivant :</p>
<table><tr><td>N° de Broche DB-9</td><td>Fonction</td></tr><tr><td>2</td><td>Transmission de Données</td></tr><tr><td>3</td><td>Réception de Données</td></tr><tr><td>5</td><td>Masse du Signal</td></tr></table>
<h1 id="il-est-à-noter-que-12">IL EST À NOTER QUE :</h1>
<ul>
<li>Il faut utiliser un cable série "direct" (et non un cable "null modem") pour relier le S170i à un PC ou à tout autre dispositifé série. </li>
<li>Les communications séries avec le S170i doivent avoir la configuration suivante : 8 bits de données, sans parité et un bit d'arrêt ; la vitesse de transmission est de 12000 b/s (bauds). (Certains dispositifs série ne sont pas capables de communiquer à 12000 b/s ; Il existe, sous forme d'accessoire, un convertisseur de débit permettant de convertir les communications du S170i en 9600 b/s ; contactez votre spécialiste d'installation NAD.</li>
</ul>
<p>Une application compatible Windows 95/98/ME permettant la commande série du S170i à partir d'un PC, ainsi que tous les détails des protocoles de communication série du S170i, sont téléchargeables sur le site WEB NAD:</p>
<h1 id="httpwwwnadelectronicscom-2">HTTP://WWW.NADELECTRONICS.COM</h1>
<p>Consultez votre spécialiste d'installation NAD pour plus d'informations.</p>
<h1 id="vue-densemble-de-la-htr-2">VUE D'ENSEMBLE DE LA HTR 2</h1>
<ul>
<li>Permet de commander jusqu'à 8 apparéils. <br />
44 touches de fonction. <br />
Apprend jusqu'à 352 commandes. </li>
<li>Enregistre jusqu'à 44 macros, dont chacune peut composer 64 commandes. </li>
<li>Configurable avec une fonction d'accès direct. </li>
<li>Éclairage des touches avec temporisation programmable. </li>
<li>Contient une bibliothèque préprogrammée de télécommandes NAD.</li>
</ul>
<p>Aussitôt déballée, la télécommande NAD HTR 2 est déjà prête à commander vos apparciels NAD ; mais son principal outat est qu'elle constitue, à elle seule, huit télécommandes distinctes. Chacune des 8 touches de Sélection d'Appareils en haut du combiné permet d'appeler une nouvelle "page" de télécommandes à transmettre grâce aux 44 autres touches. La HTR 2 est capable "d'apprendre" des codes à partir de pratiquement n'importe quel apparil télécommandé,quelle qu'en soit la marque, et de les enregistrer sous une, plusieurs ou toutes les touches de Sélection d'Appareils. Lorsque vous configguez la HTR 2 pour commander l'ensemble de votre chaine de Cinéma à Domicile, la démarche le plus logique consiste à enregistrer les codes de votre lecteur DVD sous la touche de Sélection d'Appareil [DVD], ceux de votre télévisér sous la touche de Sélection d'Appareil [TV], et ainsi de suite. Mais rien n'est obligatoire : Vous pouvez enregistrer n'importe qu'elle commande sous n'importe qu'elle touche de n'importe qu'elle page (reportez-vous à la rubrique "Apprentissage des Codes d'Autres Telecommandes" ci-dessous).</p>
<p>La HTR 2 est déjà préprogrammée avec un jeu complet de commandes NAD, à la page de Sélection d'Appareil "AMPLI" [AMP], ainsi qu'avez des commandes de bibliothèque permettant de faire fonctionner la plupart des appleils NAD de type DVD, CD, TUNER ou "MAGNETOPHONE" [TAPE] sous les touches de Sélection d'Appareils correspondantes. Ces commandes par défaut sont permanentes : Meme si vous utilisez la fonction d'apprentissage pour les replacer par d'autres commandes, les commandes sous-jacentes de la bibliothèque resteront toujours en place et vous pourrez facilement les rappeler plus tard, si jamais vous ajoutez un nouvel apparéil NAD à votre chaîne (reportez-vous à la rubrique "Mode d'Effacement" ci-dessous).</p>
<h1 id="apprendre-à-connaître-la-htr-2">APPRENDRE À CONNAîtRE LA HTR 2</h1>
<p>La télécommande HTR 2 est divisée en deux parties principales : la partie Sélection d'Appareil en haut de la télécommande, puis les 44 touches de Commande.</p>
<p>Les huit touches de Sélection d'Appareils en haut de la télécommande ("AMPLI" [AMP], [DVD], [TV], etc.) définissant l'appareil qui sera commandé par les 44 autres touches de Commande. Une touche Sélection d'Appareil ne fait que définir l'appareil qui sera commandé par la télécommande HTR 2 ; elle ne réalise aucune fonction sur l'appareil concerné. Les touches de Sélection d'Appareils sont disposées en deux rangées verticales de 4 boutons chacune ; la rangée gauche correspond à tous les apparèils Audio alors que la rangée droite correspond à tous les apparèils Video.</p>
<p>Les touches de Commande sont des touches de fonction capables "d'apprendre" les codes de commande de praticquement n'importe qu'elle télécommande infrarouge, ce qui vous permet d'enregistrer les commandes de vos apparêils dans la HTR 2,quelle qu'en soit la marque. Toutes les touches de Commande de la Sélection d'Appareil "AMPLI" [AMP] sont préprogrammées pour commander les amplificateurs, préamplificateurs et récepteurs NAD. (La HTR 2 peut aussi commander de nombreux autres apparêils NAD, à partir de ses pages [DVD], [CD], [TUNER] et "MAGNETOPHONE" [TAPE].</p>
<p>Puisque les touches de Commande de la HTR 2 peuvent réaliser plusieurs fonctions différentes, suivant la touche de Sélection d'Appareil可以选择, la HTR 2 utilise des codes couleur pour indiquer la fonction des touches de Commande par rapport à votre choix de touche de Sélection d'Appareil. La couleur de la légende de chaque touche de Sélection d'Appareil correspond donc à la couleur des légendes des différentes touches de fonction (un peu comme sur une calculatrice scientifique). À titre d'exemple, la légende en rouge orange de la touche de Sélection d'Appareil "AMPLI" [AMP] correspond à la légende en rouge orange de sélection des entrées au droit des touches du pavé numérique : Lorsque la page Sélection d'Appareil "AMPLI" [AMP] de la HTR est active, ces touches permettent de sélectionner les entrées des amplificateurs ou des récepteurs. De la même façon, la légende en mauve de la touche de Sélection d'Appareil [DVD] correspond à plusieurs légendes mauves, la touche verte de Sélection d'Appareil [TV] correspond à des légendes vertes, et ainsi de suite.</p>
<h1 id="apprentissage-des-codes-dautres-telécommandes">APPRENTISSAGE DES CODES D'AUTRES TELÉCOMMANDES</h1>
<p>Commencez par placer la télécommande HTR 2 "nez à nez" avec la télécommande d'origine, de manière à ce que la fenêtre infrarouge de chaque télécommande se trouve à environ 5 centimétres de l'autre.</p>
<ul>
<li>Activez le Mode d'Apprentissage: Sur la télécommande HTR 2, appuyez simultanément sur une touche de Sélection d'Appareil et sur la touche "d'enregistrement" [●] (qui se trouve juste sous la touche Affich. [Disp]) et maintenez ces touches enforcées pendant 3 secondes, jusqu'à ce que la LED d'Apprentissage [Learn] au milieu de la télécommande HTR 2 s'allume en vert et de façon fixe. </li>
<li>Appuyez sur la touche de Commande de la HTR 2 dans laquelle vous pouze enregistrer une commande; la LED d'Apprentissage [Learn] devient orange. </li>
<li>Appuyez de façon continua sur la touche de commande de la télécommande d'origine : la LED d'Apprentissage [Learn] de la télécommande HTR 2 clignote pendant une ou deux secondes puis devient verte et reste allumée de façon fixe. La commande a été apprise. Repreneze cette même procédure pour toutes les commandes que vous souhaitez programme sous la touche de Sélection d'Appareilchioise. </li>
<li>Appuyez à nouveau sur la touche de Sélection d'Appareil de la HTR 2 pour quitter le mode d'apprentissage, après avoir terminé la programmation de toutes les commandes pour cet Appareil.</li>
</ul>
<h1 id="nota-7">NOTA</h1>
<p>Si la LED d'Apprentissage [Learn] ne clignote pas en orange, il vous faudra peut-être varier la distance entre les deux télécommandes, oumettre des piles neuves dans les deux télécommandes. Si la LED d'Apprentissage [Learn] devient rouge au lieu de revenir verte, cela veut dire que la commande concernée n'a pas eté enregistrée. Tentez l'opération à nouveau. Dans de rares cas, il arrive que le format IR de la télécommande d'origine ne soit pas compatible avec celle de la HTR 2.</p>
<h1 id="annulation-de-lopération">ANNULATION DE L'OPÉRATION</h1>
<p>Vou pouvez annuler la configuration d'une touche en appuyant sur la touche de Sélection d'Appareil active avant la fin de la série d'apprentissage ; La LED d'Apprentissage [Learn] devient rouge.</p>
<h1 id="exemple-programmation-de-la-fonction-pause-dvd">Exemple : Programmation de la fonction "Pause DVD":</h1>
<ul>
<li>Positionnez la HTR 2 et la télécommande de votre lecteur DVD suivant les indications données ci-dessus. </li>
<li>Sur la télécommande HTR 2, appuyez simultanément et de façon continue sur [DVD] et sur (enregistrer); la LED d'Apprentissage [Learn] clignote en orange puis devient verte et reste allumée de façon fixe. </li>
<li>Appuyez sur la touche (pause) de la télécommande HTR 2; la LED d'Apprentissage [Learn] devient orange. </li>
<li>Appuyez de façon continue sur la touche "pause" de la télécommande du lecteur DVD; la LED d'Apprentissage [Learn] de la télécommande HTR 2 clignote en orange puis devient verte et resté allumée de façon fixe. La commande a été apprise. </li>
<li>Appuyez à nouveau sur la touche [DVD] pour quitter le mode d'apprentissage.</li>
</ul>
<h1 id="mode-bibliothéque">MODE BIBLIOTHÉQUE</h1>
<p>Pour passer en mode bibliothèque, appuyez simultanément et continulement sur l'une des touches de Sélection d'Appareil et sur la touche de Préselection AV [AV Preset] pendant 3 secondes, jusqu'à ce que la LED d'etat devienne verte. En Mode Bibliothèque, vous pouze faire défilier et tester les différentes tables de commandes préprogrammées dans la télécommande, pour trouver s'il existe déjà un jeu de commandes qui correspond à votre apparéil. Il existe différentes façon de naviguer entre les tables de commandes de la Bibliothèque ; ces méthodes sont décrites ci-dessous. La LED d'Apprentissage [Learn] clignote deux fois lorsque toutes les tables disponibles ont été transmises.</p>
<h1 id="touches-du-pavé-numérique">TOUCHES DU PAVÉ NUMÉRIQUE</h1>
<p>Les touches du pavé numérique (0 - 9) peuvent être utilisées pour sélectionner directement l'une des tables. Vous pouvez enter le code à trois chiffres correspondant à la table. Dès que vous aurez appuyé sur le troisième chiffre, la HTR 2 transmettra automatiquement la commande de Mise Hors Tension à titre de test, pour vérifier que vous avez sélectionné la table correcte.</p>
<h1 id="curseur-haut-curseur-bas">CURSEUR HAUT / CURSEUR BAS</h1>
<p>Les touches Curseur Haut / Curseur Bas peuvent être utilisées pour faire défilier les différentes tables disponibles. À chaque impulsion sur l'une de ces touches, la HTR 2 transmettra automatiquement la commande de test (Mise Hors Tension). Si vous maintainez la pression sur l'une de ces touches Curseur, toutes les tables disponibles dans la bibliothèque défileront au rythme de deux par seconde, ce qui vous permettra de trouver rapidement la table (c'est à dire le jeu de commandes) qui correspond à votre apparéil.</p>
<h1 id="nota-8">NOTA</h1>
<p>Vous pouvez changer la commande transmise à titre de test. Si vous appuyez sur une commande qui n'est utilisé pour aucune autre fonction en Mode Bibliothèque, cette commande sera transmise. À partir de ce moment là, toute transmission d'une commande de test correspondra à la dernière touche sur laquelle vous avez appuyé. Cette possibilité peut s'avérer utilise sur certains apparéils qui ne disposent pas d'un mode Veille, donc pour lesquels les recherches de codes ne fonctionnent pas. Certains lecteurs de CD, par exemple, ne disposent d'aucune commande de mise hors tension ; dans ce cas, vous souhaïterez peut-être utiliser la commande de Lecture à la place.</p>
<h1 id="entrée-enter">ENTRÉE [ENTER]</h1>
<p>Appuyez sur la touche de validation Entrée [Enter], en Mode Bibliothèque, pour activer la table que vous avezcision et quitter le Mode Bibliothèque.</p>
<h1 id="nota-9">NOTA</h1>
<p>En activant une table (c'est à dire un jeu de commandes de la bibliothèque), vous désactiver toutes les commandes déjà programmesées ainsi que les fonctions d'Accès Direct. Vous pouvez réactiver les commandes programmesés désactivées (sans avoir à les reprogrammer) en suivant les instructions données à la section Mode Copie du présence manuel.</p>
<h1 id="affichage-display">AFFICHAGE [DISPLAY]</h1>
<p>Vouss pouvez utiliser la touche "Affichage" pour déterminer la référence du tableau que vous venez de sclectionner. ÀpRES avoir appuyé sur la touche d'Affichage [Display], vous verrez le numéro de table s'afficher sous forme d'un clignotement de trois touches, à savoir "MAGNETOPHONE" [TAPE], "MAGNETOSCOPE" [VCR] et MACRO, qui correspondront respectivement aux trois chiffres du code de la table de commandes. Par exemple : si le code de la table est 103, vous verrez clignoter la touche "MAGNETOPHONE" [TAPE] une fois, puis la touche MACRO trois fois.</p>
<h1 id="accés-direct">ACCÉS DIRECT</h1>
<p>La fonction "accès direct" de la télécommande HTR 2 vous permet de conserver une même touche de fonction sur plusieurs "pages" de Sélection d'Appareil différentes de manière à ce que, par exemple, la fonction Mode Son. Ambioph. [Surr Mode] du dispositif AMPLI [AMP] puisse toujours commander le S170i alors que la page de Sélection d'Appareil DVD est active sur la télécommande.</p>
<h1 id="nota-10">NOTA</h1>
<p>Les touches de Volume [VOL] et Muet [MUTE] de la HTR 2 sont préprogrammées en "accès direct" sur toutes les pages de Sélection d'Apparil (sauf TV): Les touches de Volume [VOL] et Muet [MUTE] agissant donc sur le volume général de la chaine NAD quel que soit l'appareil sélectionné. De la même façon, les commandes de volume des Voies Ambioph. [Surr.] CENTRE [CENTER] et [SUB] sont préprogrammées en accès direct pour tous les apparils.</p>
<p>Pour configurer un accès direct, après avoir activé le Mode d'Apprentissage et avoir appuyé sur la touche à programmer en accès direct, il vous suffit d'appuyer deux fois sur la touche de Sélection correspondant à l'appareil vers lequel vous pouze un accès direct. La LED d'état devient verte ; appuyez à nouveau sur la touche de Sélection d'Appareil pour quitter le Mode d'Apprentissage.</p>
<h1 id="exemple-accès-direct-de-la-touche-ampli-mode-ambiophonique-amp-surr-mode-depuis-la-page-dvd">Exemple : Accès direct de la touche "AMPLI" -MODE AMBIOPHONIQUE- [AMP -SURR MODE-] depuis la "page" DVD:</h1>
<ul>
<li>Sur la télécommande HTR 2, appuyez simultanément et de façon continue sur [DVD] et sur (enregistrer); la LED d'Apprentissage [Learn] clignote en orange puis devient verte et reste allumée de façon fixe. </li>
<li>Appuyez sur la touche Mode Ambioph. [Surr Mode] ; la LED d'Apprentissage [Learn] devient orange. </li>
<li>Appuyez deux fois sur AMPLI [AMP]; la LED d'Apprentissage [Learn] devient verte. </li>
<li>Appuyez à nouveau sur la touche [DVD] pour quitter le mode d'apprentissage.</li>
</ul>
<h1 id="copie-dune-commande-depuis-une-autre-touche">COPIE D'UNE COMMANDE DEPUIS UNE AUTRE TOUCHE</h1>
<p>Vous pouvez copier une commande de n'importe qu'elle touche de la télécommande HTR 2 vers n'importe qu'elle autre touche. Pour copier la fonction d'une touche de Commande, après avoir accedé au Mode d'Apprentissage et avoir appuyé sur la touche vers laquelle copier la commande, il vous suffit d'appuyer sur la touche à partir de laquelle vous souhaitez copier (après avoir d'abord appuyé sur la touche de Sélection d'Appareil correspondante, si la touche à copier se trouve sur une autre "page"). La LED d'état devient verte; appuyez à nouveau sur la touche de Sélection d'Appareil pour quitter le Mode d'Apprentissage.</p>
<h1 id="exemple-pour-copier-la-commande-de-pause-de-la-touche-cd-vers-la-touche-ampli-ii">Exemple : Pour copier la commande de Pause de la touche CD vers la touche AMPLI II :</h1>
<ul>
<li>Sur la télécommande HTR 2, appuyez simultanément et de façon continue sur Ampli [Amp] et sur (enregistrer); la LED d'Apprentissage [Learn] clignote en orange puis devient verte et reste allumée de façon fixe. </li>
<li>Appuyez sur III (pause); la LED d'Apprentissage [Learn] devient jaune. </li>
<li>Appuyez sur [CD]; appuyez sur III (pause); la LED d'Apprentissage [Learn] devient verte. </li>
<li>Appuyez à nouveau sur la touche Ampli [AMP] pour quitter le mode d'apprentissage.</li>
</ul>
<h1 id="nota-11">NOTA</h1>
<ul>
<li>Les fonctions Copie et Accès Direct se ressemblant. Néanmoins, si vous copiez une commande avant d'effacer ou d'écraser la commande d'origine (celle de la touche source), la commande copée sur la nouvelle touche reste inchangée. Si vous créez un accès direct vers une commande avant d'éffacer ou d'écraser la commande de la touche faisant l'objet de l'accès direct, les fonctions auxquelles vous accédez via l'accès direct sont, elles aussi, effacées ou écrasées. </li>
<li>Si la fonction source et la fonction de destination sont identiques, la HTR-2 rétabira une commande programmée que vous aviez effacé, le cas échéant. Cela peut dire que si vous avez accidentellement effacé une commande programmée, ou que vous avez charge une table de bibliothèque sur des commandes programmes, vous pouvez procéder de cette manière pour les rétabir sans avoir à les reprogrammer.</li>
</ul>
<h1 id="macro-commandes">MACRO-COMMANDES</h1>
<p>Une "macro-commande" est une série d'au moins deux télécommandes (64 au maximum) que la HTR-2 peut émettre en response à une combinaison de deux impulsions sur des touches. Vous pouvez, par exemple, utiliser une macro pour automatiser une simple série comme "Allumer le lecteur DVD puis appuyer sur Lecture." Ou vous pouze créé une macro complexe pourmettre sous tension une chaîne complète d'appareils, Sélectionner une source, désir un Mode d'Écoute et lancer la lecture, le tout grâce à une seule touche macro. Chaque touche de fonction de la télécommande HTR 2 peut partager une macro (les touches de Sélection d'Appareils ne peuvent pasContaining de macro).</p>
<h1 id="nota-12">NOTA</h1>
<p>Les macros fonctionnent independament de l'appareil actuellément sélectionné.</p>
<h1 id="enregistrement-de-macros">ENREGISTREMENT DE MACROS</h1>
<p>Pour enregistrer une macro, appuyez simultanément et continulement, pendant trois secondes, à la fois sur le bouton [MACRO] et sur la touche de fonction de la HTR 2 dans laquelle vous souhaitez enregistrer votre macro; la LED d'etat devient verte. Le bouton macro s'allume aussi. Appuyez maintainant sur la suite de touches de fonction à enregistrer dans la macro, sans oublier de commencer par une impulsion sur la touche de Sélection d'Appareil pour chaque fonction (vous pouvez changer d'appareil aussi souvent que nécessaire). Vous pouze donc créé une macro contenant des commandes correspondant à plusieurs Appareils. Lorsque vous avez terminé l'enregistrement de la série de commandes souhaïée, appuyez à nouveau sur le bouton [MACRO] pour saugevager la macro; la LED d'Apprentissage [Learn] et l'éclairage du bouton [MACRO] s'éteignent.</p>
<h1 id="nota-13">NOTA</h1>
<p>Chaque macro peut stocker un maximum de 64 pas de commande. Si vous dépasseze ce nombre, la macro est automatiquement sauvegardée après l'ajout de la 64ème commande.</p>
<h1 id="exemple-enregistrer-une-macro-dans-la-touche-0-pour-allumer-le-récepteur-nad-allumer-le-lecteur-dvd-sélectionner-lentrée-dvd-et-démarrer-la-lecture">Exemple : Enregistrer une Macro dans la touche [0] pour Allumer le récepteur NAD, Allumer le lecteur DVD, Sélectionner l'Entrée DVD et Démarrer la Lecture :</h1>
<ul>
<li>Sur la télécommande HTR 2, appuyez simultanément et de façon continue sur [MACRO] et [0] (le zéro sur le pavé numérique); la LED d'Apprentissage [Learn] devient verte et reste allumée de façon fixe. </li>
<li>Appuyez sur "AMPLI" [AMP]; appuyez sur [ON]; appuyez sur [DVD]; appuyez sur "MARCHE" [ON]; appuyez sur "AMPLI" [AMP]; appuyez sur [1] ("DVD" en rouge); appuyez sur [DVD]; appuyez sur "lecture" [play] (à chaque pas de programme ajouté, la Touche d'Appareil clignote une fois). </li>
<li>Appuyez à nouveau sur [MACRO] pour quitter le mode d'enregistrement des macros.</li>
</ul>
<p>Pour effacer une macro, procedez de la manière ci-dessus mais en n'entrant aucune commande.</p>
<h1 id="exécution-des-macros">EXÉCUTION DES MACROS</h1>
<p>Pour exécuter une macro, appuyez brievement sur [MACRO]; ce bouton s'allume pendant 5 secondes. Pendant que ce bouton est allumé, appuyez sur une touche de la HTR 2 dans laquelle une macro a été enregistrée (la touche [0] dans le cas de l'exemple ci-dessus). La macro correspondante est exécutée ; lors de l'opération de chaque pas, la touche de Sélection d'Appareil "mère" dont elle dépend s'allume brievement ; à la fin de l'opération, le bouton [MACRO] s'éteint. Toutte impulsion sur une autre touche de la télécommande HTR 2 pendant l'opération d'une macro provoquera l'arrêt de l'opération de la macro. N'oubliez pas de tener la télécommande HTR 2, pendant toute l'opération de la macro, de manière à ce que son émetteur infrarouge puisse activer les apparêls concernés.</p>
<h1 id="nota-14">NOTA</h1>
<p>Lors de l'execution d'une macro, un déalié de 1 seconde est automatiquement inséré entre les commandes. Si vous voulez un déalié de plus d'une seconde après certaines commandes (par exemple pour permettre la mise sous tension correcte et complète d'un appareil), vous pouze enregistrer des pas "vides" dans la macro. Par exemple, si la touche "TITRE" [TITLE] n'est pas utilisée pour votre lecteur de CD, vous pourriez ajouter cette commande à votre macro afin d'insérer un déalié supplémentaire.</p>
<h1 id="temps-déclairage-des-touches">TEMPS D'ÉCLAIRAGE DES TOUCHES</h1>
<p>L'éclairage des touches de la télécommande HTR 2 peut être configurée pour rester allumée pendant 0 à 9 secondes. La valeur par défaut est de 5 secondes.</p>
<p>Pour régler le temps d'éclairage, appuyez simultanément et continulement, pendant 3 secondes, à la fois sur la touche [DISP] de la HTR 2 et sur une touche [0-9] du pavé numérique, c'est à dire sur le chiffre correspondant au temps d'éclairage souhaité ; la LED d'Apprentissage [Learn] clignote deux fois pour confirmer le nouveau réglage. Si le temps est régle à zéro, l'éclairage ne s'allume pas du tout.</p>
<h1 id="nota-15">NOTA</h1>
<p>L'éclairage des touches constitue la plus grande consommation de puissance des piles du HTR 2. En réglant un temps d'éclairage des touches court, vous augmenterez la durée de vie des piles; si vous n'utilise pas du tout d'éclairage des touches (réglage du temps d'éclairage = 0), vous augmenterez encore davantage la durée de vie des piles.</p>
<h1 id="rétabilssement-des-valeurs-dorigine-remise-à-zéro">RéTABILSSEMENT DES VALEURS D'ORIGINE (REMISE À ZÉRO)</h1>
<p>Il est possible de remettre à zéro la HTR 2 afin de rétablir ses valeurs d'origine, avec effacement de toutes les commandes programmes ()"apprises"), toutes les touches copées et d'accès direct, les macros et les autres informations de configuration, ce qui a pour effet de redonner à toutes les touches leurs commandes d'origine de la bibliothèque préprogrammée. Pour effectuer une remise à zéro des valeurs d'origine, appuyez simultanément et continulement sur les touches MARCHE [ON] et [RTN] de la télécommande HTR 2 pendant 10 secondes; la LED d'Apprentissage [Learn] commence à clignoter en vert. Relâchez les boutons MARCHE [ON] et [RTN] avant la fin du deuxième clignotement; la LED d'Apprentissage [Learn] devient rouge, pour indiquer que la télécommande a été remise à zéro.</p>
<h1 id="nota-16">NOTA</h1>
<p>Vou deves obligatoirement relacher les boutons MARCHE [ON] et [RTN] avant la fin du deuxieme clignotement, sinon la remise a zéro ne s'effectuera pas; si cela arrive, reprenez la procedure entiere depuis le début.</p>
<h1 id="mode-deffacement">MODE D'EFFACEMENT</h1>
<p>La télécommande HTR 2 peut stocker, sur n'importe qu'elle touche, les commandes apprises, copiées ou provenant de la "bibliothèque par défaut". (Les commandes de la bibliothèque par défaut sont des codes NAD préprogrammés, comme par exemple les commandes sur récepteur NAD sur la page "AMPLI" [AMP].) Vous pouvez effacer les commandes stockées sur n'importe qu'elle touche, et ce par couches successives, en revenant progressivement "en arrêté" jusqu'à la commande de la bibliothèque par défaut, de manière à effacer les commandes apprises, les fonctions d'accès direct et les touches copiées.</p>
<h1 id="nota-17">NOTA</h1>
<p>Il est impossible d'effacer les commandes de la bibliothèque par défaut. Vous ne risquez donc aucune perte irrécupérable lorsque vous utilisez le Mode d'Effacement.</p>
<p>Pour acceder au Mode d'Effacement, appuyez simultanément et continulement sur la touche de Sélection d'Appareil souhaitation et sur la touche [RTN], pendant 3 secondes; la LED d'Apprentissage [Learn] devient verte. Appuyez sur la touche de fonction dont vous pouze effacer le commande; la LED d'Apprentissage [Learn] clignote. Le nombre de clignotements indique le type de fonction devenue active (reportez-vous au tableau ci-dessous). Appuyez à nouveau sur la touche de Sélection d'Appareil pour quitter le Mode d'Effacement.</p>
<h1 id="clignotements">Clignotements</h1>
<h1 id="type-de-commande">Type de Commande</h1>
<p>1 Commande de la bibliothèque par défaut <br />
2 Commande copieee depuis la bibliothèque par défaut <br />
3 Commande programmee (apprise)</p>
<h1 id="résumé-des-fonctions">Résumé DES FONCTIONS</h1>
<h1 id="fonction">Fonction</h1>
<p>Programmer / Copier / Accès Direct</p>
<p>Mode Bibliothèque</p>
<p>Mode d'Effacement</p>
<p>Enregistrement de Macro</p>
<p>Temps d'Eclairage</p>
<p>Rétablissement des valeurs d'origine (remise à zéro)</p>
<h1 id="touches-sur-lesquelles-il-faut-appuyer">Touches sur lesquelles il faut appuyer</h1>
<h1 id="pendant-3-seconds">(pendant 3 seconds)</h1>
<p>Touché d'Appareil + Touche Enregistrement</p>
<p>Touched'Appareil ^+ touche preréglee A/V</p>
<p>Touché d'Appareil + touche Retour</p>
<p>Bouton Macro + Touche de Fonction</p>
<p>Touché d'Affichage + Touche Numérique</p>
<p>(reports-à la section concernant la remise à zéro des valeurs d'origine)</p>
<h1 id="tableaux-de-la-htr-2">TABLEAUX DE LA HTR 2</h1>
<h1 id="tableau">Tableau</h1>
<p>100</p>
<p>101</p>
<p>102</p>
<p>103</p>
<p>104</p>
<h1 id="description-2">Description</h1>
<p>Récepteur avec Marche/Arrêt discret</p>
<p>Récepteur avec Marche/Arrêt à bascule</p>
<p>S170i</p>
<p>L75 L76</p>
<p>Zone 2</p>
<p>200</p>
<p>201</p>
<p>Lecteur de CD</p>
<p>Lecteur de CD (ancien)</p>
<p>300</p>
<p>301</p>
<p>Tuner</p>
<p>Tuner L75, L76</p>
<p>400</p>
<p>401</p>
<p>Magnétophone B</p>
<p>Magnetophone A</p>
<p>500</p>
<p>501</p>
<p>502</p>
<p>TV 270</p>
<p>MR13</p>
<p>MR20</p>
<p>600</p>
<p>601</p>
<p>602</p>
<p>602</p>
<p>T562</p>
<p>T550,L55,L56</p>
<p>T531, T571</p>
<p>T512, T532, T572</p>
<h1 id="dépannage">DéPANNAGE</h1>
<table><tr><td>PROBLEM</td><td>CAUSE(S) POSSIBLE(S)</td><td>SOLUTIONS(S) POSSIBLE(S)</td></tr><tr><td>AUCUN SON SUR AUCUNE VOIE</td><td>L'alimentation secteur est débranchéel'appareil n'est pas sous tensionla prise murale n'est pas alimentéele Moniteur de Bande est activé</td><td>Vérifiez le cable secteur, son branchement et la prise muraledésactivez le Moniteur de Bande</td></tr><tr><td>AUCUN SON SUR CERTAINES VOIES</td><td>Câbles défectueux / manquantsles voies sont définies comme "Non" dans le menu de <Configuration des Haut-Parleurs [<Speaker setup>]l'amplificateur de puissance ou les liaisons haut-parleurs sont défectueux</td><td>Vérifiez les câblesvérifiez le menu <Configuration des Haut- parleurs [<Speaker Setup>]vérifiez l' amplificateur de puissance, le câblage et les haut-parleurs</td></tr><tr><td>AUCUN SON SUR LES VOIES AMBIOPHONIQUES</td><td>Aucun mode d'écoute ambiophonique n'est actifles voies ambiophoniques sont définies comme "Non" dans le menu <Configuration des Haut- Parleurs [<Speaker setup>]Le niveau des voies ambiophoniques est régelotrop bas dans le menu <Niveau des Voies>[<Channel Levels>]</td><td>S'électionnez le mode d'écoute appropriécorrigez le <Configuration des Haut-Parleurs [<Speaker setup>]ou les <Niveau des Voies>[<Channel Levels>]</td></tr><tr><td>AUCUN SON DU SUBWOOFER</td><td>Le subwoofer est étient, n'est pas alimenté ou est mal branchéLe subwoofer est défini comme "Inactif" dans le menu <Configuration des Haut-Parleurs [<Speaker setup>]Le niveau du subwoofer est régé trop bas dans le menu <Paramétrage des Niveau > [<Levels setup>]</td><td>Mèttez le subwoofer sous tension, vérifie la prise murale alimentant le subwoofer, vérifie les branchementscorrigez la <Configuration des Haut-Parleurs [<Speakers setup>]ou les <Paramétrage des Niveau > [<Levels setup>]</td></tr><tr><td>AUCUN SON SUR LA VOIE CENTRALE</td><td>La source est un enregistrement 2/0 (etc.) Dolby Digital or DTS sans voie centraleLa voie centrale est défini comme "Non" dans le menu de <Configuration des Haut-Parleurs [<Speaker setup>]Le niveau de la voie centrale est régé trop bas dans le menu <Configuration des Niveau> [<Levels setup>]</td><td>Utilisez un enregistrement 5.1-voies ou sélectionné le mode Dolby Pro Logic ou Monocorrigez la <Configuration des Haut-Parleurs [<Speakers setup>]ou les <Configuration des Niveau> [<Levels setup>]</td></tr><tr><td>PAS DE DOLBY DIGITAL/DTS</td><td>La sortie numérique de la Source n'est pas reliée à une entrée numérique du S170i</td><td>Vérifiez les branchements</td></tr><tr><td>LE S170I NE REAGIT PAS AUX COMMANDES DE LA TELECOMMANDE HTR 2</td><td>Les batteries sont à plat ou ne sont pas correctement inséréesla fenêtre IR émettrice de la télécommande, ou la fenêtre IR de réception du S170i est obstruéela face parlante du S170i est située sous une lumière ambiente très forté ou est exposée directement aux rayons du soleil</td><td>Vérifiez les pilesvérifiez les fenôtres IR et assurez-vous que l'espace entre la télécommande et le S170i est dégagédRéduisez l'éclairage de la pierce ou son exposition au soleil</td></tr><tr><td>LE S170I NE REAGIT PAS AUX COMMANDES DE LA FACE PARLANTE</td><td>Erreur de microproesseseur</td><td>Désalimentez le S170i en utilisant la touche Alimentation [Power] sur la face parlante, et débranchez-le de la prise secteur muraleattendez cinq minutes, rebranchez le L70, puis mettez-le sous tension.</td></tr></table>
<p>Formats de décodage</p>
<p>Dolby Digital, Dolby Digital EX, Dolby Pro Logic,</p>
<p>Taux d'échéantillonnage</p>
<p>Dolby Pro Logic II, DTS, DTS ES, DTS Neo:6</p>
<p>THX Surround EX, THX Ultra 2</p>
<p>32 kHz, 44,1 kHz, 48 kHz, 96 kHz</p>
<p>Modes</p>
<p>EARS, Party ("Fete")</p>
<p>STÉRÉO (CONTOURNEMENT ANALOGIQUE) </p>
<table><tr><td>Impédance d'entrée analogue</td><td>16 kΩ / 100 pF</td></tr><tr><td>Réponse de fréquence analogue</td><td>20 Hz - 20 kHz +/- 0,2 dB</td></tr><tr><td>Niveau d'entrée maximum</td><td>3 V eff.</td></tr><tr><td>THD+N</td><td>0,005 %</td></tr><tr><td>Rapport signal/bruit</td><td>>90 dB</td></tr><tr><td>Plage dynamique</td><td>95 dB</td></tr><tr><td>Séparation des voies analogiques</td><td>>95 dB</td></tr><tr><td>Diaphonie</td><td>>90 dB</td></tr><tr><td>Niveau de sortie maximum</td><td>6 V eff.</td></tr></table>
<p>IMPÉDANCE DE SORTIE <br />
COMMANDES DE TONALITE </p>
<table><tr><td>Sortie préampli principale</td><td>56 Ω</td></tr><tr><td>Sortie Magnéto</td><td>470 Ω</td></tr><tr><td>Sortie multi-salle</td><td>470 Ω</td></tr></table>
<table><tr><td>Graves</td><td>(à 20 Hz) +/-12 dB</td></tr><tr><td>Aigus</td><td>(à 20 kHz) +/-12dB)</td></tr></table>
<p>PERFORMANCES DES ENTRÉES NUMÉRIQUES </p>
<table><tr><td>THD+N (Largeur de bande 10 Hz - 20 kHz)</td><td>0,005 %</td></tr><tr><td>Impédance des entrées numériques</td><td>75 Ω</td></tr></table>
<h1 id="video-2">VIDEO</h1>
<p>Impedance d'entree et de sortie 75Ω</p>
<p>CHARACTERISTIQUES PHYSIQUES </p>
<table><tr><td>Dimensions (L x H x P)</td><td>17 3/4 x 3 7/8 x 11 1/4"</td></tr><tr><td></td><td>450 x 97 x 285 mm</td></tr><tr><td>Poids net</td><td>11 lbs (4,99kg)</td></tr><tr><td>Poids emballé</td><td>13 lbs (5,89kg)</td></tr></table>
<p><img alt="" src="images/ef02beff35021fbaa4f663de474f65b053ae9a88204883f7429bad6113bda2f8.jpg" /></p>
<p>www.NADelectronics.com</p>
<p>©2003 NAD ELECTRONICS INTERNATIONAL A DIVISION OF LENBROOK INDUSTRIES LIMITED</p>
<p><img alt="" src="images/7ee1497adfcb57df2556e6f4e809e99f056986c41cd42f3ad0fbb51fac4f8f19.jpg" /></p>
<p>Bedienungsanleitung</p>
<p><img alt="" src="images/6a8afd579e04ab9570a604302f069b9e48ae5d6b756101ec7ba45223fbff30cf.jpg" /></p>
<h1 id="erläuterung-der-grafischen-symbole">ERLÄUTERUNG DER GRAFISCHEN SYMBOLE</h1>
<p><img alt="" src="images/4fa13e25be8d4f97fdfa2cb8eca54990bd1ec39e92f62a1cc6785d9276fa44e0.jpg" /></p>
<p>Das Blitzsymbol mit Pfeil in einem gleichseitigen Dreieck soll den Benutzer vor einer nicht isolierten, für das Risiko eines elektrischen Schlages für Personen ausreichend hohen gefährlichen Spannung im Innern des Gerätegehäuses warnen.</p>
<p><img alt="" src="images/bf52fb7720fab1fa5a33f22c7709c2b6fe3d912e23c190aa104b845e95ad5f27.jpg" /></p>
<p>Das Ausrufezeichen in einem gleichseitigen Dreieck soll den Benutzer darauf aufmerksam machen, dass die mit dem Gerät gelieferte Dokumentation wichtige Betriebs- und Wartungshinweise enthalt.</p>
<h1 id="zur-beachtung">ZUR BEACHTUNG</h1>
<p>Vor der Benutzung des Gerätes die Bedienungsanleitung aufmerksam und ganz durchlesen. Die Bedienungsanleitung zum späteren Nachschlagen unbedingt aufbewahren. Alle Warnhinweise in der Bedienungsanleitung und am Gerät strengstens befolgen sowie die nachfolgenden Sicherheitsregeln unbedingt einhalten.</p>
<h1 id="aufstellung">AUFSTELLUNG</h1>
<p>1 Wasser und Feuchtigkeit - Das Gerät nicht in der Nähe von Wasser wie z. B. einer Badewanne, einem Waschkessel, Schwimmbad o. ä. benutzen. <br />
2 Hitze - Dieses Gerät nicht in der Höhe von Hitzequellen wie Heizluftern, Öfen oder anderen wärmeerzeugenden Geräten benutzen. Esarf auch nicht niedrigeren Temperatoren als 5^ oder höheren als 35^ ausgesetzt werden. <br />
3 Aufstellfläche - Das Gerät auf eine flache, ebene Fläche stellen. <br />
4 Luftzirkulation - Damit eine ausreichende Wärmeabfuhr gewährleistet ist, muss das Gerät mit ausreichend freiem Platz aufgestellt werden (mindestens 10 cm hinter und oben, und 5 cm auf jeder Seite). - Nicht auf ein Bett, einen Teppich oder ähnliche Oberflächen stellen, die die Luftungsöffnungen blockieren können. - Das Gerät nicht in einen Bucherschrank oder in ein abgeschlossenes Rack stellen, wo die Luftzirkulation verhindert wird. <br />
5 Eindringen von Fremdkörpern und Flüssigkeit - Achten Sie darauf, dass keine Fremdkörper oder Flüssigkeiten durch die Lufungsöffnungen in das Innere des Gerätes gelangen. <br />
6 Handwagen und Ständer - Steht das Gerät auf einem Ständer oder Handwagen, muss das Gerät vorsichtig bewegt werden. Schnelles Anhalten, zu hohe Kraftanwendung und unebene Bodenflächen könnenazo duhren, dass der Handwagen mit dem Gerät umkipipt. <br />
7 Kondensation - Auf der Linse des CD-Abtastlasers kann sich Feuchtigkeit bilden, wenn:</p>
<p>das Gerät aus einem kalten in einen warmen Raum gebracht wird. <br />
- die Heizung gerade erst eingeschaltet worden ist. <br />
das Gerät in einem sehr feuchten Raum verwendet wird. <br />
das Gerät mit einem Klimagerät gekühlt wird.</p>
<p>Wenn sich in thisem Gerät Feuchtigkeit gebildet hat, kann der normale Betrieb gestört sein. Lassen Sie das Gerät in thisem Fall für ein paar Stunden außer Betrieb und versuchen Sie es dann noch einmal.</p>
<p>8 Wand- oder Deckenmontage - Das Gerätarf nicht an einer Wand oder Decke montiert werden, es sei dess, dies wird in der Bedienungsanleitung angegeben.</p>
<h1 id="warning-um-die-gefahr-von-feuer-oder-stromschlag-zu-verhindern-dieses-gerät-nict-regen-oder-feuchtigkeit-aussetzen">WARNING! UM DIE GEFAHR VON FEUER ODER STROMSCHLAG ZU VERHINDERN, DIESES GERÄT NICT REGEN ODER FEUCHTIGKEIT AUSSETZEN.</h1>
<p>Dieses Gerät wurde in Übereinstimmung mit den Anforderungen gegen Hochfrequenzstörungen der EEC RICHTLINIE 89/68/EEC und 73/23/EEC hergestellt.</p>
<p><img alt="" src="images/4412f96bdfdacd965b2ebdf4280ed04fd91a3efd69228051cb4c8538db425eb7.jpg" /></p>
<h1 id="elektrische-versorgung">ELEKTRISCHE VERSORGUNG</h1>
<p>1 Stromversorgungen - Dieses Gerätarf nur an solche Stromquellen angeschlüssen werden, wie sie in der Bedienungsanleitung beschrieben und am Gerät angegeben sind. <br />
2 Polarität - Zur Sicherheit sind manche Geräte mit einem gepolten Wechselstromstecker ausgestattet, der nur auf eine bestimmte Art in eine Steckdose paßt. Wenn ein Stecker schwer oder gar nicht in eine Steckdose gesteckt werden kann, den Stecker umdrehen und noch einzelmal einstecken. Falls er sich immer noch nicht leicht in eine Steckdose einstecken laßt, wenden Sie sich an einen Servicetechniker oder ersetzen die Steckdose. Versuchen Sie auf keinen Fall, die Sicherheitsvorkehrung des gepolten Steckers durch Gewaltanwendung zu umgehen. <br />
3 Netzkabel - Ziehen Sie beim Ausstecken des Netzkabels nur am Netzstecker. Nicht am Kabelziehen!</p>
<ul>
<li>Den Netzstecker niemals mit feuchten Händen anfassen. Stromschlag- und Brandgefahr! </li>
<li>Zur Vermeidung von Knicken, Quetschen oder Darauftreten das Netzkabel sicher verlegen. Achten Sie besonders auf das Kabel vom Gerät zur Steckdose. </li>
<li>Steckdosen und Verlängerungskabel nicht überlasten. Stromschlag- und Brandgefahr!</li>
</ul>
<p>4 Verlängerungskabel - Zur Vermeidung von elektrischem Schlag durch freiliegende Steckerstifte, mit Verlangerungskabeln, Gerätebuchsen oder anderen Netzausgaben keine gapolten Stecker verwenden, wenn diese nicht vollständig eingesteckt werden können. <br />
5 Wenn das Gerät nicht verwendet wird - Wird das Gerät für mehrere Monate nicht verwendet, das Netzkabel aus der Steckdose ausstecken. Bei eingestecktem Netzkabel fließt ständig ein geringer Strom in das Gerät, auch wenn der Netzschalter ausgeschelt ist.</p>
<h1 id="achtung">ACHTUNG</h1>
<p>Durch Änderungen oder Einstellungen an thisem Gerät, die vom Hersteller nicht ausrücklich genehmigt sind, kann der Benutzer die Befugnis oder das Recht verlieren, das Gerät zu betreiben.</p>
<h1 id="wartung">WARTUNG</h1>
<p>Reinigen Sie das Gerät nur entsprechend den Hinweisen in der Bedienungsanleitung.</p>
<h1 id="reparaturschäden">REPARATURSCHÄDEN</h1>
<p>Lassen Sie das Gerät von einem qualifizierten Servicetechniker reparieren, wenn:</p>
<ul>
<li>Der Netzstecker beschädigt ist. </li>
<li>Fremdkörper oder Flüssigkeit in das Gerät eingedrungen ist. </li>
<li>Das Gerät Regen oder Wasser ausgesetzt war - Anscheinend nicht mehr normal Funktioniert. <br />
Das Gerät eine deutliche Leistungsänderung erkennen laßt. </li>
<li>Das Gerät hinuntergefallen ist, oder das Gehäuse beschädigt worden ist.</li>
</ul>
<h1 id="versuchen-sie-nict-das-gerät-selbst-zu-reparieren">VERSUCHEN SIE NICT, DAS GERÄT SELBST ZU REPARIEREN.</h1>
<h1 id="gerätepass">GERÄTEPASS</h1>
<p>Schreiben Sie die Modellnummer und Seriennummer des Gerätes (auf der Geräte-Rückwand angegeben) in den unter davon vorgesehenen Bereich. Halten Sie diese Daten bereit, wenn Sie sich bei Problemen mit dem Handler in Verbindung setzen.</p>
<p>Modell:</p>
<p>Seriennr.:</p>
<p>Sicherheitsinformationen 2</p>
<p>Alle Mochigkeiten des NAD S170i voll nutzen 5</p>
<p>Auspacken und aufstellen 6</p>
<p>Lieferumfang 6</p>
<p>Auswahlen des Standorts 6</p>
<p>Das Besondere am S170i 7</p>
<p>E.A.R.S. 7</p>
<p>Uber THX 7</p>
<p>Bedienerfreundlichkeit 7</p>
<p>Integration 7</p>
<p>Erweiterbarkeit 8</p>
<p>DieprogrammierbareFernbedienungHTR2 8</p>
<p>Die Fernbedienung ZR 2 für Zone 2/Multisource 8</p>
<p>Kurzanleitung 9</p>
<p>Abspielen eines DVD-Films (oder einer Musik-CD) 9</p>
<p>Frontplatte 10</p>
<p>Rückwand 11</p>
<p>Einstellen des S170i 12</p>
<p>Erste Schritte 12</p>
<p>Abhilfe bei Brummen und Rauschen 12</p>
<p>Bildschirmanzeigen (OSD) und Frontplatten-Anzeigefeld 13</p>
<p>Anzeigen der Menus 13</p>
<p>Konfigurieren des S170i 14</p>
<p>Display-Einstellung 14</p>
<p>Audio-Einstellung 15</p>
<p>Einstellen der Laufsprecher 17</p>
<p>Pegeleinstellung 17</p>
<p>Verzogungseinstellung 19</p>
<p>Einstellen von Signalquellen 19</p>
<p>Trigger-Einstellung 20</p>
<p>Die Bedienung des S170i 28</p>
<p>Auswahlen von Signalquellen 22</p>
<p>Einstellen der Lautstärke 23</p>
<p>Einstellen von Hörmodi 23</p>
<p>Einstellen der Kanalpegel 26</p>
<p>Klangeinstellung 27</p>
<p>Frontplatten-Funktionen 28</p>
<p>Wiedergabe in einer zweiten Zone (MultiSource) 28</p>
<p>NAD-Link 29</p>
<p>Systemintegration (RS-232) 30</p>
<p>Anwendung der Fernbedienung HTR 2 31</p>
<p>Die HTR 2 im Überblick 31</p>
<p>Lernen von Codes anderer Fernbedienungen 32</p>
<p>Bibliotheksmodus 32</p>
<p>Punch-Through (Durchschaften) 33</p>
<p>Kopieren eines Befehls von einer anderen Taste 34</p>
<p>Makrobefehle 34</p>
<p>Aufzeichen von Makros 34</p>
<p>Ausfuhren von Makros 35</p>
<p>Leuchtdauer der Tastenbeleuchtung 35</p>
<p>Zurücksetzen auf Werkseinstellung 35</p>
<p>Löschemodus 36</p>
<p>Zusammenfassung der Funktionen 37</p>
<p>Befehlssätze der HTR 2 37</p>
<p>Problemlösung 38</p>
<p>Technische Daten 39</p>
<h1 id="vielen-dank-dab-sie-sich-für-nad-entscheden-haben">VIELEN DANK, DAB SIE SICH FÜR NAD ENTSCHEDEN HABEN.</h1>
<p>Der Vorverträger S170i A/V Surround Sound ist einer der technologisch am weitesten entwickelten Surround-Prozessoren/Vorverträger und enthalt digitale Signalverarbeitung mit 32-Bit in Ultra-Highspeed, eine voll upgrade-fähige Architektur (Hard- und Software) sowie außerordentlich genaue Digital/Analogwandler mit 96 kHz Abtastrate in 24-Bit-Präzision für alle Kanäle.</p>
<p>Darüber hinaus gehört er zu den klanglich transparentesten und räumlich genauesten Entwicklungen, die zur Zeit erhältlich sind. Er ist die Quintessenz aus allem, was wir im letzten Vierteljahrbundert über Musik und Reproduktion im Heimkino gelernt haben. Mit der NAD-Designphilosophie “Zuerst Musik” als Leitprinzip für die Entwicklung sind wir zuversichtlich, daß der S170i unser Versprechen erfüllt, Ohnen für weitere Jahre modernstes Heimkino und Hörgensüß in weiterer audiophiler Qualität zu liefern.</p>
<p>Bitte nehmen Sie sich ein paur Minuten Zeit und lessen Sie diese Bedienungsanleitung durch. Wenn Sie gleich nach dem Auspacken ein wichtige Zeit investieren, spare Sie hinterher umso mehr, und es ist sicher der Beste Weg, ihre Investition in den NAD S170i und diese leistungsstarke und flexible Heimkino-Komponente auch voll zu nutzen.</p>
<p>Noch eines:itte registrieren Sie ihren S170i auf der NAD-Internetseite im World Wide Web:</p>
<h1 id="httpnadelectronicscomwregistrationhtml-2">HTTP://NADELECTRONICS.COMW/REGISTRATION.HTML</h1>
<p>Auf diese Weise können Sie von der NAD-Hauptniederlassung über mögliche zukünftige Software- und Firmware-Updates und Änderungen, die die Leistung und Nutzung des S170i steigern können, informiert werden. Senden Sie unsitte auch ihre Garantiekarte, damit ihre örtliche NAD-Vertretung von Ihrem Kauf weiß, und bewahren Sie den Original-Kaufbeleg auf. Dadurch erhalten Sie die Garantieleistungen bei Ohnen vor Ort.</p>
<h1 id="lieferumfang">LIEFERUMFANG</h1>
<p>Zusammen mit dem Voversteller S170i sollen den Sie erhalten haben:</p>
<ul>
<li>1 abnehmbares Netzkabel (kann bei Bedarf mit einem beliebigen IEC-Standard-Netzkabel mit entsprechender Belastbarkeit ersetzt werden) <br />
1 DC-Triggerkabel <br />
1 programmierbare Fernbedienung HTR 2 einschl. Batterien (4 x AAA) <br />
1 Multi Source-Fernbedienung ZR 2 einschl. Batterie (1 x CR2025) </li>
<li>1 Paar weiße Baumwollhandschuhe für die Handhabung des S170i während der Einrichtung, um Kratzer oder Fingerabdrücke auf der Geräteoberfläche zu vermeiden. <br />
1 Bedienungsanleitung</li>
</ul>
<h1 id="verpackung-aufbewahren">VERPACKUNG AUFBEWAHREN</h1>
<p>Bitte bewahren Sie die Schachtel und das Verpackungsmaterial des S170i auf. Sollen Sie einmal umziehen oder den Vorveränderer transportieren müssen, ist dies der Beste Behälter davon. Wir haben schon viel zu weitere ansonsten tadellose Geräte gesehen, die nur durch eine mangelhafte Verpackung beim Transport beschädigt worden sind - deshalb: Verpackungitte aufbewahren!</p>
<h1 id="auswählen-des-standorts">AUSWÄHLEN DES STANDORTS</h1>
<p>Bestimmt sind Sie mit uns einer Meinung, daß die Oberflächenqualität des S170i und seine Erscheinung einen besonderen Platz in einem Heimkino oder einer Musikanlage verdienen. Wahlen Sie einen Standort mit ausreichender Luftzirkulation und genügd Abstand an den Seiten und der Geräterückseite. Achten Sie auf eine ungehinderte Sicht innerhalb von ca. 8 Metern zwischen der Frontplatte und ihrer bevorzugten Hör-/Sichtposition, damit eine zuverlässige Kommunikation mit der Infrarot-Fernbedienung sichergestellt ist. Der S170i hat durch die Highspeed-DSP-Hardware und die hohen Strome der Audioschaltkreise eine moderate Wärmeentwicklung, die allerdings benachbarte Komponenten nicht beeinträchtigen sollen. Es ist absolut safer, zusätzliche Geräte auf den S170i - oder umgekehrt - zu stellen, im allgemeinen ist es jedoch better (und bedeutend praktischer), den S170i allein aufzustellen.</p>
<p>Der AV-Vorverstärker S170i besteht nicht nur zu den leistungsstärksten und anspruchsvollsten digitalen Surround-Dekodern/Prozessoren, die erhältlich sind, sondern er ist auch eine der Heimkino-Komponenten mit der hochsten Klangtransparenz. Und das meinen wir mit der NAD-Designphilosophie "Zuerst Musik". Hier nur ein paar Beispiele:</p>
<ul>
<li>Im S170i stecken in allen analogen Audioschaltkreisen Hochleistungs-FETs mit der höchsten Klangreinheit </li>
<li>Extrem niedrige Ausgangsimpedanz bei allen Kanälen (lange schon ein NAD-Gütezeichen) beseitigt Klangbeeinträchtigungen durch Kabel und Verständereingangssimpedanzen </li>
<li>Ausgangsstummschaltung über zuverlässige, klanglich transparente Goldkontaktrelais und nicht über klangverfürbende Elektronik </li>
<li>Anschlüsse mit vergoldeten Kontakten sowohl intern als auch extern sorgen für einen ungestörten Signalweg.</li>
</ul>
<h1 id="ears-5">E.A.R.S.</h1>
<p>Ein wichtiges Element der einzigartigen Musikalität des S170i ist das NAD-eigene Enhanced Ambience Recovery System (EARS). Im Gegensatz zu vielen Musik-Surround-Modi mit „Umgebungssynthese" nützt EARS die wesentliche DSP-Leistung des S170i aus und leitet die in practisch allen tatsächlichen Tonaufzeichnungen enthalten den Umgebungsinhalte ohne künstlich erzeugte Reflexionen oder Regenerierung an die entsprechenden Haupt-, Center- und Surround-Lautsprecher weiter. Die tatsächliche Umgebung von EARS erzeugt einen feinen, aber außerordentlich effektiven Surroundmodus, der die Raumpräsentation auf tatsächliche Weise und in einer Art verfürt, die für ernsthafterns Musikhören geeignet ist.</p>
<p>Auf der digitalen Seite kombiniert der S170i außergewöhnlich Schnelles DSP mit einer der fortschrittlichsten Highspeed-DSP-Engine: volte 24-Bit-D/A-Wandler mit 96kHz Abstraute für alle Kanäle. Alle digitalen Schaltkreise werden von einem einfachen, hochprüzisen Bustakt ohne die Timingfehler („Jitter“) versorgt, die sonst zwischen digitalen Stufen auftreten konnen und die Klangleistung beeinträchtigen. Folgerichtig ist das Ergebnis modernestes Surround-Decodering von Dolby Digital und DTS-Signalquellen in den Kanalausgangsmodii 5.1 und 6.1/7.1 sowie wirklichkeitsgetreue, überragende Klangqualität in allen Modi.</p>
<h1 id="über-thx">ÜBER THX</h1>
<p>Der Vorverträger S170i ist von THX Ltd. zertifiziert und erfüllt davon die strengen Anforderungen des Programms THX/Ultra 2 für Surround-Controller. Das bedeutet, daß der Vorverträger ein Klangerlebnis liefern kann, das dem der bestenCOMMMERIEN KINGS gleichwertig ist, wenn seine an sich schon hervorragende Leistung mit den Surround-Erweiterungen des Programms THX/Ultra 2 kombiniert werden.</p>
<h1 id="bedienerfreundlichkeit">BEDIENERFREUNDLICHKEIT</h1>
<p>Wir haben einen groBen Aufwand für die hohe Bedienerfreundlichkeit getrieben und in gleichem MaBe in die konkurrenzlose Klangeleitung des S170i investiert. Sein Design ist für ein so anspruchsvolles Gerät ungewöhnlich einfach, und die Fernbedienung HTR 2 sowie die Anzeigen auf der Frontplatte des S170i und dem On-Screen-Display sind für den Anwender einfach, selbsterklärend und intuitiv zu bedieten. Mit dem leistungsfähigen und einfahren Voreinstellungssystem konnen Sie ihre persönlichen Einstellungen an verschiedene Bedingungen anpassen und diese Parameter mit nur zwei Tasten wieder abrufen.</p>
<h1 id="integration-3">INTEGRATION</h1>
<p>Mit den beiden konfigurierbaren DC-Triggerausgängen und über das eigene NAD-Link-Kommunikationsprotokoll bietet der Vorversteller S170i umfangreiche und flexible Mochigkeiten zur Systemintegration. Darüber hinaus liefert der serielle RS-232-Anschluß die Einbindung in noch anspruchsvollere Steueranlagen wie z. B. Touchscreen-Systeme und vollautomatische Gesamtinstallationen.</p>
<h1 id="erweiterbarkeit">ERWEITERBARKEIT</h1>
<p>Ein einzigartiges Merkmal des S170i ist sein moduler Aufbau. Die gesamte „Intelligenz" des S170i ist auf einem einzigen Einsteckmodul untergebracht. Diese anspruchsvolle Architektur vereinfacht den Service und ermöglicht zukünftige Upgrades. Bei der außergewöhnlichen Verarbeitungsleistung und Geschwindigkeit des S170i können wir zur Zeit allerdings den Bedarf für Hardware-Upgrades noch nicht voraussehen. Allerdings ist es gut zu wissen, daß der S170i wahrseinlich nicht so schnell veraltet sein wird.</p>
<p>Wir haben die weitaus wahrscheinlichere Option von Softwareaktualisierungen leicht realisierbar gemacht, indem sie über den RS-232-Anschluß auf der Rückwand des S170i durchgeführt werden konnen. Benutzer, die ihren S170i auf unserer internationalen Internetseite www.NADelectronics.com registriieren, werden über Updates informiert. Einige davon konnen kostenlos sein, für andere ist entsprechend dem Upgrade möglicherweise die Zahlung von Lizenzgebühren erforderlich. Geübte Computeranwender konnen diese Upgrades selbst durchführten. Die Dateien werden von unserer Website per E-Mail heruntergeladen und durch Anschließen des S170i an einen PC installment. Außen dem kann der Handl, von dem der S170i bezogen wurde, bei der Installation dieser Upgrades hinzugezogen werden.</p>
<h1 id="die-programmierbare-fernbedienung-htr-2">DIE PROGRAMMIERBARE FERNBEDIENUNG HTR 2</h1>
<p>Zusammen mit ihrem S170i haben wir die programmierbare Mehrfachkomponenten-Fernbedienung NAD HTR 2 eingepackt. Dieses handliche Gerät kann bis zu 8 verschiedene Komponenten steuern, wie z. B. DVD-Player, Fernseher und Satelliten-Receiver. Sie vereinfacht die Bedienung Ihres ganzen Heimkinos enorm und eliminiert bzw auch noch die lassige Ansammlung von Fernbedienungen auf dem Tisch. Da die Tasten der HTR 2 bei Tastendruck aufleuchten, wird die Bedienung bei geringem Licht noch einfacher und angenehmer.</p>
<p>Zur Steuerung eines Gerätes mit der HTR 2 müssen Sie zuerst auswahlen, zu welcher der 8 Komponenten das zu steuernde Gerät gehört, wie z. B. AMP, TV, DVD, usw. Die restlichen 46 Tasten sind dann für die Steuerung des ausgewählten Gerätes bereit. Das kann am Anfang etwas verwirrend sein, aber wenn Sie einmal verstanden haben, wird die Bedienung eines beliebigen Gerätes in Ihr ganzen Heimkino mit nur einer Fernbedienung zur wahren Freude.</p>
<p>Für alle NAD-Komponenten sind Codetabellen beigefugt und die Codes anderer Hersteller können leicht über die Fernbedienung des Fremdgerätes "gelert" und auf eine beliebige Taste der HTR 2 gespeichert werden. Darüber hinaus gibt es die einfache Möglichkeit, "Makros" oder Befehlsfolgen zu erzeugen, mit denen alle notwendigen Einzelschritte, z. B. zum Abspielern einer DVD, sofort und auf einem abgerufen werden konnen. Mit dieser erweiterten Funktionalität sind selbst komplizierte AV-Systeme kein zu bedieren.</p>
<p>Lesen Sieitte im Abschnitt HTR 2 in thisem Handbuch die vollständige, schrittweise Anleitung zur Anwendung der Funktionen dieser bemerkenswerten Heimkino-Fernbedienung.</p>
<h1 id="die-fernbedienung-zr-2-für-zone-2multisource">DIE FERNBEDIENUNG ZR 2 FÜR ZONE 2/MULTISOURCE</h1>
<p>Im Lieferumfang finden Sie außer dem die klinne Fernbedienung ZR 2 mit der Spezialfunktion zur Steuerung des Audioausgangs Multisource oder Zone 2. Mit ihr konnen Sie vollkommen unabhängig die Signalquelle und Lautstärke für einen separaten Bereich in ihrer Wohnung auswahlen. Mit dem Einsatz von Fernbedienungssensoren von Drittenbietern (Xantech) und der NAD-Link-Funktion des S170i ist es möglich, den Ausgang Multisource mit der ZR 2 von einer anderen Stelle aus zu steuern.</p>
<p>Lesen Sie dazu den Abschnitt "Wiedergabe in einer zweiten Zone".</p>
<p>Falls Sie es einfach nicht erwarten können, die Leistung Ihres neuen Vorverstärkers S170i zu erleben, geben wir Ohnen nachfolgend eine Kurzanleitung. Dabei gehen wir davon aus, daß der DVD/CD-Player am Eingang VIDEO1 angeschlossen ist und die entsprechenden Audio- und Videoverbindungen bereits hergestellt sind.</p>
<h1 id="abspielen-eines-dvd-films-oder-einer-musik-cd">ABSPIELEN EINES DVD-FILMS (ODER EINER MUSIK-CD)</h1>
<p>Drücken Sie auf der HTR 2 zuerst die Gerätetaste [AMP] (dämit wird der S170i gewählt), drücken Sie dann die Taste [ON] und danach [DVD] (auch mit "1" bezeichnet). Stellen Sie mit den Tasten [VOLUME auf/ab] auf der Fernbedienung die Lautstärke ein.</p>
<p>Starten Sie die Wiedergabe des DVD/CD-Players. Wenn Sie die Taste [SURR MODE] der HTR 2 (neben der Taste VOLUME DOWN) drücken und die Cursortaste [Cursor / ] loslassen, können Sie durch alle, für das aktuelle Eingangssignal verfügbar hörmodi des S170i durchblättern (siehe “Die Hörmodi des S170i”, unter).</p>
<p>Je nach Signalformat und den aktuellen Verbindungen sind manche Hörmodi nicht verfügbar (siehe „Einstellen des S170i", unter). Mölicherweise müssen Sie erst im On-Screen-MENU des DVD-Players ein surroundfähiges Signalformat auswahlen.</p>
<p>GenieBen Sie den Film oder die Musik, abernehmen Sie sich trotzdem die Zeit zum gründlichen Durchlesen dieser Bedienungsanleitung und für die sorgfällige Einstellung, Kalibrierung und Konfiguration Ihres S170i.</p>
<p><img alt="" src="images/2cd97ded4313f4e40805f666bfc6e5f3553673e1ff0f5f7adf69e471d41c52e9.jpg" /></p>
<p>1 POWER: Ausschalten trennt den S170i vom Wechselstromnetz und beendet den Bereitschaftsmodus. Einsatzlen stellt die Netzverbindung wieder her und aktiviert den Vorverträger. <br />
2 STANDBY: Leuchtet, wenn der S170i im Bereitschaftsmodus ist (dunkel, wenn er aktiv oder ausgeschaltet ist). <br />
3 AUDIO: Zur Auswahr der Audioeingänge drücken und mit dem Einsteller VOLUME (SETUP) die Eingänge nacheinander auswahlen (siehe „Frontplatten-Funktionen", unter). <br />
4VIDEO: Zur Auswahl der Videoeingänge drucken und mit dem Einsteller VOLUME (SETUP) die Eingänge nacheinander auswahlen (siehe „Frontplatten-Funktionen", unter). <br />
5 TAPE MONITOR: Zur Aktivierung der Bandüberwachungsschleife. Das an den Buchsen TAPE MONITOR IN auf der Rückwand anliegende Signal wird wiedergegeben (siehe „Frontplatten-Funktionen", unter). <br />
6 MULTSOURCE: Zur Auswahr des Signalausgangs über die Buchsen MULTISOURCE OUT auf der Rückwand mit dem Einsteller VOLUME (SETUP) (siehe „Wiedergabe in einer zweiten Zone", unter). <br />
7 SPEAKERS: Zum Aufrufen des Menüs <Speaker setup> auf dem Frontplatten-Display und zur Auswahl von Parametern mit dem Einsteller VOLUME (SETUP) und nachfolgenden Tastendruck auf SPEAKERS (siehe „Konfigurieren des S170i" und „Frontplatten-Funktionen", unter). <br />
8 DELAY: Zum Aufrufen des Menüs <Delay setup> auf dem Frontplatten-Display und zur Auswahr von Parametern mit dem Einsteller VOLUME (SETUP) und nachfolgenden Tastendruck auf DELAY (siehe „Konfigurieren des S170i" und „Frontplatten-Funktionen", unter).</p>
<p>9 LEVELS: Zum Aufrufen des Menüs <Levels setup> auf dem Frontplatten-Display und zur Auswahr von Parametern mit dem Einsteller VOLUME (SETUP) und nachfolgenden Tastendruck auf LEVELS (siehe „Konfigurieren des S170i" und „Frontplatten-Funktionen", unter). <br />
10 BRIGHTNESS: Zum Dimmen des S170i-Frontplatten-Displays. Zum Wiederherstellen der vollen Helligkeit erneut drucken. <br />
11 TONE: Zur Einstellung der Höhen mit dem Einsteller VOLUME (SETUP) drücken. Erneut drücken zur Einstellung der Tiefen und ein drittes Mal zum Verlassen der Klangeinstellung. <br />
12 MODE: Zur Auswahl der Hörmodi drücken und mit dem Einsteller VOLUME (SETUP) die Hörmodi nacheinander auswählen (siehe „Einstellen von Hörmodi" und „Frontplatten-Funktionen", unter). <br />
13 VOLUME (SETUP): Drehen Sie diesen Einsteller im Uhrzeigersinn, um die Lautstärke (Master-Volume) zu erhöhen, gegen den Uhrzeigersinn, um sie zu verringern. Im VFL und am Bildschirm wird die Einstellung in Dezibel zwischen -90 und +16 angezeigt.</p>
<p>Der Einsteller Volume(Setup) wird entsprechals dazu verwendet, einzeln Kanalpegel und andere einstellbare Parameter zu erhöhen oder zu verringn.</p>
<p>14 VFL DISPLAY: Das „Vacuum Fluorescent Display" (Vakuum-Fluoreszenz-Anzeige) betiet visuelle Informationen über alle wichtigen Modi, Einstellungenund Funktionen des S 170i für beiden Zonen (MAIN und zweite ZONE).</p>
<p><img alt="" src="images/668247d732471d0c07b58018712913d1e2fa851149ed66d2607da5d6b7c51677.jpg" /></p>
<h1 id="achtung-2">ACHTUNG!</h1>
<p>Stellen Sie alle Verbindungen mit dem Vorverträger S170i nur her, wenn dieser ausgescheltet oder vom Netz getrennt ist. (Es ist ebensratsam, während der Verbindung oder Trennung von Signal- oder Netzverbindungen alle anderen Komponenten vom Netz zu trennen oder auszuschalten.)</p>
<p>1 COMPOSITE VIDEO IN 1-6: Verbinden Sie die Videoeingänge 1-6 mit BAS-Video signalen von Quellengeräten (siehe „Signalquellen-Einstellung", unter). <br />
2 COMPOSITE VIDEO OUT 4-6 OUT; MON OUT: Zur Verbindung mit BAS-Videoeingangen an Aufnahmegeräten; verbinden Sie MON OUT mit dem BAS-Videoeingang eines Monitors/Fernsegeräts. <br />
3 SVID1 IN - SVID6 IN: Verbinden Sie die Videoeingänge 1-6 mit S-Video signalen von Quellengeräten (siehe „Signalquellen-Einstellung", unter). <br />
4 S VID4 OUT - S VID6 OUT; MON OUT: Zur Verbindung mit S-Videoeingangen an Aufnahmegeräten; verbinden Sie MON OUT mit dem S-Videoeingang eines Monitors/Fernsehgeräts. <br />
5 COMPONENT VIDEO IN (oben), OUT (unter): Zum Anschluß von RGB-Signalen oder Breitbart-RGB-Signalen von einem Quellengerät wie z. B. einem DVD-Player oder HDTV-Tuner. Verbinden Sie diese Ausgänge mit den RGB-Eingängen des Monitors oder Fernsehgeräts. Achten Sie darauf, daß die Buchsen Y, CB und CR mit den entsprechenden Ein-/Ausgängen des anderen Gerätes richtig verbunden sind (siehe „Signalquellen-Einstellung", unter). <br />
6 NAD LINK IN/OUT: Zum Anschluss an die entsprechenden NAD-Link-Buchsen (Eingang auf Ausgang oder umgekehrt) von kompatiblen NAD-Komponenten (siehe „NAD-Link“, unter). <br />
7 DIGITAL 1-3; DIGITAL IN; DIGITAL OUT: Verbinden Sie DIGITAL 1-3 mit digitalen Signalquellen im S/PDIF-Format mit koaxalen Anschlüssen wie z. B. CD- oder DVD-Player; verbinden Sie DIGITAL IN mit einer hochwertigen Quelle im S/PDIF-Format über BNC-Kabel; verbinden Sie DIGITAL OUT mit dem digitalen, koaxalien Anschluß im S/PDIF-Format von Aufzeinungsgeräten wie z. B. CD-Rekorder, DAT-Decks oder Computer-Soundcards (siehe „Signalquellen-Einstellung", unter). <br />
8 OPTICAL DIGITAL IN 1-2; DIGITAL IN; OPTICAL DIGITAL OUT: Verbinden Sie OPTICAL DIGITAL 1-2 mit digitalen Signalquellen im S/PDIF-Format wie z. B. CD- oder DVD-Player; verbinden Sie OPTICAL DIGITAL OUT mit dem digitalen optischen S/PDIF-Eingang von</p>
<p>Aufnahmegeräten wie z. B. CD-Rekordern, DAT-Decks oder Computer-Soundcards. <br />
9 RS-232: Zum Verbinden mit dem seriellen RS-232-Anschluß eines Heimsteuersystems oder Personalcomputers (siehe „Systemintegration", unter). <br />
10VIDEO 1-6 Analoge Audioeingänge: Zum Anschluß an analoge Stereogausgänge von Audio/Videogeräten (siehe „Signalquellen-Einstellung", unter). <br />
11VIDEO ANALOGREC OUT 4-6:Zum AnschluB an analoge Stereoeingänge von Audio/Video-Aufnahmegeräten wie z.B. Videorekorder. <br />
12 CD, AUX, TUNER Eingänge: Zum Anschluß an analoge Stereogausgänge von Audiogeräten. <br />
13 TAPE MONITOR IN/OUT: Verbinden Sie OUT mit analogen Stereoeingängen und IN mit den Ausgängen von analogen Aufnahmegeräten wie z. B. Kassettendecks oder CD-Rekorder, oder eines analogen Audioprocessors wie z. B. ein Stereo-Equalizer. <br />
14 MULTISOURCE OUT: Zum Anschluß an die Eingänge eines Stereoverständrakers oder Receivers, der die Lautspricher in einer zweiten Zone versorgt (siehe „Wiedergabe in einer zweiten Zone", unten). <br />
15 PREAMP ANALOG 7.1 OUTPUTS: Verbinden Sie L, R und CENTER mit den Kanaleingängen des oder der Leistungsveränder für die vorderen Kanäle; verbinden Sie LS und RS mit dem Leistungsveränder für die Surround-Lautsprecher und LEFT B und RIGHT B mit dem für die hinteren Surround-Lautsprecher (falls vorhanden); verbinden Sie SUB mit dem Line-Eingang eines aktiven Subwooferers oder mit dem Veränder für einen passiven Subwoofer (falls vorhanden). <br />
16 EXTERNAL 5.1 INPUTS: Zum Anschluss an die entsprechenden analogen Audioausgänge einer Mehrkanal-Signalquelle wie z. B. ein DVD-Audio- oder Mehrkanal-SACD-Player. Für diese Eingänge ist keine Steuerung oder sonstige Verarbeitung der tiefen Frenzen verfügbar; siehe „Auswählen von Signalquellen", unter. <br />
17 12V TRIGGERS: Zum Anschluß an die 12-Volt-Triggereingänge mit kompatiblen Geräten wie z. B. Leistungsverträger und Projektorlifts; siehe „Trigger-Einstellung", unter. <br />
18 Netzanschluß: Zum Anschluss des mitgelieferten, abnehmbaren IEC-Standard-Netzkbabels oder eines kompatiblen Kabels.</p>
<h1 id="erste-schritte">ERSTE SCHRITTE</h1>
<p>Bevor Sie die ersten Verbindungen an Ihr hem S170i herstellen, sollen den Sie die Anordnung Ihres Hörraums, ihrer Heimkino-Komponenten und Möbel - zumindest ansatzweise - festgelegt haben. Leider wurde eine Erörterung von so wichtigen Fragen wie Lautsprecherplatzierung und Hör-/Sichtpositionen den Rahmen dieser Bedienungsanleitung sprengen. Es soll deshalb nur darauf hingewiesen werden, daß diese beiden Aspekte die Leistung Ihres Systems genauso beeinflussen, wie die Auswahl von Elektronik und Lautsprechem. Ihr NAD-Audiospezialist wird Sie bisher beraten und entsprechende Nachschlagwerke empfehlen.</p>
<h1 id="abhilfe-bei-brummen-und-rauschen">ABHILFE BEI BRUMMEN UND RAUSCHEN</h1>
<p>Der S170i besteht eine geerdete (3-polige) Netzsteckdose. Der Einsatz eines Adapters ohne Erdungsstift gefahrdet bzw nicht die elektrische Sicherheit, kann aber die Anfälligkeit für Brummen und Rauschen erhöhen. In komplexen Mehrkanal-Audiosystemen sind solche Störgeräusche manchmal geradezu eine Herausforderung. Zur Vermeidung von Brumm- und Rauschproblemen beachten Sie die folgenden Punkte:</p>
<ul>
<li>Versorgen Sie alle Audiokomponenten Ihres Systems von Steckdosen, die imselben Stromkreis ihrer Hausinstallation sind. Versorgen Sie, sowieit dies möglich ist, alle Audiokomponenten von derselben Steckdose, oder verwenden Sie benachbarte Steckdosen im selben Stromkreis. Unter Umständen ist es better, Monitore (und Computer!) von Steckdosen eines anderen Stromkreises zu versorgen, weiterewhen thiser Stromkreis von einem anderen Strang der Hausinstallation gespeist wird. </li>
<li>Bündeln Sie analoge Audiokabel nicht mit Netzkabeln oder mit koaxialen digitalen Audiokabeln. </li>
<li>Verwenden Sie überall nur hochwertige und gut abgeschirmte Audiokabel, und achten Sie daraufuf, daß alle Verbindungen sicheren sitzen. </li>
<li>Kupfer- und Goldkontakte konnen mit einem Radiergummi poliert werden, um einen sauberen, niederohmigen Kontakt sicherzustellen. Auch spezielle Kontaktreiniger konnen nutzlich sein. Vermeiden Sieunnotiges Ein- und Ausstecken, da der Überzug von Gold- oder Kupferkontakten von typischen und selbst hochwertigen Kabelanschlüssen nur Dunn und leicht abnutzbar ist.</li>
</ul>
<p>Untersuchen Sie Brumm- und Rauschprobleme nacheinander mit jedem Gerät einzeln und gehen Sie damit vom Leistungsverträger aus rückwärts vor, das heißt: SchlieBen Sie zunachst nur die Lautsprecher am Leistungsverträger an und prufen auf Brummen. Verbinden Sie dann nur den Vorverträger (ohne andere am Vorverträger angeschlossenen Komponenten) mit dem Leistungsverträger und prufen auf Brummen. SchlieBen Sie dann eine Signalquelle (z. B. ein CD-Player) am Vorverträger an und prufen auf Brummen. Untersuchen Sie in jeder Phase beim Auftreten von Brummen/Rauschen die Audioverkabelung und die Netzkabelverlegung der jeweiligen Komponente. In manchen Fällen genugt es schon, wenn das Netzkabel der Komponente an einer anderen Steckdose oder ein Erdungsadapter am Netzkabel angeschlossen wird, um das Brummen zu beseitigen.</p>
<p>Der Vorverträger S170i ist mit einem einfachen, selbsterklärenden OSD-Menüsystem ausgestattet, das auf dem Monitor/Fernsehgrät des Systems angezeigt wird und sowohl während der Grundeinstellung als auch im täglichen Betrieb nutzlich ist. Da dieselben Daten immer auch auf dem Anzeigefeld auf der Frontplatte des Vorverträgers angezeigt werden, wenn auch in verkürzter Form, kann der S170i aber genauso gut ohne Monitor betrieben oder)sagar eingestellt werden.</p>
<h1 id="anzeigen-der-menus">ANZEIGEN DER MENUS</h1>
<p>Sobald ein Monitor oder Fernsehgerät am Monitorausgang des S170i angeschlossen ist, wird durch Drücken der Cursorstaste links oder rechts auf der Fernbedienung HTR das OSD-Menu (On Screen Display) des S170i aufgerufen. Dort können mit den Taste nach oben und unter sowie der [Enter]-Taste alle Systemparameter einfach eingestellt werden.</p>
<ul>
<li>Sollte das OSD-MENU nicht erschreiben, prüfen Sie die Ausgänge des Monitors und/oder im Frontplatten-Anzeigefeld des S170i im Menu <Display setup> die Einstellungen unter <Video format> und <OSD display> (siehe unten).</li>
</ul>
<h1 id="osd-navigation-und-änderungen">OSD-NAVIGATION UND ÄNDERUNGEN</h1>
<p>Mit den Tasten [Cursor / ] der Fernbedienung konnen Sie sich durch alle OSD-Menüpunkte bewegen. Zum Ändern eines beliebigen Wertes (Einstellung) verwenden Sie die Tasten [Cursor / ]; zur Auswahl eines OSD-Menüpunktes drücken Sie die Taste [Enter] auf der Fernbedienung. Mit der Auswahl von <Exit> in einer Menüseite werden vorgenommene Änderungen gespeichert und das Menu der nachst hohenen Ebene wird angezeigt. Im Hauptmenu wird das OSD-MENU ausgebrendet.</p>
<p>Sie können die Pegel, Modi und Optionen des S170i in jeder beliebigen Reihenfolge einstellen. Die hier verwendete Reihenfolge muß nicht eingehalten werden. Es ist jedoch ratsam, mit der Konfiguration der OSD-Menüoptionen zu beginnen, da eine davon die in anderen Einstellungsroutinen verfügbarbaren Optionen bestimmen.</p>
<h1 id="display-einstellung">DISPLAY-EINSTELLUNG</h1>
<p>Wahlen Sie im mit den Tasten [Cursor / ] und [Enter] der Fernbedienung im OSD-Hauptmenu des S170i den Befehl <Display setup>. Stellen Sie den Parameter <TV system> mit den Tasten [Cursor / ] auf „NTSC" für die nordamerikanische Fernsehnorm oder auf „PAL" für die europäische.</p>
<p>Stellen Sie mit denselben Fernbedienungstasten:</p>
<ul>
<li><Superimpose> auf „On" oder „Off". Bei der Auswahl von „Off" werden OSD-Menüs auf einem blauen Hintergrund dargestellt, wobei das laufende Programm (falls aktiv) überdeckt wird; wird „On" eingestellt, erscheint der Text in weiß eingebrendet über dem laufenden Programm (falls aktiv). </li>
<li><Temporary disp.> auf „Full", „Simple" oder „Off". Diese Parameter kontrolliert, welche Informationen der S170i beim Einschalten, Auswahlen oder Wechseln einer Signalquelle oder Ändern der Eingangssignale in einem Text am Bildschirm kurz anziegt. Im Modus „Full" erscheint ein vollständiger Datenbildschirm mit Eingang, Audiosignaleingang, Art, Format und Hörmodus sowie Videosignalart und -eingang. Im Modus „Simple" wird nur der Eingang angezeigt. Im Modus „Off" wird keine Bildschirminformation angezeigt. </li>
<li><Video format> auf „Auto", „S-Video" oder „Compos." (Composite-Video). Dieser Parameter bestimmt, welche Videoausgänge des S170i aktiv sein sollen, wenn ein Videoeingang ausgewählt wird; im Modus „Auto" wird der Ausgangsmodus entsprechend dem Eingangssignal gesetzt, wobei S-Video beim Anschluß einer Signalquelle mit beiden Formaten Vorrang hat. Beachten Sie, daß der Vorverträker S170i Videosignale durchläßt, auch wenn er auf „Standby" geschählt wird. So können auch Videoquellen wie Videotext oder Web-TV-Geräte genutzt werden, wenn das System nicht aktiv ist. </li>
<li><OSD output> auf „Both“, „S-Video“, „Compos.” (Composite-Video). Dieser Parameter bestimmt, welche Videoausgänge die OSD-Menüs und -Anzeigen des S170i übertragen. Wird „Both" ausgewählt, werden OSD-Menüs an S-Video und BAS-Videoausgaben übertragen; bei der Einstellung von „S-Video" oder „Compos." werden OSD-Anzeigen nur an den jeweiligen Ausgang geleitet, und „Off" schaltet das OSD ganz aus. (In allen Fällen bleiben Standarddaten über das Anzeigefeld auf der Frontplatte des S170i sightbar. Sie können also ihre Bedienung sehen, auch wenn das OSD mit „Off" ganz deaktiviert ist).</li>
</ul>
<h1 id="bitte-beachten">BITTE BEACHTEN:</h1>
<ul>
<li>Das OSD-Menü wird nicht über die RGB-Ausgänge (COMPONENT VIDEO) ausgegeben. </li>
<li>Wenn das OSD für einen Videoausgang aktiviert wird, passieren die Videosignale für diesen Format den OSD-Schaltkreis. Kritische Videoliehaber können das OSD im S-Video-Ausgang deaktivieren, um die besten Wiedergabe/Aufnahmebedingungen zu erhalten. </li>
<li><Distance units> auf „Feet" oder „Meters". Zur Bestimmung der Maß einheit für die Eingabe der Laufsprecherdaten im S170i-Menu <Delay setup> (siehe unter).</li>
</ul>
<h1 id="audio-einstellung">AUDIO-EINSTELLUNG</h1>
<p>Im Menu <Audio setup> können Sie Klangeinstellungen und andere Höroptionen modifizieren. Die Einstellungen, die Sie in thisem Menu vornehmen, bleiben bis zur nachsten Änderung oder bis zum Aufruf einer Voreinstellung mit anderen Werten erhalten (siehe unter).</p>
<h1 id="dolbydts-einstellung">DOLBY/DTS-EINSTELLUNG</h1>
<p>Wenn Sie mit den Fernbedienungstaten [Cursor / ] im Menu <Audio Setup> den Menüpunkt <Dolby/DTS setup> wahren und anschließend [Enter] drücken, wird ein Unternehmen mit den folgenden Auswahlmöglichkeiten zur Einstellung der Musikmodi von Dolby und DTS Surround-Dekodern angezeigt:</p>
<h1 id="pl-ii-panorama-wählen-sie-off-oder-on"><PL II PANorama> WÄHLEN SIE <OFF> ODER <ON></h1>
<p>Bei Auschwitz von <On> verteil der besondere Panoramaeffekt den Klang aus den vorderen linken und rechten Laatsprechern um Sie herum.</p>
<h1 id="pl-ii-center-width-wählen-sie-min-1-2-3-4-5-6-max"><PL II CENTER WIDTH> WÄHLEN SIE <MIN.> <1> <2> <3> <4> <5> <6> <MAX.></h1>
<p>Center Width erhögtlich die stufenweise Verteilung des Centerkanals in die vorderen linken und rechten Lautsprecher. In der hochsten Stellung <Max.> wird derGPC Centerkanal in die linken und rechten Lautsprecher gemischt. Mit dieser Steuerung kann ein noch räumlicherer Klang oder eine bessere Mischung des vorderen Klangbildes erreicht werden.</p>
<h1 id="pl-ii-dimension-wählen-sie-0123"><PL II DIMENSION> WÄHLEN SIE <0><1><2><3></h1>
<p>Mit Dimension ist die Einstellung der Balance vorne/hinten ganz nach individuellen Geschmack möglich.</p>
<h1 id="neo6-center-image-wählen-sie-min-1-2-3-4-max"><NEO:6 CENTER IMAGE> WÄHLEN SIE <MIN.> <1> <2> <3> <4> <MAX.></h1>
<p>Center Image ermitteligt die stufenweise Verteilung des Centerkanals in die vorderen linken und rechten Laufsprecher.</p>
<h1 id="voreinstellungen">VOREINSTELLUNGEN</h1>
<p>Der S170i enthalt fünf speicherbare Voreinstellungen ("Presets") für fünf verschiedene Kombinationen von Klangeinstellungen und Center/Surround/Subwoofer-Kanalpegeln für verschiedene Anforderungen. Beispiel: „Preset 1" konnten Sie mit Klangeinstellungen auf Null und den Kanalpegeln in der kalibrierten Stellung für Film-Surround konfigurieren, „Preset 2" für Musik-Surround mit weniger angehobenen Surround- und Subwoofer-Kanalpegeln, möglich zurückgenommenen Centerkanalpegeln und angepassten Bässen oder Höhen. Voreinstellungen können für beliebige Zwecke beliebig konfiguriert werden.</p>
<h1 id="konfigurieren-von-voreinstellungen">KONFIGURIEREN VON VOREINSTELLUNGEN</h1>
<p>Wahlen Sie mit den Fernbedienungstasten [Cursor / ] und [Enter] im Menu <Audio setup> den Menüpunkt <Preset setup>. Wahlen Sie unter <Preset> mit denselben Tasten die Voreinstellung, die Sie konfigurieren möchten und stellen mit [Cursor auf/ab] die gewündten Klangeinstellungen für Bässe und Höhen ein. Legen Sie mit denselben Tasten die relativen Pegel für Center-, Surround- und Subwooferkanäle für diese Voreinstellung fest.</p>
<h1 id="bitte-beauchten">BITTE BEAuchtEN:</h1>
<ul>
<li>Sind wichtere Surround-Lautsprecher im OSD-MENU <Speaker setup> (unter) alsvorhandenkonfiguriert, wird ihr Pegel zusammen mit den Surround-Kanalpegeln gesteuert. </li>
<li>Eine einzel konfigurierte Voreinstellung bleibt unverändert, bis Sie sie im OSD-MENU <Preset setup> wieder bearbeiten. </li>
<li>Eine Voreinstellung gilt unabhängig von der ausgewählten Signalquelle oder des aktiven Hörmodus. </li>
<li>Das Verlassen des S170i-Bereitschaftsmodus Löscht alle vorher gespeicherten Voreinstellungen und aktiviert alle in den HTR 2-Masken LEVELS oder MODE/MULTI.S (unter) oder im OSD-MENU <Audio setup> des S170i (oben) enthaltenen Klang- und Pegeleinstellungen. Wenn Sie alle Kanalpegel und Klangeinstellungen ohne Verlassen des Bereitschaftsmodus auf Null setzen möchten, speichern Sie einen Preset mit allen Werten „auf Null". <br />
Die Kanalpegeleinstellungen werden zu den im OSD-Menüpunkt <Levels setup> vorhandenen Pegeln hinzuaddiert. Beispiel: Wenn im <Level setup> für <Center> ein Wert von -3 dB vorgegeben ist, und Sie in einer Voreinstellung einen Wert von +2 dB festlegen, resultiert darauf aus Center-Kanalpegel von -1 dB. Im Gegensatz dazu haben Klangeinstellungen vor den Einstellungen in <Audio setup> Vorrang.</li>
</ul>
<h1 id="abrufen-von-voreinstellungen">ABRUFEN VON VOREINSTELLUNGEN</h1>
<p>Eine Voreinstellung konnen Sie jederzeit aufrufen. Drücken Sie dazu nacheinander die HTR 2-Fernbedienungstaste [AV PRESET] und die entsprechende numerische Taste <1-5> . Ein- und Ausschalten des S170i-Bereitschaftsmodus deaktiviert die Voreinstellung.</p>
<p>Die Nummer der aufgerufenen Voreinstellung erscheidt kurz im OSD und im Anzeigefeld des S170i. (Siehe auch "Verwenden von Voreinstellungen", unter).</p>
<h1 id="basstreble-basshöhen">BASS/TREBLE (BASS/HÖHEN)</h1>
<p>Wahlen Sie mit den Fernbedienungstasten [Cursor / ] im Menu <Audio setup> den Menüpunkt oder <Treble>. Mit den Tasten [Cursor / ] können Sie die Einstellungen für Bass und Höhen in Schritten von 1 dB um ±12 dB verändern.</p>
<p>Die Einstellungen für Bass/Höhen wirken sich nur auf die vorderen Kanäle aus (links, center und rechts) und sind in allen Hörmodi aktiv. <br />
- Oft ist eine Abschwächung (Minus-Einstellung) better als eine Verstärkung (Plus-Einstellung). Versuchen Sie für einen „wärmeren" Klang die Höhen um einige dB zu reduzieren, anstatt die Bässe zu verstärken, und umgekehrt. <br />
- Wenn Sie*häufig große Klangeinstellungen vornehmen müssen, sollen den sie viellich die Lautspecher und zur betteren Ausnutzung der Raumakustik ihre Positionen sowie die Hörposition noch einem überprüfen.</p>
<h1 id="lfe-kanal">LFE-KANAL</h1>
<p>Der LFE-Kanal (Low Frequency Effects) - der „Punkt-Eins"-Kanal in „5.1/6.1 - ist nur bei Dolby Digital oder DTS-Mehrkanal-Signalquellen aktiv. LFE wird früig als Ergänzungskanal zur Erweiterung des Dynamikbereiches von sehr niederefficienten Klängen eingesetzt. Er damit nicht mit dem Subwoofer-Ausgangskanal des S170i verwechselt werden, der je nach Konfiguration der Menüseite <Speaker setup> die meisten oder)sagar alle Bassinformationen einiger oder aller Kanäle übertragen kann.</p>
<p>Wahlen Sie mit den Fernbedienungstaten [Cursor / ] im Menu <Audio setup> den Menüpunkt <LFE channel>. Mit den Tasten [Cursor / ] können Sie die Einstellung für den LFE-Kanal in 1-dB-Schritten um bis zu 10 dB verändern.</p>
<p>In den meisten Systemen kann die LFE-Kanaleinstellung auf 0 dB (keine Änderung) bleiben, da der Bassbegrenzer des S170i (siehe unter) darauf eingestellt wird, eine Subwoofer-Überlastung zu verhindern. Wenn der Dynamikumfang des Subwoofer aber begrenzt ist oder Bassfrequenzeffekte von Film-Soundtracks im allgemeinen zu stark in Ihr System erschieren, konnen Sie versuchen, die Einstellung von <LFE channel> um einen geringen Wert zu verringn.</p>
<h1 id="einstelllen-der-lautsprecher">EINSTELLLEN DER LAUTSPRECHER</h1>
<p>Jedes Surround-Klangsystem besteht „Bass-Management", um die niedrigen Frenzen von bestimmten oder von allen Kanälen zu den Lautsprechern zu leiten, die für die Reproduktion dieser Frenzen am besten geeignet sind. Damit diese Funktion einwandfrei arbeitet, ist es wichtig, daß die Fähigkeiten der Lautsprecher richtig angegeben werden.</p>
<p>Wir verwenden dazu die Ausdrücks „Small" (klein), „Large" (groß) und „No" (nicht installiert), aber die physikalische Groß muß damit nicht unbedingte Rolle spielten.</p>
<ul>
<li>Einkleiner Laufsprecher (,Smaill^ ) ist ein Modell ohne bedeutende Basswiedergabe, d. h. unter 80Hz </li>
<li>Ein großer Laufsprecher ("Large") ist ein Allfrequenz-Laufsprecher, d. h. er hat die Fähigkeit, tiefe Bassfrequenzen wiederzugegeben. </li>
<li>Kein Lautspricher ( „No“) bedeutet, daß er nicht in Ihr Systemvorhanden ist. Zum Beispiel, wenn Sie keine hinteren Lautspricher installiert haben, stellen Sie den Menüpunkt <Back speakers> auf „No“.</li>
</ul>
<h1 id="konfigurieren-der-lautsprecher">KONFIGURIEREN DER LAUTSPRECHER</h1>
<p>Wahlen Sie mit den Fernbedienungstasten [Cursor / ] und [Enter] im OSD-Hauptmenü den Befehl. <Speaker setup>. Stellen Sie <Main speakers> mit den Tasten [Cursor / ] auf „Large" oder „Small". Wahlen Sie für <Center speaker>, <Surround speakers> und <Backspeakers> mit denselben Tasten „Large", „Small" oder „No", je nachdem, welche Lautsprecher in Ihrem System vorhanden sind. Stellen Sie <Subwoofer> nur dann auf „Yes", wenn Sie einen Subwoofer an der Analogausgangsbuchse SUB des S170i angeschlossen haben.</p>
<h1 id="hinweis">HINWEIS</h1>
<p>Der S170i erhögt die Einstellung des Subwoofer auf „Yes" auch mit Frontlautsprechem „Large". In einem solchen Fall werden Bassfrequenzen von Kanälen, die auf „Small" eingestellt sind, zum Subwoofer und zu den Frontlautsprechem geleitet. Diese Anordnung konnen Sie ausprobieren, wenn ihre Frontlautsprecher eine natürliche Übergangsfrequency von ca. 80 Hz haben und starke Bass-Signale ohne Verzerrungen verarbeiteten konnen. In den meisten Systemen mit Subwoofer ist die Einstellung von „Small" für die Frontlautsprecher die Beste Lösung.</p>
<p>Im Menu <Speaker setup> gibt es drei Zusatzfunktionen:</p>
<ul>
<li>Adjustable Crossover Frequency (Einstellbare Übergangsfrequency) von 40 Hz bis 140 Hz in 10-Hz-Schritten. Damit kann der Hochpass (2. Ordnung, 12 dB/Oktave) zum Lautsprecher und der Tiefpass (4. Ordnung, 24dB/Oktave) zum Subwoofer eingestellt werden. </li>
<li>Defeatable Subwoofer Filter (Ein-/Ausschaltbares Subwoofer-Filter). Dies ermitteligt die Verwendung der internen Frequenzwichte des aktiven Subwooers und ist vorteilhaf zum Ausgleichen schweiger Raumakustik-Probleme durch Einstellen der Subwoofer-Übergangsfrequency auf eine andere als die Hochpassfilterfrequenz des S170i, wobe iine Kerbe oder Überscheidung im Frequenzgang erzeugt wird. </li>
<li>Enhanced Bass (Erweiterter Bass), bei Auswahl ist der Subwoofer ungeachtet der Lautsprachereinstellungen immer aktiv und sorgt für drohnende Basse.</li>
</ul>
<h1 id="pegeleinstellung">PEGELEINSTELLUNG</h1>
<p>Die Einstellung der Lautspricherbalance in Ihrm System ist weitereicht die wichtige Funktion zur Einrichtung des S170i überhaupt. Einmal stellt dieser Vorgang sicher, daß Surround-Klangaufnahmen, ob Musik oder Film-Soundtracks, mit der Balance von Effekten, Musik und Dialogen wiedergegeben werden, wie sie vom Künstler beabsichtigt waren. Zum zweiten sorgt sie in Systemen mit Subwoofer für eine einwandfreie Beziehung zwischen der Lautstärke des Subwoofer's und der anderen Lautspricher und dadurch zwischen den niedrigen Frenquenzen (Basse) und den anderen Toneelementen.</p>
<h1 id="anwenden-eines-spl-messgeräts">ANWENDEN EINES SPL-MESSGERÄTS</h1>
<p>Es ist problemlos möglich, die Pegeleinstellung im S170i „mit dem Ohr" durchzuführen, und ein geübtes Ohr wird in der Regel auch akzeptabel genaue Resultate liefern. Die entsprechliche Klangfarbe von Front-, Center- und Surround-Lautsprechem kann allerdings eine prazise Pegelanpassung schwierig machen. Deshalb empfehlen wir für diese Aufgabe den Einsatz eines preisgūnstigen Schalldruckpegelmessers (SPL) wie z. B. von Radio Shack, Artikelnr. 33-2050. Damit geeht es schnell, wiederholbar und zuverlössig. Ein solches Audiohilfsmittel zu besitzen kann sehr nützlich sein, oder weitereicht kann Ohnen IHR NAD-Audiospezialist mit einem solchen Messgerät kurzzeitig aushelfen. Durch Kalibrieren des Systems mit einem SPL konnen Sie auch den Gesamtpegel Ihres Systems so einstellen, daß der Wert von -0 ("Referenzpegel") des S170i-Lautstärkeeinstellers bei der Wiedergabe in Ihrheimkino der Lautstärke eines Films in einem gut eingerichteten Kino entspricht. ("Master Volume" konnen Sie selbstverständlich immer beliebig einstellen).</p>
<p>Das SPL-Messgerät sollte in der primären Hörposition, etwa in Kopf/howe des sitzenden Zuhörs aufgestellt werden. Ein Stativ ist damit sehr nützlich, aber mit etwas Klebeband kann davon so ziemlich alles - eine Standlampe, ein Musikregal oder eine gegen einen Stuhl gelehnte Leiter - verwendet werden. Achten Sie aber darauf, daß keine große, akustisch reflektierenden Oberflächen das Mikrofonelement blockieren oder sich in dessen Höhe befinden. Richten Sie den SPL mit dem Mikrofon (in der Regel an einem Ende) nach oben gegen die Decke aus (nicht zu den Laufsprechern hin) und stellen Sie safer, daß die C-Kurve ausgewähl ist. Zur Kalibrierung des Systems zur Wiedergabe mit derselben objektiven Lautstärke wie in einem hochwertigen kommerziellen Kino, stellen Sie den SPL zur Anzeige von 75 dB ein. (Bei Instrumenten von Radio Shack themselves dazu 80 dB eingestellt und die Messung am -5 dB Punkt abgelesen, oder der 70-dB-Bereich mit Ablesung am +5-dB-Punkt eingestellt werden.</p>
<p>Der 75-dB-Punkt ist der „offizielle" Kino- (und THX-) Referenzpegel. Allerdings schreiben kein Gesetz diesen Pegel vor, und tatsächlich scheint dieser Pegel für manche Heimkino-Nutzer zu laut zu sein. Viele finden eine Kalibriierung auf 70 dB SPL gerade richtig.</p>
<h1 id="konfigurieren-der-pegel">KONFIGURIEREN DER PEGEL</h1>
<p>Wahlen Sie mit den Fernbedienungstasten [Cursor / ] und [Enter] im OSD-Hauptmenü den Befehl <Level setup>. Aktivieren Sie mit der Fernbedienungstaste [Test] (neben der Taste [Volume up]) das Testsignal. Sie horen einen „wandernden" Ton, der nacheinander aus den Laufsprechern wiedergegeben wird, beginnend mit dem linken Frontlatsprecher. Wenn Sie keinen Testton horen, überprüfen Sie die Audioverbindungen (oben) und die Einstellungen von <Speaker setup> im OSD-Menu (oben).</p>
<p>In der Spalte gaz links im OSD zeigt ein Pfeil auf <Left> (falls der Pfeil in einer anderen Zeile steht, bewegen Sieihn mit den Fernbedienungstasten [Cursor / ] auf <Left>). Stellen Sie nun mit den Fernbedienungstasten [Cursor / ] den Pegel des Testtons aus dem linken Frontlautsprecher ein; der Testton wandert automatisch dort hin und der Pegelwert ändert sich in Schritten von 0,5 dB. Wenn Sie einen SPL verwenden, stellen Sie den linken Ausgang so ein, daß Sie einen Wert von 75 dBA oder einen anderen beliebigen Referenzpegel erhalten.</p>
<p>Wenn Sie den Abgleich "mit dem Ohr" durchfuhren, müssen Sie einen Laufsprecher als Referenz wahlen (in der Regel den Centerlautsprecher) und jeder der anderen so einstellen, daß er so laut ist wie die Referenz.</p>
<p>Stellen Sie mit den Fernbedienungstasten [Cursor / ] und [Cursor / ] jeder Lautsprecher nacheinander so ein, daß Sie denselben SPL-Wert (oder dieselbe subjektive Lautstärke) innerhalb von ± 1 dB oder better erhalten. Da Sie im S170i die Ausgänge in Schritten von 0,5 dB kalibrieren können, sollene diese Genauigkeit erreicht werden.</p>
<h1 id="bitte-beauchten-2">BITTE BEAuchtEN:</h1>
<ul>
<li>Vor dem Einstellen der Pegel mussen sich alle Lautsprecher an ihrer Endposition befinden. </li>
<li>Wenn Sie den Ausgang SUBWOOFER verwenden, sollte im Subwoofer die interne Frequenzwische deaktiviert oder falls diese nicht deaktivierbar ist, die hochstmögliche Frequenz eingestellt werden. </li>
<li>Durch Auswirkungen der Raumakustik können abgeglichene Lautsprecherpaare (Front, Surround, hinten) nicht immer auf exakt denselben Pegelwert kalibriert werden. </li>
<li>Wenn Sie es davon ganz genau machen möchten, wiederholen Sie die Pegeleinstellung nach der Konfiguration der Verzögerung (Delay setup, unter).</li>
</ul>
<h1 id="verzögerungseinstellung">VERZÖGERUNGSEINSTELLUNG</h1>
<p>Die Einstellung der Kanalverzögerung ist bzw nur eine leichte aber dennoch wichtige Verfeinerung Ihres Systems. Durch Festlegen der Abstände zwischen Lautsprecher und Hörposition für jeder Lautsprecher stellt der S170i automatisch die richtige Verzögerung für jeder Kanal ein, und optimiert damit das Klangbild, die Dialogverständlichkeit und die Surroundklang-Umgebung. Geben Sie die Werte mit einer Genauigkeit von ca. 30 cm ein.</p>
<h1 id="konfigurieren-der-verzögerungen">KONFIGURIEREN DER VERZÖGERUNGEN</h1>
<p>Wahlen Sie mit den Fernbedienungstasten [Cursor / ] und [Enter] im OSD-Hauptmenü den Befehl <Delay setup>. Stellen Sie mit den Fernbedienungstasten [Cursor / ] den Menüpunkt <Right> auf die Entfernung zwischen ihrer hauptsächlichen Hörposition und der Vorderseite des rechten Frontlautsprechers.</p>
<p>Geben Sie mit denselben Fernbedienungstasten entsprechend ihrer Systemanordnung die Werte für die restlichen Laufsprecher ein. Wenn ein Laufsprecher in Ihr System nicht vorhanden ist, wird „None" angezeigt und es ist keine Entfernungseinstellung möglich.</p>
<h1 id="einstelllen-von-signalquelen">EINSTELLLEN VON SIGNALQUELEN</h1>
<p>Der S170i ist mit insgesamt 9 Eingängen ausgestattet: 6 Audio/Videoeingänge (mit der Bezeichnung VIDEO 1-6 auf der Rückwand) und 3 Audioeingänge (Bezeichnung CD, AUX und TUNER). AuBerdem gibt es eine Audioschleife TAPE MONITOR. Für jeder Eingangsposition des S170i konnen Sie einen digitalen Eingang auswahlen, der mit der Auszahl des jeweiligen Eingangs aktiviert werden soll, und Sie konnen einen 7 Zeichen langen Name zuordnen, der bei der Eingangsauswahl im Frontplatten-Anzeigefeld und kurzzeitig im OSD angezeigt wird.</p>
<h1 id="konfigurieren-der-eingangsquellen">KONFIGURIEREN DER EINGANGSQUEllen</h1>
<p>Wahlen Sie mit den Fernbedienungstasten [Cursor / ] und [Enter] im OSD-Hauptmenü den Befehl <Source setup>. Wahlen Sie mit den Tasten [Cursor / ] die Signalquelle aus, die Sie konfigurieren möchten. Die Nummerierung der Signalquellen von 1 - 9 entspricht der Reihenfolge der Eingänge VIDEO 1-6, CD, AUX und TUNER auf der Rückwand. Da TAPE MONITOR nicht konfigurierbar ist, erscheint dieser Eingang nicht in der Liste. Bewegen sie mit der Taste [Cursor] (nach unten) den Menüpunkt <Title> und drücken Sie die Taste [Enter]. Sie können jetzt den Standardtitel ("Video 1", "CD" usw.) bearbeiten und ihm einen aussagekräftigen Nameim mit bis zu 7 Zeichen geben. Mit den Tasten [Cursor auf/ab] können Sie durch die Listere der verfügbaren Zeichen blättern und mit den Tasten [Cursor / ] die Schreibmarke nach links und rechts bewogen (Zeichen können frei geändert werden). Wenn Sie den Titel beareritet haben, drücken Sie [Enter], um ins Menu <Source setup> zurückzukehren.</p>
<p>Blättern Sie mit der Taste [Cursor] (nach unten) zum Menüpunkt <Digital input>. Ordnen Sie der aktuellen Signalquelle mit den Tasten [Cursor ] einen digitalen Eingang zu. Die digitalen Eingänge werden in der folgenden Reihenfolge angezeigt: Coax1-4, OPT 1 und OPT 2, danach Off. Wenn Sie möchten, daß von einer Signalquelle kein digitaler Bitstream abgespielt wird, können Sie den <Digital input> der Signalquelle auf „Off" stellen.</p>
<h1 id="hinweis-2">HINWEIS</h1>
<p>Sie können jeder digitalen Eingang einer beliebigen Signalquelle zuorden und Sie können einen digitalen Eingang auch zwei oder mehreren Signalquellen zuweisen. Wenn Sie z.B. den DVD/CD-Player am digitalen Eingang COAX1 anschließen, können Sie COAX1 den Eingängen „CD" und „VIDEO1" zuweisen und VIDEO1 in „DVD" umbenennen.</p>
<p>Die folgenden Zeichen sind verfügbar:</p>
<p>ABCDEFGHIJKLMNOPQRSTUVWXYZ0123456789</p>
<p>abcdefghijklmnopqrstuwxyz*-:/</p>
<p>Blättern Sie mit der Taste [Cursor] (nach unten) zum Menüpunkt <Component video>. Stellen Sie mit den Tasten [Cursor ] „Component video" auf „On" oder „Off". Wir „Component video" für eine Signalquelle auf „On" gesetzt, wird bei jeder Auswahl dieseres Eingangs das an den Buchsen COMPONENT VIDEO IN (Y-Cb-Cr) des S170i anliegende Videosignal an die Buchsen COMPONENT VIDEO OUT gesendet.</p>
<ul>
<li>Das OSD-MENU wird nicht über die RGB-Ausgänge (COMPONENT VIDEO) ausgegeben.</li>
</ul>
<h1 id="trigger-einstellung">TRIGGER-EINSTELLUNG</h1>
<p>Der S170i ist mit zwei 12-Volt-Triggerausgängen ausgestattet, mit denen benachbarte Komponenten oder Systeme wie z. B. Leistungsveränder, Projektorlifts, Lichtsysteme usw. aktiviert oder gesteuert werden können. Eine Triggerfungkann ganz einfach sein und zum Ein- und Ausschalten eines NAD S250 Leistungsveränderkorden, oder so komplex wie das Bereitschalten eines kompletten Heimkinoraums. Weitere technische Informationen über die 12-Volt-Triggerausgänge des S170i finden Sie im Anhang 1, oder wenden Sie sich an ihren NAD-Audiospezialisten.</p>
<p>Beispiel einer einfahren 12-Volt-Trigger-Konfiguration: Einschalten des NAD S250 Leistungsverträkers Im folgenden Beispiel wird der 12-V-Triggerausgang 1 des S170i dazu verwendet, den Verträker S250 zusammen mit dem Vorverträker ein- und auszuschalten.</p>
<ul>
<li>Verbinden Sie die Buchse 12V TRIGGER auf der Rückwand des S170i mit dem mitgelieferten 12V-Triggerkabel mit dem 12V-TRIGGER-Eingang des S250 Leistungsverträkers. Beachten Sie die Spezialanschlüsse an thisem Kabel mit einem 1/8-Zoll-Ministecker für den S170i an einem Ende und einem Gleichspannungsstecker für den Triggereingang des S250 am anderen Kabelende. </li>
<li>Wahlen Sie mit den Fernbedienungstasten [Cursor ▼] und [Enter] im OSD-Hauptmenu den Befehl <Trigger setup>. Die Punkte für <Trigger 1> sollenen wie folgt angezeigt werden (Standardwerte):</li>
</ul>
<p>-polarity Posit. <br />
-delay Nein <br />
-duration Infin.</p>
<p>Falls andere Werte eingestellt sind, ändern Sie diese mit den Fernbedienungstasten [Cursor / ] und [Cursor / ] auf die o. g. Werte.</p>
<h1 id="einstellen-von-thx-audio">EINSTELLEN VON THX-AUDIO</h1>
<p>THX Surround EX erzeugt einen sechsten, hinteren Centerkanal, der zur Reproduktion durch einen oder mehrere Laufsprecher gedacht ist, die sich hinter dem Hörfeld befinden. Dies liefert bei Aufnahmen mit dem Dolby Surround EX-Zeichen einen speziell entwickelten, hinteren Centerkanal, der ähnlich wie der in die linken/rechten Frontkanäle kodierte Centerkanal in matrix-kodierten Dolby Surround-Mischungen in die linken/rechten Surroundkanäle kodiert ist. Die Klangverarbeitung in THX Surround EX erzeugt allerdings oft einen nützlichen hinteren Centerkanal-Effekt auch von Programmen, die ursprünglich nicht direkt für EX-Wiedergabe codiert worden sind.</p>
<h1 id="bass-limiter-bassbegrenzer">BASS LIMITER (BASSBEGRENZER)</h1>
<p>Der S170i enthalt einen Bassbegrenzer, den Sie zur Beseitigung von hörbaren Verzerrungen einstellen können. Dazu horen Sie ein eingebautes Testsignal, das der S170i an den Subwoofer sendet, und erhöhen den Dynamikumfang des Bassbegrenzers soweit, bis Verzerrungen hörbar werden. Der Bassbegrenzer verhindert dann, daß jeder Programmsignal, das diesen Pegel übersteigt, zum Subwoofer gesendet wird.</p>
<h1 id="konfigurieren-des-bassbegrenzers">KONFIGURIEREN DES BASSBEGRENZERS</h1>
<p>Wahlen Sie mit den Fernbedienungstaten [Cursor / ] und [Enter] im Menu <THX Audio setup> den Menüpunkt <Bass limiter setup>. Stellen Sie mit denselben Taten die Menüpunkte <Bass limiter> und <Limiter noise> auf „On". Sie sollen jetzt ein leichtes Rumpeln aus dem Subwoofer horen. (Wenn Sie nichts vom Subwoofer horen, prufen Sie die Subwoofer-Audio- und Netzverbindungen, die Lautsprachereinstellungen, Speaker Setup, unter, und/oder prufen Sie die Subwoofer-eigenen Hardware-Einstellungen)</p>
<p>Bewegen Sie die Markierung jetzt mit den Fernbedienungstasten [Cursor / ] auf den Menüpunkt <Limiter level> und verringern Sie mit der Taste [Cursor ] die Begrenzereinstellung in Schritten von 1 dB. Der Testton aus dem Subwoofer wird damit lauter. Achten Sie auf den Punkt, wo Verzerrungen (grelle Töne, klappern, knacken oder andere Seltsame Gerausche) hörbar werden, und verringern Sie dann mit der Taste [Cursor ] den Begrenzer um 1 oder 2 dB bis die Verzerrungen wieder nachlassen. Damit richten Sie die verzerrungsfreie Grenze für ihre aktuelle Subwoofer-Einstellung ein. Auf die Bassbegrenzer-Einstellung sollenn Sie später noch einmal zurückkommen, wenn Sie die Einstellungen für <Level Setup> (siehe unter) abgeschlossen haben.</p>
<ul>
<li>Auch nach der Bassbegrenzer-Einstellung konnen Sie den Testton verwenden, um das von einem hohen Subwooferausgang unvermeidbar erzeugte Klirren im Raum zuuchen und zu beseitigen. (Fenstershmuck, lose Schalter/Steckdosen und aufgehängte Kunstgegenstände sind drei tatsächige Störquellen). </li>
<li>Wenn Sie Subwoofer tauschen, ihre oder die Hörposition verändern, sollen den Sie die Bassbegrenzer-Einstellung wiederholen. </li>
<li>Bei einem Hochleistungs-Subwoofer kann diese Prozedur ziemlich laut werden. Oft ist es better, eine günstige Gelegenheit abzuwarten, wenn z. B. Partner, Kinder oder Haustiere nicht anwesend sind, um die Bassbegrenzer-Einstellung vollständig durchführten zu konnen.</li>
</ul>
<h1 id="boundary-gain-compensation-2">BOUNDARY GAIN COMPENSATION</h1>
<p>These Funktion von THX Ultra 2 kompensiert die Audioverstärkung (Pegelzunahme), wenn der Subwoofer direkt an einer Wand oder in der Höhe von Raumecken aufgestellt wird.</p>
<h1 id="hinweis-3">HINWEIS</h1>
<p>These Funktion ist nur für einen THX Ultra 2 zertifizierten Subwoofer anwendbar, bei dem Bandbreite und Empfindlichkeit in den technischen Daten angegeben werden.</p>
<p>Wahlen Sie <THX Ultra2 Sub> mit den Fernbedienungstasten [Cursor / ] und stellen Sie mit den Fernbedienungstaten [Cursor / ] die Auswahl <Yes> oder <No> ein. Wahlen Sie dann mit den Fernbedienungstaten [Cursor / ] den Punkt <Boundary gain comp.> und damit <On> oder <Off> mit den Fernbedienungstaten [Cursor / ].</p>
<h1 id="hinweis-4">HINWEIS</h1>
<p>"Boundary Gain Compensation" kann nur ausgewählt werden, wenn der Menüpunkt <THX Ultra2 Sub> auf <Yes> eingestellt ist.</p>
<h1 id="asa-3">ASA</h1>
<p>Mit dieser THX-Funktion wird die Verstärkung und Verzögerung der hinteren Surround-Laatsprecher eingestellt, um ihre Aufstellung im Horraum zu kompressieren. Wahlen Sie aus drei möglichen Standorten: zusammen (<Together>), nah beieinander (<Close>) oder auseinander (<Apart>).</p>
<h1 id="hinweis-5">HINWEIS</h1>
<p>Damit these Option Funktioniert, werden zwei frühere (7.1)-Surround-Laufsprecher bereitsigt.</p>
<p>Wahlen Sie <Back speakers> mit den Fernbedienungstasten [Cursor / ] und anschließend mit den Fernbedienungstasten [Cursor / ] einen der Punkte <Together>, <Close> oder <Apart>.</p>
<p>Der Vorverträger S170i kann sowohl über die Elemente auf der Frontplatte als auch über die Fernbedienung HTR 2 bedient werden. Da in den meisten Fällen hauptsächlich die Fernbedienung der Eingabe von Steuerungen dient, konzentrierten wir uns auf die Handhabung der Fernbedienung. Lesen Sie auf jeder Fall den Abschnitt „Frontplatten-Funktionen", unter.</p>
<h1 id="auswählen-von-signalquellen">AUSWÄHLEN VON SIGNALQUEllen</h1>
<p>Wahlen Sie auf der HTR 2 die Geräteseite [AMP] und anschließend mit den numerischen Tasten [1 - 10 + ] die ebenfls wie die Taste [AMP] rot beschriften Geräte [DVD], [SAT], [VCR],VIDEO] usw., um diese direkt auszuwahlen.</p>
<h1 id="bitte-beauchten-3">BITTE BEAuchtEN:</h1>
<ul>
<li>Wird eine Audiosignalquelle ohne Video ausgewählt, bleibt das zuletzt eingestellte Videosignal aktiv, bis ein anderer Audio/Videoeingang ausgewählt wird. </li>
<li>Beim Umschalten von Signalquellen werden im OSD entsprechend den Displayeinstellungen (oben) kurzzeitig Informationen über den neuen Eingang angezeigt. Der Umfang dieser Informationen ist abhängig von der Einstellung von <Temporary disp.>:bei „Full" wird alles über die Audio-, Video- und digitalen Signale des neuen Eingangs angezeigt; „Simple" zeigt nur den Name des neuen Eingangs und „Off" schaltet die Anzeige von Informationen aus. </li>
<li>Der Hörmodus (Stereo, EARS, Dolby Digital usw.) eines neu gewährten Engangs wird auf den Modus zurückgesetzt, der beim letzten Auswahlen these Engangs aktiv war. Davon ausgenommen sind digitale Mehrkanal-Signalquellen (Dolby Digital oder DTS) bei denen automatisch auf 5.1/6.1-Kanal-Surround umgeschaltet wird, auch wenn dieser Eingang zuletzt in einem anderen Modus wie z. B. Stereo oder EARS verwendet worden ist. </li>
<li>Der Eingang Ext5.1 ist in der Signalquellen-Ausb Wahl des S170i wie jeder andere Nur-Audio-Signalquelle enthalten. Da der Ext5.1-Eingang aber nur ein „Durchgang" für die Signalquelle ist, stehen dafür kein Bass-Management, keine Klangregelung oder anderen Vorveränderkerfunktionen zur Verflügung; Signale an den Buchsen EXTERNAL 5.1 INPUTS werden direkt ohne Verarbeitung (außer MasterVolume) an die entsprechenden sechs Buchsen PREAMP ANALOG 7.1 OUTPUTS weitergeleitet. Bass-Management und andere Signalverarbeitung sollen von der externen Mehrkanal-Signalquelle aus erfolgen.</li>
</ul>
<p>Es gibt eine einstellbare EINGANGSPEGELSTEUERUNG für analyge Signalquellen mit einem EINGANGSPEGELMESSER zur einfachen und genauen Einstellung. Diese Schaltkreis stellt einen einzelnen Eingang automatisch und ohne vom Anwender erforderliche Einstellungen so ein, daß eine Überlastung des A/D-Wandlers (Umwandlung von Analog- in Digitalsignale zur Surround-Verarbeitung) vermieden wird. Aber wenn Sie möchten, konnen Sie den Eingangspegel auch manuell einstellen, um z. B. für alle Signalquellen denselben subjectiven Lautstärkepegel zu erreichen. Da die automatische Einstellung nur auf Spitzensignale reagiert, klingen Signalquellen mit einem hohen Dynamikumfang (klassische MusicCDs) subjektiv weiter als solche mit schmalem oder komprimiertem Dynamikumfang (Rockmusik-Radiosendungen).</p>
<p>Zur Einstellung des EINGANGSPEGELS rufen Sie zunachst durch Drücken der CURSORTASTE RECHTS das OSD-Menü (On Screen Display) auf, blättern mit der NACH-UNTEN-TASTE auf SIGNALQUELLEN-EINSTELLUNG und drücken anschließend ENTER.</p>
<p>Wahlen Sie im Menu SIGNALQUELEN-EINSTELLUNG den Menupunkt ANALOG-EMPFINDLICHKEIT und stellen mit der CURSORTASTE RECHTS/LINKS den EINGANGSPEGEL ein. Der Einstellbereich beträgt -5dB bis +10dB. Sie können mit ANALOG MON auch eine vertikale Balkenanzeige (mit Peak-Hold-Funktion) des Eingangspegels auswahlen. In this modus können Sie mit den CURSORASTEN AUF/AB den Skalenbereich von -20dB bis 0dB auf -40dB bis 0dBändern.</p>
<h1 id="einstellen-der-lautstarke">EINSTELLEN DER LAUTSTARKE</h1>
<p>Stellen Sie mit den Tasten [Volume auf/ab] der Fernbedienung HTR 2 die Lautstärke „Master-Volume" (alle Kanäle lauter oder leiser) des S170i ein.</p>
<h1 id="bitte-beauchten-4">BITTE BEAuchtEN:</h1>
<ul>
<li>Ein kurzzeitiger Tastendruckändert die Lautstärke (Master Volume) in Schritten von 1 dB. Wenn Sie die Taste [Volume / ] gedrückt halten, wird die Lautstärke so lange kontinuierlich verändert, bis Sie die Taste wieder loslassen. </li>
<li>Im OSD des S170i wird die Lautstärkeeinstellung als grafischer Balken relativ zum Referenzpegel (das „+“-Zeichen auf der Linie) angezeigt, außer dem darüber eine numerische Skala in dB bereitsfalls relativ zum Referenzpegel. (Wenn für den Menüpunkt <Temporary disp.> im Menu <Display setup> „Off" eingestellt ist, erscheint die kurzzeitige Lautstärkanzeige NIGHT.)</li>
</ul>
<p>Da der durchschnittliche Gesamtpegel von Aufnahmen stark variieren kann, gibt es keine feste Regel für den Referenzpegel oder irgendene andere Einstellung. Die Einstellung von -20 bei der einen CD kann so laut empfinden werden wie -10 bei einer anderen.</p>
<ul>
<li>Erhöhen der Lautstärke (Master Volume) mit den HTR 2-Fernbedienungstasten [Volume auf/ab] oder dem Einstellknopf auf der Frontplatte bei aktiver Stummschaltung (Mute, unter)heits die Mute-Funktion automatisch wieder auf; beim Verringern der Lautstärke bleibt Mute aktiv. </li>
<li>Beim S170i ist nach dem Einsatzen/Beenden des Bereitschaftsmodus immer der zuletzt eingestellte Lautstärkepegel wirksam. Wenn allerdings die letzte Einstellung über -20 dB lag, beträgt die Lautstärkeeinstellung -20 dB. Auf diese Weise wird eine übermäßig Lautstärke beim Einsatzen verhindert.</li>
</ul>
<h1 id="stummschaltung">STUMMSCHALTUNG</h1>
<p>Mit der HTR 2-Fernbedienungstaste [Mute] konnen alle Kanäle stummgeschaltet werden. Die Stummschaltung ist unabhängig von der eingestten Signalquelle oder den ausgewählten Hörmodi immer verfügbar.</p>
<h1 id="bitte-beauchten-5">BITTE BEAuchtEN:</h1>
<ul>
<li>Aktivieren des Bereitschaftsmodus oder Ausschalten des Geräts schaltet auch die Stummschaltung ab. Beim Einsatzen/Beenden des Bereitschaftsmodus deaktiviert der S170i die Stummschaltung immer. </li>
<li>Eingangs- oder Hörmodus-Änderungen deaktivieren die Stummschaltung nicht. </li>
<li>Erhöhen der Lautstärke (Master Volume) mit den HTR 2-Fernbedienungstasten [Volume auflab] oder dem Einstellknopf auf der Frontplatte besteht die Mute-Funktion automatisch wieder auf; beim Verringern der Lautstärke bleibt Mute aktiv.</li>
</ul>
<h1 id="einstellen-von-hormodi">EINSTELLEN VON HORMODI</h1>
<h1 id="die-hormodi-des-s170i">DIE HORMODI DES S170I</h1>
<p>Der Vorverträger S170i betet sieben verschiedene, auf bestimmte Aufnahmen oder Programme zugeschnittene Hörmodi.</p>
<h1 id="mono-3">MONO</h1>
<p>Die Ausgabe erfolgt nur über den Centerkanal oder über den linken und rechten Kanal, wenn kein Centerkanal vorhanden oder aktiviert ist. Falls ein Subwoofer im <Speaker setup>vorhanden ist, werden niedrige Frenzen zum Subwoofer geleitet.</p>
<p>Der Monomodus eignet sich am besten für Mono-Aufzeichnungen mit nur einem Kanal, wie z. B. klassische Filme und historische Musikaufnahmen. Er gewährleistet eine stabile, klar monaurale Klangpräsentation mit korrektem Bass-Management.</p>
<h1 id="stereo-2">STEREO</h1>
<p>Stereoaufnahmen in PCM/digitaler oder analoger Form, mit oder ohne Surround-Kodierung, werden so wiedergegeben, wie sie aufgezeichnet wurden. Digitale Mehrkanal-Aufnahmen (Dolby Digital und DTS) werden nur über den linken und rechten Frontkanal als Lt/Rt, d. h. Links/Rechts-Gesamt- oder „heruntergemischte" Signale reproduziert.</p>
<p>Wahlen Sie den Modus „Stereo", wenn Sie Stereouafnahmen ohne Surrounddefekte horen möchten oder für Mehrkanal-Aufnahmen, wenn nur eine Zweikanal-Wiedergabe möglich oder gewünscht ist.</p>
<h1 id="direct-nur-dolby-digitaldts-signalquellen">DIRECT (NUR DOLBY DIGITAL/DTS-SIGNALQUELLEN)</h1>
<p>Digitale Mehrkanal-Aufnahmen (Dolby Digital oder DTS) werden nur über die in der Aufnahme selbst eingesetzten Kanäle wiedergegeben. Eine "5.1-Kanal"-Dolby Digital 3/2/1-Aufnahme z. B. wird über die Frontloutsprecher links, Center, rechts, die Surroundloutsprecher links/rechts und den Subwoofer reproduziert. Eine Aufzeichnung in Dolby Digital 2/0/0 wird nur über die linken und rechten Frontloutsprecher (und den Subwoofer, falls diese als „Small" im <Speaker setup> des OSD-Menüs festgelegt worden sind) wiedergegeben.</p>
<h1 id="dolby-ex-dts-es-thx-ex-surround-61-3">DOLBY EX, DTS ES, THX EX, SURROUND 6.1</h1>
<p>Digitale Mehrkanal-Aufnahmen (Dolby Digital oder DTS) werden über die volle Garnitur aus Front-, Surround- und einem oder zwei „Back"-Kanal-Lautsprechnern (falls im <Speaker Setup> vorhanden) wiedergegeben. Wenn die Aufnahme in Dolby Digital EX/DTS ES kodiert ist, wird diese Logik zur Ableitung der hinteren Kanäle verwendet, im anderen Fall leitet der S170i einen einzelnen hinteren Surround-Kanal aus den linken und rechten Surround-Kanälen ab.</p>
<h1 id="dolby-pro-logic-3">DOLBY PRO LOGIC</h1>
<p>Aufnahmen mit Surround-Kodierung (und Stereoufzeichnungen ohne Kodierung) werden in Dolby Surround Pro Logic wiedergegeben, und darüber mit den Frontkanalen links, Center und rechts sowie einem Mono-Surround-Signal auf beiden Surround-Lautsprechern. Die Bandbreite der Surroundkanale wird oberhalb von 7 kHz abgeschritten, um die Lokalisierung der Surround-Lautsprecher in thisem Modus zu unterbinden.</p>
<p>Der Pro-Logic-Modus eignet sich am besten für Surround-kodierte Aufzeichnungen, die mit Dolby Surround oder kompatiblen Systemen reproduziert werden sollen. Dazu gehören die meisten Filme auf Videoband und weitere auf LaserDisc, für Surroundklang produzierte Fernseh- und Kabelprogramme und die meisten ätheren LaserDiscs. Die meisten DVD-Aufnahmen, selbst solche, die kein Mehrkanal-Surround nutzen, haben eine Tonspur in Dolby Digital und/oder DTS mit einem oder zwei Kanälen. Wo diese vorhanden ist, wird in der Regel eine bessere Klangleistung erzielt. Von ganz weniger Ausnahmen abgesehen, liefert der NAD-eigene Hörmodi EARS von Stereomusikaufzeichnungenweit bessere Klangergebnisse als Pro Logic.</p>
<h1 id="dolby-pro-logic-ii-movie-3">DOLBY PRO LOGIC II MOVIE</h1>
<p>Ahnlich wie Dolby Pro Logic wird bei diesen verbesserten Algorithmus die Logik nach der Matrixdekodierung angewendet, nicht vorher wie in Pro Logic. Da ergibt eine bessere Klangstätigkeit und das Signal kann genauer gesteuert werden. Die Surroundkanäle werden ebenfalls im Vollbereich gefahren.</p>
<h1 id="dolby-pro-logic-ii-music-3">DOLBY PRO LOGIC II MUSIC</h1>
<p>Feinabgestimm auf das Musikhoren wird die Bandbreite der Surroundkanä abgeschritten, um die akustische Absorption eines typischen Raumes zu simulieren. Darüber hinaus gibt es mehrere Einstellmöglichkeiten zur Steigerung des Hörgenusses:</p>
<p>PL II Panorama Bei Aktivierung dieser Option verteil der besondere Panoramaeffekt den Klang aus den vorderen linken und rechten Lautsprechern um Sie herum.</p>
<p>PL II Center Width Center Width ermoiglich die stufenweise Verteilung des Centerkanals in die vorderen linken und rechten Lautsprecher. In der hochsten Stellung wird derGPCe Centerkanal in die linken und rechten Lautsprecher gemischt. Mit dieser Steuerung kann ein noch räumlicherer Klang oder eine bessere Mischung des vorderen Klangbildes erreicht werden.</p>
<p>PL II Dimension Mit Dimension ist die Einstellung der Balance vorne/hinten ganz nach individuellen Geschmack möglich.</p>
<h1 id="dts-neo-6-cinema">DTS NEO: 6 CINEMA</h1>
<p>Surround-Kodierte Aufzeichnungen (und nicht kodierte Stereo-Aufzeichnungen) werden mit DTS Neo:6-Surround reproduziert. Das ergibt eine Wiedergabe über die Frontkanäle links/rechts und Center sowie Surround und hinterer Surround-Kanal (falls ausgewählt).</p>
<h1 id="dts-neo-6-music">DTS NEO: 6 MUSIC</h1>
<p>Dieser Musik-Surroundmodus kann dazu verwendet werden, mit jedem 2-Kanal-Stereosignal einen überzeugenden Surroundklang zu produzieren, der über die vorderen, den Center- und alle ausgewählten Surround-Laatsprecher wiedergegeben wird. Neo:6 erhögt dem Anwender die Einstellung des Center-Klangbildes in 6 Stufen. Center Image erhögt die stufenweise Verteilung des Centerkanals in die vorderen linken und rechten Laatsprecher.</p>
<h1 id="ears-6">EARS</h1>
<p>Stereoaufnahmen (und Surround-kodierte Stereoaufzeichnungen) in PCM/digitaler oder analoger Form werden über die NAD-eigene Surroundverarbeitung über die Frontkanäle links, Center, rechts und beiden Surroundkanäle wiedergegeben. EARS holt die in fast allen gut produzierten Stereoaufnahmen vorhandene natürliche Umgebung hersa. Da darauf keine Umgebung oder andere Klangelemente künstlich erzeugt werden, bleibt der Original-Klangeindruck welt better erhalten als bei den meisten anderen Musik-Surround-Optionen.</p>
<p>Wahlen Sie EARS zum Horen von Stereomusikaufzeinungen oder Radiosendungen. EARS erzeugt eine feine aber überaus natürliche und realistische Umgebung von fast allen „naturlich-akustischen" Stereoaufzeinungen wie Klassik, Jazz und Folk, aber auch von einer Vielzahl anderer Musikrichtungen. Dieser Hörmodus zeichnet sich durch ein realistisches, klares Bühnen-Klangbild und eine geräumige aber nicht übertriebene virtuelle Umgebungsakustik aus, die der Originalaufnahme treu bleibt.</p>
<h1 id="hinweis-6">HINWEIS</h1>
<p>Der aktive EARS-Schaltkreis kann beim Empfang von UKW-Sendungen zu deutlicher hörbaren Stereoverzerrungen führen. Diese Störungen können vorteilhalt dazu verwendet werden, eine UKW-Anteenne auf einen bestimmen UKW-Sender auszurichten.</p>
<p>EARS kann nicht auf digitale Mehrkanal-Aufzeichnungen (Dolby Digital/DTS) angewendet werden. Diese Aufzeichnungen enthalten durch ihre Mehrkanal-Technik ihren eigenen Surround und ihre eigene Umgebung. EARS kann jedoch auch mit diesen Aufnahmen genutzt werden, wenn sie über die analogen Stereogausgänge eines DVD-Players oder anderen Abspielgerätes wiedergegeben werden, oder wenn DVD oder andere Tonspuren auf „Stereo/PCM" und nicht auf „5.1" oder gleichwertiges eingestellt werden.</p>
<h1 id="analog-bypass-2">ANALOG BYPASS</h1>
<p>Aufzeichnungen in Stereo oder Mono von den analogen Eingängen einer beliebigen Signalquelle am S170i werden ohne jegliche Verarbeitung direkt an die vorderen linken und rechten Ausgänge geleitet.</p>
<p>Mit Analog Bypass reproduzieren Sie audiophile Minimal-Signalpfad-Bedingungen für das kritische Hören von Zweikanal- oder Mono-Signalquellen.</p>
<p>Da im Analog-Bypass-Modus das Bass-Management entfällt, werden die Signale von den linken und rechten Frontkanälen, unabhängig von den Einstellungen im <Speaker setup> des S170i, im Vollbereich reproduziert.</p>
<p>In der nachfolgenden Tabelle sind die für die drei möglichen Signalquellentypen verfügbaren Hörmodi zusammengefasst: Digitaleingang 2-Kanal (mit aktuellem Signal in Mono, Stereo oder Surround-kodiert), Analogeingang 2-Kanal (Mono, Stereo oder Surround-kodiert) oder Digital-Mehrkanal (Dolby Digital oder DTS). Ist ein Hörmodus für eine bestimmte Signalquelle nicht verfügbar, erscheidert er nicht in der Auswahl <Mode>.</p>
<table><tr><td>2-Kanal PCM</td><td>2-Kanal analog</td><td>Mehrkanal (DD/DTS)</td></tr><tr><td>Mono</td><td>Mono</td><td>Mono</td></tr><tr><td>Stereo</td><td>Stereo</td><td>Stereo</td></tr><tr><td>Pro Logic</td><td>Dolby Pro Logic</td><td>Direct</td></tr><tr><td>EARS</td><td>EARS</td><td>Surround 6,1*</td></tr><tr><td>—</td><td>Analog Bypass</td><td>—</td></tr></table>
<p>*bei Einstellung mit „hinteren“ Lautspruchern</p>
<h1 id="auswählen-von-hörmodi">AUSWÄHLEN VON HÖRMODI</h1>
<h1 id="bitte-beauchten-6">BITTE BEAuchtEN:</h1>
<ul>
<li>Wenn Sie beim Betätigten von [Cursor ] zur Änderung der Hörmodi langere Pausen machen, müssen Sie die Taste [Mode] erneut drucken. </li>
<li>Aändern des Eingangs, Ausschalten, Aktivieren des Bereitschaftsmodus oder der Stummschaltung beeinflussen den ausgewählten Hörmodus nicht. </li>
<li>Aändern des Signals ändert auch den Hörmodus, wenn das neue Signal eine digitale Mehrkanal-Aufzeichnung oder mit dem aktuellen Modus nicht kompatibel ist. Beisiel: Nach dem Hören einer CD in einem DVD/CD-Player über den EARS-Hörmodusnehmen Sie die CD Heraus und legen eine Mehrkanal-DTS-CD mit 5.1-Kanal ein. Der S170i aktiviert automatisch die DTS/5.1-Wiedergabe.</li>
</ul>
<h1 id="der-thx-modus">DER THX-MODUS</h1>
<p>THX Ltd. zertifiziert mit dem THX/Ultra-Logo nicht nur Geräte mit besonders hoher Mehrkanal-Audioleistung, sondern verlangt in seinem Home-THX-Programm auch, daß Ultra-Komponenten über den THX-Modus verfügbar. Dazu gehören drei wesentliche Surround-Audioerweiterungen:</p>
<ul>
<li>Erneute Frequenzanpassung, d. h., zur betteren Anpassung an das Klangbild der Originalfilm-Tonspur, wie sie in der Vertonungssphase vom Regisseur und den Tingesienieuren während der Filmproduktion reproduziert worden ist, werden die hohen Frenzen der Frontlautsprecher erneut geformt. </li>
<li>Mit Klangfarben-Anpassung werden die seitlich/rückseitig angeordneten Surround-Lautsprecher in einem korrekt aufgebauten Surround-Heimkinosystem kompensiert, wodurch eine konsistentere Charakteristik der von jedem beliebigen Punkt um die Hörpositionen herum erzeugten Klänge erreicht wird. </li>
<li>Dekorrelation mildert den von allen Pro Logic-Aufnahmen (und manchen Dolby Digital und DTS-Signalquellen) gelieferten Mono-Surroundkanal und schafft eine geräumigere und tatsächcher Reproduktion der Umgebung und virtuellen Akustik eines Films.</li>
</ul>
<h1 id="aktivieren-von-thx">AKTIVIEREN VON THX</h1>
<p>Drücken Sie auf der Fernbedienung HTR 2 zuerst die Taste [AMP] und anschließend die Taste [THX] zur Aktivierung von THX-Surround. jeder weitere Tastendruck auf [THX] schaltet zwischen den Modi Standard-THX und THX Surround EX (falls verfügbar) um und dann den THX-Modus wieder aus. Beachten Sie:</p>
<ul>
<li>THX-Modi sind nur für digitale Signaleingänge verfügbar: Dolby Digital, DTS, PCM </li>
<li>Bei PCM-Signalquellen muß der Hörmodus Dolby Pro Logic vorher aktiviert worden sein. </li>
<li>Beim Aufruf von THX für eine analoge Signalquelle, wenn Pro Logic nicht der aktuelle Hörmodus ist, oder wenn THX Surround EX für eine PCM-, Dolby Digital oder DTS-Surround-Signalquelle (2/0/0, 2/1/0, 3/1/1 usw.) eingestellt wird, erscheidt im OSD und im Frontplatten-Anzeigefeld „Incompatible Source".</li>
</ul>
<h1 id="einstellen-der-kanalpegel">EINSTELLEN DER KANALPEGEL</h1>
<p>Die relativen Pegel von Center-, Surround- und Subwooferkanänen konnen Sie temporär ändern, ohne die im OSD-Menüpunkt <Level setup> fest eingestellen Pegel zu beeinflussen. Dafür gibt es eine Reihe von Umständen, wo dies nützlich sein kann, z. B.: erhöhen (oder verringern) der Dialogklarheit in einem Film durch Anheiten (Abseken) des Centerkanals; verstärken (oder abschwächen) der subjektiven Umgebung in einer mit EARS wiedergegebenen Musikaufnahme durch Anheiten (Abseken) des Surroundkanalpegels; mildern von tiefen Bässen (oder verstärken von tiefen Bässen) durch Abseken (Anheiten) des Subwooferpegels.</p>
<h1 id="ändern-der-kanalpegel">ÄNDERN DER KANALPEGEL</h1>
<p>Stellen Sie mit den drei senkrechten HTR 2-Tastenpaaren [Surr.], Center] und [Sub] die relativen Pegel von Surroundkanal, Centerkanal und Subwoofer ein. Die sich ändernden Pegel werden im OSD und im Frontplatten-Anzeugefeld angezeigt.</p>
<h1 id="bitte-beachten-2">BITTE BEACHTEN:</h1>
<p>Die Pegeleinstellungen werden zu den im OSD-Menupunkt <Levels setup> (oben) vorhandenen Pegeln hinzuaddiert. Beisiel: Wenn im <Level setup> für <Center> ein Wert von "-3 dB" vorgegeben ist, und Sie mit [Center auf/ab] einen Pegel von + 2 dB festlegen, resultiert darauf ein Center-Kanalpegel von -1 dB. <br />
- Änderungen in der Maske [LEVELS] werden durch Ein- und Ausschalten des S170i-Bereitschaftsmodus verworfen. <br />
- Bei vorher ausgewählter Voreinstellung enthalten die Pegel der drei in der Maske [LEVELS] angezeigten Elemente alle Pegel aus der Voreinstellung. (Siehe „Konfigurieren von Voreinstellungen“, oben). <br />
Die Maske [LEVELS] zeigt und erhögt die Einstellung auch von Kanälen, die im OSD-Menu <Speaker setup> nicht vorhanden sind. Beispiel: Selfst wenn Sie im OSD-Menu <Speaker setup> den Parameter <Center> auf „No" eingestellt haben, erschein den Tasten [Center auflab] in der Maske [LEVELS]. Sie haben aber keine Wirkung und steuern auch keinen „Phantom-Centerkanal" wenn einer der Surroundmodi aktiv ist. <br />
- Wenn einer oder zwei wichtere Surroundkanäe im OSD-MENU <Speaker setup> als vorhanden konfiguriert sind, werden ihre Pegel mit den Tasten [Surr auf/lab] in der Maske [LEVELS] zusammen mit den Surroundkanänen verändert.</p>
<h1 id="klangeinstellung">KLANGEINSTELLUNG</h1>
<p>Drücken Sie die Taste [Tone]; im OSD und Anzeigenfeld der Frontplatte erscheidt „Treble". Erhöhen oder verringern Sie die Höhen mit den Fernbedienungstasten [Cursor ] in Schritten von 1 dB. Drücken Sie [Tone] erneut und stellen Sie in derselben Weise mit den Tasten [Cursor ] die Basse ein. Im OSD und im Frontplatten-Anzeigefeld erscheidt „Bass". Drücken Sie [Tone] ein weiteres Mal zum Verlassen der Klangeinstellung.</p>
<p>TONE-Taste auf der Frontplatte: Zum Umschalten zwischen Bass (Basse), Treble (Hohen) und TONE ON (Klangregelung ein). Die Pegel für Basse und Höhen werden mit dem Einsteller VOLUME verändert.</p>
<h1 id="bitte-beachten-3">BITTE BEACHTEN:</h1>
<p>Die Einstellungen für Bass/Höhen wirken sich nur auf die vorderen Kanäle aus (links, center und rechts) und sind in allen Hörmodi aktiv. <br />
- Klangeinstellungen für Bass/Höhen über die HTR 2-Fernbedienungstaste [Tone] haben Vorrang vor den im Menu <Audio setup> eingestallen Werten, gelten aber nur temporär: Ein/Ausschalten des S170i-Bereitschaftsmodus (oder Aufrufen des Menüs <Audio setup>) oder Aufrufen einer Voreinstellung stellen die Einstellungen in <Audio setup> oder der aufgerufenen Voreinstellung wieder her.</p>
<h1 id="verwenden-von-voreinstellungen">VERWENDEN VON VOREINSTELLUNGEN</h1>
<p>Drücken Sie auf der HTR 2 die Taste [AV Preset] und anschließend eine der numerischen Tasten [1] bis [5], um die gewünschte Voreinstellung auszuwahlen.</p>
<h1 id="bitte-beauchten-7">BITTE BEAuchtEN:</h1>
<p>Die ausgewählte Voreinstellung bleibt so lange aktiv, bis Sie eine andere Voreinstellung wahlen oder den S170i-Bereitschaftsmodus ein- und wieder ausschalten. <br />
- Eine Voreinstellung gilt unabhängig von der ausgewählten Signalquelle oder des aktiven Hörmodus. <br />
- Ein- und Ausschalten des S170i-Bereitschaftsmodus Löscht alle vorher gespeicherten Voreinstellungen und aktiviert alle in den HTR 2-Masken LEVELS oder MODE/MULTI.S oder im OSD-MENU <Audio setup> (oben) des S170i enthaltenen Klang- und Pegeleinstellungen. <br />
- Die Pegeleinstellungen in einer Voreinstellung werden den im OSD-Menu <Levels setup> enthalten den Pegeln hinzuaddiert; die Klangeinstellungen einer Voreinstellung haben Vorrang vor den im OSD-Menu <Audio setup> oder in der Maske MODE/MULTI.S der Fernbedienung enthaltenen Werten.</p>
<h1 id="frontplatten-funktionen">FRONTPLATTEN-FUNKTIONEN</h1>
<p>Der S170i kann auch ohne die Fernbedienung HTR 2 direkt von der Frontplatte aus bedient werden.</p>
<ul>
<li>Um Eingänge oder Hörmodi zu ändern, können Sie AUDIO oder Video oder MODE drucken und anschließend durch Drehen am Einsteller VOLUME (SETUP) in beiden Richtungen durch alle Audio-Video oder Nur-Audio-Signalquellen oder Hörmodi blättern. Die Bezeichnungen der Signalquellen oder Modi erschieren im OSD und im Frontplatten-Anzeigefeld. Erfolgt 5 Sekunden lang keine Eingabe, wird die normale Funktion der Anzeige und des Einstellers wiederhergestellt. </li>
<li>Durch Drücken von TAPE MONITOR horen Sie das an den Buchsen TAPE MONITOR IN/OUT auf der Rückwand angeschlossene Gerät oder Signal. Wenn Sie TAPE MONITOR erneut drücken, wird die Tape Monitor-Schleife deaktiviert. Im OSD wird <Tape Monitor On> oder <Tape Monitor Off> angezeigt. </li>
<li>Zum Einstellen der Höhen drücken Sie einzelmal TONE und erhöhen oder verringern den Wert mit dem Einsteller VOLUME (SETUP). Zur Einstellung der Basse drücken Sie TONE ein zweites Mal. Die neuen Klangeinstellungen erschieren im OSD und im Frontplatten-Anzeigefeld. Drücken Sie TONE ein drittes Mal, um das Anzeigefeld und den Einsteller VOLUME (SETUP) auf ihre normale Funktion zurückzusetzen. </li>
<li>Drücken Sie BRIGHTNESS einmal, um das Frontplatten-Anzeigefeld abzublenden. Wenn Sie die Taste erneut drücken, wird die normale Helligkeit des Anzeigefeldes wiederhergestellt. </li>
<li>Mit der Taste SPEAKERS können dieselben Funktionen wie im OSD-Menüpunkt <Speaker setup> (siehe „Lautsprecher-Einstellungen“, oben) aufgerufen werden. Das OSD wird nicht angezeigt, aber die erforderlichen Informationen erschienen im Frontplatten-Anzeugefeld. Drücken von SPEAKERS blätter nacheinander durch die Optionen „Main“, „Center“, „Surround“, „Back“ und „Subwoofer“. In jeder Auswahr kann mit dem Einsteller VOLUME (SETUP) in beiden Richtungen durch die verfügbaren Optionen geblätter werden, wie z. B „No/Small/Large“ für die Position „Center“. Drücken Sie SPEAKERS ein weiteres Mal (nach Subwoofer), werden die normalen Funktionen des Anzeugefeldes und Einstellers wiederhergestellt. </li>
<li>Die Taste DELAY/arbeitet in der gleichen Weise. Mit ihr konnen die Kanalverzögerungen für jeder Kanal eingestellt werden. Siehe vorhergehenden Absatz. </li>
<li>Die Taste LEVELSarbeitet in der gleichen Weise. Mit ihr konnen die Kanalpegel fur jedem Kanal eingestellt werden. Siehe vorhergehende Absätze. </li>
<li>Mit der Taste MULTISOURCE können Sie die Wiedergabe in einem zweiten Raum einstehen. Drücken Sie MULTISOURCE einmal, um mit dem Einsteller VOLUME (SETUP) die Lautstärke im zweiten Raum einzustellen; drücken Sie MULTISOURCE ein zweites Mal, um mit dem Einsteller VOLUME (SETUP) die Nur-Audio-Signalquelle für die Buchsen REMOTE ROOM auf der Rückwand bidirektonial einzustellen. Drücken Sie MULTISOURCE ein drittes Mal, um die normale Funktion des Anzeigefeldes und des Einstellers wiederherzustellen. Die Standardfunktionen werden auch automatisch wiederhergestellt, wenn 5 Sekunden lang keine Eingabe erfolgt.</li>
</ul>
<h1 id="wiedergabe-in-einer-zweiten-zone-multisource">WIEDERGABE IN EINER ZWEITEN ZONE (MULTISOURCE)</h1>
<p>Der S170i kann über die Buchsen MULTISOURCE OUT auf der Rückwand Linepegel-Signale an einen zweiten Raum oder eine andere Zone liefern. Über diese Buchsen konnen Ausgangssignale von der aktuell an den Hauptausgangsbuchsen des S170i anliegenden oder einer ganz anderen Analog-Signalquelle ausgegeben werden. Die Lautstärke für diese Signalquelle ist separat einstellbar. Signalquelle und Lautstärke der zweiten Zone bleiben immer unabhängig, auch wenn der S170i zur gleichen Zeit im Hauptraum/Heimkino betrieben wird.</p>
<h1 id="bitte-beachten-4">BITTE BEACHTEN:</h1>
<p>Da dies ein Linepegel-Ausgang ist, wird ein Leistungsverträger zwischen dem MultiSource-Ausgang und den Laufsprechem in der zweiten Zone besteht.</p>
<h1 id="einstellenvonmultisource">EINSTellenVONMULTISOURCE</h1>
<p>Wahlen Sie mit der Fernbedienung ZR 2 den gewünschten Signalquelleneingang. Oder über die Frontplatte: Drucken Sie zweimal die Taste MULTISOURCE. In der ersten Zeile des Frontplatten-Anzeigefeldes erscheidt „Zone: CD" (Beispiel). Mit dem Einsteller VOLUME (SETUP) konnen Sie dann bidirektonal durch alle neun für die Buchsen MULTISOURCE OUT verfügbarbaren Audio/Video oder Nur-Audio-Signalquellen durchblättern. Die Bezeichnungen der Signalquellen werden im Frontplatten-Anzeigefeld angezeigt. Erfolgt 5 Sekunden lang keine Eingabe, wird die normale Funktion der Anzeige und des Einstellers wiederhergestellt.</p>
<h1 id="einstellen-der-multisource-lautstarke">EINSTELLEN DER MULTISOURCE- LAUTSTARKE</h1>
<p>Stellen Sie mit den Tasten [VOLUME / ] auf der Fernbedienung ZR 2 die Lautstärke ein. Oder über die Frontplatte: Drücken Sie einzelmal die Taste MULTISOURCE und stellen Sie anschließend mit dem Einsteller VOLUME (SETUP) die Lautstärke ein. In der letzten Zeile des Frontplatten-Anzeugefeldes wird die Lautstärke-Einstellung „Z.v: -40" (Beispiel) angezeigt. Erfolgt 5 Sekunden lang keine Eingabe, wird die normale Funktion der Anzeige und des Einstellers wiederhergestellt.</p>
<h1 id="bitte-beauchten-8">BITTE BEAuchtEN:</h1>
<ul>
<li>Der Eingang EXT5.1 ist für die Buchsen MULTISOURCE OUT nicht einstellbar. </li>
<li>Eine Signalquelle kann gleichzeitig an den Hauptausgaben und an den MultiSource-Ausgaben des S170i abgenommen werden. </li>
<li>Signale an den Buchsen MULTISOURCE OUT sind immer im Stereomodus, unabhängig vom gerade eingestellten Hörmodus für die S170i-Hauptausgabe (auch bei derselben Signalquelle). </li>
<li>MultiSource-Befehle und Funktionen erschinen nicht im OSD. </li>
<li>Kurzzeitig und zur Anzeige von OSD-Menus konnen über die BAS-Video-Buchse MON OUT Videosignale an die MultiSource-Zone gesendet werden. Bei länger dauernden Verbindungen muß allerdings mit Videosignalverlust gerechnet werden. Es wird nicht empfohlen, den S-Video-Monitorausgang für solche längere Zeiträume zu benutzen.</li>
</ul>
<h1 id="nad-link-2">NAD-LINK</h1>
<p>Mit NAD Link OUT konnen Fernbedienungsbefehle vom Vorverstärker/Prozessor S170i zu anderen Geräten, die mit NAD Link oder einem kompatiblen Eingang ausgestattet sind, weitergeleitet werden. NAD Link überträgt die Infrarot-Steuerbefehle, die der S170i von der Fernbedienung HTR 2 über den IR-Sensor auf der Frontplatte empfängt. NAD Link stellt sozusagen eine "Hardware"-Verbindung zu einem anderen NAD-Gerät her. Das Kabel damit ist ein Standard-Koaxialkabel mit gummisolierten Buchsen.</p>
<p>So kann der S170i externe Steuerbefehle von einer Zentrale oder einem entfernten Schaltsystem (oder von der Buchse NAD Link OUT an einem anderen NAD-Gerät) empfangen. Die empfangenen Befehle steuern den S170i und werden auch an die Buchse NAD Link OUT weitergeleitet. Das kann sehr hilfreich sein, wenn Sie die MultiSource-Funktion mit einem drahtgebundenen Schaltfeld oder einem Infrarot-Repeater (wie z. B. Xantech, Russound, Niles usw.) verwenden. So konnen Sie einen mit NAD Link ausgestatteten UKW-Tuner oder CD-Player und den S170i von der entfernten Stelle aus steuern. Durch In-Serie-Schalten von NAD Link OUT einer Komponente auf NAD Link IN einer anderen kann das Signal zu jedem Gerät weitergeleitet werden.</p>
<h1 id="bitte-beauchten-9">BITTE BEAuchtEN:</h1>
<p>Wenn ein Gerät denselben Steuerbefohl gleichzeitig vom IR-Sensor auf der Frontplatte UND dem NAD Link-Eingang empfängt, kann es sein, daß das Mikroprozessor-Steuersystem den Befohl nicht erkennt und der Befohl ignoriert wird. Um dies zu vermeiden, verbinden Sie nicht Geräte, die zur gleichen Zeit denselben Fernbedienungsbefohl empfangen (was der Falläre, wenn zwei Geräte sehr eng beieinander aufgestellt werden).</p>
<h1 id="systemintegration-rs-232">SYSTEMINTEGRATION (RS-232)</h1>
<p>Der RS232-Anschluß des S170i betiet viiele Integrationsmöglichkeiten in anspruchsvolle Media- und Heimautomationssysteme und ermöglich die volle Steuerung aller S170i-Funktionen. Über diesen Anschluß kann der S170i mit jedem anderen Gerät verbunden werden, das über einen RS232-Anschluß verfügt, wie z. B. ein Personalcomputer oder ein Heimautomationssystem. Jede Funktion, die über die Frontplatte oder die Fernbedienung HTR 2 ausfuhrbar ist, kann auch über den RS-232-Anschluß aufgerufen werden. AuBerdem werden die aktuellen Einstellungen des S170i, einschl. des MultiSource-Status, von der RS-232-Schnittstelle des S170i an den angeschlossenen PC oder ein anderes Gerät übertragen. So sind auch die MultiSource-Funktionen des S170i über RS232 voll steuerbar.</p>
<h1 id="technische-details">TECHNISCHE DETAILS</h1>
<p>Die Stiftbelegung des RS-232-AnschluBes folgt dem allgemeinen Standard:</p>
<table><tr><td>DB-9-Pin-Nr. Funktion</td><td>Funktion</td></tr><tr><td>2</td><td>Transmit Data (Daten senden)</td></tr><tr><td>3</td><td>Receive Data (Daten empfangen)</td></tr><tr><td>5</td><td>Signal-Masse (GND)</td></tr></table>
<h1 id="bitte-beauchten-10">BITTE BEAuchtEN:</h1>
<ul>
<li>Für den Anschluß des S170i an einen PC oder ein serialles Gerät muß ein „durchverbundenes" Standard-Serienkabel (kein Nullmodem-Kabel) verwendet werden. </li>
<li>Die serielle Kommunikation mit dem S170i muß folgendermaßen eingestellt werden: 8 Datenbit, keine Parity und 1 Stopbit, 12000 bps (Baud). (Da manche serielle Geräte nicht mit 12000 bpsCOMMUNIZIEREN können, ist als separates Zubehör ein Bitraten-Konverter zur Umwandlung der Kommunikation mit dem S170i in 9600 bps erhältlich. Wenden Sie sich an ihren NAD-Audiospezialisten.</li>
</ul>
<p>Zur seriellen Steuerung des S170i von einem PC aus kann eine Windows 95/98/ME-kompatible Anwendung mit einer vollständigen Beschreibung der seriellen Kommunikationsprotokolle des S170i von der NAD-Website http://www.NADelectronics.com heruntergeladen werden</p>
<p>Weitere Informationen dazu erhalten Sie von ihrem NAD-Spezialisten.</p>
<h1 id="die-htr-2-im-überblick">DIE HTR 2 IM ÜBERBLICK</h1>
<p>Steuert bis zu 8 Geräte. <br />
44 Funktionstasten. <br />
- Lernt bis zu 352 Steuerbefehle. <br />
- Speichert bis zu 44 Makros mit jeweils bis zu 64 Steuerbefehlen. <br />
- Konfigurierbare Punch-Through-Funktion (Durchschanten). <br />
- Tastenbeleuchting mit einstellbarer Leuchtdauer. <br />
- Enthält vorprogrammierte Sammlung von NAD-Fernbedienungsgodes.</p>
<p>Die NAD HTR 2 ist davon sehr nach dem Auspacken für die Bedienung von NAD-Geräten bereit, aber tatsächlich sind es acht Fernbedienungen in einer. Mit jeder der 8 Geräteauswahltasten im oberen Bereich der Fernbedienung kann eine neue „Seite" mit Fernbedienungscodes zur Übertragung mit den anderen 44 Tasten aufgerufen werden. Die HTR 2 kann Codes von practisch jeder Infrarot-Fernbedienung -ungeachtet der Marke - „lernen" und auf einer beliebigen Geräteauswahltaste speichern. Beim Einrichten der HTR 2 für die Bedienung eines kompletten Heimkinosystems ist es gaz logisch, die Codes vom DVD-Player auf die Geräteauswahltaste [DVD], die Codes für den Fernseher auf die Taste [TV] usw. zu legen. Aber dafür gibt es kein zwingendes Schema: Sie können beliebige Befehle für jeder beliebige Taste einer beliebigen Seite lernen halten (siehe weiter unter „Lernen von Codes anderer Fernbedienungen").</p>
<p>Die HTR 2 enthalt bereits einen komplett vorprogrammierten Satz NAD-Befehle auf der Geräteauswahlseite [AMP] und eine Befehlssammlung zur Bedienung der meisten NAD-Geräte für die entsprechenden Geräteauswahltasten DVD, CD, TUNER oder TAPE. Diese Standardbefehle sind permanent gespeichert, d. h. auch wenn Sie die HTR 2 mit neuen Befehlen an deren Stelle programmieren, bleiben die Befehle aus der Sammlung erhalten und konnen einfach wieder abgerufen werden, wenn Sie z. B. ein NAD-Gerät zu Ihr System hinzufugen (siehe „Löschemodus" weiter unter).</p>
<h1 id="die-htr-2-im-detail">DIE HTR 2 IM DETAIL</h1>
<p>Die HTR 2 ist in zwei Hauptbereiche eingeteilt: Die Geräteauswahltasten (Device Selector) im oberen Bereich der Fernbedienung und die restlichen 44 Funktionstasten.</p>
<p>Acht Geräteauswahltasten oben - [AMP], [DVD], [TV] usw. - bestimmten, welche Gerät die restlichen 44 Funktionstaten steuern. Eine Geräteauswahltaste bestimmt nur, welches Gerät von der HTR 2 bedient werden soll, sie dient nicht der Ausführung einer Funktion am Empfänger. Die Geräteauswahltasten sind in zwei vertikalen Reihen zu je vier Tasten angeordnet; die linke Reihe ist für Audiogeräte, die rechte für Videogeräte.</p>
<p>Steuertasten sind Funktionstasten, die Steuercodes von praktisch jeder anderen Infrarot-Fernbedienung „lichen“ können. Dadurch ist es möglich, die HTR 2 mit den Codes von Geräten, ungeachtet der Marke, zu programmieren. Alle Steuertasten der Geräteauswahltaste [AMP] sind für die Bedienung von NAD-Verständern, -Vorverständern und -Receivern vorprogrammiert. (Die HTR 2 kann über die Seiten [DVD], [CD], [TUNER] und [TAPE] auch weitere NAD-Komponenten steuern.)</p>
<p>Da die Steuertasten der HTR 2 je nach gewähler Geräteauswahltaste verschiedene Funktionen ausführten konnen, wird die aktuelle Funktion der Steuertasten auf der HTR 2 entsprechend farbig angezeigt. Die Farbe der Bezeichnungen der Geräteauswahltsten entspricht daher der Bezeichnung der Funktionstasten (wie beim Taschenrechner). Die orangerote Bezeichnung der Geräteauswahltaste [AMP] zum Beispiel entspricht der orangeroten Eingangsauswahlbezeichnung neben den numerischen Tasten: Ist die Seite [AMP] der HTR 2 aktiv, werden mit diesen Tasten die Versteller- oder Receivereingänge ausgewählt. Genauso bezieht sich die Farbe violett der Geräteauswahltaste [DVD] auf mehrere violette Bezeichnungen, die grüne Farbe der Geräteauswahltaste [TV] auf grüne Bezeichnungen usw.</p>
<h1 id="lernen-von-codes-anderer-fernbedienungen">LERNEN VON CODES ANDERER FERNBEDIENUNGEN</h1>
<p>Legen Sie zunachst die HTR 2 und die andere Fernbedienung im Abstand von ca. 5 cm der beiden Infrarot-Fenster bereits einander gegenüber.</p>
<ul>
<li>Lernmodus aktivieren: Drücken Sie auf der HTR 2 eine Geräteauswahltaste und die Aufzeinungsstaste (direkt unter der Taste [DISP]) gleichzeitig mindestens 3 Sekunden lang, bis die LED „Learn" in der Mitte der HTR 2 im grünen Dauerlicht leuchtet. </li>
<li>Drücken Sie die Steuertaste der HTR 2, die den Befehl aufnehmen soll; die LED "Learn" leuchtet gelb. </li>
<li>Drücken Sie die Funktionstaste auf der Quellen-Fernbedienung und halten Sie diese gedrückt. Die LED "Learn" der HTR 2 flackert eine oder zwei Sekunden lang gelb und leuchtet dann wieder im grünen Dauerlicht. Der Befehl ist gelernt. Wiederholen Sie diesen Vorgang für alle Befehle, die unter der ausgewählten Geräteauswahltaste gelernt werden sollen. </li>
<li>Wenn Sie mit dem Lernen aller Befehle für das gewährte Gerät fertig sind, drücken Sie die Geräteauswahltaste der HTR 2 erneut, um den Lernmodus zu beenden.</li>
</ul>
<h1 id="hinweis-7">HINWEIS</h1>
<p>Sollte die LED "Learn" nicht gelb flackern, mussen Sie möglicherweise den Abstand der beiden Fernbedienungen verändern oder neue Batterien in weitere Fernbedienungen einlagen. Leuchtet die LED "Learn" rot anstelle von grün, wurde der Befehl der Quellen-Fernbedienung nicht gelernt. Versuchen Sie es noch einmal. In seltenen Fälle ist das Infrarot-Format nicht mit der HTR 2 kompatibel.</p>
<h1 id="konfiguration-abbrechen">KONFIGURATION ABBRECHEN</h1>
<p>Durch vorzeitiges Drücken der aktiven Geräteauswahltaste können Sie die Konfiguration einer Taste abbrechen. Die LED „Learn" leuchtet dann rot.</p>
<h1 id="beispiel-lernen-von-dvd-pause">Beispiel: Lernen von „DVD Pause":</h1>
<ul>
<li>Legen Sie die HTR 2 und die Fernbedienung Ihres DVD-Players wie oben beschrieben gegenüber. </li>
<li>Drücken Sie auf der HTR 2 die Taste [DVD] und ), gleichzeitig, bis die LED „Learn" im grünen Dauerlicht leuchtet. </li>
<li>Drücken Sie die Taste (Pause) auf der HTR 2; die LED „Learn" leuchtet gelb. </li>
<li>Drücken Sie die Pausetaste der DVD-Fernbedienung und halten Sie diese gedrückt; die LED „Learn" auf der HTR 2 flackert gelb und leuchtet dann im grünen Dauerlicht. Der Befehl ist gelernt. </li>
<li>Drucken Sie die Taste [DVD] erneut, um den Lernmodus zu beenden.</li>
</ul>
<h1 id="bibliotheksmodus">BIBLIOTHEKSMODUS</h1>
<p>Um den Bibliotheksmodus aufzurufen, drücken und halten Sie eine Geräteauswahltaste und die Taste [AV PRESET] 3 Sekunden lang bis die Status-LED grün leuchtet. Im Bibliotheksmodus konnen Sie die verschiedene vorprogrammierten Befehlssätze nacheinander aufrufen und ausprobieren, ob für Ihr Gerät ein geeigneter damit ist. Weiter unter werden mehrere Arden der Navigation durch die Bibliotheks-Befehlssätze beschreiben. Die LED "Learn" blinkt zweimal, wenn alle verfügbaren Befehlssätze übertragen worden sind.</p>
<h1 id="zifferntasten">ZIFFERNTASTEN</h1>
<p>Mit den Zifferntasten (0 - 9) kann einer der Befehlssätze direkt ausgewählt werden. Geben Sie die dreistellige Befehlssatznummer ein. Nach dem Drücken der letzten Ziffer sendet die HTR 2 als Test automatisch einen Netz-Aus-Befehl, um sicherzustellen, daß Sie den richtigen Befehlssatz gewählt haben.</p>
<h1 id="pfeil-nach-oben-pfeil-nach-unten">PFEIL NACH OBEN / PFEIL NACH UNTEN</h1>
<p>Mit den Tasten Pfeil nach oben / Pfeil nach unter kann durch die verfügbaren Befehlssätze geblättert werden. Nach jedem Drücken auf eine Pfeiltaste sendet die HTR 2 einen Testbefehl (Netz Aus). Wenn Sie eine der Pfeiltasten gedrückt halten, werden pro Sekunde zwei der verfügbaren Befehlssätze durchgeblättert. Auf diese Weise konnen Sie den wichtigen Befehlssatz schnell aus den vorhandenen auswahlen.</p>
<h1 id="hinweis-8">HINWEIS</h1>
<p>Sie können den zum Testen übertragenen Befehländern. Wenn Sie eine Taste drücken, die im Bibliotheksmodus nicht für etwas andes verwendet wird, wird dieser Befehl übertragen. Alle nachfolgenden, durch Ändern der Befehlssätze ausgelösten Testbefehle werden den zuletzt gewählten Befehl verwenden. Dies kann bei Geräten Sinnvoll sein, die keinen Bereitschaftsmodus haben und für die diese Codesuche auch nicht Funktioniert. Es gibt z. B. CD-Player, die keinen Netz-Aus-Befehl haben, und für die Sie dann den Befehl „Play" als Testbefehl einsetzen können.</p>
<h1 id="enter-eingabe">ENTER (EINGABE)</h1>
<p>Wenn Sie die Enter-Taste im Bibliotheksmodus drücken, wird der aktuelle Befehlssatz aktiv und der Bibliotheksmodus verlassen.</p>
<h1 id="hinweis-9">HINWEIS</h1>
<p>Das Aktivieren eines Befehlssatzes deaktiviert alle gelernten Befehle und aktiven Punch-Through-Funktionen. Deaktivierte gelernte Befehle können wiederhergestellt werden (ohne erneutes Lernen). Eine Beschreibung dazu finden Sie im Abschnitt „Kopiermodus" in dieser Anleitung.</p>
<h1 id="display-2">DISPLAY</h1>
<p>Mit der Taste Display kann die Referenznummer desGPCa ausgewählten Befehlssatzes bestimmt werden. Nach dem Drucken der Display-Taste wird die Befehlssatznummer durch Blinken der Tastena TAPE, VCR und Macro entsprechend der ersten, zweiten und dritten Ziffer des Befehlssatzes angezeigt. Beispiel: Bei der Befehlssatznummer 103 blinkt die Taste TAPEomal und danach dreimal die MacroTaste.</p>
<h1 id="punch-through-durchschalten">PUNCH-THROUGH (DURCHSCHALTEN)</h1>
<p>Mit der Punch-Trough-Funktion der HTR 2 konnen Sie eine Funktionstaste von einer Geräteauswahrscheinite auf einer anderen erhalten, so daß z. B. die AMP-Funktion [SURR MODE] immer noch den S170i steuert, auch wenn die Geräteauswahrscheinite DVD aktiv ist.</p>
<h1 id="hinweis-10">HINWEIS</h1>
<p>Die Tasten [VOL] und [MUTE] der HTR 2 sind für alle Geräteauswahrscheinen als Punch-Through vorprogrammiert (außer TV): [VOL] und [MUTE] steuern unabhängig vom aktuell ausgewählten Gerät die Master-Lautstärke von NAD-Geräten. Die Kanal-Lautstärke-Tasten [SURR.] [CENTER] und [SUB] sind ebenfls für alle Geräte als Punch-Through vorprogrammiert.</p>
<p>Um eine Taste für Punch-Through zu programmieren, drücken Sie nach dem Aufrufen des Lernmodus und Drücken der gewünschten Punch-Through-Taste einfach zweimal die Gerätetaste des Gerätes, zu dem durchgeschaltet werden soll. Die Status-LED leuchtet grün; drücken Sie die Geräteauswahltaste erneut, um den Lernmodus zu verlassen.</p>
<h1 id="beispiel-durchschaften-zur-dvd-section-von-der-taste-amp-surr-mode">Beispiel: Durchschaften zur DVD-Section von der Taste AMP [SURR MODE]:</h1>
<ul>
<li>Drücken Sie auf der HTR 2 die Taste [DVD] und (Aufzeichnen) gleichzeitig, bis die LED „Learn" im grünen Dauerlicht leuchtet. </li>
<li>Drücken Sie [SURR MODE]; die LED „Learn" leuchtet geb. </li>
<li>Drücken Sie zweimal [AMP]; die LED „Learn“ leuchtet grün. </li>
<li>Drucken Sie die Taste [DVD] erneut, um den Lernmodus zu beenden.</li>
</ul>
<h1 id="kopieren-eines-befehls-von-einer-anderen-taste">KOPIEREN EINES BEFEHLS VON EINER ANDEREN TASTE</h1>
<p>Sie können einen Befehl von jeder beliebigen HTR 2-Taste auf eine andere Taste kopieren. Um eine Steuertastenfunktion zu kopieren, drücken Sie nach dem Aufrufen des Lernmodus und Drücken der Taste, auf die kopiert werden soll, einfach die Geräteteaste, die Sie kopieren möchen (zuerst die entsprechende Geräteauswahltaste, falls sie sich in einer anderen Geräteauswahrscheinmente befindet). Die Status-LED leuchtet grün; drücken Sie die Geräteauswahltaste erneut, um den Lernmodus zu verlassen.</p>
<h1 id="beispiel-kopieren-des-pausebefehls-von-der-cd-taste-auf-die-amp-taste">Beispiel: Kopieren des Pausebefehls von der CD-Taste auf die AMP Taste:</h1>
<ul>
<li>Drücken Sie auf der HTR 2 die Taste [AMP] und (Aufzeichen) gleichzeitig, bis die LED „Learn" im grünen Dauerlicht leuchtet. </li>
<li>Drucken Sie III (Pause); die LED "Learn" leuchtet gelb. </li>
<li>Drucken Sie [ CD ]; drucken Sie III (Pause); die LED „Learn" leuchtet grün. </li>
<li>Drücken Sie die Taste [AMP] erneut, um den Lernmodus zu beenden.</li>
</ul>
<h1 id="hinweis-11">HINWEIS</h1>
<ul>
<li>Die Funktionen „Kopieren" und „Punch-Through" sind gleich. Wenn Sie jedoch einen Befehl kopieren und danach löschen oder den Originalbefehl (Quellentaste) überschreiben, bleibt der Ursprüngliche Befehl der Taste, auf die kopiert worden ist, unverändert. Wenn Sie auf einen Befehl durchschaften und dann die Originaltaste löschen oder überschreiben,ändert sich auch die durchgeschaltete Funktion entsprechend. </li>
<li>Sind Quellenfunktion und Zielfunktion gleich, stellt die HTR-2 einen vorher gelöschten, gelernten Befehl wieder her, falls dieser existiert. Wenn Sie also einen gelernten Befehl aus Versehenlöschen oder einen Befehlssatz aus der Bibliothek über gelernte Befehle geladen haben, konnen Sie diese so Schnell wiederherstellen, ohne sie erneut lernen zu müssen.</li>
</ul>
<h1 id="makrobefehle">MAKROBEFEHLE</h1>
<p>Ein Makrobefehl ist eine Reihe von zwei oder mehr (bis zu 64) Fernbedienungscodes, die automatisch durch Drücken von zwei Tasten ausgesendet wird. Mit einem Makro konnen Sie einfache Befehlssequenzen automatischen, wie z. B. „DVD-Player einschalten und danach „Play' drucken". Sie konnen aber auch ein umfangreiches Makro zusammenstellen, um ein ganzes System einzuschalten, das Wiedergabegerät und den Hörmodus auszuwahlen und gleich mit der Wiedergabe zu beginnen - und auch das alles mit nur einem einzigen Tastendruck. Die HTR 2 kann ein Makro auf jeder Funktionstaste speichern (mit Ausnahme der Geräteauswahltasten).</p>
<h1 id="hinweis-12">HINWEIS</h1>
<p>Makros sind unabhängig vom gerade ausgewählten Gerät.</p>
<h1 id="aufzeichnen-von-makros">AUFZEICHNEN VON MAKROS</h1>
<p>Zur Aufzeichnung eines Makros drücken Sie 3 Sekunden lang gleichzeitig die Taste [MACRO] und die HTR 2-Funktionstaste, der Sie das Makro zuordenen möchten; die Status-LED leuchtet grün. Die Macro-Taste leuchtet ebenalls auf. Drücken Sie jetzt nacheinander die Steuertasten, die im Makro gespeichert werden sollen und achten Sie darauf, immer zuerst die erforderliche Geräteauswahltaste für jeder Funktion zu drucken (während der Makraufzeichnung konnen Sie die Geräte wechseln so oft Sie wollen). Das erhögt die Aufzeichnung von Makros mit Befehlen für mehr als ein Gerät. Wenn Sie mit der Eingabe der Befehlsssequenz fertig sind, drücken Sie zum Speichern des Makros die Taste [MACRO] erneut; die LED „Learn" und die Taste [MACRO] verlösen.</p>
<h1 id="hinweis-13">HINWEIS</h1>
<p>In einem Makro können bis zu 64 Befehlsschritte gespeichert werden. Wir在这种 Zahl übersritten, erfolgt die automatische Speicherung nach der Eingabe des 64. Befehls.</p>
<h1 id="beispiel-aufzeichnen-eines-makros-für-die-taste-0-um-den-nad-receiver-und-dvd-player-einzuschalten-den-dvd-eingang-zu-aktivieren-und-mit-der-wiedergabe-zu-beginnen">Beispiel: Aufzeichnen eines Makros für die Taste [0], um den NAD-Receiver und DVD-Player einzuschalten, den DVD-Eingang zu aktivieren und mit der Wiedergabe zu beginnen:</h1>
<ul>
<li>Drücken Sie auf der HTR 2 die Taste [MACRO] und [0] (numerisch Null) gleichzeitig, bis die LED "Learn" im grünen Dauerlicht leuchtet. </li>
<li>Drücken Sie [AMP]; drücken Sie [ON]; drücken Sie [DVD]; drücken Sie [ON]; drücken Sie [AMP]; drücken Sie [1] (rot „DVD"); drücken Sie [DVD]; drücken Sie [Play] (nach jedem Schritt blinkt die Geräteauswahltaste). </li>
<li>Drücken Sie die Taste [MACRO] erneut, um den Makroaufzeinungsmodus zu beenden.</li>
</ul>
<p>Zum Löschen eines Makros führen Sie die o. g. Schritte ohne Eingabe von Funktionen durch.</p>
<h1 id="ausführen-von-makros">AUSFühREN VON MAKROS</h1>
<p>Zum Ausführren eines Makros drücken Sie zuerst die Taste [MACRO]; ihre Tastenbeleuchtung leuchtet 5 Sekunden lang. Solange die Macro-Taste leuchtet drücken Sie die HTR 2-Taste, für die ein Makro aufgezeichnet worden ist (im o. g. Fall die Taste [0]). Das entsprechende Makro wird gestartet; bei jedem ausgewährten Schritt blinkt kurz die dazugehörende Geräteauswahltaste; ist die Ausführung beendet, verloßt die Beleuchtung der Taste [MACRO]. Drücken Sie während der Ausführung eines Makros irgend eine andere HTR 2-Taste, wird die Makroausfuhrung abgebrochen. Denken Sie daran, die HTR 2 so zu halten, daß der Infrarot-Sender die Zielkomponenten aktivieren kann.</p>
<h1 id="hinweis-14">HINWEIS</h1>
<p>Bei der Ausführung von Makros wird automatisch eine Verzögerung von 1 Sekunde zwischen die Befehle eingefegt. Wenn Sie eine länger Verzögerung als 1 Sekunde zwischen bestimmten Befehlen benötigen, z. B. um einem Gerät genügd Zeit zum vollständigen Hochfahren zu geben, konnen Sie „leere" Schritte in das Makro eingufen. Wenn beispelsweise die Taste [TITLE] für ihren CD-Player nicht verwendet wird, konnen Sie mit der Aufzeichnung these Befehls eine zusätzliche Verzögerung in das Makro eingufen.</p>
<h1 id="leuchtdauer-der-tastenbeleuchtung">LEUCHTDAUER DER TASTENBELEUCHTUNG</h1>
<p>Die Tastenbeleuchting der HTR 2 kann für eine Leuchtdauer von 0-9 Sekunden eingestellt werden. Der Standardwert ist 5 Sekunden.</p>
<p>Zum Einstellen der Leuchtdauer drücken Sie gleichzeitig und 3 Sekunden lang die HTR 2-Taste [DISP] und eine Zifferntaste [0-9], wobei die Ziffer der gewünschten Leuchtdauer entspricht; zur Bestätigung der neuen Einstellung blinkt die LED "Learn" zweimal. Bei einer Einstellung von Null ist die Tastenbeleuchting deaktiviert.</p>
<h1 id="hinweis-15">HINWEIS</h1>
<p>Die Tastenbeleuchtung ist der größte Verbraucher für die Batterien der HTR 2. Eine kurze Leuchtdauer der Tastenbeleuchtung verlangert die Lebensdauer der Batterien merklich; schalten Sie sie ganz aus (Einstellung auf O Sekunden), halten die Batterien noch länger.</p>
<h1 id="zurücksetzen-auf-werkseinstellung">ZURÜCKSETZEN Auf WERKSEINSTELLUNG</h1>
<p>Die HTR 2 kann auf ihre Werkseinstellungen zurückgesetzt werden. Dabei werden alle gelernten Befehle, kopierten und durchgeschalteten (Punch-Through) Tasten, Makros und anderen Einstellungen gelöscht und alle Tasten auf die vorprogrammierten Bibliotheksbefehle zurückgesetzt. Mocht den Sie die Werkseinstellungen aktivieren, drücken Sie gleichzeitig und 10 Sekunden lang die HTR 2-Taste [ON] und [RTN]; die LED „Learn" beginnnt grün zu blinken. Lassen Sie [ON] und [RTN] vor dem zweiten Blinken wieder los; zur Anzeige, daß die Fernbedienung zurückgesetzt worden ist, leuchtet die LED „Learn" rot.</p>
<h1 id="hinweis-16">HINWEIS</h1>
<p>Sie,müssen [ON]und [RTN]vor dem Verlöschen des zweiten Blinkens loslassen,sonst wird die Fernbedienung nicht zurückgesetzt;wiederholen Sie in einem solchen Fall dieGPCe Prozedur.</p>
<h1 id="loschmodus">LOSCHMODUS</h1>
<p>Die HTR 2 kann gelernen, kopierte und Standard-Bibliotheksbefehle auf jeder beliebigen Taste speichern. (Die Standard-Bibliotheksbefehle sind die vorprogrammierten NAD-Codes wie z. B. die systemeigenen NAD-Receiver-Befehle auf der Seite [AMP].) Die Befehle einer Taste konnen Sie ebenenweise bis hinunter zum Standard-Bibliotheksbefehllöschen und darauf gelernte Befehle, durchgeschaltete (Punch-Through) Funktionen und kopierte Tasten entfern.</p>
<h1 id="hinweis-17">HINWEIS</h1>
<p>Da Standard-Bibliotheksbefehle nicht gelöscht werden können, brauchen Sie sich keine Sorgen zu machen, daß der Lösmodus irreparable Schäden anrichtet.</p>
<p>Um den Löschemodus aufzurufen, drücken Sie gleichzeitig und 3 Sekunden lang die gewünschte Geräteauswahltaste und die Taste [RTN], bis die LED „Learn“ grün aufleuchtet. Drücken Sie die Funktionstaste, deren Befehl Sie loschen möchten; die LED „Learn“ blinkt; wie oft die LED blinkt hängt davon ab, welche Funktion aktiv geworden ist - siehe Tabelle weiter unter. Drücken Sie die aktive Geräteauswahltaste erneut, um den Löschemodus zu verlassen.</p>
<h1 id="blinken">Blinken</h1>
<p>1</p>
<p>2</p>
<p>3</p>
<h1 id="befehlstyp">Befehlstyp</h1>
<p>Standard-Bibliotheksbefehl</p>
<p>Kopierter Bibliotheksbefehl</p>
<p>Gelernter Befehl</p>
<h1 id="zusammenfassung-der-funktionen">ZUSAMMENFASSUNG DER FUNKTIONEN</h1>
<h1 id="funktion">Funktion</h1>
<p>Lernen/Kopieren/Punch Through</p>
<p>Bibliotheksmodus</p>
<p>Löschmodus</p>
<p>Makroaufzeichnung</p>
<p>Leuchtdauer der Tastenbeleuchting</p>
<p>Zurücksetzen auf Werkseinstellung</p>
<h1 id="zudruckende-tasten-3-sekunden-lang">Zudruckende Tasten (3 Sekunden lang)</h1>
<p>Geratetaste + Taste Record</p>
<p>Geratetaste + Taste AV Preset</p>
<p>Geratetaste + Taste Return</p>
<p>Taste Macro + Funktionstaste</p>
<p>Taste Display + numerische Zifferntaste</p>
<p>(siehe Abschnitt über Werkseinstellung)</p>
<h1 id="befehlssätze-der-htr-2">BEFEHLSSÄTZE DER HTR 2</h1>
<table><tr><td>Nummer</td><td>Beschreibung</td></tr><tr><td>100</td><td>Receiver mit separator Ein/Aus</td></tr><tr><td>101</td><td>Receiver mit Umschalt-Ein/Aus</td></tr><tr><td>102</td><td>S170</td></tr><tr><td>103</td><td>L75 L76</td></tr><tr><td>104</td><td>2. Zone</td></tr><tr><td>200</td><td>CD Player</td></tr><tr><td>201</td><td>CD Player (alt)</td></tr><tr><td>300</td><td>Tuner</td></tr><tr><td>301</td><td>L75, L76 Tuner</td></tr><tr><td>400</td><td>Kassettendeck B</td></tr><tr><td>401</td><td>Kassettendeck A</td></tr><tr><td>500</td><td>TV 270</td></tr><tr><td>501</td><td>MR13</td></tr><tr><td>502</td><td>MR20</td></tr><tr><td>600</td><td>T562</td></tr><tr><td>601</td><td>T550, L55, L56</td></tr><tr><td>602</td><td>T531, T571</td></tr><tr><td>602</td><td>T512, T532, T572</td></tr></table>
<h1 id="problemlosung">PROBLEMLOSUNG</h1>
<table><tr><td>BEDINGUNG</td><td>MÖGLICHE ursache(N)</td><td>MÖGLICHE LösUNG(EN)</td></tr><tr><td>KEIN TON AUS ALLEN KANÄLEN</td><td>·Netzstecker gezogen
·Netz ist nicht eingeschaltet
·Steckdose ohne Spannung
·Tape Monitor aktiv</td><td>Netzkabel, Verbindung und Steckdose prüfen
·Tape Monitor deaktivieren</td></tr><tr><td>KEIN TON AUS MANCHEN KANÄLEN</td><td>·Fehlerhafte/fehlende Kabel
·Kanä in <Speaker setup> auf „None" (Nicht installiert) eingestellt
·Leistungsverträker oder Laatsprecherverbindungen fehlerhaft</td><td>Kabel überprüften
·<Speaker setup> überprüften
·Leistungsverträker, Verkabelung und Laatsprecher überprüften</td></tr><tr><td>KEIN TON AUS SURROUND-KANÄLEN</td><td>·Kein Surround-Hörmodi aktiv
·Surround-Kanä in <Speaker setup> auf “None” (Nicht installiert) eingestellt
·Pegel der Surround-Kanä im Menu <Levels setup> zu niedrig eingestellt</td><td>·Geeigneten Hörmodus auswähen
·<Speakers setup> oder <Levels setup> korrigieren</td></tr><tr><td>KEIN TON VOM SUBWOOFER</td><td>Subwoofer ist aus, ohne Stromversorgung oder falsch angeschlossen
·Subwoofer in <Speaker setup> auf „OFF" (Aus) eingestellt
·Sub-Pegel in <Levels setup> zu niedrig eingestellt</td><td>·Subwoofer einschalten, Steckdose und/oder Anschlüsse des Subwooferers überprüften
·<Speaker setup> oder <Levels setup> korrigieren</td></tr><tr><td>KEIN TON AUS CENTER-KANAL</td><td>·Signalquelle ist 2/0 usw. Dolby-Digital- oder DTS-Aufzeichnung verwendet keinen Center-Kanal
·Center in <Speaker setup> auf „OFF" (Aus) eingestellt
·Center-Pegel in <Levels setup> zu niedrig eingestellt</td><td>·Bekannte 5.1-Kanal-Aufzeichnung abspielen oder Dolby Pro Logic oder Mono-Modus auswähen
·<Speakers setup> oder <Levels setup> korrigieren</td></tr><tr><td>KEIN DOLBY DIGITAL/DTS</td><td>·Der digitale Ausgang einer Signalquelle ist nicht mit dem digitalen Eingang des S170i verbunden</td><td>·Anschlüsse prüfen</td></tr><tr><td>S170i REAGIERT NICT NOT Auf FERNBEDIENUNG HTR 2</td><td>·Batterien sind erschöpft oder falsch eingelegt
·IR-Sender der Fernbedienung oder IR-Empfänger am S170i ist verdeckt
·S170i-Frontplatte stehen in starkem Sonnenlicht oder in sehr heller Umgebungsbeleuchtung</td><td>·Batterien überprüften
·IR-Fenster überprüften und klare Sightverbindung von der Fernbedienung zum S171i sicherstellen
·Einfall von Sonnenlicht/Raumbeuchtung reduzieren</td></tr><tr><td>S170i REAGIERT NICT NOT Auf EINGABEN VON DER FRONTPLATTE</td><td>·Mikroprozessorfahrher</td><td>·S170i über den Netzschalter am Gerät ausschalten und Netzstecker aus der Steckdoseziehen
·5 Minuten warten, wiederanschieben und einschalten.</td></tr></table>
<p>Dekodierformate Dolby Digital, Dolby Digital EX, Dolby Pro Logic,</p>
<p>Dolby Pro Logic II, DTS, DTS ES, DTS Neo:6,</p>
<p>THX Surround EX, THX Ultra 2</p>
<p>Abtastraten 32kHz - 44,1kHz - 48kHz - 96kHz</p>
<p>Modi EARS,Party</p>
<h1 id="stereo-analog-bypass-2">STEREO (ANALOG BYPASS)</h1>
<p>Eingangsimpedanz, analog 16kΩ/100pF</p>
<p>Bandbreite, analog 20Hz - 20kHz +/- 0,2dB</p>
<p>Max. Eingangsgepel 3 V/eff.</p>
<p>Klirrfaktor 0,005%</p>
<p>Rauschabstand >90dB</p>
<p>Dynamikbereich 95dB</p>
<p>Kanaltrennung, analog >95dB</p>
<p>Übersprechen >90dB</p>
<p>Max. Ausgangspegel 6 V/eff.</p>
<h1 id="ausgangsimpedanz">AUSGANGSIMPEDANZ</h1>
<p>Main Pre-out 56Ω</p>
<p>Tape-Ausgang 470Ω</p>
<p>Mehrfachraum-Ausgang 470Ω</p>
<h1 id="klangregelung">KLANGREGELUNG</h1>
<p>Bass (20Hz) +/- 12dB</p>
<p>Hohen (20kHz) +/- 12dB</p>
<h1 id="digitale-eingangsleistung">DIGITALE EINGANGSLEISTUNG</h1>
<p>Klirrfactor (Bandbreite 10Hz - 20kHz) 0,005%</p>
<p>Eingangsimpedanz, digital 75Ω</p>
<h1 id="video-3">VIDEO</h1>
<p>Eingangs- und Ausgangsimpedanz 75Ω</p>
<h1 id="abmessagengen-und-gewich">ABMESSAGENGEN UND GEWICH</h1>
<p>GröBe (B x H x T) 450 x 97 x 285 mm</p>
<p>Nettogewicht 4,99kg</p>
<p>Versandgewicht 5,89kg</p>
<p><img alt="" src="images/7cc4cf44c9f8622319e602dd0407109ae0d5a0bf50e2e4180faa0082c8093f1a.jpg" /></p>
<p>www.NADelectronics.com</p>
<p>©2003 NAD ELECTRONICS INTERNATIONAL A DIVISION OF LENBROOK INDUSTRIES LIMITED</p>
<p><img alt="" src="images/7921d95da7c804ab8c5fb8a7c15c9cd3372f32eb21afa3abe398e9ff4f094742.jpg" /></p>
<p>Manual del Nombre</p>
<p><img alt="" src="images/bb7fa121b85002b96029e7e930ba3c907e03429c3f0c9971d913c8bc35445322.jpg" /></p>
<h1 id="expiacion-de-simbolos-graficos">EXPIACION DE SIMBOLOS GRAFICOS</h1>
<p><img alt="" src="images/0f54462473062b2c9aa4af8656f58ebf5ec8db99d281dea447bd2d735397b2a4.jpg" /></p>
<p>El relampago con symbolo deckeza de flecha bajo de un triangulo equilatero es para alertar al usuario sobre la presencia de "montaje peligioso" no aislado bajo de la caja del producto que pueda tener magnitud suficiente para constituir un riesgo deCHOque elctrico para las personas.</p>
<p><img alt="" src="images/f66f1cfb2dbc9b1f570b2c338ec18c7c55985cc4f98fdd5582b24598a0033955.jpg" /></p>
<p>El signo de exclamacion bajo de un triangulo equilatero es para alertar al usuario sobre la presencia de instrucciones importantes de funciona y mantenimiento (servicio) en los impresos que acompanan al aparato.</p>
<h1 id="precauciones">PRECAUCIONES</h1>
<p>Lea las Instrucciones de Funcionamento cuidadasa y Completely ante de hacer funciona el equipo. Asegürese de guardar las Instrucciones de Funcionamento para consulta futura. Todas las advertencias y precauciones de las Instrucciones de Funcionamento y las que hay en el equipo se deben cumplir estRICTamente, asi como también las sugerencias de seguridad siguientes.</p>
<h1 id="installacion">INSTALLACION</h1>
<p>1 Agua y Humedad - No use este equipo circa del agua como circa de una bañera, lavabo, piscina, o similar. <br />
2 Calor - No use este equipo cerca de fuentes de calor, incluyendo ventilaciones de calefacion, estufas y除外 aparatos que generan calor. Tampoco debe colocarse en temperatas inferiores a 5^ (41^) o superiores a 35^ (95^) . <br />
3 Superficie de montaje - Coloque el equipo sobre una superficie plana y uniforme. <br />
4 Ventilación - El equipo debe colocarse con un espacio adecuado a su alrededor, de modo que se asegure ventilación apropiada. Deje una separación de 10 cm (4 in.) desde la parte trasera y la parte superior del equipo, y 5 cm (2 in.) desde cada lado. - No loonga sobre una cama, estera, o superficie similar que pueda bloquear las aberturas de ventilación. - No instale el equipo en un armario de biblioteca, ni en un estante herméticamente cerrado en que se impida la ventilación. <br />
5 Entrada de objetivos y liquidos - Tenga cuidado de que no deturen en el equipo objetivos ni liquidos a工程技术 de las aberturas de ventilación. <br />
6 Carritos y soportes - Si se coloca o monta sobre un soporte o carrito, el equipo ha de moverse con cuidado. Las paradas rápidas, la fuerza excessiva, y las superficies desiguales peuvent hacer que el equipo y el carrito se vuelquen o caigan. <br />
7 Condensation - Se pueda formar humedad sobre las lentes de la toma de discos CD cuando:</p>
<ul>
<li>El equipo se traslada desde un situo frío a un situo caliente. </li>
<li>El sistemas de calefaction se acababa de encender. </li>
<li>El equipo se usa en una habitación muy humeda. </li>
<li>El equipo se enfiía con un acondicionador de aire.</li>
</ul>
<p>Cuando este equipo Tiene condensation en el interior, pueda que no funciona normalmente. Si ocurre este, deje el equipo duranteunas horas, bajo intente hacerlo funcionaloanother vez.</p>
<p>8 Montaje en pared o techo - El equipo no debe montarse sobre una pared o techo, a no ser que se especifique en las Instrucciones de Funcionamento.</p>
<h1 id="iadvertencia-para-reducir-el-riesgo-de-incendio-o-choque-electrico-no-exponga-este-aparato-a-la-lluvia-o-la-humedad">iADVERTENCIA! PARA REDUCIR EL RIESGO DE INCENDIO O CHOQUE ELECTRICO, NO EXPONGA Este APARATO A LA LLUVIA O LA HUMEDAD</h1>
<p>Este producto está fabricado para que cumpla con los requisitos de la interferencia de radio de la COMUNIDAD EUROPEA, DIRECTIVA EEC 89/68/EEC y 73/23/EEC.</p>
<h1 id="energia-electrica">ENERGIA ELECTRICA</h1>
<p>1 Fuentes de Energía Eléctrica - Conecte este equipo solamente a las fuentes de energia electrónica asignadas en las Instrucciones de Funcionimiento, y tal como se indica con MARCAS en el equipo. <br />
2 Polarizacion - Como prestacion de seguridadalgunos equipos tienen enchufes polarizados de CA que unicamenteuen insertarse deuna manera enuna toma deenergiaelctrica.Sis dificil o imposible insertar el enchufe de CA en una toma,de la vuelta al enchufe e inteintelo otherv. Si todavia no se inserta fácilmente en la toma,rogamos llame a un technician de service para que haga el service o cambie la toma.Para evitar que se inutilice la prestacion de seguridad del enchufe polarizado,no lo fuerc para insertarlo en la toma. <br />
3 Cordón eletrico de CA - Cuando desconecte el cordón eletrico de CA, sáquelo tirando del enchufe eletrico de CA. No tire del cordónismo.</p>
<ul>
<li>No maneje jamás el enchufe electrico de CA con las manos húmedas, porque this produces a un incendio oCHOque electrico. </li>
<li>Los cordones electricos deben enrutarse de modo que se eviten curvas severas, se perforen los cordones o se pisen. Preste atencion particular al cordon que sale del equipo y va a la toma electrica. </li>
<li>Evite sobrecargar las tomas de CA y los cordones de tension más allá de su capacité, porque esta podra producir incendio oCHOque electrico.</li>
</ul>
<p>4 Cordón de extension - Para poder a impeder el Choque eletrico, no use un enchufe eletrico de CA polarizzato con un cordón de extension, un receptáculo u otheras tomas a no ser que el enchufe polarizzato pueda insertarse Completely para impedir que queden expuestos las espinas del enchufe. <br />
5 Cuando no se usa - Desenchufe el cordón electrico de CA de la toma de CA si el equipo no va a usarse durante various mezes o más. Cuando el enchufe está insertado, continua pasando al equipo unaiosa�能a�能idad de corriente, aun cuando la alimentacion electrica está desconnectada.</p>
<h1 id="precaucion">PRECAUCION</h1>
<p>Las modificaciones o ajustes de este producto, no expresamente aprobadas por el fabricante,SEO anular el derecho o autorizacion del usuario a hacer funciona este producto.</p>
<h1 id="mantenimiento">MANTENIMIENTO</h1>
<p>Limpie el equipo solamente como se recomienda en las Instrucciones de Funcioncimiento.</p>
<h1 id="dano-que-requiere-servicio">DANO QUE REQUIERE SERVICIO</h1>
<p>Haga que el servicios del equipo lo realice un技术服务 si</p>
<ul>
<li>El enchufe electrico de CA se ha dadado. </li>
<li>Han penetrado en el equipo objetos o liquidos extraños. </li>
<li>El equipo ha;quedado expuesto a la lluvia o al agua - el equipo no parece funcional normalmente. </li>
<li>El equipo muestra un notable cambio de rendimiento. </li>
<li>El equipo se ha caido, o el armarito ha sido danado.</li>
</ul>
<h1 id="no-intente-hacer-usted-mismo-el-servicio-del-equipo">NO INTENTE HACER USTED Mismo EL SERVICIO DEL EQUIPO</h1>
<h1 id="registro-del-propietario">REGISTRO DEL PROPIETARIO</h1>
<p>Para su comodidad, registre el número de modelos y número de série (los encontrará en la parte trasera de su aparato) en el espacio provisto a continuación. Rogamos los indique cuando contacte a su concesionario en caso de dificultad.</p>
<p>Modelo No.:</p>
<p>Serie No..</p>
<p>Informacion de Seguridad 3</p>
<p>Index 4</p>
<p>Aprovechando maximo el NAD S170i 5</p>
<p>Desembalaje y preparacion 6</p>
<p>Contenido de la caja 6</p>
<p>Elección de unaubicación 6</p>
<p>Información sobre el S170i 7</p>
<p>E.A.R.S. 7</p>
<p>Información sobre THX 7</p>
<p>Facilitad deutilizacion 7</p>
<p>Integrazione 7</p>
<p>Facilitad de mayor 8</p>
<p>Información sobre el mando a distancia Sistema HTR 2 8</p>
<p>Información sobre el mando a distancia ZR 2 Segunda Zona 8</p>
<p>Puestarapidenafunctionamento 9</p>
<p>Reproduccion de un这部电影 DVD (o Música de CD) 9</p>
<p>Panel Delantero 10</p>
<p>Panel Trasero 11</p>
<p>Preparación del S170i 12</p>
<p>Comienzo 12</p>
<p>Tratamente de zumbidos y ruidos 12</p>
<p>Información sobre las Visualizaciones en Pantalla (OSD) ylecture de panel delantero . .13</p>
<p>Visualization de los Menues 13</p>
<p>Configuración del S170i 14</p>
<p>Preparación de Visualización 14</p>
<p>Preparación de Audio 15</p>
<p>Preparación de altavoces 17</p>
<p>Preparación de Nivel 18</p>
<p>Preparación de Retardo 19</p>
<p>Preparación de fuente 20</p>
<p>Preparación de Disparador 21</p>
<p>Utilización del S170i 23</p>
<p>Selección de fuentes 23</p>
<p>Ajusted volume 24</p>
<p>Ajuste de los Modos de Escucha 24</p>
<p>Ajuste de los Niveles de Canal 27</p>
<p>Ajuste de contrôles de tonos 28</p>
<p>Operaciones del Panel Delantero 29</p>
<p>Escucha en una Zona Remota (Multiples fuentes) (MultiSource) 30</p>
<p>Conexión NAD (NAD Link) 31</p>
<p>Integrazione del Sistema (RS-232) 31</p>
<p>Utilización del mando a distancia HTR 2 32</p>
<p>Resumen del HTR 2 32</p>
<p>Córgidos de aprendizaje desdeotrosmandosadistancia 33</p>
<p>Modo de biblioteca (Library Mode) 33</p>
<p>Acceso directo 34</p>
<p>Copia de unaorden desdeotra tecla 35</p>
<p>Orderenes macro 35</p>
<p>Grabación de macros 35</p>
<p>Ejecución de macros 36</p>
<p>Tiempo limite de iluminacion de tecla 36</p>
<p>Reposicion al estado de fabrica (Factory Reset) 36</p>
<p>Modo de borno (Delete Mode) 37</p>
<p>Resumen de Prestaciones 37</p>
<p>Cuadros del HTR 2 38</p>
<p>Localizacion de fallos 39</p>
<p>Especificaciones 40</p>
<h1 id="le-agradecemos-que-haya-elegido-nad">LE AGRADECEmos QUE HAYA ELEGIDO NAD.</h1>
<p>El Preamplificador de Sonido Surround S170i A/V es uno de los procesadores /preamplificadores de audio surround más avanzados technologically que se han inventado, incorpando procesamento de Signals digital de 32 bitios de velocidad ultra alta con una arquitectura que es totalmente capaz de mejoras (tantó en hardware como en software), y conversion de digital a analógico de muestreo extraordinaryamente preciso con precision de 24 bitios/muestreo de 96 kHz para todos los canales.</p>
<p>Lo que es más importante, es uno de los diseños disponibles más musicalmente transparentes y espacialmente precios, la culminación de todo cuando hemosalreadycido durante un cuarto de siglo sobre la reproduccion de la música y el sonido en el teatro en casa. Con la filosofía de Diseño Música lo primero ("Music First") de nuestra compañero como su principio de guía de diseño, confiamos en que el S170i裱pirá这是我们 promesa a usted de proportionscarle una experiencia del teatro en casa de sonido surround que es tanto de la más alta technología como una escucha de música genuinamente de calidad para el melómano, durante muchos años.</p>
<p>Le animamos a que dedique algunos Minutes a leer Completely este manual. Dedicando un poco de tiempoquiry al principio, tal vez le ahorre bastante tiempo más adelante,adelmas de ser con mucho la mejor direccion de asegurar que aproveche al máximo su inversionion en el NAD S170i, y obtenga el mejorprovecho de este potente y flexible componente del "teatro en casa".</p>
<p>Una vez más, le instamos a que registre la propidad de su S170i en el situo Worldwide Web de NAD:</p>
<h1 id="httpnadelectronicscomwregistrationhtml-3">HTTP://NADELECTRONICS.COM/W/REGISTRATION.HTML</h1>
<p>Esto es con mucho el mejor modo de asegurar que nosotros en la central mundial de NAD podamos informarle deactualizaciones posibles futuras de software y ofrecer ambios que poderoomayar notablemente el rendimiento yutilidadde su S170i.Le rogamos también que envie su tarjeta de garantia, de modo que suorganization NAD localonga un registrar de su compra,yque guarde usted su recibo de comprar original. Esto le asegurar a usted el service de garantia en su zona.</p>
<h1 id="contenido-de-la-caja">CONTENIDO DE LA CAJA</h1>
<p>Embalado con el preamplificador S170i encontrará lo siguientes:</p>
<ul>
<li>Un cable desmontable CA (si lo desea, pueda sustituirserialquier cable CA estandar IEC de potencia en varios apropiada). <br />
1 Cable de disparador CC </li>
<li>El mando a distancia de aprendizaje HTR 2 con pilas (4 x AAA) </li>
<li>El mando a distancia de segunda zona ZR 2 con pila (1 x CR2025) </li>
<li>Un par de guantes de algogón blanco - para manejar su S170i durante la preparación sin temor a produir arañazos nideoarhuellas dactilares. </li>
<li>Este manual del usuario.</li>
</ul>
<h1 id="guarde-el-embalaje">GUARDE EL EMBALAJE</h1>
<p>Sirvase guardar la caja y todo el embalaje en el que llego su S170i. Si se cambia de domicilio o precise transporte su preamplificador por otheras razones, este sera con referencia el embalaje más seguro para realizarlo. Hemos visto componentes en perfectas conditiones que se han dado durante el transporte por falta de una caja de carton adecuada para su transporte. Asípus, guarde la caja.</p>
<h1 id="eleccion-de-una-ubicacion">ELECCION DE UNA UBICACION</h1>
<p>Esperamos que usté reconozca que la calidad del acabado y el aspecto del S170i le merecen un lugar destacado enequalquier teatro en casa o sistemas de musica. Elija unaubicacionque este bien ventilada (con various centimetros por lo menos en ambos lados y por detrás) y que proportionscione un camino libre de visión, Dentro de 25 pies/8 metros, entre el panel delantero del receptor y su posicón primaria de esucha/visión -de este modo se asegurarán comunicaciones fiables del mando a distancia de infrarrojos. Debido al hardware DSP de alta velocidad del S170i y a los circuitos de audio de corrente alta, genera unaklequeñacantadade calor, si bien este calor no supondrá problemas para componentes adyacentes. Esperfectamente seguro apilar componentes adiconiales sobre el S170i o viceversa, pero generalmente espreferible(yde mucho mayor aspecto)queel S170i este solo.</p>
<p>Aúnque el S170i se enquirytra entre los descodificadores/procesadores de sonido surround digital disponibles más potentes y sofisticados, no hemos escatimado esfuerzos para hacer también de él uno de los componentes más transparentes musicalmente del teatro dométrico; este es lo que significa la filosofía de Diseño "Música lo primero" de NAD. HeAquí algunos ejemplos:</p>
<ul>
<li>El S170i utilizes los componentes FET delultimate y más alto rendimiento de pureza sónica en todos sus circuitos de audio analógico. </li>
<li>Una impedancia de salute extremadamente bajo de todos los canales (característica de NAD hace mucho tiempo) elimina el impacto sónico de los cables y las impedancias de entrada del amplíficator. </li>
<li>El silencimiento de salute se realiza por medio de relés de contacto dorado sónicamente transparentes en lugar de dispositivos electrónicos que colorean el sonido. </li>
<li>Los conectores de superficie dorada se Employment en todo, tanto interior como exteriormente para asegurar la transferencia no impedida de la seals.</li>
</ul>
<h1 id="ears-7">E.A.R.S.</h1>
<p>Un elemento clave de la singular aptitud musical del S170i es el Sistema de Recuperación de Ambiente Reforzado (Enhanced Ambience Recovery System) (EARS) propio de NAD. En acusado contraste con muchos发展模式 de difusión musical de "sintesis de ruido ambiente", EARS explota la notable potencia DSP del S170i para encaminar el contenido ambiental que es "encriptado" virtuallymente en todas las grabaciones de acústica natural a los correspondientes altavoces principal, central y surround, sin recurrir a reflexiones generadas artificially o a regeneración. El ambiente natural del EARS produce un modo surround sutil exceptionalmmente eficaz que mejor naturalmente la presentación espacial de forma idonea para la escucha Serbia de música.</p>
<p>En el aspecto digital, el S170i combina tratamiento DSP a alta velocidad extraordinariamente,employando un de los más avanzados "motores"DSP de alta velocidad, con convertoides D/A totalmente capaces de muestreo de 24 bitios, 96kHz para todos los canales. Un solo reloj de alta precision sincroniza todos los circuitos digitales para eliminar los erros de temporizacion ("instabilitad") que comprometen la?sónica. El的结果是这一 descodificacion surround legitimamente de avanzadisima的技术ologia desde modelos Dolby Digital y DTS, y de reproduccion de canales 6.1/7.1, con una calidad de sonido genuinamente superior en todos los modelos.</p>
<h1 id="informacion-sobre-thx">INFORMACION SOBRE THX</h1>
<p>El preamplificador S170i está certificado por THX Ltd. en cuando que cumple con los rigurosicos requisitos de su programa propio THX/Ultra para controladores de sonido surround. Esto quiereURT que es capaz de.Ofrecer una experiencia de audio igual a la de losreatestes cinematografos commerciales cuando se combina su magnifico rendimiento fundamental con las miglioras de sonido surround que son aplicadas por el programa THX/Utra 2.</p>
<h1 id="facilidad-de-utilizacion">FACILIDAD DE UTILIZACION</h1>
<p>A pesar del esfuerzo que NAD ha aplicado para que el rendimiento sónico del receptor S 170l sea el mejor, no ha aplicado menos esfuerzo para hacerlo poderosamente fácil de utiliser. Su Diseño es inusualmente semiclassical para tratarse de un componente tan sofisticado, y el mando a distancia HTR 2 es singularmente autoincitador e intuitivo para su uso, al igual que lo son el panel delantero propio del S170i y las visualizaciones en pantalla. Un Sistema semiclassical y a la vez potente de preajustes le permitirá a vested la sintonización precisa de su preparación de escucha para-distintas conditiones, asi como reactivar these multiples parámetros mediante dos pulsaciones de teclas.</p>
<h1 id="integración">INTEGRación</h1>
<p>El preamplificador S170i ofrece options amplias y flexibles de integrazione del sistema por medio de sus dos salidas configurables de disparadores CC, asi como a工程技术 de la Conexión NAD (NAD Link) patentada por NAD protocolo de通讯aciones entre componentes. Además, una puerta en series RS-232 se Halla dispuesta para integrar el preamplificador con más controladores aún tales como sistemas de pantalla táctil e instalaciones de automatización en toda la casa.</p>
<h1 id="facilidad-de-mejora">FACILIDAD DE MEJORA</h1>
<p>Un prestación singular del S170i es su construcción modular. Touta la "intelligence" del S170i se sitúa en un solo modulo enchufable.Esta aritectura Sofisticada simplifica el service y hace possible las mejoras futuras. Dadas las extraordinaryas velocidad y potencia de proceso del S170i, no premos, francamente, la posible necessities de mejoras del hardware por ahora.. No obstarce, Sin embargo, complace saber que no es probable que el S170i的结果to obsoletorenQUALquier momento pronto.</p>
<p>Hemos hecho fácil de遵守 el escenario más probable de mejoras del software mediante la puerta de alta velocidad RS-232 situada en el panel trasero del S170i. Los propietarios que registren su S170i en nuestro situo web internacional www.NADElectronics.com serán asesorados acerca deactualizaciones. Algunas de estas serán Gratis y othert vas requieran pagos de derechos de autor en funcdo del tipo deactualizacion. El usuario avanzado podra realizar estas miglioras bajo archivos desde nuestros situo web mediante el correto electronomico, e instalarlas connectado el S170i a un PC. Alternativamente, el concezionario de whom se adquiro el S170i podra poderayrarizar estasactualizaciones.</p>
<h1 id="informacion-sobre-el-mando-a-distancia-sistema-htr-2">INFORMACION SOBRE EL MANDO A DISTANCIA SISTEMA HTR 2</h1>
<p>El embalaje de su S170i contiene el mando a distancia NAD HTR 2 de aprendizaje de multíples componentes. Este(PRáctico aparato pueda controlar un total de 8 componentes distinctos, tales como el Reproductor DVD, el aparato de TV, y la caja de control del Satélite, simplificando drásticamente el funciona de la totalidad de su Teatro en casa, al tiempo que elimina el desorden de multíplesmandos a distancia sobre la mesa del café. Los botones del HTR 2 se encienden cada vez que se apriete un botón con lo que con poca luz resulta más fácil y agradable el funcionaimiento.</p>
<p>Para operar el HTR 2, se deben elegir cuando de los 8 componentes o el "dispositivo", tal como AMP, TV, DVD, etc se desea controlar. Los 46 botones restantes quedarán asi dispuestos para controlar el dispositivo selectionado. Tal vez thiso resulte un tanto confuso al principio, pero una vez entendido, lafacultyd de using simplye un mando a distancia para controlarrialquier dispositivo de suystema, har que disfrute mas del functiomento de su Cine en casa.</p>
<p>Se incluyen cuadros deCORDOS para todos los componentets NAD, y los coidigos de other fabricantes se ensenan fácilmente desde el mando a distancia de la unidad arialquier boton del mando a distancia HTR 2. Ademas, se pueda crear y almacenar fácilmente para su reactivacion al instante "macros" o cadenas de ordenes que realizan todas las operaciones individuales para "reproducir un DVD".Esta funcionalidad avanzada hace fácil de operar incluso complejos sistemas AV.</p>
<p>Sirvase leer en la seccion del HTR 2 de este manual las instrucciones completas bajo a bajo acerca de usar todas las prestaciones de este asombroso mando a distancia del Teatro en casa.</p>
<h1 id="informacion-sobre-al-mando-a-distancia-zr-2-segunda-zona">INFORMACION SOBRE AL MANDO A DISTANCIA ZR 2 SEGUNDA ZONA</h1>
<p>Tambien encontrar a peu y mando a distancia denominado ZR 2 queiene la func tion especializada de controlar la calidad de audio de Mulples Fuentes (MultiSource) o Zona 2. Esto permite la seleccion Completelye independiente de fuentes y volumen en una zona remota de su casa. Utilizing senseores a distancia de postmercado (Xantech) y la prestacion de Enlace NAD del S170I,oulda controlar la calidad de Mulples Fuentes (MultiSource) desde una ubicacion a distancia con el ZR 2.</p>
<p>Para más amplía infomación, lea la sección "Escucha en una Zona Remota".</p>
<p>Si le urge sencillamente experimentar el funciona de su nuevo preamplificador S170i, damos lasSIGUIENTES instrucciones para la "Puesta rápida en funciona" para poderle en camino. Suponen queel reproductor DVD/CD está connectado a la entrada VIDEO1 y que se han realizado las conexiones deaudio y video apropriadas.</p>
<h1 id="reproduccion-de-un-filme-dvd-o-música-de-cd">REPRODUCCION DE UN FILME DVD (O MúsICA DE CD)</h1>
<p>Entre 2015, el HTR 2 pulse primero la tecla de dipositivo [AMP] (asi selecciona el S170I i), bajo pulse la tecla de ALIMENTACION [ON], despues la tecla [DVD] (tanbién etiquetada con el numero "1") Use las teclas de [VOLUMEN arriba/abajo] ([VOLUME up/down]) del mando a distancia HYR 2 para ajustar el volumen.</p>
<p>Comience el uso del reproductor DVD/CD. Pulsando la tecla [SURR. MODE] del HTR 2 (situada+junto a la tecla de VOLUME DOWN) y pulsando cuando la tecla [Cursor ] pourrait realizar el ciclo por todos losculos de eschucía del S170i que se hallan disponibles para el tipo de signaled de entrada actual (vease "Información sobre temas de eschucía del S170i" más adelante).</p>
<p>Dependiendo del formatting de senales y conexiones que haya realizado, tal vez no se hallen aún diponibles algunos de losodos de eschua; vexe "Preparacion del S170i ", más adelante.. Puede que usted necesiteUGCar el systema de menu en planta del reproductor DVD para seleccionar un formatting de senal capaz de sonido surround.</p>
<p>Disfrute del这部电影 o la música, pero asegure dedicar tiempo para leer totalmente el presentemanual y preparar, calibrar y configurar ciuidadosamente su S170i.</p>
<p><img alt="" src="images/04eb40d862deb0f08d92bcf439bf4488d2e01b25db96d6287a700ce180cab0cc.jpg" /></p>
<p>1 ALIMENTACION (POWER): Póngalo en "Off" para desconectar el S170i de toda la alimentación CA yEAR del modo Reserva (Standby). Si se pone en "On"la ALIMENTACION (POWER) vuelve a conectar la alimentación CA yactiva el preamplificador. <br />
2 RESERVA (STANDBY): Se enciende cuando el S170i está en el modo de Reserva (Standby) u Encendido (On) (se oscurece cuando el S170i se desconecta la alimentacionoff). <br />
3 AUDIO: Pulse para selectionar en secuencia entradas de audio usingo el boton de PREPARACION DE VOLUMEN (VOLUME (SETUP) (vea a continuacion "Operaciones del Panel Delantero"). <br />
4VIDEO: Pulse para seleccionar en secuencia entradas de video usingo el boton de PREPARACION DE VOLUMEN (VOLUME (SETUP) (vea a continuacion "Operaciones del Panel Delantero"). <br />
5 MONITOR DE CINTA (TAPE MONITOR): Púlselo para acoplar el bucle de Monitor de Cinta (Tape Monitor). Se oira la seals presente en los enchufes de clavija ENTRADA DEL MONITOR DE CINTA (TAPE MONITOR IN) del panel trasero (vea "Operaciones del Panel Delantero" más adelante). <br />
6 MULTIPLES FUENTES (MULTISOURCE): Pulse para selectionar la salute de senal con los enchufes de clavija de SALIDA DE MULTIPLESFUENTES (SALIDA DE MULTIPLE SFUENTES (MULTISOURCE OUT)) del panel trasero usingo el boton de PREPARACION DE VOLUMEN(VOLUME SETUP) (vease "Escucha en una Zona Remota"mas adelante). <br />
7 ALTAVOCES (SPEAKERS): Pulse para tener acceso al menu <Preparacion de altavoces> (<Speaker setup>) en la lecture del panel delantero, y para selectionar parametros usinge el boton de PREPARACION DE VOLUMEN (VOLUME (SETUP) y las siguientes pulsaciones de la tecla de ALTAVOCES (SPEAKERS) (vea a continuacion "Configuracion del S170i" y "Operaciones del Panel Delantero"). <br />
8 RETARDO (DELAY): Pulse para tener acceso al menu <Preparacion de retardo> (<Delay setup>) de la lectura del panel delantero, y seleccionar parametros usingo el PREPARACION DE VOLUMEN (VOLUME (SETUP) y las siguientes pulsaciones de la tecla de RETARDO (DELAY) (vea a continuacion "Configuracion del S170i," y "Operaciones del Panel Delantero").</p>
<p>9 NIVELES (LEVELS): Pulse para tener acceso al menu <Preparacion de niveles> (<Levels setup>) de la lectura del panel delantero, y seleccionar parametros usinge el boton de PREPARACION DE VOLUMEN (VOLUME SETUP) y las pulsaciones seguides de la tecla LEVELS (vea a continuacion "Configuracion del S170i," y "Operaciones del Panel Delantero"). <br />
10 BRILLO (BRIGHTNESS): Pulse para amortiguar el brillo de la lectura del panel delantero del S170i, pulse otra vez para restuarar el brillopleteo. <br />
11 TONO (TONE): Pulse para ajustar el trémolo usingo el botón de PREPARACION DE VOLUMEN (VOLUME SETUP); pulse otra vez para ajustar los bajos, y una tercera vez para pagar del ajuste de control de tono. <br />
12 MODO (MODE): Pulse para selectionar losodos de escucha en secuencia usingo el boton de PREPARACION DE VOLUMEN (VOLUME SETUP) (vease a continuacion "Ajuste de los Modos de Escucha" y "Operaciones del Panel Delantero") más adelante. <br />
13 Volumen (Preparacion) [Volume (Setupl)]: Girelo en sentido horario para augmentar el ajuste del volumen maestro; en sentido antihorario para disminuirlo. El VFL y las visualizaciones en pantalla muestran el ajuste, visualizo en decibees entre -90y + 16</p>
<p>El botón de Volumen (Preparación) se usa igualmente para incrementar/disminuir los niveles de canales individuales y para algunos parámetros ajustables.</p>
<p>14 VISUALIZADOR VFL (VFL DISPLAY): El Visualizador Fluorescente en Vacio (VFL) proportionsa informacion visual acerca de todos losodos,ajustes y functions importantes del S 170i para ambasposiciones PRINCIPAL (MAIN) y seguda ZONA.</p>
<p><img alt="" src="images/f6c7e4e4204acb762ffe39116484a74a6a1af1b36a07a399f5dd73abf5037184.jpg" /></p>
<h1 id="atention">ATENTION!</h1>
<p>RogamosHola todas las conexiones de su preamplificador S170i con el equipo puesto en "Off"o desenchufado. (Tambien es acontejal apagar o desenchufar todos los componentes asociados cuando se inicia o interrupre cualquierolen o conexiones de alimentacion CA).</p>
<p>1 ESTRADA DE VIDEO COMOPUESTO 1-6 (COMPOSITE VIDEO IN 1-6): Conecte las Entradas de Video 1-6 a video compuesto de componentes fuente (véase "Preparación de Fuentes").más adelante. <br />
2 SALIDA DE VIDEO COMPUESTO 4-6; SALIDA DE MONITOR (COMPOSITE VIDEO OUT 4-6 OUT; MON OUT): Conecte a entradas de grabación de video compuesto de componentes de grabación, conecte MON OUT a la entrada de video compuesto del monitor de video/TV. <br />
3 ENTRADA S VID 1 - ENTRADA S VID6 (S VID1 IN - S VID6 IN): Conecte las Entrada de Video 1-6 a S-Video de componentes de fuente (vexe "Preparacion de Fuentes") mas adelante. <br />
4 SALIDA S VID4 - SALIDA S VID6; SALIDA DE MONITOR (S VID4 OUT - SVID6 OUT; MON OUT): Conectaras las entradas de grabacion S-Video de los componentes de grabacion; conectar MON OUT a la entrada S-Video del monitor de videoo/TV. <br />
5 ENTRADA DE VIDEO COMPUESTO (superior), SALIDA (inferior) (COMPONENT VIDEO IN (upper), OUT (lower): Conecte las entradas a la seals de video compuesto o video compuesto de banda ancha de un componente fuente como un reproductor DVD o sintonizador HDTV; conecte las salidas a las entradas de video compuesto del monitor de video/TV. Asegürese de observar la consistencia en laNECTION de los enchufes de clavija Y, CB, y CR a las correspondientes fuentes/entradas (vease "Preparacion de Fuentes") mas adelante. <br />
6 ENTRADA/SALIDA DE LA CONEXION NAD (NAD LINK IN/OUT): Conecte a los correspondientes enchufes de clavija de Conexión NAD (NAD Link) (entrada a calidad y viceversa) de los componentes NAD compatibles (vease "Conexión NAD" ("NAD Link") más adelante. <br />
7 DIGITAL 1-3, ENTRADA DIGITAL; SALIDA DIGITAL (DIGITAL 1-3; DIGITAL IN; DIGITAL OUT): Conecte DIGITAL 1-3 a fuentes digitales de formatting coaxial S/PDIF como los reproducor de CD o DVD; conecte DIGITAL IN a una fuente de alta calidad de formatting S/PDIF a temas de cable BNC; conecte DIGITAL OUT a la entrada digital coaxial S/PDIF de un componente de grabación como una grabadora de CD, plataforma DAT, o tarjeta de sonido de ordinador (véase "Preparación de Fuentes") más adelante. <br />
8 ENTRADA DIGITAL OPTICA 1-2; ENTRADA DIGITAL: SALIDA DIGITAL OPTICA (OPTICAL DIGITAL IN 1-2; DIGITAL IN; OPTICAL DIGITAL OUT): Conecte OPTICAL DIGITAL 1-2 a fuentes digitales de formattingístico S/PDF</p>
<p>tales como reproductor de CD o DVD; conecte OPTICAL DIGITAL OUT a la entrada digital optica S/PDIF de un componente de grabacion como una grabadora de CD, plataforma DAT o tarjeta de sonido de ordinador. <br />
9 RS-232: Conecte a la puerta en series RS-232 de un sistema de automación domestica uordenador personal (vease "Integración del Sistema") más adelante. <br />
10 ENTRADAS DE AUDIO ANALOGicas VIDEO 1-6 (VIDEO 1-6 ANALOG AUDIO INPUTS): Conectar a lassonianicas estereo de fuentes de audio-video (vease "Preparacion de Fuentes") mas adelante. <br />
11 SALIDA (VIDEO ANALOG REC OUT 4-6): Conecte a entradas analógicas estéreo de componentes de grabación de audio-video tales como grabadoras de videocasetes. <br />
12 Entradas CD, Auxiliar, SINTONIZADOR (CD, AUX, TUNER Inputs): Conecte a las salidas analógicas estéreo de los componentes de audio. <br />
13 ENTRADA/SALIDA DEL MONITOR DE CINTA (TAPE MONITOR IN/OUT): Conecte OUT a las entradas analógicas estéreo, e IN a las salidas de un componente de grabación de audio tal como una plataforma deCNTAs oGrabadora de CD, o a un procesador de audio analogico tal como un igualador de estéreo. <br />
14 SALIDA DE MULTIPLES FUENTES (MULTISOURCE OUT): Conecte a las entradas del amplificador de estéreo (amplificador, receptor integrado) que alimentará los altavoces de la zona remota (vease "Escucha en una Zona Remota") más adelante. <br />
15 SALIDAS ANALOGICAS DE AMPLIFICADOR 7.1 (PREAMP ANALOG 7.1 OUTPUTS: Conecte L, R (izquierda, derecha), y CENTRAL (CENTER) a las entradas de canal de los amplificadores de potencia que activan los canales delanteros; conecte LS y RS al amplificador de potencia que activa los altavoces surround e IZQUIERDA B Y DERECHA B (LEFT B y RIGHT B) al que activa los altavoces de sonido surround draseros (si los hay); conecte altavoz de graves (subwoofer) a la entrada de linea de un altoz de graves alimentado o al amplificador que activa un altoz de graves (subwoofer) pasivo (si lo hay). <br />
16 ENTRADAS EXTERNAS 5.1 (EXTERNAL 5.1 INPUTS): Conecte a las correspondientes salidas de audio analógicas de un componente fuente multicultural como un DVD-Audio o reproductor multicultural SACD. No hay gestion de bajos ni altri procesamientos disponible para estas entradas; Véase a continuación "Selección de Fuentes". <br />
17 DISPARADORES DE 12V (12V TRIGGERS): Conecte a las entradas de disparador de 12-voltos de componentes compatibles como amplificadores de potencia y elevadores de projector; Véase "Preparación de Disparadores" más adelante. <br />
18 Entrada de alimentación (AC power inlet): Conectela al cable electrico CA desmontable estándar de IEC que se suministra o a un cable compatible.</p>
<h1 id="comienzo">COMIENZO</h1>
<p>Antes de que realize la primera connexion su S170i, deben planificar, al menos inicialmente, la disposicion de los componentes de su sala de eschucha/teatro en casa. Lamentablemente, quaida ahora alla de nuestro alcanceequalquierdiscusiónde lostemasvitalesdeubicaciondelosaltavocyesdeposicionesdeschucha/visión. Baste manifestarque这些dos aspectos influriranel rendimientoenultimainstancia de susistema de forma tan potente como su eleccionde la electrònica y los altavocenos.El especialista de audio de NAD se complaceré en asesorarley en recomendarle materiales de consulta.</p>
<h1 id="tratamento-de-zumbidos-y-ruidos">TRATAMENTO DE ZUMBIDOS Y RUIDOS</h1>
<p>El S170i require unaittersa CA con tierra (con 3 espigas de contacto). Utilizing an adaptador de 3 a 2 para eliminar la espiga de tierra no se comprete la calidad eléctrica, pero puede incrementar la susceptibilitad para zumbidos y ruidos. Los zumbidos y ruidos demuestran a vezes ser un desafío en sistemas de audio complejos y multicanales. Tenga en cuenta que这些东西 para contribuir a evitar problemas de zumbidos y ruidos:</p>
<ul>
<li>Alimente todo componente de su sistemas de tomas de CA que procedan del mesmo circuito que el de la instalacion electrica de su vivienda. En lo possible, alimentente todos los componentes de audio desde la misma toma, o desde tomas adyacentes del mesmo circuito. Tal vez resulte util alimentar visualizaciones de video (yordenadores) desde tomas de除外o circuito, especially si esc circuito se suministra desde除外o "ramal" de la instalacion electrica de la vivienda. </li>
<li>No forme haces de cables de audio analógico con cables de alimentación de CA ni con cables coaxiales de audio digital. </li>
<li>Emcee unicamente cable de audio de alta calidad y bien blindado, y cerciorese de que todas las conexiones queden fjas. </li>
<li>Se pueda usar una goma de borrar para pulir contactos recubiertos de cobre o de oro para asegurar un buena contacto de baja resistencia; también poder resultar útiles los productos especiales para la limpieza de contactos. Evite desenchufar y enchufar de nuevo innecasamente, ya que el revestimiento de oro (o de cobre) de contactos de conectores típicos de cables, inclujo el de los de muy alta calidad, es muy fino y se descasta fácilmente.</li>
</ul>
<p>Localice los problemas de zumbidos/ruidos de los componentes uno a uno, yendo hacerships a partir del receptor. Es decir: Conecte los altavoces al receptor solamente y compruebe si hay zumbidos. Luego conecte un componente solamente (un reproductor CD, por exemple), si que haya other componente connectado y compruebe si hay zumbidos. Conecte al receptor componentes adiconiales, uno cada vez, y compruebe si hay zumbidos. En cada etapa, si aparecen zumbidos/ruidos, inspeccione el cableado de audio y el trazado de la alimentacion de CA del nuevo componente. En algunos casos, Cambiaro el cordon de CA del nuevo componente a una toma distinta, o instalando un "ground-lift" (dispositivo de fijacion del nivel de tension) (adaptador de 3 a 2 espigas) en el cordon de alimentacion, se eliminarian los zumbidos.</p>
<p>El preamplificador S170i funciona un Sistema sencillo y explicativo por si本身就是 "menues" que se visualizan en pantalla y que aparecerán en el monitor de video/TV conectado, siendo útiles tanto durante la preparación como durante el funciona bajo el monitor. Aúnque las OSD siempre son úiles, también esperfectamente possible hacerFuncar (o incluso preparar)el S170i sinellas,porque siempre se muestranos mismos datos basics,excepta una vez en forma abreviada, en la lectura de panel delantero propia del preamplificador.</p>
<h1 id="visualizacion-de-los-menues">VISUALIZACION DE LOS MENUES</h1>
<p>Una vez que un monitor de video (TV) este conectado a la Salida del Monitor (Monitor Output) S170i, pulsando las teclas del cursor izquierda o referencia del mando a distancia HTR 2 se accederá a la Visualización en pantalla (OSD) del S170i donde se puedaaabrear fácilmente todos los perámetros de preparación del sistemasutilizando las teclas hacía arriba y hacía bajo y [ENTER].</p>
<ul>
<li>Si no aparece la OSD, disfruebe sus conexiones de Salida del Monitor (Monitor Out), y/o los ajustes del < FORMato de video> (<Video format>) y de <Visualizacion OSD> (<OSD display>) del menu <Preparacion de la Visualizacion> (<Display setup>) (vexe mas adelante), usinga la lectura del panel delantero del S170i.</li>
</ul>
<h1 id="navegacion-por-la-visualizacion-en-pantalla-osd-y-realizacion-de-cabios">NAVEGACION POR LA VISUALIZACION EN PANTALLA (OSD) Y REALIZACION DE CABIOS</h1>
<p>Use las teclas [Cursor arriba/abajo] ([Cursor up/down]) del mando a distancia para desplazarse arriba o bajo entre los manos de la lista de OSD; use las teclas [Cursor / ] paraCambiar el valor de parámetro (ajuste) deequalquier punto de la lista;use la tecla [Enter] del mando a distancia para selectionar un punto delmenudeOSD.Selectionando < Salir> (<Exit>)desidera la Pagina de menu (Menu Page) guarda caulesquiera Cambios haya realizado y sale de ese menu paraasar alsigiente nivel "superior" (o, desde el Menu Principal (Main Menu),se desconecta la OSD).</p>
<p>Usted puede preparar los niveles de su S170i, sus modos y-optiones enequalquierorden;sinque seanecessary seguir elorden que se usaaquí. No obstante, es aconsejable comenzar por configurar lasoptionedesvisualización enpellala delS170i,porquealguna deéstasafectanalasoptionesque seponedisponiblesparaotrasrutinasde preparación.</p>
<h1 id="preparacion-de-visualizacion">PREPARACION DE VISUALIZACION</h1>
<p>En el Menu Principal (Main Menu) de OSD del S170i, selección el punto <Preparación de visualización (<Display setup>) using las teclas de [Cursor arriba/abajo] ([Cursor up/down]) y [Enter] del mando a distancia. Usando las teclas de [Cursor ],ajuste:el < _i Sistema TV> (<TV system>) para "NTSC" para uso en Norteamérica, o "PAL." para uso en Europa.</p>
<p>Utilizando las mismas teclas del mando a distancia, ajuste:</p>
<ul>
<li><Superponer> (<On> u "Off. Cuando se selecciona "Off", los menues en pantalla aparecen sobre un fondo azul que oscurece el actual programa de video (si lo hay); cuando se selecciona "On" los menues aparecen en texto blanco superpuestos al programa de video actual (si lo hay). </li>
<li><Visualización temporal> (<Temporary disp>) para "Total" ("Full"), "Sencilla" ("Simple") u "Off." Esto controlla la calidad de información que visualiza el S170i, en texto en Pantalla siempre que se ponga en "On", selecciónando o cambiendo una fuente o modo de escucha, o cambiendo temas de senales de entrada. En modo "Total" ("Full") hay una Pantalla completa de datos que incluye nombre de entrada, entrada de SENSOR de audio, tipo, formatting, y modo de escucha, y tipo y entrada de SENSOR de video; en modo "Sencillo" ("Simple"), únicamente aparece el nombre de la entrada. En modo "Off" no se visualiza información temporalalguna en pantalla. </li>
<li><Formato de video> (<Video format>) para "Auto", "SVideo", o "Video compuesto" ("Compos"). Controla qué salidas de video del S170i están activas cuando se selección una entrada de video; en modo "Auto", el modo de calidad se selección conforms al formatting de la seals dellegada, siendo S-Video prioritario al connectarse una fuente a工程技术 de ambos FORMATOs. Tenga en cuenta que el preamplificador S170i的那一ves de video incluo cuando este conectado a Reserva" ("Standby"). Esto permite usar fuentes de video como dispositivos TeleText o Web-TV incluo excepte el equilibrio del systema esté en "off". </li>
<li><Salida de OSD> (<OSD output>) para "Ambos" ("Both") "SVideo", "Video compuesto" ("Compos"), u "Off." Controla qué salidas de video ponen visualizaciones y menues en pantalla del S170i. Cuando se selección "Ambos" ("Both") habrá OSD tanto en lassonianas S-Video como en las de Monitor de video compuesto; si se selección "SVideo" o "Video compuesto" ("Compos"), se limitan lasvisualizaciones enpellalla a cada salute sola, y "Off" incapacita totalmente lasvisualizaciones enpellalla. (En todos los casos, los datos basics他们在 legibles por medio de lalectura de panel delantero del S170i, por lo tanto usted peut, por exemple, ver lo que está hacerndonueque las OSD estén puestos en "Off.") Tengase en cuenta que:</li>
</ul>
<h1 id="téngase-en-cuenta-que">TÉNGASE EN CUENTA QUE:</h1>
<p>Las OSD no aparecen en la calidad de video de componente <br />
- Si se activa la OSD para una calidad de video, se hace que las señales de fuente de video de tal formatting "pasen" por los circuitos de OSD. Los amantes de videocriticos tal vez deseen desactivar la OSD en la calidad SVideo para las functions máscriticas de visión/grabacion. <br />
- <Unidades de distancia> (<Distance units>) en "Pies" ("Feet") o "Metros" ("Meters") Secciona que unidades de medida introduce usted en las dimensiones de preparacion de altavoces en la pagina de menu <Preparacion de retardo> (<Delay setup>) del S170i (vease más adelante).</p>
<h1 id="preparacion-de-audio">PREPARACION DE AUDIO</h1>
<p>El menu de <Preparación de audio> (<Audio setup>) le permitte modifier los ajustes de control de tono yDEMAs opciones de escucha.Las Modifications que usted haga en este menu permanecen efectivas hasta que se cambien otra vez, o haya que se reactve un Preajuste (Preset) que contenga differsentes ajustes (vease mas adelante).</p>
<h1 id="preparacion-de-dolbycts">PREPARACION DE DOLBY/CTS</h1>
<p>Śde el menú de <Preparación del audio> (<Audio Setup>), selección el punto de la Preparación de Dolby/DTS (<Dolby/DTS setup>) utilizing las teclas de [Cursor arriba/abajo] ([Cursor up/down]) del mando a distancia, bajo pulse [Enter], ton lo que se做不到 un submenú con las siguientes OPCIONES paraaabstar losodos de música del descodificadores Dolby y DTS surround:</p>
<h1 id="panorama-pl-ii-pl-ii-panorama"><Panorama PL II> (<PL II Panorama>)</h1>
<h1 id="selectiona-off-u-on">seLECTIONA <Off> u <On></h1>
<p>Cuando se selecciona <On> el ajuste de Panorama envuelve el sonido de los altovoces Delanteros Izquierdo y derechos alrededor de usted para Obtener un efecto apasionante.</p>
<h1 id="la-anchura-central-pl-ii-pl-ii-center-width">La <Anchura Central PL II> (<PL II Center Width>)</h1>
<h1 id="selectiona-mathrmmin-1-2-3-4-5-6-max">seLECTIONA < Min> <1> <2> <3> <4> <5> <6> <Max></h1>
<p>La Anchura Central (Center Width) le permette repartir gradualmente el sonido del canal Central a los altavoces Delanteros Izquierdo y Derecho. En el ajuste más ancho <Max> todo el sonido del altovoz Central se mezcla a los altavoces Inquierdo y Derecho. Este control能把MASTER a lograr un sonido más espacioso, o una mejor mezcla, de la imagen delatera.</p>
<h1 id="la-dimensión-pl-ii-pl-ii-dimension">La <Dimensión PL II> (<PL II Dimension>)</h1>
<p>seLECTIONA < 0> <1><2><3></p>
<p>La Dimisión ajusta el equilibrio delantero/trasero según el gusto.</p>
<h1 id="laimagencentral-neo6neo6centerimage"><LaImagenCentral Neo6>(<Neo:6CenterImage>)</h1>
<p>selectiona < Min> < 1> < 2> < 3> < 4> < Max></p>
<p>La Imagen Central le permette repartir gradualmente el sonido del canal Central a los altavoces Delanteros Izquierdo y Derecho.</p>
<h1 id="preparacion-de-preajustes">PREPARACION DE PREAJUSTES</h1>
<p>El S170i tiene incorporedados cinco "Preajustes" ("Presets,"), lugarares de la memoria en los que pueda estude memorizar cinco differsentes combinaciones de control de tono y niveles relativos de canal central/surround/Altavoz de graves (Subwoofer) para adaptarse a differentes requisitos. Por exemple: Usted puede configurar el Preajuste (Preset) 1 para sonido surround de这部电影 con controles de tono ajustados acero y niveles de canal relativosajsados en sus+puntos calibrados, perofirar el Preajuste (Preset) 2 para eschar sonido surround musical con niveles ligeramente elevados de sonido surround -y niveles de canales de Altavoz de graves (Subwoofer), niveles de canal central ligeramente reducidos y bajo o trémolo modificados. Los Preajustes (Presets) poderen configurarse deequaliermana,paraequalquier fin que usted considere adecuado.</p>
<h1 id="configuracion-de-preajustes-presets">CONFIGURACION DE PREAJUSTES (PRESETS)</h1>
<p>En el menu <Preparación de Audio> (<Audio setup>), use las teclas de [Cursor arriba/abajo] ([Cursor up/down]) y [Enter] del mando a distancia para selectionar <Preparación de preajustes> (<Preset setup>). Usando las mismas teclas, selección el Preajuste (Preset) que ha de configurarse en el <Preajuste> (<Preset>); bajo invoque los ajustes de bajos y trémolos deseados para tal Preajuste (Preset) usinga las mismas teclas. Otra vez, con estas mismas teclas, fije los niveles relativos de los canales Central, Surround, y Altavoz de graves (Subwoofer) para tal Preajuste (Preset).</p>
<h1 id="téngase-en-cuenta-que-2">TÉNGASE EN CUENTA QUE:</h1>
<ul>
<li>Si se configuran los altavoces surround traseros tal como está en el menu de OSD de la <Preparación de altavoces> (<Speaker setup>) (más adelante), sus niveles estarán controlados conjuntamente con los niveles de los canales surround. </li>
<li>Una vez configurado, un Preajuste (Preset) permanece sin cambio hasta que usted lo edite por medio del menu de OSD <Preparación de Preajustes> (<Preset setup>). </li>
<li>Un Preajuste (Preset) se aplica a cualesquera que sea la fuente que se seleccione, o el modo de eschuaque se utilise </li>
<li>Haciendo que el S170i realizé el ciclo a travers de su modo de Reserva (Standby) se Cancela cualquier Preajuste (Preset), previamente selecciónado, volviendo los ajustes de tono y de niven a los ajustados en las pantallas LEVELS o MODE/MULTI.S del mando a distancia S170i (más adelante), o atraves del menu de OSD <Preparación de Audio> (<Audio Setup>) (anterior) del preamplificador S170i. Si desea poderaabstar todos los niveles de canal y valeurs de control de tono a cero sin realizar el ciclo a travers de Reserva (Standby), fije un Preajuste (Preset) a "todos zeros" ("all zeroes"). </li>
<li>Los niveles de canales almacenados en preajustes seañden a los niveles de preparación establecidos en el menu de OSD <Preparación de Niveles> (<Levels setup>) del preamplificador S170i. Por exemple: si su <Preparación de nivel> (<Level setup>) establish <Central> (<Center>) a "-3 dB" yasted marca en un nivel de canal central de Preajuste (Preset) de +2 dB, el efecto general neto sera un nivel de canal central de -1 dB. Por contraste, los ajustes de control de tono se sobreponen totalmente a los niveles de tono de <Preparación de Audio> (<Audio Setup>).</li>
</ul>
<h1 id="reactivacion-de-preajustes">REACTIVACION DE PREAJUSTES</h1>
<p>Para implementar el preajuste en cualquier momento, pulse secuencialmente la tecla [AV PRESET] del HTR 2 y la tecla númeroica correspondiente <1 - 5> . Haciendo que el S170i realize el ciclo por el Modelo de Reserva (Standby) se liberaré el preajuste.</p>
<p>El número del preajuste invocado aparecerá brevamente en en la OSD y en la visualación del panel delantero del S170i. (Véase también Uso de los Preajustes (Presets) más adelante.</p>
<h1 id="bajostrémolos">BAJOS/TRÉMOLOS</h1>
<p>En el menu <Preparación de Audio> (<Audio Setup>), selección <Bajos> (<Bajos>) o <Trémolos> (<Treble>) using las teclas de [Cursor arriba/abajo] ([Cursor up/down]) del mando a distancia. Usando las teclas de [Cursor / ], usted可以选择 augmentar o disminuir los ajustes de Bajos o Trémolos en incrementos de 1 dB en ± 12 dB.</p>
<ul>
<li>Los ajustes de Bajos/Trémolos afectan únicamente a los canales delanteros (izquierdo, central y derecho), y está activos en todos los modos de esucha. </li>
<li>Muchas vezes es mejor "cortar" (un ajuste menos) que reforzar (un ajuste más); para un sonido general "más calido" trate de reduir Trémolos一些 poco dB en lugar de reforzar Bajos, y viceversa. </li>
<li>Si usted comprúa que_frequentemente ha de seleccionar ajustes grandes de control de tono, lo mejor sera que vuelva a examinar su seleccion de altavoces, y las posiciones de esucha y de los altavoces para explotar melhor la acústica de la habitación.</li>
</ul>
<h1 id="canal-lfe">CANAL LFE</h1>
<p>El canal de Efectos de baja Frecuencia (LFE) I—el canal de “punto uno” (“point-one” en “5.1/6.1”—está activo con fuentes multicanales Dolby Digital o DTS multichannel sources. LFE se Employmenta más frencuentamente como canal suplementario paraEAR la gama dinámica de sonidos de muy baja freecuencia; y noDebeconfundirse con el canal de salute de Altavoz de graves (Subwoofer) del S170i, que puedaellar la mayor parte o toda la informacionde bajodesalguno o todos los canales,segúnsea la configuracion de la page de ese menue<Preparacion de altavoces> (<Speaker setup>)</p>
<p>En el menu <Preparación de Audio> (<Audio Setup>), selección el <Canal LFE> (<LFE channel>) using las teclas de [Cursor arriba/abajo] ([Cursor up/down]) del mando a distancia. Utilizando las teclas de [Cursor ], podra disminuir el ajuste de canal LFE hasta 10 dB con decreimientos de 1 dB.</p>
<p>En la mayoría de los sistemas el ajuste del canal LFE puedaJKLM a 0 dB (sin cambio), porque el Limitador de Bajos del S170i (véase más adelante) estáJKLM para impedir la sobrecarga del Altavoz de graves (Subwoofer). No obstar, si se conoce que el punto elevado de su Altavoz de graves (Subwoofer) es limitado, o si los efectos de baja Frequencia de las pistas de sonido de这部电影 parecen generalmente excessivas en su sistemas, puede estar intentar con provecho disminuir el ajuste <LFE channel> un poco.</p>
<h1 id="preparacion-de-altavoces">PREPARACION DE ALTAVOCES</h1>
<p>Todo sistemas de sonido surround requiere una "gestión de bajos" ("bass-management") para dirigir el contenido de baja Frequencia desde cualesquiera de los canales o desde todos ellos a los altavoces que mejor能把 reproducirlo. Para que funciona correctamente esta operación, es muy importante que usted identifique correctamente las capacities de sus altavoces.</p>
<p>Usamos los TERMINOS "Small" (pequeño) y "Large" (grande) (y "No"), peroonga enIELD que el時間 no se quede.</p>
<ul>
<li>Un altovo "Pequeño" ("Small") esrialquier modelo sin respuesta notable de bajos profundos,esto es por bajo deunos 80Hz </li>
<li>Un altovoz "Grande" ("Large") esrialquier modelo de gama completa, es decir, uno con respuestade bajos profundos </li>
<li>Un altovoz "No" es uno que no está presente en su sistemas. Por exemple, puede que usted noonga altavoces Traseros instalados; en tal caso, usted debe fjar la preparacion de <Altavoces traseros> (<Back speakers>) en "No."</li>
</ul>
<h1 id="configuracion-de-altavoces">CONFIGURACION DE ALTAVOCES</h1>
<p>A partir del Menu Principal (Main Menu) de OSD, selección <Preparación de altavoces> (<Speaker setup>) uso las teclas de [Cursor arriba/abajo] ([Cursor up/down]) y [Enter] del mando a distancia. Usando las teclas [Cursor / ], ajuste los <Altavoces principales> (<Main speakers>) a "Grande" ("Large") o "Pequeño" ("Small"). Usando las mismas teclas del mando a distancia,pongá <Altavoz central> <Center speaker>, Altavoces Surround> (<Surround speakers>), y <Altavoces traseros> (<Backspeakers>) en "Grande" ("Large"), "Pequeño" ("Small") o "No," según los altavoces que haya del sistema. Ponga <Altavoz de graves> (<Subwoofer>) en "Si" ("Yes") únicamente si tiene usted un Altavoz de graves (Subwoofer) que está connectado al enchufe de clavija de salute análogica ALTAVOZ DE GRAVES (SUBWOOFER) del preamplificador S170i.</p>
<h1 id="nota-18">NOTA</h1>
<p>El S170i le permittedajustarel Altavoz de graves (Subwoofer) a "Si"("Yes")aún con altavocedeselanteros "Grandes"(Large):En este caso, el contenidode bajos decaulesquiera canales que haya fijado "Pequeño"(Small")se llevará amobaltavocedes bajos(Subwoofer)y a los altavocedeselanteros. Tal vezdesee ensayareste método dedispositionsius altavocedeselanterosatenuana naturalmente a una Frequencia de trasiciondeunos 80Hz ypueden manejar fuertes senalesde bajos sin distorsión ni daños.En la mayoría delos sistemas que usan un Altavoz de graves (Subwoofer),es usualmente lo mejorajustarlos altavocedeselanterosa"Pequeño"(Small").</p>
<p>Hay tres prestaciones adiconiales en el menu de <Preparacion de altavoces> (<Speaker setup>):</p>
<ul>
<li>Frecuencia de Transmisión ajustable y seleccionable en incrementos de 10Hz desde 40Hz hasta 140Hz . Esto ajusta la alimentacion de Paso Alto (High Pass) (2^ orden, 12 dB/octava) al altavoz, y la alimentacion de Paso Bajo (Low Pass) (4^ orden, 24dB-octava) al altavoz de graves (subwoofer). </li>
<li>Filtro de Altavoz de graves (Subwoofer) superable. Este permitted usar su transmisión interna del altavoz de graves (subwoofer) alimentado. Esto peut ser ventajoso para superar dificiles problemas acústicos de la habitación fjando la transmisión del Altavoz de graves (Subwoofer) en una Frequenciadistincta de la del filtro de Paso Alro (High Pass) del S170i para create una muesca o un recubrimiento en la respuesta. </li>
<li>Bajos Mejorados (Enhanced Bass), cuando se seleccionan, siempre tienen activo el Altavoz de graves (Subwoofer), independientelemente de los ajustes de los altavoces, para maximizing reverberacion..</li>
</ul>
<h1 id="preparacion-de-nivel">PREPARACION DE NIVEL</h1>
<p>El ajuste del equilibrio relativo de los altavoces de su sistemas es quizás la función individual más importante del ajuste de su S170i. Primerio, este proceso asegura que las grabaciones de sonido surround, Sean música o pistas de sonido de这部电影, se esuchen con el equilibrio de efectos, música, y dialogo que son los que pretendío el artista. Segundo, si su sistemas Tiene incorporeal un Altavoz de graves (Subwoofer), establece una relacion correcta entre el volumen del Altavoz de graves (Subwoofer) y los demas altavoces, y asi la correcta relacion de las Frequencias bajas (bajos) con los otheros elementos sónicos.</p>
<h1 id="utilizacion-de-un-medidor-spl">UTILIZACION DE UN MEDIDOR SPL</h1>
<p>Esperfectamentepossiblerealizarrutinasde preparacion delNivel delS170i“de oido,"y un oido experimentado producirasualmenteresultadosexactosayceptables.Noobstante,lasdiferencias de timbre entre los altavoces delanteros,centrales y de sonido surrounduedehaganquesea dificilla coincidencede nivelprecisa.Porlo tanto,recomendamosencarecidamenteeluso deun medidorde nivel de presionde sonido(SPL),tal comoel RadioShacknummero depieza33-2050,paraestaarea.Esrapido, repetibleyfiable.Laposesiondeunmedidorasipeudasarultyutilcacherramentaofaudio,obien su especialista de audio NADpuedeaydarlecon eluso temporal deun medidor.Ademas la calibraciondeusystemacounmedidorSPLlepermiajustarenelnivergalemaneraque,cuando el controldeVolumenPrincipal(MasterVolume)delS170iestayajustadoa-0("niveldereferencia”,la eschucha en su teatro en casa coincide con la fuerza del sonido elevado del这部电影 mismo proyectado en un cinematotografocomercialbien preparado.(Por supuesto,ustedtodaviapejajustarelVolumenPrincipal (MasterVolume)siemprequedesee deundiaatoo.)</p>
<p>El medidor SPL deben situarse en la posicion primaria de escucha, aproximamente a la alta de lackeza del oyente cuando esté sentado. Serviría de ayud un típode, si bien podra servir un poco de cinta conequaliercosa, por ejemplo, un pie de lámpara, un atril de música o una silla con respaldo escalonado. Simplemente, cerciórese de que ninguna superficie grande acústicamente reflectora produzca obstruccion o esté cerca del elemento del micrófono. Oriente el medidor con su micrófono (usuallya a un lado) apuntando directamente hacel techo (no hacia adelante a los altavoces) yasegúrese de que esté seleccionada su escala "C" de peso. Para calibrar su sistemas para que se escuche con la misma intensidad sonora objetiva que un cinematógrafo commercial de alta calidad, ajuste el medidor para que visualice 75 dB SPL. (En los medidores Radio Shack this exige ajustar el medidor a sugama de 80 dB y.tomar sus lecturas en el punto -5, o selectionar la gama de 70 dB y leer el punto +5.</p>
<p>Este punto 75 dB SPL es el nivel de referencia "oficial" del cine (y THX). No obstarve, observamos que no hay ley que le obligue a usted a usar este nivel, y de/hecho esta referencia parece excessivamente alta para algunos.usuarios en la esucha del cine en casa. Muchos comprueban que calibrando a 70 dB SPL的结果justanmente correcto aproximamente.</p>
<h1 id="configuracion-de-niveles">CONFIGURACION DE NIVELES</h1>
<p>En el menú principal de OSD, selección <Preparación de Nivel> (<Level setup>) using las teclas de [Cursor arriba/abajo] ([Cursor up/down]) y [Enter] del mando a distancia. Active la seals de ruido de pruneba con la tecla de [Prueba] ([Test]) (junto a la tecla de [Volumen arriba] ([Volume up]); y oira un ruido de "oleaje" que realiza un ciclo atramés de sus altavoces, empezando por el delantero izquierdo. (Siusted no oye el ruido de pruneba, compruebe sus Conexiones de Audio (anterior), y sus ajustes del menú de OSD <Preparación de altavoces> (<Speaker setup>) (anterior)</p>
<p>En la columna delazo izquierdo de la OSD ver a signo que apunta hacia la (<Left>) (si el signo apunta a另一边 linea qualquera, use las teclas de [Cursor arriba/abajo] ([Cursor up/down]) del mando a distancia para mover el signo a la (<Izquierda> (<Left))). Ahora use las teclas de [Cursor ] del mando a distancia para ajustar el nivel de la salute del ruido de altovo Izquierdo (delantero izquierdo); el ruido de prueba se traslada automatamente all y la lectura de "compensacion de nivel" ("level offset") de la derecha cambiara en incrementos de 0,5 dB. Si usted está using an mediator SPL, ajuste la salute Izquierda (Left) para producir una lecture de 75 dB SPL con compensacion C (o qualquier(other nivel de referencia que usted prefera adoptar).</p>
<p>Si está equilibrando "de oído"endale que elegir un altovo—generalmente el central —como eferencia y ajustar cada uno de los demas de forma que "suene tan alto" como el de referencia.</p>
<p>Usando las teclas de [Cursor arriba/abajo] ([Cursor up/down]) y [Cursor / ] del mando a distancia, ajuste cada altovo a su vez para producir la mesma lectura de mediator SPL (o intensidad sonora subjativa), dentro de ± 1 dB o mejor; la capacité del S170i para calibrar las開放es en incrementos de 0,5 dB facilita esta precision.</p>
<p><h1 id="téngase-en-cuenta-que-3">TÉNGASE EN CUENTA QUE:</h1></p>
<ul>
<li>Todos los altavoces deben estar en su posicion final antes del ajuste de niveles. </li>
<li>Su Altavoz de graves (Subwoofer) (if any) deben fjarse transicion integral superada, o fjarse a la Frequencia más alta possible. </li>
<li>Debido a los efectos de la acústica de la sala, los altavoces de pares emparejados (delantero; surround; trasero) no siempre se calibraran exactamente a las mismaslectureuras de compensación de nivel. </li>
<li>Si usted es particulamente mériculoso, pueda que deseee volver y probar other vez su preparación de niveles afterwards de completar la rutina de Preparación de retardo (Delay Setup) (a continuación).</li>
</ul>
<h1 id="preparacion-de-retardo">PREPARACION DE RETARDO</h1>
<p>Los ajustes de retardo de canal de su sistemas son sutiles pero también son un refinamento importante de su preparación. Informando al S170i de las dimensiones de altovoz al que eschucha para cada altovoz, se imponen automatistically los retardos correctos para cada canal, optimizando laImagen, inteligibility y ambiente de sonido surround. Introduzca sus dimensiones con exactitud bajo de 30~cm .</p>
<h1 id="configuracion-de-retardos">CONFIGURACION DE RETARDOS</h1>
<p>En el menu Principal de OSD, selección <Preparación de retardo> (<Delay setup>) using las teclas de [Cursor arriba/abajo] ([Cursor up/down]) y [Enter] del mando a distancia. Usando las teclas de [Cursor / ], ajuste <Derecho> (<Right>) a la distancia entre su posición principal de escucha y la superficie delantera del altovoz delantero Derecho.</p>
<p>Usando las mismas teclas del mando a distancia, ajuste los altavoces restantes, cada uno con las distacias de disposicion de su sistemas. Si no hay presente un altovoz particular en su sistemas, se visualiza "Ninguno" ("None") y no sera possible和睦ar distancia alguna.</p>
<h1 id="preparacion-de-fuente">PREPARACION DE FUENTE</h1>
<p>El S170i está equipado con un total de neue entradas: seis entradas de audio-video (etiquetadas en el panel trasero con VIDEO1-6), y 3 entradas de solo audio (etiquetadas con CD, AUX, y SINTONIZADOR (TUNER) también hay un bucle de solo audio MONITOR DE CINTA (TAPE MONITOR). Para cada posicion de entrada del S170i, usted可以选择aruna entrada digital que se activa siempre que tal entrada se seleccione, y usted可以选择 asignar un nombre de 7 caracteres que se visualizaré en la visualizacion del panel delantero y normalmente en la visualacion en pantalla siempre que se seleccione tal entrada.</p>
<h1 id="configuracion-de-fuentes">CONFIGURACION DE FUENTES</h1>
<p>En el menú Principal de OSD, selección <Preparación de fuentes> (<Source setup>) using las teclas de [Cursor arraba/abajo] ([Cursor up/down]) y [Enter] del mando a distancia. Usando las teclas de [Cursor ], active la fuente que deseña configurar. Las fuentes están numeradas con 1-9, lo que corresponde pororden a VIDEO1-6, CD, AUX, y SINTONIZADOR (TUNER) en el panel trasero (el bucle MONITOR DE CINTA (TAPE MONITOR) no es configurable, y no aparece en la rotación). Use la tecla [Cursor] abajo (down) para mover el punto del menu <Titulo> (<Title>) y pulse la tecla [Enter]. Ahora puede estudé editor el titulo por defecto ("Video 1", "CD," etc.) con un nombre más significativo, que tengahasta 7 caricacteres. Las teclas de [Cursor arraba/abajo] ([Cursor up/down]) avanzan por la lista completa de caricacteres disponibles@mueras que las teclas de [Cursor ] mueven a izquierda y derecha a工程技术 de losSES caricacteres (Usted pueda retroceder y embariar los caricacteres libremente). Cuando haya terminado el titulo, pulse [Enter] para volver al menú <Preparación de fuent> (<Source setup>).</p>
<p>Usando la tecla [Cursor] avance hacer abajo (down) hasta pagar a <Digital input> (Entrada digital). Use las teclas de [Cursor ] para asignar una entrada digital a la fuente actual. Las entradas digitales aparecen por order: Coax1-4, OPT 1, y Opt 2, seguidas por Off. Usted ajusta una <Entrada digital> (<Digital input>) de fuente a "Off" si DEAse asegurar que la fuente no utilise un tren de corriente de bitios digitales entrada.</p>
<h1 id="nota-19">NOTA</h1>
<p>Usted pueda asignar librementeequalquier entrada digitalaequalquierposiciondefuente,ypuede asignaruna entrada digitala dosomaspositionedesfuente.Porejemplo,con su reproductordVD/CD conectado a la entrada digital COAX1,usted能看出egir asignar COAX1 tanto a la entrada"CD”comoa la“VIDEO1”,cambiandoel nombreVIDEO1a“DVD."</p>
<p>Se dispone de los siguientes caracteres:</p>
<p>ABCDEFGHIJKLMNOPQRSTUVWXYZ0123456789</p>
<p>abcdefghijklmnopqrstuvwxyz*-:/</p>
<p>Usando la tecla [Cursor] hacía abajo (down) avance hacía abajo <Video componente> (<Component video>) Use las teclas de [Cursor ] para poder Video componente en "On" u "Off." Cuando una fuente se ha ajustado a Video componente video "On," la seals de video presente en los enchufes de clavija de ENTRADA DE VIDEO COMPONENTE (COMPONENT VIDEO IN) (Y-Cb-Cr) del S170i se transmite a sus enchufes de clavija de SALIDA DE VIDEO COMPONENTE (COMPONENT VIDEO OUT) salute de (entradas CD, Auxiliar, sintonizador (entradas CD, Auxiliar, sintonizador COMPONENT VIDEO OUT)yempre que se seleccione tal entrada.</p>
<p>Las OSD no aparecen en la calidad de video compuesto.</p>
<h1 id="preparacion-de-disparador">PREPARACION DE DISPARADOR</h1>
<p>El S170i está equipado con salidas de disparador de TK12-voltios que pueda usarse para poder en "On", activar, o controlar de除外 mode componentes o sistemas auxiliares, tales como amplificadores de potencia, elevadores de projector, sistemas de alumbrado, etc. Su funciona podra ser tan sencilla como encender y apagar su amplificador de potencia NAD S250, o tan compleja como disponible para su uso una habitacion completa de teatro en casa. Para más informacion技术水平a de las salidas de disparador de 12 voltios del S170i, vexe el Apendice 1, o consulte a su especialista de audio instalador de NAD.</p>
<h1 id="simple-configuración-de-disparador-de-12-voltios-ejemplo-puesta-en-ondel-amplificador-de-potencia-nad-s250">Simple Configuración de Disparador de 12-Voltios Ejemplo: Puesta en "On"del Amplificador de Potencia NAD S250</h1>
<p>El ejemplo sugiente utilizes el Disparador de 12V #1 del S170i para poder en "On"y "Off"el amplificador S250 en concerto con el preamplificador.</p>
<ul>
<li>Usando el cable de Disparador de 12V que se suministra con el S170i, conecte el enchufe de clavija de DISPARADOS DE 12V (12V TRIGGERS) del panel trasero del S170i marcado con #1, con el enchufe de clavija de entrada DE disparador de 12V (12V TRIGGER) del amplificador de potencia S250. Observe que este cable de especialista proVEe un minienchufe de 1/8 de pulgada en un extremo para el S170i, y un enchufe estilo CC en el othero extremo para insertar en la entrada de disparador del amplificador S250. </li>
<li>A partir del menu Principal de OSD, selección <Preparación de Disparador> (<Trigger setup>) using las teclas de [Cursor arriba/abajo] ([Cursor up/down]) y [Enter] del mando a distancia. Apartecen las listas de <Trigger 1> como sigue (estás son por defecto):</li>
</ul>
<p>-polarity (polaridad) Positiva (Posit)</p>
<p>-retardo(delay) No <br />
-duración(duration) Infinita(Infin)</p>
<p>Si se han realizado cualesquierathersajutes,use las teclasde <a href="[Cursorup/down">Cursor arriba/abajo</a>]y [Cursor ] del mando a distancia para cambiarlos a los antedichos.</p>
<h1 id="preparacion-de-audio-thx">PREPARACION DE AUDIO THX</h1>
<p>THX Surround EX create un sexto canal "central-trasero" para reproduccion por uno o más altovasces situados detrás del área de esucha. Con grabaciones que lleven lamarca Dolby Surround EX, proportionscna canal central-traserospecificamentecreado técnicamenteque está codificado en los canales de sonido izquierdo/derecho muysimilar al canal central codificado en los canales delanteros izquierdo/derecho en las mezclas de Dolby Surround de matriz codificada. Sin embargo, el proceso THX Surround EX producirá a bajo unutil efecto central reasero incluso desde software que originalmente no estaba deliberamente codificado para reproduccion EX.</p>
<h1 id="limitador-de-bajos">LIMITADOR DE BAJOS</h1>
<p>El S170i tiene incorporeal un Limitador de Bajos que usted puedaJKLM para eliminar cualquier posibiliad de que su Altavoz de graves (Subwoofer) produzca distorsion audible. Usted hara este eschuchando una senal incorporeal de prueba de ruido que transmite el S170i a su Altavoz de graves (Subwoofer), e incrementando el ajuste de "punto superior" de Limitador de Bajos hasta el momento de la distorsion audible. Ahora el Limitador de Bajos impide cualesquiera senales de material de programa que superen el nivel para que no se transmitan al Altavoz de graves (Subwoofer).</p>
<h1 id="configuracion-del-limitador-de-bajos">CONFIGURACION DEL LIMITADOR DE BAJOS</h1>
<p>En el menú de <Preparación de Audio THX> (<THX Audio setup>), use las teclas de [Cursor arriba/abajo] ([Cursor up/down]) y [Enter] del mando a distancia para selección <Preparación del limitador de bajos> (<Bass limiter setup>). Usando las mismas teclas, ajuste <Limitador de bajos> (<Bass limiter>) en "On" y <Ruido del limitador> (<Limiter noise>) en "On", ousted oirá un suave ronroneo en su Altavoz de graves (Subwoofer). (Si no oye sonido en el Altavoz de graves (Subwoofer) disfruebe las conexiones de audio y de alimentación del mesmo, disfruebe Preparación de altavoces (Speaker Setup), a continuación, y/o disfruebe los ajustes de control del "hardware" del propio Altavoz de graves (Subwoofer).</p>
<p>Ahora use las teclas de [Cursor arriba/abajo] ([Cursor up/down]) del mando a distancia para pagar al punto <Limitador de nivel> (<Limiter level>), y [Cursor ] para disminuir el ajuste del limitador en incrementos de 1 dB. Cuando haga this, la prueba de ruido del Altavoz de graves (Subwoofer)aculara de nivel. Escuche hasta el momento en que las distorsiones audibles (dureza, "golpeteo", "murmullo", uothers elementos extraños) se hagan evidentes, y bajo use [Cursor ] para que el limitador returne (aumente) el nivel 1 o 2 dB hasta que cese la distorsión. Esto establishe el limite "sin distorsión" para su actual ajuste del Altavoz de graves (Subwoofer). Es acontejalable returnar y volver a comprobar su preparación del Limitador de Bajos (Bass Limiter) desdeques de que haya completado las rutinas de Preparación de Nivel (vease más adelante).</p>
<ul>
<li>Incluso después de que el Limitador de bajos (Bass Limiter) está ajustadousteduepuca activarutilmente su prueba de ruido para la "busesada y destruccion"de los ruidos de habitacionque quedan inevitablementeactivados por la calidad del Altavoz de graves (Subwoofer) de alto nivel. (las ventanas, las placas electricas de pared,y las obras de arte colgadas son tres fuentes comunes de ruido). </li>
<li>Si usted cambía alguna vez los Altavoces de graves (Subwoofoers), o cambia su Altavoz de graves (Subwoofer) actual o la posición de escucha, deben repetir la rutina de preparación del Limitador de bajos (Bass Limiter). </li>
<li>Con un Altavoz de graves (Subwoofer) de alto rendimiento, esta rutina puede ser de sonido bastante fuerte. Muchas vezes lo mejor es esperar un momentoopportuno en que la esposa/niños/animales domesticos no está en casa para realizar totalmente la preparacion del Limitador de bajos (Bass Limiter).</li>
</ul>
<h1 id="compensacion-de-la-ganancia-limite">COMPENSACION DE LA GANANCIA LIMITE.</h1>
<p>Esta prestación THX Ultra 2 compensate la ganancia de audio (incremento del novel) cuando el Altavoz de graves (Subwoofer) se sitúa contra una pared o cerca de un rincón de la habitación.</p>
<h1 id="nota-20">NOTA</h1>
<p>Esta prestación featuresole aplicable cuando se usa un Altavoz de graves (Subwoofer) THX Ultra 2 certificado para el que la的回答a de fecuencia y la sensibility forman parte de la asignacion.</p>
<p>Selección <THX Ultra2 Sub> using las teclas de [Cursor arriba/abajo] ([Cursor up/down]) del mando a distancia, bajo selección <Si> (<Yes>) o <No> using las teclas de [Cursor izquierda/derecha] ([Cursor left/right]) del mando a distancia. Luego using las teclas de [Cursor arriba/abajo] ([Cursor up/down]) del mando a distancia, selección <Comprensión de la ganancia limite> (<Boundary gain comp.>), y bajo selección <On> u <Off> using las teclas de [Cursor izquierda/derecha] ([Cursor left/right]) del mando a distancia.</p>
<h1 id="nota-21">NOTA</h1>
<p>La compensación de la ganancia limite sólo puede selectionarse si se selección en <Si> <Yes> el punto del筷 <THX Ultra2 Sub>.</p>
<h1 id="asa-4">ASA</h1>
<p>Esta prestación THX feature ajusta la ganancia y el retardo de los altavoces Surround detreras para compensar su ubicación fisica en la habitación de escucha. Elija una de las tresubicaciones posibles: juntos,proximos o separados.</p>
<h1 id="nota-22">NOTA</h1>
<p>Debera tener dos altavoces Surroundadoras (7.1) para que funciona esta prestación.</p>
<p>Selezione >Altavoces traseros> (<Back speakers>) using las teclas de [Cursor arriba/abajo] ([Cursor up/down])del mando a distancia, Luego seleccione <Juntos> (Together) o <Proximos> (Close) o <Separados> (<Apart>) using las teclas de [Cursor izquierda/derecha] [Cursor left/right] del mando a distancia.</p>
<p>Usted pueda hacerFuncionar igualmente el preamplificador S170i con su panel delantero o por medio del mando a distancia HTR 2. Dado que en la mayoría de las occasions sera el mando a distancia el medio primario de control, nos concentraremos en operaciones controlas por el mando a distancia. Asegúrese de leer la sección, "Operaciones del Panel Delantero," más adelante.</p>
<h1 id="selection-de-fuentes">SELECTION DE Fuentes</h1>
<p>Entre el HTR 2 selección [AMP] y bajo use las teclas numéricas [1 - 10+] etiquetadas con el mismo color rojo que la tecla [AMP] para [DVD], [SAT], [VCR], [VIDEO], etc. para selectionar directamente esas fuentes.</p>
<h1 id="téngase-en-cuenta-que-4">TÉNGASE EN CUENTA QUE:</h1>
<ul>
<li>Cuando se selección una fuente de audio solo, permanece selectionada la seals de video másrecentamente seleccionada, hasta que se seleccione otra entrada de audio-video. </li>
<li>Cuando cambie fuentes, la OSD, según Sean los ajustes de preparación de la Visualización (Display) (anterior) muestranmomentáneamenteinformation sobre la nuevo entrada. El nivel de detaille depende del ajuste de<Visualización temporal> (<Temporary disp>): "Total" ("Full") indica toda la información sobre lareshuelareshaingal digital selecciónada,y lasseñasde video; "Sencilla" ("Simple")muesraunicamenteel nombrede lareshasta, y "Off"impide queaparezcacualquier visualización. </li>
<li>El modo de eschucha de entrada-Newamente seleccionada (Stereo, EARS, Dolby Digital, etc.) vuede al modo que se utilizes la ultima vez que se eligio tal entrada, excepto que una fuente digital de multicanal (Dolby Digital o DTS) cambia automatistically a sonido surround de canal 5,1 o 6.1, incluso awhileancia打入a ultima usada en other mode como Stereo or EARS. </li>
<li>La entrada Ext 5.1 participates en la "rotación" de fuentes del S170i como cualquier othera fuente de audio solo. No obstar, bajo que la entrada Ext 5.1 es una fuente "directa" no recibe gestión de bajos, control de tono, ni otra función alguna del preamplificador; las señales que aparecen en la parte trasera del panel EXTERNAL 5.1 INPUTS pasan directamente a los correspondientes theirs enchufes de clavija PREAMP ANALOG 7.1 OUTPUTS sin procesar othera casa que el control de Volumen Principal (Master Volume). La gestión de bajos y cualquier(othero proceso que se desee ha de realizarse con el componente de fuente externa multicanal.</li>
</ul>
<p>Hay un CONTROL DE NIVEL DE ENTRADAS (INPUT LEVEL CONTROL) ajustable para las fuentes analógicas con un MEDIDOR DE NIVEL DE ENTRADAS (INPUT LEVEL METER) para hacer que el ajuste的结果是 fácil y precise. Este circuito ajustará automatistically la entrada individual para evaporar la sobrecarga del convertidor A/D (convertifor de senales analógicas en digitales ara procesar surround), y no requires que el usuario realize ajuste algo. No obstar, tal vez se seesajustarmanualmenteel niveldeentradas para que cada fuente reproduzca con el本身就是nivel subjeto de intensidad sonora.Dado que el ajuste automatico solo contempla senales的最大as,las fuentes conuna gama dinamica ancha(CDs de musica clásica)sonaran subjectivement mas suaves que las fuentes de gama dinamica estrecha o comprimida (transmisiones por radio de música rock).</p>
<p>Paraaabstarenel NIVELDEENTRADAS(INPUTLEVEL),entreprimeroenOSD(Visualacionenpantalla) pulsando la TECLA DE CURSOR DERECHA (RIGHT CURSOR KEY)yavance hacia abajo hasta PREPARACIONDEFUEENTE(SOURCESETUP)conlaTECLADEFLECHAABAJO(DOWNARROWKEY)ypulseENTER.</p>
<p>Śde el MENU DE PREPARACION DE FUENTE (SOURCE SETUP MENU) selección SENSIBILIDAD ANALOGICA (ANALOG SENSITIVITY) y use la TECLA DE CURSOR DERECHA/ZQUIERDA (RIGHT/LEFT CURSOR KEY) paraaabstar el NIVEL DE ENTRADAS (INPUT LEVEL). La gama de ajustes es -5dB a +10dB. Internacionalmente可以选择ar ANALOG MON para ver una visualización de gráfo de barras verticales (con función de Retencion de picos (Peak Hold) de nivel de entrada. En este modo, use la tecla de CURSOR ARRIBA/ABAJO CURSOR UP/DOWN para expandir la escalal del medidor desde -20dB hasta 0dB, hasta -40dB hasta 0dB.</p>
<h1 id="ajuste-del-volumen">AJUSTE DEL VOLUMEN</h1>
<p>Use las teclas de <Volume arriba/abajo> (<Volume up/down>) del mando a distancia HTR 2 para ajustar el "volumen maestro" del S170i, incrementando o disminuyendo todos los canales jintos.</p>
<h1 id="téngase-en-cuenta-que-5">TÉNGASE EN CUENTA QUE:</h1>
<ul>
<li>Una pulsación momentánea de tecla cambiará el volumen maestro en incrementos de 1dB; si se mantiene pulsada la tecla de <Volume arriba/abajo> (<Volume up/down>) el cambio del volumen maestro proseguirá hasta que se suele la tecla. </li>
<li>La OSD del S170i muestra el ajuste del volumen como linea GRAPHICA correspondiente al nivel de referencia (marca "+" en la linea), con una visualizacion numérica encima en dB respecto al nivel de referencia. (Si está ajustado a "Off" <Preparacion de visualizacion> (<Display setup>) <Visualizacion temporal> (<Temporary disp>), laancia de volumen momenteña NO aparecerá).</li>
</ul>
<p>Puesto que las grabaciones varian considerablemente en nivei medio general, no es imperativo escuchar el nivel de referencia oequalquierotroajuste particular.Unajuste de-20puede sonar“tan fuerte”con un CD como lo hace con other un -10.</p>
<ul>
<li>Si se ha activado silenciamiento (a continuación) augmentando el Volumen Principal (Master Volume) a工程技术 de las teclas de [Volumen arriba/abajo] ([Volumen up/down]) del mando a distancia HTR 2 o con el botón del panel delantero se desactiva automatistically la función silenciamiento; disminuyendo el volumen permanece el silenciamiento. </li>
<li>El S170i se pone en "On"/"Off"/returno a partir del modo de Reserva (Standby) con在哪quier ajuste de Volumen Principal (Master Volume) que se use; no obstar, si el ajuste anterior fue superior a -20 dB, el S170i se pone en "On"a -20 dB. Esto impedirá comenzar inadvertamente una sesión con volumen excessivo.</li>
</ul>
<h1 id="silenciamiento-del-sonido">SILENCIAMIENTO DEL SONIDO</h1>
<p>Use la tecla de <Silenciamiento> (<Mute>) del mando a distancia HTR 2 para silenciar todos los canales por completo. El silenciamiento se Halla siempre disponible, independiente de la fuente o de las selecciones de modo de esucha.</p>
<h1 id="téngase-en-cuenta-que-6">TÉNGASE EN CUENTA QUE:</h1>
<p>Realizando el ciclo de Reserva (Standby) o poniendo el equipo en "Off"el silencimiento se desactiva; el S170i siempre se pone en "On"o vuelve desde Reserva (Standby) con el silencimiento en off. <br />
- Cambiando la entrada o las selecciones del modo de escucha no se libera el silenciamiento. <br />
- Si se AUGmente el Volumen Principal (Master Volume) por medio de las teclas de [Volumen arriba/abajo] ([Volumen up/down]) del mando a distancia HTR 2 o con el botón del panel delantero se desactiva automatistically el silenciamiento; si se disminuye el volumen permanece el silenciamiento.</p>
<h1 id="ajuste-de-los-modos-de-escucha">AJUSTE DE LOS MODOS DE ESCUCHA</h1>
<h1 id="informacion-sobre-los-modos-de-escucha-del-s170i">INFORMACION SOBRE LOS MODOS DE ESCUCHA DEL S170i</h1>
<p>El preamplificador S170i offre siete modelos distinctos de escucha, a la medida para differedes temas de grabaciones o material de programas.</p>
<h1 id="mono-4">MONO</h1>
<p>Toda laitterse dirige al canal central o a los canals izquierdo y derecho si no hay canal central presente o seleccionado; las bajas freuencias se dirigen al Altavoz de graves (Subwoofer) si hay uno presente en la preparacion de altavoces.</p>
<p>El modo Mono es mejor selectionarlo para grabaciones monoaurales originalmente producidas en formattingo de un solo canal, incluyendo los filmes cláscios y grabaciones historicas de música. Asegura una presentacion monoaural estable y clara con gestion correcta de bajos.</p>
<h1 id="stereo-3">STEREO</h1>
<p>Las grabaciones estéreo, Sean en forma PCM/digital o analógica y con sonido surround codificado o no se reproducen tal como estángrabadas; las grabaciones digitales multicanal (Dolby Digital y DTS) se reproduce a工程技术 de los canales delantero izquierdo y derecho unicamente, como señales Izquierda/Derecha (Lt/Rt) - totales o "mezcladas en downmix").</p>
<p>Selección el modo Stereo para eschar Grabaciones estéreo cuando usted no desea sonido surround activo, o para grabaciones multicanal en que únicamente la reproduccion de dos canales es possible (o deseada).</p>
<h1 id="directa-fuentes-dolby-digitaldts-solamente">DIRECTA (FUENTES DOLBY DIGITAL/DTS SOLAMENTE)</h1>
<p>Las grabaciones digitales multicanal (Dolby Digital o DTS) se reproduce a属实mente de los canales empleados en la grabacion original. Por exemple, una grabacion "canal 5.1" Dolby Digital 3/2/1 se reproducirá a属实es de los altavoces delanteros izquierdo-central.derecho, y Altavoz de graves (Subwoofer); una grabacion Dolby Digital 2/0/0 se reproducirá solamente a属实es de los altavoces delanteros izquierdo y derecho (and he Altavoz de graves (Subwoofer) si ellos se fijaron en "Pequeño" ("Small") en el menu OSD de <Preparacion de altavoces> (<Speaker setup>) OSD.</p>
<h1 id="dolby-ex-dts-es-thx-ex-surround-61-4">DOLBY EX, DTS ES, THX EX, SURROUND 6.1</h1>
<p>Las grabaciones digitales multicanales (Dolby Digital o DTS) se reproduce a工程技术 de la série completa de altavoces delanteros, surround, y uno o dos canales "traseros" (si se han seleccionado en <Preparacion de altavoces> (<Speaker Setup>)). Si hay codificacion Dolby Digital EX/DTS ES en la grabacion original se usa su lógica para derivar los canales traseros; de lo contrario, el preamplificador S170i derives un canal individual surround trasero a partir de los canales surround izquierdo/derecho.</p>
<h1 id="dolby-pro-logic-4">DOLBY PRO LOGIC</h1>
<p>Las grabaciones de sonido surround coficcido (y las grabaciones estéreo que estén codificadas) se reproducen con descodificio Pro Logic Dolby Surround, con calidad a canales izquierdo, central, y delantero derecho y una sola señal monoaural surround a todos altavoces de canal surround; la respecta del canal surround se atenúa por encima de 7 kHz desalentar la localización deubicaciones de altovoces surround en modo DPL.</p>
<p>El modo Pro Logic se reserva mejor para grabaciones de sonido surround codificio dedicadas a Dolby Surround o reproduccion de sistemas compatible. Incluye la mayoría de los filmes en cinta de video y muchos en Disco por láser (LaserDisc) programas de television/cable producidos para sonido surround, y muchos Discos por láser (LaserDiscs) más viejos. La mayoría de las grabaciones DVD, incluso las que no usesan surround multicanal, incluyen una pista de sonido Dolby Digital y/o DTS en modelos de 1- o 2-canales; si está disponible, este proportióna usualmente el mejor rendimiento. Con raras exceptiones, el modo de escucha EARS patentado de NAD produce resultados superiores con grabaciones musicales estéreo a los que se obtienen con Pro Logic</p>
<h1 id="dolby-pro-logic-ii-filme-movie">DOLBY PRO LOGIC II FILME (MOVIE)</h1>
<p>Similar a Dolby Pro Logic, este algo rigorimo mejorado aplica lógica afterwards de descodificación de matris, más bien que antes como en Pro Logic, melhorando la calidad de laImagen y la precision de direccion de la seals. Los canales surround se executan también aplenama gama.</p>
<h1 id="dolby-pro-logic-ii-musica-music">DOLBY PRO LOGIC II MUSICA (MUSIC)</h1>
<p>Con sintonización finala para escharcer música, en este modo la的回答sta de los canales surround se atenúa para simular la absorccion acistica de una habitacion típica. Además, hay various ajustes que能把 realizarse para melhorar la experiencia de esucha:</p>
<p>PL II Panorama Cuando se selecciona el ajuste de Panorama envuelve el sonido de los altavoces Delanteros Izquierdo y derecho alrededor de usted para Obtener un efecto apasionante.</p>
<p>Anchura Central PL II La Anchura Central (Center Width) le permite repartir gradualmente el sonido del canal Central a los altavoces Delanteros Izquierdo y Derecho. En el ajuste más ancho todo el sonido del altovoz Central se mezcla a los altavoces Inquierdo y Derecho. Este control能把 ayudar a lograr un sonido más espacioso, o una mejor mezcla, de laImagen delatera.</p>
<p>Dimension PLII La Dimensión ajusta el equilibrio delantero/trasero según el gusto.</p>
<h1 id="dts-neo6-cine-cinema">DTS NEO:6 CINE (CINEMA)</h1>
<p>Las grabaciones de sonido surround codificado (y las grabaciones estéreo que no estén codificadas) se reproduce con descodificación Surround DTS Neo:6, con salute a los canales izquierdo, central delantero derecho, y surround y canales surround traseros (si se selecciónan).</p>
<h1 id="dts-neo6-musica-music">DTS NEO:6 MUSICA (MUSIC)</h1>
<p>Este modo de música surround se pueda usar para create una experiencia de sonido surround convincente usingo los altavoces delanteros, central y todos los altavoces surround selectionados desde cadaquier fuente estereo de 2 canales. Neo:6 permitted al usuarioajsar la Imagen Central (Center Image) en seeds incrementos. La Imagen Central (Center Image) le permitte gradualmente el sonido del canal Central a los altavoces delanteros izquierdo y derechocho.</p>
<h1 id="ears-8">EARS</h1>
<p>Las grabaciones estéreo (y las granaciones estéreo de sonido surround codificado), bien Sean an PCM/digital o forma analógica, se reproducen con proceso de sonido surround propio de NAD con calidad a canales izquierdo, central y delantero derecho, y también altavoces de canal de sonido surround. EARS extrae el ambiente natural presente en la casi todas las grabaciones estéreo bien producidas. No sintetizarialquer ambiente u others elementos sónicos y por lo tanto permanece mucho más fiel al sonido de la actuación musical original respecto a la mayoría de otheras optiones surround musical.</p>
<p>Selección EARS para escharGrabaciones y transmissions de música estéreo. EARS produce un ambiente sutil pero altoamente natural y creble desde casi todas las grabaciones de "acústica natural"; típically, estas incluyen los@generos de música clásica, jazz, y folklorica, asi como numerousos ejemplos de Others. Sus virtudes incluyen imagenes acústicas realizas y estables como "frente al escenario" y una "acústica virtual" ambiental espaciosa pero no exagerada que permanecen fifeles a la grabación original.</p>
<h1 id="nota-23">NOTA</h1>
<p>Cuando escucha retransmisión de FM, pueda revelarse más claramente la "distorsión multipaso" con el circuito EARS. Nombre peut usarse ventajosamente para orientar optimamente una antenna de FM para una estación de FM dada.</p>
<p>EARS no se pueda aplicar a grabaciones digitales multicanales (Dolby Digital/DTS); estas grabaciones llevan su proprio sonido surround y ambiental en su naturaleza multicanal. No obstarve, se pueda aplicar EARS a estas grabaciones cuando se eschuchen a trovés desonianas estéreo de un reproductor DVD u otherro reproductor, o cuando la selección de pista de sonido de DVD u other grabación está ajustada a "stereo/PCM" en lugar de "5.1" o equivalente.</p>
<h1 id="desvio-analogico">DESVIO ANALOGICO</h1>
<p>Las grabaciones estéreo o monoaurales desdeequalquier enchufe de clavija de entrada analógica del S170i se enrutan directamente a las salidas delanteras izquierda/derecha sin proceso.</p>
<p>Use el Desvio Analógico (Analog Bypass) para reproducir conditiones "melómanas" de menorizo paso deSEOnal para la esucha crónica de fuentes de dos canales (o monoaurales).</p>
<p>No se realiza gestión de bajos en el modo de Desvio Analógico (Analog Bypass), por lo tanto las señales se reproducen por la "gama completa" de canales delanteros izquierdo y decrecho, Sean cuales fueren los ajustes introducidos en la頁ina de Prepoxidación de Altavoces del S170i.</p>
<p>El cuadrosuma indica los发展模式 de eschuchas disponibles con los tres temas posibles de fuentes de senal: entrada digital 2 canales (digital-input 2-channel) (ya sea la senal actual monoaural, estereo o de sonido surround codificado); entrada analógica 2 canales (analog-input 2-channel) (mono, estereo o de sonido surround codificado), o multicanal digital (Dolby Digital o DTS). Si no se dispone de un modo de eschuchapara una fuente de senal dada, no aparece en la rotación de selección de <Mode> (<Mode>).</p>
<table><tr><td>2 canales. PCM</td><td>2-canales Analógico</td><td>Multicanal. (DD/DTS)</td></tr><tr><td>Mono</td><td>Mono</td><td>Mono</td></tr><tr><td>Estéreo</td><td>Estéreo</td><td>Estéreo</td></tr><tr><td>Pro Logic</td><td>Dolby Pro Logic</td><td>Directo</td></tr><tr><td>EARS</td><td>EARS</td><td>Surround 6,1*</td></tr><tr><td>—</td><td>Desvío Analógico</td><td>—</td></tr></table>
<p>*Si se han preparado altavoces "Traseros".</p>
<h1 id="selection-de-los-modos-de-escucha-tengase-en-cuenta-que">SELECTION DE LOS MODOS DE ESCUCHA TENGASE EN CUENTA QUE:</h1>
<ul>
<li>Debera teclear otra vez [Modo] ([Mode]) si transcurren algunos segundos desde que usted'utilizase [Cursor up/down] paraCambiar los modelos de esucha </li>
<li>El cambio de la entrada selectionada, o realizando el ciclo del S170i por Reserva (Standby) o la;puesta en "Off", o la activacion del silenciamiento no cambian el modo de esucha selectionado. </li>
<li>El cambio del tipo de Signals Cambia el modo de escucha si laewsna es un grabacion digital multicanal, o es incompatible con el mode selecionado. Por exemple: afterwards of escuchar un disco CD en unroductor DVD/CD con el mode de escucha EARS,usted quita el CD y lo cambia con una grabacion CD de multicanal DTS de canal 5.1. El S170i activa automatamente la escucha DTS/5.1.</li>
</ul>
<h1 id="informacion-sobre-el-modod-thx-mode">INFORMACION SOBRE EL MODOD THX MODE</h1>
<p>Además de certifyar un rendimiento fundamental muy alto de audio multicanal con componentes que tengan el logotipo THX/Ultra, el programa Home THX de THX Ltd. también obliga a los componentes Ultra a que incluyan el modo THX. Este tiene incorpuras tres mejorasfundamentales del audio surround:</p>
<ul>
<li>La reecualación contornea las Frequencias altas de los canales delanteros para que coincida mejor el equilibrio tonal de la pista de sonido del这部电影 original como se reproduce en la "etapa de doblaje" en la que el director y los mezcladores de sonido vigilaron el这部电影 durante su produccion. </li>
<li>La coincidencia de tiempo (tiempo matching) compensate la colocacion lateral/trasera de los altavoces surround en un sistema de teatro en casa surround correctamente colocado, consiguiendo una caracteristica tonal más consistente con sonidos originados enequalquier punto alrededor de las posiciones de la audiencia. </li>
<li>La Descorrelation (Decorrelation) mitiga el canal surround monoaural proportionado por todas las grabaciones Pro Logic (y的一些 fuentes Dolby Digital y DTS), realizando una reproduccion más espaciosa y natural de un ambiente de terme y de "acústica virtual".</li>
</ul>
<h1 id="activacion-de-thx">ACTIVACION DE THX</h1>
<p>De se el mando a distancia HTR 2, pulse la tecla [AMP] primero y bajo pulse la tecla [THX ] y quedará activado el THX surround. Las pulsaciones subsiguentes de la tecla [THX ] alternará entre los modos estándar-THX y THX Surround EX modes (si se hallan disponibles) y kuego de vuelata a modo no THX. Tenga en cuenta que:</p>
<ul>
<li>Los modelos THX sólo estárnables para fuentes de entrada digital: Dolby Digital; DTS; PCM </li>
<li>Para fuentes PCM, deben haber sido previamente activado el modo Dolby Pro Logic. </li>
<li>Aparece en la OSD "Fuente incompatible" ("Incompatible Source") y también en la lecture del panel delantero cuando se invoca THX para una fuente analógica, si Pro Logic no es el modo actual de escucha, o cuando se invoca THX Surround EX para una fuente PCM o una fuente surround no discrete Dolby Digital o DTS (2/0/0, 2/1/0, 3/1/1, etc.).</li>
</ul>
<h1 id="ajuste-de-los-niveles-de-canal">AJUSTE DE LOS NIVELES DE CANAL</h1>
<p>Usted puede hacer Cambios temporales en los niveles relativos de las salidas central, surround, y Altavoz de graves (Subwoofer) sin abandonar los niveles permanentes calibrados en la Preparacion de Nivel de la OSD. Esto能把 resultar utilisen diversas circumstantias, por exemple: para augmentar (o disminuir el tono) de la claridad de dialogo de un这部电影 elevando (bajando) el canal central, para mejor (o inhibir) el ambiente subjectivo de una grabacion de musica producida con EARS elevando (bajando) el nivel de los canales surround, para mitigar los bajos profundos excessivos (o melhorar los bajos profundos) bajo (elevando) el nivel del Altavoz de graves (Subwoofer).</p>
<h1 id="cambio-de-los-niveles-de-canales">CAMBIO DE LOS NIVELES DE CANALES</h1>
<p>Des el mando a distancia HTR 2, use los tres pares de teclas emparejados verticalmente [Surr], [Center], y [Sub] paraaabstar los niveles relativos de los canales Surround, Canal central o Altavoz de graves (Subwoofer);mostatendose los niveles cambiantes en OSD y en la lecture del panel delantero.</p>
<h1 id="téngase-en-cuenta-que-7">TÉNGASE EN CUENTA QUE:</h1>
<ul>
<li>Los ajustes de nivel seañaden a los niveles de preparación establecidos en el menu (anterior) <Preparación de niveles> (<Levels setup>) de OSD del preamplificador S170i. Por exemple: Si su <Preparación de Nivel> (<Level setup>) establish <Central> (<Center>) a "-3 dB" yasted Manipula el nivel [Centrar arriba/abajo] ([Center up/down])poniéndolo a +2 dB, el efecto neto total sera un nivel de canal central de -1 dB. </li>
<li>LosCambioshechos en la pagina [NIVELES] [LEVELS]se cancelanrealizando el ciclo del S170i por el mode de Reserva (Standby). </li>
<li>Si está en vigor un Preajuste (Preset) (seLECTIONdo antes) los niveles por los que "comienzan" los tres controlles de la pagea [NIVELES] [LEVELS] reflejan los niveles memorizados con el Preajuste (Preset). (Véase la Configuración de Preajustes anteriorsmente). </li>
<li>La párgnia [NIVELES] ([LEVELS]) se muestra y permite ajuste de un canal que no esté presente en el menu <Preparación de altavoces> (<Speaker setup>) de OSD. Por exemple: Avec usted haya ajustado <Central> (<Central>) con "No" en el menu <Preparación de altavoces> (<Speaker setup>) de OSD, las teclas de [Central Arriba/abajo] [Center up/down] aparecen en la párgnia [NIVELES] ([LEVELS]); noienen efecto, incluo en el "canal central fantasma" si se escaucha en在哪quiera de los modos surround. </li>
<li>Si se han configurado uno o dos canales traseros surround como presentes en el menu de <Preparación de altavoces> (<Speaker setup>) de OSD, se elevaran y bajarán sus niveles con las teclas de [Surround arriba/abajo] ([Surr up/down]) de la頁a [NIVELES] ([LEVELS]) en concorro con los canales surround..</li>
</ul>
<h1 id="ajuste-de-controles-de-tonos">AJUSTE DE CONTROLES DE TONOS</h1>
<p>Pulse la tecla de [ Tono] ([ Tone]); aparece "Trémolos" ("Treble") en las Visualizaciones en Pantalla (OSD) y en la lectura de panel delantero. Utilice [Cursor / ] ([Cursor / ) del mando a distancia para augmentar o disminuir trémolos en incrementos de 1 dB. Pulse la tecla de [ Tono] ([ Tone]) otra vez paraaabstar bajos,utilizando de forma similar las teclas [Cursor / ] ([Cursor / ); aparece "Bajos" ("Bass") en las Visualizaciones en Pantalla (OSD) y en la lectura de panel delantero. Pulse [ Tono] [ Tone] otra vez para salute de la función de control del tono.</p>
<p>BOTON DE TONO DEL PANEL DELANTERO: Pulse este botón para alternar entre Bajos (Bass), Trémolos (Treble) y TONO "ON" (TONE ON). El botón de VOLUMEN (VOLUME) se usa para ajustar los niveles de Bajos (Bass) y Trémolos (Treble).</p>
<h1 id="tengancuentaque">TENGANCUENTAQUE:</h1>
<ul>
<li>Los ajustes de Bajos/Tremolos (Bass/treble) afectan solamente a los canales delanteros (izquierdo, central, y derecho), y estar anivos en todo los modos de esucha </li>
<li>Los ajustes de Bajos/Trémolos (Bass/treble) impuestos mediante la tecla [Tono] ([Tone]); del mando a distancia HTR 2 serán prioritarios a los almacenados en el menu de <Preparación de audio> (<Audio setup>), si bien son temporales: Realizarando el ciclo por el modo de Reserva (Standby) del S170i (o reactivando el menu de <Preparación de audio> (<Audio setup>), o reactivando un Preajuste (Preset), se les sobrefrdrán y se revertirá a los ajustes selectionados por la <Preparación de audio> (<Audio setup>) o al Preajuste (Preset) reactivado.</li>
</ul>
<h1 id="uso-de-los-preajustes-presets">USO DE LOS PREAJUSTES (PRESETS)</h1>
<p>Entre el HTR 2 seleccione [Preajuse AV] ([AV Preset]) y bajo pulse la tecla numérica [1] hasta [5] para seleccionar el Preajuste (Preset) deseado.</p>
<h1 id="téngase-en-cuenta-que-8">TÉNGASE EN CUENTA QUE:</h1>
<ul>
<li>El Preajuste (Preset) seleccionado permanece en vigor hasta que usted seleccione un Preajuste (Preset) diferente, o realice el ciclo del S170i en su modo de Reserva (Standby). </li>
<li>Se aplica un Preajuste (Preset) searial Fuere la fuente seleccionada, o el modo de escucha que se utilize. </li>
<li>Realizando el ciclo del S170i a工程技术 de Reserva (Standby) se Cancela cualquier Preajuste (Preset) seleccionado, revirtiendo todos ajustes de tono y de todos los ajustes de nivel a los fjados en las pantallas LEVELS o MODE/MULTI.S del mando a distancia HTR 2, o del menu de OSD <Preparacion de Audio> (<Audio Setup>) del preamplificador S170i (anteriamente). </li>
<li>Los niveles de canal de un Preajuste (Preset) seañden a los niveles de preparación establecidos en el menu <Preparación de niveles> (<Levels setup>) de OSD del preamplificador S170i; los ajustes de control de tono de un Preajuste (Preset) se superponen a los existecidos en el menu <Preparación de Audio> (<Audio Setup>) de OSD (o la págin MODE/MULTI.S del mando a distancia) totalmente.</li>
</ul>
<h1 id="operaciones-del-panel-delantero">OPERACIONES DEL PANEL DELANTERO</h1>
<p>Es posible realizar todas las functions directamente con el panel delantero del Preamplificador S170i, sin el mando a distancia HTR 2.</p>
<ul>
<li>ParaATTER las fuentes de entrada o modelos de escucha, pulse AUDIO oVIDEO o MODE; y el boton de PREPARACION DE VOLUMEN (VOLUME SETUP) realizar ahora el ciclo bidirecionalmente, através de todas las fuentes de audio-video o de audio solo, o de los modelos de escucha. Los nombres de fuente o modo aparecen en la OSD asi como en la lecture del panel delantero. Transcurridos cinco segundos de inactividad, la visualizacion y el boton returnan a sus functions normales. </li>
<li>Pulse MONITOR DE CINTA (TAPE MONITOR para oir el componente o la seals conectados a los enchufes de clavija ENTRADA/SALIDA DEL MONITOR DE CINTA (TAPE MONITOR IN/OUT) de panel trasero; pulse MONITOR DE CINTA (TAPE MONITOR) otra vez para circunvalar el bucle del MONITOR DE CINTA (TAPE MONITOR). Aparece en la OSD <MONITOR DE CINTA "On"> (<TAPE MONITOR On>) y <MONITOR DE CINTA "Off"> (<TAPE MONITOR Off>). </li>
<li>Paraaabstur el tremolo, pulse una vez TONO (TONE) y use el boton de PREPARACION DE VOLUMEN (VOLUME SETUP) para elevar o bajo el ajuste; pulse por segunda vez TONO (TONE) paraaabstur los bajos; losuales ajustes de tono aparecen tanto en la OSD como en la lectura del panel delantero. Pulse TONO (TONE) por cercera vez para volver la lectura y el boton de VOLUMEN (PREPARACION) (VOLUME) (SETUP)) a sus functiones normales. </li>
<li>Pulse una vez BRILLO (BRIGHTNESS) para amortiguar la lectura del panel delantero, pulse la tecla另外一个 vez para volver la lectura a su brillo normal. </li>
<li>La tecla ALTAVOCES (SPEAKERS) da acceso a las mismasmericanes que el menu <Preparacion de altavoces> (<Speaker setup>) de OSD (vea Preparacion de Altavoces, anterionmente). La OSD no aparece, pero se visualiza la informacionnecessary en la lecture del panel delantero. Cada pulsacion seguiente de ALTAVOCES (SPEAKERS) mueve a travescde las optiones de canal Principal (Main), Central (Center), Surround, Trasero (Back), y Altavoz de graves (Subwoofer); cuando cualesquiera este seleccionado el boton de PREPARACION DE VOLUMEN (VOLUME SETUP) realiza el ciclo bidirecionalmente a travescde las optiones disponibles, como "No/Pequeño/Grande" ("No/Small/Large") para la posicn Central. Pulse otra vez la tecla ALTAVOCES (SPEAKERS) (más allá del Altavoz de graves (Subwoofer)) para volver la lecture y el boton a sus functiones normales. </li>
<li>La tecla RETARDO (DELAY) funciona de modo similar, ajustando los retardos de canal para cada canal presente. Véase el párafo inmediamente anterior. </li>
<li>La tecla NIVELES (LEVELS) funciona de modo similar, ajustando los niveles de canal para cada canal presente. Véanse los párrafos inmediamente anteriores. </li>
<li>Usted pueda ajustar el audio de habitación remota usinga la tecla de MULTIPLE SFUENTES (MULTISOURCE). Pulse MULTIPLE Fuentes (MULTISOURCE) una vez para ajustar el volumen de la habitacion remota using a boton de VOLUMEN (PREPARACION) (VOLUME (SETUP)); pulse MULTIPLE Fuentes (MULTISOURCE) por segunda vez para realizar el ciclo la fuente enviada a los enchufes de clavija del panel trasero de la HABITACION REMOTA (REMOTE ROOM) atramés de fuentes de audio solamente using a boton de VOLUMEN (PREPARACION) (VOLUME (SETUP)), bidirectionalmente. Pulse por tercera vez (FUENTES MULTIPLEs (MULTISOURCE) para volver la lectura y el boton a sus functions normales; estas también returnan automatistically transcurridos cincosegundos de inactividad.</li>
</ul>
<h1 id="escucha-en-una-zona-remota-multiples-fuentes-multisource">ESCUCHA EN UNA ZONA REMOTA (MULTIPLES FUENTES) (MULTISOURCE)</h1>
<p>El S170i pueda proportionsar senales estéreo nivel de linea a una segunda habitación o zona a工程技术 de los enchufes de clavija del panel trasero de SALIDA DE MULTIPLES FUENTES (MULTISOURCE OUT). Estos enchufes de clavija puede dar calidad a una fuente Completely independiente de (o identica a) laactualmente seleccionada en los enchufes de clavija de calidas principales del S170i, y dispones de una control del volumen totalmente independiente.. La habitación o zona a distancia mantiene control a distancia independiente de la fuente deignal y el volumen, excepte el S170i estéfuncionando simultaneamente en la habitación/teatro en casa de esucha primaria.</p>
<h1 id="téngase-en-cuenta-que-9">TÉNGASE EN CUENTA QUE:</h1>
<p>Esta es unaitters de nivel que requiere incorporar un amplificador de potencia entre laitters de Mulples Fuentes (MultiSource) y los altavoces de la zona remota.</p>
<h1 id="selection-de-fuentes-multiples-multisource">SELECTION DE FUENTES MULTIPLES (MULTISOURCE)</h1>
<p>Śde el mando a distancia ZR 2, selección la entrada de fuente deseada. O en el panel delantero: Pulse la tecla de MULTIPLES FUENTES (MULTISOURCE) dos veces; la linea superior de lalecture del panel delantero muestra "Zona CD" ("Zone: CD") (por exemple). Luego use el botón de PREPARACION DE VOLUMEN (VOLUME SETUP), bidirectionalmente, para realizar el ciclo todas las neue fuentes disponibles de audio-video o sólo audio en los enchufes de clavija SALIDA DE MULTIPLES FUENTES (MULTISOURCE OUT); los nombres de las fuentes aparecen en la lecture del panel delantero. Transcurridos cinco segundos de inactividad, la visualización y el botón returnan a sus sistemas normales.</p>
<h1 id="controldel-volumen-de-multiples-fuentes-multisource">CONTROLDEL VOLUMEN DE MULTIPLES Fuentes (MULTISOURCE)</h1>
<p>Des el mando a distancia ZR 2, use las teclas de [Volumen arriba/abajo] ([Volumen up/down]) paraaabstar el volumen: O en el panel delantero: Pulse una vez la tecla de MULTIPLES FUENTES (MULTISOURCE); tLuego use en boton de VOLUMEN (PREPARACION) (VOLUME (SETUP)) paraaabstar el volumen. La linea inferior de la lecture del panel delantero muestra "Z.v: -40" (por exemple) paraindicar elajuste de volumen. Transcurridos cinco segundos de inactividad, la visualizacion y el boton returnan a sus functiones normales.</p>
<h1 id="téngase-en-cuenta-que-10">TÉNGASE EN CUENTA QUE:</h1>
<ul>
<li>La entrada EXT5.1 no está disponible para los enchufes de clavija SALIDA DE MULTIPLES FUENTES (MULTISOURCE OUT). </li>
<li>Una fuente能把 estar disponible para las salidas principal y Múltiples Fuentes (MultiSurce) del S170i simultáneamente. </li>
<li>Las señales en los enchufes de clavija de SALIDA DE MULTIPLES FUENTES (MULTISOURCE OUT) está ahora en modo estéreo, independientelement de modo de escucha selectionado, incluso para la misma fuente, para lassonianas principales. <br />
Las ordenes y functions de Mulples Fuentes (MultiSurce) no aparecen en la OSD. </li>
<li>Es possible usar el enchufe de clavija de video compuesto MON OUT para transmitir video a la habitación remota de Múltiples Fuentes (MultiSource) para la visión casual de las OSD, también con largas distancias deben esperarse cierta perdida del video. No recommendamos el uso de la calidad de monitor S-Video a lo largo de tales largas distancias.</li>
</ul>
<h1 id="conexionad-nadlink">CONEXIONAD (NADLINK)</h1>
<p>La SALIDA de Conexión NAD (NAD Link OUT) permite transmitir ordinanes de mando a distancia desde el Preamplificador S170i/Procesador aothers productos dotados de una entrada de Conexión NAD (NAD Link) (o compatible). Transmite los@cuidos de control de IR (infrarrojos) que el S170i recibe desde el mando a distancia HTR 2 a trovés del sensor IR del panel delantero. La Conexión NAD (NAD Link) create una conexión "cableada" a other componente NAD. El formatting del cable es un cable coaxial estandar terminado con enchufes de clavija RCA.</p>
<p>Esto también permite al S170i recibir ordenes de control externas desde un controlador de habitaciones multiples o desde unsystema de transmisión a distancia (o desde el enchufe de clavija de SALIDA de Conexión NAD (NAD Link OUT) de other producto NAD).Las ordenes recibidas controlarán al S170i y también seran transmitidas al enchufe de clavija de SALIDA de Conexión NAD (NAD Link OUT).Esto peut ser muyutil si utilizes la prestación de Mulples Fuentes (MultiSurce) con un teclado "cableado" o un sistemas repetidor IR (tal como Xantech, Russound, Niles, etc.) que le permite controlar un Sintonizador FM o un Reproductor CD de Conexión NAD (NAD Link) dotado de Conexión NAD (NAD Link), asi como el S170i desde una posicón remota. Mediente un "encadenado tipo margarita" de la SALIDA de Conexión NAD (NAD Link OUT) desde un componente a la ENTRADA de Conexión NAD (NAD Link IN) de other componente,la senal se pueda pagar alo largo de cada componente.</p>
<h1 id="téngase-en-cuenta-que-11">TÉNGASE EN CUENTA QUE:</h1>
<p>Si un componente recibe simultaneamente la misma orders desde el sensor IR del panel delantero Y desde la ENTRADA de Conexion NAD (NAD Link INPUT), el sistemas de control del procesador tal vez no reconozca laorden con el resultado de que esta se pase por alto. Para evaporar this, no conecte componentes que reciban la mesma order a distancia desde IR al本身就是 time (como occurriria si se situuan dos componentes whilstos muy cae uno de other).</p>
<h1 id="integración-del-sistema-rs-232">INTEGRación DEL SISTEMA (RS-232)</h1>
<p>La puerta RS-232 del S170i-ofrece amplia integrazione para sofisticado control de sistemas de medios y automatizacion domestica, y permite control completo de todas las prestaciones del S170i. Usando esta puerta, el S170i pueda connectarse arialquier othero dispositivo con una puerta RS-232, como un ordinador personal o Sistema de automatizacion domestica. Cualquier orden o functio que能把 darse desde el panel delantero o desde el mando a distancia HTR 2能把 realizarse a travers de la puerta RS232,y la retroinformacion de los ajustes actuales del S170i, incluyendo el estado de Mulples Fuentes (MultiSurce),se transmite desde la puerta RS-232 del preamplificador al PC o al disposito vico connectado.Las prestaciones Mulples Fuentes (MultiSurce) del S170i son asi plenamente controables a trovés de la orden del RS-232.</p>
<h1 id="detelles-tecnicos">DETELLES TECNICOS</h1>
<p>La puerta RS-232 usa la?singular disposicion estandar de patilla de salute:</p>
<table><tr><td>DB-9 Patilla N°</td><td>Prestación</td></tr><tr><td>2</td><td>Transmisión de datos</td></tr><tr><td>3</td><td>Recepción de datos</td></tr><tr><td>5</td><td>Señal tierra</td></tr></table>
<h1 id="téngase-en-cuenta-que-12">TÉNGASE EN CUENTA QUE:</h1>
<ul>
<li>Ha de usarse un cable en série "directo" estándar, (no un cable de MODem nulo) para conectar el S170i a un PC u otro dispositorio en série. <br />
Las comunicaciones en series del S170i deben usar bitios de 8 datos, sin paridad, y 1 bitio de parada; el régimen de datos de 12.000 bps (baudios). (Algunos dispositivos en series noSEOuen comunicar con 12.000 bps; se dispone de un convertor de régimen de bitios para convertir las comunicaciones del S170i a 9.600 bps, como accesorio separado; dirjase a su especialista instalador de audio NAD.</li>
</ul>
<p>Temblo ofrecemos para descarga del portal de la red NAD la aplicacion Windows 95/98/ME-compatible para control en series del S170i desde un PC, asi como detailles completos de los protocolos de comunicaciones en series del S170i:</p>
<h1 id="wwwnadelectronicscom">WWW.NADELECTRONICS.COM</h1>
<p>Contacte a su especialista instalador de NAD para más información.</p>
<h1 id="resumen-del-htr-2">RESUMEN DEL HTR 2</h1>
<ul>
<li>Controla hasta 8 dispositivos. <br />
44 teclas de sistemas. </li>
<li>Aprende hasta 352 ordenes. </li>
<li>Registra hasta 44 macros con un máximo de 64 Órdenes cada uno. </li>
<li>Funcion de acceso directo configurable. </li>
<li>Iluminación de teclas con tiempo de duración programable. </li>
<li>Contiene biblioteca preprogramada decottigos NAD del mando a distancia.</li>
</ul>
<p>El NAD HTR 2 está preparado para hacer functional componentes NAD solo en la caja, pero en realizad consiste en ocho mandos a distancia en uno solo. Cada una de las 8 teclas de Selector de Dispositivos (Device Selector) de la parte superior del equipo manual puede extraer unaewsuna "pagina"de@c Rodrigos de mando a distancia para ser Transmitida por las 44 teclas restantes. El HTR 2 peute "aprender"c Rodrigos procedentes de virtuallymente qualier componente controloremotamente por infrarrojos,sea cui fuera la marca, para qualquiera o todas estas teclas de Selector de Dispositivos (Device Selector). Cuando se prepara el HTR 2 para hacer funcionar todo el systema de su teatro en casa, el enfoque mas lógico es ensenlarle los@c Rodrigos procedentes de su equipo DVD a la tecla de Selector de Dispositivo [DVD], sus@c Rodrigos de television a la tecla [TV], etc.Pero no hay un esquema obligatorio: Usted能把 cargarequalierorden en qualquier tecla en qualquier pagina. (Véase "Aprendizaje de@c Rodrigos desdeothersmandos a distancia"(Learning Codes From Other Remotes),más adelante).</p>
<p>El HTR 2 está ya programado previamente con un Conjunto completo de ordenes NAD en su págrina de Selector de Dispositivo [AMP], y con ordenes de biblioteca para hacer funciona la mayoría de los componentes NAD DVD, CD, SINTONIZADOR (TUNER), o CINTA (TAPE) en las correspondientes teclas de Selector de Dispositivos (Device Selector). Estas ordenes por defection son permanentes. Incluso si ustedenseña las新品as ordenes al HTR 2 para que ocufen su lugar, las ÓrdenesFundamentales de la biblioteca quan dan vigentes y peuvent ser fácilmente reactivadas en caso de que aada más tarde un componente NAD a su sistemas (vexe "Modo de bomrado" ("Delete Mode"), más adelante).</p>
<h1 id="parafamiliarzarseconelhtr2">PARAFAMILIARZARSECONELHTR2</h1>
<p>El HTR 2 está dividido en dos secciones principales. La/sección de Selector de Dispositivos (Device Selector) en la parte superior del equipo manual y las 44 teclas de Control restantes.</p>
<p>Ocho teclas de Selector de Dispositivos (Device Selector) en la parte superior-[AMP], [DVD], [TV], etc. - determinan qué componentes harán configurar las 44 teclas de Control restantes. Una tecla de Selector de Dispositivos (Device Select) determina solamente a qué componente dará ordenes el HTR 2; no realiza funciona algoa en el receptor. Las teclas de Selector de Dispositivos (Device Selector) está organizadas en dos filas verticales de 4 botones cada una; la受害者 de izquierda corresponde a todos los dispositivos de Audio, la受害者 de la红线 corresponde a todos los dispositivos de Video.</p>
<p>Las teclas de Control son teclas sociales que pueda "aprender"cycodes de control virtually de该如何 mando a distancia de infrarrojos, lo que le permite a usted ensenar loscycodes de su equipo, sea cui fuere lamarca, al HTR 2. Todas las teclas de Control del Selector de Dispositivos [AMP] estan preprogramadas para controlar amplificadores, preamplificadores, y receptores NAD. (El HTR 2 también能把 dar ordenes aOthers muchos componentes NAD, desde sus paginas [DVD],[CD],[SINTONIZADOR] [TUNER] y [CINTA] [TAPE].</p>
<p>Dado que las teclas de Control del HTR 2 peuvent realizar functions differentes, según la tecla de Selector de Dispositivo selección, el HTR 2 usacottigs de color para indicar la functión de las teclas de Control cuando se eligen differentes teclas de Dispositivos. Así, el color de etiquetado de la tecla de Selector de Dispositivos corresponde al etiquetado de las teclas de functión (similar a una calculadora españilla). Por exemple, el rojo-naranja de etiqueta de tecla de Selector de Dispositivo [AMP] correspone al etiquetado rojo-naranja de selección de entrada que hay+junto a las teclas numéricas: Cuando está activa la página de Selector de Dispositivo [AMP] del HTR 2, estas teclas seleccionan las entradas de amplificador o receptor. De modo similar, el color morado de la etiqueta de tecla de Selector de Dispositivo [DVD] corresponde a varias etuetas moradas, la tecla verde de Dispositivo [TV] corresponde a las etuetas verdes, etc.</p>
<h1 id="códigos-de-aprendizaje-desde-otros-mandos-a-distancia">CÓDIGOS DE APRENDIZAJE DESDE OTROS MANDOS A DISTANCIA</h1>
<p>Empiece por situar el HTR 2 "frente arente" con el mando a distancia de la fuente de forma que las ventanillas de infrarrojos de los dos dispositivos queden a una distancia deunos 5 centimetros.</p>
<ul>
<li>Entre en el Mode de aprendizaje (Learning Mode): En el HTR 2, pulse simultaneamente y mantenga pulsadas durante 3segundos tanto la tecla Selectora de dispositivos (Device Selector) y la tecla de "grabacion" [●] (justamente bajo de la tecla [DISP]), hasta que el diodo LED de Aprender (Learn) en el centro del HTR 2 se encienda en verde constante. </li>
<li>Pulse la tecla de Control del HTR 2 a la que deseaenser unaorden; el diodo LED de Aprendizaje se pone de color ambar. </li>
<li>Pulse y mantenga pulsada la tecla funcional de control del mando a distancia fuente: El diodo LED de Aprender (Learn) del HTR 2 parpadeará en amarillo durante uno o dos segundos, cuando se encenderá en verde continuo. Laorden queda aprendida. Repita este proceso para todas las ordenes que deseee que se aprendan en la tecla de Selector de Dispositivo (Device Selector) seleccionada. </li>
<li>Pulse或其他次由 tecla de Selector de Dispositivo (Device Selector) del HTR 2 para pagar del modo de aprendizaje cuando que haya completado el aprendizaje de todas las ordenes para tal Dispositivo.</li>
</ul>
<h1 id="nota-24">NOTA</h1>
<p>Si el diodo LED de Aprendizaje no parpadea enámbar pueda que usted necesse variar la distancia entre los mandos a distancia o usar pilas新品as en ambos mandos a distancia. Si el diodo LED de Aprendizaje se pone en rojo en lugar de verde, talorden particular de tal mando a distancia fuente no se ha aparecido. Intente other. En casos ramos能把 haber alcun formatting of infrarrojos IR que no sea compatible con el HTR 2.</p>
<h1 id="operacion-de-cancelacion">OPERACION DE CANCELACION:</h1>
<p>Podrá cancelar la configuración de una tecla, pulsando la tecla Selectora de dispositivos (Device Selector) activa antes de completar el aprendizaje; el diodo LED de Aprender (Learn) se enciende rojo.</p>
<h1 id="ejempo-aprender-pausa-dvd-dvd-pause">Ejempo : Aprender "Pausa DVD" ( "DVD Pause"):</h1>
<ul>
<li>Coloque el HTR 2 y el mando a distancia de su equipo DVD como se describe antes. </li>
<li>En el HTR 2, pulse y mantenga pulsados simultaneamente [DVD] y [●]; el diodo LED de Aprender (Learn) se enciende en verde constante. </li>
<li>Pulse la tecla [II] (pausa) del HTR 2; el diodo LED de Aprender (Learn) se enciende en amarillo. </li>
<li>Pulse y mantenga pulsada la tecla de pausa del mando a distancia del reproductor DVD; el diodo LED de Aprender (Learn) del HTR 2 parpadea en amarillo y bajo se enciende en verde constante. Laorden queda aparenda. </li>
<li>Pulse otra vez [DVD] para salir del modo de aprendizaje.</li>
</ul>
<h1 id="modo-de-biblioteca-library-mode">MODO DE BIBLIOTECA (LIBRARY MODE)</h1>
<p>Para introducir el modo de biblioteca, pulse y mantenga pulsada una tecla de selector de dispositivos y la tecla de Preajuste (Preset) durante 3segundos hasta que el diodo LED de estado se ponga verde. Mientras está en modo de Biblioteca usted能把 avanzar y comprobar los differentes cuadros preprogramados en el mando a distancia para ver si hay una etiqueta apropriada para su dispositivo. Las diversas manos de navegar por los cuadros de la Biblioteca se describen a continuacion. El diodo LED de Aprendizaje parpadea dos veces cuando se han transmitido todos los cuadros disponibles.</p>
<h1 id="teclas-de-digitos">TECLAS DE DIGITOS</h1>
<p>Las teclas de digitos (0 - 9) peuvent usarse para selectionar directamente uno de los cuadros. Introduzca el número de 3 digitos del cuadro. Después de pulsar el tercer digito, el HTR 2 Transmitirá automatistically laorden de Alimentacion "Off"(Power Off) como prueba para asegurarde que usted ha seleccionado el cuadro correcto.</p>
<h1 id="cursor-arriba-cursor-abajo-cursor-up-cursor-down">CURSOR ARRIBA / CURSOR ABAJO (CURSOR UP / CURSOR DOWN)</h1>
<p>Las teclas de Cursor arriba / Cursor abajo (Cursor Up / Cursor Down) puede usarse para avanzar por los cuadros disponibles. El HTR 2 transmite una orders e Alimentacion "Off"(Power Off) de prueba afterwards de cada pulsacion de la tecla del Cursor. Manteniendo pulsada una de las teclas del Cursor se avanza por todos los cuadros de biblioteca disponibles a energia de dos porsegundo, lo que le permite encontrar rápidamente el cuadro correcto entre los cuadros disponibles.</p>
<h1 id="nota-25">NOTA</h1>
<p>Usted puedeCambiar laorden transmitsida para la prueba. Si pulsauna tecla que no se usa para ninguna othercosa en mode de biblioteca, talorden se transmite.Cualesquiera ordenes de prueba posterioresque resulten de cambiar cuadros usaranlaordenque usted pulsóla ultima vez.Esto peut serutil conalgunosdispositivosque no tenenmode deReserva(Standby),encuyo caso las busquadasde cuestiono nofuncionan.Porejemplo,algunos reproductoresde CDpuede que no tengan orderede Alimentacion "Off"(Power off),yustedpuede desearusar Reproduccion Play) como su orden de prueba correspondiente.</p>
<h1 id="introducir-enter">INTRODUCIR (ENTER)</h1>
<p>Pulse la tecla de Introducir (Enter) cuando está en Modo de Biblioteca y haá que se active el cuadroactualmente seleccionado y se sale del Modo de Biblioteca.</p>
<h1 id="nota-26">NOTA</h1>
<p>Si se pone activo un cuadro se desactivan las ordenes actualmente aprendidas y las functiones activas de Acceso directo (Punch-through) Las ordenesAFPendidas que se desactivan peuvent restablecerse. <br />
otra vez (sin tener que volver a;auderlas) como se describe en la section Modo de Copia de este manual.</p>
<h1 id="visualizacion-display">VISUALIZACION (DISPLAY)</h1>
<p>La tecla de Visualizacion (Display)uede usarse para determinar el numero de referencia del cuadro que ustede seleccionadoactualmente.Pulsada la tecla de Visualizacion(Display),se visualiza el numero del cuadro parpadeando las teclas de Cinta (Tape),VCR,y Macro,que corresponden al primo,segundo ytocer digito del cuadro de ordenes. Por exemple: si el numero del cuadro es el 103,parpadea una vez la tecla de CINTA (TAPE),seguida de la tecla Macro que parpadea tres vezes.</p>
<h1 id="acceso-directo">ACCESO DIRECTO</h1>
<p>La prestación de "acesso directo" ("punch-through") del HTR 2 le permite retener una tecla funcional de una "頁目" de Selector de Dispositivo en另一边, de modo que, por exemple, la prestación AMP MODO DE SONIDO SURROUND (AMP [SURR MODE]) toda可以选择 controlar el S170i cuando está activa la頁目 de Selector de Dispositivos DVD.</p>
<h1 id="nota-27">NOTA</h1>
<p>Las teclas de [VOLUMEN] ([VOL]) y [SILENCIAMIENTO] ([MUTE]) del HTR 2 está preprogramadas como acceso directo (punch-through) para todas las páginass de Selector de Dispositivos (excepto TV): [VOLUMEN] ([VOL]) y [SILENCIAMIENTO] ([MUTE]) haceFuncionarel VolumenPrincipal (Master Volume) del NADsea cualfuere eldispositivoactualmente seleccionado. The [SURR].De modo similar, los controlles de [SURR.] [CENTRAL] ([CENTER]) y ALTAVOZ DE BAJOS ([SUB]) de Volumen de canales (Channel Volume)están preprogramados ysemujuanlateralmente por todoslosdispositivos.</p>
<p>Para fazer un accesso directo, après de entrada en el Modo de aprendizaje y pulsar la tecla a la que se ha de dar acceso directo, pulse simplement dos vezes la tecla del dispositivo al que se ha de tener acceso directo. El diodo LED de estado se encendera en verde; pulse othera vez la tecla del Selector de Dispositivos (Device Selector) para salir del Modo de aprendizaje.</p>
<h1 id="ejempl-paso-con-acceso-directo-punch-through-a-la-pagina-dvd-desde-la-tecla-amp-surr-mode">Ejempl: Paso con Acceso directo (Punch-through) a la "pagina" DVD desde la tecla AMP [SURR MODE]:</h1>
<ul>
<li>En el HTR 2, pulse y mantenga pulsados simultáneamente [DVD] y (grabación); el diodo LED de Aprender (Learn) se enciende en verde constante. </li>
<li>Pulse [SURR MODE]; el diodo LED de Aprender (Learn) se enciende en amarillo. </li>
<li>Pulse dos vezes [AMP]; el diodo LED de Aprender (Learn) se pone en verde. </li>
<li>Pulse或其他方法 [DVD] para seresir del modo de appendizaje.</li>
</ul>
<h1 id="copia-de-una-orden-desde-otra-tecla">COPIA DE UNA ORDEN DESDE OTRA TECLA</h1>
<p>Puede copiar unaorden deequalier tecla del HTR 2aequalier othera Para copiaruna prestacion de tecla de Control,despuesdeintroducirelModeoAprendizaje(Learning Mode)y pulsar la tecla deseada que ha de copiarse,pulse simplemente la tecla de dispositivo del qual desea copiar,hABIendo pulsado primero su tecla de Selector de Dispositivos (Device Selector) si reside en othera tecla de Dispositivo. El diodo LED de estado se encendera en verde; pulse otra vez la tecla de Selector de Dispositivos (Device Selector) para salir del Modo de aprendizaje.</p>
<h1 id="ejempo-copia-de-la-order-pausa-pause-de-la-tecla-de-cd-a-la-tecla-amp-ii">Ejempo : Copia de la order Pausa (Pause) de la tecla de CD a la tecla AMP II :</h1>
<ul>
<li>En el HTR 2, pulse y mantenga pulsados simultáneamente [AMP] y (grabación); el diodo LED deklepler (Learn) se enciende en verde constante. </li>
<li>Pulse (pausa); el diodo LED de Aprender (Learn) se enciende en amarillo. </li>
<li>Pulse [CD]; pulse (pausa); el diodo LED de Aprender (Learn) se pone en verde. </li>
<li>Pulse或其他方法 [AMP] para darre el mode de =</li>
<li>Pulsos de la respiración [AMPA] para darre el mode de =</li>
<li>Pulsos de la respiración [AMPA] para darre el mode de =</li>
<li>Pulsos de la respiración [AMPA] para darre el mode de =</li>
<li>Pulsos de la respiración [AMPA] para darre el mode de =</li>
<li>Pulsos de la respiración [AMPA] para darre el mode de =</li>
<li>Pulsos de la respiración [AMPA] para darre the mode of /</li>
<li>Pulsos de la respiración [AMPA] para darre the mode of /</li>
<li>Pulsos de la respiración [AMPA] para darre the mode of /</li>
<li>Pulsos de la respiración [AMPA] para darre the mode of /</li>
<li>Pulsos de la respiración [AMPA] para darre the mode of /</li>
<li>Pulsos de la respiración [AMPA] para darre the mode of /</li>
<li>Pulsos del pulso de la respiración [AMPA] para darre the mode of /</li>
<li>Pulsos del pulso de la respiración [AMPA] para darre the mode of /</li>
<li>Pulsos del pulso de la respiración [AMPA] para darre the mode of /</li>
<li>Pulsos del pulso de la respiración [AMPA] para darre the mode of /</li>
<li>Pulsos del pulso de la respiración [AMPA] para darre</li>
<li>Pulsos del pulso de la respiración [AMPA] para darre the mode of /</li>
<li>Pulsos del pulso de la respiración [AMPA] para darre the mode of /</li>
<li>Pulsos del pulso de la respiración [AMPA] para darre the mode of /</li>
<li>Pulsos del pulso de la respiración [AMPA] para darre the mode of /</li>
<li>Pulsos del pulso de la respiración[AMPA] para darre the mode of /</li>
<li>Pulsos del pulso de la respiración [AMPA] para darre the mode of /</li>
<li>Pulsos del pulso de la respiración [AMPA] para darre the mode of /</li>
<li>Pulsos del pulso de la respiración [AMPA] para darre the mode of /</li>
<li>
<h2>Pulsos del pulso de la respiración [AMPA] para darre the mode of /</h2>
</li>
</ul>
<h1 id="nota-28">NOTA</h1>
<p>Las functions de copia y acceso directo son similes. Sin embargo, si united copia y bajo borra mas tarde, o sobrescribe laorden original (tecla fuente), laorden de la tecla "copiar a" permanece inalterada. Si united accede directamente a unaorden y bajo la borra o sobrescribe la tecla original, también cambian correspondIENTemente las functions a las que se ha asignado acceso directo. <br />
- Si la prestación fuente y la prestación destino son las mismas, el HTR-2 restablece unaorden aprendidaBORrada previamente si existe. Por lo tanto, si usted sin darse cuenta ha borrado unaorden aprendidao carrado un cuadro de biblioteca sobre ordenes aprendidas, esta es una manners rapida derestablecerlas sin tener que volver a;auderlas.</p>
<h1 id="ordenes-macro">ORDENES MACRO</h1>
<p>Unaorden“macro”esuna seriesede dosomáscódigos del mandoa distancia(hasta64)que se da automatistically con un simple procedimiento de pulsaciónde dos teclas.Ustedpuedeusruna macro para automatizaruna sencilla secuenciadeordenes,como porejemplo,Activar equipoDVD y bajo pulsar play'Oustedpuede copiaruna macrocomplicadaparaactivar la alimentacióndeun systemacompleto,Selecciónuna fuente,elegir unModeo de Escucha,ycomenzarla escucha-otra vez, todoesto con solo pulsaruna tecla.El HTR2puede memorizaruna macro en cadauna de sus teclasdefuneciones (estas excluyen las teclas de Selector de Dispositivos(Device Selector).</p>
<h1 id="nota-29">NOTA</h1>
<p>Las macros son independentes del dispositivoactualmente seleccionado.</p>
<h1 id="grabacion-de-macros">GRABACION DE MACROS</h1>
<p>Para grabar una macro, pulse y mantenga pulsados simultanamente durante 3segundos la tecla [MACRO] y la tecla funcional del HTR 2 a la que desea asignar la macro; el diodo LED de estado se pone verde. también se encenderá el botón de macros. Ahora, pulse la secuencia de teclas functionales de Control que hay que registrar en la macro, asegurando que pulsa primero la tecla de Selector de Dispositivos (Device Selector) que se require para cada prestación (usted pueda intercambiar dispositivos cuando registra la macro tantas vezes como sea Neededo). Este le permite create una macro queonga ordenes de mas de un Dispositivo. Cuando haya acabado de entrada la secuencia de ordenes deseada, pulse otherz [MACRO] para memorizar la macro; Se apagaran el diodo LED de Aprender (Learn) y la iluminacion de la tecla [MACRO].</p>
<h1 id="nota-30">NOTA</h1>
<p>Cada macro puede memoriar un máximo de 64 pasos de ordenes. Si supera esta cifra, una macros sera memorizada automatistically antes de anadir laorden 64.</p>
<h1 id="ejempo-registrar-de-una-macro-en-la-tecla-0-para-activar-el-receptor-nad-activar-el-equipo-dvd-selectionar-la-entrada-dvd-y-comenzar-la-utilizacion">Ejempo: Registrar de una macro en la tecla [0] para Activar el Receptor NAD, Activar el equipo DVD, SeLECTIONAR la Entrada DVD, y Comenzar la Utilizacion:</h1>
<ul>
<li>En el HTR 2, pulse y mantenga pulsada simultáneamente [MACRO] y [0] (cero número); el diodo LED de Aprender (Learn) se enciende en verde constante. </li>
<li>Pulse [AMP]; pulse [ON]: pulse [DVD]; pulse [ON]; pulse [AMP]; pulse [1] ("DVD" rojo); pulse [DVD]; pulse [play] (La Tecla de Dispositivo parpadea al añadirse cada etapa). </li>
<li>Pulse otra vez [MACRO] para partir del modo de grabación macro.</li>
</ul>
<p>Para borrar una macro, dé los pasos anteriores sin entrada funciona algoa.</p>
<h1 id="ejecuación-de-macros">EJECUación DE MACROS</h1>
<p>Para executar una macro, pulse y suele [MACRO]; se enciende la iluminación de su tecla durante 5 seguidos. Mientras está encendida, pulse una tecla del HTR 2 en la que se haya memorizzato anteriormente una macro ([0] como en el caso que se presenta antes. La macro correspondiente funciona; a medía que se ejectca cada paso, se enciende con destellos brevamente su tecla "matriz" Selectora de Dispositivos (Device Selector); cuando finaliza la的操作, se apaga la iluminación de la tecla [MACRO]. Pulsando cualquier othera tecla del HTR 2@msteads se está ejectuting una macro se abortará la macro. Recuerde que debe retener el HTR 2 para que su emisor de infrarrojos pueda activar los componentes de destino.</p>
<h1 id="nota-31">NOTA</h1>
<p>Cuando una macros se ejecta, se inserta automatistically 1 retardo de 1 segundo entre sus ordenes. Si usted necesa un retardo superior a 1 segundo entre ordenes particulares por exemple, para permitir que un componente se active Completely-usted pueda grabar etapas "vacias" en la macros. Por exemple, si no se usa la tecla [TITLE] (titulo) para su reproductor CD, ustededia grabar estaorden en la macros para insertar un retardo.</p>
<h1 id="tiempo-limite-de-iluminacion-de-tecla">TIEMPO LIMITE DE ILUMINACION DE TECLA</h1>
<p>La iluminación de teclas del HTR 2 se pueda ajustar para que permanzca encendida durante 0 a 9 segundos. El valor por defecto es 5segundos.</p>
<p>Paraaabstareltempolimitsdeluminacionpulsymantengaspulsadossimultaneamentedurante3 segundos [DISP] del HTR 2y la tecla [0-9],con el digito correspondiente a la duracion deseada;el diodo LED de Aprendizaje parpadea dos times para confirmar el nuevo ajuste.Cuongseajusteacero,no se encendera la iluminacion en absoluto.</p>
<h1 id="nota-32">NOTA</h1>
<p>La iluminación de teclas constituya el mayor consumo para las pilas del HTR 2. Un tiempo limite corte de iluminación de teclas prolongará notablemente la duración de las pilas; Si se desconecta porcomplete (fijándola en 0 segundos) la prolongará incluo más.</p>
<h1 id="reposicion-al-estado-de-fabrica-factory-reset">REPOSICION AL ESTADO DE FABRICA (FACTORY RESET)</h1>
<p>El HTR 2 pueda reajustarse conforme a su estado de fabrica, boringando todas las teclas de ordenesDSPENDAS, copiadas y con acceso directo (punch-through), las macros, y demas informacion de preparacion, volviendo todas las teclas a sus ordenes de biblioteca preprogramadas. Para realizar una reposacion al estado de fabrica, pulse y mantenga pulsadas simultaneamente durante 10 segundos las teclas de [ON] y [RTN] del HTR 2; el diodo LED de Aprender (Learn) comenza a parpaear en verde. Suelte las teclas de [ON] y [RTN] antes de que se complete elsegundo parpadeo; el diodo LED de Aprender (Learn) se encendera en rojo,indicando que se ha reposacionado el mando a distancia.</p>
<h1 id="nota-33">NOTA</h1>
<p>DeberaURTas teclasde[ON]y[RTN]antes de que se apague elsegundo destello,pues de other modulo no se reposacionara la unidad; de occurriresto, repita el procedimientocomplete.</p>
<h1 id="modo-de-borrado-delete-mode">MODO DE BORRADO (DELETE MODE)</h1>
<p>El HTR 2 puede memorizar ordenes apareidas, copiadas y de biblioteca por defecto en una sola tecla其中之一. (Las ordenes de biblioteca por defecto son loscottos NAD preprogramados, como las ordenes originales del receptor NAD en la "pagina" [AMP]). Usted pueda barrar ordenes en capas de vueita a laorden de biblioteca por defecto, eliminando ordenes apareidas, functions de accesodirecto y teclas copiadas.</p>
<h1 id="nota-34">NOTA</h1>
<p>Las ordenes de biblioteca por defecto no se pueda borrar,reason por la que noiene que preocuparse de que utilizing el Mode de borrado (Delete Mode) se pueda originar Cambios irreparables.</p>
<p>Para entrada en el Mode de bomrado (Delete Mode), pulse y mantenga pulsadas simultanamente durante 3seguidos tanto la tecla Selectora de dispositivos (Device Selector) de la tecla deseada, como la tecla [RTN], hasta que el diodo LED de Aprender (Learn) se encienda en verde. Pulse la tecla de unidades cuyaorden紊ee bomrar; el diodo LED de Aprender (Learn) parpadea; el numero de veces indica que tipo defuncion se ha puesto activa -vease el cuadro más adelante. Pulse otherz va la tecla Selectora de Dispositivos (Device Selector) activa para partir del Mode de bomrado (Delete Mode).</p>
<h1 id="destellos">Destellos</h1>
<p>1</p>
<p>2</p>
<p>3</p>
<h1 id="tipdeorden">Tipdeorden</h1>
<p>Organ de biblioteca por defecto</p>
<p>Orden de biblioteca copiada</p>
<p>Organapendida</p>
<h1 id="resumen-de-prestaciones">RESUMEN DE PRESTACIONES</h1>
<h1 id="prestación">Prestación</h1>
<p>Aprender/Copiar/Acceso directo</p>
<p>(Learn/Copy/ Acceso directo (Punch Through))</p>
<h1 id="teclas-a-pulsar-durante-3段时间">Teclas a pulsar (durante 3段时间)</h1>
<p>Tecla de dispositivo + Tecla de grabar</p>
<p>Device Key + Record Key)</p>
<p>Modo de biblioteca (Library Mode)</p>
<p>Tecla de Dispositivo + Tecla de Preajuste A/V</p>
<p>Device Key + Record Key)</p>
<p>Modo de bomrado (Delete Mode)</p>
<p>Tecla de disposativo + Tecla de returno</p>
<p>Device Key + Return Key)</p>
<p>Grabar macro (Macro Record)</p>
<p>Tecla de macro + Tecla de sistemas</p>
<p>(Macro Key + Function Key)</p>
<p>Tiempo limite de iluminacion de Fondo</p>
<p>Tecla de visualización + Tecla de+dígitos</p>
<p>(Display Key + Digit Key)</p>
<p>Reposicion al estado de fabrica (Factory Reset)</p>
<p>(vea sección de Reposión de Fábrica)</p>
<p>CUADROS DEL HTR 2 </p>
<table><tr><td>Cuadro</td><td>Descripción</td></tr><tr><td>100</td><td>Receptor con On/Off Discreto</td></tr><tr><td>101</td><td>Receptor con On/Off Alternativo</td></tr><tr><td>102</td><td>S170I</td></tr><tr><td>103</td><td>L75 L76</td></tr><tr><td>104</td><td>2a. Zona</td></tr><tr><td>200</td><td>Reproductor CD</td></tr><tr><td>201</td><td>Reproductor CD (viejo)</td></tr><tr><td>300</td><td>Sintonizador</td></tr><tr><td>301</td><td>Sintonizador L75, L76</td></tr><tr><td>400</td><td>Platina de Cinta B</td></tr><tr><td>401</td><td>Platina de Cinta A</td></tr><tr><td>500</td><td>TV 270</td></tr><tr><td>501</td><td>MR13</td></tr><tr><td>502</td><td>MR20</td></tr><tr><td>600</td><td>T562</td></tr><tr><td>601</td><td>T550, L55, L56</td></tr><tr><td>602</td><td>T531, T571</td></tr><tr><td>602</td><td>T512, T532, T572</td></tr></table>
<table><tr><td>CONDICION</td><td>CAUSA(S) POSIBLE(S)</td><td>SOLUCION(ES) POSIBLE(S)</td></tr><tr><td>SIN SONIDO DESDE TODOS LOS CANALES</td><td>Alimentación CA desenchufadaalimentación no connectadasalida a falta de alimentaciónmonitor de la cinta acoplado</td><td>Compruebe el cable de CA,la connexión y la salidadesacople el monitor de la cinta</td></tr><tr><td>SIN SONIDO DESDE ALGUNOS CANALES</td><td>Cables defectuosos/ausentescanal(es) de <Ajustes de altavoces><Preparación de altavoces> (Speaker setup>)fijado(s) en "Ninguno"amplificador de potencia o conexiones dealtavoces defectuosos</td><td>Compruebe los cablescompruebe el menú <Ajustes de altavoces><Preparación de altavoces> (Speaker setup>)compruebe amplificador de potencia, cableado yaltavoces</td></tr><tr><td>SIN SONIDO DESDE LOS CANALES SURROUND</td><td>No activado modo de escucha surroundcanales surround fjados en "No" en el menu del<Preparación de altavoces><Speaker setup>)nivel de canales surround fjado demasiado bajoen el menú de <Preparación de niveles>(Levelssetup>)</td><td>Selección el modo de escucha apropiadocorrija los ajustes de <Preparación de altavoces><Speakers setup>)o de <Preparación de niveles>(Levels setup>)</td></tr><tr><td>SIN SONIDO DESDE EL ALTAVOZ DE GRAVES(SUBWOOFER)</td><td>Altavoz de graves (Subwoofer) is off, sinalimentación, incorrectamente connectadoAltavoz de graves (Subwoofer) en "No" en elmenú de <Preparación de altavoces><Speaker setup>)nivel del altavoz de graves (subwoofer) levelfijado demasiado bajo en el meú del<Preparación de niveles>(Levels setup>)</td><td>Alimente el Altavoz de graves (Subwoofer),compruebe la toma CA del altavoz de graves(subwoofer), o compruebe las conexionesajustes correctos de <Preparación dealtavoces><Speakers setup>) o <Preparación de niveles>(Levels setup>)</td></tr><tr><td>SIN SONIDO DESDE EL CANAL CENTRAL</td><td>La fuente es una grabación 2/0 (etc.) DolbyDigital o DTS recording sin canal centralcentral fjado en "No" en el menú del<Preparación de altavoces><Speaker setup>)nivel del central djado demasiado bajo en elmenu de <Preparación de niveles>(Levels setup>)</td><td>Reproducza una grabación de canal 5.1 o selección el modo Dolby Pro Logic o Monocorrija los ajustes de <Preparación de altavoces><Speakers setup>) o <Preparación de niveles>(Levels setup>)</td></tr><tr><td>SIN DOLBY DIGITAL/DTS</td><td>La calidad digital de la fuente no está connectada alentradadigital del S170i</td><td>Compruebe las conexiones</td></tr><tr><td>EL S170i NO RESPONDE AL MANDO ADISTANCIA HTR 2</td><td>Las pilas están descargadas o colocadasincorrectamenteobstrucción de la abertura del transmisor IR delmando a distancia o de la abertura del receptorIR del S170iEl panel delantero del S170i está en luz solar oluz ambiental muy brillante</td><td>Compruebe las pilas, compruebe las ventanillasIR y cerciórese de que nada interruple la SSHnalde每一 mando a distancia hasta el S170i reduzca la luz solar/alumbrado de la sala</td></tr><tr><td>EL S170i NO RESPONDE A LAS ÚRDENES DEL PANEL DELANTERO</td><td>Error del microprocesador;</td><td>Desenchufe el S170i por el botón de Potencia delpanel delantero y desenchúfelo de la toma CAespère cinco,minutos,reconnecte y alimentente.</td></tr></table>
<p>Formatos de descodificacion Dolby Digital, Dolby Digital EX, Dolby Pro Logic,</p>
<p>Dolby Pro Logic II, DTS, DTS ES, DTS Neo:6</p>
<p>THX Surround EX, THX Ultra 2</p>
<p>Frecuencia de muestreo 32kHz, 44.1kHz, 48kHz, 96kHz</p>
<p>Modos EARS, Party</p>
<h1 id="estereo-desvio-analogico">ESTEREO (DESVIO ANALOGICO)</h1>
<p>Impeancia de entradaanaloga 16kΩ/100pF</p>
<p>Respuesta de fecuencia analógica 20Hz - 20kHz +/- 0.2dB</p>
<p>Maximo nivel de entrada 3V rms</p>
<p>THD+N 0.005%</p>
<p>Relación postal/ruido >90dB</p>
<p>Gama dinámica 95dB</p>
<p>Separación analógica de canales >95dB</p>
<p>Diafonía >90dB</p>
<p>Maximo nivel de salute 6V rms</p>
<h1 id="impedancia-de-salida">IMPEDANCIA DE SALIDA</h1>
<p>Salida de preamplificador principal 56Ω</p>
<p>Salida de cinta 470Ω</p>
<p>Salida a habitaciones multiples 470Ω</p>
<h1 id="control-de-tono">CONTROL DE TONO</h1>
<p>Bajos (a 20Hz) +/- 12dB</p>
<p>Trémolos (a 20kHz) +/- 12dB)</p>
<h1 id="rendimiento-de-entrada-digital">RENDIMIENTO DE ENTRADA DIGITAL</h1>
<p>THD+N (Anchura de banda 10Hz - 20kHz) 0,005%</p>
<p>Inpedancia de entrada digital 75Ω</p>
<h1 id="video-4">VIDEO</h1>
<p>Impedancia de entrada y calidad 75Ω</p>
<h1 id="especificaciones-fiscas">ESPECIFICACIONES FISCAS</h1>
<p>Medidas (Anchura x Altura x Fondo) 17 3/4 x 3 7/8 x 11 1/4"</p>
<p>450 × 97 × 285 mm</p>
<p>Peso neto (4,99kg)</p>
<p>Peso de expedicion (5,89kg)</p>
<p><img alt="" src="images/8c278048983a38b7ccd18d6866d21fb2188c0beb0f214249e3e7d8b4bd4619ea.jpg" /></p>
<p>www.NADelectronics.com</p>
<p>©2003 NAD ELECTRONICS INTERNATIONAL A DIVISION OF LENBROOK INDUSTRIES LIMITED</p>