
XTX-7500UHD - Monitor Legamaster - Free user manual and instructions
Find the device manual for free XTX-7500UHD Legamaster in PDF.


| Product Type | Monitor |
| Brand | Legamaster |
| Model | XTX-7500UHD |
| Screen Size | 75 inches |
| Resolution | Ultra HD (3840 x 2160) |
| Panel Technology | LED |
| Aspect Ratio | 16:9 |
| Input Connectors | HDMI, DisplayPort, USB |
| Power Consumption | Approximately 200 W |
| Weight | Approximately 35 kg |
| Dimensions (WxHxD) | Approximately 1675 x 960 x 80 mm |
| Power Supply | AC 100-240 V, 50/60 Hz |
| Main Features | UHD display, HDR compatibility, built-in speakers |
| Care and Cleaning | Use a soft, dry cloth; avoid solvents |
| Safety | Wall mounting recommended, ensure proper ventilation |
| Spare Parts and Repairability | Contact Legamaster customer service |
| General Information | Manual available online |
Frequently Asked Questions - XTX-7500UHD Legamaster
User questions about XTX-7500UHD Legamaster
0 question about this device. Answer the ones you know or ask your own.
Ask a new question about this device
Download the instructions for your Monitor in PDF format for free! Find your manual XTX-7500UHD - Legamaster and take your electronic device back in hand. On this page are published all the documents necessary for the use of your device. XTX-7500UHD by Legamaster.
USER MANUAL XTX-7500UHD Legamaster
We make communication visible


natural_image
Close-up of a car's side profile with navigation icons and a 'Ripton Software Suite v20.4' watermark (no readable text or symbols beyond UI icons)ENGLISH | DEUTSCH | FRANÇAIS | NEDERLANDS | ESPAÑOL
XTX-7500UHD
USER MANUAL

natural_image
Two people in a meeting room with brick walls and city skyline display (no visible text or symbols)LANGUAGES
| GB | ENGLISH | 2 | |
| DE | GERMAN | DEUTSCH | 33 |
| FR | FRENCH | FRANÇAIS | 61 |
| NL | DUTCH | NEDERLANDS | 89 |
| ES | SPANISH | ESPAÑOL | 117 |
TABLE OF CONTENTS
- Important Information .... 3
1.1. Use 3
1.2. Exemptions 3
- Safety Instructions....4
2.1. Safety Precautions....4
2.2.Moving and Carrying Notice 5
2.3.Installation 5
2.4. Wall Mount Safety Notice 6
2.5. Recommended Use 7
2.6. Cleaning 8
- Package Contents 8
3.1. Unpacking....8
3.2. Included Accessory 9
- Installation 9
4.1.Environment State 9
4.2.Power Input 9
4.3.EasyFix mounting solutions and Cable Management 10
4.4. Control Panel 11
4.5. Status LED 11
4.6.Input and Output Connector....11
4.7. Remote Control....12
- Operations....13
5.1.Turning the Display On and Off 13
5.2. Adjusting the Volume and Input Source 13
5.3. Add a label to an input source....13
- OSD (On-Screen Display) Controls 13
6.1. OSD Menu Overview 14
6.2. Navigation through OSD Menu 15
- Touch Operation 21
7.1. Touch USB Cable Connection 21
- Specifications 22
- Supported Timings....23
- Serial Commands....24
10.1.Serial Communications....24
10.2.RS-232 Connection and Port Configuration 24
10.3. Command and Response Format 24
10.4. Command and Response Examples 25
10.5.Serial Command List....25
- Troubleshooting....31
- Compliance 31
- Appendix 32
13.1. Dimensions 32
1. IMPORTANT INFORMATION

WARNING:
TO PREVENT FIRE OR SHOCK HAZARDS, DO NOT EXPOSE THIS UNIT TO RAIN OR MOISTURE. ALSO, DO NOT USE THIS UNIT'S POLARIZED PLUG WITH AN EXTENSION CORD RECEPTABLE OR OTHER OUTLETS UNLESS THE PRONGS CAN BE FULLY INSERTED. REFRAIN FROM OPENING THE CABINET AS THERE ARE HIGH VOLTAGE COMPONENTS INSIDE.

CAUTION:
TO REDUCE THE RISK OF ELECTRIC SHOCK, MAKE SURE POWER CORD IS UNPLUGGED FROM WALL SOCKET. TO FULLY DISENGAGE THE POWER TO THE UNIT, PLEASE DISCONNECT THE POWER CORD FROM THE AC OUTLET. DO NOT REMOVE COVER (OR BACK). NO USER SERVICEABLE PARTS INSIDE. REFER SERVICING TO QUALIFIED SERVICE
1.1. USE 1.2. EXEMPTIONS
- Transport the display upright with proper packaging. Avoid placing the display face up or down. Be careful not to bump to the display.
- Do not send a static (non-moving) image to the display, or it may cause image 'burn-in' or image retention.
- "Burn in" and/or image retention is not covered under warranty.
-
Make sure to change the image on the display periodically. It is recommended to (1) turn off the display for at least 6 hours after 16 hours of usage in a 24 hour period to help avoid image retention and (2) to turn the "IRFM" function to "ON" in the OSD menu (under "Advanced Settings").
-
This product isn't warranted for any damage caused by natural disaster (such as earthquake, thunder, etc.), fire, acts by third parties, accidents, owner's intentional misuse and fault, or use in other improper conditions.
- This product isn't warranted for incidental damages (such as profit loss or interruption in business, modification or erasure of record data, etc.) caused by use or inability to use of this product.
- This product isn't warranted for any damage caused by inappropriate operation, or from not following the user manual.
- This product isn't warranted for any damage caused by misuse or malfunction through simultaneous use of this product and the connected equipment or software.
- This product isn't warranted for any damage caused by neglect of the instructions described about installation.
- This product isn't warranted for any damage caused by improper installation.
- This product isn't warranted for any damage caused by disassembly, modification or repair by non-authorized service center or people.
2. SAFETY INSTRUCTIONS
Before using this display, please read this user manual thoroughly to help protect against property damage and to ensure your personal safety and the safety of others.
- Be sure to observe the following instructions.
- For your safety, be sure to observe the warnings located in this manual.
- For installation or adjustment, please follow the instructions in this manual and refer all servicing to qualified service personnel.
2.1. SAFETY PRECAUTIONS
If smoke or a peculiar smell comes from the display, remove the power plug from the outlet immediately.
Failure to do so may result in fire or electrical shock. Contact your dealer for inspection.
If the display has been turned on but there isn't a picture, remove the power plug from the outlet immediately.
Failure to do so may result in fire or electrical shock. Contact your dealer for inspection.
If water is spilled or objects are dropped inside the display, remove the power plug from the outlet immediately.
Failure to do so may result in fire or electrical shock. Contact your dealer for inspection.
If the display is dropped or the cabinet is damaged, remove the power plug from the outlet immediately.
Failure to do so may result in fire or electrical shock. Contact your dealer for inspection.
If the power cord or plug is damaged or becomes hot, turn off the main power switch of the display, make sure the power plug has cooled down and remove the power plug from the outlet.
If the display is still used in this condition, it may cause fire or electrical shock. Contact your dealer for replacement.
2.2. MOVING AND CARRYING NOTICE
Moving the display:
Moving the display requires at least four people. Attempting to move the display with one person may result in dropping the display and/or serious injury. When moving a display in its shipping carton, lift the carton using the white handles.

natural_image
Line drawing of three people standing beside a blank rectangular object, no text or symbols present
natural_image
Line drawing of two workers installing a large cabinet (no text or symbols present)
natural_image
Line drawing of a hand holding a pen, no text or symbols presentCarrying the display:
This display is heavy; please follow proper lifting techniques, as pictured below. Failure to do so may cause injury.

natural_image
Two line drawings showing a person bending forward at a desk and kneeling, with no text or symbols present.2.3.INSTALLATION
Don't install in a high-temperature environment.
If the display is used in high-temperature or in direct sunlight, it may cause the case or other parts to become distorted or damaged, resulting in overheating or electrical shock.
Don't install in a high-humidity environment.
This may cause overheating or electrical shock.
Don't install near any heat sources such as radiators, heat registers, stoves, or other apparatus that produce heat.
This may cause fire or electrical shock.
Don't overload outlets or cables beyond electrical capacity.
Don't use extension cords as it may cause fire or electrical shock.
Don't insert the power plug into an outlet other than 100\~240V AC.
This may cause fire or electrical shock.
- Don't use a damaged power plug or worn outlet.
- Don't insert an improper power plug it may cause fire or electric shock.
Don't place the display on an unstable shelf or surface.
The display may fall, causing injury. Please install on a horizontal, stable, level surface.
Don't place objects on the display.
- If the display is covered or the vents are blocked, the display could overheat and cause a fire.
- If metal or liquid gets into the display, it may cause fire or electrical shock.
- Do not put heavy objects on the display as they may fall, causing injury.
- Please keep a 10 cm minimum distance between the display and the wall for sufficient ventilation.
Don't move the display when it is connected to the power cord and AV cables.
- When moving the display, make sure to remove the power plug and cables from the outlet or source.
-
When unpacking or carrying the display, at least 2 people are needed. Make sure the display is carried upright.
-
Transport the display upright. Avoid placing the display face up or down.
- Handle the display gently. Do not drop.
2.4. WALL MOUNT SAFETY NOTICE
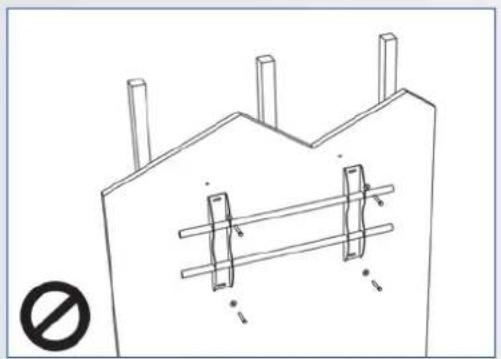
- Please make sure if the bracket is fixed to the solid wall / solid pillar for fear of falling due to heavy weight.
natural_image
Technical line drawing of a structural support frame with no text or symbols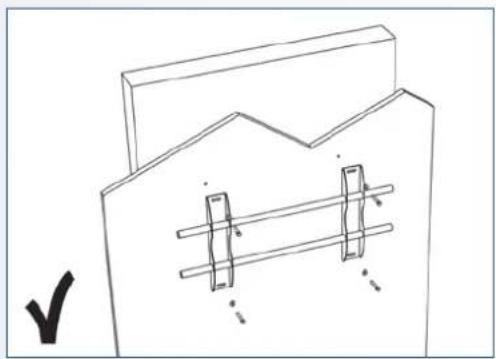
natural_image
Simple line drawing of a mechanical component with two rectangular components and a zigzag top section (no text or symbols)- After assembling, please don't pull or shake violently.

natural_image
Simple line drawing of a room with vertical bars and a window, no text or symbols present
natural_image
Simple line drawing of a room with vertical bars and a hanging sign, no text or symbols present- Please don't install the bracket directly under the sunshine or humidity / high temperature places for fear that the quality is effected.

natural_image
Simple line drawing of a room corner with sunlight illuminating the wall and a prohibition symbol below (no text or labels)
natural_image
Line drawing of a room with doors, a monitor, and a heater (no text or symbols)- Installing the bracket over 10 cm from each wall side and begin vertical to the ground is the suggested installing position.
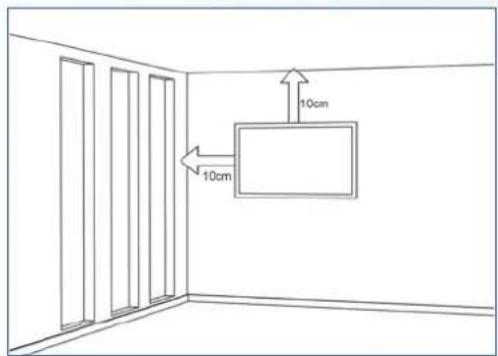

If you encounter a problem during installation, please contact your supplier for assistance. Don't repair or open the display by yourself.
Failure to do so may result in fire or electrical shock. Contact your dealer for inspection.
Protect and correctly use the power cord/plug.
- Don't pinch the power cord/plug between hard surfaces.
- Don't step on the power cord/plug.
• Before inserting the power plug into the wall outlet, connect the power cord to the display. - Don't operate the display with a damaged power cord or it may damage the display.
Using extension cords (not recommended)
If an extension cord must be used, ensure the voltage rating exceeds the max power consumption of the display. If the voltage rating is less than the display, it will cause the extension cord to overheat.
If there is thunder or lightning, don't touch the display or the power plug.
This may cause an electric shock.
Don't use any kind of liquid on the display.
- If liquid is spilled on the display, remove the power and ask qualified service personnel to check the display.
- If the liquid gets on the display's screen, please clean it with a dry and soft cloth immediately.
- Don't use any harsh chemical on the display.
- If metal or liquid gets into the display, it may cause a fire or an electrical shock.
Don't install or remove the power plug with wet hands.
This may cause an electrical shock.
If the display will not be used for a long period of time, unplug the display.
This may cause premature wear of electrical components or fire.
Don't push or shake the display.
This may cause damage or injury.
- If the glass of the display panel is broken, liquid may escape. Please don't touch the liquid.
- If liquid get into your eyes or touches your skin, wash with the clean water and seek medical attention immediately.
Precautions with the remote control batteries
- Please only use approved AAA type batteries.
- Please be sure to insert batteries by matching the + and -.
- Don't recharge, heat, disassemble, short or throw batteries into a fire.
- Don't mix a new battery with a used one.
- Don't mix different types of batteries together (only use the specified type). it may cause burn and injury.
2.6. CLEANING
Take off the power plug before cleaning.
Failure to do so may result in electrical shock or damage.
Cleaning the surface of the display
- When the surface of the display becomes dirty, please wipe the surface lightly with a soft clean cloth.
-
If the surface requires additional cleaning, lightly moisten the cloth.
-
Do not to let any kind of liquid enter the display as it may cause electrical shock or damage.
- Do not clean the display with alcohol, solvents or ammonia, as this could damage the display.
3. PACKAGE CONTENTS
3.1. UNPACKING
- The e-Screen XTX display is packed using cushions to protect the display during shipping.
- Before unpacking your display, prepare a stable, level, and clean surface near a wall outlet.
-
Set the display box in an upright position and open from the top of the box before removing the top cushions.
-
Step 1: Remove the white handle and cut the banding
- Step 2: Remove the top cushion and take the accessory bag out.
Item Description Quantity
| 1 Display 1 | |
| 2 Carton 1 | |
| 3 EPE Cushion Bottom 2 | |
| 4 Poly Bag 1 | |
| 5 Carton Lock 8 | |
| 6 Accessory Bag | 1 |
3.2. INCLUDED ACCESSORY
| Item |
| IR Remote Control (Batteries Included) |
| IR Extender |
| HDMI Cable |
| USB Type B to A |
| Power Cord |
| USB Stick (User manual included) |
| Bag with EasyFix cable clips |
| Legamaster Ergonomic stylus |
4. INSTALLATION
4.1. ENVIRONMENT STATE
When operating the XTX series display, ambient room conditions should not exceed the following:
- Operating temperature: -5°C to 45°C (41°F to 104°F)
• Humidity: less than 90% RH (Max)
4.2. POWER INPUT
The power cord (shipped separately) is used to connect the display to an AC wall outlet. Plug the power cord into the AC inlet on the side of the display. Locate the Main Power switch directly above the AC inlet and press "-" to turn power on, and "O" to turn power off.

flowchart
graph TD
    A["OSD control panel"] --> B["Main power – Switch AC In socket"]
    B --> C["I" is power on "O" is power off"]
    D["Status LED / Light Sensor / IR Receiver"] --> B
4.3. EASYFIX MOUNTING SOLUTIONS AND CABLE MANAGEMENT

4.4. CONTROL PANEL

natural_image
Close-up of a four-pole button interface with icons for audio, power, image, and sound (no text or labels visible)Key Descriptions
Power Power on/Power off
Source Source selection (toggle)
Menu Right/Volume +
Menu Left/Volume -
▲ Menu Up
Menu Down
Menu/Exit Menu/Exit selection
4.5. STATUS LED
LED Illumination Condition
| Green Normal operation | |
| Blinking Orange No signal | |
| Orange | Power Saving |
| Off | Power off |
| AC off | |
Note:
If the Status LED is set to „Off“ in the OSD menu, the Status LED will not operate.
4.6. INPUT AND OUTPUT CONNECTOR

| 1 | PowerConnects the display to power here. |
| 2 | Touch USB 1A standard, Type B USB port for the touch functionality of the display.Automatically links to HDMI 1, 2, VGA or DisplayPort |
| 3 | Service USB portA standard type A USB port for service purposes like e.g. firmware upgrades. Only to be used by, or if instructed by, an authorized Legamaster service technician. |
| 4 | DisplayPortDisplayPort 1.1a and DisplayPort-HDCP 1.1 compliant, SD/HD input for connecting SDTV, EDTV or HDTV component video sources. |
| 5-6 | HDMI 1, 2HDCP-compliant digital video inputs for connecting HDMI sources. |
| 7 | HDMI outHDCP-compliant digital video inputs for connecting HDMI sources. |
| 8 | VGA (D-Sub 15 pin)Connects components that have RGB or component output jacks, such as a personal computer or external |
| 9 | PC Audio InConnects the audio output from a personal computer here. |
| 10 | IR ExtenderConnects the IR Extender cable provided with the display to this input. |
| 11 | Audio OutConnects external, powered speakers or an external audio receiver/amplifier. |
| 12 | SPDIFConnects external, powered digital speakers or audio receiver/amplifier. |
| 13 | Touch USB 2A standard, Type B USB port for the touch functionality of the display.Linked to HDMI 3 in Auto setting. |
| 14 | HDMI 3HDCP-compliant digital video inputs for connecting HDMI sources. |
| 15 | RS-232CA female, 9-pin D-sub connector for interfacing with a PC or control system. |
| 15 | EthernetAn RJ-45 connector for interfacing with a PC or home theater automation/control system via a Cat 5 cable. |
4.7. REMOTE CONTROL

Label Description
| 1 INFO Provides source and resolution information | |
| 2 | Turns the display on and off |
| 3 VGA Selects the PC RGB source | |
| 4 DISPLAYPORT Selects the DisplayPort source | |
| 5, 8, 11 HDMI 1, 2, 3 Selects the HDMI source | |
| 10 OPS Selects the OPS computer source | |
| 19 MENU Opens the display's on-screen menu system. | |
| 17, 18,20, 21 | When the menu system is already open,pressing this button will select the previous submuenuNavigates through submenus and settings |
| 22 ENTER Selects highlighted menu choices | |
| 23 EXIT Closes the menu system | |
| 26 SCALING | Selects each aspect ratio, in sequence: FullScreen, Native, Letter Box and Pillar Box |
| 27 FREEZE Freezes the current picture on the screen | |
| 28 MUTE Turns off the sound | |
| 29 BRIGHTNESS | Adjusts the brightness |
| 30 CONTRAST | Adjusts the contrast |
| 31 AUTO Auto adjustment of VGA source | |
| 32 SOURCE | Selects each source, in sequence |
| 33 VOLUME - | Decreases the sound volume |
| 34 VOLUME + | Increases the sound volume |
4.7.1. Changing the Remote Control Battery
1. Remove the battery cover
Slide back and remove the battery cover in the direction of the arrow.

natural_image
Line drawing of a hand holding a small object, possibly a device or tool, with no visible text or symbols.2. Insert the batteries
Align and insert two AAA batteries according to their plus and minus ports (as indicated in the remote control).
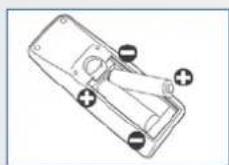
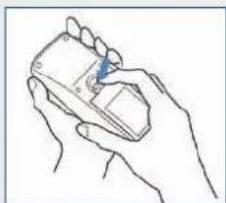
3. Close the battery cover
Replace the battery cover in the direction of the arrow and snap it back into place.
natural_image
Line drawing of a hand holding a small object, possibly a device or tool, with no visible text or symbols.- Used batteries needed to follow the city rule to be discarded.
II. Avoid keeping used, old batteries inside the remote control, causing leakage of internal liquid resulting metal rust or fatal damage to the remote control hand unit.
III. Battery to be used according to the instruction

CAUTION
About the remote control
- Don't drop, shake or bump.
- Don't place on wet materials.
- Don't dismantle.
- Don't place in locations with exposure to high-temperature or high-humidity levels.
5. OPERATIONS
5.1. TURNING THE DISPLAY ON AND OFF
Turning the display on
- Connect the display to an AC power outlet
- Ensure the AC switch is set to “—”.
- Press and hold the power button on the control pad for 2 seconds, alternatively you can use the power button on the remote control.
Turning the display off
With the power on, press and hold the power button on the control panel for 2 seconds to put the display into standby mode, alternatively you can use the power button on the remote control. To turn off power completely, turn the AC switch to „O” or disconnect the AC power cord from the power outlet.
Note:
If there is no signal input for a period of time, the display will automatically go into power saving (sleep) mode.
5.2. ADJUSTING THE VOLUME AND INPUT SOURCE
Adjusting the Volume
- Using the remote or control panel, press the VOLUME- or VOLUME+ to increase or decrease the volume.
Selecting the input source
- Press the SOURCE select button (▼▲) on the control pad of the display and toggle to the desired input source. The display will automatically switch to the selected input after two seconds:
• VGA
- DisplayPort
- HDMI 1
- HDMI 2
- HDMI 3
- OPS
- Using the remote, press the desired source button (DISPLAYPORT, HDMI1, HDMI2, HDMI3, HDMI4, VGA)
- If the display cannot find a source, a "No signal" message will appear.
5.3. ADD A LABEL TO AN INPUT SOURCE
To indicate what type of equipment, device or connection is linked to an input, a label can be added. Please refer to the Source Renaming setting under Display Settings in chapter 6.
6. OSD (ON-SCREEN DISPLAY) CONTROLS
To display the on-screen menus, press MENU on the remote control.
To select a sub-menu, use the ▲ and ▼ buttons to highlight it. Then, press ▶ to enter that sub-menu.
To select a menu item, use the ▲ and ▼ buttons to highlight it. Then, press ◀ or ▶ to adjust that setting and press ENTER.
The OSD menus are arranged hierarchically, as shown in the following table. Depending on the selected input source and signal characteristics, some menu options may not be available.
6.1. OSD MENU OVERVIEW
| Main Menu Sub Menu Value | |||
| Image Settings | Scheme User / Vivid / Cinema / Game / Sport | ||
| Brightness 0~100 | |||
| Contrast 0~100 | |||
| Sharpness 0~100 | |||
| Saturation 0~100 | |||
| Hue 0~100 | |||
| Backlight 0~100 | |||
| Color Temp & Gamma | Gamma 2.2, Off | ||
| Color Temp 5000K / 6500K / 7500K / 9300K / User | |||
| Red Gain 0~100 | |||
| Green Gain 0~100 | |||
| Blue Gain 0~100 | |||
| Red Offset | 0~100 | ||
| Green Offset | 0~100 | ||
| Blue Offset | 0~100 | ||
| HDMI RGB Range | Auto / Full / Limited | ||
| Display Settings | Input Source | VGA / DisplayPort / HDMI1 / HDMI2 / HDMI3 / OPS | |
| Aspect Ratio | Auto / 4:3 / 16:9 / Letterbox / PointToPoint | ||
| OverScan | 0% ~ 10% | ||
| Auto Scan Off / On | |||
| Source Renaming | Default, STB, DVD, BluRay DVD, HD DVD, XBOX, Wii, PS4, Computer, User | ||
| Auto Adjust | Yes / No | ||
| VGA Position | 0~100 | ||
| VGA Phase | 0~255 | ||
| VGA Clock | 0~100 | ||
| Audio Settings | Volume | 0~100 | |
| Bass | -10 ~ 10 | ||
| Treble | -10 ~ 10 | ||
| Balance | -10 ~ 10 | ||
| Speaker | Off / On | ||
| Audio Source | Default / VGA | ||
| Basic Settings | Horizontal Pos. | 0~100 | |
| Vertical Pos. | 0~100 | ||
| OSD Transparency | 0 ~ 4 | ||
| OSD Timeout | 5~60 sec. | ||
| OSD Language | English / French / German / Nederland | ||
| Power On/Off Music | Off / On | ||
| Power LED | Off / On | ||
| RTC & Schedule | Current Time | Setup Date & Time | |
| Time Mode | User / Workday / Everyday | ||
| Mon. ~ Sun. | 0/■00:00 ~ 23:59 / 00:00 ~ 23:59 | ||
| Adv. Settings | Smart light control | Off / DCR / Light Sensor | |
| IRFM | Off / On | ||
| Noise Reduction | Off / High / Medium / Low | ||
| Wake Up from Sleep (Note2) | VGA Only / Digital, RS232, Ethernet / Never Sleep | ||
| EDID Switch | 1080p / 4K2K@30 / 4K2K@60 | ||
| Touch Input Mapping | Auto / OPS / Rear USB / HDMI3 | ||
| Network Configuration | Configure network settings. | ||
| Software Update (USB) | Yes / No | ||
| Restore Factory Default | Yes / No | ||
| Information | Channel Information | Source | Show the Name of Input Source |
| Resolution | Show the Current Resolution | ||
| Model Name | XTX-7500UHD | ||
| Firmware Version | Show the Firmware Version of the Monitor | ||
| SubMCU Version | Show the Firmware Version of the Monitor | ||
| Serial Number | Show the Serial Number of the Monitor | ||
6.2. NAVIGATION THROUGH OSD MENU
6.2.1. Image Settings
This menu is used for image adjustments..

Scheme
Press ◀ or ▶ to select one of the following:
Options: User, Vivid, Cinema, Game, Sport;
Default: User
Brightness
Increase or decrease the brightness of picture.
Press ◀ or ▶, select the desired level, and then press
ENTER.
Range: 0\~100;
Default: 50
Contrast
Increase or decrease the contrast of picture.
Press ◀ or ▶, select the desired level, and then press
ENTER.
Range: 0\~100;
Default: 50
Sharpness
Adjust the definition of picture.
Press ◀ or ▶, select the desired level, and then press
ENTER.
Range: 0\~100;
Default: 50
Saturation
Adjust the brilliance and brightness.
Press ◀ or ▶, select the desired level, and then press
ENTER.
Range: 0\~100;
Default: 50
Hue
Increase or decrease the green hue.
Press ◀ or ▶, select the desired level, and then press ENTER.
Range: 0\~100;
Default: 50
Backlight
Increase or decrease the intensity of the LCD backlight.
Press ◀ or ▶, select the desired level, and then press ENTER.
Range: 0\~100;
Default: 80
Color Temp & Gamma
Select Color Temperature and Gamma Curve
Color temperature:
Options: User, 5000K, 6500K, 7500K and 9300K;
Default: 9300K
Gamma curve
Options: Off, 2.2;
Default: 2.2
HDMI RGB Range
Select an RGB range for the HDMI input.
Options: Auto, Full, Limited;
Default: Auto
OSD (ON-SCREEN DISPLAY) CONTROLS
6.2.2. Display Settings
This menu is used for display settings.

Input Source
Select the main input source
Options: VGA, DisplayPort, HDMI1, HDMI2, HDMI3, OPS;
Default: VGA
Aspect Ratio
Set the aspect ratio.
Options: Auto, Full Screen/16:9, Pillarbox/4:3, Auto, Letterbox, Point to Point.
Default: Full Screen/16:9
Over Scan
Adjust the image size.
Range: 0%\~10%;
Default: 0%
Auto Scan
Select whether the display will automatically scan for a main input source
Options: On, Off;
Default: Off
Source Renaming
Rename the input source. Select a name from the options or create a new name. The user defined name can be up to twelve characters (0\~9, A\~Z, a\~z, symbols).
Options: Default, STB, DVD, BluRay DVD, HD DVD, XBOX, Wii, PS4, Computer, User
Default: Default
Auto Adjust
Force the display to reacquire and lock to the input signal (VGA source only). This is useful when the signal quality is marginal.
Options: No, Yes;
Default: No
Note: This feature does not continually reacquire the signal.
VGA Position
Adjust the position of the image (VGA source only). Press ◀ or ▶ to select the desired level, and then press
ENTER.
Range: 0\~100; Default: 50
VGA Phase
Adjust the phase of the displayed signal (VGA source only). Press ◀ or ▶ select the desired level, and then press ENTER.
Range: 0\~255
VGA Clock
Adjust the clock of the displayed signal (VGA source only). Press ◀ or ▶ to select the desired level, and then press ENTER.
Range: 0\~100;
Default: 50
6.2.3. Audio Settings
This menu is used for volume settings.

Volume
Adjust the sound.
Press ◀ or ▶, select the desired level, and then press
ENTER.
Range: 0\~100
Default: 20
Bass
Adjust the sound in low tones (bass).
Press ◀ or ▶, select the desired level, and then press
ENTER.
Range: -10 \~ 10
Default: 0
Treble
Adjust the sound in high tones (treble).
Press ◀ or ▶, select the desired level, and then press
ENTER.
Range: -10 \~ 10
Default: 0
Balance
Adjust the balance of the left and right speakers.
Press ◀ or ▶, select the desired level, and then press
ENTER.
Range: -10 \~ 10
Default: 0
Speaker
Turn the internal speaker on or off
Options: On, Off
Default: On
Audio Source
Select the audio source for the Main input
Options: Default, VGA
Default: Default
6.2.4. Basic Settings
This menu is used for basic settings.
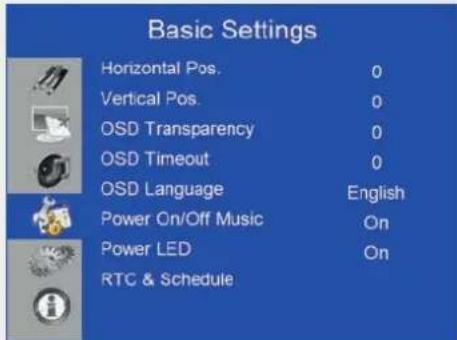
Horizontal Pos.
Adjust the horizontal position of the OSD menu.
Press ◀ or ▶ to select the desired level, and then press ENTER.
Range: 0\~100
Default: 50
Vertical Pos.
Adjust the vertical position of the OSD menu.
Press ◀ or ▶ to select the desired level, and then press ENTER.
Range: 0\~100
Default: 50
OSD Transparency
Adjust the transparency of the OSD menu.
Press ◀ or ▶ to select the desired level, and then press ENTER.
Range: 0\~4
Default: 0
OSD Timeout
Adjust the time in seconds before the OSD menu disappears.
Press ◀ or ▶ to select the desired level, and then press ENTER.
Options: 5s, 10s, 20s, 30s, 60s
Default: 30s
OSD Language
Select the OSD language
Options: English, French, Deutsch, Nederland
Default: English
Power On/Off Music
Select whether to enable the power on/off music when the monitor is powered up.
Options: On, Off
Default: On
Power LED
Enable or disable the status LED.
Options: On, Off
Default: On
RTC & Schedule
Set the internal clock of the display, and to turn on/off the display at preset times.
Options: User mode, Workday mode, Everyday mode
Default: User mode
6.2.5. Advance Settings

Smart Light Control
Enable dynamic contrast (DCR) or ambient light sensor
Options: Off, DCR, Light Sensor
Default: Light Sensor
IRFM
Create slight frame motion to help avoid image retention
Options: On, Off
Default: Off
Noise Reduction
Reduce random noise in the video content
Options: Off, High, Medium, Low
Default: Off
Wake Up From Sleep
Change the behavior of Sleep Mode
Options: VGA Only, Digital/RS232/Ethernet; Never Sleep
Default: VGA Only
EDID Switch
Select EDID (Extended Display Identification Data) of the HDMI and DisplayPort inputs
Options: 1080p, 4K2K@
Note: Use the 1080p for the broadest support of lower resolution sources. Use 4K2K to support high resolution sources such as 3840x2160.
Touch Input Mapping
Select the touch port.
Options: Auto, OPS, Rear USB, HDMI3;
Default: Auto
Note: Auto will link Touch USB 1 to HDMI 1, 2, DisplayPort or VGA and Touch USB 2 to HDMI 3. All other options will force the touch input to that respective touch input
Network Configuration
Configure network settings.
Please refer to next page for more details.
Software Update (USB)
Update the firmware using USB drive.
Options: Yes, No;
Default: Yes.
Restore all settings to their default.
Options: No, Yes;
Default: No
Wake Up from Sleep
By default, the display will enter power saving (Sleep Mode) if no signal is received for 5 minutes. Normally, the RS-232, DisplayPort, and HDMI inputs are inactive in Sleep Mode, to save power.
To change the behavior of Sleep Mode, change the "Wake up from Sleep" setting in the "Adv. Setup" menu.
I. VGA Only (default) – The RS-232, DisplayPort, and HDMI inputs are inactive when the display is in sleep mode. The display will wake up when it receives a signal at the VGA input.
II. Digital, RS232C, Ethernet – The RS-232, DisplayPort and HDMI inputs stay active when the display is in sleep mode. The display will wake up when it receives a signal at either of the DisplayPort, HDMI, or RS-232 inputs, or via LAN connection.
Network Configuration

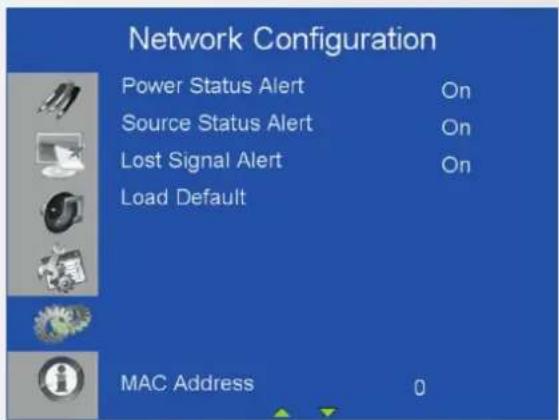
SUB-MENU DESCRIPTION SETTINGS DEFAULT
| UART Baudrate Adjust the baud rate of serial port (RS-232) 115200 /38400 /19200 /9600 115200 | |||
| Network Enable network feature No / Yes No | |||
| Dynamic IP Enable Dynamic IP mode Disable / Enable (Disable) Disable | |||
| IP Address Set static IP address 255.255.255.255(0.0.0.0) 0.0.0.0 | |||
| Netmask | Set subnet mask | 255.255.255.255(0.0.0.0) | 0.0.0.0 |
| Gateway | Set gateway address | 255.255.255.255(0.0.0.0) | 0.0.0.0 |
| DNS. | Set DNS address | 255.255.255.255(0.0.0.0) | 0.0.0.0 |
| Save Settings | Update the IP settings to net device. | No / Yes | - |
| Refresh | Refresh dynamic IP info | - | |
| Power Status Alert | Power change notification sent letters | Off / On | Off |
| Source Status Alert | Source change notification sent letters | Off / On | Off |
| Lost Status Alert | Signal lost change notification sent letters | Off / On | Off |
| Load Default | Load default network settings | No / Yes | - |
| MAC Address | MAC info | 00:00:00:00:00:00 | 00:00:00:00:00:00 |
6.2.6. Information
This read-only menu provides information on the active sources and the latest firmware version

7. TOUCH OPERATION
7.1. TOUCH USB CABLE CONNECTION
- Connect the signal cable witch display, and then turn on the display.
- Connect the USB cable with display and the computer; connect one side of USB cable (Type-B USB connector) on the display side.
- Connect the other side of USB cable (Type-A USB) to the USB port on computer. See picture below.
- Then turn on the computer.
- When USB cable connected, then wait for 5 seconds and the touch function is ready to go. It can be activated by pen, finger, or any other pointer
Note: Windows 10 is required for differentiation between pen, touch and palm input devices.
8. SPECIFICATIONS
XTX-7500UHD
| PANEL | |
| Diagonal Size (Inch) 75" | |
| Backlight Edge LED | |
| Aspect Ratio 16:9 | |
| Input Resolution 3840 x 2160 @ 60Hz | |
| Response Time 8 ms | |
| Brightness 370 cd/m | ^2 |
| Contrast Ratio 2500:1 | |
| Viewing Angle 178° (H)/178° (V) | |
| Supported Colors 1.07 Billion colors | |
| Display Orientation Landscape compatible | |
TOUCH SYSTEM
| Interface 2 x Touch USB | |
| Touch InGlassTM touch technology; 20 touch points, 4 passive pens | |
| Glass 3.0 mm Chemically-strengthened AGC Glass | |
| Supported Operating System | Windows 7/8/8.1/10, Mac 10.10, 10.11, 10.12 |
AUDIO
| Built-in Speakers | 2x20W front facing |
| CONNECTIVITY | |
| Video | 3x HDMI 2.0 / 1 x DisplayPort / 1 x VGA |
| Audio | Audio Out / SPDIF Out / PC Audio In |
| Control | IR Extender / RS232 / Ethernet / Touch USB |
| OPS slot | Yes |
CONFERENCING
| Camera | 2 Full HD wide angle cameras, 1080p@30Hz (linked to OPS) |
| Microphone | High performance 4 channel array with Acoustical Echo Cancelling,Automatic Gain Control and Noise Suppression (linked to OPS) |
PHYSICAL SPECIFICATIONS
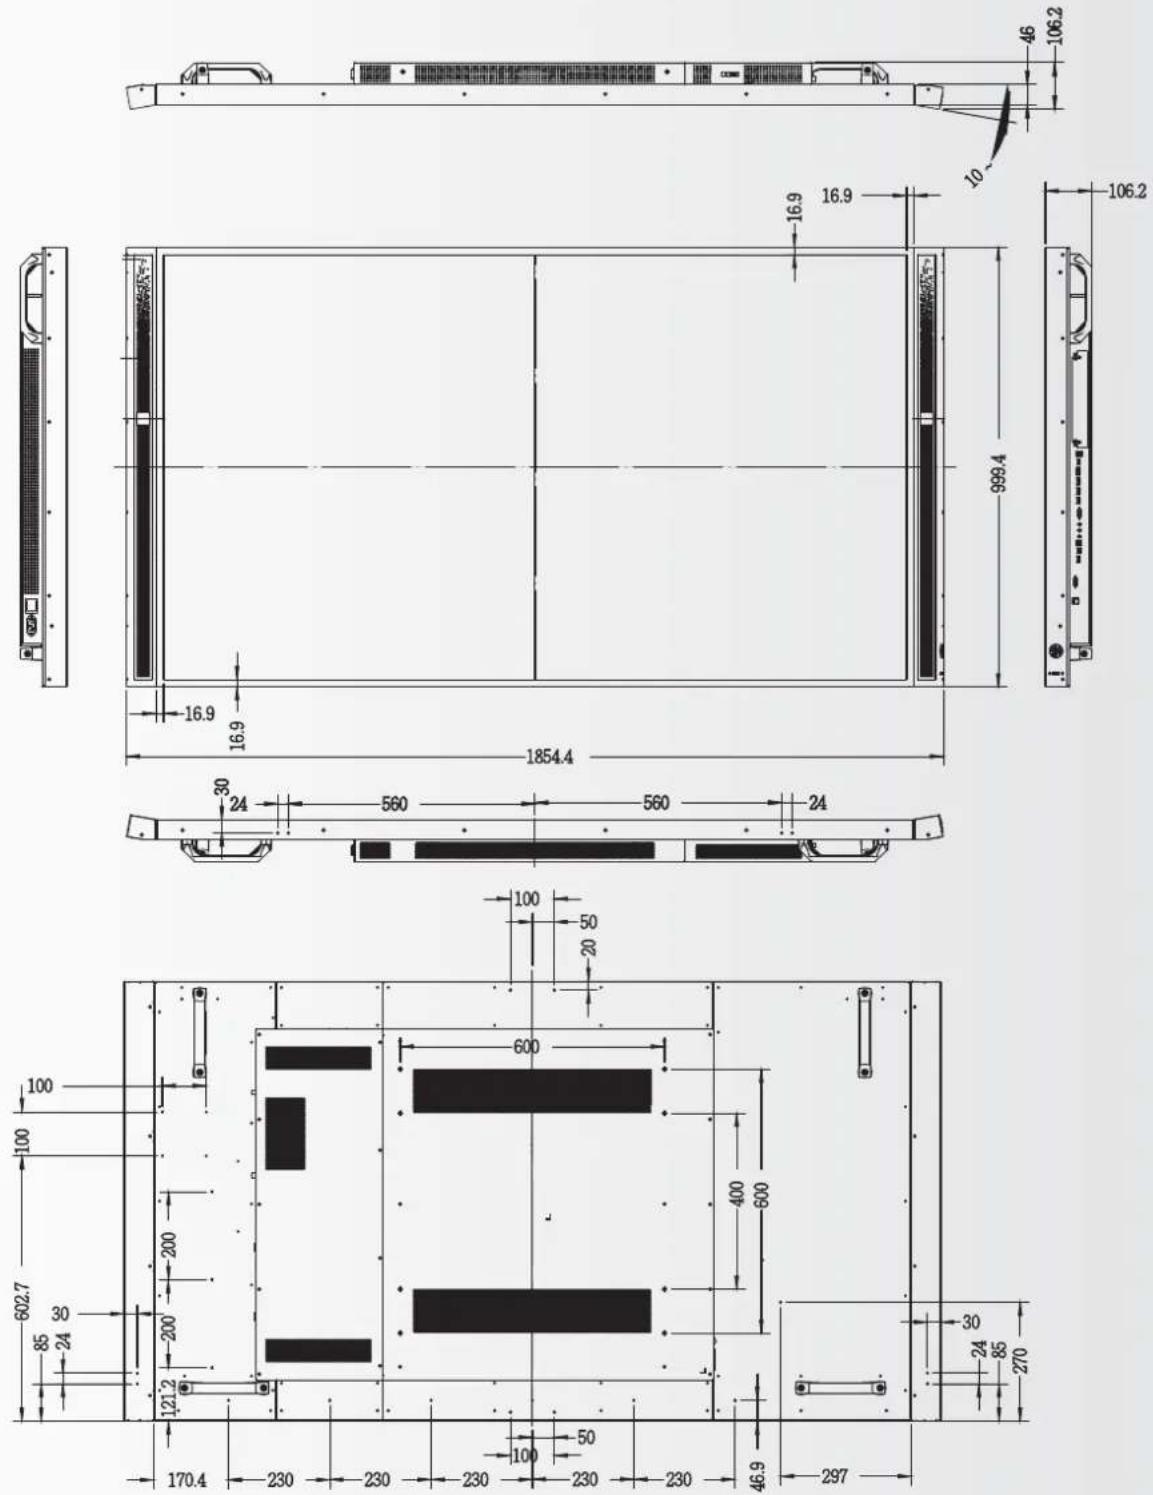
| Dimensions (mm) | 1854 (W) x 999 (H) x 106 (D) |
| Weight | Net: 83 kg; Gross: 96 kg |
| Wall Mount | 600mm x 400mm / 600mm x 600mm VESA |
| Fanless Design | Yes |
OSD FUNCTIONS
| OSD Languages | English, French, German, Dutch |
| Source Auto Detect Function | Yes |
| OSD Key Lock Function | Yes |
POWER
| Power Supply | AC100-240V (Worldwide), 6A 50/60Hz |
| Maximum Power Consumption | ≤ 320 W |
| Standby | ≤ 0.5 W |
ENVIRONMENTAL
| Operating Temperature | 0 °C ~ 40 °C |
| Storage Temperature | -20 °C ~ 60 °C |
| Humidity | 35% ~ 85% RH |
- SUPPORTED TIMINGS
| Timing fH (kHz) fV (Hz) Dot clock (MHz) HDMI VGA DisplayPort | |||||||
| VESA | VGA 640x480 | 31.469 59.94 | 25.175 0 0 0 | ||||
| 37.861 72.80 | 31.5 0 0 0 | ||||||
| 37.5 75 31.5 | 0 0 0 | ||||||
| SVGA 800x600 | 35.156 56.25 | 36 0 0 0 | |||||
| 37.879 60.31 | 40 0 0 0 | ||||||
| 48.077 72.18 | 50 0 0 0 | ||||||
| 46.875 | 75 49.5 0 0 0 | ||||||
| XGA 1024x768 | 48.363 60.004 | 65 0 0 0 | |||||
| 56.476 70.06 | 75 0 0 0 | ||||||
| 60.023 75.02 | 78.75 | 0 0 0 | |||||
| WXGA1366x768 | 47.712 59.79 | 85.5 0 0 0 | |||||
| 1280 x 720 | 44.444 59.98 | 64 - | 0 0 | ||||
| 44.772 59.86 | 74.5 | - | 0 0 | ||||
| 56.456 74.78 | 95.75 | - | - | 0 | |||
| 1280 x 768 | 47.776 | 59.87 | 79.5 | - | - | ||
| 47.396 59.99 | 5 68.25 | - | - | 0 | |||
| 1280 x 800 | 49.306 59.91 | 71 0 0 0 | |||||
| 49.702 59.81 | 83 0 0 0 | ||||||
| SXGA | 1152x864 | 67.5 75 | 108 | 0 0 0 | |||
| 1280x1024 | 63.981 60.02 | 108 | 0 0 0 | ||||
| 79.976 75.02 | 5 135 | 0 0 0 | |||||
| 1440 x 900 | 55.469 59.90 | 1 88.75 | - | - | 0 | ||
| 55.935 59.88 | 106.5 | 0 0 0 | |||||
| WSXGA+ 1680 x1050 | 64.674 59.88 | 3 119 | 0 0 0 | ||||
| 65.29 59.95 | 146.25 0 0 0 | ||||||
| UXGA 1600 x 1200 75 | 60 162 | 0 0 0 | |||||
| 1920 x 1080 | 66.587 59.93 | 138.5 | 0 0 0 | ||||
| WUXA 1920 x 1200 | 74.038 | 59.95 | 154 | - | 0 | ||
| QHD 2560x1440 | 88.787 | 59.951 | 241.5 | 0 | - | ||
| QSXGA 2560x1600 | 98.713 | 59.972 | 268.5 | 0 | - | ||
| EDTV | 480p | 31.5 | 60 | 27.03 | 0 | - | |
| 576p | 31.25 | 50 | 27 | 0 | - | ||
| HDTV | 720p | 37,5 | 50 | 74,25 | 0 | - | |
| 1280x720 | 44.995 59.94 | 74.176 0 | - | 0 | |||
| 45 | 60 | 74.25 | 0 | - | |||
| 1080i | 28.13 | 50 | 74.25 | 0 | - | ||
| 1920x1080 | 33.716 59.94 | 74.176 0 | - | 0 | |||
| 33.75 60 74.25 | 0 | - | 0 | ||||
| 1080p 1920x1080 | 27 | 24 | 74.25 | 0 | - | ||
| 28.125 | 25 | 74.25 | 0 | - | |||
| 33.75 30 74.25 | 0 | - | 0 | ||||
| 56.25 50 148.5 | 0 | - | 0 | ||||
| 67.433 59.94 | 148.352 | 0 | - | 0 | |||
| 67.5 60 148.5 | 0 | - | 0 | ||||
| 4K2K | 3840x2160 | 54 | 24 | 297 | 0 | - | |
| 56.25 | 25 | 297 | 0 | - | |||
| 67.5 | 30 | 297 | 0 | - | |||
| 112.5 | 50 | 594 | - | - | |||
| 133.313 | 59.997 | 533.25 | - | - | |||
| 135 | 60 | 594 | - | - | |||
10. SERIAL COMMANDS
10.1. SERIAL COMMUNICATIONS
The display uses a simple text-based control protocol to take requests from control devices and to provide responses to such devices. This section describes how to send control messages over a serial link between the display and an automation/control system or a PC running a terminal emulation program such as Windows® HyperTerminal or Tera Term.
10.2. RS-232 CONNECTION AND PORT CONFIGURATION
Connect your control system or PC to the RS-232 input of the display.
Configure the RS-232 controller or PC serial port as follows: no parity, 8 data bits, 1 stop bit and no flow control. Set the baud rate to 115200, to match that of the display RS-232 port.
10.3. COMMAND AND RESPONSE FORMAT
Commands sent from an automation/control system or PC to the display must have the following format:
[STX] [IDT] [TYPE] [CMD] ([VALUE] or [REPLY]) [ETX] [CR]
Where:
- [STX] indicates the start of the command data (always 07).
• [IDT] is the display ID (always 01).
• [TYPE] is the command type:
- 00 = return to host (response from the LCD panel)
- = read / action
- =write
- [VALUE] is the parameter setting for the command.
- [REPLY] is the parameter setting for the command, acknowledged by the display in its response to a command.
- [ETX] indicates the end of the command data (always 08).
• [CR] is the ASCII carriage return key (0x0D).
10.4. COMMAND AND RESPONSE EXAMPLES
Here are some examples of serial commands and their responses:
| DESCRIPTION | COMMAND SENT TO LCD PANEL | RESPONSE RECEIVED FROM LCD PANEL |
| Turn LCD panel power off. | 07 01 02 50 4F 57 00 08 | 07 01 00 50 4F 57 00 08 |
| Turn LCD panel power on. | 07 01 02 50 4F 57 01 08 | 07 01 00 50 4F 57 01 08 |
| Request LCD panel power status. | 07 01 01 50 4F 57 08 | 07 01 00 50 4F 57 XX 08(XX = 0 when off or 1 when on) |
| Set the LCD panel contrast to 30 (1E hex). | 07 01 02 43 4F 4E 1E 08 | 07 01 00 43 4F 4E 1E 08 |
| Reset the LCD panel display settings. | 07 01 02 41 4C 4C 00 08 | 07 01 00 41 4C 4C 00 08 |
| Request LCD panel serial number. | 07 01 01 53 45 52 08 | 07 01 00 53 45 52 S(0)...S(12) 08S(0)...S(12) = the serial number in ASCII |
| Request LCD panel firmware version. 07 01 01 47 56 45 08 | 07 01 00 47 56 45 S(0)...S(5) 08S(0)...S(5) = the firmware version in ASCII | |
10.5. SERIAL COMMAND LIST
| Main Item Control Item CMD Type Value (DEC) Reply (DEC) Content | CMD(HEX) | Remark | ||||||
| Power Control and Input Source | Power Control POW W/R | 00 00 Off (soft power) | 50 4F 57 | ▲ | ||||
| 01 01 On (soft power) | ▲ | |||||||
| IPC Control IPC W/R | 00 00 Off | 49 50 43 | ||||||
| 01 01 On | ||||||||
| Input Source MIN | W/R | 00 00 | VGA | 4D 49 4E | ||||
| 9 | 9 | HDMI1 | ||||||
| 0A | 0A | HDMI2 | ||||||
| 0B 0B | HDMI3 | |||||||
| 0D | 0D | Displayport | ||||||
| 0E | 0E | IPC/OPS | ||||||
| Display Adjustment | Display Adjustment | BRI | W/R | 00~64 | 00~64 | Back Light Brightness | 42 52 49 | |
| BRL | W/R | 00~64 | 00~64 | Digital Brightness Level | 42 52 4C | |||
| BLC | W/R | 00 00 | Off (Back Light) | 42 4C 43 | ||||
| 01 01 | On (Back Light) | |||||||
| CON | W/R | 00~64 | 00~64 | Contrast | 43 4F 4E | |||
| HUE | W/R | 00~64 | 00~64 | Hue | 48 55 45 | |||
| SAT | W/R | 00~64 | 00~64 | Saturation | 53 41 54 | |||
| NOR | W/R | 00 00 | Noise Reduction: Off | 4E 4F 52 | ||||
| 01 01 | Noise Reduction: Low | |||||||
| 02 02 | Noise Reduction: Medium | |||||||
| 03 03 | Noise Reduction: High | |||||||
| USR | W/R | 00~64 | 00~64 | Red Gain (mapping 0~100) | 55 53 52 | |||
| USG | W/R | 00~64 | 00~64 | Green Gain (mapping 0~100) | 55 53 47 | |||
| USB | W/R | 00~64 | 00~64 | Blue Gain (mapping 0~100) | 55 53 42 | |||
| UOR | W/R | 00~64 | 00~64 | Red Offset (mapping 0~100) | 55 4F 52 | |||
| UOG | W/R | 00~64 | 00~64 | Green Offset (mapping 0~100) | 55 4F 47 | |||
| UOB | W/R | 00~64 | 00~64 | Blue Offset (mapping 0~100) | 55 4F 42 | |||
▲: Valid command on Power saving/ off mode (The setting of "Wake Up from Sleep" must be "VGA, Digital, RS-232").
Main Item Control Item CMD Type Value (DEC) Reply (DEC) Content CMD (HEX)
| Display Adjustment | Display Adjustment | COT W/R | 00 00 User | 43 4F 54 | |||
| 01 01 6500K | |||||||
| 02 02 9300K | |||||||
| 06 06 5000K | |||||||
| 07 07 7500K | |||||||
| GAC W/R | 00 00 Gamma Off | 47 41 43 | |||||
| 01 01 Gamma 2.2 | |||||||
| VGA Adjustment | PHA W/R | 00~FF | 00~FF | Phase | 50 48 41 | ||
| CLO | W/R | 00~64 | 00~64 | Clock | 43 4C 4F | ||
| HOR | R/W | 00~64 | 00~64 | Horizontal Position | 48 4F 52 | ||
| VER | R/W | 00~64 | 00~64 | Vertical Position | 56 45 52 | ||
| ADJ | W | 00 00 Auto | Adjust 41 44 4A | ||||
| Sharpness | SHA | W/R | 00~64 | 00~64 | Sharpness | 53 48 41 | |
| Other Control | Scaling | ASP | W/R | 00 00 | Main Window Aspect Ratio Native (PointToPoint) | 41 53 50 | |
| 01 01 | Full Screen (16:9) | ||||||
| 02 02 | Pillarbox (4:3) | ||||||
| 03 03 | Letterbox | ||||||
| 04 04 | Auto | ||||||
| ZOM | W/R | 00~0A | 00~0A | Adjust overscan ratio | 5A 4F 4D | ||
| Baudrate Adjustment | BRA | W/R | 00 00 | 115200 | 42 52 41 | ||
| 01 01 38400 | |||||||
| 02 02 19200 | |||||||
| 03 03 | 9600 | ||||||
| Other Control | RCU | W | 00 00 | MENU Key | 52 43 55 | ||
| 01 01 | INFO Key | ||||||
| 02 02 | UP Key | ||||||
| 03 03 | DOWN Key | ||||||
| 04 04 | LEFT Key | ||||||
| 05 05 | RIGHT Key | ||||||
| 06 06 | ENTER Key | ||||||
| 07 07 | EXIT Key | ||||||
| 08 08 | VGA Key | ||||||
| 0A | OA HDMI1 Key | ||||||
| 0B 0B | HDMI2 Key | ||||||
| 17 17 | SCALING Key | ||||||
| 18 18 | FREEZE Key | ||||||
| 19 19 | MUTE Key | ||||||
| 1A | 1A | BRIGHT Key | |||||
Main Item Control Item CMD Type Value (DEC) Reply (DEC) Content CMD (HEX)
| Other Control | Other Control | RCU W | 1B 1B CONTRAST Key | 52 43 55 | ||
| 1C 1C AUTO Key | ||||||
| 1D 1D VOLUME+ Key | ||||||
| 1E 1E VOLUME- Key | ||||||
| 1F | 1F | HDMI3 Key | ||||
| 21 21 | OPS Key | |||||
| ALL | W | 00 00 | Reset all | 41 4C 4C | ||
| 01 01 | Reset all but communication (RS232, LAN) | |||||
| KLC | W/R | 00 00 | Un-lock keys | 4B 4C 43 | ||
| 01 01 | Lock keys | |||||
| SER | R | 13 bytes | Read Serial Number | |||
| MNA R | 13 bytes | 13 bytes | 4D 4E 41 | |||
| GVE | R | 6 bytes | Read Firmware Version | |||
| RTV | R | Current value | Read RS232 table Vers | |||
| GVS W | 00 | [00]+5 byte Querying main scaler version | 47 56 53 | |||
| 01 | [00]+5 byte | Querying sub mcu version | ||||
| 02 | [00]+5 byte | Querying network module version | ||||
| Audio | VOL | W/R | 00~64 | 00~64 | Volume | |
| BAS | W/R | 00~14 | 00~14 | Bass (-10~10) | ||
| TRE | W/R | 00~14 | 00~14 | Treble (-10~10) | ||
| BAL | W/R | 00~14 | 00~14 | Bass (-10~10) | ||
| INS | W/R | 00 00 | Internal Speaker Off | 49 4E 53 | ||
| W/R | 01 01 | Internal Speaker On | ||||
| MUT | W/R | 00 00 | Mute Off | 4D 55 54 | ||
| W/R | 01 01 | Mute On | ||||
| Scheme selection | SCM | W/R | 00 00 | User | 53 43 4D | |
| W/R | 01 01 | Sport | ||||
| W/R | 02 02 | Game | ||||
| W/R | 03 03 | Cinema | ||||
| W/R | 04 04 | Vivid | ||||
| EcoMode WakeUpFromSleep | WFS | W/R | 00 00 | Set VGA_ONLY | 57 46 53 | |
| W/R | 01 | 01 | Set DIGITAL, RS232, Ethernet | |||
| W/R | 02 02 | Set Never_Sleep | ||||
| RTC | RTY | W/R | 00~63 | 00~63 | Set Real time Year | |
| RTM | W/R | 01~0C | 01~0C | Set Real time Month | ||
| RTD | W/R | 01~1F | 01~1F | Set Real time Day | ||
| RTH | W/R | 00~17 | 00~17 | Set Real time Hour | ||
| RTN | W/R | 00~3B | 00~3B | Set Real time Minute |
Main Item Control Item CMD Type Value (DEC) Reply (DEC) Content CMD (HEX)
| Other Control | RTC | TMS | W/R 00 00 Same Settings On All (Everyday) | 54 4D 53W/R 01 01 | |||
| Same Settings On Work Days (Workday) | |||||||
| W/R 02 02 User | |||||||
| AEN | W/R 01 01 Sunday Alarm Enable (Note 14) | 41 45 4E | |||||
| W/R 02 02 Monday Alarm Enable (Note 14) | |||||||
| W/R 04 04 Tuesday Alarm Enable (Note 14) | |||||||
| W/R 08 08 | Wednesday Alarm Enable (Note 14) | ||||||
| W/R 10 10 | Thursday Alarm Enable (Note 14) | ||||||
| W/R 20 20 | Friday Alarm Enable (Note 14) | ||||||
| W/R 40 40 | Saturday Alarm Enable (Note14) | ||||||
| AEF | W/R 01 01 Sunday Alarm Disable (Note 14) | 41 45 46 | |||||
| W/R 02 02 Monday Alarm Disable (Note 14) | |||||||
| W/R 04 04 | Tuesday Alarm Disable (Note14) | ||||||
| W/R 08 08 | Wednesday Alarm Disable (Note14) | ||||||
| W/R 10 10 | Thursday Alarm Disable (Note14) | ||||||
| W/R 20 20 Friday Alarm Disable (Note 14) | |||||||
| W/R 40 40 | Saturday Alarm Disable (Note14) | ||||||
| NNH | W/R | 00~17 | 00~17 | Monday On Hour | 4E 4E 48 | ||
| NNM | W/R | 00~3B | 00~3B | Monday On Minute | 4E 4E 4D | ||
| NFH | W/R | 00~17 | 00~17 | Monday Off Hour | 4E 46 48 | ||
| NFM | W/R | 00~3B | 00~3B | Monday Off Minute | 4E 46 4D | ||
| ENH | W/R | 00~17 | 00~17 | Tuesday On Hour | 45 4E 48 | ||
| ENM | W/R | 00~3B | 00~3B | Tuesday On Minute | 45 4E 4D | ||
| EFH | W/R | 00~17 | 00~17 | Tuesday Off Hour | 45 46 48 | ||
| EFM | W/R | 00~3B | 00~3B | Tuesday Off Minute | 45 46 4D | ||
| DNH | W/R | 00~17 | 00~17 | Wednesday On Hour | 44 4E 48 | ||
| DNM | W/R | 00~3B | 00~3B | Wednesday On Minute | 44 4E 4D | ||
| DFH | W/R | 00~17 | 00~17 | Wednesday Off Hour | 44 46 48 | ||
| DFM | W/R | 00~3B | 00~3B | Wednesday Off Minute | 44 46 4D | ||
| UNH | W/R | 00~17 | 00~17 | Thursday On Hour | 55 4E 48 | ||
| UNM | W/R | 00~3B | 00~3B | Thursday On Minute | 55 4E 4D | ||
| UFH | W/R | 00~17 | 00~17 | Thursday Off Hour | 55 46 48 | ||
| UFM | W/R | 00~3B | 00~3B | Thursday Off Minute | 55 46 4D | ||
Main Item Control Item CMD Type Value (DEC) Reply (DEC) Content CMD (HEX)
| Other Control | RTC | INH W/R | 00~17 00~17 | Friday On Hour 49 | 4E 48 | ||
| INM W/R | 00~3B 00~3B | Friday On Minute | 49 4E 4D | ||||
| IFH W/R | 00~17 00~17 | Friday Off Hour | 49 46 48 | ||||
| IFM W/R | 00~3B 00~3B | Friday Off Minute | 49 46 4D | ||||
| TNH W/R | 00~17 00~17 | Saturday On Hour 54 4E | 48 | ||||
| TNM | W/R 00~3B | 00~3B Saturday On Minute | 54 4E 4D | ||||
| SNH W/R | 00~17 00~17 | Sunday On Hour | 53 4E 48 | ||||
| SNM | W/R | 00~3B | 00~3B | Sunday On Minute | 53 4E 4D | ||
| SFH W/R | 00~17 00~17 | Sunday Off Hour | 53 46 48 | ||||
| SFM W/R | 00~3B 00~3B | Sunday Off Minute | 53 46 4D | ||||
| Auto Scan | ATS | W/R | 00 | 00 | Off | 41 54 53 | |
| ATS | W/R | 01 | 01 | Main | |||
| IRFM | IRF | W/R | 00 | 00 | Off | 49 52 46 | |
| IRF | W/R | 01 | 01 | On | |||
| Smart Light Control | SLC | W/R | 00 | 00 | Off | 53 4C 43 | |
| SLC | W/R | 01 | 01 | DCR | |||
| SLC W/R | 02 | 02 | Light Sensor | ||||
| Power LED | LED | W/R | 00 | 00 | Off | 4C 45 44 | |
| LED W/R | 01 | 01 | On | ||||
| HDMI EDID | EDH W/R | 00 | 00 | 4Kx2K | 45 44 48 | ||
| EDH W/R | 01 | 01 | 1080P | ||||
| DisplayPort EDID | EDP | W/R | 00 | 00 | 4Kx2K | 45 44 50 | |
| EDP | W/R | 01 | 01 | 1080P | |||
| HDMI RGB Color Range | HCR | W/R | 00 | 00 | Auto Detect | 48 43 52 | |
| HCR | W/R | 01 | 01 | Full Range | |||
| HCR | W/R | 02 | 02 | Limited Range | |||
| Touch Control | TOC | W/R | 00 | 00 | Auto (Read Only) | 54 4F 43 | |
| TOC | W/R | 01 | 01 | OPS | |||
| TOC | W/R | 02 | 02 | HDMI 3 | |||
| TOC | W/R | 03 | 03 | External Touch 2 (Rear USB) | |||
| OSD Control | Transparency | OST | W/R | 00~04 | 00~04 | OSD Transparency | 4F 53 54 |
| H Position | OSH | W/R | 00~64 | 00~64 | OSD H Position | 4F 53 48 | |
| V Position OSV | W/R | 00~64 00~64 | OSD V Position 4F | 53 56 | |||
| OSD Language | OSL | W/R | 00 | 00 | English | 4F 53 4C | |
| OSL | W/R | 01 | 01 | French | |||
| OSL | W/R | 02 | 02 | German | |||
| OSL | W/R | 03 | 03 | Dutch | |||
| OSD Timeout OSO | W/R | 05~3C | 05~3C | OSD Timeout(5, 10, 20, 30, 60 sec) | 4F 53 4F | ||
Main Item Control Item CMD Type Value (DEC) Reply (DEC) Content CMD (HEX)
| Ethernet Setup | Network Enable | NWE W/R 00 00 No | 4E 57 45 | |||
| NWE W/R 01 01 Yes | ||||||
| Dynamic IP | DIP W/R 00 00 Disable | 44 49 50 | ||||
| DIP W/R 01 01 | Enable | |||||
| Default | LDS | W | 00 00 | Load network default settings (It will take about 15 seconds.) | ||
| E-Mail Alert | PSA | W/R 00 00 | Off (Power Status Alert) | 50 53 41 | ||
| PSA | W/R 01 01 | On (Power Status Alert) | ||||
| SSA | W/R 00 00 | Off (Source Status Alert) | 53 53 41 | |||
| SSA | W/R 01 01 | On (Source Status Alert) | ||||
| SLA | W/R 00 00 | Off (Signal Lost Alert) | 53 4C 41 | |||
| SLA | W/R 01 01 | On (Signal Lost Alert) | ||||
| Static IP Settings | IP1 | W/R | 00~FF | 00~FF | Static IP Address 1 | |
| IP2 | W/R | 00~FF | 00~FF | Static IP Address 2 | ||
| IP3 | W/R | 00~FF | 00~FF | Static IP Address 3 | ||
| IP4 | W/R | 00~FF | 00~FF | Static IP Address 4 | ||
| MK1 | W/R | 00~FF | 00~FF | Subnet Mask 1 | ||
| MK2 | W/R | 00~FF | 00~FF | Subnet Mask 2 | ||
| MK3 | W/R | 00~FF | 00~FF | Subnet Mask 3 | ||
| MK4 | W/R | 00~FF | 00~FF | Subnet Mask 4 | ||
| GW1 | W/R | 00~FF | 00~FF | Gateway 1 | ||
| GW2 | W/R | 00~FF | 00~FF | Gateway 2 | ||
| GW3 | W/R | 00~FF | 00~FF | Gateway 3 | ||
| GW4 | W/R | 00~FF | 00~FF | Gateway 4 | ||
| FD1 | W/R | 00~FF | 00~FF | DNS Address 1 | ||
| FD2 | W/R | 00~FF | 00~FF | DNS Address 2 | ||
| FD3 | W/R | 00~FF | 00~FF | DNS Address 3 | ||
| FD4 | W/R | 00~FF | 00~FF | DNS Address 4 | ||
| SNS | W | 00 | 00 | Save Network Settings | ||
| MAC | W | 00~05 | 00~FF | Querying MAC ID #0~#5 | ||
11. TROUBLESHOOTING
Before calling service personnel, please check the following chart for a possible cause to the trouble you are experiencing.
- Perform the adjustments according to page 13 - "Operation" and page 21 - "Touch Operation".
- If the problem you have experienced isn't described below or you can't correct the problem, stop using the display and call service personnel or your dealer.
PROBLEM CHECK THESE THINGS
| No Display | Ensure the power plug is installed correctly on both endsCheck the main power switch is set to “—”Check that source equipment is operating correctlyCheck the input signal is compatible with this displayCheck the LED light |
| The image is not centered Check the input signal is compatible with this display | |
| The image is not locked correctly Check the input signal is compatible with this display | |
| The remote control doesn’t work | Make sure the batteries fresh and are installed correctlyEnsure the remote is aimed at the IR sensor on the front of the displaySome functions are not available with this display, see page 12 |
| The picture color looks poor | Check the picture settingsReset the display |
| Touch does not function | Ensure the USB cable is installed correctly on both endsPower the display off and on to recognize if a new PC is connected |
12. COMPLIANCE
FCC:
FCC CFR Title 47 Part 15 Subpart B Class A, CISPR 22
ANSI C63.4
ICES-003
CE:
EN 55032
EN 55024
EN 61000-3-2
EN 61000-3-3
cTUVus:
UL 60950-1
CAN/CSA-C22.2 No. 60950-1
CB:
IEC 60950-1
13. APPENDIX
13.1.DIMENSIONS
The following illustration shows the overall dimensions of the display:

natural_image
Two people in a meeting room with brick walls and city skyline display (no visible text or symbols)DEUTSCH
INHALTSVERZEICHNIS
natural_image
Line drawing of three people standing beside a blank rectangular object (no text or symbols)
natural_image
Line drawing of a person using a device to interact with another person (no text or symbols present)
natural_image
Line drawing of a hand holding a pen, no text or symbols presentnatural_image
Two line drawings showing a person bending forward at a desk and kneeling, with no text or symbols present.2.3.INNSTALUATION
natural_image
Technical line drawing of a structural support frame with no text or symbols
natural_image
Simple line drawing of a house with two vertical bars and a checkmark (no text or symbols)natural_image
Simple line drawing of a room with vertical bars and a window, no text or symbols present
natural_image
Simple line drawing of a room with vertical bars and a hanging sign, no text or symbols presentnatural_image
Simple line drawing of a room corner with sunlight illuminating the wall and a prohibition symbol below (no text or labels)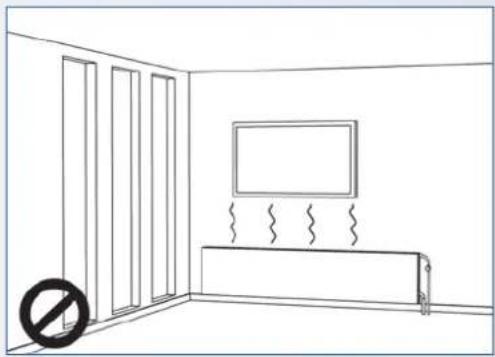
natural_image
Line drawing of a room with doors, a monitor, and a heater (no text or symbols)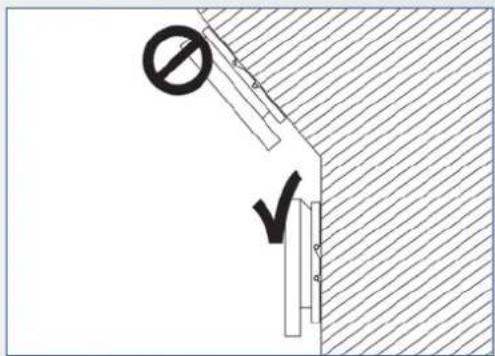
natural_image
Circular button interface with four icons: play, refresh, close, and photo (no text or labels)Taste Beschreibung
natural_image
Line drawing of a hand holding a small electronic device (no text or symbols visible)natural_image
Line drawing of a hand holding a small object, possibly a device or tool, with no visible text or symbols.Farbschema
| Display Settings | |
| Input Source | VGA |
| Aspect Ratio | Auto |
| OverScan | 0% |
| Auto Scan | Off |
| Source Renaming | |
| Auto Adjust | |
| VGA Position | |
| VGA Phase | 0 |
| VGA Clock | 0 |
Eingangsquelle
Lautstärke
Options: 5s, 10s, 20s, 30s, 60s
Voreinstellung: 30s
OSD-Sprache
m = 311
m = 311
natural_image
Two people in a meeting room with brick walls and city skyline display (no visible text or symbols)FRANÇAIS
TABLE DES MATIÈRES
- Informations importantes .... 62
natural_image
Line drawing of three people standing in front of a blank rectangular object (no text or symbols)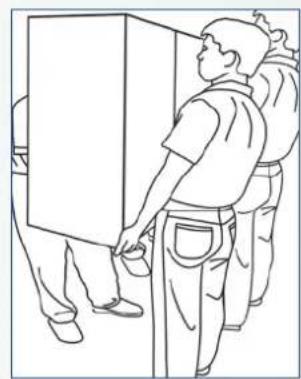
natural_image
Line drawing of two workers installing a large cabinet (no text or symbols present)
natural_image
Line drawing of a hand holding a pen, no text or symbols presentnatural_image
Two line drawings showing a person bending forward at a desk and kneeling, with no text or symbols present.2.3. INSTALLATION
natural_image
Technical line drawing of a structural support frame with no text or symbols
natural_image
Simple line drawing of a house with two vertical bars and a checkmark (no text or symbols)natural_image
Simple line drawing of a room with vertical bars and a window, no text or symbols present
natural_image
Simple line drawing of a room with vertical bars and a hanging sign, no text or symbols presentnatural_image
Simple line drawing of a room corner with sunlight illuminating the wall and a prohibition symbol below (no text or labels)
natural_image
Line drawing of a room with doors, a monitor, and a heater (no text or symbols)
2.5. UTILISATION RECOMMANDÉE
natural_image
Close-up of a four-pole button interface with icons for camera, power, and image (no text or labels visible)natural_image
Line drawing of a hand holding a small electronic device (no text or symbols visible)natural_image
Line drawing of a hand holding a small object, possibly a device or tool, with no visible text or symbols.| Scheme | User |
| Brightness | 0 |
| Contrast | 0 |
| Sharpness | 0 |
| Saturation | 0 |
| Hue | 0 |
| Backlight | 0 |
| Color Temp & Gamma | |
| HDMI RGB Range | Auto |
Mode d'affichage
| Display Settings | |
| Input Source | VGA |
| Aspect Ratio | Auto |
| OverScan | 0% |
| Auto Scan | Off |
| Source Renaming | |
| Auto Adjust | |
| VGA Position | |
| VGA Phase | 0 |
| VGA Clock | 0 |
Source d'entrée
| Audio Settings | |
| Volume | 0 |
| Bass | 0 |
| Treble | 0 |
| Balance | 0 |
| Speaker | On |
| Audio Source | |
Volume
Options : 5s, 10s, 20s, 30s, 60s
Par défaut : 30s
Langue OSD
SOUS-MENU DESCRIPTION PARAMÈTRES PAR DÉFAUT
• = lecture / action
•=écriture
natural_image
Two people in a meeting room with brick walls and city skyline display (no visible text or symbols)NEDERLANDS
INHOUDSOPGAVE
natural_image
Two line drawings showing a person bending forward at a desk and kneeling, with no text or symbols present.2.3. INSTALLATIE
natural_image
Technical line drawing of a structural support frame with no text or symbols
natural_image
Simple line drawing of a house with two vertical bars and a checkmark (no text or symbols)natural_image
Simple line drawing of a room with vertical bars and a window, no text or symbols present
natural_image
Simple line drawing of a room with vertical bars and a hanging sign, no text or symbols presentnatural_image
Simple line drawing of a room corner with sunlight illuminating the wall and a prohibition symbol below (no text or labels)
natural_image
Line drawing of a room with doors, a monitor, and a heater (no text or symbols)
natural_image
Close-up of a four-pole button interface with icons for camera, power, and image (no text or labels visible)Toets Omschrijving
natural_image
Line drawing of a hand holding a small electronic device (no text or symbols visible)natural_image
Line drawing of a hand holding a small object, possibly a device or tool, with no visible text or symbols.Selecting the input source
| Scheme | User |
| Brightness | 0 |
| Contrast | 0 |
| Sharpness | 0 |
| Saturation | 0 |
| Hue | 0 |
| Backlight | 0 |
| Color Temp & Gamma | |
| HDMI RGB Range | Auto |
Schema
Ingangsbron
Selecteer de primaire ingangsbron.
Opties: VGA, DisplayPort, HDMI1, HDMI2, HDMI3, OPS;
Standaard: VGA
Beeldverhouding
Volume
Pas het geluid aan.
Opties: 5s, 10s, 20s, 30s, 60s
Standaard: 30s
OSD-taal
SUBMENU OMSCHRIJVING INSTELLINGEN STANDAARD

natural_image
Two people in a meeting room with brick walls and city skyline display (no visible text or symbols)ESPAÑOL
ÍNDICE
natural_image
Two line drawings showing a person bending forward at a desk and kneeling, with no text or symbols present.2.3. INSTALACIÓN
This may cause fire or electrical shock.
natural_image
Technical line drawing of a structural support frame with no text or symbols
natural_image
Simple line drawing of a house with two vertical bars and a checkmark (no text or symbols)natural_image
Simple line drawing of a room with vertical bars and a wall-mounted panel, no text or symbols present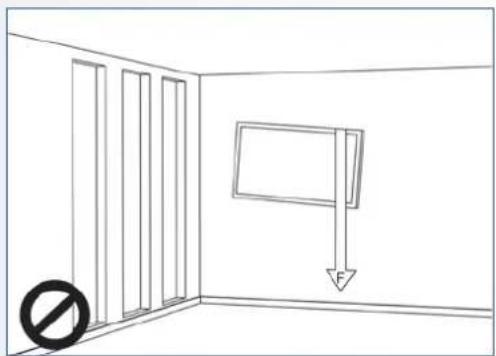
natural_image
Simple line drawing of a room with vertical bars and a hanging sign, no text or symbols presentnatural_image
Simple line drawing of a room corner with sunlight illuminating the wall and a prohibition symbol below (no text or labels)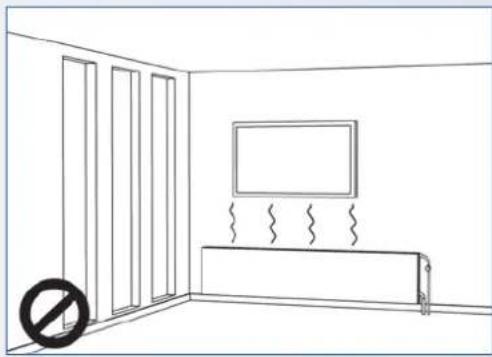
natural_image
Line drawing of a room with doors, a monitor, and a radiator (no text or symbols)
2.5. USO RECOMENDADO
natural_image
Circular button interface with four function icons (no text or labels)Tecla Descripción
natural_image
Line drawing of a hand holding a small electronic device (no text or symbols visible)natural_image
Line drawing of a hand holding a small object, possibly a device or tool, with no visible text or symbols.| Scheme | User |
| Brightness | 0 |
| Contrast | 0 |
| Sharpness | 0 |
| Saturation | 0 |
| Hue | 0 |
| Backlight | 0 |
| Color Temp & Gamma | |
| HDMI RGB Range | Auto |
Esquema
| Display Settings | |
| Input Source | VGA |
| Aspect Ratio | Auto |
| OverScan | 0% |
| Auto Scan | Off |
| Source Renaming | |
| Auto Adjust | |
| VGA Position | |
| VGA Phase | 0 |
| VGA Clock | 0 |
Fuente de entrada
| Audio Settings | |
| Volume | 0 |
| Bass | 0 |
| Treble | 0 |
| Balance | 0 |
| Speaker | On |
| Audio Source | |
Volumen
Ajuste el sonido.
Opciones: 5s, 10s, 20s, 30s, 60s
Predeterminado: 30s
Idioma OSD


natural_image
Blurred image with indistinct blue and gray shapes, no readable text or symbols
natural_image
Pure white background with no visible text, symbols, or identifiable objects
natural_image
Interior view of a modern office or meeting room with blue seating chairs, no visible text or symbols
natural_image
Tablet displaying three smartphone icons on a light blue surface (no text or symbols visible)Legamaster International B.V.
Postbus 111
NL-7240 AC Lochem
T +31 (0)573 71 30 00
F +31 (0)573 71 30 01
info@legamaster.com
www.legamaster.com

- XTX-7500UHD
- USER MANUAL
- LANGUAGES
- TABLE OF CONTENTS
- IMPORTANT INFORMATION
- WARNING:
- CAUTION:
- USE 1.2. EXEMPTIONS
- SAFETY INSTRUCTIONS
- SAFETY PRECAUTIONS
- MOVING AND CARRYING NOTICE
- Moving the display:
- Carrying the display:
- 2.3.INSTALLATION
- Don't install in a high-temperature environment.
- Don't install in a high-humidity environment.
- Don't install near any heat sources such as radiators, heat registers, stoves, or other apparatus that produce heat.
- Don't overload outlets or cables beyond electrical capacity.
- Don't insert the power plug into an outlet other than 100\~240V AC.
- Don't place the display on an unstable shelf or surface.
- Don't place objects on the display.
- Don't move the display when it is connected to the power cord and AV cables.
- WALL MOUNT SAFETY NOTICE
- Don't install or remove the power plug with wet hands.
- If the display will not be used for a long period of time, unplug the display.
- Don't push or shake the display.
- Precautions with the remote control batteries
- CLEANING
- Take off the power plug before cleaning.
- Cleaning the surface of the display
- PACKAGE CONTENTS
- UNPACKING
- INCLUDED ACCESSORY
- INSTALLATION
- ENVIRONMENT STATE
- POWER INPUT
- EASYFIX MOUNTING SOLUTIONS AND CABLE MANAGEMENT
- CONTROL PANEL
- Key Descriptions
- STATUS LED
- Note:
- INPUT AND OUTPUT CONNECTOR
- REMOTE CONTROL
- Changing the Remote Control Battery
- Remove the battery cover
- Insert the batteries
- Close the battery cover
- CAUTION
- About the remote control
- OPERATIONS
- TURNING THE DISPLAY ON AND OFF
- Turning the display on
- Turning the display off
- ADJUSTING THE VOLUME AND INPUT SOURCE
- Adjusting the Volume
- Selecting the input source
- ADD A LABEL TO AN INPUT SOURCE
- OSD (ON-SCREEN DISPLAY) CONTROLS
- OSD MENU OVERVIEW
- NAVIGATION THROUGH OSD MENU
- Image Settings
- Scheme
- Brightness
- ENTER.
- Contrast
- Sharpness
- Saturation
- Hue
- Backlight
- Color Temp & Gamma
- Color temperature:
- Gamma curve
- HDMI RGB Range
- OSD (ON-SCREEN DISPLAY) CONTROLS
- Display Settings
- Input Source
- Aspect Ratio
- Over Scan
- Auto Scan
- Source Renaming
- Auto Adjust
- VGA Position
- VGA Phase
- VGA Clock
- Audio Settings
- Volume
- Bass
- Treble
- Balance
- Speaker
- Audio Source
- Basic Settings
- Horizontal Pos.
- Vertical Pos.
- OSD Transparency
- OSD Timeout
- OSD Language
- Power On/Off Music
- Power LED
- RTC & Schedule
- Advance Settings
- Smart Light Control
- IRFM
- Noise Reduction
- Wake Up From Sleep
- EDID Switch
- Touch Input Mapping
- Network Configuration
- Software Update (USB)
- Information
- TOUCH OPERATION
- TOUCH USB CABLE CONNECTION
- SPECIFICATIONS
- SERIAL COMMANDS
- SERIAL COMMUNICATIONS
- RS-232 CONNECTION AND PORT CONFIGURATION
- COMMAND AND RESPONSE FORMAT
- Where:
- COMMAND AND RESPONSE EXAMPLES
- SERIAL COMMAND LIST
- TROUBLESHOOTING
- COMPLIANCE
- FCC:
- CE:
- cTUVus:
- CB:
- APPENDIX
- 13.1.DIMENSIONS
- DEUTSCH
- INHALTSVERZEICHNIS
- 2.3.INNSTALUATION
- Farbschema
- Eingangsquelle
- Lautstärke
- OSD-Sprache
- FRANÇAIS
- TABLE DES MATIÈRES
- INSTALLATION
- UTILISATION RECOMMANDÉE
- Mode d'affichage
- Source d'entrée
- Langue OSD
- NEDERLANDS
- INHOUDSOPGAVE
- INSTALLATIE
- Schema
- Ingangsbron
- Beeldverhouding
- OSD-taal
- ESPAÑOL
- ÍNDICE
- INSTALACIÓN
- USO RECOMENDADO
- Esquema
- Fuente de entrada
- Volumen
- Idioma OSD
Brand : Legamaster
Model : XTX-7500UHD
Category : Monitor