
HD4451 - Thermostat BTICINO - Free user manual and instructions
Find the device manual for free HD4451 BTICINO in PDF.


| Product type | Programmable room thermostat |
| Brand | BTicino |
| Model | HD4451 |
| Dimensions (L x W x H) | 85 x 85 x 25 mm |
| Weight | 120 g |
| Power supply | 2 AAA 1.5 V batteries (not included) or mains power via optional adapter |
| Display | Backlit LCD screen |
| Temperature range | 5 °C to 35 °C |
| Accuracy | ± 0.5 °C |
| Main functions | Weekly programming, Comfort / Eco modes, window opening detection, anti-frost function |
| Maintenance and cleaning | Clean with a soft, dry cloth. Do not use abrasive products or solvents. |
| Safety | Anti-frost function, key lock (child lock) |
| Spare parts and repairability | Available from BTicino after-sales service |
| General information | Compliant with CE standards; compatible with gas boilers, electric boilers, heat pumps |
Frequently Asked Questions - HD4451 BTICINO
User questions about HD4451 BTICINO
0 question about this device. Answer the ones you know or ask your own.
Ask a new question about this device
Download the instructions for your Thermostat in PDF format for free! Find your manual HD4451 - BTICINO and take your electronic device back in hand. On this page are published all the documents necessary for the use of your device. HD4451 by BTICINO.
USER MANUAL HD4451 BTICINO
HC/HS/HD4451 L/N/NT4451 AM5721
Flush mounting chronothermostat
Istruzioni d'uso • Instruction sheet
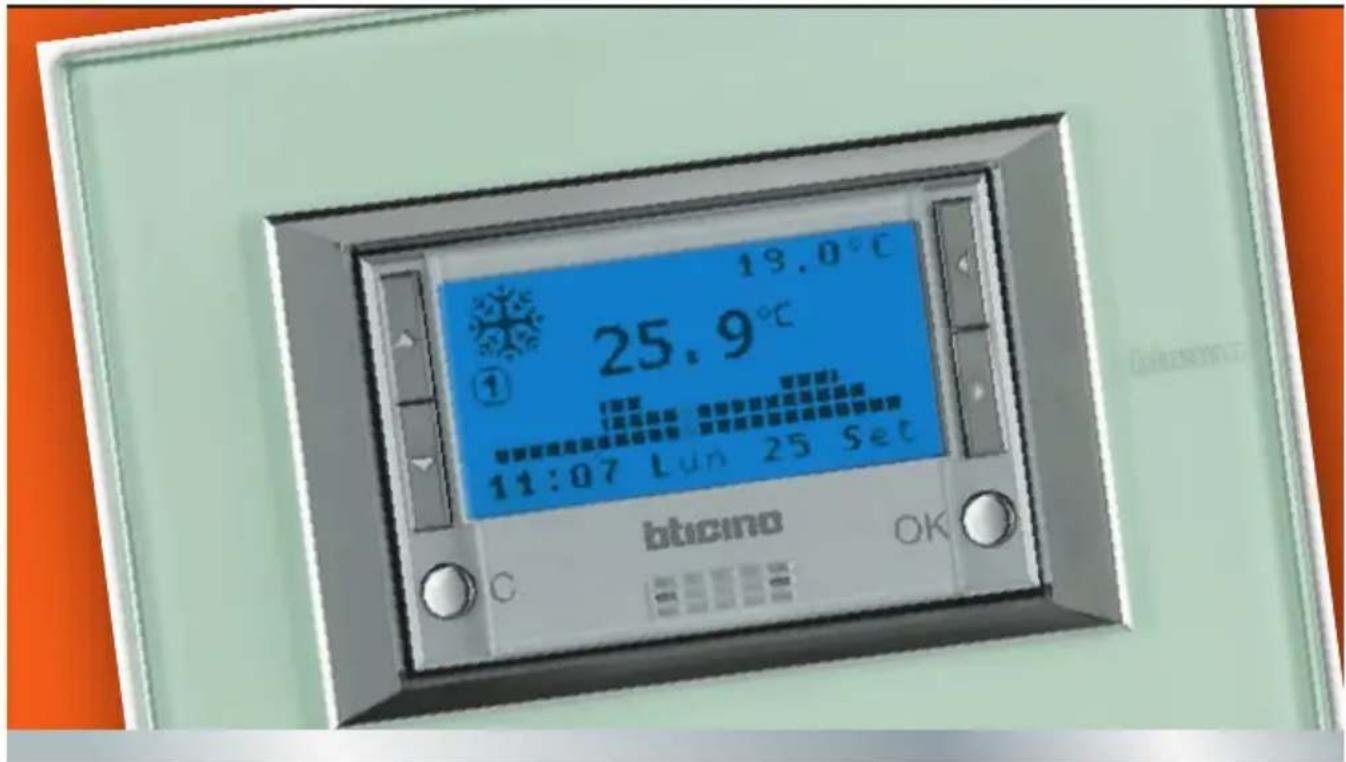
Flush mounting chronothermostat
IT ITALIAN 3
EN ENGLISH 24
FR FRANÇAIS 46
DE DEUTSCH 68
ES ESPAÑOL 90
NL NEDERLANDS 112
PT PORTUGUÊS 134
AR
عربية 156
Flush mounting chronothermostat
Flush mounting chronothermostat
1.1.2 II display
Flush mounting chronothermostat
natural_image
3D illustration of a battery pack inside a housing with an orange arrow indicating direction (no text or symbols)Flush mounting chronothermostat
Flush mounting chronothermostat
Flush mounting chronothermostat
Flush mounting chronothermostat
Flush mounting chronothermostat
Flush mounting chronothermostat
Procedura:

1


2

3

Flush mounting chronothermostat
3.1.1 Rename a Weekly program 40
3.1.2 Change a Weekly program 40
3.1.3 Copy a Weekly program 45
3.1.4 View a Weekly program 45
3.1.5 Remove a Weekly program 45
Flush mounting chronothermostat
1.1 General information 28
1.2 Your Chronothermostat: use it now! 30
1.1 General information
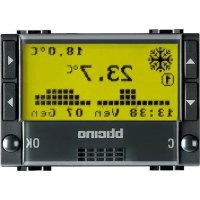
The 4451 Chronothermostat is a flush-mounting device which can be used for heating and air-conditioning systems; it is possible – through several programming possibilities – to adjust the temperature at any time of the day and in a differentiated manner, every day of the week. It is possible to choose how to use a standard program (already stored but can be changed according to the specific needs of the user) or to create a new one with a simple programming procedure.
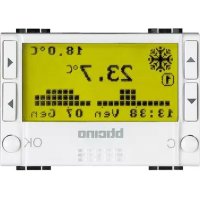
A large back-lit display shows you at all times the programme setting, the status of the system and the temperature of the room. The Chronothermostat consists of a base used for the system electric connections and a removable front part to allow the user to execute the programming operations and to replace the batteries more easily.

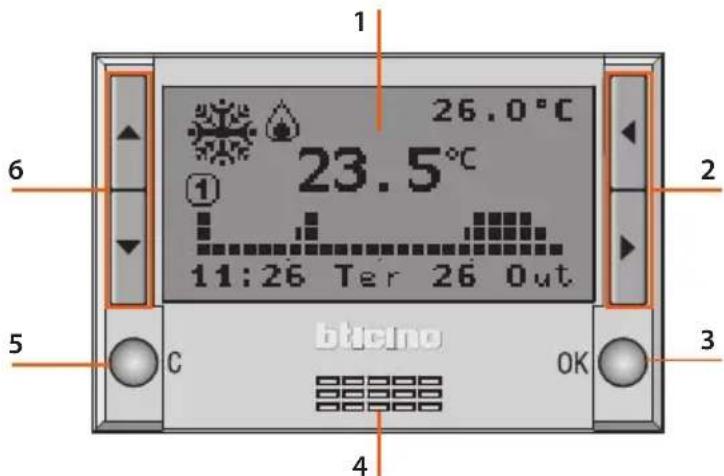
1.1.1 The front side

1 - Graphic display: displays the messages which determine the programming operations as well as the system status
2 - Selection Keys: these let you cycle through the functioning modes inside the menu, if any, while the main screen is being viewed;
3 - OK Key: accesses the main menu, confirms the selection displayed or the data entered
4 - Sensor: measures the ambient temperature
5 - C Key: cancels the selection and returns to the previous page; if held down, it returns to the initial page
6 - Scroll Keys: these let you change the set temperature while the main screen is being viewed; when inside the menu, you can scroll the list of the options available
Flush mounting chronothermostat
1.1.2 The display
During normal operation, the graphic display shows the following background information:
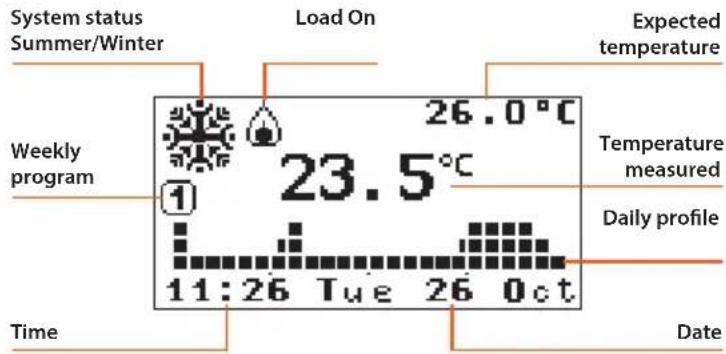
1.1.2 Symbols
Depending on the functioning mode selected, the display may be characterised by the following symbols:
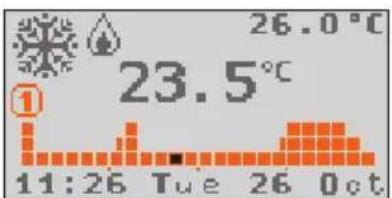
Weekly
Temperature profile and number of the operational program
The range of the corresponding time will flash on the graph (for example, 11:26 will flash on the square corresponding to the time from 11:00 to 12:00).

Manual
Manual mode Icon (hand)

Holidays
Antifreeze or Thermal protection Icon, time and date of Holidays program end

Timed
Manual mode Icon and number of hours and minutes to the end of the Timed program

Antifreeze
Antifreeze (winter)
or Thermal protection (summer) mode Icon

OFF
OFF mode Icon
If an external probe is connected to the Chronothermostat and the preset function is "External Temp.", its associated icon will be shown on the display. Every 2 seconds the outside temperature and the ambient temperature will be displayed alternately (in the same position). (See chapter 2.1.12).

External probe
External temperature signaling Icon
When the battery is flat, its signaling icon will be displayed (in any mode, even when the screen saver is functioning). If flashing, the device will not work, thus the batteries need to be replaced.

Battery
Flat battery signaling Icon
1.2 Your Chronothermostat: use it now!
1.2.1 First activation
To enable the Chronothermostat:
- select the functioning Language
- set Date / Time
- the Chronothermostat automatically sets to Winter mode and Weekly Program1 mode.
The display shows the currently set selection.
(Italian factory setting)
- The ▲▼ keys can be used to scroll the list and select the language
- Press OK to confirm
After confirming, the Chronothermostat switches to the Set DATE and TIME menu
- Set time and date with keys: ▲▼ increases/decreases the selected digit, ◀▶ scrolls the time and date digits
- Press OK to confirm
- Hold down the C key to exit the menu and return to the main page
The Chronothermostat will automatically set up as follows: - Winter mode
- Weekly-Program1 mode
To set the Summer mode - press OK to access the menus
- select Setup with the▼key
- press OK to confirm
Complete the setup by following the procedure described on see chapter 2.1.

Daylight saving time: if the default setup is kept, "Manual" must be updated manually; to set up the "Automatic" update mode, see paragraph "Set Daylight saving time" on see chapter 2.1.4).
1.2.2 Navigation keys
When the main screen is displayed, the following operations can be executed with the navigation keys:
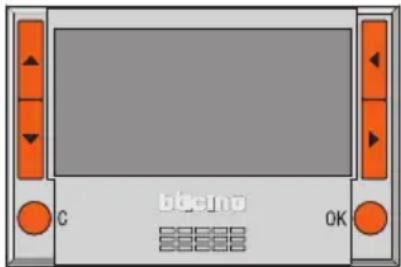
OK Key accesses the Main menu - confirm
C Key cancels and returns to the previous mode
▲▼ Keys depending on the preset mode:
Weekly – Manual – Timed: increase / decrease in the current temperature;
Holidays – Antifreeze – OFF: no effect
◀▶ Keys cycle through the functioning modes
1.2.3 View the functioning modes
When the Chronothermostat display shows the Screen saver (or when it is off), the preset functioning mode will be displayed if any key is pressed.
Flush mounting chronothermostat
1.2.4 Scroll the modes
When the Chronothermostat display shows the Screen saver (or when it is off), the preset functioning mode will be displayed if any key is pressed.
- Use the ◀▶ keys to view the other modes: Weekly, Manual, Holidays, Timed, Antifreeze and Off.
The name of the selected mode flashes to indicate the modification status: if it is not confirmed (by pressing OK) or, if a key is not pressed for more than 10 seconds, the operation will be cancelled, thus displaying the main screen with the current mode.
To set the functioning mode displayed:
- Use the OK key to confirm
the Chronothermostat is now working under the new mode.
Depending on the mode selected, the following modification functions will be possible.
1.2.5 Change the Weekly mode
- Use the ◀▶ keys to select the "Weekly" mode
The number of the operative program flashes as well as the square corresponding to the time.
- Use the ▲▼ keys to scroll the three programs and to display the daily profile.
Select the required program; when the number of the program stops flashing, it will be possible to change the level of the current temperature.
- Use the ▲▼ keys to select the level of the required temperature.
The profile displayed, starting from the flashing square, will be modified with the new temperature level, until the next level is changed.
- Use the OK key to confirm
1.2.6 Change the Manual mode
- Use the ◀▶ keys to select the "Manual" mode.
- Use the ▲▼ keys to increase or decrease the value of the preset temperature.
- Use the OK key to confirm or
the C key to cancel and return to the previous mode.
The Chronothermostat is now working under the new preset mode.
1.2.7 Change the Holidays mode
- Use the ◀▶ keys to select the "Holidays" mode.
- Use the OK key to confirm
When confirming, the Holidays Mode setup menu will be displayed;
- Use the ◀▶ and ▲▼ keys to set the time and data:
▲▼ increases/decreases the selected digit ◀ ▶ scrolls the time and date digits
- Use the OK key to confirm
- Use the ▲▼ keys to select the weekly program to be reset at the end of the Holidays period.
- Use the OK key to confirm
The display shows the Antifreeze or Thermal protection mode Icon as well as the time and date of the Holidays program end.
The Chronothermostat is now working under the new preset mode.
1.2.8 Change the Timed mode
- Use the ◀▶ keys to select the "Timed" mode.
- Use the ▲▼ keys to increase or decrease the value of the preset temperature.
- Use the OK key to confirm
When confirming, the Timed Mode setup menu will be displayed;
- Use the ◀▶ and ▲▼ keys to set the temperature and hours/minutes
▲ ▼ increases/decreases the selected digit ◀ ▶ toggles from temperature to hours/minutes
- Use the OK key to confirm
The Manual mode Icon and the time to the end of the Timed program will be displayed.
The Chronothermostat is now working under the new preset mode.
1.2.9 Change the Antifreeze mode
- Use the ◀▶ keys to select the "Antifreeze" mode.
- Use the OK key to confirm
The display shows the Antifreeze mode Icon for Winter functioning or the Thermal protection mode Icon for Summer functioning.
The Chronothermostat is now working under the new preset mode.
1.2.10 Change the Off mode
- Use the ◀▶ keys to select the "Off" mode.
- Use the OK key to confirm
The Off mode Icon will be displayed.
The Chronothermostat is now working under the new preset mode.
1.2.11 Replacing the batteries
When the symbol below is displayed it is necessary to replace the batteries. If flashing, the device will not work, thus the batteries need to be replaced. The "dead battery" signal appears about one month before the batteries totally run out.
When replacing the batteries, the data stored will be saved.

natural_image
Isometric line drawing of a wall-mounted panel with internal structure (no text or symbols)After replacing the batteries, it is recommended to check the Date and Time of the Chronothermostat.

natural_image
3D illustration of a mechanical housing with cylindrical components and an orange arrow indicating direction (no text or symbols)Putting in the batteries
- Remove the Chronothermostat from the base
- Put in the two long-lasting LR6/AA (recommended for photographic applications) 1.5V alkaline batteries according to the polarity shown in the drawing.

natural_image
Diagram of a battery pack layout with three compartments and labeled terminals (no text or symbols beyond basic labels)The batteries will last for at least 1 year. The duration depends on the type of batteries, on the screen saver selected (See chapter 2.1.8) and on the display activation time (about 5 seconds every time a key is pressed).
Flush mounting chronothermostat
2.1 Setup menu 34
2.1 Setup menu
The setup menu lets you customize some parameters or functioning modes of the Chronothermostat.
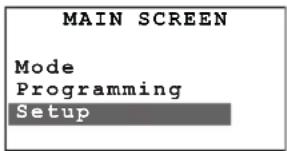
2.1.1 Set the Summer/Winter functioning mode
Sets the system functioning mode (default is Winter):
Summer = cooling, Winter = heating
- Use the ▲▼ keys to select the option "Summer/Winter"
- Press OK to confirm
A screen will be displayed showing the indication of the functioning mode being used.
- Press OK to switch over the functioning mode
- Press C to exit the menu and to return to the previous page.
After switching over, the system will set to the Antifreeze mode (for Winter) or Thermal protection (for Summer).
2.1.2 Set the Temperature levels
You can set the level of the Antifreeze temperature or Thermal protection T* and the temperature levels T1, T2 and T3 used in the weekly programs.
The default values are:
Winter T*=7°C, T1=18°C, T2=20°C, T3=22°C
Summer T*=35°C, T1=20°C, T2=23°C, T3=25°C
- Use the ▲▼ keys to select the option "Temperature"
- Press OK to confirm
- Use the ◀▶ keys to select the temperature level
- Use the ▲▼ keys to set the value of the required temperature
- Press OK to confirm and to go back to the previous page or press C to exit the menu and to return to the previous page, hence cancelling the change.
2.1.3 Set the Date and Time
For proper operation of your system, make sure that the date and time are set correctly.
- Use the ▲▼ keys to select the option "Date and Time"
- Press OK to confirm
- Set time and date with keys:
▲▼ increases/decreases the selected digit,
◀▶ scrolls the time and date digits;
- Press OK to confirm and to go back to the previous page or press C to exit the menu and to return to the previous page, hence cancelling the change.
2.1.4 Set the Daylight saving time
For proper operation of your system, make sure that the date and time are set correctly.
- Use the ▲▼ keys to select the option "Daylight saving time"
- Press OK to confirm
A screen will be displayed showing the indication of the status.
- Press OK to switch over the functioning mode
- Press C to exit the menu and to return to the previous page.
Flush mounting chronothermostat
2.1.5 Set the measurement unit of the temperature
Sets the measurement unit of the temperature: Celsius or Fahrenheit (default is Celsius).
- Use the ▲▼ keys to select the option "Degrees"
- Press OK to confirm
A screen will be displayed showing the indication of the preset measurement unit. - Press OK to change the measurement unit
- Press C to exit the menu and to return to the previous page.
2.1.6 Enable/Disable the Remote control
Enables/Disables the remote control using a telephone actuator of the Chronothermostat (default is Enabled).
The remote contact is managed as follows:
Closed= antifreeze mode activation
Open= last set weekly program
- Use the ▲▼ keys to select the option "Remote control"
- Press OK to confirm
The display shows the preset status. - Press OK to change the status
- Press C to exit the menu and to return to the previous page.
2.1.7 Adjust the Display contrast
Adjusts the contrast of the graphic display.
- Use the ▲▼ keys to select the option "Contrast"
- Press OK to confirm
- Press OK to confirm and to go back to the previous page or press C to exit the menu and to return to the previous page, hence cancelling the change.
2.1.8 Select the Screen Saver
Selects what you want to show on the Chronothermostat display when in idle condition (default is Temp/date/time).
You can select the following:
1: Only Temp. - temperature measured
2: Temp./date/time - temperature measured and date/time
3: Main - complete main screen
4: Off - display completely off
- Use the ▲▼ keys to select the option "Screen Saver"
- Press OK to confirm
The display shows the currently set selection.
- Use the ▲▼ keys to select the "Screen Saver"
- Press OK to confirm and to go back to the previous page or press C to exit the menu and to return to the previous page, hence cancelling the change.
Please note:
maximum battery duration is guaranteed when the display is OFF.
2.1.9 Select the Language
Selects the language for the menu (default is Italian).
- Use the ▲▼ keys to select the option "Language"
- Press OK to confirm
The display shows the currently set selection.
- Press OK to confirm and to go back to the previous page or press C to exit the menu and to return to the previous page, hence cancelling the change.
2.1.10 Select the Temperature adjustment
This setting lets you choose the type of temperature adjustment according to the type of system.
1: Standard default (recommended)
2: Proport. 5min low-inertia systems (fan-coil)
3: Proport. 10min medium-inertia systems (aluminium radiators)
4: Proport. 20min high-inertia systems (cast iron radiators)
- Use the ▲▼ keys to select the option "Adjustment"
- Press OK to confirm
The display shows the currently set selection.
- Use the ▲▼ keys to select the required adjustment
- Press OK to confirm and to go back to the previous page or press C to exit the menu and to return to the previous page, hence cancelling the change.
2.1.11 Calibrating the thermal probe
This setting lets you calibrate the measurement of the internal and external probe.
- Use the ▲▼ keys to select the option "Calibration"
- Press OK to confirm
If the external probe is set as a floor probe or used for the outside temperature, the selection of the probe will be given.
- Use the ▲▼ keys to select the probe
- Press OK to confirm
If the external probe is not operative, the calibration menu of the internal probe will be displayed directly.
If the external probe is set for measuring the ambient temperature, the calibration menu of the external probe (internal probe inoperative) will be displayed directly.
- Use the ▲▼ keys to change the temperature
- Press OK to confirm and to go back to the previous page or press C to exit the menu and to return to the previous page, hence cancelling the change.

If you RESET the Chronothermostat, the temperature offset determined during the Calibration will be removed.
Flush mounting chronothermostat
2.1.12 Select the function of the external Probe
Select the function of the external probe (default is Not active).
You can select the following:
1: Not active - the probe will not be read
2: Ambient Temp - measures the ambient temperature in lieu of the Chronothermostat internal sensor
3: Floor - measures the temperature of the floor and turns off the load if it exceeds the set value
4: External Temp. - measures the external temperature; when selected, every 2 seconds the outside temperature and the ambient temperature will be displayed alternately (in the same position).
- Use the ▲▼ keys to select the option "External probe"
- Press OK to confirm
- Use the ▲▼ keys to select the function
- Press OK to confirm
If you set the "Floor" function, a screen will be displayed which will let you set the threshold temperature of the probe (range: from 15 to 55°C; default is 35°C).
- Use the ▲▼ keys to change the threshold temperature
- Press OK to confirm and to go back to the previous page or press C to exit the menu and to return to the previous page, hence cancelling the change.
2.1.13 View/Reset the activation Hours
This function enables you to display/reset the functioning hours of the system.
- Use the ▲▼ to select the option "Operation time"
- Press OK to confirm
The display will show the functioning hours of the system.
- Press OK to confirm and to go back to the previous page or, to reset the counter, use the ◀▶ Ikeys to select the "Reset" function
- Press OK to confirm, C to go back to the previous page.
2.1.14 Resetting the Chronothermostat
This lets you totally reset the Chronothermostat; all factory settings will be retrieved.
- Use the ▲▼ keys to select the option "Reset"
- Press OK to confirm
The display will show a confirmation request.
- Press OK to Reset the Chronothermostat and to go back to the previous page or press C to cancel and to return to the previous page.

After executing this operation, the Chronothermostat configuration as well as all the programming operations will be lost!
Flush mounting chronothermostat
3.1 Programming Menu 40
3.1 Programming menu
Here, you will be able to change/program the weekly profiles of the 3 weekly programs for the selected functioning mode (Summer/Winter).
Within these programs, it will be possible to differentiate the temperatures around the clock and for each day of the week.
"PROGRAM 1" is set in advance but can be changed.
Select the weekly program to be customized:
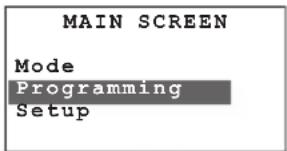
Select "Programming" in the Main menu with the ▲▼ keys

Press OK to confirm
select ▲▼ the progra you want to change
the following functions are available for the selected program:
Use the ◀▶ keys to select the required function

flowchart
graph TD
    A["Rename"] --> B["Modify"]
    B --> C["Copy from"]
    C --> D["Visualize"]
    D --> E["Erase"]
3.1.1 Rename a Weekly program
When you select this function you can customize the name of the program (maximum 13 characters).
- Use the ▲▼ keys to select the Program to be renamed
- Press OK to confirm
- Use the following keys to enter the new name for the Program:
◀▶ to move the cursor
▲ ▼ to scroll the characters - Press OK to save or C to cancel.
The ▲▼ keys scroll alphanumeric characters (only uppercase), numbers and special characters in the following order: A, B, C, D, E, F, G, H, I, J, K, L, M, N, O, P, Q, R, S, T, U, V, Z, 0, 1, 2, 3, 4, 5, 6, 7, 8, 9, space, dot, hyphen, prime.
3.1.2 Change a Weekly program
When you select this function you can change the selected weekly program.
- Use the ▲▼ keys to select the Program to be changed
- Press OK to confirm
- Use the ▲▼ keys to select the day
The following functions are also available for the day selected:
Copy from and View which can be selected with the ◀▶keys
- press OK to confirm the modification function
It is now possible to modify the profile displayed with the navigation keys, as shown specifically in the following pages.
Flush mounting chronothermostat
Copy a daily profile
Copy the program from one day to another.
- Use the ▲▼ keys to select the day you want to copy the profile in
- Select ◀ the function Copy from
- Press OK to confirm
- Use the ▲▼ keys to select the day you want to copy
- Press OK to confirm.
Display a daily profile
Displays the profile of the selected day.
- Use the ▲▼ keys to select the day
- Select ◀▶ the function Display
- Use the ▲▼ keys to scroll all the days of the week
- Press OK or C to exit the viewing mode.
Daily profile modification tools
Information displayed:
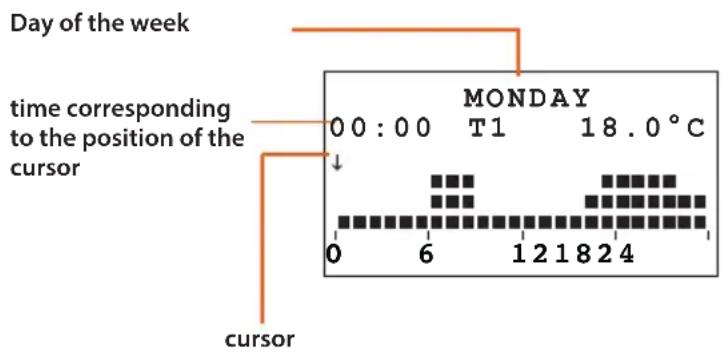

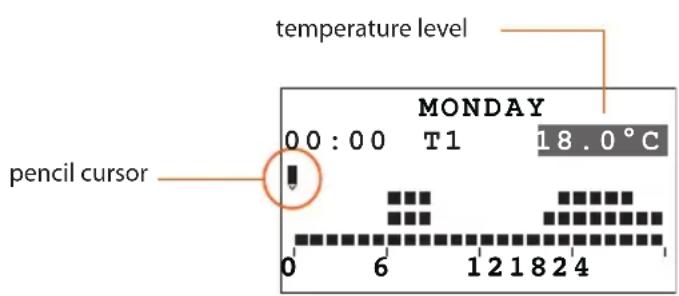
There are two working modes:
• SCROLLING
The arrow-shaped cursor lets you move the cursor, using the ◀▶ keys, along the timeline without making any changes to the daily profile.

• MODIFYING
The pencil-shaped cursor and the temperature level shown let you move the cursor, using the ◀▶, keys, along the timeline in order to set the selected temperature level.
Create a new daily profile
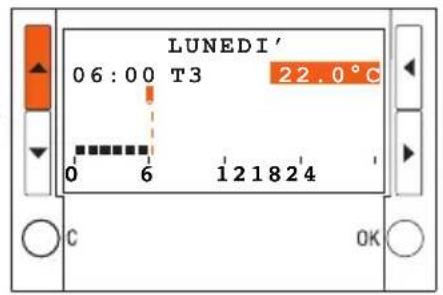
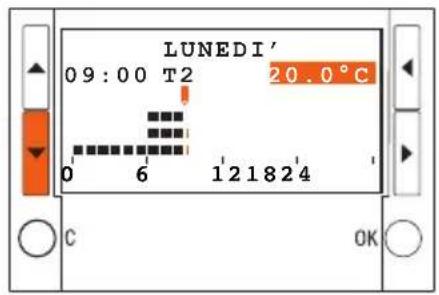
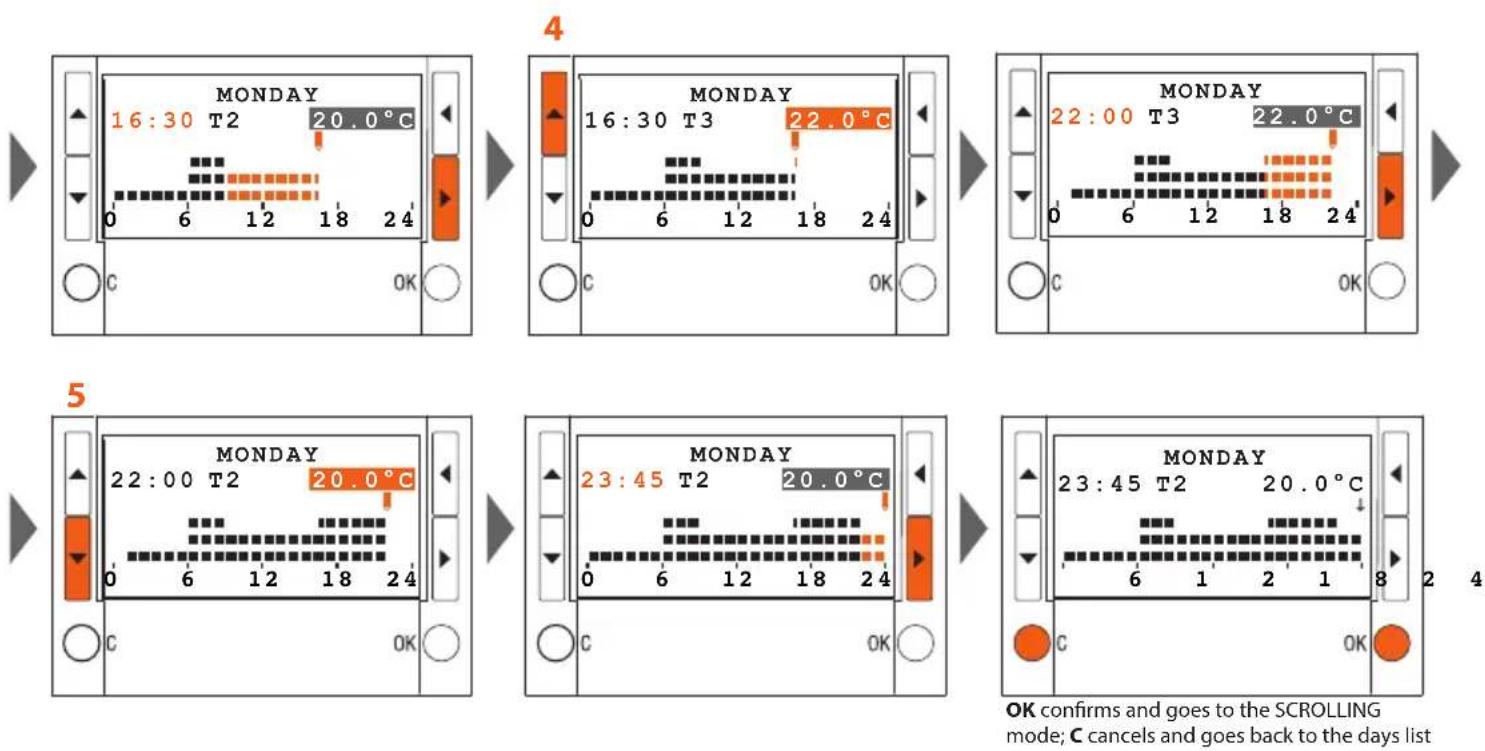
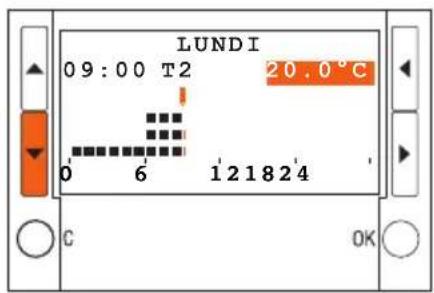
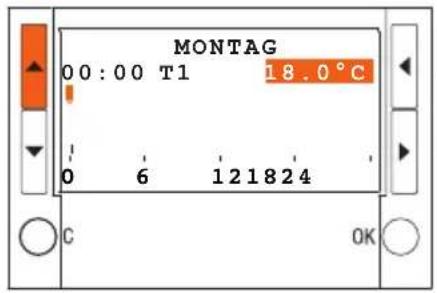
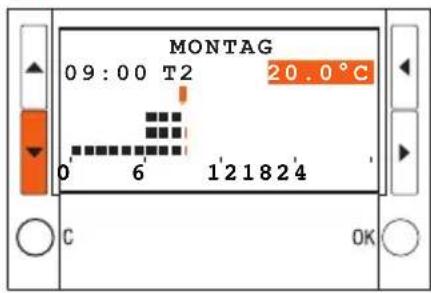
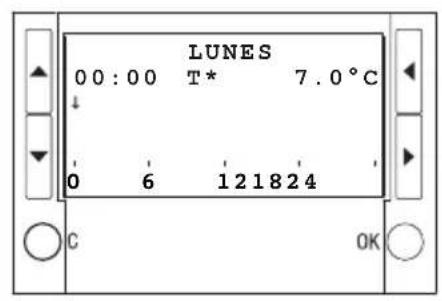
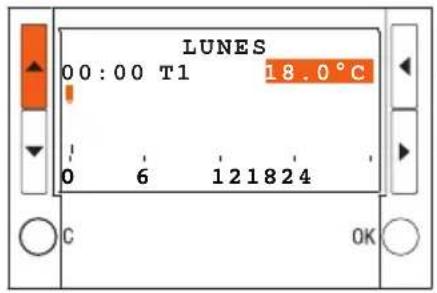
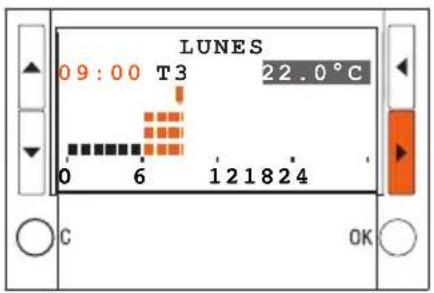
It is recommended to follow the procedure described in this example step by step. It will be useful to get you acquainted with the "Modifying" and "Scrolling" modes and with the navigation keys.
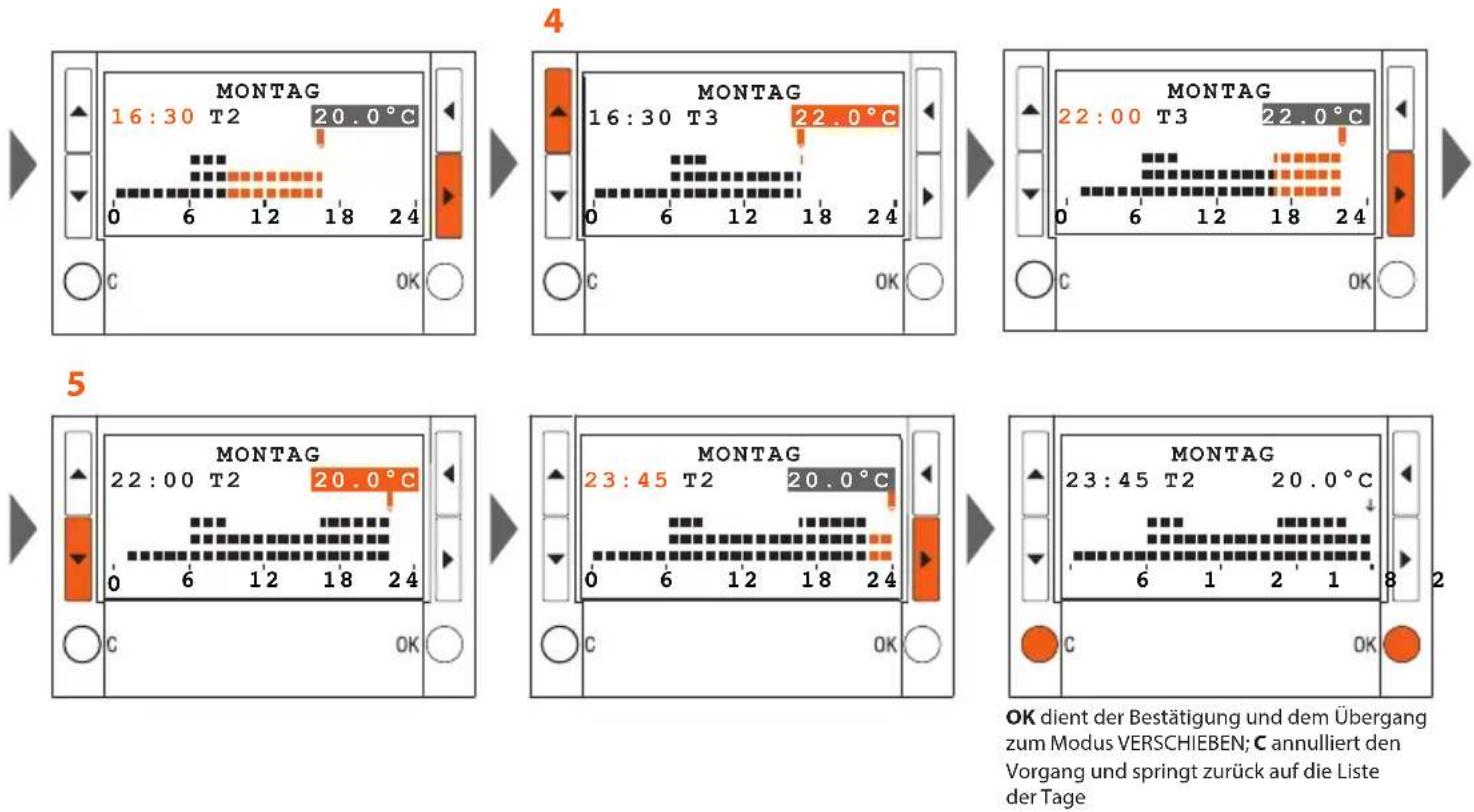
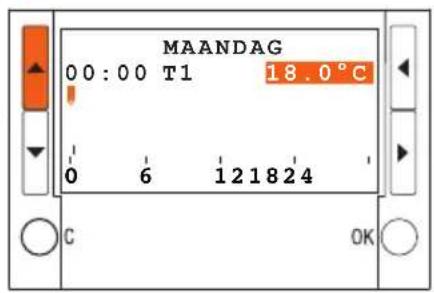
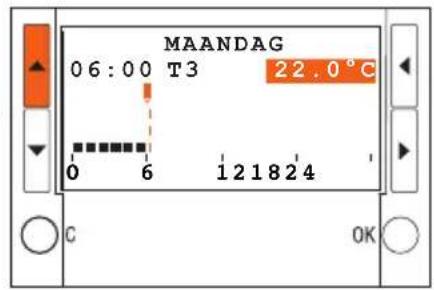
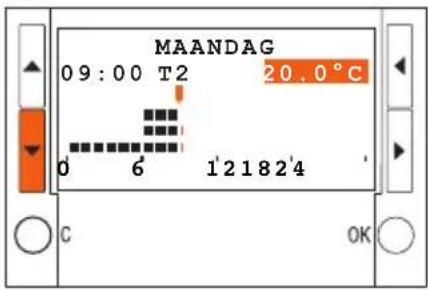
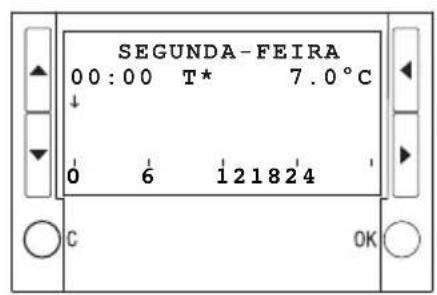
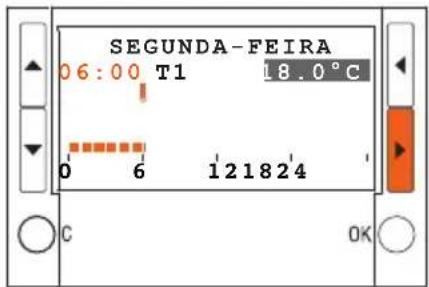
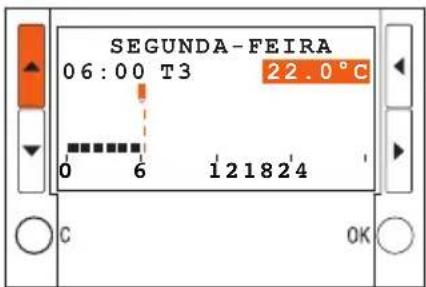
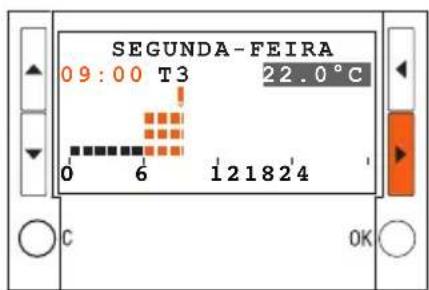
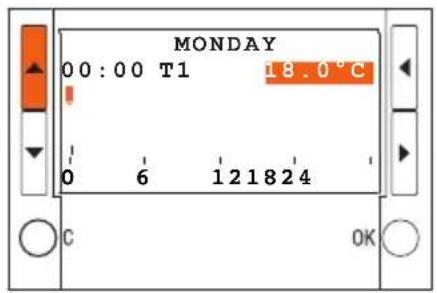
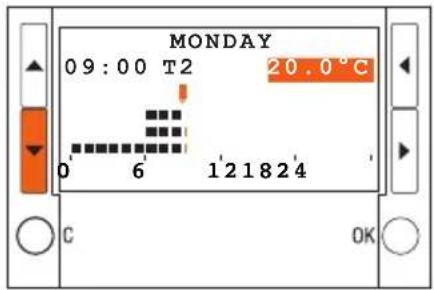
Example: creation of the following daily temperature profile for "Monday" of the "WEEK.WINTER" program.
1 - from h 00:00 to h 06:00 - 18°C (T1)
2 - from h 06:00 to h 09:00 - 22°C (T3)
3 - from h 09:00 to h 16:30 - 20°C (T2)
4 - from h 16:30 to h 22:00 - 22°C (T3)
5 - from h 22:00 to h 24:00 - 20°C (T2)
Temperature levels set
$$ \mathbf {T 1} = 1 8 ^ {\circ} \mathrm{C} \quad \mathbf {T 2} = 2 0 ^ {\circ} \mathrm{C} \quad \mathbf {T 3} = 2 2 ^ {\circ} \mathrm{C} $$
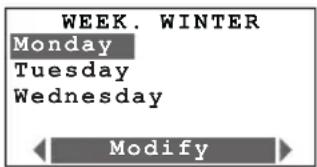
Use the ▲▼ keys to select Mon-day and press OK to confirm the Modify function
After completing the procedure, use the "Copy from" function (See chapter 3.1.2) to copy the "Monday" profile to other days of the "WEEK.WINTER" weekly program.
Flush mounting chronothermostat
Procedure:

1
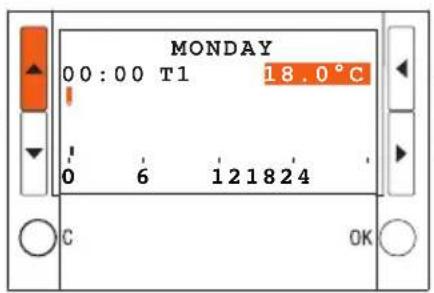

2


3

Flush mounting chronothermostat
3.1.3 Copy a Weekly program
This function lets you copy a weekly program into another one. For example, copy Program 1 (preset at factory) to WEEK. WINTER.
- Use the ▲▼ keys to select the program you want to copy
- Use the ◀▶ keys to select the function Copy from
- Press OK to confirm
- Use the ▲▼ keys to select the program to be copied
- Press OK to confirm
The display will show a confirmation screen
3.1.4 View a Weekly program
This function lets you display (in "scrolling" mode) the profile of the selected day.
- Use the ▲▼ keys to select the program
- Use the ◀▶ keys to select the function View
- Press OK to confirm
- Use the ▲▼ keys to select the day
- Press OK to confirm
The display shows the profile associated with the selected day
- Use the ▲▼ keys let you scroll the daily profiles of the whole week.
3.1.5 Remove a Weekly program
This function lets you to eliminate a customized program and restore the default settings.
- Use the ▲▼ keys to select the program you want to eliminate
- Use the ◀▶ keys to select the function Erase
- Press OK to confirm
The display will show a confirmation request.
- Press OK to confirm
The program will be removed and all default settings will be restored (profile and name).
bticino
Flush mounting chronothermostat
Flush mounting chronothermostat
1.1.2 Le moniteur
Hebdomadaire
Flush mounting chronothermostat
natural_image
Isometric line drawing of a wall-mounted panel with internal structure (no text or symbols)natural_image
3D illustration of a mechanical component with cylindrical parts and an orange arrow indicating direction (no text or symbols)natural_image
Diagram of a battery pack layout with two cells and four terminals (no text or labels)Flush mounting chronothermostat
Flush mounting chronothermostat
Flush mounting chronothermostat
Flush mounting chronothermostat
3.1 Menu programmation 62
3.1 Menu Programmation
Flush mounting chronothermostat
Flush mounting chronothermostat
Procédure:

1


2


3
Flush mounting chronothermostat
Flush mounting chronothermostat
Flush mounting chronothermostat
1.1.2 Das Display
Flush mounting chronothermostat
1.2.4 Modi abrollen
natural_image
Isometric line drawing of a wall-mounted electronic panel or enclosure with internal components (no text or symbols)natural_image
3D diagram showing a mechanical component with two cylindrical parts, one highlighted by an orange arrow (no text or symbols present)Batterien einsetzen
natural_image
Diagram of a battery pack with two cells and four external components (no text or symbols)Flush mounting chronothermostat
2.1 Menü Setup 78
2.1 Menü Setup
Sommer = kühlen, Winter = heizen
Flush mounting chronothermostat
Flush mounting chronothermostat
Flush mounting chronothermostat
3.1 Menü Programmieren 84
3.1 Menü Programmieren
Flush mounting chronothermostat
Flush mounting chronothermostat
Prozedur:

1

2


3
2 4
Flush mounting chronothermostat
Flush mounting chronothermostat
Flush mounting chronothermostat
1.1.2 La pantalla
Semanal
Tecla OK accede al menú Principal - confirmar
Flush mounting chronothermostat
natural_image
Isometric line drawing of a wall-mounted panel with internal components (no text or symbols)
natural_image
3D illustration of a battery pack with an orange arrow indicating direction, next to two cylindrical batteries (no text or symbols)natural_image
Diagram of a battery pack layout with two cells and four terminals (no text or labels)
Flush mounting chronothermostat
2.1 Menú Ajustes 100
2.1 Menú Ajustes
Flush mounting chronothermostat
Flush mounting chronothermostat
Flush mounting chronothermostat
Flush mounting chronothermostat
Flush mounting chronothermostat
Procedimiento:
1

2

3

Flush mounting chronothermostat
3.1.3 Copiar un programa Semanal
Flush mounting chronothermostat
Flush mounting chronothermostat
1.1.2 Het display
Flush mounting chronothermostat
natural_image
3D illustration of a battery pack inside a housing with an orange arrow indicating direction (no text or symbols)Invoer batterijen
natural_image
Diagram of a battery pack with two stacked cells and four external components (no text or symbols)Flush mounting chronothermostat
2.1 Menu Instellingen 122
2.1 Menu Instellingen
Zomer = koeling, Winter = verwarming
Flush mounting chronothermostat
Flush mounting chronothermostat
Flush mounting chronothermostat
3.1 Menu programmatie 128
Flush mounting chronothermostat
Flush mounting chronothermostat
Procedure:

1

2

3

2 4
Flush mounting chronothermostat
Flush mounting chronothermostat
1.1.1 O frontal
Flush mounting chronothermostat
1.1.2 O ecrã
Tecla OK entra no menu Principal – confirma
Flush mounting chronothermostat
1.2.4 Deslocar os modos
natural_image
Isometric line drawing of a wall-mounted device with internal components and labeled dimensions (no text or symbols beyond basic labels)natural_image
3D illustration of a mechanical component with cylindrical parts and an orange arrow indicating direction (no text or symbols)Flush mounting chronothermostat
Flush mounting chronothermostat
2.1.5 Configurar a unidade de medida da temperatura
Flush mounting chronothermostat
Flush mounting chronothermostat
Flush mounting chronothermostat
Flush mounting chronothermostat
Método:
1

2
3


2 4
Flush mounting chronothermostat
3.1.3 Copiar um programa Semanal
Flush mounting chronothermostat
Flush mounting chronothermostat
1.1.2 شاشة العرض
Flush mounting chronothermostat
natural_image
Isometric line drawing of a wall-mounted panel with internal components (no text or symbols)natural_image
3D illustration of a mechanical assembly with cylindrical components and an orange arrow indicating direction (no text or symbols)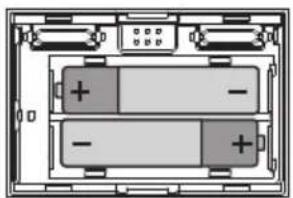
natural_image
Diagram of a battery pack with two cells and four terminals (no text or symbols)تركيب الطارات
Flush mounting chronothermostat
166
2.1 قائمة الإعدادات
2.1 قائمة الإعدادات
Flush mounting chronothermostat
Flush mounting chronothermostat
Flush mounting chronothermostat
172
3.1 قائمة البرجمة
3.1 قائمة البرمجة

flowchart
graph TD
    A["Rename"] --> B["Modify"]
    B --> C["Copy from"]
    C --> D["Visualize"]
    D --> E["Erase"]
Flush mounting chronothermostat
نسخ نمط يومي
Flush mounting chronothermostat
الإجراء:

1

2


3
Flush mounting chronothermostat
Flush mounting chronothermostat
bticino
BTicino SpA
Viale Borri, 231
21100 Varese - Italy
www.bticino.com
Servizo Clienti

Timbro installatore Installer stamp
- Flush mounting chronothermostat
- II display
- General information
- The front side
- The display
- Symbols
- Weekly
- Manual
- Holidays
- Timed
- Antifreeze
- OFF
- External probe
- Battery
- Your Chronothermostat: use it now!
- First activation
- Navigation keys
- View the functioning modes
- Scroll the modes
- Change the Weekly mode
- Change the Manual mode
- Change the Holidays mode
- Change the Timed mode
- Change the Antifreeze mode
- Change the Off mode
- Replacing the batteries
- Putting in the batteries
- Setup menu 34
- Setup menu
- Set the Summer/Winter functioning mode
- Set the Temperature levels
- Set the Date and Time
- Set the Daylight saving time
- Set the measurement unit of the temperature
- Enable/Disable the Remote control
- Adjust the Display contrast
- Select the Screen Saver
- Please note:
- Select the Language
- Select the Temperature adjustment
- Calibrating the thermal probe
- Select the function of the external Probe
- View/Reset the activation Hours
- Resetting the Chronothermostat
- Programming Menu 40
- Programming menu
- Rename a Weekly program
- Change a Weekly program
- Copy a daily profile
- Display a daily profile
- Daily profile modification tools
- • SCROLLING
- • MODIFYING
- Create a new daily profile
- Copy a Weekly program
- View a Weekly program
- Remove a Weekly program
- Le moniteur
- Hebdomadaire
- Menu programmation 62
- Menu Programmation
- Das Display
- Modi abrollen
- Batterien einsetzen
- Menü Setup
- Menü Programmieren
- La pantalla
- Semanal
- Menú Ajustes
- Copiar un programa Semanal
- Het display
- Invoer batterijen
- Menu Instellingen
- O ecrã
- Deslocar os modos
- Configurar a unidade de medida da temperatura
- Copiar um programa Semanal
- قائمة الإعدادات
- قائمة البرمجة
- bticino
- BTicino SpA
Brand : BTICINO
Model : HD4451
Category : Thermostat