RSM1001 - Saw Ferm - Free user manual and instructions
Find the device manual for free RSM1001 Ferm in PDF.


| Product Type | Circular Saw |
| Brand | Ferm |
| Model | RSM1001 |
| Power Input | 1200 W |
| Blade Diameter | 160 mm |
| Max Cutting Depth at 90° | 55 mm |
| Max Cutting Depth at 45° | 40 mm |
| Bevel Adjustment | 0° - 45° |
| No-Load Speed | 5000 rpm |
| Voltage / Frequency | 230 V / 50 Hz |
| Weight | 3.5 kg |
| Dimensions (L x W x H) | 320 x 250 x 200 mm |
| Main Functions | Rip cuts, cross cuts, bevel cuts, plunge cuts |
| Safety Features | Blade guard, safety switch, anti-kickback, spindle lock |
| Maintenance and Cleaning | Clean dust vents regularly; check carbon brushes every 50 hours; lubricate moving parts |
| Spare Parts and Repairability | Replacement blade, carbon brushes, power cord available; service centers |
| General Information | For DIY and professional use; double insulated; CE certified |
Frequently Asked Questions - RSM1001 Ferm
User questions about RSM1001 Ferm
0 question about this device. Answer the ones you know or ask your own.
Ask a new question about this device
Download the instructions for your Saw in PDF format for free! Find your manual RSM1001 - Ferm and take your electronic device back in hand. On this page are published all the documents necessary for the use of your device. RSM1001 by Ferm.
USER MANUAL RSM1001 Ferm
natural_image
Diagram showing a mechanical component with arrows indicating direction (no text or symbols)Fig.D

natural_image
Diagram of a mechanical tool interacting with a bracket, showing a cutting tool and rotating arm (no text or symbols)Fig.B
natural_image
Illustration of a tool cutting through water with a flat blade (no text or symbols)Fig.E
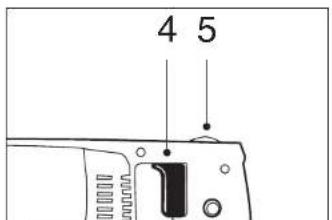
Fig.C

Ferm 47
SPARE PARTS LIST FRS-600
REF NR DESCRIPTION FERM NR
| 001 ADJUSTABLE BOTTOM PLATE 408500 | |
| 002 GUARD PLATE 408501 | |
| 003 RUBBER SLEEVE 408502 | |
| 007 BLADE HOLDER 408503 | |
| 014 RECIPROCALING BAR 408504 | |
| 015 SLIDING BEARING 408505 | |
| 019 ADJUSTING SPEED PLATE 408506 | |
| 021 large cover sheet 408507 | |
| 024 ROLLER BEARING 408508 | |
| 027 ROLLER SHAFT 408509 | |
| 028 GEAR WHEEL 408510 | |
| 029 WASHER 408511 | |
| 030 CENTRE COLUMN 408512 | |
| 032 CARBON BRUSH SET | 408513 |
| 033 CARBON BRUSH HOLDER | 408514 |
| 037 SWITCH | 408515 |
| 052 ROTOR | 408516 |
| 057 STATOR | 408517 |

RECIPROCATINGSAW
THE NUMBERS IN THE FOLLOWING TEXT CORRESPOND WITH THE PICTURES AT PAGE 2
TECHNICAL SPECIFICATIONS
| Voltage | 230V~ |
| Frequency | 50 Hz |
| Power input | 600 W |
| No load speed | 300-2000/min |
| Maximum cutting thickness | 115 mm |
| Stroke length | 30 mm |
| Weight | 3.3 kg |
| Lpa (sound pressure level) | 86 dB(A) |
| Lwa (sound pressure capacity) | 99 dB(A) |
| Vibration value | 8.9 m/s2 |
PRODUCT INFORMATION
Fig.A
- Blade
- Footplate
- Blade clamp screw
- Triggerswitch
- Speed control
- Triggerlock button
- Triggerlock button
- Mainlead
- Mainshead
- Footplate length adjustment screws
- 3 mm hexagon key (not shown)
- 4mm hexagon key (not shown)
SAFETY INSTRUCTIONS
The following pictograms are used in these instructions for use:

Denotes risk of personal injury, loss of life or damage to the tool in case of non-observance of the as in this manual.

Denotes risk of electric shock.
Carefully read this manual before using the machine. Make sure that you know how the machine functions and how to operate it. Maintain the machine in accordance with the instructions to make sure it functions properly. Keep this manual and the enclosed documentation with the machine.
When using electric machines always observe the safety regulations applicable in your country to reduce the risk of fire, electric shock and personal injury. Read the following safety instructions and also the enclosed safety instructions. Keep these instructions in a safe place!
ADDITIONAL SAFETY INSTRUCTIONS
The machine must not be damp and must not be operated in a wet environment. Always inspect cable and plug before using machine. Only have damage repaired by a qualified professional. Only insert the plug into the mains socket when the machine is switched off. Wear protective gloves and sturdy footwear.

Do not saw materials containing asbestos!!!
- Wear protective goggles when working with materials which produce large amounts of chips.
- Wear a protective mask when sawing other fibrous materials.
- Portable equipment used outdoors must be connected with a fault-current circuit breaker.
- Extension cables and plugs must be approved for outdoors.
- Remove adjusting keys and wrenches before turning the tool on.
- Secure your workpiece with clamps. Always lead cable away from machine towards the rear.
- Move machine towards the workpiece only when switched on.
• Always hold machine with both hands and ensure that you have a safe footing while working. - The machine may be operated only with the foot plate mounted. When sawing, the foot plate must always rest on the workpiece.
• Always remove the plug from the mains socket before carrying out any work on the machine.
• Do not carry the machine by the cable. - Incorrect handling may damage the machine. Therefore always comply with the following instructions.
- Use only sharp saw blades in perfect condition; replace cracked, distorted or blunt saw blades immediately.
• Machine should only be switched on with blade installed - Select tools, stroke rate and pendulum actions according to material, Take care to maintain a constant reed rate.
- Do not attempt to stop the saw blade with lateral pressure after switching off.
• Only use genuine accessories. - Always use the correct supply voltage. The voltage specifications on the rating plate must correspond with the mains voltage. Equipment marked with 230 V can also be connected to 220-240 V.
IMMEDIATELY SWITCH OFF THE MACHINE WHEN:
- Excessive sparking of the carbon brushes and verticiliosis in the collector.
- Interruption in the mains plug, mains lead or mains lead damage.
- Defect switch
• Smoke or stench of scorched insulation.
ELECTRICAL SAFETY

Always check that the power supply corresponds to the voltage on the rating plate.
Your machine is double insulated in accordance with EN 50144; therefore no earthwire is required.
Replacing cables or plugs
Immediately throw away old cables or plugs when they have been replaced by new ones. It is dangerous to insert the plug of a loose cable in the wall outlet.
Using extension cables
Only use an approved extension cable suitable for the power input of the machine. The minimum conductor size is 1.5 mm ^2 . When using a cable reel always unwind the reel completely.
OPERATION
CHANGING/FITTING THE BLADE
Fig.B

Ensure the machine is unplugged.
- Loosen the grub screw with the 3 mm hexagon key.
- Insert the saw blade between the stroke rod and the clamping plate.
• Take care that the securing pin of the stroke rod engages in the hole of the saw blade. (Saw blade can not be pulled out).
• Retighten the grub screw. - When changing the saw blade, take care that the blade holder is free of material residue (e.g. wood or metal shavings).
- Before using the saw make sure the saw blade is secure.
USE
Fig.C

Make sure that the saw blade does not rest on or touch any objects when the machine is switched on.
Switching on
- Put the on-off trigger switch (4).
Switching off
- Release the on-off trigger switch.
- The on-off trigger switch can be locked on for continuous operation by pressing the trigger lock button whilst pulling the trigger.
• To release the trigger lock, simply pull the trigger switch again.
SPEED CONTROL
- During operation and whilst the machine is at rest the stroke rate (speed) can be selected using the thumbwheel (S). The stroke rate will remain constant even under load.
- The stroke rate required depends upon the material conditions. The optimal setting should be determined in use.
• After working for longer periods at low speed you should allow the machine to cool down by running it at maximum speed with no-load for approx. 3 minutes.
• To allow the foot plate to follow and securely rest on the workpiece, the angle of the footplate can be adjusted as shown in the diagram.
- The footplate can also be extended by loosening the two footplate length adjustment screws (Fig. A8) using the 4 mm hexagon key and then pulling the footplate out to the required length.

Ensure the footplate adjustment screws are secure before resuming work.
SAWING TIPS
- Adjust saw blade and stroke rate to suit the material to be processed. For right radius curves it is best to use a narrow saw blade. Apply coolant or lubricant to deal with the beat produced along the cut line when sawing metal.
- Check wood, chip boards, building materials etc, for foreign bodies (nails, screws etc.), before sawing and remove them, if necessary.
- Clamp material well. Do not support the workpiece with hand or foot. Do not touch objects or the floor with the saw running (danger of backlash).
- Material containing asbestos must not be sawn! - Put the footplate on the surface of the workpiece, and saw through it with constant contact pressure or feed. If the saw blade seizes switch the machine off immediately. Spread the gap with a suitable tool and pull out the saw blade.
• After finishing work, switch off the machine and only put down after it has come to a complete standstill.
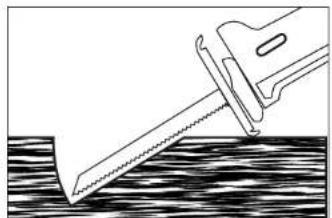
PLUNGECUTTING
Fig.E
- Plunge cutting may only be used on soft materials such as wood, aerated concrete, gypsum plaster boards, etc.
• However, this requires a certain practise and is only possible with short saw blades.
- Place the saw onto the workpiece and switch it on. - Ensure that the bottom edge of the footplate rests on the workpiece surface as shown.
- Slowly saw into the workpiece at an angle, moving the saw to a vertical position and continue to saw along the cutting line.
- Switch the saw off and lift off the workpiece when the work is complete.
FLUSHSAWING
- Elastic bi-metal saw blades allow you to saw projecting objects (e.g., water pipes, iron bars, etc.) flush against the wall.
- Apply the saw blade directly to the wall and bend slightly so that the footplate rests against the wall.
- Switch the machine on and saw off the workpiece keeping constant lateral pressure against the wall.
There are no user servicable parts in this unit. Any repairs or servicing should be carried out by qualified service en-gineers.
TROUBLESHOOTING
In case the machine does not work well, we give you some possible causes and solutions.
• The cool ventilation slots in the motor are stopped up with dirt.
Clean the cool ventilation slots.
• The motor is defect. Have your machine repaired or checked by your local Ferm dealer.
2. The connected machine does not work
- Interruption in the mains connection. Check mains connection for fracture. Have your machine repaired/checked by your local Ferm dealer.

Repairing of electric appliances may be carried out only by experts.
MAINTENANCE

Make sure that the machine is not live when carrying out maintenance work on the motor.
The Ferm machines have been designed to operate over a long period of time with a minimum of maintenance. Continuous satisfactory operation depends upon proper machine care and regular cleaning.
Clawling Keep she
Keep the ventilation slots of the machine clean to prevent overheating of the engine.
Regularly clean the machine housing with a soft cloth, preferably after each use. Keep the ventilation slots free from dust and dirt.
If the dirt does not come off use a soft cloth moistened with soapy water. Never use solvents such as petrol, alcohol, ammonia water, etc. These solvents may damage the plastic parts.
Lubrication
The machine requires no additional lubrication.
Faults
Should a fault occur, e.g. after wear of a part, please contact your local Ferm dealer. In the back of this manual you find an exploded view showing the parts that can be ordered.
ENVIRONMENT
In order to prevent the machine from damage during transport, it is delivered in a sturdy packaging. Most of the packaging materials can be recycled. Take these materials to the appropriate recycling locations.
Take your unwanted machines to your local Ferm-dealer. Here they will be disposed of in an environmen-tally safe way.
GUARANTEE
The guarantee conditions can be found on the separately enclosed guarantee card.
CE DECLARATION OF CONFORMITY (UK)
We declare under our sole responsibility that this
product is in conformity with the following
standards or standardized documents
EN50144-1, EN50144-2-11
in accordance with the regulations.
98/37/EEC.
73/23/EEC
89/336/EEC
1.2.2.20
from 04-10-2002
GENEMUIDEN NL
W. Kamphof
Quality department

D)
Deutsch
SÄBELSÄGE
- Storing in de netstelker, netsnoer of snoerbeschadiging.
• Defectreschakelaar
vanaf04-10-2002 GENEMUIDEN NL W. Kamphof Quality department
F Français
SCIERECIPRO
LES CHIFFRES DU TEXTE SUIVANT CORRESPONDENT AUX ILLUSTRATIONS PAGE 2
INFORMATIONS PRODUIT
A GÉPET AZONNAL KAPCSOLJA KI, HA:
98/37/EEC 73/23/EEC 89/336/EEC
dal 04-10-2002 GENEMUIDEN NL W. Kamphof Quality department

H Magyar
SZÚRÓFűRÉSZ
AZ ALÁBBI SZÖVEGBEN SZEREPLÖ SZÁMOK MEGFELELNEKA 2. OLDAL KÉPEINEK
MÜSZAKI ADATOK
W. Kamphol Quality department


a partir de 04-10-2002 GENEMUIDEN NL W. Kamphof Quality department

SÅGNINGSTIPPS
frán 04-10-2002 GENEMUIDEN NL W. Kamphof Quality department


Suomi
OSKILLOIVA SAHA
SEURAAVAN TEKSTIN NUMEROT VASTAAVAT SIVULLA 2 OLEVIEN KUVIEN NUMEROITA
TEKNISET TIEDOT
The Ground Truth image displays a single, solid horizontal line. According to Rule 2 (UNDERSCORE & LINE RULES), if the GT contains lines used for stylistic emphasis or as background (like ruled paper), the OCR result must ignore them. The OCR content provided is "____", which represents four underscores. This is incorrect because underscores are not equivalent to a solid line in this context; they are a different character often used as placeholders. Since the OCR output incorrectly rendered a stylistic line as underscores (it’s a continuous line), this violates the rule that stylistic/background lines must be ignored. Therefore, the OCR result is inconsistent with the Ground Truth.
CE ERKLÆRING AV ANSVARSFORHOLD (N)
97/37/EEC, 73/23/EEC
89/336/EEC
frà 04-10-2002
GENEMUIDEN NL
W. Kamphof
Quality department

Español
SIERRA RECIPRO
98/37/EEC, 73/23/EEC 89/336/EEC
04-10-2002 GENEMUIDEN NL W. Kamphof Quality department


STEMPELSAG
VERC | 3,5 Kg Lys (hydroxide) | BF, dR(A)


- SPARE PARTS LIST FRS-600
- RECIPROCATINGSAW
- PRODUCT INFORMATION
- SAFETY INSTRUCTIONS
- ADDITIONAL SAFETY INSTRUCTIONS
- IMMEDIATELY SWITCH OFF THE MACHINE WHEN:
- ELECTRICAL SAFETY
- Replacing cables or plugs
- Using extension cables
- OPERATION
- CHANGING/FITTING THE BLADE
- Fig.B
- USE
- Fig.C
- Switching on
- Switching off
- SPEED CONTROL
- SAWING TIPS
- PLUNGECUTTING
- FLUSHSAWING
- TROUBLESHOOTING
- The connected machine does not work
- MAINTENANCE
- Clawling Keep she
- Lubrication
- Faults
- ENVIRONMENT
- GUARANTEE
- CE DECLARATION OF CONFORMITY (UK)
- D)
- Deutsch
- SÄBELSÄGE
- F Français
- SCIERECIPRO
- INFORMATIONS PRODUIT
- A GÉPET AZONNAL KAPCSOLJA KI, HA:
- H Magyar
- SZÚRÓFűRÉSZ
- MÜSZAKI ADATOK
- SÅGNINGSTIPPS
- OSKILLOIVA SAHA
- TEKNISET TIEDOT
- CE ERKLÆRING AV ANSVARSFORHOLD (N)
- frà 04-10-2002
- Español
- SIERRA RECIPRO
- STEMPELSAG
Brand : Ferm
Model : RSM1001
Category : Saw