
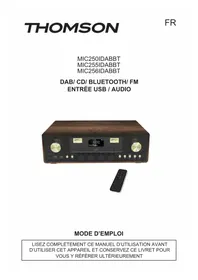
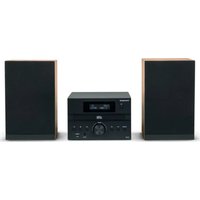
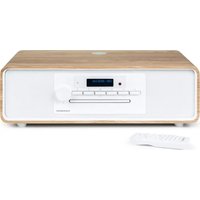
MIC122BT - Hi-Fi System THOMSON - Free user manual and instructions
Find the device manual for free MIC122BT THOMSON in PDF.
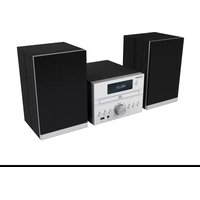


| Product Type | Hi-Fi System |
| Brand | Thomson |
| Model | MIC122BT |
| Dimensions (W x H x D) | 460 x 230 x 235 mm |
| Power Supply | 100-230 V, 50/60 Hz |
| Power Consumption (Standby) | 0.6 W |
| RMS Output Power | 10 W |
| Peak Power | 40 W |
| Speaker Type | Broadband 3" (5W x 2) |
| Speaker Impedance | 6 Ω |
| Frequency Response | 60 Hz - 20 kHz |
| Signal-to-Noise Ratio | ≥ 75 dB |
| Bluetooth Version | 5.0 |
| Bluetooth Range | Up to 10 m |
| Bluetooth Pairing Name | MIC122BT |
| FM Frequency Range | 88.8 - 108 MHz |
| CD Playback | Yes (CD/MP3) |
| USB Playback | Yes |
| Auxiliary Input | Yes (3.5 mm jack) |
| Remote Control | Yes |
| Alarm Clock | Yes |
| Auto Standby | Yes (after 10 min inactivity) |
| Antenna | FM telescopic |
| Equalizer | Preset EQ modes |
Frequently Asked Questions - MIC122BT THOMSON
User questions about MIC122BT THOMSON
0 question about this device. Answer the ones you know or ask your own.
Ask a new question about this device
Download the instructions for your Hi-Fi System in PDF format for free! Find your manual MIC122BT - THOMSON and take your electronic device back in hand. On this page are published all the documents necessary for the use of your device. MIC122BT by THOMSON.
USER MANUAL MIC122BT THOMSON
USER INSTRUCTIONS
BEFORE USING THIS DEVICE, PLEASE READ THIS MANUAL CAREFULLY AND KEEP IT FOR FUTURE REFERENCE.
Controls
Input/Output
BELGIUM, customerservice@bigben-interactive.be
NETHERLANDS, customerservice@bigben-interactive.nl
SPAIN, soporte@metronic.com
Tel.: 93 713 26 25
USER INSTRUCTIONS
PLEASE READ THIS USER MANUAL CAREFULLY BEFORE OPERATING THE UNIT AND RETAIN FOR FUTURE REFERENCE.
| Getting started 20 | Menu | 29 | |
| Safety warning and notice 20 | Warning about batteries 33 | ||
| Contents of the box 22 | Environmental protection | 34 | |
| Description of parts 22 | Additional information | 35 | |
| Before starting 25 | Declaration of conformity | 35 | |
| Operation | 25 | Warranty | 35 |
| Use | 26 |
Getting started
• Take the device out of the box. - Remove all the packaging from the product. - Place the packaging inside the box or dispose of it safely in compliance with the waste sorting instructions shown on the outside.
Safety warning and notice
You must read and understand all the instructions before using this device. The warranty will not apply if damage is caused by failure to follow the instructions.

- Never remove the device casing.
- Never place this device on top of other electrical equipment.
- Protect the power cable from being stepped on or pinched, particularly at the plugs, sockets, and the point where it exits the device. Make sure that the power rating corresponds to the voltage shown on the rating plate at the rear of the device. Always pull the plug from the socket when disconnecting from the mains. Never pull on the cable. Ensure you have completed all the other connections before connecting the mains plug.
- Only use attachments/accessories that are recommended by the manufacturer.
- Entrust all device repairs to qualified repairers. Repair is needed when the device has been damaged in any fashion, and in particular:
- if the power cable is damaged;
- in the event of a liquid spill or objects being inserted into the device;
- if the device is exposed to rain or dampness;
- if the device does not operate normally;
- or if the device has been dropped or impacted.
- The series panel is located on the bottom of the device.
- Never block the air vents.
- Make sure you have enough space for ventilation. Place the product on a stable surface.
- This device must be used in a moderate climate, away from direct sunlight, naked flames or sources of heat, heaters, cookers or any other devices (including amplifiers) that generate heat. Do not install near a heat source.
- The batteries (battery pack or inserted batteries) must not be exposed to excessive heat, such as sunshine, fire, etc.
- Always unplug the device before cleaning it. Never lubricate any part of this device. Clean it using a soft cloth. Do not use abrasive products or harsh cleaners.
- Ensure that you always have easy access to the power cable, plug or adapter to disconnect this device from the mains if necessary.
- Do not use this device near water. It must not be dripped on or splashed. Do not use this device in a damp or wet environment.
- Disconnect this device in the event of a storm, or if you intend not to use it for a long period of time.
- This device can be used by children aged 8 and over, and by persons with a physical or sensory disability, learning difficulties or a lack of experience and knowledge, provided they are supervised or have received instructions on the safe use of the device, and they understand the risks involved. Children must not play with the device or the power cable (risk of strangulation). Children must not clean or maintain the device without supervision.
- This device must only be supplied with very low safety voltage as indicated on the device.
- The battery should be removed from the device before disposal. The device must be disconnected from the power supply when removing the battery.
- When in operation, the device must be at a minimum distance of 20 cm from the human body.
- This device is for household use only; do not use outdoors.

WARNING:
Class 1 Laser Product

Warning: do not touch the laser lens.

The lightning bolt symbol within an equilateral triangle alerts users to the presence of dangerous uninsulated voltages, inside the device, that may present a risk of electric shock.

The exclamation mark inside a triangle indicates the presence of important operating and maintenance (repair) instructions in the literature accompanying the device.
| Class II material |  |
| Direct current |  |
| Alternating current |  |
| For indoor use only |  |
Contents of the box
Check and identify the contents of your box:
- Main appliance
- Remote control
- Aux-in cable
- User manual
- Power cable
- FM antenna
Description of parts
Controls
- Previous
- Play/→ Enter
- Next
- Power on/off
- Mode
- Stop CD
- Eject CD
- Volume adjustment
- Line in
- USB reading port

Input/Output
- FM antenna
- AC mains
- Speaker connector
Remote control
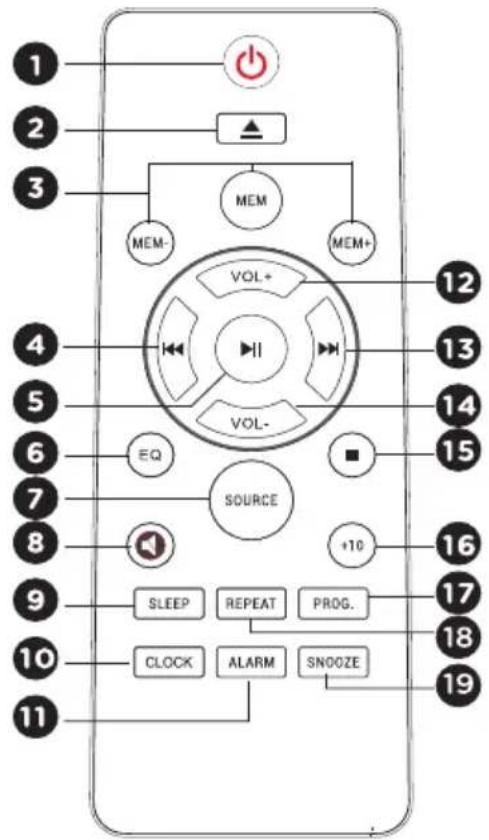
Remote control functions:
- ON/OFF
- Mute
- Mode
- Brightness dimmer
- Volume +
- Back (Previous track)
- Play/Pause/Enter
- Next (Next track)
- Volume –
- Stop
- Info
- Previous saved station
- Next saved station
- Save current station
- Low +/-
- Repeat/Shuffle
- Menu
- Treble +/- (Adjusting the treble)
- Equaliser
Before starting
Position the device where you want it. Insert the plug into the electrical outlet and switch it on if necessary.
Mains power supply of the device: 230V 50Hz
Insert the mains plug into the wall socket (230 V).
Warning:
- Before using the unit, check that the power supply is compatible with the 230V (50 Hz) rating of the unit.
- Do not plug or unplug the power cord with wet hands.
- When you are planning not to use the appliance for a prolonged period (holiday, etc.), disconnect the plug from the mains outlet.
- When you disconnect the plug from the power outlet, hold the end of the plug; do not pull on the cord to avoid electric shocks caused by the damaged cable.
Automatic standby
When you are playing audio from a connected accessory, the micro sound system automatically goes into standby mode if:
- you don't press any buttons for 10 minutes:
- the connected accessory has not sent any audio data for 10 minutes.
Operation
Press the POWER button to turn the device ON or OFF.
Adjust the volume with the remote control
Press the Volume + button to increase the volume and the Volume - button to decrease the volume.
Check the screen display, which should confirm the volume adjustment.
Mute function
Press the 🔒 button on the remote control. The volume is muted and the word "Mute" appears on the LCD screen. Press this button again to cancel the mute function.
Set the clock (in standby mode)
- Press CLOCK to "SET CLOCK", press ▶II to confirm and the "24H" symbol will flash.
- Press or to choose the 24h format or 12h format, then press to confirm.
- Press or to set the current time, press to confirm and the minutes will flash.
- Press ▶II to save the time setting.
Setting the alarm (in standby mode)
- Once you have set the clock, you can set an alarm.
- "Alarm Setup" is displayed. Press the button to make your choice.
- Press or to set the current time, press to confirm. The minutes start flashing.
- Press or to set the current minutes and press to confirm.
- Press ◀◀ or ▶▶ to adjust the alarm volume.
- Press or select the alarm source (buzzer, FM, CD, USB) and press .
- Press or to adjust the alarm duration. You can choose between 15, 30, 45 and 60 minutes. Press to confirm.
- Press ◀◀ or ▶▶ to save the alarm settings.
Use
Carefully deploy the telescopic aerial.
Press the POWER button to turn on the device, which will automatically switch to CD mode.
CD playback
Playing a compact disc (CD/MP3)
NOTE: Never touch the laser lens located inside the CD player. Clean the laser lens using a cleaning disk if it becomes dirty.
- Press the SOURCE button repeatedly to select the CD function.
- Press the ▲ button to open the CD holder, insert the CD (with the printed side facing up), then press the ▲ button again.
- The CD will spin for a few seconds before automatically playing the first track.
- Press the ▶II button to pause playback. Press the ▶II button to resume playback.
- Press the ■ button to stop playback, and press the ▶ button to restart playback from the beginning.
- Press ▲ to open the CD player.
Previous track / Next track
- Use the ◀◀ and ▶▶ buttons to move from one track to another, or to play a track in fast forward mode by pressing and holding the button.
- Press the 🖼 button once to listen to the start of the current track. Press it twice or more to listen to the previous tracks on the disk.
- Press the ▶ button to listen to the next track on the disk.
- Press and hold the 🖼 button. The current track goes back to the previous track(s); when the disk has reached the required part of the track, release the button: normal play resumes.
- Press and hold the 🖼 button; the current track is fast-forwarded to the next track(s). When the disk has reached the required part of the track, release the button: normal play resumes.
Repeat function
The button is used to repeat the same track or all the tracks of a CD.
- Press the button once during playback; The LCD screen displays "REP 1". The same track is repeated continuously.
- Press the button a second time to repeat all the tracks. The LCD screen displays "REP All".
- Press the button three times to start random playback. The screen will display "RANDOM".
- To cancel repeat play, press the REPEAT button several times until "REP OFF" is displayed.
USB reader
Music playback via USB
This device was designed with the latest technical innovations in the field of USB. However, given the wide selection of USB storage devices available on the market, we cannot guarantee compatibility with every device. For this reason, in certain rare cases it may be difficult to go back to the previous song from a USB device. This is not a device malfunction.
- Press the SOURCE button repeatedly until the screen displays "USB".
- Directly connect a USB storage drive to the USB port. The screen will quickly display the number of folders and then the total number of tracks. Playback will start automatically after a few seconds.
- The buttons work in the same way as for the CD player. Check out the aforementioned section on CDs.
NOTE:
• Always connect a USB storage drive directly to the USB port to avoid any malfunction. - The USB port is not designed for charging external devices. - Important: Change the device mode before removing the USB storage device.
Bluetooth mode
You need to carry out several steps to connect your mobile phone:
- Activate Bluetooth on your mobile phone (refer to the instructions for your phone).
- Push the POWER button to turn on the unit, then press the SOURCE button repeatedly until the LCD screen displays "Bluetooth". It will then be ready to be paired
automatically.
- Using your mobile phone, search for the Bluetooth device called "MIC122BT".
- Your mobile phone will detect the "MIC122BT" and will ask you if you want to connect.
To connect, enter the password 0000 (if applicable). Once the connection is made, the
"Connected" symbol will appear on the LCD screen.
Automatic connection with your smartphone
Pairing is only necessary when you first use the appliance with the phone. Once the device has been paired with the phone, it will connect to the appliance automatically when it is turned on and Bluetooth is activated on the phone. The next time you turn on the appliance, it will automatically connect to the mobile phone it was last connected to.
Press and hold the button to disconnect the Bluetooth.
Playing from a Bluetooth device
Once the Bluetooth has been paired, press the ▶ button to play. Press the ▶ or button to switch to the previous or next track. To pause or resume play, press the ▶ button again.
FM radio
Carefully extend the telescopic aerial until fully deployed.
On the FM version, check that the cable is untangled.
Automatic search
- Press the SOURCE button to select FM mode.
- Press and hold the ▶ button. The radio will scan the frequencies and stop automatically when it finds a station with a strong enough signal.
- The display updates after a few seconds. The screen shows the frequency of the station.
- To find other stations, press and hold the ▶ button as before.
- To scan the FM band in reverse (from high frequencies to low frequencies), press and hold the MEM+ button for 2 seconds.
- Once the end of the frequency range is reached, the device begins searching for frequencies again, starting from the other end of the range.
- Press MEM to display the preset radio stations.
- Press MEM- or MEM+ (on the main unit) or MEM- or MEM+ (on the remote control) to select the stored station and start listening.
Manual search
- Press MEM- or MEM+ (on the remote control) to choose the station. Every time you press the frequency adjustment button, the frequency increases or reduces by 50 kHz.
- Once you find a station that you want to store, press and hold the + button and the store preset station symbol and station number will appear on the screen. Press MEM- or MEM+ to choose the station and press ▶II to confirm and store the current station.
- Press MEM to view and listen to the radio station.
- Press MEM- or MEM+ to choose the preset station to listen to the radio.
Preset
- Preset recall (choose station):
Press MEM to choose the station stored in the preset radio stations.
- Storing preset stations (choose station):
You can store your favourite FM stations in the station preset memory. There are 50 presets in the radio's memory. The presets are stored in the radio in the event of a power cut.
In FM mode, select the required frequency range. Press MEM- or MEM+ to view the stored stations. Press MEM- or MEM+ to select the required station as described previously, then press and hold MEM+ to choose the preset number you want to store the station on. Press MEM to confirm.
Aux-in
Aux-in jack
- Press SOURCE button repeatedly to choose the Aux-in mode, and the screen will display "LINE-IN".
- Plug the Aux jack cord from your personal player (e.g. portable MP3 player) into the Aux-in jack socket.
- Start playback from your personal player.
This product contains one or more batteries.
- Use batteries correctly to prevent any injury or fire caused by a leak, overheating, explosion, erosion or other damage.
- Keep new and used batteries out of the reach of children or any vulnerable person. Stop using the device if the battery compartment does not close properly.
- If the liquid from an alkaline battery comes into contact with skin or eyes, rinse immediately with fresh water and consult a physician.
- If an alkaline battery leaks, clean the liquid with a cloth and replace the battery with a new one.
- Do not swallow batteries. If swallowed, a battery can cause severe internal burns in 2 hours and can cause death. If batteries are swallowed, contact a poison centre immediately and consult a physician.
- Use AA Ni-MH, alkaline or lithium batteries.
- Do not charge these batteries. Charging non-rechargeable batteries generates gas or heat emissions that can cause explosions or fires.
- Do not use different types of batteries or a mixture of new and old batteries.
- Insert the batteries according to the correct polarity (+ and -).
- Do not allow the same battery poles to be in contact.
- Remove spent batteries quickly. There is a risk of the battery exploding if it is not replaced or if the device is unused for a long period of time.
- Replace the battery with an identical or equivalent model.
- The batteries (or battery pack) must not be exposed to excessive heat, such as sunlight, fire, etc.
- Do not heat batteries or dispose of them in a fire or in water.
- Do not use metal pliers or metal objects such as the point of a pen or tweezers to remove batteries. Avoid deforming, crushing or piercing batteries.
- Do not disassemble the batteries.
- Cover the ends of the batteries with tape to prevent explosions and combustion when these are scrapped.
- Scrap batteries in an environmentally friendly way
- Do not dispose of batteries in ordinary household waste.
- When disposing of batteries, be sure to follow local disposal regulations.

BATTERY WARNING
KEEP OUT OF REACH OF CHILDREN
Swallowing can lead to chemical burns, perforation of soft tissue, and death. Severe burns can occur within 2 hours of ingestion. Seek medical attention immediately.

| Type Technical | specifications | Type Technical | specifications |
| Broadband loudspeaker | 3" (5W)*2 Wireless frequency 2,402 - 2,480 MHz | ||
| Peak power 40 W FM | frequency 88.8 - 108 MHz | ||
| RMS power 10 W | |||
| Power consumption 0 | 6 W Bluetooth version | 5.0 | |
| Input power 100-230V | 50/60Hz Transmission range 10 m | ||
| Impedance of the speaker | 6 Ω Maximum output | power (EIRP) | 3.3 dBm |
| Speaker frequency 60 | Hz - 20 kHz Input/Output CD, Bluetooth, | Mains input, USB | |
| S/B ratio ≥ 75dB Distortion < 1 % | |||
| Bluetooth pairing name | MIC122BT | Dimensions 460 x 230 | x 235 mm |
NB: the maximum connection distance is approximately 10 metres. Place your Bluetooth speaker as close as possible to the device to avoid any interference with the connection.
The device may turn off in an environment with electrostatic discharge. The user must then recharge the battery and reset the device.
Environmental protection

Your product has been designed and manufactured using high-quality materials and components that can be recycled and reused. Attention should be drawn to the environmental aspects of battery disposal.

When the crossed-out wheelie bin symbol appears on a product, it means that the product is covered by European Directive 2002/96/EC. Please find out about the local sorting and collection system for electrical and electronic products. Please act according to local rules and do not dispose of your old products in your household waste. By ensuring this product is disposed of correctly, you are helping to prevent potentially negative consequences for the environment and human health.
Additional information
- When the device does not transmit audio output for a certain amount of time, it will automatically go into standby mode to save energy. It can then be switched back on using the power button
- If an incoming call is received while the MIC122BT system is connected to your mobile phone during music playback, the music will immediately pause when you answer the call, and start again once the call is finished (depending on the mobile phone, playback may sometimes stay paused after the end of the call).
- The word Bluetooth ® , the brand and logo are registered trademarks owned by Bluetooth SIG, Inc., and any use of such marks by Bigben Interactive is under licence. All other brands and trade names are the property of their respective owners. • THOMSON is a trademark of Talisman Brands, Inc. used under licence by Bigben Interactive. • This product is manufactured and sold under the responsibility of Bigben Interactive.
- THOMSON and the THOMSON logo are trademarks operated under licence by Bigben Interactive – for more information: www.thomson-brand.com.
- All other products, services, corporate names, trademarks, trade names, and logos referenced herein are the property of their respective owners.
Declaration of conformity
- Bigben Interactive hereby declares that the MIC122BT-type radio equipment is in compliance with Directive 2014/53/EU. The full text of the EU declaration of conformity is available at the following internet address: https://www.bigben-interactive.co.uk/support/
Warranty
This product is guaranteed by Bigben for a period of 2 years from the date of purchase, except in countries of the European Economic Area, which offer a longer warranty period. We recommend that you keep your receipt for any claims. The warranty covers breakdowns due to defective material, a missing element or manufacturing defect. In this case, contact our technical support. For any problem with a defective product, contact your point of purchase with your receipt. The warranty does not cover problems of improper use.
Support
www.bigben-interactive.co.uk/support
support@bigben.fr
Made in China
Manufactured by BIGBEN INTERACTIVE SA
396, Rue de la Voyette
CRT2 - FRETIN
CS 90414
59814 LESQUIN Cedex - France
www.bigben.eu





This product can be recycled
TO DROP OFF IN STORE
or
TO DROP OFF IN RECYCLING CENTER

Manufacturer: Bigben Interactive FRANCE
396, Rue de la Voyette, C.R.T. 2, Fretin,
CS90414 - 59814 Lesquin Cedex, France
BELGIUM, customerservice@bigben-interactive.be
NETHERLANDS, customerservice@bigben-interactive.nl
SPAIN, soporte@metronic.com
Tel.: 93 713 26 25
Input/Output
BELGIUM, customerservice@bigben-interactive.be
NETHERLANDS, customerservice@bigben-interactive.nl
SPAIN, soporte@metronic.com
Tel.: 93 713 26 25
INSTRUCTIONS FOR USE
READ THIS MANUAL CAREFULLY BEFORE USING THE DEVICE AND KEEP IT FOR FUTURE REFERENCE.
Controls
Input/Output
KEEP OUT OF REACH OF CHILDREN


Manufacturer: Bigben Interactive FRANCE
- Rue de la Voyette, C.R.T. 2, Fretin,
CS90414 - 59814 Lesquin Cedex, France
BELGIUM, customerservice@bigben-interactive.be
NETHERLANDS, customerservice@bigben-interactive.nl
SPAIN, soporte@metronic.com
Tel.: 93 713 26 25
Input/Output
BELGIUM, customerservice@bigben-interactive.be
NETHERLANDS, customerservice@bigben-interactive.nl
SPAIN, soporte@metronic.com
Tel.: 93 713 26 25
INSTRUCTION MANUAL
Input/Output
BELGIUM, customerservice@bigben-interactive.be
NETHERLANDS, customerservice@bigben-interactive.nl
SPAIN, soporte@metronic.com
Tel.: 93 713 26 25
INSTRUCTIONS FOR USE
BEFORE USING THIS DEVICE, READ THESE INSTRUCTIONS CAREFULLY AND KEEP THEM FOR FUTURE REFERENCE.
Input/Output
BELGIUM, customerservice@bigben-interactive.be
NETHERLANDS, customerservice@bigben-interactive.nl
SPAIN, soporte@metronic.com
Tel.: 93 713 26 25


- USER INSTRUCTIONS
- CONTROLS
- INPUT/OUTPUT
- GETTING STARTED
- SAFETY WARNING AND NOTICE
- WARNING
- CONTENTS OF THE BOX
- REMOTE CONTROL
- REMOTE CONTROL FUNCTIONS
- BEFORE STARTING
- AUTOMATIC STANDBY
- OPERATION
- ADJUST THE VOLUME WITH THE REMOTE CONTROL
- MUTE FUNCTION
- SET THE CLOCK (IN STANDBY MODE)
- SETTING THE ALARM (IN STANDBY MODE)
- USE
- CD PLAYBACK
- PREVIOUS TRACK / NEXT TRACK
- REPEAT FUNCTION
- USB READER
- NOTE
- BLUETOOTH MODE
- AUTOMATIC CONNECTION WITH YOUR SMARTPHONE
- PLAYING FROM A BLUETOOTH DEVICE
- FM RADIO
- AUTOMATIC SEARCH
- MANUAL SEARCH
- PRESET
- AUX-IN
- AUX-IN JACK
- BATTERY WARNING
- ENVIRONMENTAL PROTECTION
- ADDITIONAL INFORMATION
- DECLARATION OF CONFORMITY
- WARRANTY
- INSTRUCTIONS FOR USE
- KEEP OUT OF REACH OF CHILDREN
- INSTRUCTION MANUAL
Brand : THOMSON
Model : MIC122BT
Category : Hi-Fi System