
ICR-B31 - Voice recorder SANYO - Free user manual and instructions
Find the device manual for free ICR-B31 SANYO in PDF.

User questions about ICR-B31 SANYO
0 question about this device. Answer the ones you know or ask your own.
Ask a new question about this device
Download the instructions for your Voice recorder in PDF format for free! Find your manual ICR-B31 - SANYO and take your electronic device back in hand. On this page are published all the documents necessary for the use of your device. ICR-B31 by SANYO.
USER MANUAL ICR-B31 SANYO
INSTRUCTION MANUAL ISTRUZIONI PER L'USO
ICR-B29
ICR-B31
ICR-B34
| ENGLISH | 1 |
| DEUTSCH | 14 |
| FRANÇAIS | 28 |
| NEDERLANDS | 41 |
| SVENSKA | 54 |
| ITALIANO | 67 |
| ESPÁÑOL | 81 |
ENGLISH
Precautions
- The apparatus shall not be exposed to dripping or splashing.
- Do not drop the unit or subject it to strong shocks.
- Do not use where there are extremes of temperature (below 5^ or exceeding 35^ ).
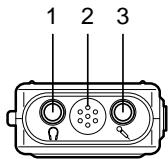
Controls
- Earphone socket (O)
- Built-in microphone
- External microphone socket
- Recording LED
- Display
- Stop/Power off button (■) (STOP/OFF)
- Erase button (ERASE)
- Built-in speaker
- Repeat button (REPEAT)
- Menu button (MENU)
- Play/Pause/Power on button (▶) (PLAY/PAUSE)
- Record button (●) (REC)

- Volume buttons (VOLUME)
- Skip/Search buttons (I▲,▶) (SKIP/SEARCH)

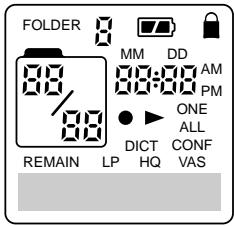
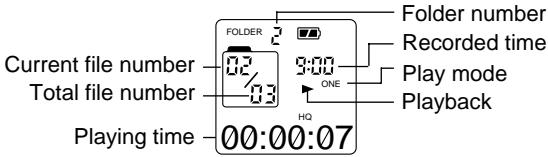
Display
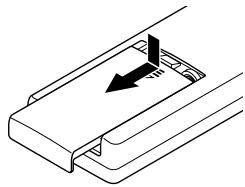
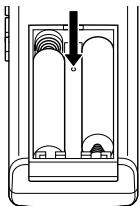
Inserting batteries
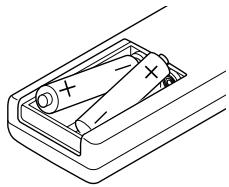
- Remove the battery compartment lid.
- Install two "R03/HP16/AAA" batteries (not supplied). Observe proper polarity and replace the lid.
1
2
Connections
External microphone
Plug an external microphone (not supplied) into the socket. The built-in microphone is automatically disconnected.
Earphone
Connect an earphone (not supplied) to the socket for monitoring the content being recorded or for private listening. The built-in speaker is automatically disconnected.
WHAT TO DO IF...
If the operation of the unit or display is not normal,
- Open the battery compartment lid.
- Press the RESET switch for at least 30 seconds using a small ball-point pen, etc.
- Resume operation.
Getting start
Turning the power on and off
Press the PLAY/PAUSE button to turn the power on. The display lights and the unit is in the stop mode.
To turn the power off, press the STOP/OFF button in the stop mode. The time display remains lit.
- If time is not set, the time display will flash.
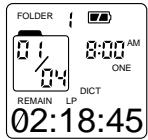
Example:
(Stop mode)
Battery indicator
Shows the battery condition while the unit is operating.
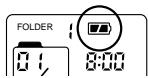

:Full

: Approximately half used

: Weak or exhausted batteries, must be replaced
CAUTION:
- Do not replace the batteries while the power is on. It may cause the unit malfunction.
- Remove the batteries if the unit will not be used for a month or longer.
- Dispose of all used batteries safely and in accordance with all applicable laws.
Auto power off function
If you do not use the unit for 3 minutes, the power will be automatically turned off.
Lock function
This function avoids accidental button activation during recording or playback.
Press the MENU button for at least 2 seconds to set the lock mode. "LOCKED" flashes briefly and "■" remains lit.
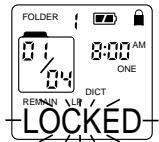
- If you press any other button while the unit is in the lock mode, "LOCKED" flashes and the button will not function.
Press the MENU button for at least 2 seconds again to release the lock mode. " " disappears.
Beep
Beep sound can be heard whenever you press any button except during playback and recording (See page 7).
Date and time setting
With this function, you can always read on the display the recording date and time of your recorded messages (See page 8).
- You can still use this unit for normal recording without setting the time. However, no correct recording date and time can be referred for your recorded massages.
Menu function
Common procedures of menu function
- In the stop mode, press the MENU button briefly. The unit enters the menu setting mode. Only the related indicator is lit and all other indicators go off.
Each time the button is pressed, the display changes as follows:
"FOLDER" "DICT" (or "CONF") "LP" (or "HQ") "VAS" (OFF or ON) "ONE" (or "ALL") "BEEPON" (or "BEEPOFF") Date and time setting mode (YEAR, MM/DD, 12 or 24 HOUR, TIME) Stop mode
- To change the setting of the selected menu, press the▶orI<SKIP/SEARCH button. (For more detail, refer to the following explanations.)
- If no button is pressed within 10 sec., the stop mode returns.
- Press the STOP/OFF button to quit the menu setting mode. The stop mode returns.
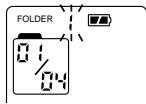
FOLDER: Selecting folder (1, 2, 3 or 4)
DICT (or CONF): Setting recording condition
DICT (dictation): In a more enclosed area and recording source is close to the unit.
CONF (conference): In a more open area and recording source is far from the unit.

LP (or HQ): Setting recording quality
LP: For long play
HQ: For high quality play
| Model | Memory size | Recording time (approx.) | |
| ICR-B29 | 8 MB | LP: 3 hr. 35 min. | HQ: 1 hr. |
| ICR-B31 | 16 MB | LP: 7 hr. 10 min. | HQ: 2 hr. |
| ICR-B34 | 32 MB | LP: 14 hr. 20 min. | HQ: 4 hr. |
VAS (OFF or ON): Setting VAS (Voice activated system)
OFF: To start and stop recording manually
ON: Recording begins when you are speaking into the microphone. When dictation stops for about 3 seconds, recording stops. "VAS" remains lit.
Press the "+" or "-" VOLUME button to set the microphone's sensitivity when recording begins. The VAS sensing level appears ("SEN 01" - "SEN 10").
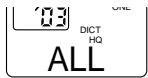
ONE (or ALL) : Setting play mode
- ONE: To play a specific file.
ALL: To play all files in a folder.
BEEPON (or BEEPOFF): Setting beep
BEEPON: Beep sound can be heard whenever you press any button except during playback and recording.
BEEPOFF: Beep off
OFF
VAS

B101
VAS
SEN
08

1

ONE
BEEPON
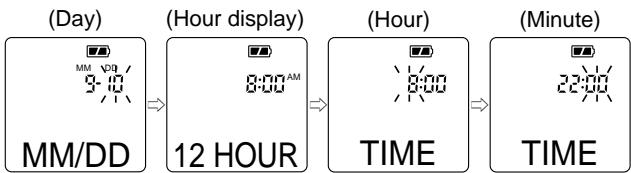
Date and time setting mode: YEAR, MM/DD, 12 or 24 HOUR, TIME
- In the stop mode, press the MENU button seven times. The unit enters the date and time setting mode. "YEAR" appears and the year display flashes.
(Year)


YEAR
- Press the or button repeatedly to select the year.
- Press the MENU button. The month display (Month)
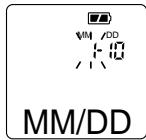
- Set the month, day, hour display (12-hour or 24-hour), hour and minute by following steps 2 - 3 above.
Recording
Set the recording condition (DICT/CONF), recording quality (LP/HQ) and VAS function before you start recording (see pages 6-7).
- In the stop mode, select the desired folder (see page 6).
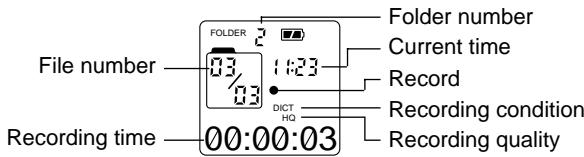
- Press the REC button. Recording starts with new file number. The recording LED lights.
Example:
-
For recording with VAS: See page 7.
-
To pause recording, press the REC button. "PAUSE" appears and the recording LED flashes. Press it again to resume recording.
- Press the STOP/OFF button to stop recording.
Total remaining time for recording appears.
To view the remaining recording time, press and hold the PLAY/ PAUSE button during recording.
Note:
You can record up to 99 files in one folder, not exceeding 200 files in total.
Playback
Set the play mode (ONE/ALL) before you start playback (see page 7).
- In the stop mode, select the desired folder (see page 6).
- Press the▶or↓SKIP/SEARCH button to select the desired file.
- Press the PLAY/PAUSE button to start playback. The recorded date appears briefly on the time display, then the recorded time remains lit.
Example:
- To pause playback, press the PLAY/PAUSE button. "PAUSE" appears. Press it again to resume playback.
- Press the "+" or "-" VOLUME button to adjust the volume (VOL 00 - VOL 28).
VOL 13 - Press the MENU button. Playback point reverses for 5 seconds within a file and playback continues.
- Press and hold the▶orI按钮 to make a quick search within a file.
- Press the button briefly to skip to the next file. Press the button briefly to skip back to the beginning of the current file. Press the button again immediately to skip back to the beginning of the previous file.
- Press the STOP/OFF button to stop playback.
Introscan
Plays back the first 3 seconds of each file in a folder.
- In the stop mode, select the folder.
- Press the or button repeatedly until "ALL" appears.
- Press the PLAY/PAUSE button to start introscan.
- Press the STOP/OFF button to stop introscan.
Designated range repeat play (A-B Repeat)
- Press the REPEAT button during play at the beginning of the section you want to repeat (Point A).

- Press the REPEAT button again at the end of the section (Point B). "AB REP" appears. The section between points A and B is played repeatedly.
- To return to normal play, press the REPEAT button again.
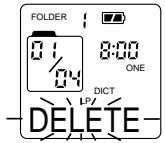
Erasing
Erasing the selected file
- In the stop mode, select the folder and file.
- Press the ERASE button briefly. "DELETE" flashes.
- While "DELETE" is flashing, press the ERASE button for at least 2 seconds. The selected file in the folder is erased. All the file numbers after the file that was erased are reduced by one.
Erasing one folder
- In the stop mode, select the folder.
- Press the or SKIP/SEARCH button until "ALL" appears.
- Press the ERASE button briefly. "DELETE" flashes.
- While "DELETE" is flashing, press the ERASE button for at least 2 seconds. All the files in the selected folder are erased.
Erasing all folders
- In the stop mode, press the ERASE button briefly. "DELETE" flashes.
- Press the REC button for at least 3 seconds. "FOLDER", "ALL" and "DELETE" flash.
- While the display is flashing, press the ERASE button for at least 2 seconds. All files in all folders are erased.
If you do not want to erase, press the STOP/OFF button.
Troubleshooting guide
Display is blank
- Check that the batteries are inserted proper polarity and not exhausted.
Buttons do not respond
- Make sure the lock function is not activated.
Cannot record
- Make sure memory is not full.
- You have recorded 99 files in one folder. Try record in a new folder.
- Check the total files are not exceeding 200.
No sound
- Make sure the volume is not set to 0.
- Make sure you have selected folder with recorded messages.
- Earphone should not be connected.
Cleaning the cabinet
Clean the outside of the unit with a clean soft cloth, moistened with lukewarm water. Do not use benzene, thinner or alcohol since they will mar the finish of the surfaces.
SERVICE
UNITED KINGDOM
For online support and assistance contact:
UK: Freephone: 0800 328 7060 (Mon-Fri, 8am-5pm)
Outside of UK: +44 1582 730 730 (Mon-Fri, 8am-5pm)
Email: dictationsupport@sanyo.co.uk
or visit our website www.sanyodictation.co.uk
Vorsichtsmaßnahmen
BEEPON (eller BEEPOFF): Stalla in signal
Dimensioni (L x A x P)
Circa 42 x 111 x 20 mm
Peso
This set complies with the EMC Directive 89/336 and with the LVD Directive 73/23.
Frequency response 400 Hz - 3,500 Hz
Output power 120 mW
Power source DC:DC 3V ("R03/HP16/AAA"×2)
Loudspeaker 28 mm dia.
Output terminal 8 ohms
Dimensions (W x H x D)
Approx. 42 x 111 x 20 mm
Weight
Approx. 49 g (without batteries)
IMPORTANT INFORMATION
Because its products are subject to continuous improvement, SANYO reserves the rights to modify product designs and specifications without notice and without incurring any obligation.