
ABC-VW24A - Air-conditioner SANYO - Free user manual and instructions
Find the device manual for free ABC-VW24A SANYO in PDF.


| Product type | Air purifier with sterile electrolyzed mist |
| Brand | SANYO |
| Model | ABC-VW24A |
| Net weight | 7.2 kg |
| Power supply | 220 - 240 V ~, 50 Hz |
| Power consumption | 65 W |
| Protection class | II |
| Filter type | Air filter (part number ABC-FAH941A) |
| Filter lifespan | Approximately 4 years |
| Water tank capacity | Approximately 2 to 3 weeks of autonomy in automatic mode |
| Main functions | Automatic, Manual (LOW, MED, HIGH), Electric mist, Stop timer (1/2/8 h), Sterile electrolyzed mist |
| Indicators | Cleanliness (green/yellow/red), Water add, Filter replacement, Electric mist, Electrolyzed water |
| Sensors | Odor detector (adjustable sensitivity) |
| Safety device | Automatic shut-off in case of tipping over |
| Maintenance and cleaning | Regular cleaning of the pre-filter, odor detector, water tank and electrolyzed water unit |
| Spare parts and repairability | Replacement filter: ABC-FAH941A; repairs by qualified technician |
| General information | Use only with tap water (max 30 °C); do not use without filters; operation memory |
Frequently Asked Questions - ABC-VW24A SANYO
User questions about ABC-VW24A SANYO
0 question about this device. Answer the ones you know or ask your own.
Ask a new question about this device
Download the instructions for your Air-conditioner in PDF format for free! Find your manual ABC-VW24A - SANYO and take your electronic device back in hand. On this page are published all the documents necessary for the use of your device. ABC-VW24A by SANYO.
USER MANUAL ABC-VW24A SANYO
natural_image
Line drawing of a white electronic device with ventilation slots and a wavy base (no text or symbols)Thank you for purchasing this air purifier. Be sure to read this instruction manual thoroughly to ensure correct use.
- Read the “Precautions” carefully before using this device to ensure proper operation.
- Follow these precautions to ensure the safe and proper operation of this device and to prevent injury or damage to you or any others. In addition, the presumed results of mishandling this device are divided into “Warning” and “Caution” to specify the extent of injury or damage that can be expected and degree of urgency. Always ensure that these instructions are followed as they are related to important safety issues.
Warning
This appliance is not intended for use by persons (including children) with reduced physical, sensory or mental capabilities, or lack of experience and knowledge, unless they have been given supervision or instruction concerning use of the appliance by a person responsible for their safety.
Children should be supervised to ensure that they do not play with the appliance.
Do not modify this device. Any disassembly or repair should be conducted by qualified technicians.
This may cause a fire, electrical shock, or injury. Consult with the place of purchase regarding any repairs.
Remove the power plug from the wall outlet before cleaning. In addition, do not insert or pull out the power plug with wet hands.
This may cause an electrical shock or injury.
Do not use this device if the cord or power plug is damaged or if the wall outlet is loose. This may cause an electrical shock, short circuit, or fire.
Do not scratch, damage, modify, forcefully bend, pull, twist, or bundle the power cord. In addition, do not place heavy objects on or clamp the cord.
This will damage the cord and may cause a fire or electrical shock.
Use only the specified voltage as the power source.
This may cause a fire or electrical shock.
Caution
Do not hold the cord when unplugging from the wall outlet. Always hold the end of the power plug when unplugging the cord.
In addition, periodically wipe away any dust on the power plug.
This may cause a fire from an electrical shock or short circuit.
Do not wipe with petrol or paint thinner and do not spray with insecticides.
This may cause the cord to crack, an electrical shock, or fire.
Caution
Ensure there is adequate ventilation when using this device with combustible appliances.
This may cause carbon monoxide poisoning.
- This device does not eliminate carbon monoxide.
Ensure that combustible material or cigarette or incense particles still on fire are not drawn into this device.
This may cause a fire.
Do not use in places with oil particles, i.e. from machinery, suspended in the air.
This may cause cracks or the falling of this device may cause injury.
Ensure that the power plug is removed from the wall outlet when this device is not in use for long periods of time. Dispose of the water in the electrolyzed water unit and tank.
This may cause an electrical shock or fire.
Without electricity, the effect of the electrolyzed water is reduced and mold and bacteria may develop.
Do not place fingers or foreign objects in the air intake or vent.
This may cause an electrical shock or malfunctions.
Do not use this device in extremely humid environments, i.e. bathrooms.
This may cause an electrical shock or malfunctions.
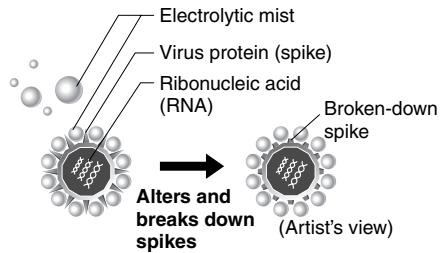
The sterile, electrolytic mist effectively suppresses allergens such as viruses, bacteria and pollen which are floating in the air.
The OH radicals and electrolytic hypochlorites in the electrolyte break down the virus spikes. They envelop allergens such as airborne bacteria and mold spores, as well as pollen and mite feces and carcasses, and also odor molecules, and deactivate and deodorize them.
Suppresses viruses
Acts on the surface proteins to break down viruses.
Suppresses pollen
Alters by enveloping and acting on the surface.

natural_image
Abstract spherical diagram with a central sphere and surrounding smaller spheres, labeled 'Artist's view' below (no other text or symbols)Suppresses odors
Envelops the odor molecules with water and breaks them down.

Part Names and Functions
![Cover Tank Electrolyzed Water Unit Generates a sterilized and electrolyzed mist. Sensor Sensitivity Adjustment Slide Tab Odor Sensor Power Mist Lamp Turns on when the power mist is operating. Electrolyzed Water Lamp Turns on when the electrolyzed water function is operating. Clean Indicator Indicates the degree of cleanliness of the room. Air inlet Fan Release Button Filter Pre-filter Front Cover Cover Sterilized and Electrolyzed Mist Outlet Top Air Outlet Handle Side Air Outlet Air Inlet Cord Release Button Power Plug [Rear]](/content/2025/01/96525/images/4ef956d2518eb1a82d47f384e72630b29d9c6b9d1ba83a8e9697c588e83e0ae2.jpg)
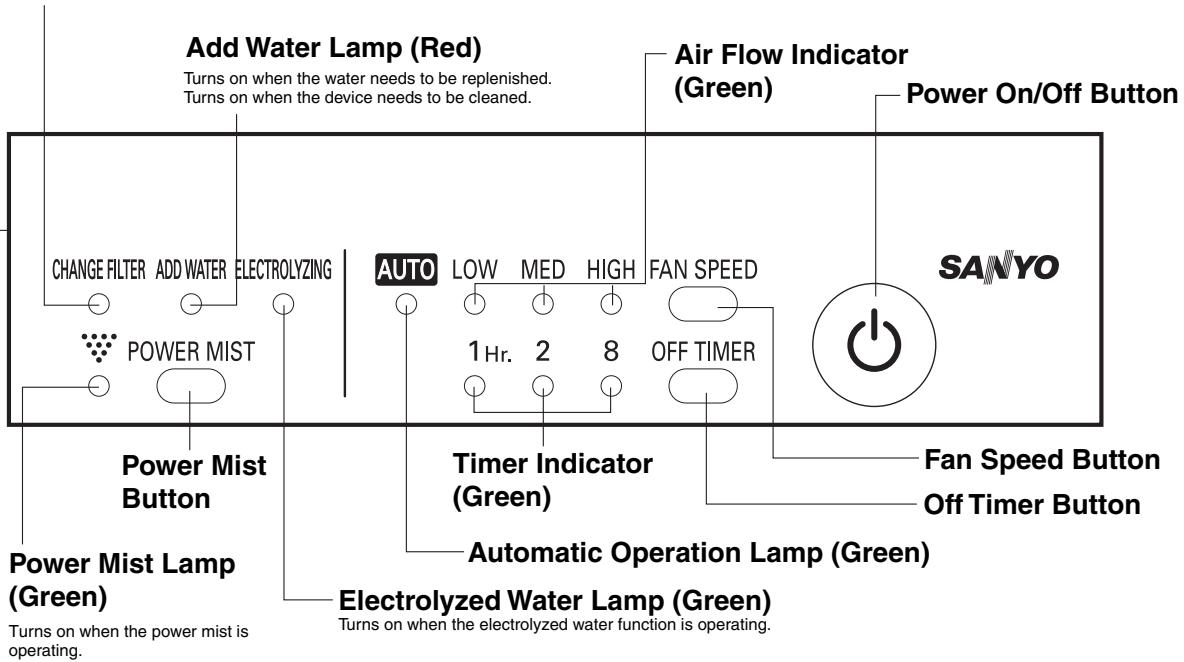
Operating Unit
Filter Replacement Lamp (Red)
Turns on when the filter needs to be replaced.
Remove the front cover before operating.
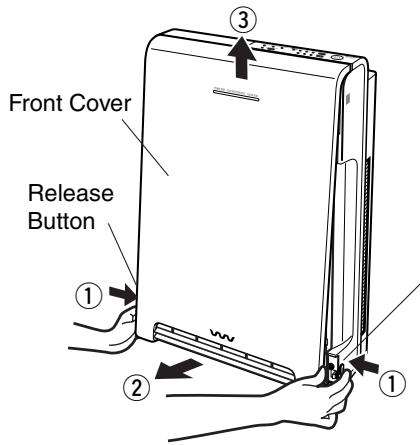
Release Button
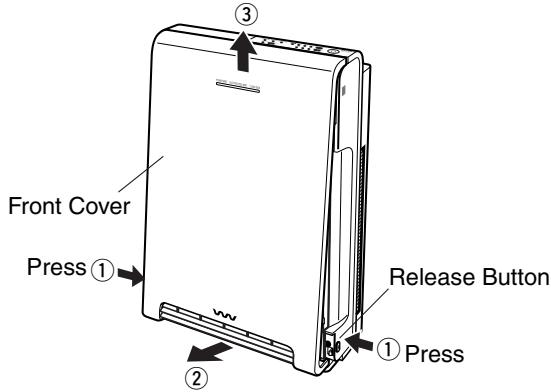
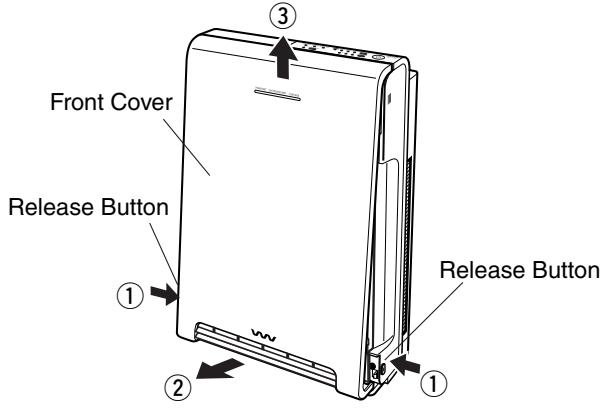
① Press the release buttons (both sides) at the bottom of the unit, ② pull the front cover away from the unit, and ③ lift.
Safety Mechanism
■When this unit tips over, the device is automatically stopped.
- Stand the device correctly and press the Power On/Off button to restart.
- If water spills from the electrolyzed water unit and tank, ensure that the spill is cleaned and dry completely before operating the unit.
- The unit cannot be operated while tilted.
- The memory is cleared.
Confirm the accessories.
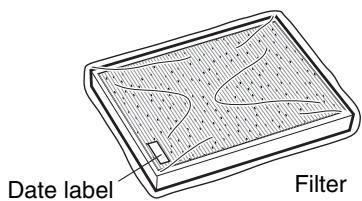
(The filter has been placed within the device during shipping. Remove the plastic protector and replace the filter into the unit. Refer to page E-5)
Installing the Filter
1 Remove the front cover
- ① Press the Release buttons (both sides) at the bottom of the unit, ② pull the front cover away from the unit, and ③ lift.
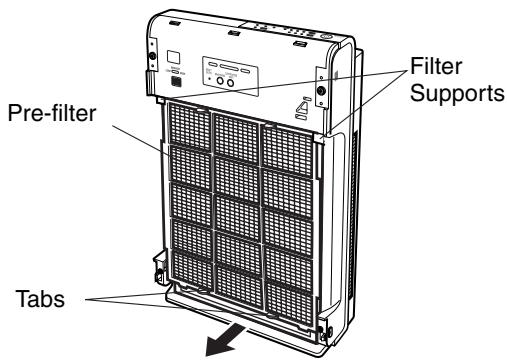
Remove the pre-filter (filter).
- Hold the tabs of the pre-filter and pull to remove.
3 Remove the pre-filter from the filter and remove from the plastic protector.
- Widen the frame of the pre-filter and remove the filter.
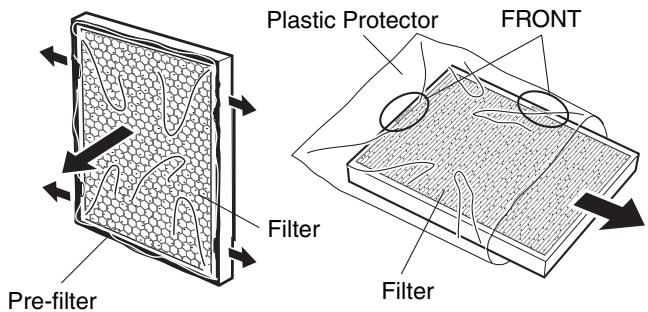
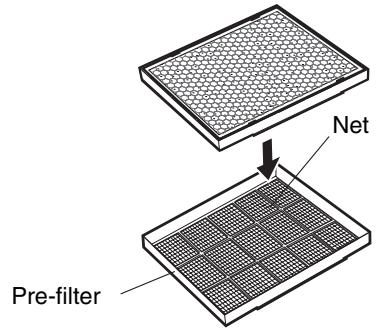
1 Attach the filter to the pre-filter.
- Insert the side printed with the word "FRONT" into the side of the net.
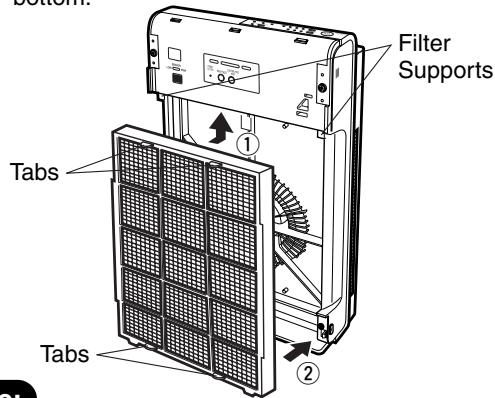
5 Attach the pre-filter.
- Ensure that the tabs of the pre-filter are to the front. ① Insert the filter under the filter supports at the top and then ② push the filter in at the bottom.
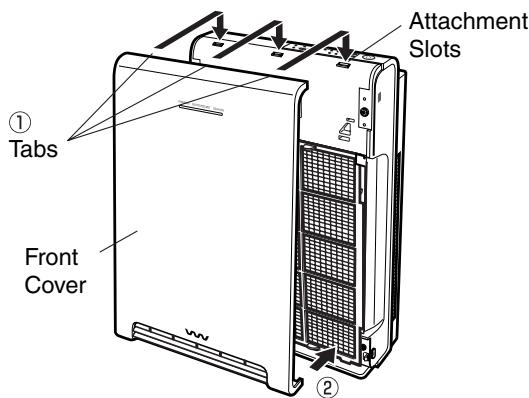
6 Attach the front cover.
- ① Place the tabs (3) at the top of the front cover into the attachment slots.
- ② Press the bottom until the cover clicks.
Note:
- Always be sure to install the pre-filter, filter and front cover before operating the unit.
- If the plastic protector is not removed from the filter, the device will not clean the air. In addition, this may cause a malfunction.
- Write the date of the filter installation on the date label as a guide for the filter replacement and attach the label to the unit.
Replenishing the Water
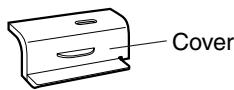
1 Lift the tab on the cover and remove.
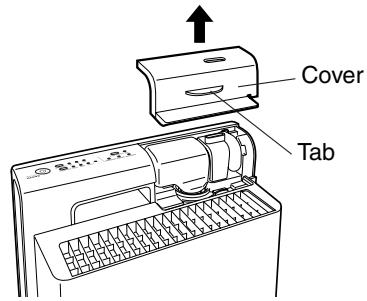
3 Loosen the cap to the tank and fill the tank with tap water.
- Fill the tank with tap water without overfilling. As a guide, a full tank of water will last for a maximum of about 2 to 3 weeks of operation. (For automatic operation) The length of time before the tank needs to be refilled will vary depending on the usage conditions.
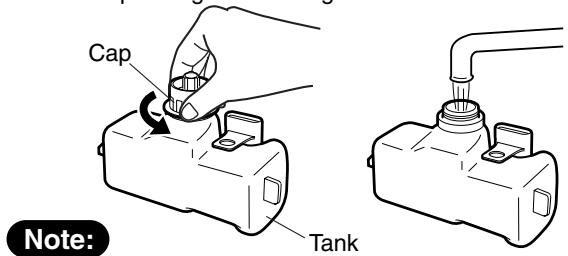
- Wash the cap well as mold may form on the tank cap.
5 Replace the tank. • Line up the tank.
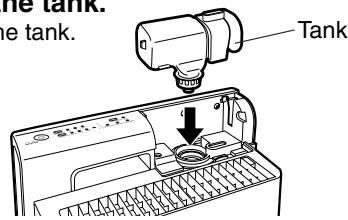
2 Remove the tank. - Lift the tank straight
- Lift the tank straight up.
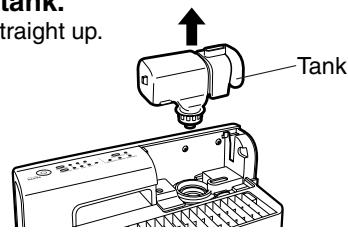
- Water attached to the cap may drip when removing the tank. Use a towel to ensure that the floor does not get wet.
4 Tighten the cap of the tank. - Confirm that the cap is on secure
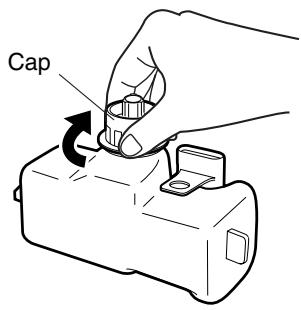
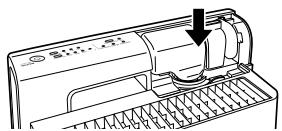
6 Replace the cover.
- Press the cover into place matching the configuration.
natural_image
Line drawing of a refrigerator with a downward arrow indicating a drop or change (no text or symbols present)Water
Use water specified in the attached (Notes).
This may hinder proper operation.
Note:
- Only use tap water below 86°F.
- Mold and bacteria may develop if unspecified water is used and may hinder proper operation.
- Dispose the water in the electrolyzed water unit and tank after removing the power plug. Without electricity, the effect of the electrolyzed water is reduced and mold and bacteria may develop.
- Dispose of the water in the tank if the water has a chance of freezing. If the water freezes, it may cause the device to malfunction.
- If the temperature of the water is low (50°F or below), the sterile electrolytic mist may not be emitted.
- When filling the tank with water, let the water run freely for about 3 to 5 seconds before filling the tank, otherwise the quality of the water remaining in the faucet will deteriorate.
Adjusting the Sensitivity of the Odor Sensor
1 ① Press the Release buttons (both sides) at the bottom of the unit, ② pull the front cover away from the unit, and ③ lift.
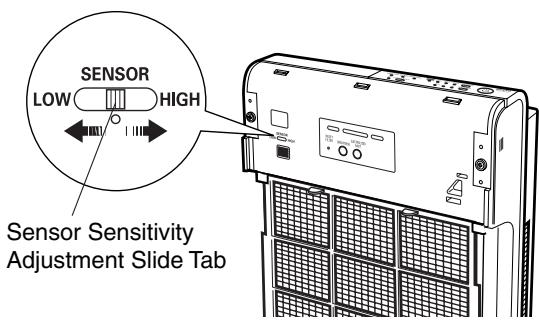
2 Adjust the sensor sensitivity adjustment slide tab.
- The tab is set to the middle when shipping. Set the tab to this location during normal operation.
- To operate when even slightly dirty set to "High"
- To operate infrequently set to "Low"
Unit Installation
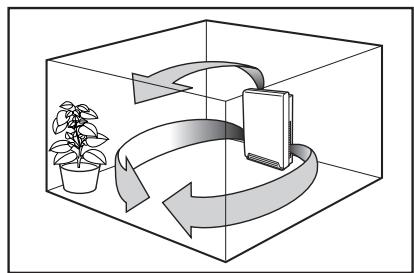
1 Place the unit on a stable and horizontal surface and in a location where the air circulates well around the room.
- This unit operates more effectively when the unit is set in the middle of a wall facing the center of the room.
flowchart
graph TD
    A["Potted Plant"] --> B["Process Step"]
    B --> C["Mobile Device"]
    C --> D["Return Path"]
    D --> E["Recycle/Loop"]
    E --> A
Caution
- Unplug the unit when moving or not using for extended periods and dispose of the water in the electrolyzed water unit and tank (water may spill or mold and bacteria may develop).
- Do not tilt the unit when in use. The electrolyzed water unit may cease to operate properly or water may spill.
Note:
- Do not set in a location where the air inlet or outlet may be covered.
- Ensure that AV equipment, i.e. TV and radios, is located at least 6.5ft away (noise may interfere with the equipment).
Ventilate the room to clean the air before plugging the cord into the wall outlet.
- When the power plug is inserted into the wall outlet and the unit starts operating, the sensor will detect the cleanliness of the air and use this as a reference for making settings. The automatic operation lamp (green) will flash for a short while (about 3 minutes) while this is being done. If the air quality is detected as being clean, the settings will be updated automatically to reflect this.
The device can be operated according to preference. Normally, it is recommended that automatic operation is selected to operate automatically in response to the cleanliness of the air. When the automatic operation, adjust the sensitivity of the odor sensor (refer to page E-7).
- Press the power on/off button.
- Press the power on/off button to operate in [AUTO/Electrolyzed Water "On"] mode after plugging in the power plug.
- The electrolyzed water and clean lamps turn on. (The electrolyzed water lamp turns on while operating the electrolyzed water function).
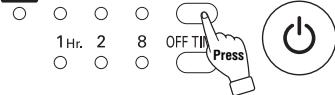
2 Press the fan speed button and operate according to preference.
- The operating mode switches with each press of the button and the mode is indicated by the corresponding lamp.
AUTO LOW MED HIGH FAN SPEED
○ ○ ○ ○
1 Hr. 2 8 OFF TIMER
○ ○ ○

AUTO LOW MED HIGH FAN SPEED


Automatic Operation
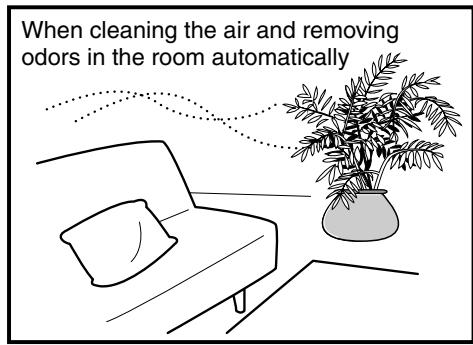
- Press the fan speed button and operate in "AUTO".
- Operates automatically when the odor sensor detect dirt or odor in the air of the room.
- A sterile, electrolyzed mist is produced (the electrolyzed water function generates a sterile, electrolyzed mist).
Press the electrolyzed water button to turn off the electrolyzed water. - The electrolyzed water function cannot be operated independently.
* Even when the air of the room is clean, the electrolyzed water function operates silently for about 5 minutes, once every hour, to agitate the water.
Operation of the Odor Sensor
The odor sensor operate automatically when set to automatic operation mode.
- The odor sensor responds to cigarette smoke, insecticides, cosmetics, alcohol, gases generated by burning appliances, and sudden changes of temperature and humidity.
Color of Clean Indicator and Operating Status (Air flow indicator lamp does not turn on)
| Cleanliness | Clean ←→ Very Dirty | |||
| Color of Clean Indicator | Green | Yellow | Red | |
| Operating Status | Fan | Stop | Low | Medium |
| Sterile, Electrolytic Mist | Stop | Low | Low or Strong | |
The generated volume of sterile, electrolytic mist is intermittent with Low (small) and Strong (large).
Note:
- Toxic substances (carbon monoxide, etc.) from cigarettes cannot be eliminated.
- Odor components (odors from building material, pets, etc.) that are continuously generated cannot be entirely eliminated.
Continuous Mode
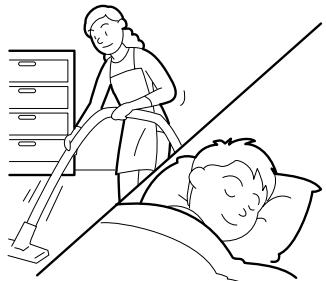
Operate in "HIGH" when vacuuming
natural_image
Illustration of a caregiver cleaning a patient in a hospital bed (no text or symbols)Operate in "LOW" when sleeping

Manual Operation
Manual Operation
AUTO
LOW
MED
HIGH
FAN SPEED
O
O
O
O

- Press the fan speed button to choose "LOW", "MED", or "HIGH" mode.
- The volume of sterile, electrolytic mist generated during High is strong (large). The volume is low (small) for all other modes. The mist is generated intermittently.
- Press the electrolyzed water button to turn the electrolyzed water function "On" or "Off".
To generate a lot of sterile, electrolytic mist and quickly clean the air in the room
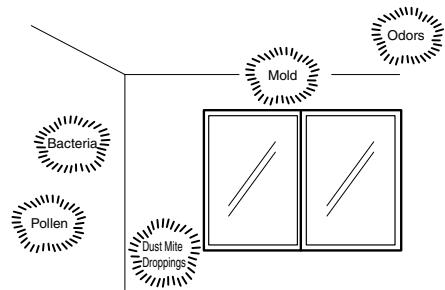
flowchart
graph TD
    A["Bacteria"] --> B["Pollen"]
    B --> C["Dust Mite Droppings"]
    D["Mold"] --> E["Odors"]
    C --> F["/\//\/"]

Power Mist Mode
CHANGE FILTER ADD WATER ELECTROLYZING
O
O
O

POWER MIST

- Press the power mist button to operate in power mist mode.
- High (5 min) → Medium (25 min) (The air flow indicator does not turn on.)
- A sterile, electrolytic mist is intermittently generated for 30 minutes.
- Once the power mist cycle is complete, the device switches to automatic mode.
- Press the fan speed button to cancel and to switch to a different operating mode.
* When the mode is switched to power mist while the timer is operating, the configured timer cancels.
Stopping the operation at a specified time


Timer Operation
1 Hr.
2
8
OFF TIMER
O
O
O

- Press the off timer button and set to a preferred time. Each time the button is pressed, the indicator lamp sets to the timer according to the lamp.
Continuous
(The lamp does not turn on.)
- The indicators change according to the amount of time that has passed and the lights indicate the amount of time remaining.
- Once the pre-determined amount of time passes, the device automatically turns off.
* The power mist mode cannot be set with a timer.
Generating and changing the settings of the sterile, electrolytic mist
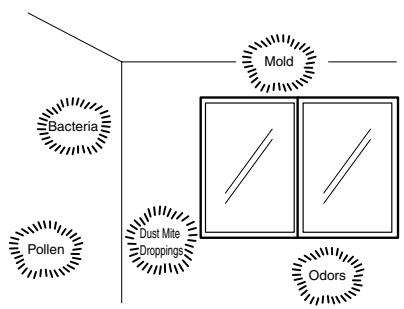
flowchart
graph TD
    A["Bacteria"] --> B["Dust Mite Droppings"]
    C["Pollen"] --> B
    D["Mold"] --> E["Odors"]
    style A fill:#f9f,stroke:#333
    style C fill:#f9f,stroke:#333
    style D fill:#f9f,stroke:#333
    style E fill:#f9f,stroke:#333

Electrolyzed Water
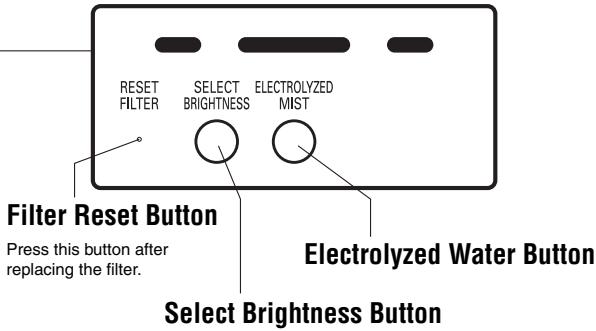
RESET FILTER
SELECT BRIGHTNESS
ELECTROLYZED MIST
Press the button after removing the front cover(refer to page E-5).


- The electrolyzed water and mistream lamps light when the power on/off button is pressed and a sterile, electrolytic mist is generated.
- The sterile, electrolytic mist is generated intermittently.
- Press the electrolyzed water button to turn the electrolyzed water function "On" or "Off".
- The electrolyzed water function cannot be operated independently.
- The electrolyzed water function cannot be turned on while the power mist is operating.
Note:
- When there is no water in the tank, the "ADD WATER" lamp turns on. Remove the tank and fill the tank with tap water (refer to page E-6).
- A flashing of the “ADD WATER” lamp indicates that an extended period of time has elapsed since filling the tank with water. Remove and clean (refer to page E-13) the electrolyzed water unit and fill the tank with water.
- The “ADD WATER” lamp flashes when the electrolyzed water mode has not been operated for an extended period of time (this is not a malfunction). Remove the tank and replace it after 20 seconds.
- The electrolyzed water lamp flashes when cleaning the water to maintain its sterilizing effect.
Adjusting the Brightness of the Lamps
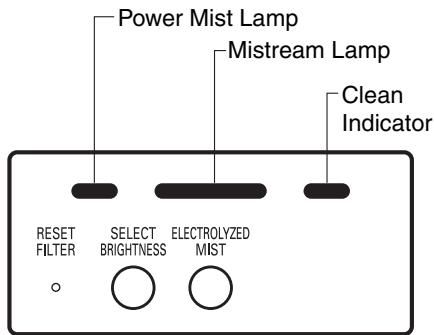

Select Brightness
RESET FILTER
SELECT BRIGHTNESS
ELECTROLYZED MIST
Remove the front cover and press the button (refer to page E-5).

- Press the select brightness button to change the brightness of the lamp (power mist lamp, mistream lamp, and clean indicator).
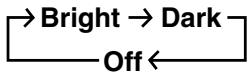
Stopping Operation
Press the power on/off button.
Memory Function
- Press the power on/off button after the operation to return to the previous mode.
- The timer/power mist operations are not placed in memory.
- When the power plug is unplugged, the memory is erased.
AUTO
LOW MED HIGH FAN SPEED
O
○ ○ ○ □
1 Hr. 2 8 OFF TIMER
○ ○ ○ □

Replacement Periods
Although replacement periods differ according to operating modes and installation locations, replace once every 4 years.
- Filter replacement lamp turns on.
Prepare a new filter as the filter replacement period approaches.

- Filter replacement lamp flashes.
Replace with a new filter.
■ If the color of the filter or dirt changes to the indicated color on the replacement guide label, replace the filter within 4 years.
(Confirm this color when cleaning the pre-filter).
■ Replace the filter within 4 years if there are odors that are not being eliminated.
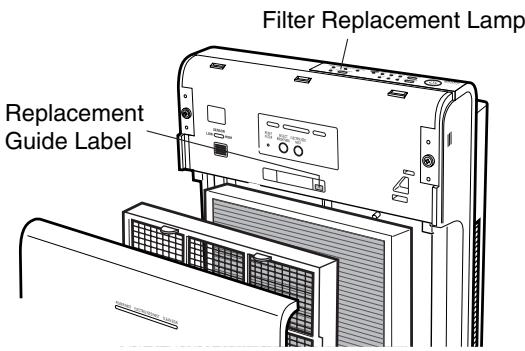
Refer to page E-5 regarding replacement methods.
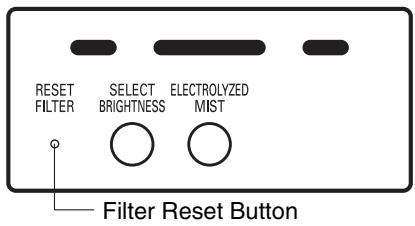
- Once the filter has been replaced, plug the power plug into the wall outlet, press the filter reset button with something small, i.e. ballpoint pen tip, and confirm that the filter replacement lamp has turned off.
Once the lamp has turned off, the microcomputer calculates the new replacement period of the filter.
Note:
- Do not reuse the filter under any circumstances.
The life of the filter is greatly reduced by the following.
(Even if the filter replacement lamp does not turn on, replace the filter.)
- If oily smoke or carbonaceous materials (i.e. soot) are drawn in.
- If the device is always used on high in a room with particularly dirty air or with strong odors.
- If the pre-filter has not been installed.
Replacement Filter
● Purchase this filter at a store selling Sanyo commercial devices.
Filter No. ABC-FAH941A The life of the filter is about 4 years.
Note:
- Do not tilt the unit when cleaning. Water from the tank and electrolyzed water unit will spill.
- Do not use petrol, paint thinner, or any other solvents or polishing powders.
This may cause scratches, discoloration, and cracks.
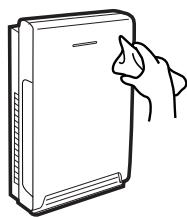
Unit
- Soak a soft cloth in diluted neutral kitchen detergent, wring it dry, and wipe.
Use a vacuum cleaner to remove dust from the air inlet and outlet.
Lastly, wipe with a dry cloth.
natural_image
Line drawing of a hand holding a closed book (no text or symbols visible)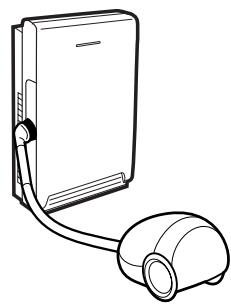
natural_image
Line drawing of a closed book connected to a cylindrical device (no text or symbols)Pre-filter
- Remove the front cover and pre-filter (refer to page E-5).
- Use a vacuum cleaner to remove dust.
- Wash with water if extremely dirty and dry completely.
natural_image
Line drawing of a solar panel connected to a cylindrical device (no text or symbols)Filter
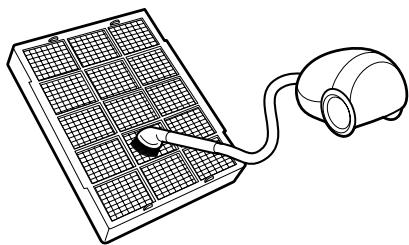
It is recommended that the filter is cleaned once per year to ensure the air is effectively cleaned.
- Use a vacuum cleaner to remove any dust from the surface of the filter. Ensure that the filter does not tear when the mouth of the vacuum cleaner is firmly pressed against the filter. (Remove the filter after removing the front cover and pre-filter. Refer to page E-5.)
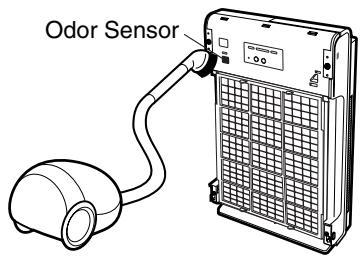
Odor Sensor
- Clean the dust by using a vacuum cleaner. It is recommended that the device is cleaned once every 3-6 months. (Remove the front cover. Refer to page E-5.)
Electrolyzed Water Unit/Tank
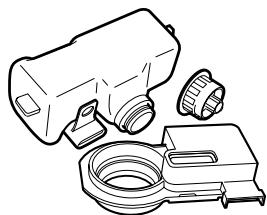
1 Remove the cover, tank, and electrolyzed water unit.
- Lift the tank straight up.
![Cover Tank Electrolyzed Water Unit [Rear]](/content/2025/01/96525/images/3eac1607760139b95f988045ac7653f74e3ebf229f095f59fe93a86592957a94.jpg)
Remove the electrolyzed water cover.
- Remove the cover from both sides (lift to remove the electrolyzed water cover).

Note:
- Use a towel to ensure that the floor does not get wet from water attached to the electrolyzed water unit and tank.
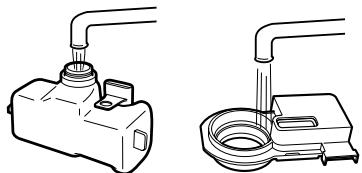
3 Wash the tank and electrolyzed water cover with water.
- Rinse clean with water. Use a toothbrush to remove the dirt if extremely dirty.
natural_image
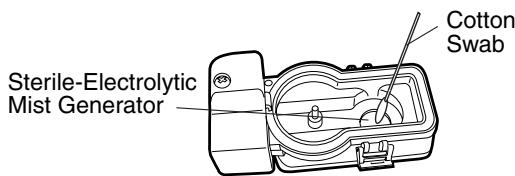
Technical line drawings of two mechanical components with pipes and fittings (no text or symbols)4 In the event of limescale build up on the Sterile-Electrolytic Mist Generator, clean with white vinegar to remove the limescale. Do not use water as this may cause the unit to malfunction.
5 Wipe off any water and dry completely.
natural_image
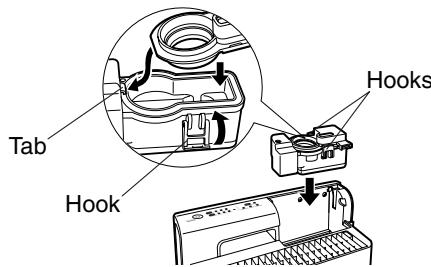
Line drawing of various household appliances including a blender, hose, and plastic bag (no text or symbols)6 Re-assemble the electrolyzed water unit and replace.
- Place the side tabs of the electrolyzed water unit cover to the bottom and press the hooks on both sides.
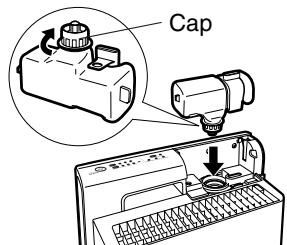
7 Close the cap on the tank and replace.
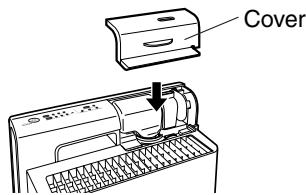
8 Replace the cover. - Push from above.
Note:
- Do not wash any other components except the tank and electrolyzed water unit. This may cause an electric shock or malfunction.
- Do not use detergents. This may cause malfunctions.
Warning
- If the device is still operating abnormally after inspecting the following, stop using the device to prevent accidents, unplug the power plug from the wall outlet and consult the place of purchase.
- Do not attempt to repair at home as this may be dangerous.
| Condition | Inspect | Repair |
| Does not operate. | Is the power plug securely in the wall outlet? | Place the power plug securely in the wall outlet. |
| Smoke and odors are not removed. | Are the filter and pre-filter installed? | Install the filter and pre-filter. |
| Has the plastic protector on the filter been removed? | Remove the plastic protector on the filter. | |
| Is the filter or pre-filter dirty?Is the filter replacement lamp flashing? | Replace the filter or clean the pre-filter. | |
| Is the air inlet dirty and blocked? | Clean the air inlet. | |
| The clean indicator is continuously red. | Is the air very dirty?Are any insecticides or cosmetic devices that may trigger the sensor being used? | Ventilate the room. |
| Is the sensor sensitivity adjustment slide tab set to “HIGH”? | Set the sensor sensitivity adjustment slide tab to “Mid” or “LOW”. | |
| The add water lamp is on. | Is there water in the tank? | Fill the tank with tap water.Remove the tank and replace after waiting 20 seconds. |
| The add water lamp is flashing. | It is time to replace the water.The electrolyzed water function has not been used for an extended period of time. | Clean the electrolyzed water unit and replace the water in the tank.Remove the tank and replace after waiting 20 seconds. |
| Water is leaking. | Has the cap been placed correctly on the tank? | Retighten the cap correctly. |
| Has the electrolyzed water unit been properly installed? | Install the electrolyzed water unit properly. | |
| There is an odor of chlorine. | This is from the electrolyzed water and is not a malfunction. | |
| The sterile, electrolytic mist is not emitted. | Has the electrolyzed water unit and tank been properly installed?Is the electrolyzed water button turned “Off”?Is the water level in the electrolyzed water unit high? | Ensure that the installation is correct.Press the electrolyzed water button to turn “On”.Replace the water in the electrolyzed water unit. |
| The Electrolyzed Water lamp is flashing. | The Electrolyzed Water lamp flashes when cleaning the water to maintain its sterilizing effect. The Water Cleaning function operates once every 8 hours for about 4 minutes. | |
| Does not operate even when the air is dirty. | The automatic operation lamp (green) is flashing.Is the sensor sensitivity adjustment slide tab set to “Mid” or “LOW”?Is the air inlet dirty and blocked? | The sensor is configuring the air cleanliness standard. This is not a malfunction.Set the sensor sensitivity adjustment slide tab to “Mid” or “HIGH”.Clean the air inlet. |
Specifications
Power supply voltage : 220 - 240 V
Frequency : 50 Hz
Power consumption : 65 W
Protection class : II
Net weight : 7.2 kg
Précautions
natural_image
Line drawing of a hand holding a closed book (no text or symbols visible)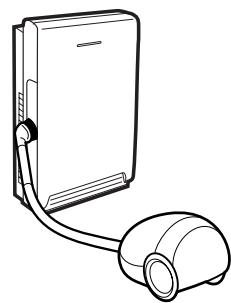
natural_image
Line drawing of a closed book connected to a cylindrical device (no text or symbols)Préfiltre
natural_image
Line drawing of a solar panel connected to a cylindrical device (no text or symbols)Filtre
natural_image
Diagram of a computer monitor with an open lid and a rack, showing no text or symbolsRéservoir
natural_image
Technical line drawings of two mechanical components with pipes and fittings (no text or symbols)natural_image
Line drawing of a portable device with a hose, bulb, and camera (no text or symbols)flowchart
graph TD
    A["Potted Plant"] --> B["Process Step"]
    B --> C["Smartphone"]
Precaución
natural_image
Illustration of a caregiver cleaning a patient's bed with a hand on the floor (no text or symbols)natural_image
Cartoon character shaped like a coin with a checkmark and smiling expression (no text or symbols)
LOW MED HIGH FAN SPEED
O
○ ○ ○ □
1 Hr. 2 8 OFF TIMER
○ ○ ○ □
natural_image
Illustration of two devices: a hand inserting a cable to a device and a connected mouse (no text or symbols)Prefiltro
natural_image
Line drawing of a solar panel connected to a device via a cable (no text or symbols)Filtro
natural_image
Technical line drawings of two mechanical components with pipes and fittings (no text or symbols)natural_image
Line drawing of various mechanical components including a spray gun, hose, and ring (no text or symbols)natural_image
Illustration of a caregiver assisting a patient in bed, with no visible text or symbolsnatural_image
Line drawing of a hand holding a closed book (no text or symbols visible)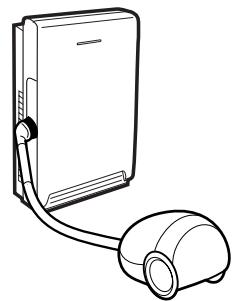
natural_image
Line drawing of a closed book connected to a mouse (no text or symbols)Vorfilter
natural_image
Line drawing of a solar panel connected to a cylindrical device (no text or symbols)Filter
natural_image
Technical line drawings of two mechanical components with pipes and fittings (no text or symbols)natural_image
Line drawing of a portable air purifier with attached hose and bulb (no text or symbols)Nota:
flowchart
graph TD
    A["Potted Plant"] --> B["Process Step"]
    B --> C["Smartphone"]
    C --> D["End"]
Precauzioni
natural_image
Illustration of a person cleaning a bed with a hand on the floor (no text or symbols)
natural_image
Cartoon character resembling a clock with a checkmark and arrow, holding a finger (no text or symbols present)
natural_image
Line drawing showing two devices: a hand inserting a cable to a device with a hose, and a connected device (no text or symbols present)Prefiltro
natural_image
Line drawing of a solar panel connected to a portable device (no text or symbols)Filtro
natural_image
Technical line drawings of two mechanical components with pipes and fittings (no text or symbols)natural_image
Line drawing of a mechanical device with a cylindrical component and attached tubing (no text or symbols)For any service and/or support inquiry, please contact our hot line:
→+49 (0) 7621 17 49 73
Or
service.eu@sanyo.com
or write to:
Sanyo Electric Service GmbH
Weiler Strasse 13
De 79540 Lörrach
- Warning
- Caution
- The sterile, electrolytic mist effectively suppresses allergens such as viruses, bacteria and pollen which are floating in the air.
- Part Names and Functions
- Operating Unit
- Safety Mechanism
- ■When this unit tips over, the device is automatically stopped.
- Installing the Filter
- Remove the front cover
- Remove the pre-filter (filter).
- Remove the pre-filter from the filter and remove from the plastic protector.
- Attach the filter to the pre-filter.
- Attach the pre-filter.
- Attach the front cover.
- Note:
- Replenishing the Water
- Lift the tab on the cover and remove.
- Loosen the cap to the tank and fill the tank with tap water.
- Replace the tank. • Line up the tank.
- Remove the tank. - Lift the tank straight
- Tighten the cap of the tank. - Confirm that the cap is on secure
- Replace the cover.
- Water
- Adjusting the Sensitivity of the Odor Sensor
- Unit Installation
- - Press the power on/off button.
- Press the fan speed button and operate according to preference.
- Automatic Operation
- Operation of the Odor Sensor
- Manual Operation
- Power Mist Mode
- Timer Operation
- Electrolyzed Water
- Select Brightness
- Stopping Operation
- Press the power on/off button.
- Replacement Periods
- Refer to page E-5 regarding replacement methods.
- The life of the filter is greatly reduced by the following.
- Replacement Filter
- Unit
- Pre-filter
- Filter
- Odor Sensor
- Electrolyzed Water Unit/Tank
- Remove the cover, tank, and electrolyzed water unit.
- Remove the electrolyzed water cover.
- Wash the tank and electrolyzed water cover with water.
- In the event of limescale build up on the Sterile-Electrolytic Mist Generator, clean with white vinegar to remove the limescale. Do not use water as this may cause the unit to malfunction.
- Wipe off any water and dry completely.
- Re-assemble the electrolyzed water unit and replace.
- Close the cap on the tank and replace.
- Replace the cover. - Push from above.
- Specifications
- Précautions
- Préfiltre
- Filtre
- Precaución
- Prefiltro
- Filtro
- Vorfilter
- Nota:
- Precauzioni
Brand : SANYO
Model : ABC-VW24A
Category : Air-conditioner