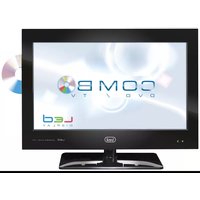
LTV 2116 CDVD - Television Trevi - Free user manual and instructions
Find the device manual for free LTV 2116 CDVD Trevi in PDF.


| Product Type | Television with DVD player |
| Brand | Trevi |
| Model | LTV 2116 CDVD |
| Screen Size | 21 inches (diagonal) |
| Display Type | CRT (Cathode Ray Tube) |
| Resolution | 640 x 480 pixels |
| Aspect Ratio | 4:3 |
| DVD Player | Combo unit, supports DVD, CD, and CD-R/RW |
| Audio Output | Stereo speakers (2 x 5W) |
| Power Supply | AC 220-240V, 50Hz |
| Power Consumption | 80W (typical) |
| Dimensions (W x H x D) | 600 x 450 x 450 mm |
| Weight | 15 kg |
| Remote Control | Included (batteries not included) |
| Inputs | Antenna (RF), AV input (RCA), SCART (optional) |
| Outputs | Headphone jack (3.5mm) |
| Features | Sleep timer, parental lock, automatic tuning |
| Cleaning | Use a soft dry cloth. Do not use liquid cleaners or abrasives. |
| Safety | Do not expose to rain or moisture. Disconnect from power during lightning storms. |
| Spare Parts | Remote control, batteries, power cord (available from authorized dealers) |
| Reparability | Refer to qualified service personnel. Do not attempt internal repairs yourself. |
Frequently Asked Questions - LTV 2116 CDVD Trevi
User questions about LTV 2116 CDVD Trevi
0 question about this device. Answer the ones you know or ask your own.
Ask a new question about this device
Download the instructions for your Television in PDF format for free! Find your manual LTV 2116 CDVD - Trevi and take your electronic device back in hand. On this page are published all the documents necessary for the use of your device. LTV 2116 CDVD by Trevi.
USER MANUAL LTV 2116 CDVD Trevi
16" TV COLOR/MONITOR TFT LED
HD DVB-T - DVD - CI SLOT - USB
Manuale D'uso
Instruction manual
1 PREFAZIONE
Televisore
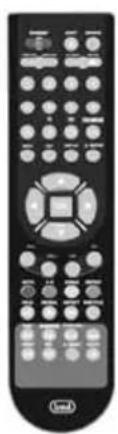
natural_image
Black remote control with black buttons and a central square dial (no visible text or symbols)Telecomando

9 TELEVISIONE DIGITALE TERRESTRE (DTV)
10 TELEVISIONE ANALOGICA (ATV)
9 TELEVISIONE DIGITALE TERRESTRE (DTV)
10 TELEVISIONE ANALOGICA (ATV)
16" TV COLOR/MONITOR TFT LED
HD DVB-T - DVD - CI SLOT - USB
English
Instruction manual
Contents
Important safety instructions.... 1
Setting up and using your TV.... 4
What's included with your TV.... 6
Sockets on the back of your TV.... 7
Basic installation 8
Remote Control Instruction.... 13
Select Input Source.... 17
Basic menu operation.... 17
USB Multimedia playback format.... 32
DVD Fuction Generalsetup 35
If you're having problems.... 39
Your Tv's specification.... 40
Wall mount installation.... 41
Attaching the stand.... 42
Important safety instructions
Warning
- Do not let your TV become wet(for example, by keeping it in a damp room, leaving it outside or dripping water on it)
-
You must not put objects filled with water on your TV (including vases of water).
-
Read these instructions carefully.
-
Keep these instructions in a safe place.

- Follow all the instructions.
4.Do not put your TV near water.

natural_image
Cartoon illustration of a computer monitor with a smiling face and a money bag nearby (no text or symbols)- Only clean your TV with a dry cloth.

natural_image
Illustration of a smiling computer monitor with a child standing beside it (no text or symbols present)6.Do not block the ventilation openings.

natural_image
Cartoon illustration of a computer monitor with a sad face and wavy lines, surrounded by flying debris (no text or symbols)- Do not put your TV near any heat source (such as radiators or stoves), or near equipment (including amplifiers) that produce heat.

natural_image
Cartoon illustration of a computer monitor with a sad face and falling tears, accompanied by a refrigerator (no text or symbols)-
Your TV is either fitted with a polarised plug or grounding-type plug. A polarised plug has two blades with one wider than the other. A grounding-type plug has two blades and a third grounding prong. The wide blade or the third prong is provided for your safety. If the provided plug does not fit into your outlet, ask an electrician to replace your plug socket so that it fits your TV plug.
-
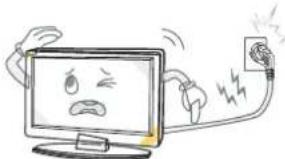
Do not walk on, trap, pinch or damage the power cord. Take care that the cord is not pulled, especially at plug sockets and where it comes out of the TV.
natural_image
Cartoon illustration of a computer monitor with a sad face and electrical plug, showing electrical connections (no text or symbols)- Only use attachments and accessories (included with your TV) that we have approved.
Important safety instructions
- Only use TV trolleys, stands, tripods or tables that we approve. If you use a trolley/table with your TV, be careful when you move it. So that it doesn't tip over.

natural_image
Silhouette of a person climbing a ladder inside a circular frame with a diagonal line (no text or symbols)- Unplug your TV both power and antenna during lightning storms or when you won't be using it for a week or more.

natural_image
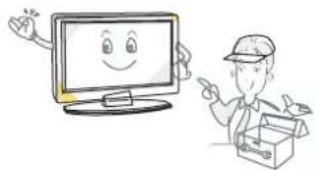
Cartoon illustration of a smiling computer monitor character with arms and legs, surrounded by clouds and industrial smoke (no text or symbols)- If your TV needs repairing, use a qualified service technician. If you damage your TV, it will need to be serviced.
natural_image
Illustration of a smiling computer monitor and a delivery worker pointing at a box (no text or symbols present)-
Be careful when you plug the power cord into a socket. Do not overload wall sockets. They could damage your TV and could give you an electric shock or cause a fire. Check your TV's power cord from time to time, and unplug your TV if the power cord looks worn. Stop using it until you have had the power cord replaced by a qualified technician. Do not twist, kink or pinch the power cord.
-
Disposing of your TV. The fluorescent lamp inside your TV has a small amount of mercury in it. Phone your local council to find out where your nearest recycling centre is located to ensure the TV is scrapped in compliance with UK & EU regulations.
Note
-If your TV is cold, there may be some small 'flickers' when you turn it on. This is normal and there is nothing wrong with your TV.
-Avoid touching the LED screen with any object or holding your finger against it as this may cause damage.
Important safety instructions

Caution
Risk of electric shock Do not open


Warning : To reduce the risk of fire or electric shock, do not expose this product to rain or moisture.

You will see these stickers on your TV.
This symbol means there are wires in your TV which are not insulated. If you touch these wires, you may get an electric shock.

This symbol means you should read the servicing guide before you take further action.
[ Caution ]
-You should not service your TV unless you are qualified to do so. If your TV breaks down, contact a qualified TV engineer.
![Trevi LTV 2116 CDVD - [ Caution ] - 1](/content/2026/05/960087/images/c458e6339b5f3398b0cdff5f0c27d43e68dbc752dbd8d230711a8b1bcd7ad403.jpg)
-Make sure you plug in your TV securely.
![Trevi LTV 2116 CDVD - [ Caution ] - 2](/content/2026/05/960087/images/6bc1f6338b32f0e8b1619cd47bc1ab600cc2a8e59462b8041fe2b81ada00fa09.jpg)
-If you use your TV to play video games or connect to your computer to use as a screen, keep brightness and contrast at a low level. Images with a high level of brightness or contrast may burn on to the screen permanently.
How to clean your TV
1 Wipe the TV screen with a soft, dry cloth
2 Do not use solvent methyl benzene. Strong chemicals may damage your TV screen.
3 Make sure you switch the TV off before you clean it.
Setting up and using your TV
- Check the voltage shown on the serial number or rating label on your TV, and make sure your TV is compatible with the voltage in your home. If you are not sure about the voltage you have in your home, please contact your distributor or an electrician.
- Make sure you plug the power cable into the socket securely. If you have problems plugging in your TV, please contact the shop you bought your TV from to replace the power cable.

The plug is designed, ostitavill only fit one way If you have problems plugging in the socket properly, please contact the shop you bought your TV from
- Do not overload power sockets or extension cords when you are setting up your TV. If you overload the power sockets or extension cords, you could receive an electric shock or cause a fire.
- Do not place any objects on the power cord when you are setting up your TV. Keep your TV screen away from any sharp objects such as screw drivers or knives so that you don't scratch or damage the TV screen. Only use the correct power cord when you set up your TV.
- Make sure you turn off your TV when you are not using it. If you won't be using your TV for a week or more, unplug both power and aerial connections.
- The vents at the back of your TV are to let air cool the inside of your TV, so it doesn't overheat. Please make sure the vents are not blocked.
- Do not put your TV on a bed, sofa or carpet. This may block the vents.
- Do not put your TV in an enclosed space, such as on a bookshelf or in a TV cabinet. Doing this may block the vents.
- Keep your TV away from direct sunlight.
- Do not place your TV on an unsteady shelf or desk. The TV could fall and injure you.
- Do not put objects inside the TV (such as children's toys). Doing this could give you an electric shock or damage the parts inside your TV.
When you must call a technician
If any of the following happens, unplug your TV and contact the shop you bought your TV from or a qualified technician to repair your TV.
- If the power cord or plug is damaged
- If liquid gets into the screen
- If your TV is damp or wet
- If your TV is damaged
- If the TV doesn't work properly.
The temperatures your TV will work in
Your TV will only work when the temperature is in the range of 0^ C– 40^ C.
Setting up and using your TV

Do not try to repair your TV yourself. There is high voltage inside it and you could receive an electric shock.
Safety notice
Your TV has a CE marking. This means your TV meets both the EMC directive (89/336/EEC), (93/68/EEC) and the Low Voltage Directive (73/23/EEC) that the European Community have issued.
When you need to throw your TV away
Please contact the shop that sold you your TV when you need to throw it away.
1. Do not throw your old TV away with your household waste.
2. You can also contact your local council to see if they can collect your old TV. If you throw your TV away at a landfill site, dangerous chemicals from your TV can leak into the ground and get into the food chain.
3. When you replace your TV with a new one, the shop who sold you your TV are legally responsible for taking your old TV and throwing it away.
END OF LIFE DISPOSAL

Warning ! This logo set on the product means that the recycling of this apparatus comes within the framework of the Directive 2002/96/CE of January 27, 2003 concerning the Waste of Electrical and Electronic Equipment (WEEE). This symbol means that used electrical and electronic products should not be mixed with general household waste. There is a separate collection system for these products.
If you want to dispose of this equipment, please do not use the ordinary dust bin!
-The presence of dangerous substances in the electrical and electronic equipments can have potential consequences on the environment and human health in the cycle of reprocessing this product.
-Therefore, at the end of its lifetime, this product shall not be disposed with other non-recycled waste. Used electrical and electronic equipment must be treated separately and in accordance with legislation that requires proper treatment, recovery and recycling of used electrical and electronic equipment.
-Local authorities and resellers have set special procedures for the purpose of collecting and recycling this product (please contact your local authority for further details). You have the obligation to use the selective waste collection systems put in place by your local authority.
-If your used electrical or electronic equipment has batteries or accumulators, please dispose of these separately beforehand according to local requirements.
-By disposing of this product correctly you will help ensure that the waste undergoes the necessary treatment, recovery and recycling and thus prevent potential negative effects on the environment and human health which could otherwise arise due to inappropriate waste handling.
CE
This unit complies with European Council Directive 2006 / 95 CE (Electromagnetic Compatibility & Low Voltage Directives)
What is included with your TV
What your TV should look like

natural_image
Technical line drawing of a computer monitor front panel with no visible text or symbols
natural_image
Line drawing of a flat-screen monitor with a base mount (no text or symbols)What is included with your TV
| User guide | Remote control |
| User Manual |  |
How to use your remote control
- Take the back cover off your TV remote and put two AAA batteries into the remote control. Make sure the + and - symbols on your batteries match the diagram.
- Replace the batteries. So they are facing the right way. If you won't be using the remote control for a long time, take the batteries out. Use your remote control carefully. Do not drop. Keep the remote control away from water, direct sunlight and hot surfaces.
Sockets on the back of your TV

DC IN
Headphone: Connect the earphone.
PC AUDIO: Connect the Audio output jack of PC.
VGA: Connect a computer to these jacks.
YPbPr:Connect the YPbPr output jack of DVD or VCR.
SCART:Connect the SCART jack of VCR or DVD
Video: Connect the Video output jack of DVD or VCR.
R/L AUDIO:Connect the Video/YPbPr AUDIO output jack of DVD.
Coax: Coax output.
RF IN: Connect the antenna.
HDMI: Connect the HDMI output jack of DVD.
USB: Connect to portable usb device.
Cl:Connect to the Cl card.
BASIC INSTALLATION
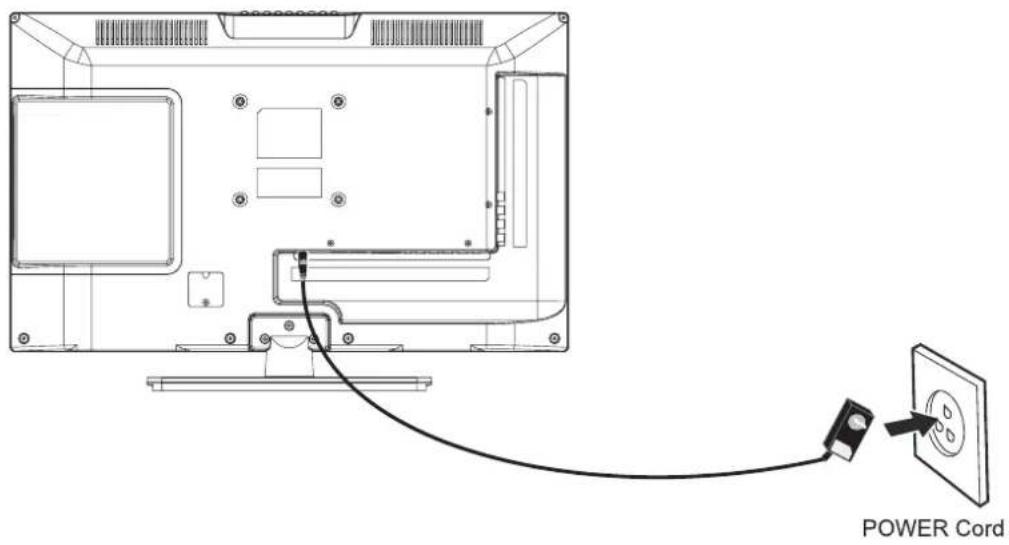
Power Cord Connection
- Connect the power cord correctly as shown.
- Press the STANDBY switch of your LED TV to switch the unit on. The power indicator on the front panel lights up in green or blue.
Antennas Connection
To ensure good picture and sound, TV antenna system needs to be installed. The antenna system as shown can be sourced from TV equipment shops, which will provide service for correct installation and connection. After installation, insert the 75-OHM antenna plug into the antenna jack as shown.

flowchart
graph TD
    A["VHF"] --> B["OUTDOOR ANTENNA AMPLIFIER"]
    C["UHF"] --> D["INDOOR ANTENNA AMPLIFIER"]
    B --> E["RF IN"]
    D --> E
    E --> F["75 OHM ANTENNA PLUG"]
    G["POWER PLUG OF ANTENNA AMPLIFIER"] --> B
    G --> D
AV Connection
Connect the VIDEO and AUDIO output jack of the DVD or VCR to the AV IN jacks on the set using the RCA cable (Yellow [video], White and RED [left & Right audio]).
Select the AV input source using the SOURCE button on the remote control.

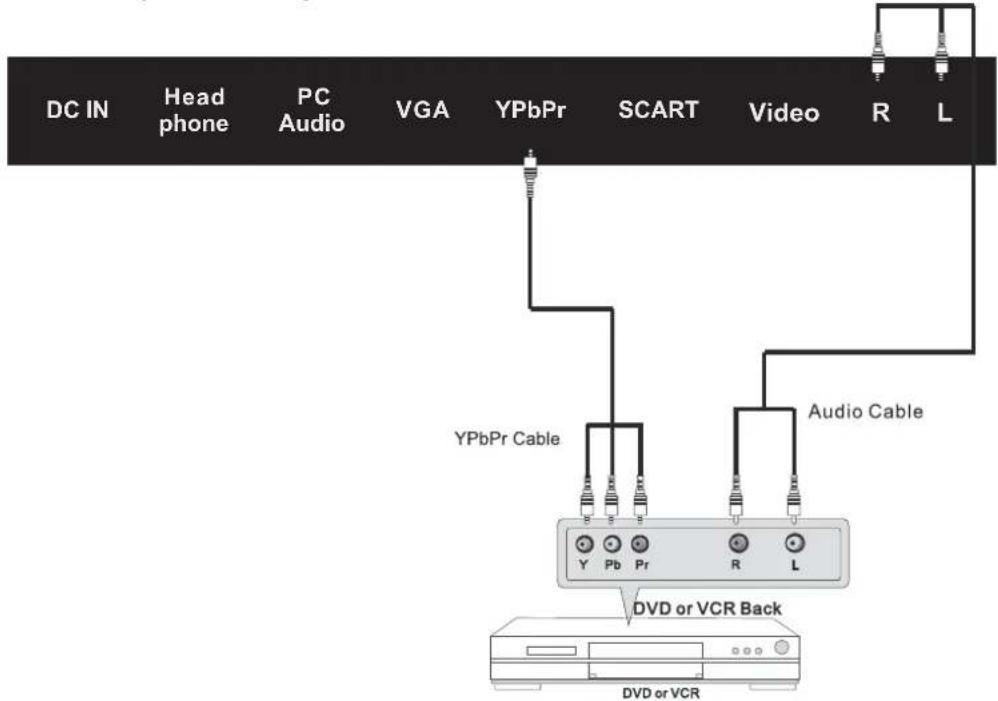
YPbPr Connection
Connect the YPbPr/YCbCr output of the DVD or VCR to the YPbPr input on the set. The picture quality is improved compared to connecting a regular VCR to the video input. Connect the Audio output of the DVD or VCR to the Audio input jacks on the set using the RCA cable.(3.5mm plug-2 X RCA plug) Match the jacks colours: Y is green, Pb is blue, Pr is red, Audio left is white and Audio right in red. Select YPbPr input source using the SOURCE button on the remote control.
VGA(PC) Connection
Connect the RGB output of the PC to the VGA jack on the set. Connect the AUDIO output of the PC to the PC AUDIO jack on the set. Select the PC input source using button on the remote control.SOURCE

flowchart
graph TD
    A["DC IN"] --> B["Head phone"]
    B --> C["PC Audio"]
    C --> D["VGA"]
    D --> E["SCART"]
    E --> F["Video"]
    F --> G["R"]
    G --> H["L"]
    I["Audio Cable"] --> J["VGA Cable"]
    K["AUDIO RGB-PC OUTPUT"] --> L["Output Device"]
HDMI Connection
HDMI connection allows the user to transfer both audio and video control signals through one cable only. These signals are transferred in digital.

flowchart
graph TD
    A["Coax Cl"] --> B["HDMI RF"]
    B --> C["USB"]
    C --> D["HDMI Cable"]
    D --> E["HDMI OUT"]
    E --> F["DVD or VCR Back"]
    E --> G["DVD or VCR"]
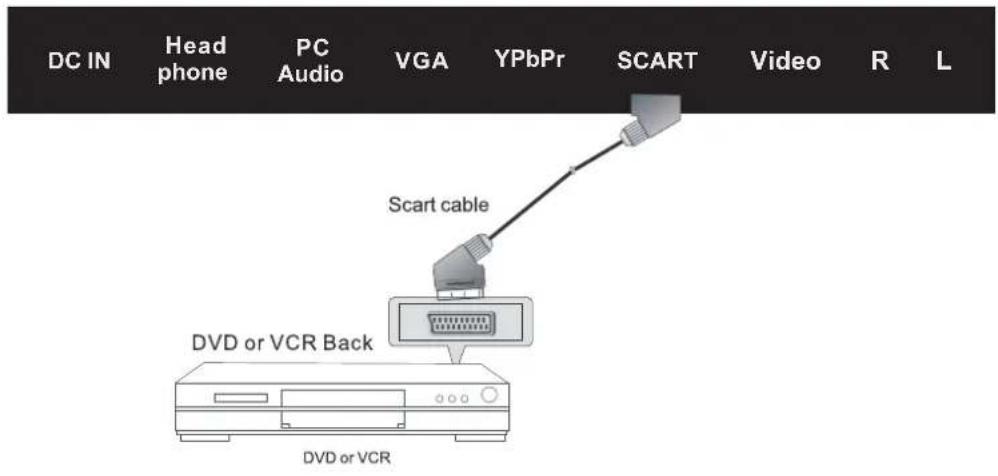
SCART Connection
Connect the SCART connector on the external video device to the SCART connector on the LED TV using a SCART cable.
MEDIA Connection
USB: Connect to portable usb device.

Headphone Connection

-You can connect a headphone to your TV if you wish to watch program without disturbing people around you.
-Insert some standard headphone with a 3.5mm jack plug into the 3.5mm jack on the back of the TV (see diagram).
NOTE:
- HEADPHONE VOLUME WARNING.
Connect headphones with the volume set low and increase it if required.
Prolonged listening through some headphones at high volume settings can result in hearing damage.
- You will not receive the sound from the TV when you connect headphones to the system.
Remote control instruction

STANDBY
Turn the LED TV ON or OFF.
SOURCE
Press to cycle through the input source in following:

PMODE
Press repeatedly to cycle through the available video picture modes.
SMODE
Press to cycle through the different sound settings.
SLEEP
Select amount of time. Let your TV turn off automatically. MUTE
Press to mute the sound. Press again or press V+ to un-mute the TV.
NUMBER BUTTONS
Press 0-9 to select a TV channel directly when you are watching TV. The channel change after 2 seconds.

Return to the previous channel viewed.
FAV
Press to increase/decrease your favourite program. MENU
Brings up the main TV menu to the screen. EXIT
Exit the main TV menu to the screen.
DISPLAY
Press to display the source and channel's information.
THUMBSTICK(▲/▼/◄/►/OK ENTER)
Allows you to navigate the on-screen menus and adjust the system settings to your preference.
VOL+/VOL-
Press to increase/decrease the sound level.
CH+/CH-
Press to scan through channels.
ASPECT
Press to change the screen scale.
I/II
Press to search the NICAM modes.
Remote control instruction
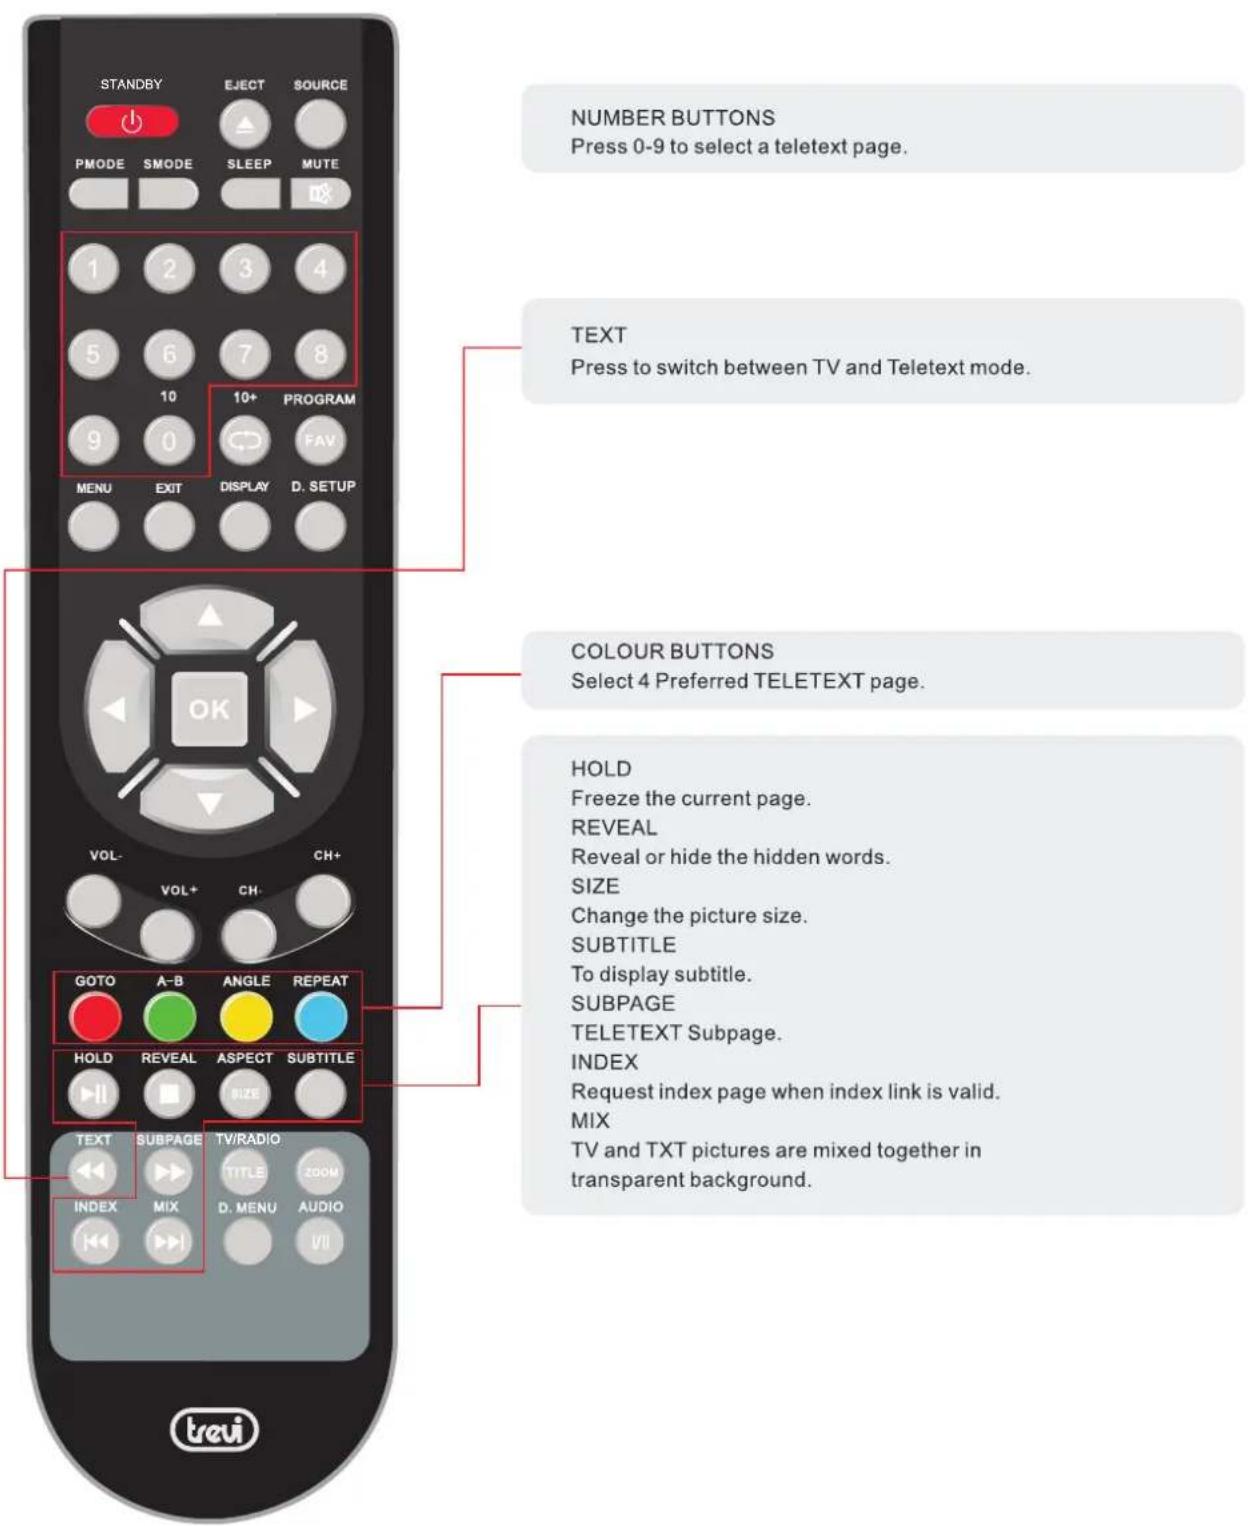
Remote control instruction
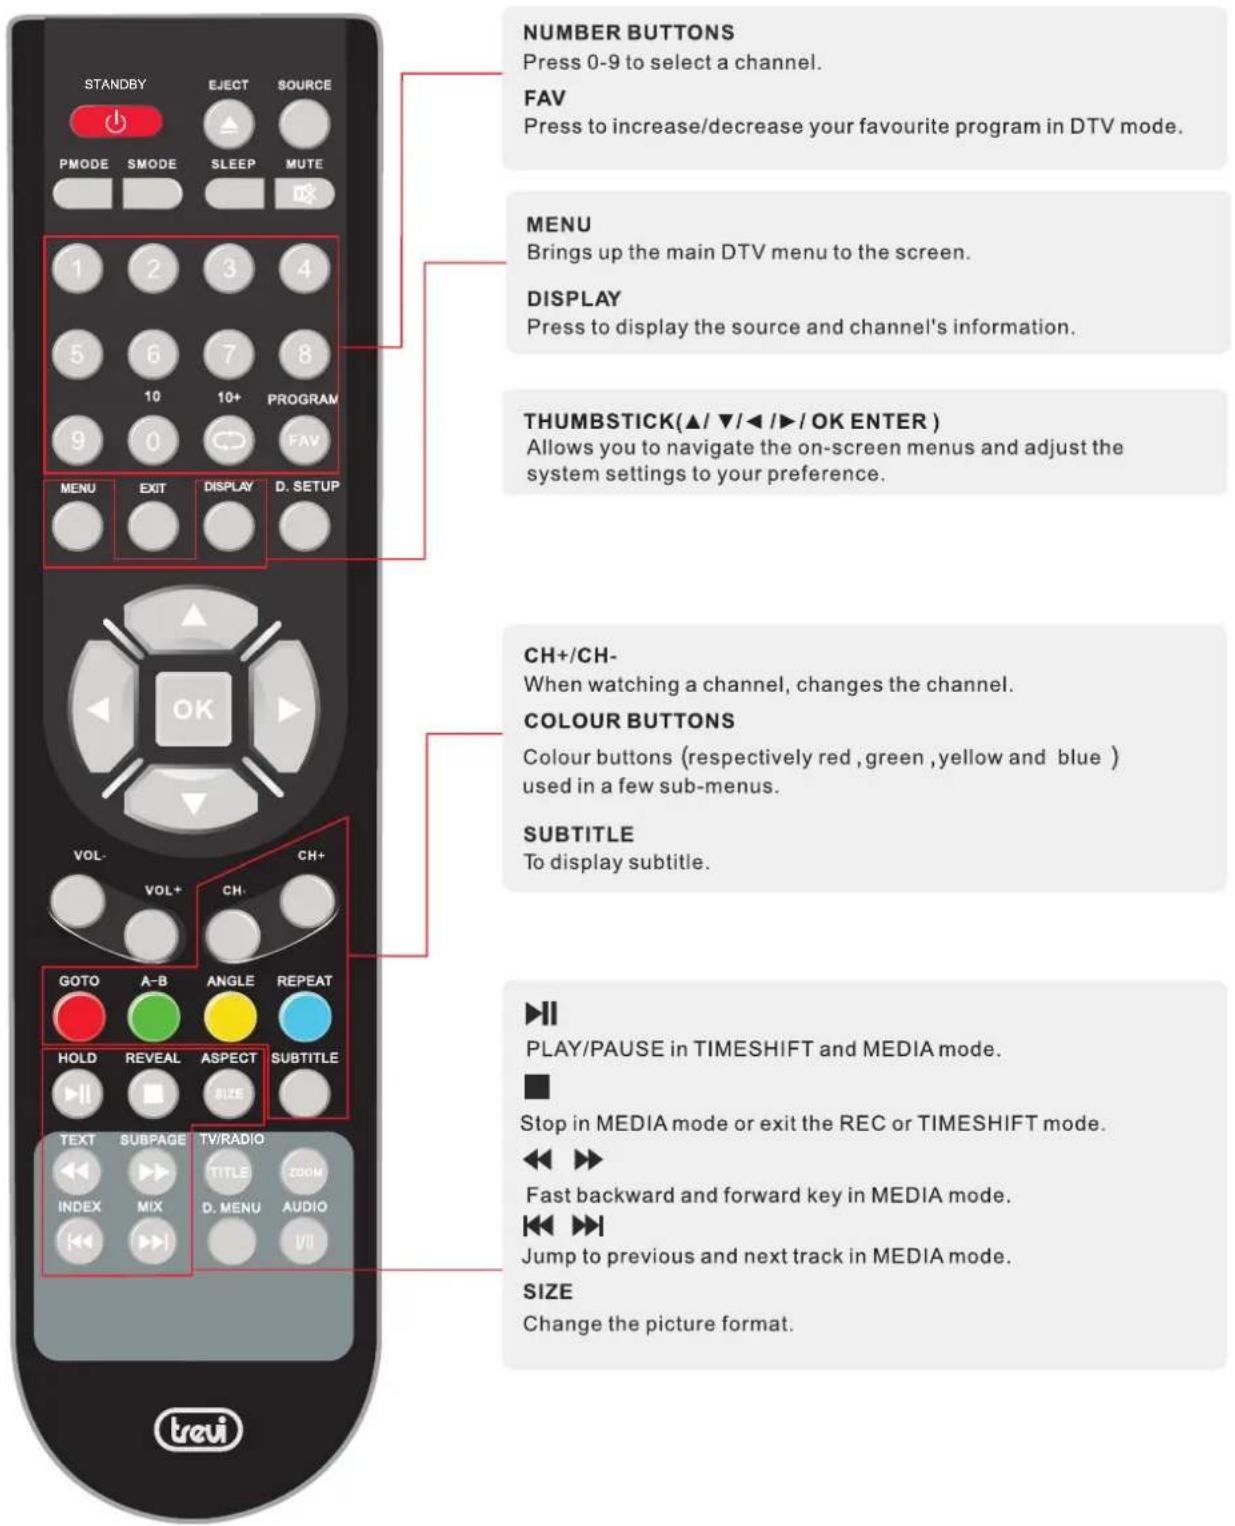
Remote control instruction


EJECT
To eject the disc.
NUMBER BUTTONS
Numerical buttons for various data.
PROGRAM
Program a disc playing in a desired sequence.
DISPLAY
Press to display the DVD information of DVD mode.
D. SETUP
Used for selecting programs. It may also be used to execute commands.
THUMBSTICK(▲/▼/◄/►/OK ENTER)
Allows you to navigate the on-screen menus and adjust the system settings to your preference.
GOTO
It is possible to get access to any point on the directly using the 'GOTO' menu.
Press GOTO to access the 'GOTO' menu.
A-B
This button enables you to repeat a selected section from the disc.
ANGLE
Selects various camera angles for certain scenes or passages on the DVD during playback.
REPEAT
Press REPEAT to cycle through the repeat play options.
SUBTITLE
Select a different subtitle language(the DVD disc must have the subtitle you selected.
TITLE
When DVD is playing, brings up the Title Menu.
ZOOM
In play state, press ZOOM, the player will zoom in the picture one time.
D.MENU
DVD disc menu Access to menu.
AUDIO
AUDIO selection buttons in DVD mode.

PLAY/PAUSE in DVD mode.

DVD STOP

Jump to previous and next track.


Fast backward and forward key.
Select Input Source
SOURCE

DTV
ATV
SCART
AV
YPbPr
DVD
HDMI
PC
USB
SOURCE:Exit
Basic Menu Operation
Press SOURCE button on the remote control to display the input source list
Press ▼button to select the input source you want to watch.
Press OK button to enter the input source.
Press EXIT button to quit.
Picture Menu
Press MENU button to display the main menu.
Press ◀ / ▶ button to select PICTURE in the main menu, it will highlight the first option.

- Press ▼ / ▲ button to select the option that you want to adjust in the PICTURE menu.
- Press ◀ / ▶ button to adjust.
- After finishing your adjustment, Press MENU button to return back to the previous menu.
Picture Mode
Press ▼ / ▲ button to select Picture Mode, then press OK button to enter sub-menu. Press ▼ / ▲ button to select. (Available Picture mode: Dynamic, Standard, Mild, Personal).
You can change the value of contrast, brightness, color and sharpness when the picture is in Personal mode.
TIPS: You can press PMODE button on the remote control to change the Picture Mode directly.
Brightness
Press ▼ / ▲ button to select Brightness, then press OK button to enter sub-menu. Press ◀ / ▶ button to adjust.
Contrast
Press ▼ / ▲ button to select Contrast, then press OK button to enter sub-menu. Press ◀ / ▶ button to adjust.
Sharpness
Press ▼ / ▲ button to select Sharpness, then press ◀ / ▶ button to adjust.
Saturation
Adjust the saturation of the color based on your own like.
Hue
Use in compensating color changed with the transmission in the NTSC code.
Color Temp
Press ▼ / ▲ button to select Color Temperature, then press ◀ / ▶ button to select. (Available Color Temperature: Standard, Cool, Warm).
Aspect Ratio
Press ▼ / ▲ button to select Aspect Ratio , then press ◀ / ▶ button to select. (Available Aspect Ratio: Full, Zoom1, Zoom2, 4:3).
Advanced Settings
Press ▼ / ▲ button to select ,then press OK button to enter sub-menu.Advanced Settingse

Press ▼ / ▲ button to select NR, then press ◀ / ▶ button to adjust. (Available NR: Medium, Strong, Off, Weak).
Press ▼ / ▲ button to select MPEG NR, then press ◀ / ▶ button to adjust. (Available MPEG NR: Medium, Strong, Off, Weak).
Press ▼ / ▲ button to select Dynamic Contrast, then press ◀ / ▶ button to adjust. (Available Dynamic Contrast: Off, Weak, Medium, Strong).
Sound Menu
Press MENU button to display the main menu.
Press ◀ / ▶ button to select Sound in the main menu, it will highlight the first option.
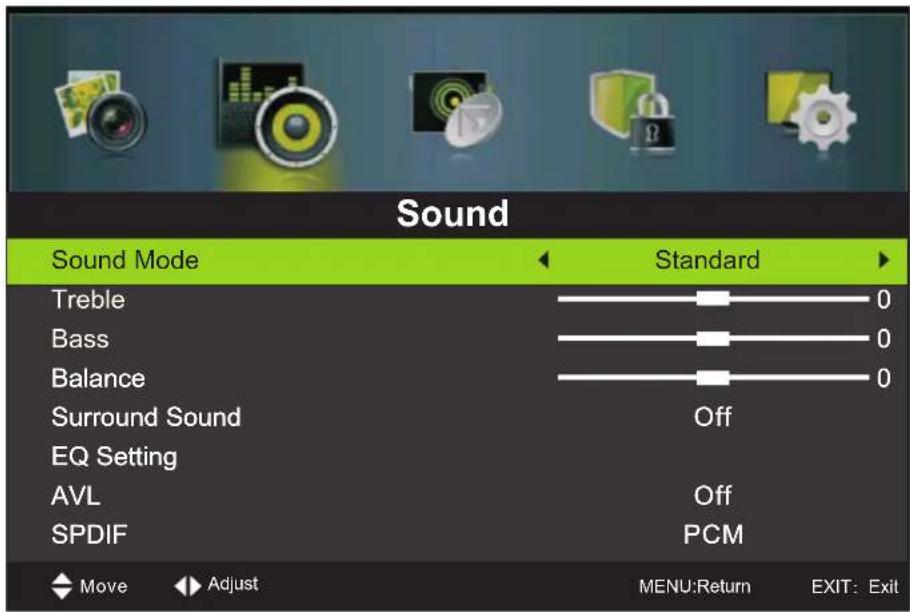
- Press ▼ / ▲ button to select the option that you want to adjust in the SOUND menu.
- Press ◀ / ▶ button to adjust.
- After finishing your adjustment, Press MENU button to return back to the previous menu.
Sound Mode
Press ▼ / ▲ button to select Sound Mode, then press OK button to enter sub-menu. Press ▼ / ▲ button to select. (Available Sound mode: Standard, Music, Movie, Sports, Personal).
You can change the value of Treble and Bass when the sound is in Personal mode.
TIPS: You can press SMODE button on the remote control to change the Sound Mode directly.
Treble
Press ▼ / ▲ button to select Treble, then press OK button to enter sub-menu. Press ◀ / ▶ button to adjust.
Bass
Press ▼ / ▲ button to select Bass, then press OK button to enter sub-menu. Press ◀ / ▶ button to adjust.
Balance
Press ▼ / ▲ button to select Balance, then press OK button to enter sub-menu. Press ◀ / ▶ button to adjust.
Surround Sound
Press ▼ / ▲ button to select Surround Sound, then press Press ◀ / ▶ button to select On or Off.
EQ Setting
EQ Setting, then press OK/Press ▼ / ▲ button to select ▶ button to enter submenu.

AVL
Press ▼ / ▲ button to select ,then press Press ◀ / ▶ button to select On or Off.AVL
SPDIF
Press ▼ / ▲ button to select SPDIF , then press Press ◀ / ▶ button to select Off, Auto, PCM.
Audio Description
Press ▼ / ▲ button to select Audio Description, then press OK/▶ button to enter submenu.

Sound Type
Press ▼ / ▲ button to select Sound Type, then press Press ◀ / ▶ button to select Stereo, DualI, Dual II, Mixed.
Channel Menu
Press MENU button to display the main menu.
Press ◀ / ▶ button to select CHANNEL in the main menu, it will highlight the first option.

- Press ▼ / ▲ button to select the option that you want to adjust in the CHANNEL menu.
- Press ◀ / ▶ button to adjust.
- After finishing your adjustment, Press MENU button to return back to the previous menu.
Auto Scan
Press ▼ / ▲ button to select ▶ button press@re Submenu.Auto Scan (Default password is '0000')

Manual Scan
Press ▼ / ▲ button to select ▶ button press or submenu. Manual Scan (Default password is '0000')

Digital Manual Scan
Press Button to better DigitalMauraleScan, then press OK/

Analog Manual Scan
Press Button be set to the erpsen@KU.Analog Manual Scan

Channel Edit
Press ▼ / ▲ button to select Channel Edit, then press OK/▶ button to enter submenu(Default password is '0000').

The three colored key is the shortcut key for programming the channel.
First press ▼ / ▲ to highlight the channel you want to delete or move or skip, then:
Press the Redon to delete the channel.
Press the Button to skip the select channel.
(Your TV set will skip the channel automatically when using CH+/- to view the channels.)
Press the Button to to set the channel to moving state. then press ▼ / ▲ to move
it to the position you want to put.
Common interface
Press ▼ / ▲ button to select Common interface, then press OK/▶ button to enter submenu.
Only available when there is CI card under DTV.
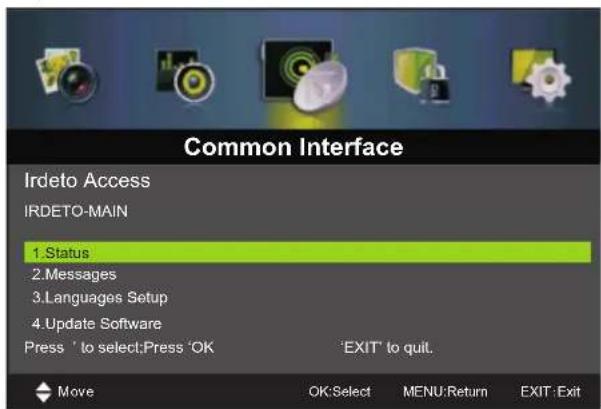
Signal Information
Press ▼ / ▲ button to select Signal Information, then press the Enter button to see the detail information about the signal. Only available when there is signal under DTV.

Lock Menu
Press MENU button to display the main menu.
Press ◀ / ▶ button to select LOCK in the main menu, it will highlight the first option.
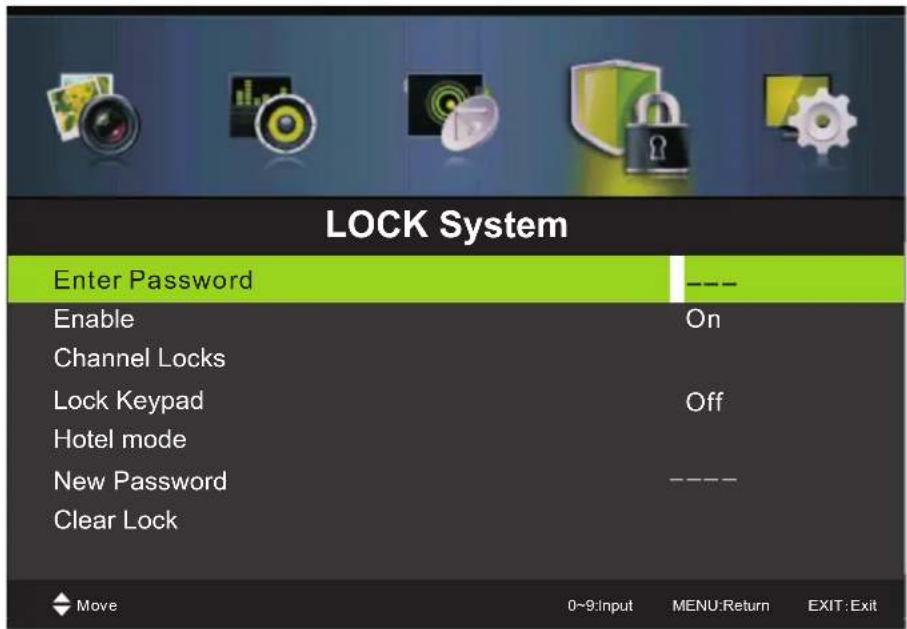
- Press ▼ / ▲ button to select the option that you want to adjust in the LOCK menu.
- Press ◀ / ▶ button to adjust.
- After finishing your adjustment, Press MENU button to return back to the previous menu.
Enter Password
Press ▼ / ▲ button to select , EnterPassWord button to make the following 4 options valid. (Default password is '0000').
Enable
Press ▼ / ▲ button to select ,then press Press ◀ / ▶ button to select On or Off.Enable Channel Locks,Parental Rating and Lock Keypad are available when Enable is On.
Channel Locks
, then press OK/Press ▼ / ▲ button to select ▶ button to enter submenu.Channel Locks
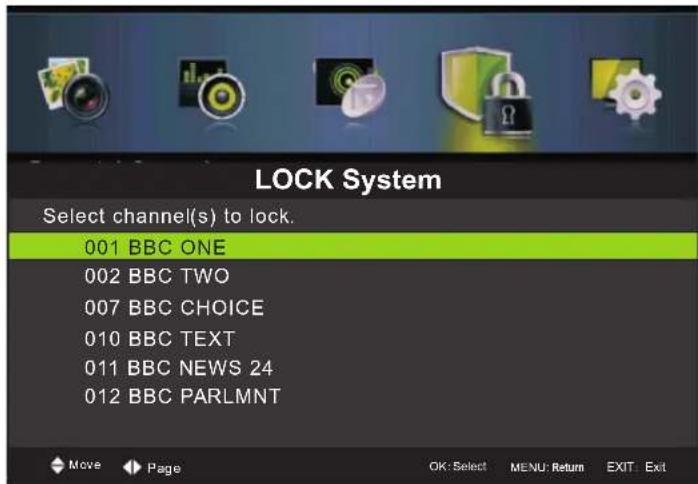
Lock Keypad
Set to prevent it from being used by young child ren, or other unexpected usage.
Press ▼ / ▲ button to select Lock Keypad, then press ◀ / ▶ button to select On or Offt.
Hotel mode
Press ▼ / ▲ button to select Hotel mode, hen press ▶ button to enter submenu.
Hotel mode
| Active Hotel Mode | Off |
| Max Vol. | 100 |
| Default Vol. | 20 |
| Source Lock | |
| Default source | DTV |
| Default Dtv program | --- |
| Default Atv program | -- |
| Backup to USB | |
| Restore from USB | |
| Recall |

Move

Adjust
EXIT: Exit
New Password
Press ▼ / ▲ button to select New Passwor,, then enter a 4-digital number you want to set twice.
Clear Lock
Press ▼ / ▲ button to select Clear Lock, then press ◀ / ▶ button to select.
Setup Menu
Press MENU button to display the main menu.
Press ◀ / ▶ button to select SETUP in the main menu, it will highlight the first option.

OSD Language
Press ▼ / ▲ button to select the OSD/Language button press OK button to enter sub-menu. Press to select OSD Language
Audio Languages
Press ▼ / ▲ button to select Audio Languages, then press OK button to enter submenu.
Press ▼ / ▲ / ◀ / ▶ button to select the Audio Primary Language and Audio Secondary Language.

Subtitle
then press OK Press ▼ / ▲ button to select button to enter submenu. Subtitle,

Teletext
Adjust Teletext settings. Only available under DTV and ATV source.
Press ▼ / ▲ button to select Teletext, then press OK/▶ button to enter submenu.


Under DTV source, press ◀ / ▶ button to select Digital Teletext Language.
Under ATV source, press ◀ / ▶ button to select Decoding Page Language.
Time Settings
then press OK Press ▼ / ▲ button to select button to enter submenu.Time Settings,

First Time Setup
Press button to select First time Setup, then press OK button to enter. ▼ / ▲

Reset
Press ▼ / ▲ button to select Reset, then press OK button to enter.

If you are sure to reset, press Yes to reset.
Software Update(USB)
Press ▼ / ▲ button to select, then press OK button to enter.Software Update(USB)
PC Menu
Press MENU button to display the main menu.
Press ◀ / ▶ button to select SETUP in the main menu, it will highlight the first option.

- Press ▼ / ▲ button to select the option that you want to adjust in the SCREEN menu.
- Press OK button to adjust.
- After finishing your adjustment, Press MENU button to save and return back to the previous menu.
Auto Adjust
Press ▼ / ▲ button to select Auto Adjust, then press OK button to start adjusting automatically.
H Position
Press ▼ / ▲ button to select H Position, then press OK button to enter sub-menu. Press ◀ / ▶ button to adjust.
V Position
Press ▼ / ▲ button to select V Position, then press OK button to enter sub-menu. Press ◀ / ▶ button to adjust.
Phase
Press ▼ / ▲ button to select Phase, then press OK button to enter sub-menu. Press ◀ / ▶ button to adjust.
Clock
Press ▼ / ▲ button to select Clock, then press OK button to enter sub-menu. Press ◀ / ▶ button to adjust.
ATV /SCART/HDMI/AV/YPbPr/PC
- PC Setting in PICTURE menu is available in PC Input only.
- Audio Description and Sound Type in AUDIO menu is invalid.
- SCART/HDMI/AV/YPbPr/PC mode has no CHANNEL menu.
- Parental Rating and Channel Locks in PARENTAL CONTROL menu is invalid for SCART/HDMI/AV/YPbPr mode. Parental Rating is invalid for ATV mode. PC mode has no PARENTAL CONTROL menu.
- Audio Languages, Subtitle and PVR Settings in SETUP option are invalid for SCART/AV/PC mode. Audio Languages, Subtitle, Teletext PVR Settings in SETUP option are invalid for HDMI/YPbPr mode.
Media Menu
Note: Before operating USB menu, Plug in USB device, then press INPUT button to set the Input Source to USB.
Press ◀ / ▶ button to select USB in the Source menu, then press OK button to enter.

Press ◀ / ▶ button to select the option you want to adjust in the main USB menu, then press OK button to enter.
Photo
Press ◀ / ▶ button to select PHOTO in the main menu, then press OK button to enter. Press ◀ / ▶ button to select drive disk you want to watch, then press OK button to enter. Press ◀ / ▶ button to select return option to back to the previous menu.
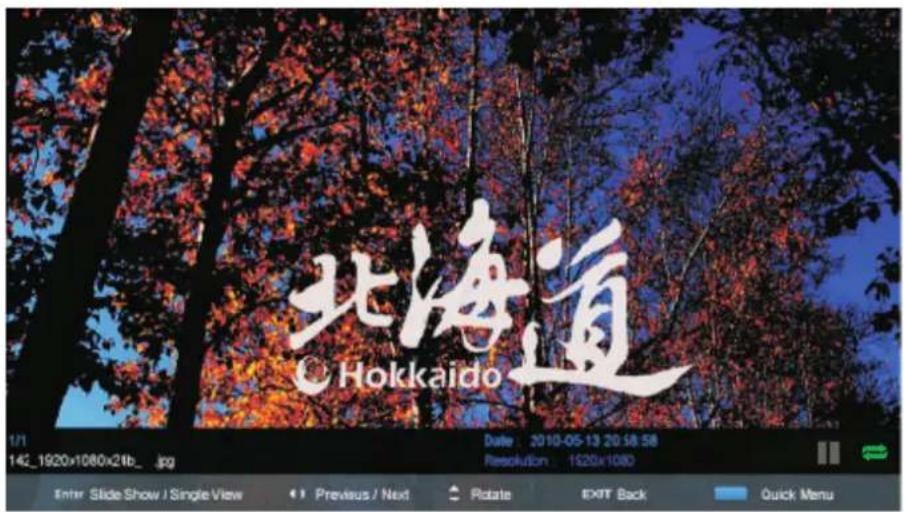
Music
Press ◀ / ▶ button to select MUSIC in the main menu, then press OK button to enter. Press ▼ / ▲ button to select drive disk you want to watch, then press OK button to enter. Press ▼ / ▲ button to select return option to back to the previous menu.

When highlighting the option you select, the file information will appear on the right.
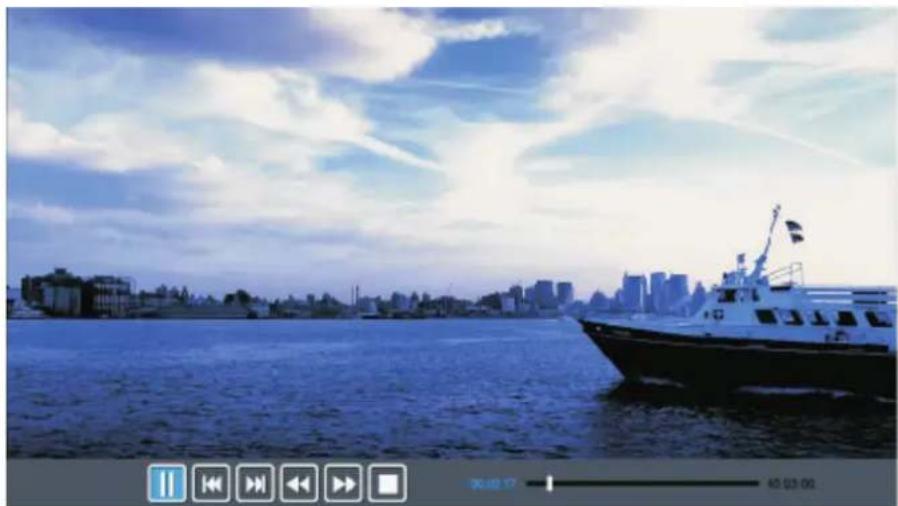
Movie
Press ◀ / ▶ button to select MOVIE in the main menu, then press OK button to enter. Press ▼ / ▲ button to select drive disk you want to watch, then press OK button to enter. Press ▼ / ▲ button to select return option to back to the previous menu.
natural_image
River scene with a ferry and city skyline under a cloudy sky (no visible text or symbols)Text
Press ◀ / ▶ button to select TEXT in the main menu, then press OK button to enter. Press ▼ / ▲ button to select drive disk you want to watch, then press OK button to enter. Press ◀ / ▶ button to select return option to back to the previous menu.

When highlighting the option you select, the file information will appear on the right.

Press the DVD.SETUP key and then press the ◀/▶ to display the general setup page when in DVD mode.
Press the ▲/▼ key to move the highlight to select following option.
Press the OK key into following menu and then press the ▲/▼ key to select a menu item.
Press the OK key to confirm.

flowchart
graph TD
    A["--General Setup Page --"] --> B["--General Setup Page --"]
    B --> C["--General Setup Page --"]
    C --> D["--General Setup Page --"]
2. Audio Setup Page
Press the DVD.SETUP key and then press the ◀/▶ to go to the Audio Setup Page when in DVD mode.
Press the ▲/▼ key to move the highlight to select following option.
Press the OK key into following menu and then press the ▲/▼ key to select a menu item.
Press the OK key to confirm.

flowchart
graph TD
    A["Speaker Setup\nDual Mono\nDynamic"] --> B["-->"]
    B --> C["Speaker Setup\nDual Mono\nDynamic"]
    C --> D["Stereo\nL-Mono\nR-Mono\nMix-Mono"]
    D --> E["-->"]
    E --> F["Speaker Setup\nDual Mono\nDynamic"]
    F --> G["FULL\n3/4\n1/2\n1/4\nOFF"]
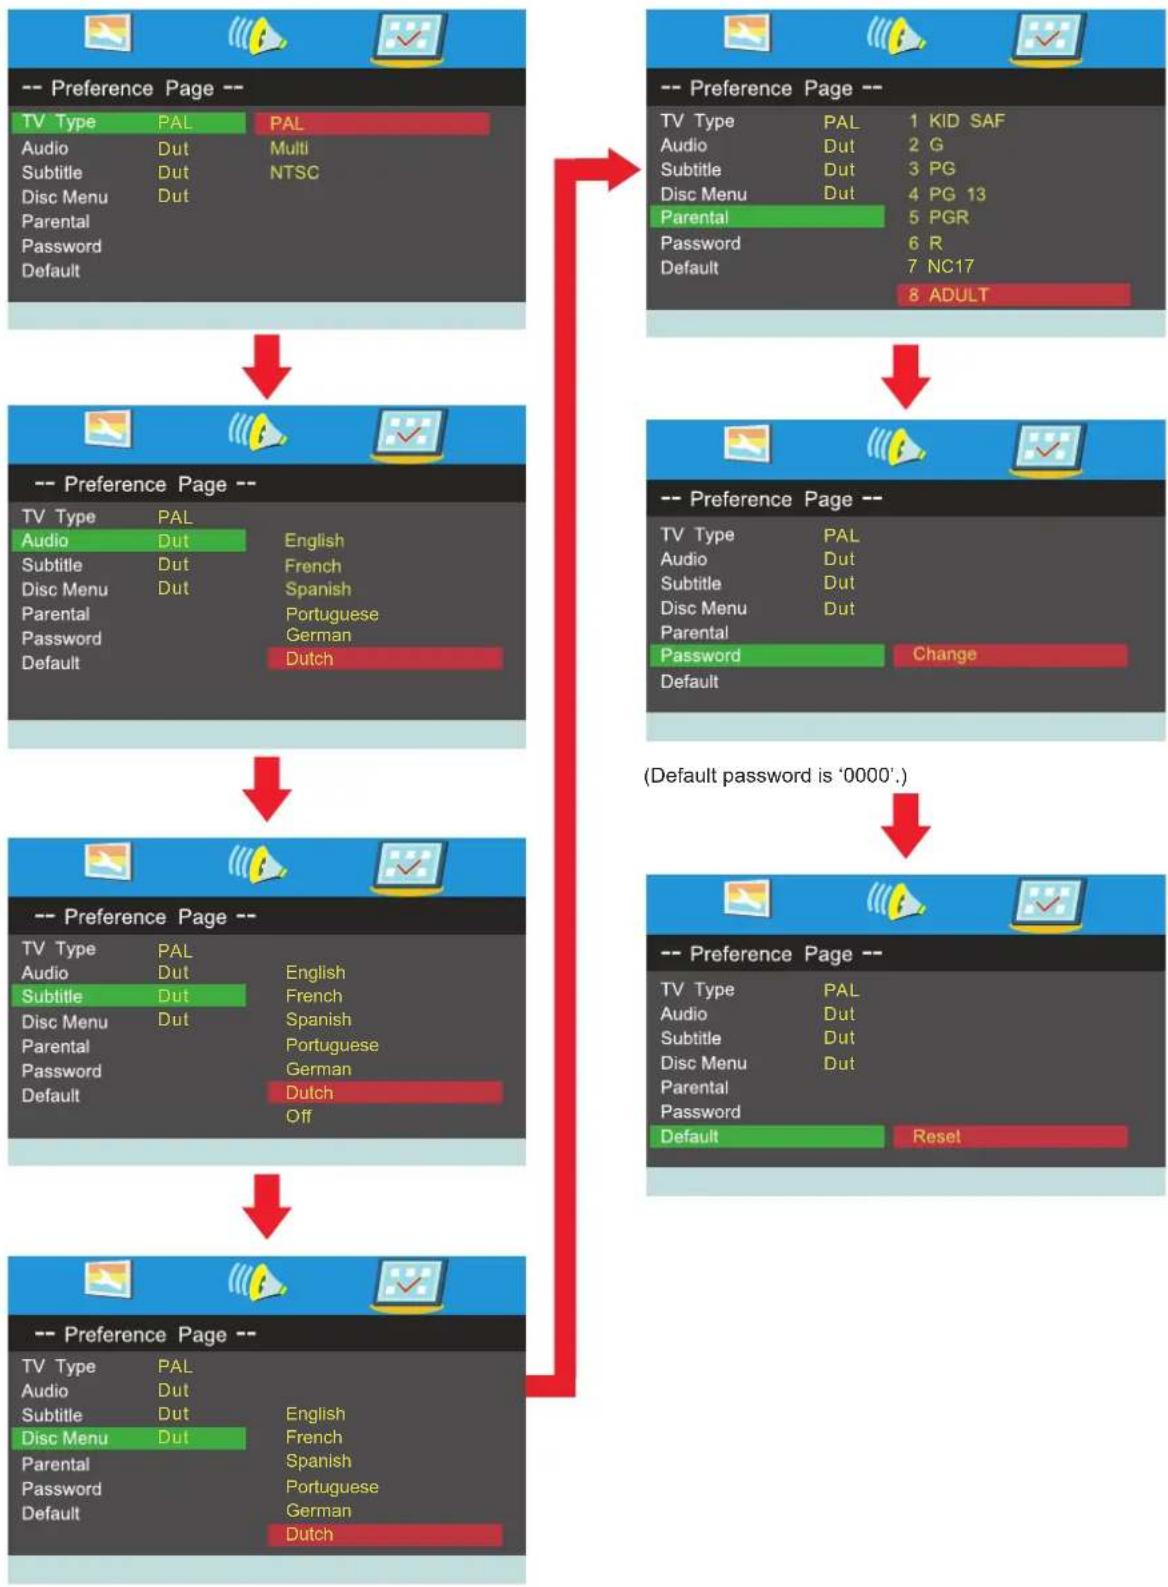
3. Preference Page
Press the DVD.SETUP key and then press the ◀/▶ to go to the Preference Page when in DVD mode.
Press the ▲/▼ key to move the highlight to select following option.
Press the OK key into following menu and then press the ▲/▼ key to select a menu item.
Press the OK key to confirm.
flowchart
graph TD
    A["-- Preference Page --"] --> B["TV Type PAL PAL"]
    A --> C["Audio Dut Multi NTSC"]
    A --> D["Subtitle Dut"]
    A --> E["Disc Menu Dut"]
    A --> F["Parental Password Default"]

    B --> G["-- Preference Page --"]
    C --> G
    D --> G
    E --> G
    F --> G

    G --> H["TV Type PAL English"]
    G --> I["Audio Dut French"]
    G --> J["Subtitle Dut Spanish"]
    G --> K["Disc Menu Dut Portuguese"]
    G --> L["Parental Password German"]
    G --> M["Password Default Dutch"]

    H --> N["-- Preference Page --"]
    I --> N
    J --> N
    K --> N
    L --> N
    M --> N

    N --> O["TV Type PAL English"]
    N --> P["Audio Dut French"]
    N --> Q["Subtitle Dut Spanish"]
    N --> R["Disc Menu Dut Portuguese"]
    N --> S["Parental Password German"]
    N --> T["Password Default Dutch"]

    O --> U["TV Type PAL English"]
    O --> V["Audio Dut French"]
    O --> W["Subtitle Dut Spanish"]
    O --> X["Disc Menu Dut Portuguese"]
    O --> Y["Parental Password German"]
    O --> Z["Password Default Dutch"]

    P --> AA["TV Type PAL English"]
    P --> AB["Audio Dut French"]
    P --> AC["Subtitle Dut Spanish"]
    P --> AD["Disc Menu Dut Portuguese"]
    P --> AE["Parental Password German"]

    Q --> AF["TV Type PAL English"]
    Q --> AG["Audio Dut French"]
    Q --> AH["Subtitle Dut Spanish"]
    Q --> AI["Disc Menu Dut Portuguese"]
    Q --> AJ["Parental Password German"]

    R --> AK["TV Type PAL English"]
    R --> AL["Audio Dut French"]
    R --> AM["Subtitle Dut Spanish"]
    R --> AN["Disc Menu Dut Portuguese"]
    R --> AO["Parental Password German"]

    S --> AP["TV Type PAL English"]
    S --> AQ["Audio Dut French"]
    S --> AR["Subtitle Dut Spanish"]
    S --> AS["Disc Menu Dut Portuguese"]
    S --> AT["Parental Password German"]

    U --> AU["TV Type PAL English"]
    U --> AV["Audio Dut French"]
    U --> AW["Subtitle Dut Spanish"]
    U --> AX["Disc Menu Dut Portuguese"]
    U --> AY["Parental Password German"]

    V --> AZ["TV Type PAL English"]
    V --> BA["Audio Dut French"]
    V --> BB["Subtitle Dut Spanish"]
    V --> BC["Disc Menu Dut Portuguese"]
    V --> BD["Parental Password German"]

    W --> BE["TV Type PAL English"]
    W --> BF["Audio Dut French"]
    W --> BG["Subtitle Dut Spanish"]
    W --> BH["Disc Menu Dut Portuguese"]
    W --> BI["Parental Password German"]

    X --> BJ["TV Type PAL English"]
    X --> BK["Audio Dut French"]
    X --> BL["Subtitle Dut Spanish"]
    X --> BM["Disc Menu Dut Portuguese"]
    X --> BN["Parental Password German"]

    Y --> BO["TV Type PAL English"]
    Y --> BP["Audio Dut French"]
    Y --> BQ["Subtitle Dut Spanish"]
    Y --> BR["Disc Menu Dut Portuguese"]
    Y --> BS["Parental Password German"]

    Z --> BT["TV Type PAL English"]
    Z --> BU["Audio Dut French"]
    Z --> BV["Subtitle Dut Spanish"]
    Z --> BW["Disc Menu Dut Portuguese"]
    Z --> BX["Parental Password German"]

    AA --> BY["TV Type PAL English"]
    AA --> BZ["Audio Dut French"]
    AA --> CA["Subtitle Dut Spanish"]
    AA --> CB["Disc Menu Dut Portuguese"]
    AA --> CC["Parental Password German"]

    AB --> DA["TV Type PAL English"]
    AB --> DB["Audio Dut French"]
    AB --> DC["Subtitle Dut Spanish"]
    AB --> DD["Disc Menu Dut Portuguese"]
    AB --> DE["Parental Password German"]

    AF --> BF
    AG --> BH
If you're having problems
If you are having problems with your TV, carry out the following checks first.
If you are still having problems, unplug your TV and contact the service centre.
Problems and how to fix them
There is no sound and no picture coming from my TV.
-Check that you have connected the TV power cord properly and switched the wall socket on.
-Check that the power switch at the rear of the TV is set to "ON
-Check that you have turned on the POWER button on your TV.
-Check the picture contrast and brightness setting.
There is a normal picture but no sound coming from my TV.
-Check that your TV is not muted or has the volume down.
-Switch the channel, the problem may be with the channel you're on, not the TV.
-Check that your audio cable input has been plugged in properly. If you are using an external amplifier.
The remote control does not work.
-Check to see if there is any object between your TV (such as a piece of furniture) that could block the remote control from connecting with the sensor on your TV.
-Have you put the batteries into the remote control the right way? ( So + to + and - to - )
-Correct remote operating mode was set (such as TV or VCR).
-The TV is not positioned in bright sunlight.
-Try fitting new batteries if none of the above work.
The TV has turned off suddenly.
-Check that you have not set the sleep timer.
-Check that you have not set the timer to control the socket which has your TV power cord on.
-Check that you have not set auto standby with the broadcast signal source which is connected to your TV.
The picture on my TV appears slowly after I have switched it on.
This is normal. The image takes a few seconds to appear after you have switched the TV on. Please contact your service centre if picture has not appeared after five minutes.
There is no or poor quality colour or a poor picture on my TV.
-Change the colour setting on the PICTURE MENU.
-Keep a distance between your TV and any VCR you may be using
-Try watching another channel. The problem may be with the channel you're watching.
-Are the video cables installed properly?
-Change the setting of picture brightness on PICTURE MENU.
There are horizontal and vertical bars on the screen, the picture is shaking.
-Check if any signal interference activities is going on nearby, such as an electrical appliance or power tool is in operation.
The reception is poor on some channels.
-The TV channel you're watching may be having problems. Change to another channel and see if the same is happening.
-TV broadcasting signal is weak or has been interrupted.
-Check whether signal sources have any possible interference.
There are lines or streaks on the pictures.
-Check if there is any damage to the aerial on the roof, try to change the direction of the aerial to receive a better signal.
One of the TV's speakers does not work.
-Check the sound balance setting on SOUND MENU.
If you're having problems
Note: This page only refer to Video Graphics adaptor (VGA) problems.
Problems and how to fix them
The signal is out of range.
-Change the resolution, horizontal or vertical frequency of your source (PC etc.).
-Check whether the signal cable is connected from the PC to your TV properly.
-Check the signal input source is connected properly.
There is a vertical bar or stripe on my TV screen.
-Turn on the auto configure or change the horizontal or vertical frequency position.
Screen colours aren't appearing as they should be or single colour.
-Check if the video signal cable is connected properly.
-Reinstall your PC video card if the signal source is from your computer.
Maintaining your TV
If you clean your TV carefully and regularly, it helps your TV to last longer. Make sure you turn the power off and unplug the power cord on your TV before you begin to clean it.
Cleaning the screen
- Here's a great way to keep the dust off your screen. Wet a soft cloth in a mixture of lukewarm water and a small amount of fabric softener or washing-up liquid. Wring the cloth until it's almost dry and then use it to wipe the screen.
- Make sure there is no excess water on your TV when you have finished cleaning it.
Cleaning the plastic parts of your TV
Wipe the plastic parts of your TV with a soft, dry, lint-free cloth. Do not use a wet cloth.

If you are going to be away for a while
If you are not going to use your TV for a while (such as when you go on holiday), you should unplug the power cord from the socket and disconnect your aerial to protect your TV against possible damage from lightning or power surges.
Your TV's specification
| LED panel | 15.6 inch |
| Pixel pitch | 0.27675 (H) x0.27675 (V) |
| Resolution | 1366x768 |
| Aspect Ratio | 16: 9 |
| Display colours | 16.7M colours |
| Backlight life | 30,000 hours |
| Power supply | 100-240V~50/60Hz |
| Rated power consumption | 24 W |
| Speaker | 2x3 W |
We want to improve our products all the time. We have the right to change the design and the specifications of this TV without telling you. The symbol below on the product or in the instructions means that you should throw your electrical and electronic equipment away separately from your household waste. There are separate collection systems for recycling in the European Union (EU). For more information, please contact your local authority or your retailer where you bought your TV.

Specifications and design are subject to possible modifications without notice due to improvements
Wall mount installation
INSTALLING REMOVING THE BASE STAND
WARNING : The LED Display is very fragile, and must be protected at all times when removing the base Stand.
Be sure that no hard or sharp object or anything that could scratch or damage the LED display comes into contact with it. Do NOT exert pressure on the front of the unit at any time because the screen could crack.
1 Disconnect all cables or cords connected to the unit.
2. Lay the unit down on a flat surface with the back side facing up. Please make sure to place a soft cushioned material such as a pillow or thick piece of foam beneath the screen.
3. To remove the base stand Iposen screws off the holes then pull downwards to release the base stand.

MOUNTING ON THE WALL
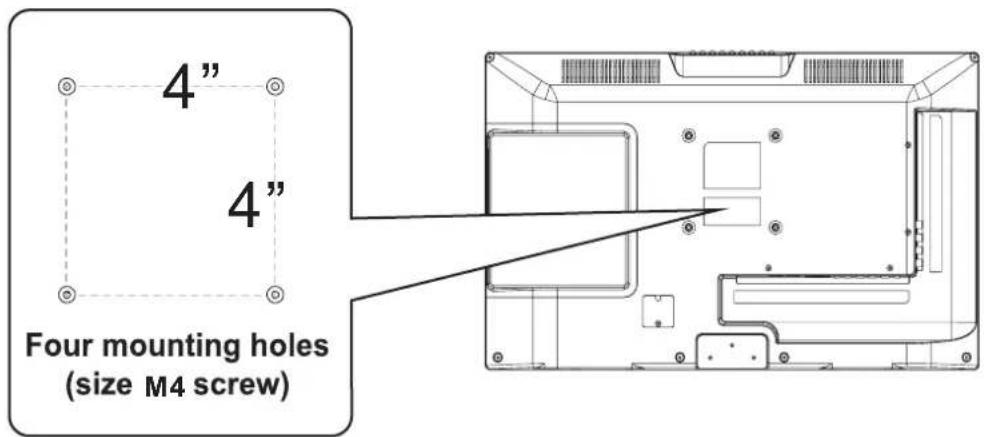
This unit is VESA-compliant, and is designed to be wall-mounted with a VESA-compliant 4"x4" (100mm x 100mm) mounting kit designed for flat-panel TVs (not supplied). Mount this unit according to the instructions included in the mounting kit. Length of screw should not exceed 8 mm.
NOTE
Remove the base stand before mounting the unit on the wall.
Attaching the stand

natural_image
Technical line drawing of a mechanical component with grid pattern and two protruding pins (no text or symbols)Place the startdeTV insert and tighten the screws 3x12mm (found in the accessories box) in the circled area with the screwdriver provided.
natural_image
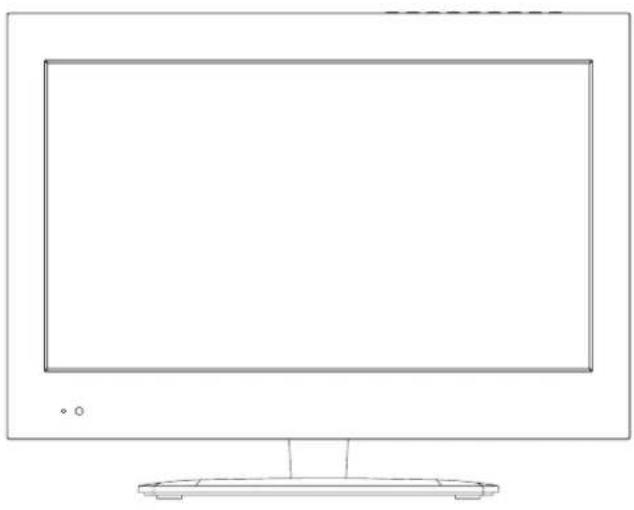
Line drawing of a flat-screen computer monitor with a base mount (no text or symbols)Then the TV is ready for use now.


- PREFAZIONE
- TELEVISIONE DIGITALE TERRESTRE (DTV)
- TELEVISIONE ANALOGICA (ATV)
- Contents
- Important safety instructions
- Warning
- Note
- Caution
- [ Caution ]
- How to clean your TV
- Setting up and using your TV
- When you must call a technician
- The temperatures your TV will work in
- Safety notice
- When you need to throw your TV away
- END OF LIFE DISPOSAL
- What is included with your TV
- What your TV should look like
- How to use your remote control
- Sockets on the back of your TV
- BASIC INSTALLATION
- Power Cord Connection
- Antennas Connection
- AV Connection
- YPbPr Connection
- VGA(PC) Connection
- HDMI Connection
- SCART Connection
- MEDIA Connection
- Headphone Connection
- NOTE:
- Remote control instruction
- STANDBY
- PMODE
- NUMBER BUTTONS
- THUMBSTICK(▲/▼/◄/►/OK ENTER)
- VOL+/VOL-
- ASPECT
- I/II
- EJECT
- PROGRAM
- DISPLAY
- SETUP
- GOTO
- A-B
- ANGLE
- REPEAT
- SUBTITLE
- TITLE
- ZOOM
- D.MENU
- AUDIO
- Select Input Source
- SOURCE
- Basic Menu Operation
- Picture Menu
- Picture Mode
- Brightness
- Contrast
- Sharpness
- Saturation
- Hue
- Color Temp
- Aspect Ratio
- Advanced Settings
- Sound Menu
- Sound Mode
- Treble
- Bass
- Balance
- Surround Sound
- AVL
- SPDIF
- Audio Description
- Sound Type
- Channel Menu
- Auto Scan
- Manual Scan
- Digital Manual Scan
- Analog Manual Scan
- Channel Edit
- Common interface
- Signal Information
- Lock Menu
- Enter Password
- Enable
- Channel Locks
- Lock Keypad
- Hotel mode
- New Password
- Clear Lock
- Setup Menu
- OSD Language
- Audio Languages
- Teletext
- Time Settings
- First Time Setup
- Reset
- Software Update(USB)
- PC Menu
- Auto Adjust
- H Position
- V Position
- Phase
- Clock
- ATV /SCART/HDMI/AV/YPbPr/PC
- Media Menu
- Photo
- Music
- Movie
- Text
- Audio Setup Page
- Preference Page
- If you're having problems
- Problems and how to fix them
- There is no sound and no picture coming from my TV.
- There is a normal picture but no sound coming from my TV.
- The remote control does not work.
- The TV has turned off suddenly.
- The picture on my TV appears slowly after I have switched it on.
- There is no or poor quality colour or a poor picture on my TV.
- There are horizontal and vertical bars on the screen, the picture is shaking.
- The reception is poor on some channels.
- There are lines or streaks on the pictures.
- One of the TV's speakers does not work.
- Maintaining your TV
- Cleaning the screen
- Cleaning the plastic parts of your TV
- If you are going to be away for a while
- Your TV's specification
- Wall mount installation
- INSTALLING REMOVING THE BASE STAND
- MOUNTING ON THE WALL
- Attaching the stand
Brand : Trevi
Model : LTV 2116 CDVD
Category : Television