
LTV 2022 CI - Television Trevi - Free user manual and instructions
Find the device manual for free LTV 2022 CI Trevi in PDF.


| Product Type | Television |
| Brand | Trevi |
| Model | LTV 2022 CI |
| Screen Size (Diagonal) | 22 inches |
| Display Resolution | 1366 x 768 pixels (HD Ready) |
| Display Technology | LED |
| Backlight Type | Direct LED |
| Tuner | DVB-T/T2/C (CI slot) |
| Common Interface (CI) | Yes (CI+ compatible) |
| Audio Output Power | 2 x 3 W (stereo) |
| Dimensions (W x H x D, with stand) | 52 cm x 35 cm x 15 cm |
| Dimensions (W x H x D, without stand) | 52 cm x 30 cm x 5 cm |
| Weight (with stand) | 3.2 kg |
| Power Consumption (typical) | 30 W |
| Standby Power Consumption | < 0.5 W |
| Energy Efficiency Class | A |
| Inputs | HDMI (1), USB (1), SCART (1), AV Composite, Headphone Out |
| VESA Mounting Pattern | 100 x 100 mm |
| Remote Control | Included (batteries not included) |
| Color | Black |
| Operating Temperature | 0°C to 40°C |
| Warranty | 2 years |
Frequently Asked Questions - LTV 2022 CI Trevi
User questions about LTV 2022 CI Trevi
0 question about this device. Answer the ones you know or ask your own.
Ask a new question about this device
Download the instructions for your Television in PDF format for free! Find your manual LTV 2022 CI - Trevi and take your electronic device back in hand. On this page are published all the documents necessary for the use of your device. LTV 2022 CI by Trevi.
USER MANUAL LTV 2022 CI Trevi
22" TV COLOR/MONITOR TFT LED
DVB-T - CI SLOT - USB
Manuale D'uso
Instruction manual
1 PREFAZIONE
natural_image
Illustration of a flat-screen TV mounted on a stand with a cable inserted, showing no text or symbols.7.2 INSERIMENTO COMMON INTERFACE
7.4 COLLEGAMENTO TRAMITE CAVO HDMI
natural_image
Diagram of a USB cable connector with two connectors and an external connector (no text or symbols present)7.6 COLLEGAMENTO TRAMITE CAVO RCA S-VIDEO o A/V o Y/Pb/Pr
9 TELEVISIONE DIGITALE TERRESTRE (DTV)

535(L)x415(A)x180(P)mm
535(L)x375(A)x55(P)mm
- Peso
3,7Kg
18 INDICE
1 PREFAZIONE pag. 2
9 TELEVISIONE DIGITALE TERRESTRE (DTV)
9.1 OPERAZIONI PRELIMINARI
Table of Contents....24
1 Safety instructions 25
2 Controls and connections 27
2.1 Front view/Side View 27
2.2 Rear View 28
2.3 Remote Control....29
3 SystemConnections 32
3.0 Connecting to Power Supply 32
3.1 Connecting to CI CARD 32
3.2 Connecting to External AV Signal Source....33
3.3 Connecting to External AV Signal Source(Y/PB/PR) 33
3.4 Connecting to External AV Signal Source(SCART) 34
3.5 Connecting to External AV Signal Source(HDMI) 34
3.6 Connecting to PC 35
3.7 Connecting to TV-Signal Input 35
4 TV operation and System Setup 36
5 Troubleshooting....55
1 Safetyinstructions
Thank you for choosing our product. Please read this manual carefully and observe all
safety and operating instructions. Store the manual in a safe place for later reference.

natural_image
Warning symbol of a lightning bolt inside a triangle (no text or numbers)CAUTION
RISK OF ELECTRIC SHOCK DONOTOPEN!

natural_image
Warning symbol: black triangle with white exclamation mark (no text or numbers)
The flash symbol displayed in a triangle warns the user of dangerous electrical voltages inside the device that could lead to electrical shocks with harmful effects to health if the device is used incorrectly.
WARNING
The apparatus shall not be exposed to dripping or splashing and that no objects filled with liquids, such as vases, shall be placed on the apparatus.
NOTES
- Read these instructions.
- Keep these instructions.
- Heed all warnings.
- Follow all instructions.
- Do not use this apparatus near water.
- Clean only with dry cloth.
- Do not block any ventilation openings. Maintain well ventilated conditions around the product. Do not put product on bed, sofa or anything that blocks ventilation. Install according to the manufacturers instructions.
- Do not install near any heat sources such as radiators, heat registers, stoves, or other apparatus (including amplifiers) that produce heat.
- Read, heed and follow all instructions to ensure correct and safe installation and interconnection of the apparatus.
- The apparatus shall not be exposed to dripping or splashing and that no objects filled with liquids, such as vases, shall be placed on the apparatus.
- The mains socket-outlet shall be installed near the apparatus and the mains plug shall remain readily operable.
- Protect the power cord from being walked on or pinched particularly at plugs, convenience receptacles, and the point where they exit from the apparatus.
-
Only use attachments/accessories specified by the manufacturer.
-
Use only with the cart, stand, tripod, bracket, or table specified by the manufacturer, or sold with apparatus. When a cart is used, use caution when moving the cart/apparatus combination to avoid injury from tip-over.
- Unplug the apparatus during lightning storms or when unused for long periods of time.
- Refer all servicing to qualified service personnel. Servicing is required when the apparatus has been damaged in any way, such as power-supply cord or plug is damaged, liquid has been spilled or objects have fallen into the apparatus, the apparatus has been exposed to rain or moisture, does not operate normally, or has been dropped.
- The apparatus shall be connected to a mains socket outlet with a protective earthing connection.

Do not touch the color TFT LCD screen by hand directly.
2. Controls and connections
2.1 Front view/Side View

1.Color TFT screen
Presents high resolution picture.
- RemoteSensor
Remote sensor window for the remote control.
- PowerIndicator
In active mode, it is blue; in standby mode, it turns red.
4.Speakers
5.SOURCEbutton
Press to select enter the source selecting menu, press the ◀ / ▶ direction buttons to select desiredmode and press the ENTER button to enter the selected mode.
6.MENUbutton
Press to enter or exit system setup menu.
7.VOL ▲/▼ buttons
Press to decrease or increase the volume.
8.CH ▲/▼ buttons
Press in ATV/DTV mode to page up or down through channels.
- POWERbutton
Press to switch on or off the device (enter or exit the standby mode).
2.2 Rear View
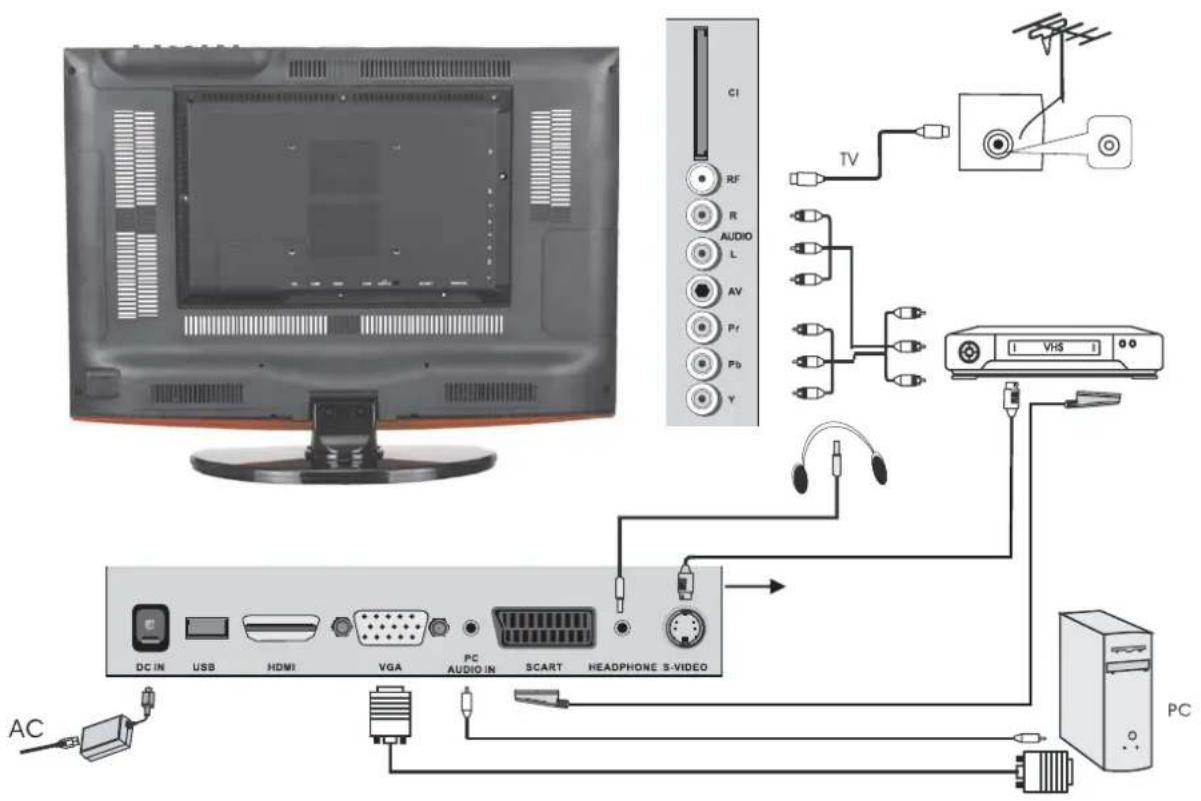
- HDMI Input Jack
Connecting for HDMI signal.
- VGA Input Jack
Connected to the VGA output jack on a personal computer.
- PC Audio Input Jack
Connected to the audio output jack on a Personalcomputer.
- Y/Pb/Pr Input Jacks
Connecting for the Y/Pb/Pr Input in Componentmode.
- AV Input Jacks
Connecting for AV signal input in Compositemode.
Y/Pb/Pr share L/R audio jacks.
6.CICardSlot
Used to insert the CI card.
7.SCARTJack
Connecting for SCART signal.
- AntennalInputJack
Connected to external antenna to receive the ATV/LTV program in ATV/DTV mode.
- HeadphoneJack
Connecting for headphone.
10.USBHOST
Connecting for USB device.(USB 2.0)
2.3 Remote Control
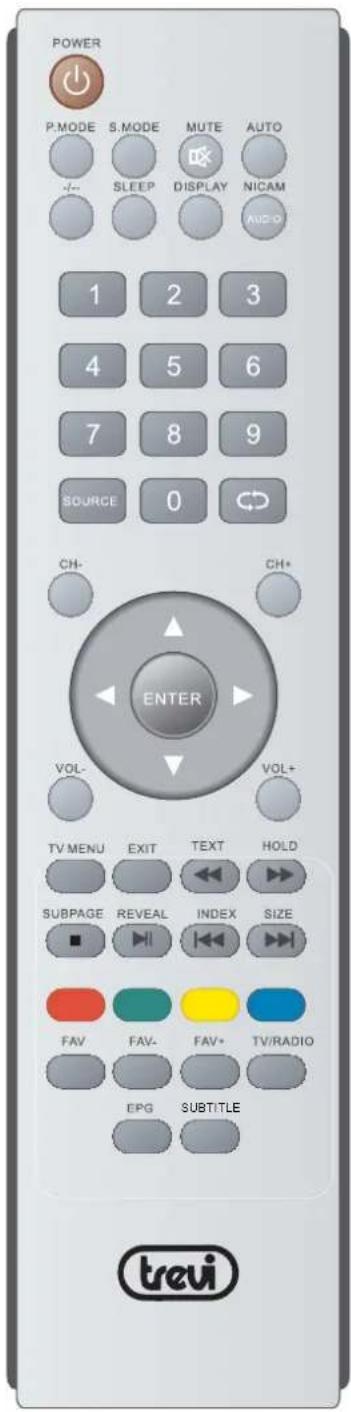
- POWERbutton
Press to enter or exit the standby mode.
2.S.MODEbutton
Press this button to change the audio mode.
3.P.MODEbutton
Press to select the picture mode.
4.MUTEbutton
Press to turn on or off the audio output.
5.AUTO
Press to do auto configuration directly (PC-RGBMODE)
6.SLEEPbutton
This feature allows you to set up sleeptime. Press the button repeatedly to select the desired time to sleep or select Off to close the function.
7.-/--button
Press this button to enter a program number for multiple program channel such as 2-1, etc.
8.DISPLAYbutton
Press this button to display information about the current mode on the screen.
9.NICAM
Press to select the NICAM modes.
AUDIO: DVD Audio Select Button
10.Number buttons (0-9)
Press to select numbers.
- button
In the ATV/DTV mode, press to return to the channel last viewed.
12.SOURCEbutton
Press to select enter the source selecting menu, press the ▲/▼ direction buttons or press the SOURCE button repeatedly to select desired mode and press the ENTER button to enter the selected mode.
13.CH+/- button
In ATV or DTV mode, press to select Analog channel or digital channel.
14.Direction buttons
Press the direction buttons to select menu options or settings.
15. ENTER/OK button
Press to confirm selection in the setup Menu.
16.VOL+/-button
Press to increase or decrease the volume.
17. EXITbutton
Press to exit all the OSD on the screen.
18.TV MENU button
Press to enter or exit the setup menu.
19.FAV+
Displays the selected favorite up programmers.
20.EPGbutton
Press to display the Channel Guide menu in DTV mode.
21.HOLD
Hold on or off for current page display.

Playing forward fast.
22.TEXT
Switch on or off the teletext mode (TV mode)

playingbackwardfast
23.INDEX
Request the index page (Teletext mode)

skip backward button.
24.SIZE
Change display size in teletext mode.

Skipforwardbutton
25.colorbutton
26.TV/RADIO
Select the TV/RADIO mode
27SUBPAGE/■
Sub coded page access
Press ■ to stop DVD playing.
28REVEAL/
Press REVEAL to reveal hidden words.
Press to pause the playback. Press again to resume normal playback.
29.SUBTITLEbutton
In teletext mode, press to display
Page100.
Note: Only available if the service is provided by the broadcaster.
30.FAVbutton
Displays the selected favorite programmers.
31.FAV-
Displays the selected favorite down programmers
Preparation of Remote Control
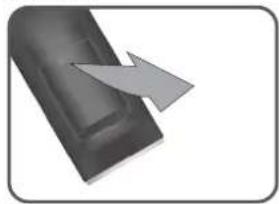
Place the remote control on an even surface and insert the supplied batteries into the remote Control as follows.
- Softly push the back cover to open the battery compartment.
natural_image
Close-up of a dark, textured surface with a gray arrow pointing to it (no text or symbols visible)- Insert two batteries (1.5V size AAA), please make sure the polarity matches the marks inside the compartment.

natural_image
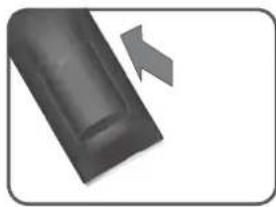
Close-up of a dark plastic component with internal channels and a separate rectangular block, no visible text or symbols.- Softly press the back cover to close it.
natural_image
Close-up of a dark, textured object with a gray arrow pointing to it (no text or symbols visible)
Under normal use the battery will last for six months.
Take out battery when the remote is Not in use for a long time.
Using of Remote control
Point the remote control unit from no more than about 7m from the remote control sensor and within about 60 degrees of the front of the unit.
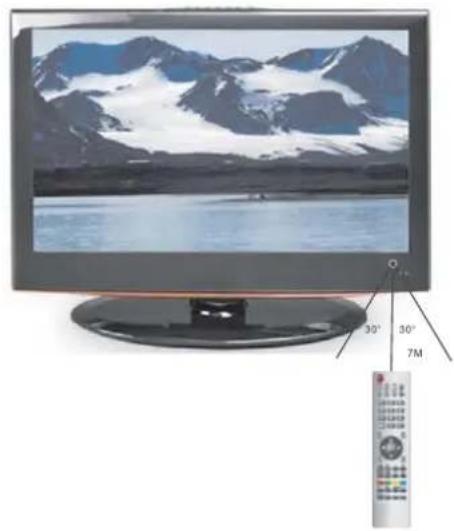
The operating distance may vary depending to the brightness around.

Do not point bright lights directly at the remote control sensor.
Do not place objects between the remote control unit and the remote controlsensor.
Do not use this remote control unit while simultaneously operating the remote control unit of any other equipment.
3SystemConnections.
Do not connect the power cord until all other connections have been made.
Ensure that you observe the color cord when connecting audio and video cables.
3.0 Connecting to Power Supply
- Connect the power cord correctly as shown.
- Press the POWER switch of your LCD TV to switch on the LCD TV. The power indicator on the front panel lights up in Green.

natural_image
Illustration of a flat-screen TV mounted on a stand with an AC cable inserted, showing no text or symbols.3.1 Common Interface Slot
Pay per view services require a smartcard to be inserted into the TV. If you subscribe to a pay per view service the provider will issue you with a CAM card "Smartcard". The CAM can then be inserted into the COMMON INTERFACE PORT.
To access the card follow the steps below.

3.2 ConnectingtoExternalAVSignalSource
Use the audio and video cable to connect the input jacks on the rear panel of the unit to the external AVsignalsource.
Connect the unit and the external AV signal source to the respective jacks with the S-Video cable.
Ensure that you observe the color cord when connecting audio and videocables.

After connection, turn on the power of the unit and the external AV signal source. Press SOURCE then direction buttons to select AV mode, and then press the ENTER button to confirm.

TheL/RaudioinputjackscanbeusedinthebothCompositemodes.
3.3 ConnectingtoExternalAVSignalSource(Y/Pb/Pr)
Use the audio and video cables to connect the Y/Pb/Pr Input jacks on the rear panel of the unit to the externalAVsignalsource.

flowchart
graph TD
    A["AV Signal Source"] --> B["RF"]
    A --> C["PR"]
    A --> D["Y"]
    A --> E["L"]
    A --> F["Pb"]
    A --> G["AV"]
    A --> H["Audio"]
    A --> I["L"]
    A --> J["RF"]
    A --> K["PR"]
    A --> L["Y"]
    A --> M["L"]
    A --> N["Pb"]
    A --> O["L"]
    A --> P["Pb"]
    A --> Q["R"]
    A --> R["L"]
    A --> S["Pb"]
    A --> T["Y"]
    A --> U["L"]
    A --> V["Pb"]
    A --> W["L"]
    A --> X["Pb"]
    A --> Y["L"]
    A --> Z["Pb"]
    A --> AA["L"]
    A --> AB["Pb"]
    A --> AC["L"]
    A --> AD["Pb"]
    A --> AE["L"]
After connection, turn on the power of the unit and the external AV signal source. Press SOURCE then directionbuttonstoselectYPbPrmode,andthen presstheENTERbuttontoconfirm.
3.4 ConnectingtoExternalAVSignalSource(SCART)
UsetheSCARTcablestoconnecttheSCARTinputJacksontherearpaneloftheunittothe
externalAVsignalsource.
After connection, turn on the power of the unit and the external AV signal source. Press SOURCE then directionbuttonstoselectSCARTmode, and then press the ENTERbutton to confirm.

3.5 ConnectingtoExternalAVSignalSource(HDMI)
Follow the figure below to connect an HDMI signal source to the HDMI jack on the rear panel of the unit.

After connection, turn on the power of the unit and the external AV signal source and use the SOURCE and the direction buttons to select HDMI mode, and then press the ENTER button to confirm.

HDMI provides both audio and video signals and typically provides superior image quality to component or composite.
3.6 Connecting to PC
The unit can be connected to PC (personal computer) via the VGA cable. Follow the figure below to connect:
- Connect one end of the VGA cable to the VGA input jack on the rear panel of the unit and connect the other end to the PC.
- Connect one end of the audio cable to the PC audio input jack on the rear panel of the unit and connect the other end to the PC audio output jack.
- Set the PC video resolution to match that of the television (typically 1440X900@60Hz).

flowchart
graph LR
    A["DC IN"] --> B["PC AUDIO IN"]
    B --> C["SCART"]
    C --> D["HEADPHONE S-VIDEO"]
    D --> E["VGA"]
    E --> F["USB"]
    F --> G["HDMI"]
    G --> H[AC/DC/HD/HD/HD/HD/HD/HD/HD/HD/HD/HD/HD/HD/HD/HD/HD/HD/HD/HD/HD/HD/HD/HD/HD/HD/HD/HD/HD/HD/HD/HD/HD/HD/HD/HD/HD/HD/HD/HD/HD/HD/HD/HD/HD/HD/HD/HD/HD/HD/HD/HD/<nl>
After connection, turn on the power of the unit and the external AV signal source and use the SOURCE and the direction buttons to select VGA mode, and then press the ENTER button to confirm.
3.7 Connecting to TV-Signal Input
ConnecttheTVsignalcable(theantennacable,forexample)totheAntennaInputJackontheback oftheunitsothatyoucanreceivetelevisionprogrammes.
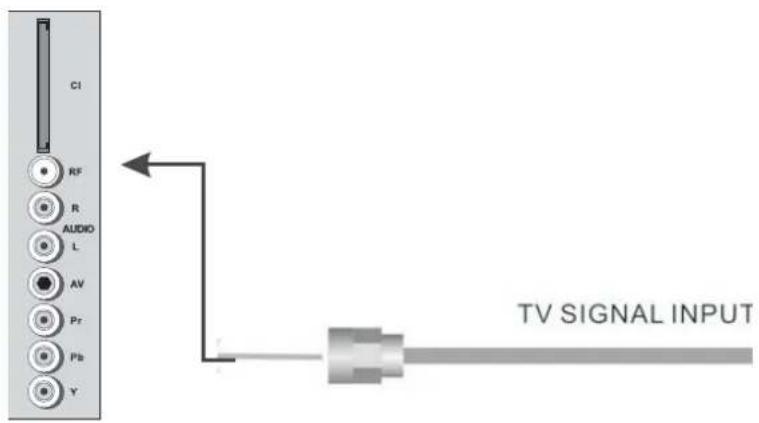
After connection, turn on the power of the unit. Then press the SOURCE button to select ATV or DTV mode and conduct program selection.
Press SOURCE button to display the input source list;
Press ▼ / ▲ button to select the input source you want to watch;
Press Enter button or ▶ button to enter the input source;

Press TV MENU button to display the MAIN OSD MENU;
Press ▼ / ▲ button to select the MENUyouwant;
Press ENTER button or ▶ button to enter the sub menu;
Press ▼/▲ button to select the option and then press Enter button or ▶ button to enter the submenu, press ◀/▶ button to adjust the value or press ▼/▲ button to select in the sub menu;
You can press TV MENU button to save and return back to the previous menu, and press EXIT button to exit the entire menu.
Press DISPLAY button on the remote control to display program Information.

- Current Channel Number.
- The colour system of current channel, could be changed on Manual Search menu.
- Current Channel Name.
- The sound system of current channel, could be changed on Manual Search menu.
- The NICAM mode of current program.

If the Icon of NICAM mode is red, It means the current program supplies multiple NICAM signals, and you can change it by pressing AUDIO button.
Four kinds of NICAM modes and relative icons:

Mono

Stereo

Dual I

Dual II
Picture Menu
Press TV MENU button to display the main menu.
Press ▼/▲ button to select Picture in the main menu, then press ENTER button or ▶ button to enter.
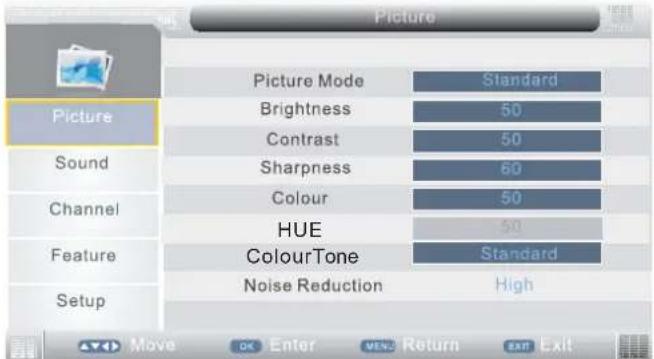
- Press ▼/▲ button to select the option that you want to adjust in the Picture menu, then press ENTER button or ▶ button to enter.
- Press ◀ / ▶ button to adjust or press ▼ / ▲ button to select.
- After finishing your adjustment, Press TV MENU button to save and return back to the previous menu, and press EXIT button to exit the entire menu.
PictureMode
Press ▼ / ▲ button to select Picture Mode, then press ENTER button or ▶ button to enter and press
▼/▲ button to select.
Brightness
Press ▼/▲ button to select Brightness, then press ENTER button or ▶ button to enter and press ◀ / ▶ button to adjust.
Contrast
Press ▼/▲ button to select Contrast, then press ENTER button or ▶ button to enter and press ◀ / ▶ button to adjust.

Sharpness
Press ▼/▲ button to select
Sharpness, then press ENTER button or ▶ button to enter and press ◀ / ▶ button to adjust.
Colour
Press ▼/▲ button to select Colour, then press ENTER button or ▶ button to enter and press ◀/▶ button to adjust.
ColourTone
Press ▼ / ▲ button to select Colour Temperature, then press ◀ / ▶ button to select standard, warm, cool.
NoiseReduction
Press ▼/▲ button to select Noise Reduction, then press ◀ / ▶ button to select Off, Low, Middle, High.
SOUNDMENU
Press MENU button to display the main menu.
Press ▼/▲ button to select Sound in the main menu, then press ENTER button or ▶ button to enter.
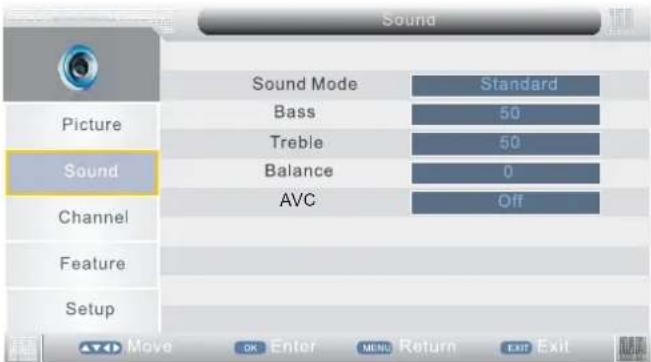
- Press ▼/▲ button to select the option that you want to adjust in the Sound menu, then
- press ENTER button or ▶ button to enter.
- Press ◀ / ▶ button to adjust or press ▼ / ▲ button to select.
After finishing your adjustment, Press TV MENU button to save and return back to the previous menu, and press EXIT button to exit the entire menu.
SoundMode
Press ▼ / ▲ button to select Sound Mode, then press ◀ / ▶ button to select. (Available Sound mode: Personal, Voice, Music, Theatre, Standard).
You can change the value of bass and treble, Balance, when the sound is in Personal mode.
TIPS: You can press SMODE button on the remote control to
change the Sound Mode directly.

Bass
Press ▼/▲ button to select Bass, then press ENTER button or ▶ button to enter and press ◀ / ▶ button to adjust.
Treble
Press ▼/▲ button to select Treble, then press ENTER button or ▶ button to enter and press ◀ / ▶ button to adjust.
Balance
Press ▼ / ▲ button to select Balance, then press ENTER button or ▶ button to enter and press ◀ / ▶ button to adjust.
AVC
Press ▼/▲ button to select AVL, then press ◀ / ▶ button to select On or Off.
CHANNELMENU
Press TV MENU button to display the main menu.
Press ▼/▲ button to select Channel in the main menu, then press ENTER button or ▶ button to enter.
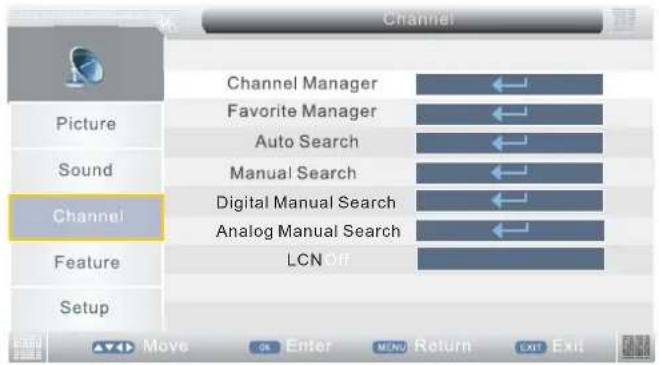
- Press ◀ / ▶ button to select the option that you want to adjust in the Channel menu, then press ENTER button or ▶ button to enter.
- Press ◀ / ▶ button to adjust or press ◀ / ▶ button to select.
- After finishing your adjustment, Press TV MENU button to save and return back to the previous menu, and press EXIT button to exit the entire menu.
ChannelManager
Press ◀ / ▶ button to select Channel Manager, then press ENTER button or ▶ button to enter.
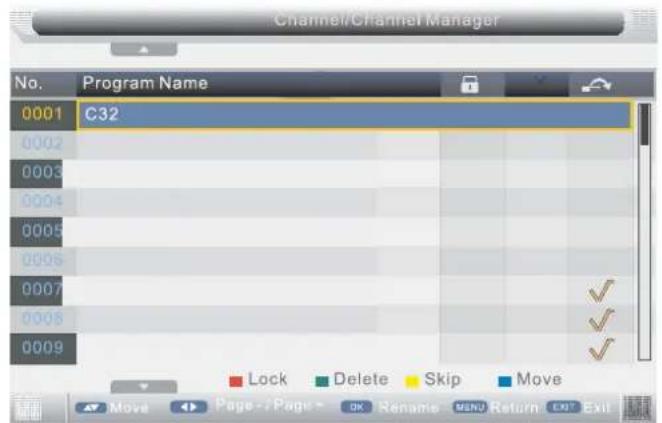
- Press red button to set the current channel to lock, if the current channel already lock, press red button again will unlock.
- Press green button to set the current channel to delete, if the current channel already delete, press green button again will cancel delete.
- Press yellow button to skip thecurrentchannel.
Use the cursor buttons to select the channel you wish to skip.
Press yellow button and will be shown at the channel selected. To remove the skip function, press the yellow button again.
- If one of the stations has been incorrectly placed in the station listing, you may move it to the correct position. Using the cursor select the channel to be moved, press blue button, move the station to the new location and press ENTER button, this will move the station to the new location.
If there is delete channel logo, press TV MENU button or ENTER button, the menu will appear as follows:
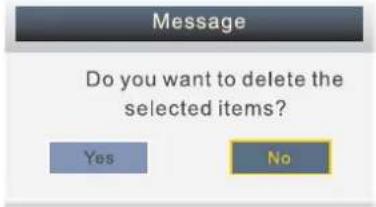
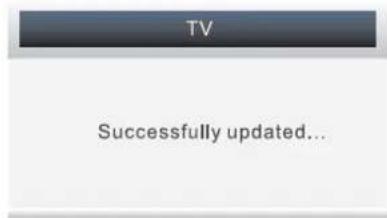
Delete the selected items if select "Yes" and press ENTER button, otherwise cancel to delete the selected items. After a few seconds, the menu will appear as follows:
- Press ◀ button to turn to the previous page, press ▶ button to turn to the next page
- Press ▼/▲ button to select channel, then press ENTER button to enter the rename channel menu.

Note: Channel name is 8 characters.
Press green button to switch the size of the letters.
Press ▼/▲ or /◀ /▶ button to select the character.
Press EXIT button, the menu will appear as follows:
Save successful if select "Yes" and press
ENTERbutton. the menu will appear as follows.
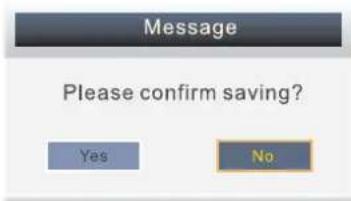
Exit the entire menu if select "No" and press ENTER button.
Save successful if select "Yes" and press ENTER button. the menu will appear as follows

FavoriteManager
Press ▼/▲ button to select Favorite Manager, then press ENTER button or ▶ button to enter.
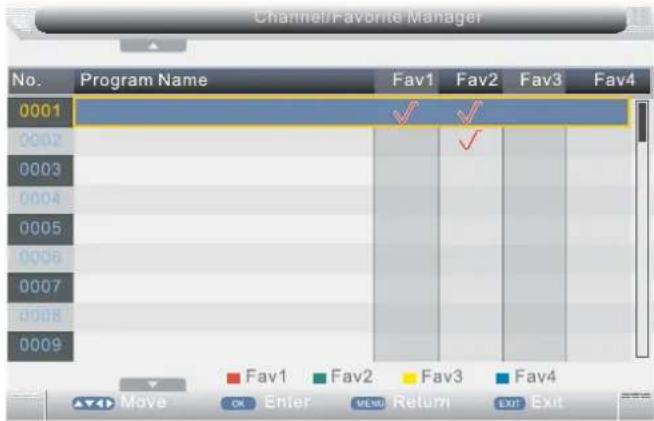
Press ▼/▲ button to select Channel, press red button to set to Fav1.
Press ▼ / ▲ button to select Channel, press green button to set to Fav2.
Press ▼/▲ button to select Channel, press yellow button to set to Fav3.
Press ▼ / ▲ button to select Channel, press blue button to set Fav4.
if the current channel already be one of your favorite channel, press red /green /yellow /blue button again will set it to a normal channel.
PressTV MENU button or EXIT button, the successfully updated menu will appear.
AutoSearch
Press ▼ / ▲ button to select Auto Search, then press ENTER button or ▶ button to enter (WhentheSystemLockison, pleaseinputthedefaultpassword"0000").
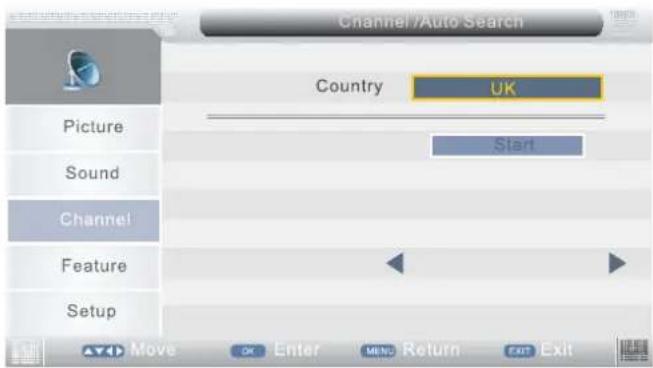
Country
PressENTER button or ▶ button to enter, then press ◀ / ▶ button to select appropriate country.
Move the cursor to the start, press ENTER button, the menu will appear as follows:
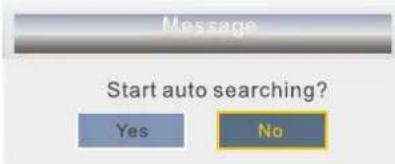
Exit the entire menu if select "No" and press ENTER button.
If select "Yes" and press ENTER button, auto search menu will appear as follows:

When auto search finish, the save successful menu will appear a few second.
ManualSearch
Pres ▼ / ▲ button to select Manual Search, then press ENTER button or ▶ button to enter (When the System Lock is on, please input the default password "0000").

CurrentChannel
Press ▼ / ▲ button to select Current Channel, then press ◀ / ▶ button to select.
Search
Press ▼/ ▲ button to select Search, then press ENTER button or ▶ button to enter, the menu will appearasfollows:

Press ◀ I ▶ button shortly to adjust channel frequency, and press for a long time to begin search until the units found.
Press TV MENU button to return back to the previous menu.
FineTune
Press ▼ / ▲ button to select Fine Tune, then press ENTER button or ▶ button to enter, the menu will appear as follows:
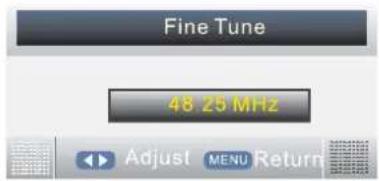
Press ◀ / ▶ button to adjust channel frequency, press TV MENU button to return back to the previous menu. Note: Save the result of the adjustment.
AFC
Press ▼ / ▲ button to select AFC, then press ◀ / ▶ button to select On or Off
ColourSystem
Press ▼ / ▲ button to select Colour System, then press ◀ / ▶ button to select Auto, PAL.SECAM.
SoundSystem
Press ▼ / ▲ button to select Sound System, then press ◀ / ▶ button to select BG, DK,I,L/L'.
FeatureMenu
Press TV MENU button to display the main menu.
Press ▼/▲ button to select Feature in the main menu, then press ENTER button or ▶ button to enter.
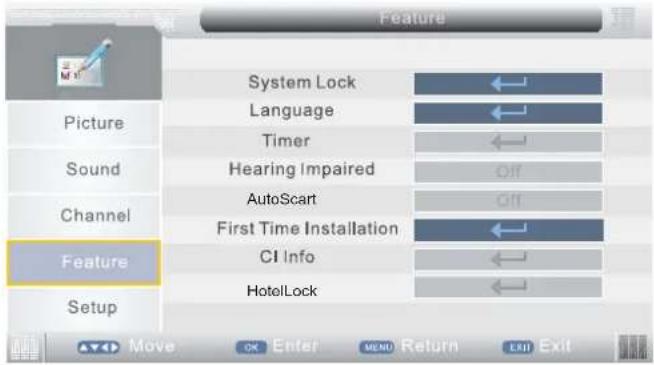
- Press ▼ / ▲ button to select the option that you want to adjust in the Feature menu, then press ENTER button or ▶ button to enter.
- Press ◀ / ▶ button to adjust or press ▼ / ▲ button to select.
- After finishing your adjustment, Press TV MENU button to save and return back to the previousmmenu and press EXIT button to exit the entire menu.
SystemLock
Press ▼ / ▲ button to select System Lock, then press ENTER button or ▶ button to enter.
Language
Press ▼ / ▲ button to select Language, then press ENTER button or ▶ button to enter submenu.
OSDLanguage
Press ▼ / ▲ button to select OSD Language, then press ◀ / ▶ button to select.
PreferredSubtitle
Press ▼ / ▲ button to select Preferred Subtitle, then press ◀ / ▶ button to select.
PreferredAudio
Press ▼ / ▲ button to select Preferred Audio, then press ◀ / ▶ button to select.
TTLanguage
Press ▼ / ▲ button to select TT Language, then press ◀ / ▶ button to select.
First Time Installation
Press ▼ / ▲ button to select First Time Installation, then press ENTER button or ▶ button to enter submenu.
Setup Menu
Press TVMENU button to display the main menu.
Press ▼ / ▲ button to select Setup in the main menu, then press ENTER button or ▶ button to enter.

- Press ▼ / ▲ button to select the option that you want to adjust in the Setup menu, then press ENTER button or ▶ button to enter.
- Press ◀ / ▶ button to adjust or press ▼ / ▲ button to select.
- After finishing your adjustment, Press TVMENU button to save and return back to the previous menu, and press EXIT button to exit the entire menu.
Hotel Lock.
Press ▼ / ▲ button to select Hotel Lock, then press ENTER button or ▶ button, the password menu will appear. At the cursor, input password to enter, default password is "0000"(When the System Lock is "On").

Hotel Lock
Press ▼ / ▲ button to select Hotel Lock, then press ◀ / ▶ button to select On or Off.
DTV
Press DISPLAY button on the remote control to display program information.

-
The current channel No. and channel name.
-
The current program's start-stop time.
-
The current program name.
6、Language icon.
- The current time.
- TV channel icon, if the current channel is RADIO channel, it will be a RADIO icon.
Notes: 1. Picture menu and description are the same as that for TV source.
-
Sound menu and description are the same as that for TV source.
-
Setup menu and description are the same as that for TV source.
CHANNEL MENU
Press MENU button to display the main menu.
Press ▼ / ▲ button to select Channel in the main menu, then press Ok button or ▶ button to enter.

- Press ▼ / ▲ button to select the option that you want to adjust in the Channel menu, then press Ok button or ▶ button to enter.
- Press ◀ / ▶ button to adjust or press ▼ / ▲ button to select.
- After finishing your adjustment, Press TVMENU button to save and return back to the previous menu, and press EXIT button to exit the entire menu.
Channel Manager
Press ▼ / ▲ button to select Channel Manager, then press ENTER button or ▶ button to enter.

Digital Manual Search
Press ▼ / ▲ button to select Digital Manual Search, then press ENTER button or ▶ button to enter (when the System Lock is On, please input the default password "0000").
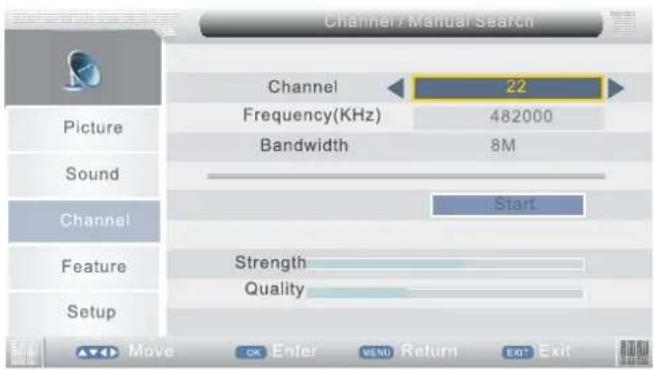
Channel
Press ◀ / ▶ button to select Channel.
Move the cursor to the start, press ENTER button or ▶ button, the channel tuning menu will appear a few second.
CI Info
Press ▼ / ▲ button to select CI Info, then press ENTER button or ▶ button to enter.

Press ENTER button or ▶ button to enter.
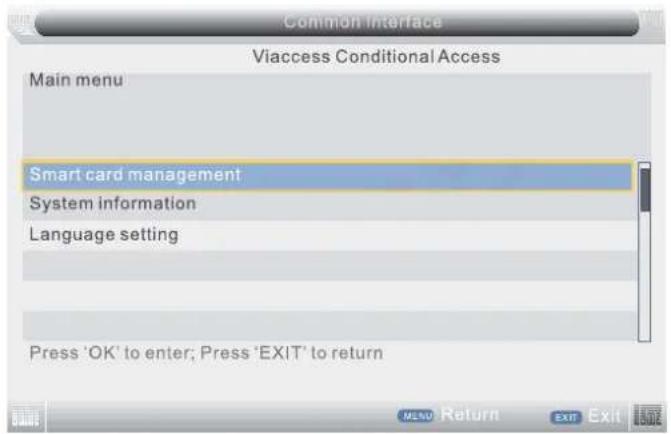
Notes: 1. This is just an example for reference, different CI module will have different CI menu. 2. Other menu and description are the same as that for TV source.
Channel List
Press ENTER button on the remote control to display the channel list menu.

Press ▼ / ▲ button to select channel that you want to view, then press ENTER button to view.
FAV List
Press FAV button on the remote control to display the FAV list menu.
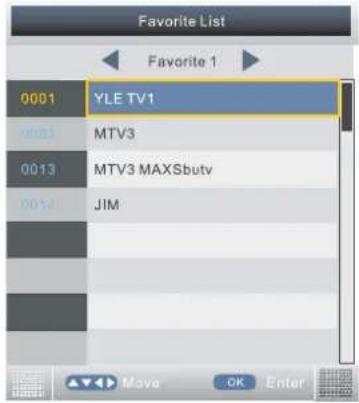
Press ▼ / ▲ button to select channel that you want to view, then press ENTERbutton to view.
Press ◀ / ▶ button to switch favorite 1, favorite 2, favorite 3 and favorite 4.
Subtitle
Press Subtitle button on the remote control, the subtitle menu will appear as follows:

Press ▼ / ▲ button to OFF, then press ENTER button, will not display subtitle.
Press ▼ / ▲ button to ENG, then press ENTER button, show the subtitle in English.
Press EXIT to exit.
EPG(ELECTRONIC PROGRAM GUIDE)
Press EPG button on the remote control to display the EPG daily mode menu.

1: The current channel No. and channel name.
2: The current program's start-stop time and program name.
3: The current date and time.
Press ▼ / ▲ button to select the channel or program.
Press ◀ / ▶ button to choose between the channel and program.
Press RED button to switch between EPG weekly mode and EPG daily mode.

To see programmes for the yesterday or further, press the YELLOW button to decrease the date.
To see programmes for the next day or further, press the BLUE button to increment the date.
For more information about a programme, press INFO.
Press GREEN button to add channel to the reminder list.
Press ENTER button to Reminder the program, there will be a small logo ● beside the program.
Press ENTER once more to cancel the operation.
5 means the channel is encoded channel.
TEXT
Press TEXT button on the remote control to display the text;.
Press TEXT button on the remote control again to stop playing the text.
Multi-Audio
Press AUDIO button on the remote control to display the multi-audio menu.
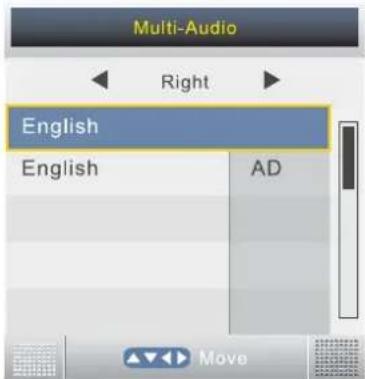
Press ◀ / ▶ button to select the audio format of the language, (available audio format: right, stereo, left).
Press ▼ / ▲ button to select the different language.
PC
Setup Menu
Press MENU button to display the main menu.
Press ▼ / ▲ button to select Setup in the main menu, then press ENTER button or ▶ button to enter.

- Press ▼ / ▲ button to select the option that you want to adjust in the Setup menu, then press ENTER4 button or ▶ button to enter.
- Press ◀ / ▶ button to adjust or press ▼ / ▲ button to select.
- After finishing your adjustment, Press TVMENU button to save and return back to the previous menu, and press EXIT button to exit the entire menu.
PC Setup
Press ▼ / ▲ button to select PC Setup, then press ENTER button or ▶ button to enter.

Auto Adjust
Press ▼ / ▲ button to select Auto Adjust, then press ▶ button, the menu will appear a few second.

H Positon
Press ▼ / ▲ button to select H Position, then press ▶ button to enter, press ◀ / ▶ button to adjust.
Adjusts the picture horizontally.
V Positon
Press ▼ / ▲ button to select V Position, then press ▶ button to enter and press ◀ / ▶ button to adjust.
Adjusts the picture vertically.
Phase
Press ▼ / ▲ button to select Phase, then press ▶ button to enter and press ◀ / ▶ button to adjust.
Adjusts the clock phase to minimise picture jitter.
Clock
Press ▼ / ▲ button to select Clock, then press ▶ button to enter and press ◀ / ▶ button to adjust.
MEDIA OPERATION
Note: Before operating MEDIA menu, Plug in USB device or memory card,
then press SOURCE button to set the Input Source to Media.
Press ◀ / ▶ button to select MEDIA in the Source Menu. then press ENTER button or ▼ button to enter.
You can also enter the Media by pressing MEDIA button on the remote control.

- Press ◀/▶ button to select the option that you want to adjust in the media menu, then press ENTER button or ▼ button to enter.
- Press ◀ / ▶ button to adjust or press ▼ / ▲ button to select.
- After finishing your adjustment, Press TVMENU button to save and return back to the previous menu, and press EXIT button to exit the entire menu.
Movie Menu
Press ◀ / ▶ button to select Movie in the main menu,
then press ENTER button or ▼ button to enter,
Press TVMENU button to return back to the previous menu.

Press ▲/▼ button to select the folder that you want to view,
press ENTER button or ▶ button to select the sub folder,
press ENTER button to play,
press the EXIT button to return back.
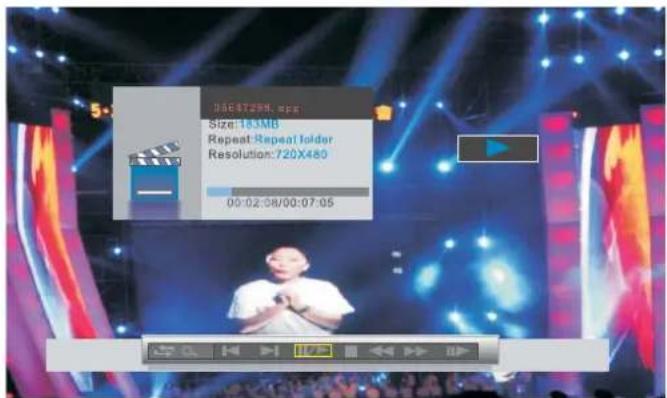
You can see the information of the current playing media.
Press ◀ / ▶ button to select menu in the bottom you want to run,
Press to select the Repeat mode,
Press ☐ to set the size of the picture.
Music Menu
Press ◀ / ▶ button to select Music in the main menu, then press ENTERbutton or ▼ button to enter, Press TVMENU button to return back to the previous menu.
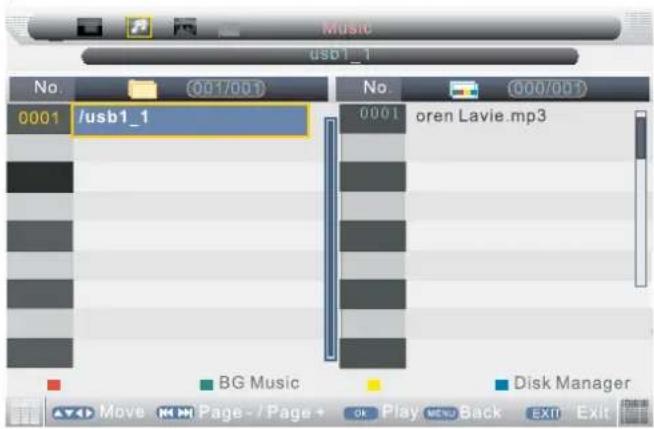
Press ◀ / ▶ button to select the Song you want to listen, then press ENTER button to play, Press TVMENU button to return back to the previous menu.

You can see the information of the current playing song .Press ◀ / ▶ button to select menu in the bottom you want to run, then press ENTERbutton to play, you can see the playing state in the right.
Press GREEN button it appears as follow: BG Music Folder is set.

Notes: 1. Other menu and description are the same as that for Movie menu.
You can see the information of the current playing media. Press ◀/▶ button to select menu in the bottom you want to run, then press ENTER button to play, you can see the playing state in the right.
Press BLUE button, then press ▼ / ▲ button to select Disk Manager.
Disk Manager
Press ENTER button or ▶ button to enter and select the folder.
-
press green button to delete the selected folder.
-
press yellow button to rename the selected folder.
-
press blue button to return menu.
Return
Press ENTER button to return.
Photo Manager
Press ◀ / ▶ button to select Photo Manager in the main menu, then press ENTER button or ▼ button to enter, Press TVMENU button to return back to the previous menu.

Press green button, then press ◀ / ▶ or ▼ / ▲ to skin the photos, press ENTER button to view.
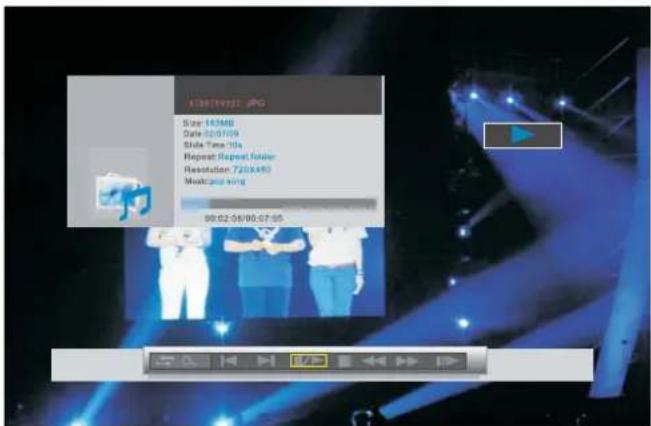
You can see the information of the current playing song .Press ◀ / ▶ button to select menu in the bottom you want to run, then press ENTER button to play, you can see the playing state in the right.
Notes: 1. Other menu and description are the same as that for Movie menu.
5. Troubleshooting
Carry out the problem-solving measures described in the following section before contacting Customer Support. Turn off the device immediately as soon as you suspect a malfunction and unplug the power plug. Do not attempt to repair the device yourself.
| SYMPTOM | CHECK ITEM |
| LCD screen stays dark. | Make sure the unit is turned on and the connections are correct.Make sure the power adapter is correctly connected. |
| There is no sound. | Make sure the system connection is correct.Make sure the power of speakers is turned on. |
| There is no picture or picture move up and down unsteady. | Check if the connections with the external AV signal source are correct.Correctly set the items in the picture menu.Check if the video type input signal is not corresponding to the unit.Make sure the unit is turned on and in correct video type. |
| The remote control does not work. | Make sure there are no obstructions between the remote control and the unit.Make sure the remote control is pointing at the unit.Make sure the batteries are inserted or the polarity is correct.Make sure the batteries are not weak.Replace the weak battery. |
Other Notes:
Static or other external interfere may cause the player to behave abnormally. In this occurs, unplug the power-supply cord from the outlet and plug it in again to reset the player. If the problems persist, then please disconnect the power and consult a qualified technician.

- PREFAZIONE
- INSERIMENTO COMMON INTERFACE
- COLLEGAMENTO TRAMITE CAVO HDMI
- COLLEGAMENTO TRAMITE CAVO RCA S-VIDEO o A/V o Y/Pb/Pr
- TELEVISIONE DIGITALE TERRESTRE (DTV)
- INDICE
- Table of Contents....24
- Safetyinstructions
- CAUTION
- RISK OF ELECTRIC SHOCK DONOTOPEN!
- WARNING
- NOTES
- Controls and connections
- Front view/Side View
- Rear View
- Remote Control
- 13.CH+/- button
- 14.Direction buttons
- ENTER/OK button
- 16.VOL+/-button
- EXITbutton
- 18.TV MENU button
- 19.FAV+
- 20.EPGbutton
- 21.HOLD
- 22.TEXT
- 23.INDEX
- 24.SIZE
- 25.colorbutton
- 26.TV/RADIO
- 27SUBPAGE/■
- 28REVEAL/
- 29.SUBTITLEbutton
- 30.FAVbutton
- 31.FAV-
- Preparation of Remote Control
- Using of Remote control
- 3SystemConnections.
- Connecting to Power Supply
- Common Interface Slot
- ConnectingtoExternalAVSignalSource
- ConnectingtoExternalAVSignalSource(Y/Pb/Pr)
- ConnectingtoExternalAVSignalSource(SCART)
- ConnectingtoExternalAVSignalSource(HDMI)
- Connecting to PC
- Connecting to TV-Signal Input
- Picture Menu
- PictureMode
- Brightness
- Contrast
- Sharpness
- Colour
- ColourTone
- NoiseReduction
- SOUNDMENU
- SoundMode
- Bass
- Treble
- Balance
- AVC
- CHANNELMENU
- ChannelManager
- FavoriteManager
- AutoSearch
- Country
- ManualSearch
- CurrentChannel
- Search
- FineTune
- AFC
- ColourSystem
- SoundSystem
- FeatureMenu
- SystemLock
- Language
- OSDLanguage
- PreferredSubtitle
- PreferredAudio
- TTLanguage
- First Time Installation
- Setup Menu
- Hotel Lock.
- Hotel Lock
- DTV
- CHANNEL MENU
- Channel Manager
- Digital Manual Search
- Channel
- CI Info
- Channel List
- FAV List
- Subtitle
- EPG(ELECTRONIC PROGRAM GUIDE)
- TEXT
- Multi-Audio
- PC
- PC Setup
- Auto Adjust
- H Positon
- V Positon
- Phase
- Clock
- MEDIA OPERATION
- Movie Menu
- Music Menu
- Disk Manager
- Return
- Photo Manager
- Troubleshooting
- Other Notes:
Brand : Trevi
Model : LTV 2022 CI
Category : Television