
PC24 - Camcorder MPMAN - Free user manual and instructions
Find the device manual for free PC24 MPMAN in PDF.


| Product Type | Digital Camcorder |
| Brand | MPMAN |
| Model | PC24 |
| Dimensions (L x H x P) | 96 x 62 x 34 mm |
| Power Supply | 3 AAA batteries (1.5 V) |
| Sensor | CMOS 5 megapixels |
| Screen | 2.4" TFT color LCD |
| Focus | 150 cm to infinity |
| Aperture | F3.2 |
| Shutter | Electronic 1/1204 s to 1/2 s |
| Photo Resolution | Up to 12 MP (4000x3000) |
| Video Resolution | 640x480 or 320x240 |
| Internal Memory | 32 MB |
| External Memory | SD/MMC card (not included) |
| Main Functions | Video, photo, audio, playback, webcam |
| Burst Mode | Yes |
| Self-timer | 2 s or 10 s |
| Photo Effects | Normal, B&W, Sepia, Negative, Red, Green, Blue |
| TV Output | NTSC or PAL |
| PC Interface | USB (PCCAM mode or removable disk) |
| Microphone | Built-in |
| Speaker | Built-in |
| Cleaning | Clean the lens with a soft dry cloth |
| Safety | Do not insert any object other than an SD card into the slot |
| Operating Temperature | 0 °C to 40 °C |
Frequently Asked Questions - PC24 MPMAN
User questions about PC24 MPMAN
0 question about this device. Answer the ones you know or ask your own.
Ask a new question about this device
Download the instructions for your Camcorder in PDF format for free! Find your manual PC24 - MPMAN and take your electronic device back in hand. On this page are published all the documents necessary for the use of your device. PC24 by MPMAN.
USER MANUAL PC24 MPMAN
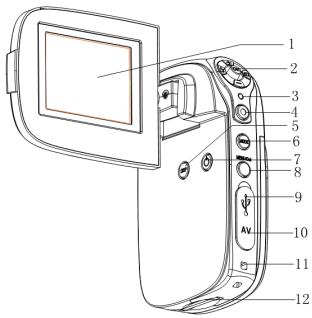
1. Parts of the camcorder
1: LCD screen
2:Joystick/OK button
3: Power/ charging LED
4:Shutter button
5: Display button
6: Mode button
7:Power button
8: Menu/Delete button
9: USB jack
10: TV out jack
11: Strap mount
12: SD card slot
13: Microphone
14:Speaker
15: Lens
16: Self-timer LED
17: Flash strobe
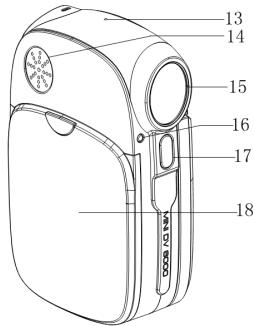
18: Battery cover
2. Preparing for using
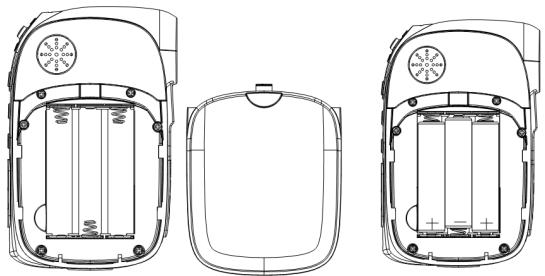
Installing the Battery
- Open the battery door.
- Insert three AAA-size batteries with the positive (+) and negative (-) poles matching the directions indicated on the battery cover.
- Close the battery door
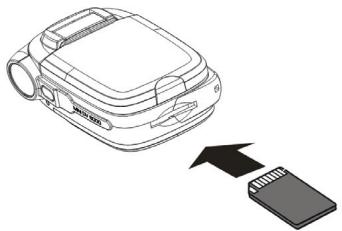
Inserting the Memory Card
- Turn off the camcorder.
- Find the SD card slot : it is at the bottom of the camcorder.
-
Insert the memory card as illustrated.
-
Never insert any other object which is not a SD/MMC card into the camera's SD card slot. Doing so will cerate the risk of damaging to the camera and the card.
To release the memory card press the edge of the card gently.
3. Using this camcorder
Turning the Camcorder On and Off
Open the LCD panel the camcorder turns on and close the LCD panel the camcorder turns off.. You may turn the camcorder on and off by another way:
- Open the LCD panel. Press the POWER button to turn on the camcorder.
- Press the POWER button again to turn the camcorder off.
Change the record mode
There are four record modes in this camcorder.
1: Turn on the camcorder.
2: Press the MODE button to change the mode. Each time the MODE button is pressed the mode icon is changed.
| Display | Title | Description |
| Capture mode | For taking still photos. | |
| Video mode | For recording movie clips. | |
| Audio mode | For recording audio files. | |
| Playback mode | Preview the record files. |
Recording a video clip
1: Turn on the camcorder and set the camcorder to video record mode.
2: Zooming:
Moving the joystick upward or downward to zoom in or zoom out the screen. The value of magnification level appears on the LCD monitor.
3: Press the SHUTTER button to start recording. Push the joystick rightward to pause and push it again to continue.
4: Press the SHUTTER again to end the recording. If the memory is full the video camera will stop recording automatically.
- On the upper of the LCD monitor displays the recorded time.
Taking still images
- Turn on the camcorder.
- Press the MODE button to set the camcorder to capture mode, the icon appears on the LCD screen.
3. Zooming:
Moving the joystick up or down to zoom in or zoom out the screen. the value of magnification level appears on the LCD monitor.
3. Hold the camcorder steady and then press the SHUTTER button down to take a picture.
Recording audio
1: Turn the camcorder on and set it to audio record mode.
2: Press the SHUTTER button to start recording. Push the joystick rightward to pause and push it again to continue.
3: Press the SHUTTER again to end the recording. If the memory is full the video camera will stop recording automatically.
- On the center of the LCD monitor displays the recorded time.
- There is no menu in audio record mode.
4. Using the menu in record mode
When a menu is displayed, the joystick is used to make the desired setting. The audio record mode doesn't have a menu.
Menu in capture mode
1: Turn on the camcorder and set it to capture mode.
2: Press the MENU button to display the menu.
3: Move the joystick upward or downward to select an item.
4: Push the joystick rightward to enter the submenu.
5: Use the joystick to select the desired item.
6: Press the OK button to confirm the setting.
7: Press the MENU button to close the menu.
Capture menu list
| Menu item | Function |
| Resolution | There are five options for choice: [12M]4000x3000/ [5M] 2592x1944/ [3M] 2048x1536 / |
| [1M]1024x768 /[VGA] 640X480. | |
| Quality | Select a lower image quality to decrease the image size in order to capture more images. There are three options for choice: [Super Fine] /[Fine] /[Normal]. |
| Metering | Change the metering method to change the brightness of the picture. [Center]: The exposure will be calculated based on light in the center area and this is suitable for general use. [Multi]: The exposure will be calculated based on the average light. [Spot]: Only the spot in the center of the LCD screen will be metered for light. |
| White Balance | Adjust the white balance to suit different light sources. There five items for option: [Auto]/ [Daylight]/ [Cloudy] / [Fluorescent] / [Tungsten]. |
| Exposure | Set the exposure value manually to compensate for unusual lighting conditions such as indirect indoor lighting, dark backgrounds, and strong backlighting. The exposure value |
| range is -2.0 to 2.0. | |
| Driver Mode | Use this item to set the camera to different mode: Off/ Self-timer 2s/ Self-timer 10s/ Burst |
| Effect | Use this function to change the image's color tone: Normal/ B&W/ Sepia / Negative/ Red/ Green/ Blue. |
| Date Stamp | This function can be used to add a date to your pictures as you take them. There are three items for option: [Off]: Neither date nor time is added to the image. [Date]: Add data to the image. [Date& Time]:Add data and time to the image. |
Menu in video mode
1: In video record mode press the MENU
button to display the menu.
2: Move the joystick upward or downward to select an item.
3: Push the joystick rightward to enter the submenu.
4: Use the joystick upward or downward to select the desired item.
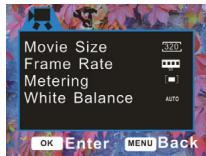
5: Press the OK button to confirm the setting.
6: Press the MENU button to close the menu.
| Menu item | Function |
| Movie Size | Select small movie size to record longer time. There are two items for option: [640x480/320X240]. |
| Frame Rate | Select low frame rate to record longer time. There are two items for option: [High]/[Low]. |
| Metering | See the details on page 9. |
| White Balance | See the details on page 9. |
Setup menu
You can set the system items in setup menu.
1: Turn the power on and press the MENU button to display the menu.
2: Push the joystick rightward to select [Setup].
3: Move the joystick upward or downward to select an item.
4: Push the joystick rightward to enter the submenu.
5: Push the joystick upward or downward to select the desired item.
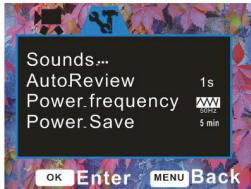
6: Press the OK button to confirm the setting.
7: Press the MENU button to close the menu.
| Menu item | Function |
| Sounds | There are four items for option: [Shutter]: Set the shutter sound on or off by pressing the joystick RIGHT. [Start-up]: Set the start-up sound. Press the joystick RIGHT to change the sound. There are four options: [None] / [1]/ [2] / [3]. [Beep]: Set the operation sound on or off by pressing the joystick RIGHT. [Volume]: Adjust the sound volume. You can change it by pressing the joystick RIGHT. |
| Auto Review | Adjust the review time after taking a picture. There are three items for option: [Off]/ [1sec.]/ [3 sec.]. |
| Power frequency | Light Frequency should be set to either 60Hz or 50Hz depending on your region. [50HZ] / [60HZ]. |
| Power save | To save power, the camera is turned off automatically |
| after a period of time. There are three options: [1min.] / [3min.] / [5min]. | |
| Date& Time | Set the date and time. |
| Language | Choose an language for displaying the information on the LCD. |
| TV Out | TV Out should be set to either NTSC or PAL depending on your region. [NTSC] /[PAL]. |
| USB | You can use this camera as a PC camera or removable disk. [PCCAM]: Use as a PC camera; [MSDC]: Use as a removable disk. |
| Start-up Image | You can use your loved picture as the start-up image. [Off]: No start-up image. [System]: Use the default image as the start-up image. [My image]: Use your loved image as the start-up image. |
| Format | All data will be deleted including protected files. Be sure to download important files to your computer before formatting. [Yes]/ [No]. |
| Reset all | To reset the entire menu and button operation settings to initial default. [Yes]/ [No]. |
5.Playback
Playing back movie clips
1: Set the camcorder to playback mode.
2: Push the joystick leftward or rightward to select the movie clips you want to playback.
3: Press the OK button to start playing. Push the joystick upward to pause it and push it again to continue. Push the joystick rightward to fast forward and push the joystick leftward to back forward.
4: Press the MENU button to end the playing.
Playback still image
1: Set the camcorder to playback mode.
The latest recorded file appears on the LCD screen. If there are no images stored, a message [No Image] appears.
2: Push the joystick leftward or rightward to preview the previous or next image.
3: Zooming:
Moving the joystick upward to zoom in the image. When the picture is enlarged press the OK button to lock the zoom ratio and then you can push the joystick upward/downward/Leftward/Rightward to browse the details of the image. Press the MENU button to recover the picture to initial size.
Playing back audio files
1: Set the camcorder to playback mode.
2: Push the joystick leftward or rightward to select the audio file you want to playback.
3: Press the OK button to start playing. Push the joystick upward to pause it and push it upward again to continue.
4: Press the MENU button to end the playing.
Delete files in playback mode
1: Press the MENU button in playback mode.
2: Move the joystick upward or downward to select the item [Delete].
3: Push the joystick rightward to enter the submenu.[One]: Delete current file. [All]: Delete all files except locked files.
4: Move the joystick upward or downward to select the item.
5: Press the OK button to confirm the setting. A dialog box will appear. Move the joystick upward or downward to select the item [Yes].
6: Press the OK button to delete the current file or all files.
6. Making connections
Connecting the Camcorder to a TV
When plug in the TV-out cable (supplied) to the camcorder output jack the LCD screen turns black, Connect the camcorder to a TV and the TV screen now performs as the camcorder LCD screen.
- Connect the camcorder to a TV via the TV-out cable (supplied)
-
Turn on the TV and the camcorder, and then set the TV to "AV" mode.
-
When the camcorder is set to record mode, you can preview the subjects you want to record on the TV screen.
- When the camcorder is set to Playback mode, you can review all the pictures, video and audio clips stored in the camera on the TV.
Connecting the Camcorder to a PC
1: Set the USB mode to [MSDC] mode.
2:Connect the supplied USB cable to the computer's USB port and turn on the video camera. A message "MSDC" appears on the screen when connection to the computer has been successfully completed.
3: Open [My Computer] or [Windows Explorer]. A "Removable Disk" appears in the drive list. Double-click the "Removable Disk" icon to view its contents. Files stored on the camera are located in the folder named "DCIM".
4: Copy the photos or files to your computer.
7. Software Installation
Installing the Software
The bundled software CD has the drivers and software that come with video camera. Insert the CD into your CD-ROM drive. The autorun menu
appears:
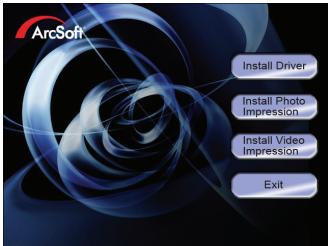
Install Driver
1:Click [Install Driver].
2: Follow the on-screen instructions to install the drivers.
3: When the installation is finished it will create an icon on the desktop.

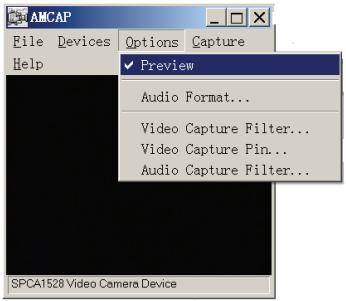
How to use the PC Camera function
Please install the camera driver first. Connect the camera to the computer with a
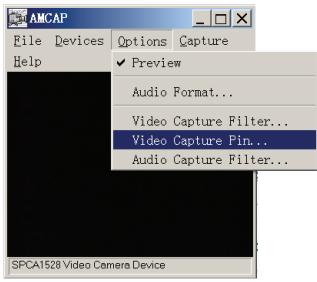
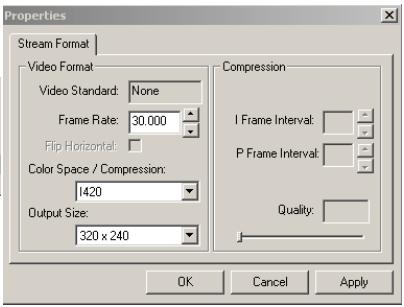
USB cable, double click the icon to run the program. If it was the first time you use this function please select the item < Preview> as in the illustration. And then you can use it as the pc camera function.
If you want to change the imaging size, select
8. Technical Specifications
| Sensor | 5MegaPixels CMOS, |
| Display | 2.4" TFT Color LCD |
| Focus range | 150cm ~ infinity |
| Aperture | F3.2 |
| Shutter | Electronic Shutter: 1/1204 ~ 1/2sec. |
| Resolution | StillImage: [12M]4000x3000/ [5M] 2592x1944/ [3M] 2048x1536 / [1M]1024x768 /[VGA]640X480. Video: 640 x 480, 320 x 240 |
| Sensitivity | Auto |
| White balance | Auto / Daylight / Tungsten / Fluoresce / Cloudy |
| Exposure control | -2EV to +2EV in 0.3 step |
| Burst | Included |
| Photo effect | Normal/ B&W/ Sepia/ Negative/ Red/ Green/ Blue |
| Self-timer | 2sec / 10 sec. |
| Storage | 32 MB internal memory External memory: SD / MMC |
| TV system | NTSC / PAL |
| Power Supply | 3 AAA (alkaline/ 1.5V) batteries |
| Ambient temperature | Operating: 0°C to 40°C Storage: -20 to 60°C |
| Microphone | Built-in |
| Speaker | Built-in |
| Dimension | 96x62x34(mm) |
www.mpmaneurope.com

PC24
1.PIECES DU CAMESCOPE 3
2. SE PREPARER POUR L'UTILISATION 4
INSTALLER LES PILES 4
METTRE LA CARTE MEMOIRE 5
- UTILISER CE CAMESCOPE. 5
ALLUMER ET ETEINDRE LE CAMESCOPE 5
CHANGER LE MODE D'ENREGISTREMENT 6
ENREGISTRER UN CLIP VIDEO 7
PRENDRE DES PHOTOS 7
FAIRE UN ENREGISTREMENT AUDIO 8
- UTILISER LE MENU EN MODE ENREGISTREMENT 9
9
MENU EN MODE VIDEO 11
MENUDREGLAGE 12
5.LECTURE 16
LIRE DES CLIPS 16
LIRE DES PHOTOS 16
LIRE DES FICHIERS AUDIO 17
EFFACER DES FICHIERS EN MODE LECTURE 18
6. FAIRE LES BRANCHEMENTS 19
BRANCHER LE CAMESCOPE A LA TV 19
BRANCHER LE CAMESCOPE A UN PC 19
- INSTALLATION DU LOGICIEL 20
INSTALLLERLELOGICIEL 20
8.CARACTERISTIQUES TECHNIQUES 22
- PARTS OF THE CAMCORDER
- PREPARING FOR USING
- INSTALLING THE BATTERY
- INSERTING THE MEMORY CARD
- USING THIS CAMCORDER
- TURNING THE CAMCORDER ON AND OFF
- CHANGE THE RECORD MODE
- RECORDING A VIDEO CLIP
- TAKING STILL IMAGES
- ZOOMING
- HOLD THE CAMCORDER STEADY AND THEN PRESS THE SHUTTER BUTTON DOWN TO TAKE A PICTURE
- RECORDING AUDIO
- USING THE MENU IN RECORD MODE
- MENU IN CAPTURE MODE
- MENU IN VIDEO MODE
- SETUP MENU
- 5.PLAYBACK
- PLAYING BACK MOVIE CLIPS
- PLAYBACK STILL IMAGE
- PLAYING BACK AUDIO FILES
- DELETE FILES IN PLAYBACK MODE
- MAKING CONNECTIONS
- CONNECTING THE CAMCORDER TO A TV
- CONNECTING THE CAMCORDER TO A PC
- SOFTWARE INSTALLATION
- INSTALLING THE SOFTWARE
- INSTALL DRIVER
- HOW TO USE THE PC CAMERA FUNCTION
- TECHNICAL SPECIFICATIONS
- PC24
Brand : MPMAN
Model : PC24
Category : Camcorder