
V261LCD - Camera Lorex - Free user manual and instructions
Find the device manual for free V261LCD Lorex in PDF.


| Product Type | Security Camera |
| Brand | Lorex |
| Model | V261LCD |
| Image Sensor | 1/3" CMOS |
| Resolution | 640 x 480 (VGA) |
| Lens | 3.6mm fixed |
| Night Vision | Yes, up to 30 feet (9 m) |
| Power Supply | 12V DC, 1A |
| Dimensions (H x W x D) | 2.5 x 2.5 x 4.5 inches |
| Weight | 0.5 lbs (227 g) |
| Mount Type | Bracket included (wall or ceiling) |
| Weatherproof Rating | IP66 (indoor/outdoor) |
| Video Output | BNC (composite) |
| Audio | None |
| Operating Temperature | -4°F to 122°F (-20°C to 50°C) |
| Storage Temperature | -22°F to 140°F (-30°C to 60°C) |
| Certifications | FCC, CE |
| Package Contents | Camera, mounting hardware, power adapter, manual |
| Repairability | Not user-serviceable; contact support |
| Cleaning | Wipe with soft dry cloth; avoid liquids |
| Compatibility | Lorex DVR systems |
Frequently Asked Questions - V261LCD Lorex
User questions about V261LCD Lorex
0 question about this device. Answer the ones you know or ask your own.
Ask a new question about this device
Download the instructions for your Camera in PDF format for free! Find your manual V261LCD - Lorex and take your electronic device back in hand. On this page are published all the documents necessary for the use of your device. V261LCD by Lorex.
USER MANUAL V261LCD Lorex
natural_image
Exterior view of a modern security camera with two dual-lens mounted on top (no text or symbols visible)V261LC Series
Quick Start Guide
lorex.com

Scan for
Lorex Home APP
Package Contents
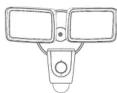
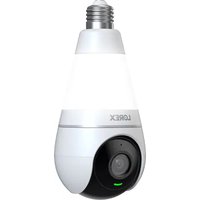
HD Video Floodlight

Mounting Screws & Anchors (×3)

Mounting Bracket
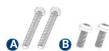
Bracket Screws A and B (×2)

Wire Caps (×3)


Phillips Machine Screw
Safety Precautions
- Read this guide carefully and keep it for future reference. - Follow all instructions for safe use and handling of the pr
- Follow all instructions for sure use and handling of the product.
- Periodic cleaning may be required. Use a damp cloth only. Do not use any harsh, chemical-based cleaners.
- Use the product within given temperature, humidity and voltage levels noted in the
product's specifications. • Do not disassemble the floodlight
CAUTION


Disclaimers
• Always follow code standards when installing wired connections. This is a light survey must be installed on well and a Ull listed
- This floodlight camera must be installed on a wall and a UL listed junction box.
- This floodlight includes an Auto Mechanical IR Cut Filter. When the camera changes between Day/Night viewing modes, an audible clicking noise may be heard from the floodlight. This clicking is normal, and indicates that the camera filter is working.
• Audio recording without consent is illegal in certain jurisdictions. Lorex Corporation assumes no liability for use of its products that does not conform with local laws.
FCC Notice
THIS DEVICE COMPLIES WITH PART 15 OF THE FCC RULES. OPERATION IS SUBJECT TO THE FOLLOWING TWO CONDITIONS:
(1) THIS DEVICE MAY NOT CAUSE HARMFUL INTERFERENCE, AND
(2) THIS DEVICE MUST ACCEPT ANY INTERFERENCE RECEIVED, INCLUDING INTERFERENCE THAT MAY CAUSE UNDESIRED OPERATION.
Need Help?
Visit us online for up-to-date software and complete instruction manuals

1
Visit lorex.com
2
Search for the model number of your product
3
Click on your product in the search results
4
Click on the Downloads tab
Copyright © 2020 Lorex Corporation As our products are subject to continuous improvement, Lorex reserves the right to modify product design, specifications and prices, without notice and without incurring any obligation. E&OE. All rights reserved.
Product Overview
Back Panel

Front Panel

LED Indicator
| Behavior | Meaning |
| ● (steady) | Operating correctly |
| ● (fashing) | Ready for connection. |
| ● (fashing rapidly) | Mobile device is attempting to connect to the camera. |
| ● (steady) | Device malfunction. Try resetting the camera and repeating the setup. |
| ● (fashing) | Network connection failed. Try resetting the camera and repeating the setup. |
| ● (fashing rapidly) | Memory slot error. Try removing and re-inserting the included memory slot card, or try a different card. |
| ● (trimating) | Firmware upgrade in progress. |
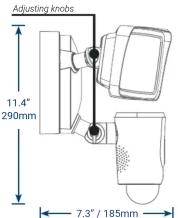

* To access the memory slot and reset button, twist left to open the top cover.
** To reset the camera, hold down the reset button until the chime sounds and the LED indicator turns red.
STEP 1: Preparation
To prepare for installation:
- TURN OFF POWER TO YOUR FLOODLIGHT CIRCUIT AT THE EUSEBOX TO ENSURE NO
POWER IS BEING SENT. If you
are unsure of which breaker
controls the circuit, then turn
off the main power switch
If you do not know where
your breaker is or how to turn
off power. consult a licensed
electrician.
- Verify that the supply voltage is correct. Connect fixture to a 100 VAC\~240 VAC 50/60 Hz power source.
- DO NOT connect floodlight to a dimmer switch or timer.
- If you are not replacing a light fixture, you will need to run power cabling to the install location, and purchase a UL listed junction box for a licensed electrician to install
Recommendation:
Mount the floodlight camera 10 feet (3 meters) high with the motion detector levelled to the ground for optimal detection of human-sized objects as far as 32 feet (10 meters).
Levelled to the ground

10 Feet

V261LC_QSG_EN_R1
STEP 2: Secure the Mounting Bracket STEP 4: Se
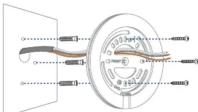
Next, install the floodlight's mounting bracket.
- With the power shut off, remove the existing light fixture and bracket from the wall.
- Disconnect the wires.
To install directly to a junction box:
-
Run the wires through the middle of the supplied mounting bracket.
-
Secure the mounting bracket to your junction box using one of the bracket screws, A or B depending on which size fits.
NOTE: Be sure to follow the "Front" / "Up" directions on the mounting bracket.
To install directly on a wall:
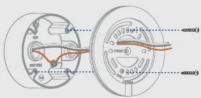
- Use the mounting bracket as a template to mark 3 holes in a triangular pattern
- Use a 1/4" drill bit to drill in the marked holes.
- Gently tap the supplied mounting anchors into the drilled holes with a hammer.
- Align the bracket and use a Phillips head screwdriver to secure the supplied mounting screws into the mounted anchors.
STEP3cloghect the Wires
To wire the floodlight:
Hang the floodlight camera from the mounting bracket using the supplied hooks.

natural_image
Illustration of a robotic arm with a hand holding a tool, no text or symbols presentA Hook one end into your floodlight camera.
B Hook the other end into the bracket.

The copper wire from the camera is ground wire. Connect the ground wire to the existing ground wire inside of your junction box. Use the supplied wire cap.
In the case that you are not wiring from a junction box, twist your ground wire around the green screw on the bracket.

natural_image
Technical line drawing of a mechanical assembly with no visible text or symbolsIMPORTANT: Properly ground fixture.

The white wire from the camera is neutral wire. Use a wire cap to connect the neutral wires from the camera and junction box. The black wire from your camera is a hot wire. Use a wire cap to connect the hot wires from the camera and junction box.*

natural_image
Pure electrical circuit lines without any symbols* Power wire colors in your home may be different. In such a case consult a licensed electrician.
Next, install the floodlight camera.
- Carefully push all the wires through the middle opening of the bracket into the junction box, and secure the floodlight camera through the middle hole using the Phillips machine screw.
In the case that you are installing the floodlight camera directly to the bracket, fit the wires into the back openings of the camera.

natural_image
Mechanical assembly diagram showing a motor and gear assembly with no visible text or symbols- Adjust the lens and light angle using the adjusting knobs.
- To enforce a water resistant seal, apply silicone compound around the entire perimeter where the junction box is attached to the bracket
- You may now restore power at the fusebox.
NOTE: If the status LED on the floodlight camera does not turn on, check to make sure wiring is done correctly.
STEP 5: In-app Setup
Next, connect the floodlight camera to the Lorex Home app.
To scan the QR code:
- Download and install the free Lorex Home app from the App Store or Google Play Store.
- Tap the Lorex Home icon to launch the app. Tap Sign up, then follow the on screen prompts to create an account. Record your account details below and store in a secure location:

- Wait for the floodlight to start up. This may take up to 5 minutes after reconnecting power at the breaker.
- Once the status LED on the floodlight is flashing green, tap + in the Lorex Home app.
- Scan the QR code on the side of the floodlight camera using your mobile device's camera. NOTE: If your mobile device cannot scan the QR code, tap Manually enter Device ID.

To link the floodlight:
- Once the status LED on the floodlight is flashing green, tap Next in the Lorex Home app. The app will connect your mobile device to the floodlight's hotspot.
- Create a secure password for the floodlight. Record your floodlight password below and store in a secure location:
Floodlight Password:
- Select your Wi-Fi network from the list, then enter the Wi-Fi password to connect your floodlight to the Internet.
NOTE: If the Wi-Fi connection is weak, try moving your router closer or adding a Wi-Fi extender.

- Once the status LED on the floodlight is solid green, tap Next to add the floodlight to your Lorex Home account.
- Set a name for the floodlight and configure date & time preferences, then tap Complete.
Overview of Lorex Home app
Live viewing screen:
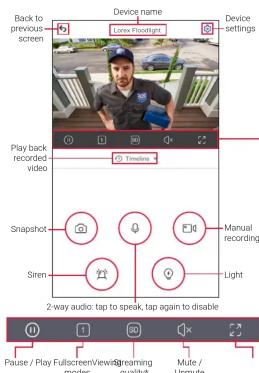
* Change the streaming quality to SD (Standard Definition) to conserve bandwidth while watching live video. This will not impact the quality of recorded video.
To configure the floodlight motion detection:
- Tap Device Settings.
- Tap Floodlight Settings
-
Mode is set to Motion Activation by default. Tap to change the floodlights from being activated by motion detection to Manual. Manually turn the floodlights on and off in the live screen view.
-
Tap PIR Area:
A. Slide the bar on the left to adjust the distance at which motion will activate your floodlights.
B. Tap the Zone(s) on or off to activate motion detection from three different areas.
C. Tap Save.

5. Light Duration is set to 1 minute by default. Tap to change the floodlight's length of time when activated from motion detection.

Overview of the most common screens and controls in the Lorex Home app. For complete instructions on using the app, see the Lorex Home app manual on the floodlight's product page at lorex.com.


- Safety Precautions
- Disclaimers
- FCC Notice
- Product Overview
- STEP 1: Preparation
- STEP 2: Secure the Mounting Bracket STEP 4: Se
- To install directly to a junction box:
- To install directly on a wall:
- STEP3cloghect the Wires
- STEP 5: In-app Setup
- To scan the QR code:
- To link the floodlight:
- Overview of Lorex Home app
- To configure the floodlight motion detection:
Brand : Lorex
Model : V261LCD
Category : Camera