
W261AQC-E - Camera Lorex - Free user manual and instructions
Find the device manual for free W261AQC-E Lorex in PDF.


| Product Type | Security Camera |
| Brand | Lorex |
| Model | W261AQC-E |
| Dimensions (W x H x D) | 3.5 x 2.5 x 2.5 inches |
| Weight | 0.5 lbs |
| Power Supply | DC 12V or Power over Ethernet (PoE) |
| Video Resolution | 1080p Full HD |
| Night Vision | Up to 30 ft with infrared LEDs |
| Field of View | 90° |
| Motion Detection | Yes, with adjustable sensitivity |
| Two-Way Audio | Yes, built-in microphone and speaker |
| Weather Rating | IP65 (outdoor use) |
| Connectivity | Wi-Fi 802.11 b/g/n or Ethernet |
| Storage | MicroSD card (up to 128GB) or NVR |
| Mounting Type | Wall or ceiling mount included |
| Operating Temperature | -4°F to 122°F |
| Maintenance | Clean lens with a soft, dry cloth. Avoid abrasive cleaners. |
| Safety Precautions | Ensure proper electrical rating. Do not expose to rain unless rated IP65. |
| Spare Parts | Power adapter, mounting screws, and Ethernet cable available |
| Repairability | User-replaceable power adapter; professional repair for other components |
Frequently Asked Questions - W261AQC-E Lorex
User questions about W261AQC-E Lorex
0 question about this device. Answer the ones you know or ask your own.
Ask a new question about this device
Download the instructions for your Camera in PDF format for free! Find your manual W261AQC-E - Lorex and take your electronic device back in hand. On this page are published all the documents necessary for the use of your device. W261AQC-E by Lorex.
USER MANUAL W261AQC-E Lorex
- Read this guide carefully and keep it. For future reference.
• Follow a instructions for safe use and handling of the product - Use the camera within given temperature, humidity and voltage levels noted in the camera's specifications.
• Do not disassemble the camera. - Do not point the camera directly at the sun or a source of intense light.
- Periodic cleaning may be required. Use a damp cloth only. Do not use any harsh, chemical-based cleaners.
Dimensions

Disclaimers
• The camera is rated for indoor use only. Do not mount the camera outdoors.
- This camera includes an Auto Mechanical IR Cut Filter. When the camera changes between Day/ Night viewing modes, an audible clicking noise may be heard from the camera. This clicking is normal, and indicates that the camera filter is working.
Audio recording without consent is illegal in certain jurisdictions. Lorex Corporation assumes no liability for use of its products that does not conform with local laws.
Troubleshooting
| Problem Solution | |
| Cannot set up camera | • Ensure your mobile device and the camera are within range of your Wi-Fi router.• Ensure the LED indicator on the camera is flashing green before beginning setup. |
| No picture / signal • Ensure the LED indicator on the camera is glowing steady green. See 'LED Behavior' section for details if otherwise• Ensure the camera is properly connected to power using the included USB power adapter.• Try repositioning the camera, router, or both to improve signal strength. | |
| Picture is not clear • Check the camera lens for dirt, dust, spiderwebs. Clean the lens with a soft, clean cloth.• Remove the vinyl cover on the camera lens | |
| No audio • Ensure audio function on camera is turned on• Ensure audio is turned up on viewing device. | |
| Person detection not working | • Ensure you have enabled Person Detection in the Device Settings screen of the Lorex Home app. See 'Overview of Lorex Home App' for details. |
| Camera stuck downwards | • Turn off Privacy Mode in Device Settings on the Lorex Home app. See 'Overview of Lorex Home App' for details. |
Resources
Need Help?
Visit us online for up-to-date software and complete instruction manuals

1
Vietorex.com
2
Search for the model number of your product
3
Click on your product in the season results
4
Click on the Downloads tab
Copyright © 2019 Lorex Corporation
As our products are subject to continuous improvement, core reserves the right to modify product design, specifications and prices, without notice and without incurring any obligation. E&OE. All rights reserved.
LED Behavior
See table below for definitions of camera's LED behaviors:
Behavior Meaning
| (steady) | Operating correctly |
| (flashing) | Ready for connection. |
| (flashing rapidly) | Mobile device is attempting to connect to the camera. |
| (steady) | Device malfunction. Try resetting the camera (see 'Camera Overview' for details) and repeating the setup. |
| (flashing) | Network connection failed. Try resetting the camera (see 'Camera Overview' for details) and repeating the setup. |
| (flashing rapidly) | microSD error. Try removing and re-inserting the included microSD card, or try a different card. |
| (alternating) | Firmware upgrade in progress. |
FCC Notice
THIS DEVICE COMPLIES WITH PART 15 OF THE FCC RULES OPERATION IS SUBJECT TO THE FOLLOWING TWO CONDITIONS:
(1) THIS DEVICE MAY NOT CAUSE HAVM-JL INTERFERENCE, AND (2) THIS DEVICE MUST ACCEPT ANY INTERFERENCE RECEIVED, INCLUDING INTERFERENCE THAT MY CAUSE UNDESIPED OPERATION.
LOREX®
HD Wi-Fi Camera

natural_image
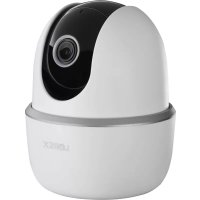
White LOREX camera with black lens and white dome, against a green background (no text or symbols on device)W261AQ Series
Quick Start Guide
lorex.com
Package Contents

Camera
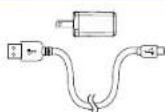
Power Accessories


Mounting Kit
ATTENTION:
A REGULATED UL / CSA APPROVED power supply is REQUIRED for use with this camera (included). Use of a non-regulated, non-conforming power supply can damage this product and voids the warranty.
Camera Overview
A Status LED
B Microphone
C Reset: Press and hold until the chime sounds to reset the camera.
D microSD slot: microSD card pre-inserted (expandable up to 256GB, microSD class 10 or higher).
Speaker
F Ethernet: For service only.
G Power: Connect the included USB power adapter


W261AQ_QSG_EN_R2
STEP 1: Connecting to Lorex Home
Connect to the camera using the free Lorex Home app on your iPhone® or Android® phone.
To connect your camera to Lorex Home:
- Connect the camera cable to the included USB adapter and plug into a nearby outlet.
- Download and install the free Lorex Home app from the App Store or Google Play Store.
- Tap the Lorex Home icon to launch the app. Tap Sign up, then follow the on-screen prompts to create an account. Record your account details below:

Email:
Account Password:
- Once the status LED on the camera is flashing green and the startup chime sounds, tap+.
- Scan the QR code on the bottom of the camera using your mobile device's camera
NOTE: If your mobile device cannot scan the OR code, tap Manually enter Device ID.
- Create a secure password for the camera. Record your camera password below:
Camera Password:
- Select your Wi-Fi network from the list, then enter the password to connect your camera to the Internet.
- Once the status LED on the camera is solid green, Iap Next to add the camera to your Lorex Home account.
- Set a name for the camera and configure date & time preferences, then tap Complete to finish the setup.
STEP 2A: Installation Tips
To ensure the best possible wireless performance, it is recommended to keep the following installation tips in mind when choosing a location for the camera:
- Place the camera as close to your Wi-Fi router or access point as possible.
- Reduce the number of obstructive materials between the camera and the router or access point. Concrete, brick, metal and wood are the most common materials in your house that can cause poor signal strength.


- Other electronic devices such as microwaves, TVs, cordless phones, and baby monitors can cause signal interference. It is recommended to install the camera as far away from these devices as possible.


STEP 2B: Ceiling Mounting (Optional)
The camera is ready at this point to be placed on any surface and begin monitoring if you would like to keep the placement of your camera flexible.
You also have the option to mount the camera to an indoor ceiling using the included mounting accessories.
To mount the camera:
- Mark the camera's mounting position using the included mounting template
- Drill holes where marked on the mounting template accessories.
NOTE: Insert the optional plastic mounting anchors if needed.
- Remove the mounting plate from the camera base and position the holes over the mounting points
- Attach the mounting plate to the mounting surface using the included mounting screws.
- Twist the camera base onto the mounting plate to secure it to the mounting surface. Adjust the camera's position as needed
- If you are installing the camera on a ceiling, use the Image Rotation feature on the Device Settings screen of the Lorex Home app to flip the camera image (see 'Overview of Lorex Home App' for details).


Overview of Lorex Home App
Overview of the live viewing screen and controls in the Lorex Home app. For complete instructions on using the app, see the Lorex Home app manual on your product page at lorex.com.

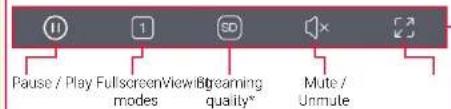

* Change the streaming quality to SD (Standard Definition) to conserve bandwidth while watching live video. This will not impact the quality of recorded video.
** Enable Smart Tracking (beta) on the Device Settings screen to have the camera follow and adjust to one moving object in the scene. Tracking varies depending on the speed of motion.


Brand : Lorex
Model : W261AQC-E
Category : Camera