
W282CAD - Camera Lorex - Free user manual and instructions
Find the device manual for free W282CAD Lorex in PDF.


| Product Type | Security Camera |
| Brand | Lorex |
| Model | W282CAD |
| Dimensions (Wall Mount) | 5.3 x 3.1 x 3.4 in (134 x 76 x 85 mm) |
| Dimensions (Ceiling Mount) | 5.1 x 3.1 x 4.6 in (129 x 78 x 118 mm) |
| Power Supply | 5V DC power adapter (included), UL/CSA approved |
| Connectivity | Wi-Fi (2.4/5 GHz) |
| Video Resolution | HD (exact resolution not specified) |
| Night Vision | IR LEDs with Auto Mechanical IR Cut Filter |
| Audio | Built-in microphone and speaker; two-way audio |
| Storage | microSD slot (card not included) |
| Detection | Motion, person, and vehicle detection |
| Siren | Yes, controllable via app |
| Warning Light | Yes, LED warning light |
| Status LED | Multi-color LED indicating status (see manual) |
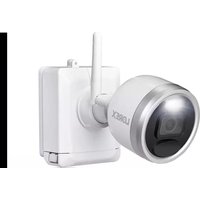
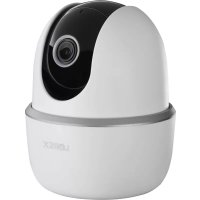
| Mounting | Wall mount and ceiling/tabletop mount included |
| Package Contents | Camera, power adapter, mounting stands, screws, drywall anchors, quick setup guide |
| Maintenance | Clean with a damp cloth; do not use harsh chemicals |
| Safety | Do not disassemble; use within specified temperature, humidity, and voltage |
| Warranty | Not specified in manual |
Frequently Asked Questions - W282CAD Lorex
User questions about W282CAD Lorex
0 question about this device. Answer the ones you know or ask your own.
Ask a new question about this device
Download the instructions for your Camera in PDF format for free! Find your manual W282CAD - Lorex and take your electronic device back in hand. On this page are published all the documents necessary for the use of your device. W282CAD by Lorex.
USER MANUAL W282CAD Lorex
natural_image
White LOREX camera lens with visible lens and control knob (no text or symbols on body)Quick Setup Guide
W282CA Series
Dimensions
Camera with wall mount

Camera with ceiling mount

Status LED Behavior
See table below for definitions of camera's LED behaviors:
| Behavior Meaning | |
| (steady) | Operating correctly. |
| (flashing) | Ready for connection. |
| (flashing rapidly) | Mobile device is attempting to connect to the camera. |
| (steady) | Device malfunction. Try resetting the camera (see 'Carrera Overview' for details) and repeating the setup. |
| (flashing) | Network connection failed. Try resetting the camera (see 'Carrera Overview' for details) and repeating the setup. |
| (flashing rapidly) | micro80 error. Try removing and re-inserting the included micro80 card, or try a different card. |
| (falternating) | Firmware upgrade in progress. |
Safety Precautions
- Read this guide carefully and keep it for future reference.
• Follow all instructions for safe use and handling of the product.
- Use the camera within given temperature, humidity and voltage levels noted in the camera's specifications.
- Do not disassemble the camera.
- Do not point the camera directly at the sun or a source of intense light.
- Periodic cleaning may be required. Use a damp cloth only. Do not use any harsh chemical-based cleaners.
Need Help?
Visit us online for up-to-date software and complete instruction manuals.
1
Visit lorex.com
2
Search for the model number of your product
3
Click on your product in the search results
4
Click on the Downloads tab

Copyright © 2020 Lorex Corporation
As our products are subject to continuous improvement, Lorex reserves the right to modify product design, specifications and prices, without notice and without incurring any obligation. E&OE. All rights reserved.
Package Contents

Camera Overview

STEP 1: Getting Started
Verify your camera image by temporarily plugging it in indoors. You will complete final installation and mounting later in the process.
a Plug in the camera:
- Connect the included power adapter to the camera cable. No need to use the induced extension cable at this time.

natural_image
Line drawing of a plug connected to a circular device (no text or symbols)b Download and sign up with Lorex Home:
• Download and launch the Lorex Home app from the App Store or Google Play Store
- Tap Sign up, then follow the on-screen prompts to create an account. Record your account details below
Email:
Account Password:

C Add your camera:
- Wait until the startup chime is heard and the status LED on the camera is flashing green.

- From the Devices tab, tap
NOTE: If this is not your first device, tap + in the top-right corner
- Sean the QR code on the bottom of the camera:

NOTE: If your mobile device cannot scan the OR code-top Manually enter Device ID

d Create password
- Create a secure password for the camera.

Camera Password:
e Connect to Wi-Fi
- Select your Wi-Fi network from the list. - Enter your WiFi password, then tap Connect.

f Finishing touches
Wait until the status LED on the camera is solid green, then top Next.

- The camera is added to your Lerox Home account. - Set the camera name and timezone, then tap Complete.
Congratulations! You can now view live video from your camera on your mobile device.
STEP 2: Important Installation Notes
Ensuring Accurate Person & Vehicle Detection:
Please refer to the following installation notes for outdoor mounting locations:
- Angle the camera so that objects of interest appear in the bottom 13 of the camera image. - Choose a location where objects of interest will be between 5-50ft (1.5-1.5m) from the camera.

natural_image
Thermal image showing a person walking near a car, with red and green color overlays (no text or symbols)Lower accuracy for objects further away than 500. (-75m) and/or in the top 1/2 of the image.
Optimal accuracy for objects between 5-30 ft (1.5-1.5m) and in the bottom 12 of the image.

- Angle the camera between 30–60° down from the level position - Install the camera between B-15ft (2 h-5m) off of the ground.
NOTE: Accuracy of person and vehicle detection will be influenced by multiple factors, such as the object's distance from the camera, the size of the object, and the height and angle of the camera. Night vision will also impact the accuracy of detection
Connectivity Guidelines:
- Place the camera as close to your Wi-Fi router or access point as possible.
- Reduce the number of constructive materials between the camera and the router of access point. Concrete, brick, metal and wood are the most common materials in your house that can cause poor signal strength.

- Other electronic devices such as microwaves, TVs, cordless phones, and baby monitors can cause signal interference. It is recommended to install the camera as far away from these devices as possible

Additional Installation Tips:
- Point the camera where there is the least amount of obstructions (e.g., tree branches)
- Install the camera where vendors cannot easily reach - Secure calling so that it is not exposed or easily cut
• This camera is rated for outdoor use, installation in a sheltered location is recommended
Once you have completed initial setup using the Lorex Home app detailed on the front page, and reviewed all installation notices above, select one of the installation methods below.
STEP 3A: Wall Mounting STEP 3B: Ceiling / Tabletop Moun
- Unplug the camera
2 Use the included mounting template to mark holes for the mounting screws (×2) and cable (see Figure 1). - Drill holes where marked. If required, insert the included drywall anchors (x2)
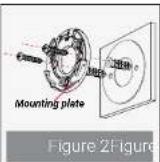
- Set the mounting plate over the screw holes with the TOP indicator pointing up. Secure the mounting plate in place using the included screws (see Figure 2).
- Twist the camera clockwise onto the wall mount (see Figure 3)
- Feed the camera cable through the cable notch in the wall mount, as well as the mounting surface (see Figure 4).
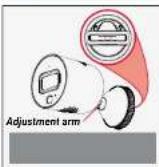
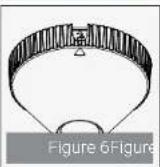
7 Use a flathead screwdriver (not included) to unlock the wall mount to move the adjustment arm. Adjust the camera angle as needed, then lock the adjustment arm (see Figure 5) - Position the wall mount over the wall mounting plate so the cable notch lines up with the unlocked position marked on the wall mount base (see Figure 6).
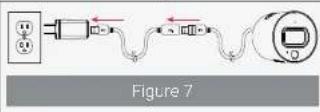
9 Twist the wall mount cover clockwise to lock the camera in place. - Reconnect the camera to the included power adapter using the optional weatherproof USB extension cable if desired (see Figure 7).



ng
For tabletop installation:
- Ensure objects of interest will be further than 5ft (1.5m) from the camera.
- Place the camera so that it has a clear view of the scene, and is not blocked by the surface it is installed on.
For ceiling installation:
Refer to "Ensuring Accurate Person & Vehicle Detection" above.
- Unplug the camera
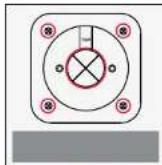
- Use the included mounting template to mark holes for the mounting screws (x4) and cable (see Figure 8).
3 Drill holes where marked. If required, insert the included drywall anchors (×4).
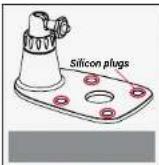
4 Remove the pre-inserted silicon plugs (4x) from the mounting stand (see Figure 9). - Twist the camera clockwise onto the mounting stand (see Figure 10)
- Set the mounting stand over the screw holes. Secure the mounting stand in place using the included screws (see Figure 11).
- Feed the camera cable through the hole in the mounting stand base, as well as the mounting surface (see Figure 12).
8 Twist the adjustment ring on the mounting stand counterclockwise to adjust the camera angle as needed. Tighten the adjustment ring when finished (see Figure 13). - Reconnect the camera to the included power adapter using the optional weatherproof USB extension cable if desired (see Figure 14).


Congratulations! Your camera is fully installed and ready to go.
Now let's start exploring what your camera can do. See the section below for an overview of features using Lorex Home.
Lorex Home Overview
Live Viewing Controls

A Return to Main Menu
B Settings: Configure settings for selected device.
Pause/Restart Video
D Viewing Mode: Switch between single and quad channel views*.
Video Quality: Tap to switch to HD ^4 video quality. Tap again for reduced video quality that is optimized for streaming.
F Audio: Tap to mute / unmute.
G Fullscreen: Tap to view in landscape mode.
Timeline: Tap to search for and play back recorded videos.
Snapshot: Tap to save a still image of the current live view.
Two-Way Audio: Tap to speak into the microphone on your mobile device. Sound will be transmitted through the camera's speaker. Tap again to disable.
Manual Recording: Tap to begin manual recording of the current live view. Tap again to stop recording and save the video clip to your mobile device storage.
L Siren: Tap to enable the camera's shot.
M Warning Light: Tap to enable the warning light.
* Quac-channel view allows you to view up to 3 other cameras, or channels from a security system. Tap the + sign on an empty channel to select additional devices.
\~ HD resolution will be limited to the maximum screen resolution of your mobile device. This will not impact the recording resolution of the camera.
Smart Motion Detection
To access smart motion detection settings:
From the Devices tab (default screen when launching Lorex Home), tap next to your Wi-Fi camera to access the device settings. Tap Detection Settings.
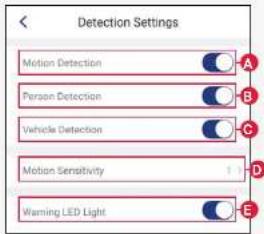
A Motion Detection: Tap to enable/disable motion detection.
Person Detection: Tap to enable/disable person detection. Motion notifications will state when a person is detected.
C Vehicle Detection: Tap to enable/disable vehicle detection. Motion notifications will state when a vehicle has been detected.
D Motion Sensitivity: Set a sensitivity level for motion detection (1 is the lowest)
Warning LED Light: Tap to enable/disable automatic warning light triggering when motion, person, or vehicle is detected.
NOTE: For complete app instructions, see the Lorex Home manual on your product page at lorex.com.
Disclaimers
- A regulated UL / CSA approved power supply is required for use with this camera (included). Use of a non-regulated, non-conforming power supply can damage this product and voids the warranty.
- Not intended for submersion in water, installation in a sheltered location recommended.
• Audio record no without consent is illegal in certain jurisdictions. Lorex Corporation assumes no liability for use of its products that does not conform with local laws. - This camera includes an Auto Mechanical IR Cut Filter. When the camera changes between Day/Night viewing modes, an audible clicking noise may be heard from the camera. This clicking is normal, and indicates that the camera filter is working.
• Some channels on the 5GHz Wi-Fi band are restricted in Canada. This means certain Wi-Fi networks may not be available to connect to curing setup.


- Quick Setup Guide
- Dimensions
- Status LED Behavior
- Safety Precautions
- Need Help?
- STEP 1: Getting Started
- a Plug in the camera:
- b Download and sign up with Lorex Home:
- C Add your camera:
- d Create password
- e Connect to Wi-Fi
- f Finishing touches
- STEP 2: Important Installation Notes
- Ensuring Accurate Person & Vehicle Detection:
- Connectivity Guidelines:
- Additional Installation Tips:
- STEP 3A: Wall Mounting STEP 3B: Ceiling / Tabletop Moun
- ng
- Lorex Home Overview
- Smart Motion Detection
- Disclaimers
Brand : Lorex
Model : W282CAD
Category : Camera