
FPSTFP1455 - Food processor OSTER - Free user manual and instructions
Find the device manual for free FPSTFP1455 OSTER in PDF.


| Product Type | Food Processor |
| Brand | Oster |
| Model | FPSTFP1455 |
| Bowl Capacity (Dry) | 10 cups (2.4 L) |
| Bowl Capacity (Dry + Liquid) | 8 cups (1.9 L) |
| Bowl Capacity (Liquid Only) | 2 cups (0.5 L) |
| Speed Settings | Low (1), High (2), Pulse |
| Blade Material | Stainless Steel |
| Included Accessories | Multipurpose S-blade, Dough blade, Reversible slicing/shredding disc, Food pusher |
| Feed Chute | Wide feed chute with lid |
| Safety Features | Interlock system, auto shut-off, non-slip feet |
| Continuous Operation Limit | 3 minutes maximum, then rest 1 minute between batches or 15 minutes if stopped |
| Max Liquid Temperature | 176°F (80°C) |
| Cleaning | Removable parts dishwasher safe (top rack); base wipe clean |
| Not Suitable For | Crushing ice, whipping cream, beating egg whites, grinding coffee beans or spices |
| Warranty | 1-year limited warranty |
| Power Cord Length | Short cord (extension cord allowed with care) |
Frequently Asked Questions - FPSTFP1455 OSTER
User questions about FPSTFP1455 OSTER
0 question about this device. Answer the ones you know or ask your own.
Ask a new question about this device
Download the instructions for your Food processor in PDF format for free! Find your manual FPSTFP1455 - OSTER and take your electronic device back in hand. On this page are published all the documents necessary for the use of your device. FPSTFP1455 by OSTER.
USER MANUAL FPSTFP1455 OSTER
natural_image
Illustration of a Oster blender with control panel and water level indicator (no text or symbols on the device itself)MODELO MODEL
FPSTFP1455
PLEASE READ ALL INSTRUCTIONS BEFORE USING THIS APPLIANCE
MANUAL DE INSTRUÇÕES
natural_image
Illustration of a blender with a side view showing the top and bottom views (no text or symbols)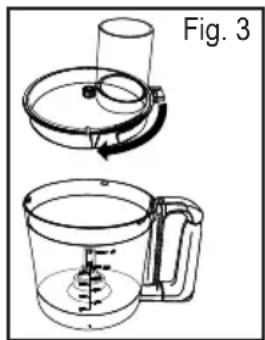
natural_image
Technical line drawing of a kitchen mixer with a side view showing internal components (no text or symbols)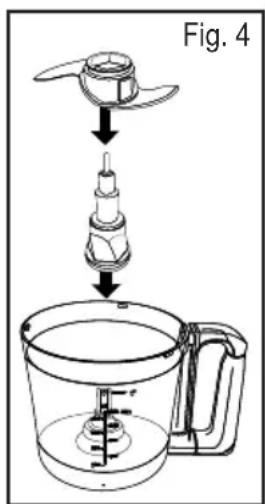
When using electrical appliances, basic safety precautions should always be followed to reduce the risk of fire, electric shock, and/or injury to persons including the following:
- Read all instructions before using this product.
- To protect against electric shock, do not place or immerse cord, plugs, or appliance in water or other liquid.
- This appliance is not intended for use by persons (including children) whose physical, sensory or mental capabilities are reduced or lack of experience or knowledge, unless such persons are supervised or trained to operate the appliance by a person responsible for their safety. Close supervision is necessary if you use the appliance near children or people with disabilities. Children should be supervised to ensure that they do not play with the appliance.
- Turn any control to OFF, then unplug from outlet when not in use, before putting on or taking off parts and before cleaning. To unplug, grasp the plug and pull from the outlet. Never pull from the power cord. Allow to cool before putting on or taking off parts, and before cleaning.
- Flashing light indicates ready to operate (models with stand-by mode). Avoid any contact with blades or moveable parts. Keep fingers out of discharge opening (if provided).
- Do not operate any appliance with a damaged cord or plug or after the appliance malfunctions, or has been damaged in any manner. Do not attempt to replace or splice a damaged cord. Return appliance to the manufacturer (see warranty) for examination, repair or adjustment.
- For appliances with markings on plug blade: This appliance has important markings on the plug blade. The attachment plug or entire cordset (if plug is molded onto cord) is not suitable for replacement. If damaged, the appliance shall be replaced.
- The use of accessory attachments not recommended or sold by the appliance manufacturer may cause fire, electric shock or injury.
- Do not use outdoors or for commercial purposes.
- Do not let cord hang over edge of table or counter, or touch hot surfaces, including the stove.
- Keep hands and utensils away from moving blades or discs while processing food to reduce the risk of severe injury to persons or damage to the food processor. A scraper may be used but must be used only when the food processor is not running.
- Blades are sharp. Handle carefully, especially when removing the blades from the bowl, emptying the bowl and during cleaning.
- To reduce the risk of injury, never place cutting blade or discs on base without first putting bowl properly in place.
ENGLISH-1
- Be certain cover is securely locked in place before operating appliance. Always wait until all moving parts have stopped before removing any lid or cover.
- Never feed food by hand. Always use food pusher.
- Do not attempt to defeat the cover interlock mechanism.
- Do not fill the bowl above the marked maximum fill line (or rated capacity) to avoid risk of injury due to damage to the cover or bowl.
- Do not use appliance for other than intended use. Misuse can cause injuries. Always use appliance on a dry, stable, level surface.
- If mixing cup or bowl is chipped, cracked or damaged in any way, discontinue use of product.
- If blades appear to be damaged, discard food and discontinue use of product.
- Be careful if hot liquid is poured into the food chopper as it can be ejected out of the appliance due to a sudden steaming.
THIS UNIT IS INTENDED FOR HOUSEHOLD USE ONLY.
SAVE THESE INSTRUCTIONS
THIS APPLIANCE IS INTENDED TO BE USED IN HOUSEHOLD AND SIMILAR APPLICATIONS SUCH AS:
• in shops, offices and other similar working environments;
- in farm houses;
- by clients in hotels, motels and other residential type environments;
- in bed and breakfast type environments.
EXTENSION CORD USE
A short power-supply cord is provided to reduce the risk resulting from becoming entangled in or tripping over a longer cord. An extension cord may be used if care is exercised in its use. If an extension cord is used, the electrical rating of the cord must be at least as great as the electrical rating of the appliance. The extension cord should be arranged so that it will not drape over the countertop or tabletop where it can be pulled on by children or tripped over unintentionally.
DESCRIPTION OF THE APPLIANCE
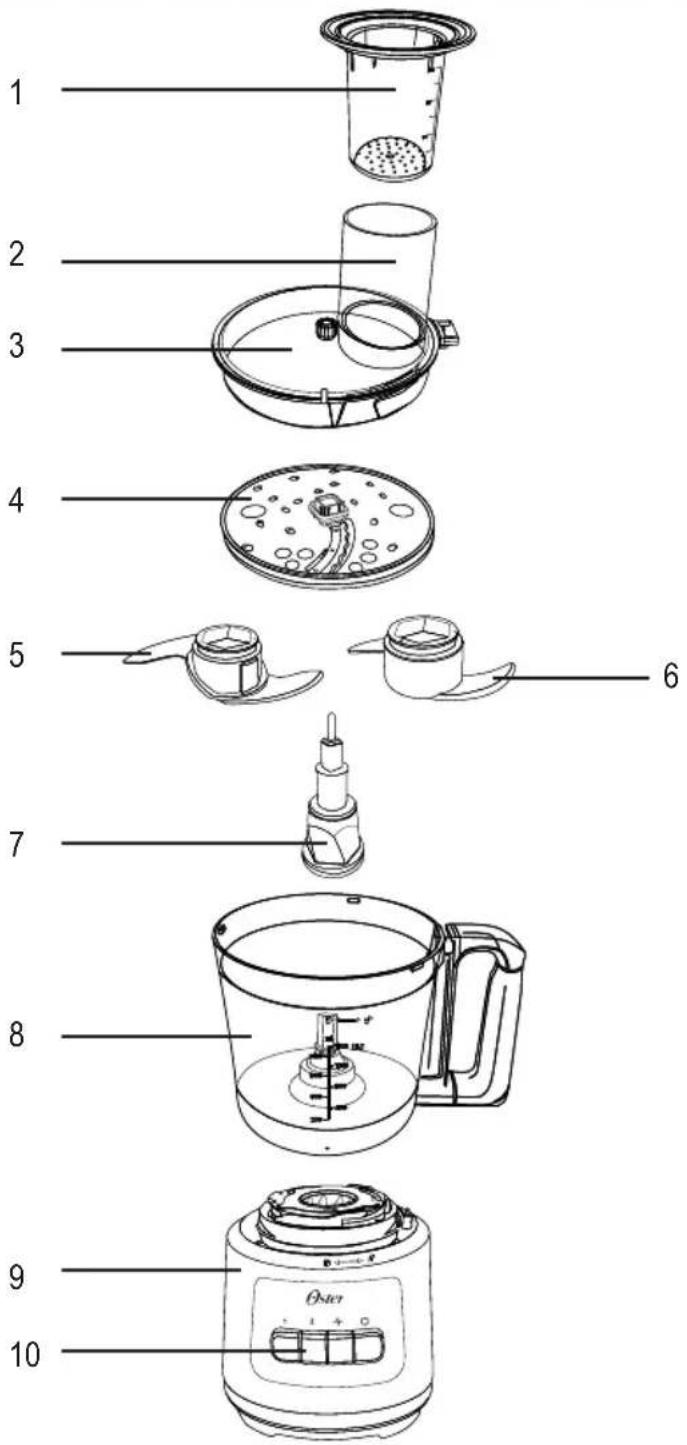
- Food Pusher
- Wide feed chute
- Food Chute Lid
- Stainless steel reversible slice/shred disc
-
Multipurpose s-blade for chopping, pureeing and mixing
-
Dough blade
- Removable shaft for accessories
- Bowl
- Motor base
- Control panel
ENGLISH-3
BEFORE USING YOUR OSTER® FOOD PROCESSOR
When unpacking the product and removing packing material, handle the multipurpose blade and slice/shred disc carefully; they are very sharp.
Wash all parts except the base in hot, soapy water. Rinse them dry. These parts can also be placed in the dishwasher. Be sure to read the “Care & Cleaning” Section of this manual to learn the correct methods for taking the unit apart and cleaning.
LEARNING ABOUT YOUR OSTER® FOOD PROCESSOR
USING YOUR FOOD PROCESSOR
NOTE: Do not attempt to crush ice in this food processor; it will damage the bowl, dull the multipurpose blade. This unit will not whip cream, beat egg whites, grind coffee beans, spices or other items with high oil content, or slice or shred hard-cooked eggs, marshmallows, or soft cheeses.
CAUTION: For your protection, this unit has an interlock system. The processor will not operate unless the bowl is properly locked onto the base and the lid is properly locked onto the bowl. Do not attempt to operate the unit without the bowl lid, bowl and food pusher correctly in place. Be sure base is on a flat, dry and clean surface before you begin processing.
Using the speed settings
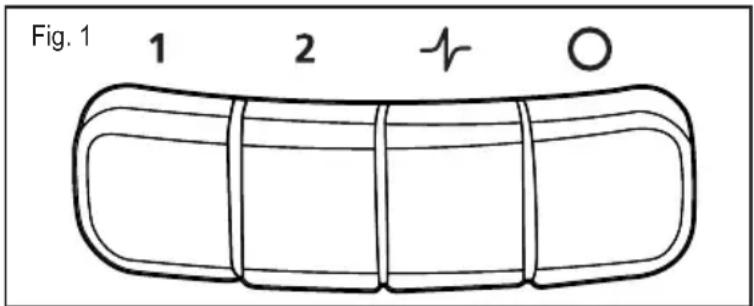
Your food processor comes with a low speed "1" and a high speed "2". The two speeds help maintain a more consistent grind of ingredients and are useful for making smooth nut butter or adding oils to sauces.
Using the pulse function "y"
The pulse button “” allows you to better control the texture of processed foods. Just press and release it to quickly switch the food processor from on to off. The pulse function “” is best for quick dough kneading or chopping. It also helps bundled foods to relocate and drip to ensure everything is processed. For longer processing, press and hold the pulse button “”
ENGLISH-4
Off position "○"
The food processor should always be in the off position when you are not using it.
NOTE: The bowl has a maximum capacity of 10 cups when used with dry ingredients. For recipes that call for both dry and liquid ingredients, the maximum capacity is 8 cups. And if only liquid ingredients are used, the recommended maximum capacity is 2 cups.
HOW TO ASSEMBLE THE BOWL
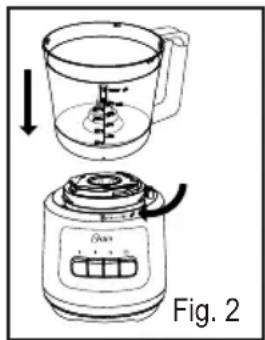
WARNING: Be sure the unit is unplugged before putting on or taking off any parts. Put the bowl on top of the motor base, with the work bowl handle to the right. Turn the bowl clockwise until the bowl clicks into place. (Figure 2)
The handle should now be to the right of the control panel.
Select the appropriate attachment and assemble onto food processor as directed in the "How to Chop", "How to Knead Dough" and "How to Slice or Shred" sections. Place food or dough in bowl if using multipurpose blade or dough blade.
NOTE: There is only one position for the bowl to lock onto the base. The unit will not operate if the bowl does not lock onto the base.
HOW TO LOCK THE LID
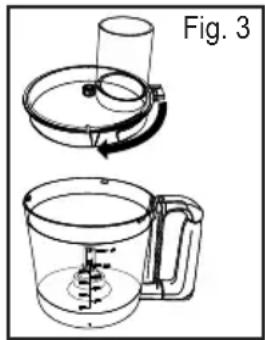
Place the lid on the bowl. Turn clockwise until the lid clicks into place; the tab on the lid should be aligned with the handle of the bowl. (Figure 3) Your food processor features a safety interlock system. The unit will not operate unless the bowl and bowl lid are properly aligned and locked into place.
natural_image
Illustration of a blender with a side view showing the top and bottom views (no text or symbols)HOW TO CHOP
CAUTION: Make sure the unit is turned OFF "○" and unplugged after use. Never use hand to push food into processor. Do not use the processor continuously for more than 3 min at a time.
Multipurpose Blade: Use multipurpose blade for chopping, mixing, blending, pureeing and preparing puff pastry, crumbs and short crust pastry.
- Lock the bowl onto base. (See "How to Assemble the Bowl")
- Slide the removable shaft over the shaft at the bottom of the bowl. Then grasp the multipurpose blade by its stem and slide over the removable shaft. (Figure 4)
- Place food into bowl.
- Lock lid onto bowl. (See "How to Lock the Cover")
- Place the food pusher into the feed tube.
- Plug the cord into an electric outlet. Use the Food Guide to prepare food for chopping.
- Press the low speed button "1" or the high speed button "2" for continuous processing. Press the "button for shorter processing. When using the pulse function, press and hold the pulse button "for about 2-3 seconds at a time, check the results and repeat if desired.
natural_image
Technical line drawing of a kitchen mixer with a side view showing internal components (no text or symbols)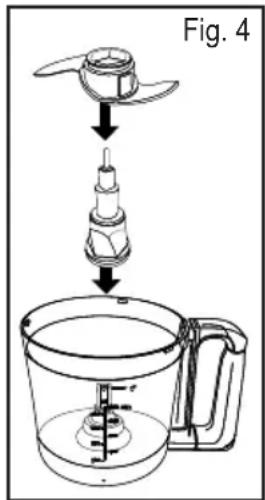
- When finished processing, press the OFF " " button and allow the multipurpose blade to stop rotating.
- Twist the lid counterclockwise to remove it.
- Hold the removable shaft with multipurpose blade attached by its stem and remove. Unlock the bowl by turning it counterclockwise towards the UNLOCK mark, and lift off. Empty the processed food.
CAUTION: Chopping Blade is very sharp, use caution when handling.
HOW TO KNEAD DOUGH
NOTE: Never try to process dough that is too stiff to knead comfortably by hand.
CAUTION: Make sure the unit is turned OFF "☐" and unplugged after use. Never use hand to push food into processor. Do not use the processor continuously for more than 3 min at a time.
CAUTION: Dough blade is sharp, use caution when handling.
Dough Blade: Use the dough blade for kneading bread dough and for mixing batters and cake mixtures.
- Lock the bowl onto base. (See "How to Assemble the Bowl")
-
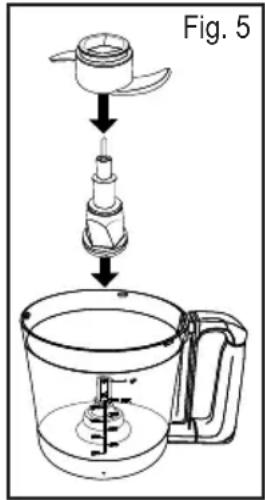
Slide the removable shaft over the shaft at the bottom of the bowl. Then grasp the dough blade by its stem and slide over the removable shaft (Figure 5).
-
Place all the dry ingredients into the bowl.
-
Lock lid onto bowl. (See "How to Lock the Cover")
-
Place the food pusher into the feed tube.
-
Plug the cord into an electric outlet.
-
Press the low speed button "1" or the high speed button "2" for continuous processing. Press the "button for shorter processing. When using the pulse function, press and hold the pulse button "for about 2-3 seconds at a time, check the results and repeat if desired.
NOTE: All liquid ingredients should be added through the food chute while unit is processing. Add liquid in a slow, steady stream for even distribution. It is important to add enough liquid to make the dough soft enough to knead. Kneading dough that is too stiff can strain the machine.
- When finished processing, press the OFF " " button and allow the dough blade to stop rotating.
- Twist the lid counterclockwise to remove it.
- Hold the removable shaft with dough blade attached by its stem and remove. Unlock the bowl by turning it counterclockwise towards the UNLOCK mark, and lift off. Empty the processed food.
ENGLISH-6
HOW TO SLICE OR SHRED
CAUTION: Make sure the unit is turned OFF "☐and unplugged after use. Never use hand to push food into processor. Do not use the processor continuously for more than 3 min at a time.
Reversible Slicing and Shredding Disc: Use these discs for slicing and shredding
meats, fruits, vegetables, cheeses and more.
- Lock the bowl onto base. (See "How to Assemble the Bowl")
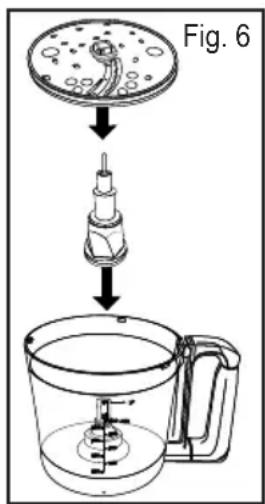
- Slide the removable shaft over the shaft at the bottom of the bowl. With the desired side facing up (slicing or shredding), push the slice/shred disc onto the removable shaft (Figure 6).
- Lock lid onto bowl. (See "How to Lock the Cover")
- Plug the cord into an electric outlet. Press low speed button "1" or high speed button "2" for continuous processing.
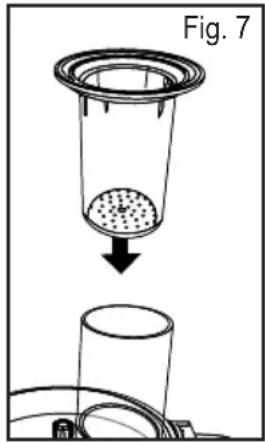
- Put ingredients in the feed tube and press the food pusher lightly onto the ingredients (Figure 7).
- When finished processing, press the OFF " " button and allow the disc to stop rotating. Twist the lid counterclockwise to remove it.
- Carefully remove the Shredding Disc. Unlock the bowl by turning it counterclockwise towards the UNLOCK mark and lift off. Empty the processed food.
CAUTION: Shredding Disk is very sharp, use caution when handling.
IMPORTANT: Use GENTLE force to press down on the food pusher. Excessive force could cause damage to the disc.
- Press the ingredients down slowly and steadily with the pusher.
- When necessary, precut large chunks of food to fit the size of the feed tube.
- For best results, fill the feed tube evenly.
- When processing large quantities, process small batches at a time and empty the bowl between batches.
HELPFUL HINTS
- Never attempt to process any food that cannot be cut with a sharp knife.
- When mincing garlic, fresh herbs or small quantities of foods, add to feed tube with multipurpose blade in place and processor running. Make sure bowl and all parts are very dry before processing garlic or fresh herbs.
- To chop nuts, use multipurpose blade and the PULSE setting. Use short PULSEs. Process smaller batches for coarser texture.
- Let hard cheeses, such as Parmesan and Romano, come to room temperature before processing. Freeze soft cheeses, such as cheddar and mozzarella, for 10 to 15 min before processing.
- Make sure uncooked meats and poultry are very cold before processing.
- Do not overfill processing bowl. Fill no more then 1/3 to 1/2 full when chopping. The bowl can hold up to 10 cups of dry ingredients or 2 cups liquid.
- Position the slicing and shredding discs so that cutting surfaces are to the right of the feed tube. This will allow one full rotation of the blade before contacting food.
- When processing several slices or pieces of food, put as many pieces as will fit in feed tube together to help hold each other in place.
- This food processor is NOT designed to grind coffee beans or spices or crush ice.
- Most foods can be processed in 10 to 30 s, depending on the quantity. For large quantities, process in several batches. Let the processor rest about 1 min between batches.
- If the food processor suddenly stops running, turn the unit OFF " and unplug.
- Let the unit cool down for 15 min and restart.
- A food processor is not recommended for making Italian meringue (a meringue made by using hot sugar syrup).
- Hot liquids (less than 176^ / 80^ ) and hot foods can be processed in the bowl.
- Be sure to process small amounts of liquids—2 cups or less at a time. Larger amounts may leak from the bowl.
- WARNING: Care should be taken when handling the sharp blade while emptying the bowl, during cleaning, or when the blade is removed from the bowl. Misuse may cause injury. Keep out of the reach of children.
- Be careful if hot liquid is poured into the food processor, as it may be ejected out of the appliance due to sudden steam.
ENGLISH-8
CARE & CLEANING
NOTE: Do not attempt to sharpen the cutting edges of the multipurpose blade or the reversible disc. They are permanently sharpened at the factory and will be ruined by attempted sharpening.
CLEANING
- Before cleaning, be sure the unit is switched off and the cord is unplugged.
-
Whenever possible, rinse parts immediately after processing for easy cleanup.
-
Wipe the base, control panel, and feet with a damp cloth and dry thoroughly. Stubborn spots can be removed by rubbing with a damp cloth and a mild, non-abrasive cleaner.
CAUTION: Do not immerse the base in liquid.
-
All removable parts can be washed by hand or in a dishwasher, top rack.
-
If washing by hand, wash in hot sudsy water, rinse, and dry thoroughly. If necessary, use a small nylon bristle brush to thoroughly clean the bowl and food chute/lid, this type of brush will also help prevent cutting yourself on the sharp multipurpose blade and slice/shred disc.
-
If washing in a dishwasher, place removable parts on the top rack only – not in or near the utensil basket.
-
Do not use rough scouring pads or cleansers on any plastic or metal parts.
-
Do not fill the bowl with boiling water or place any of the parts in boiling water. Some foods, such as carrots, may temporarily stain the bowl. To remove stains, make a paste of 2 tablespoons (30 ml) baking soda and 1 tablespoon (15 ml) warm water. Apply the paste to the stains and rub with a cloth. Rinse with sudsy water and dry.
CHOPPING GUIDE
| FOOD AMOUNT DIRECTIONS | ||
| Baby Food Up to 4 cups | (1000 ml) | Add up to 4 cups (1000 ml) cooked vegetables and/ or meat in a bowl, along with 1⁄4 cup (60ml) liquid per cup of solid food, process continuously to desired fineness. |
| Breadcrumbs Up to 5 slices | Cut either fresh or dry | bread slices into 11⁄2-2 inch (3.75-5 cm) pieces. Add to bowl and process to fine crumbs. |
| Cookie/Cracker Crumbs Up | to 5 cups (1250 ml) Use | for crumbing Graham Crackers, Chocolate or Vanilla Wafers. Break larger crackers into 11/2-2 inch (3.75-5 cm) pieces. Add to bowl and process until fine. |
| Cranberries, minced 3 cups | (750 ml) PULSE to chop | op to desired fineness. Can also add sugar to make Cranberry Relish. |
| Eggs, chopped Up to 12 Peel | dry and halve hard-cooked eggs. Add to bowl, PULSE to chop, checking fineness after 4-5 PULSEs. | |
| Garlic, minced Up to 12 Be sure bowl is dry. Drop clove(s) down Food Chute while unit is running. | ||
| Meat, chopped (raw or cooked) | Up to 2.5 cups (600 ml) | Cut the meat into 1inch (2.54 cm) cubes. Add to bowl and PULSE to chop. |
| Mushrooms, chopped Up to 12 medium Halve large ones and add to bowl. PULSE to desired fineness. | ||
| Nuts, chopped 2 cups (300 ml) Add to bowl and PULSE to chop. | ||
| Onions, chopped Up to 2 large Quarter, add to bowl. PULSE 1 or 2 times to coarsely chop. For green onions, up to 2 cups (500 ml) cut into 1 inch (2.45 cm) pieces. | ||
| Parmesan or Romano Cheese, grated | Up to 11/2 cups (375 ml) | Allow cheese to reach room temperature. Cut into 1-inch (2.54 cm) cubes. Add to bowl and PULSE to coarse chop. Process continuously to finely grate. |
| Parsley, chopped | Up to 2 cups (500 ml) | Add to bowl and PULSE to chop to desired fineness, about 10-15 s. Process other herbs in the same manner (Basil, Cilantro, Mint, etc.) |
| Pepper, Green, Red, Yellow, chopped | Up to 1 Pepper | Cut into 1-inch (2.54 cm) pieces. Add to bowl and PULSE to chop. |
| Soups, pureed or creamed | 2 cups (500 ml) | Add up to 2 cups hot (less than 176°F/80°C) vegetable soup for pureeing or creaming. Process to desired smoothness. |
| Squash (Butternut), Pumpkin or Sweet Potatoes, pureed | Up to 5 cups (1250 ml) of 1 inch (2.54 cm) cubes | Add 1⁄4 (60 ml) cup of cooking liquid per cup of food. PULSE to finely chop then process continuously to puree. |
| Strawberries, pureed 2 cups | (500 ml) Hull and halve large berries. Add to bowl and PULSE to chop. Process continuously to puree. | |
| Tomatoes, chopped | 4 medium | Quarter tomatoes. Add up to 4 and PULSE to desired size. |
ENGLISH-10
SHREDDING GUIDE
| FOOD DIRECTIONS | |
| Cabbage Use Shredding Disc for very fine cabbage or slaw. Cut into pieces to fit Chute. Shred using light pressure. Empty bowl as cabbage reaches Disc. | |
| Carrots Position in Chute and shred. | |
| Cheese, cheddar Cheese must be well chilled. Cut to fit Chute, use light pressure. | |
| Cheese, Mozzarella Cut to fit Chute. Cheese must be chilled in freezer for 30 min prior to shredding. Use light pressure. | |
| Potatoes Cut to fit Chute. | |
| Zucchini Slice off ends, cut to fit Chute, either lengthwise or horizontally. | |
SLICING GUIDE
| FOOD DIRECTIONS | |
| Apple Halve and stack horizontally in Chute. Use firm pressure. | |
| Cabbage/Lettuce Halve head, cut to fit Chute. | |
| Carrots Cut to fit Chute. | |
| Celery Remove string, pack Chute for best results. | |
| Cucumber Cut to fit Chute if necessary. | |
| Mushrooms Stack Chute with mushrooms on their sides for lengthwise slices. | |
| Onions Halve and fill Chute, positioning onions upright for coarsely chopped results. | |
| Peaches/Pears Halve and core. Position upright in Chute and slice using light pressure. | |
| Peppers, Green, Yellow, Red, etc. | Halve and seed. Fit pepper up bottom of Chute squeezing slightly to fit if necessary. Cut large ones into quarters or strips, depending on desired results. Slice using moderate pressure. |
| Pepperoni Cut into 3 inch (8cm) lengths. Remove inedible casing. | |
| Potatoes Peel if desired, cut large potatoes in halves, position in Chute. | |
| Strawberries Hull. Arrange berries on their sides for lengthwise slices. | |
| Tomatoes | Use small tomatoes for whole slices, halve if necessary. Use gentle but firm pressure. |
| Turnips | Peel, cut turnips to fit Chute. |
| Zucchini Slice off ends. Use small squash for whole slices; halve larger ones to fit Chute. | |
ENGLISH-II
KNEADING GUIDE
| FOOD DIRECTIONS | |
| Bread Dough 4 cups flour (900 g), yielding two 1 -pound loaves | |
| Pizza Dough 3 cups flour (26 ounces), yielding three 12-inch pizzas | |
| Cake Batter 1 box 18.5 oz. | cake mix, batter for three 8-inch layers |
| Cookie Dough Dough for about 50 cookies (2 pounds) | |
PRECAUÇÕES IMPORTANTES
natural_image
Illustration of a blender with a side view showing the lid and base (no text or symbols)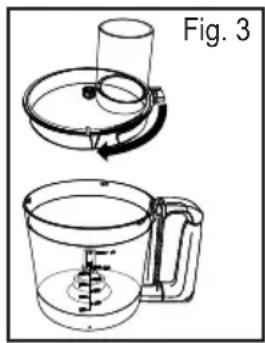
natural_image
Technical line drawing of a kitchen mixer with a side view showing internal components (no text or symbols)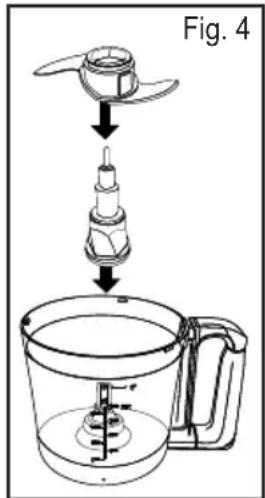
XXX where X is any number between 0 and 9 or any letter between A and Z.
The following information is intended for Mexico only.
© 2021 Sunbeam Products, Inc. All rights reserved.
One year limited warranty – please see insert for details.
P.N. NWL0001333633 Rev. A
GCDS-OST-JC

- ENGLISH-1
- THIS UNIT IS INTENDED FOR HOUSEHOLD USE ONLY.
- SAVE THESE INSTRUCTIONS
- THIS APPLIANCE IS INTENDED TO BE USED IN HOUSEHOLD AND SIMILAR APPLICATIONS SUCH AS:
- EXTENSION CORD USE
- DESCRIPTION OF THE APPLIANCE
- ENGLISH-3
- BEFORE USING YOUR OSTER® FOOD PROCESSOR
- LEARNING ABOUT YOUR OSTER® FOOD PROCESSOR
- USING YOUR FOOD PROCESSOR
- Using the speed settings
- Using the pulse function "y"
- ENGLISH-4
- Off position "○"
- HOW TO ASSEMBLE THE BOWL
- HOW TO LOCK THE LID
- HOW TO CHOP
- HOW TO KNEAD DOUGH
- ENGLISH-6
- HOW TO SLICE OR SHRED
- HELPFUL HINTS
- ENGLISH-8
- CARE & CLEANING
- CLEANING
- CHOPPING GUIDE
- SHREDDING GUIDE
- SLICING GUIDE
- ENGLISH-II
- KNEADING GUIDE
- PRECAUÇÕES IMPORTANTES
Brand : OSTER
Model : FPSTFP1455
Category : Food processor