
FPSTFP4253 - Food processor OSTER - Free user manual and instructions
Find the device manual for free FPSTFP4253 OSTER in PDF.


| Product Type | Food Processor |
| Brand | Oster |
| Model | FPSTFP4253 |
| Capacity | 10 cups (2.4 L) |
| Motor Power | 500 Watts |
| Dimensions (L x W x H) | 10.5 x 8.5 x 15.5 inches (26.7 x 21.6 x 39.4 cm) |
| Weight | 7.5 lbs (3.4 kg) |
| Blade Material | Stainless Steel |
| Control Type | Rotary Switch with Pulse |
| Speed Settings | Variable Speed |
| Feed Tube | Wide Feed Tube |
| Dishwasher Safe Parts | Work bowl, lid, blades, and discs |
| Safety Features | Interlocking lid safety system |
| Included Accessories | S-blade, shredding disc, slicing disc |
| Voltage | 120 V, 60 Hz |
| Warranty | 1-year limited warranty |
| Power Cord Length | 24 inches (61 cm) |
| Base Material | Die-cast metal |
| BPA Free | Yes |
Frequently Asked Questions - FPSTFP4253 OSTER
User questions about FPSTFP4253 OSTER
0 question about this device. Answer the ones you know or ask your own.
Ask a new question about this device
Download the instructions for your Food processor in PDF format for free! Find your manual FPSTFP4253 - OSTER and take your electronic device back in hand. On this page are published all the documents necessary for the use of your device. FPSTFP4253 by OSTER.
USER MANUAL FPSTFP4253 OSTER
For product questions contact:
Jarden Customer Service
USA:1.800.334.0759
Canada: 1.800.667.8623
www.oster.com
©2010 Sunbeam Products, Inc. doing business as
Jarden Consumer Solutions. All rights reserved.
Distributed by Sunbeam Products, Inc. doing business as
Jarden Consumer Solutions, Boca Raton, Florida 33431.
Jarden Customer Service
natural_image
Exterior view of a modern kitchen blender with clear glass casing and control knob (no text or symbols visible)
Safety
Seguridad

How to use
Cómo usar
When using electrical appliances, basic safety precautions should always be followed including the following:
- Read all instructions before use.
- To protect against risk of electrical shock, do not put food processor in water or any other liquid. This may cause personal injury or damage to the product.
- Close supervision is necessary when using this appliance near children.
- Switch Off (0) and unplug from outlet to disconnect appliance, before putting on or taking off parts, before cleaning and when not in use.
- Do not contact moving parts.
- Do not operate food processor with a damaged cord or plug or after the appliance malfunctions, or is dropped or damaged in any manner. Return appliance to the nearest authorized service center for examination, repair or mechanical adjustment.
- The use of attachments not recommended or sold by the manufacturer may cause fire, electrical shock or injury.
- Do not let cord touch hot surfaces or hang over table edges or counters.
- Do not use your food processor if any part is broken.
- Do not use outdoors or for commercial purposes.
- Keep hands and utensils away from moving blades or discs while processing food to reduce the risk of severe injury to persons or damage to the food processor. A scraper may be used but must be used only when the food processor is not running.
- Blade and processing disk are sharp. Handle carefully.
- To reduce the risk of injury to persons, never place cutting blade on motor base without first putting container properly in place.
- Be certain container cover is securely locked in place while operating appliance.
- Never feed food into food chute by hand, always use the food pusher.
- Be sure to turn switch to OFF (0) position after each use.
- Do not use this appliance for other than its intended use.
- Do not attempt to defeat the cover interlock mechanism.
THIS UNIT IS INTENDED FOR HOUSEHOLD USE ONLY.
This appliance has a polarized alternating current plug (one blade is wider than the other). To reduce the risk of electric shock, as a safety feature, this plug will fit in a polarized outlet only one way. If the plug does not insert fully in the outlet, reverse the plug. If it still fails to fit, contact a qualified electrician.
DO NOT ATTEMPT TO DEFEAT THIS SAFETY FEATURE.
EXTENSION CORD USE
A short power-supply cord is provided to reduce the risk resulting from becoming entangled in or tripping over a longer cord. An extension cord may be used if care is exercised in its use. If an extension cord is used, the electrical rating of the cord must be at least as great as the electrical rating of the appliance. The extension cord should be arranged so that it will not drape over the countertop or tabletop where it can be pulled on by children or tripped over unintentionally.
SAVE THESE INSTRUCTIONS
Thank you for purchasing the OSTER® 14 Cup Food Processor. Before you use this product for the first time, please take a few moments to read these instructions and keep it for reference. Pay particular attention to the Safety Instructions provided. Please review the product service and warranty statements. To learn more about Oster® products, please visit us at www.oster.com or call us at 1-800-334-0759.

www.oster.com
www.oster.com
leArNINg ABouT your 14 Cup Food proCessor
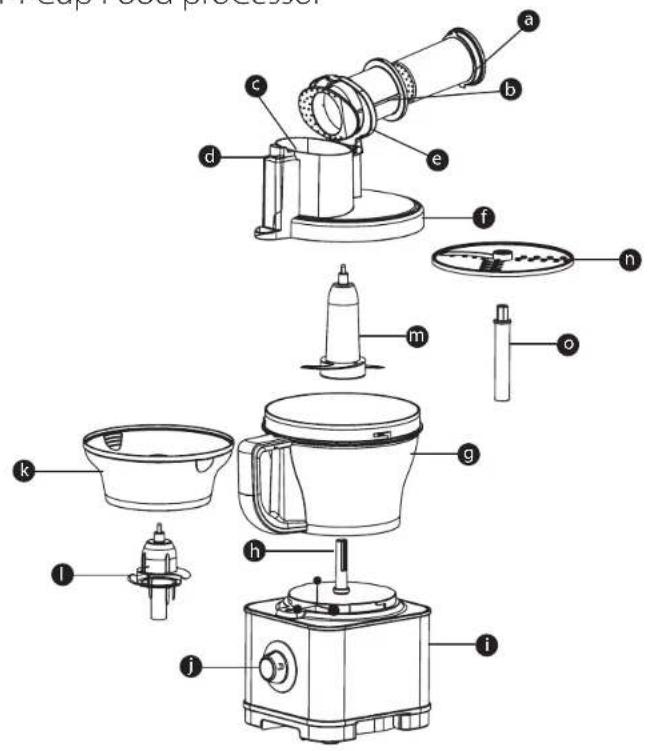
a Large Food Pusher
b Small Food Pusher
Food Chute
d Slide Release Button
e Food Chute Lid
f Bowl Lid
g Bowl
h Center Post
i Base
Control Knob
k 5-Cup Small Work Bowl
Small Chopping Blade
m Chopping Blade
Slice/Shred Disk
Disc Stem

4
www.oster.com
1 Pulse - The control knob must be turned to the left and held for unit to operate. When released, unit will stop. Use PULSE for short processing tasks, such as chopping nuts, raw meats, or vegetables. This lets you check processed results and control the consistency.
2 (1-3) Speeds - When the control knob is turned to the right to the 1, 2 or 3 position, unit will run continuously until the control knob is turned to OFF (O) position.
3 Off - Processor should always be left in the OFF (O) position when not in use.
NOTE: When slicing or shredding use high speed. When using chopping blade use lower speed to control size of chopped food.
Before Using Your Oster® Food Processor
- When unpacking the product and removing packing material, handle the chopping blade and slice/shred discs carefully: they are very sharp.
- Wash all parts except the Base in hot, soapy water. Rinse them dry. These parts can also be placed in the dishwasher. Be sure to read the Care & Cleaning Section of this manual to learn the correct methods for taking the unit apart and cleaning.
www.oster.com
5


How To:
Using Your Food Processor
NOTE: Do not attempt to chop ice in this food processor; it will damage the bowl and dull the Chopping Blade. This unit will not whip cream, beat egg whites, grind coffee beans, spices or other items with high oil content, or slice or shred hard-cooked eggs, marshmallows, or soft cheeses.
Important: For your protection, this unit has an interlock system. The processor will not operate unless the bowl is properly locked onto the base and cover is properly locked onto the bowl. Do not attempt to operate the unit without the bowl lid, bowl and food chute lid correctly in place. Be sure base is on a flat, dry and clean surface before you begin processing.
NOTE: Before you begin, PLEASE BE SURE THAT THE ELECTRIC CORD IS UNPLUGGED.
How To Assemble the Large Bowl
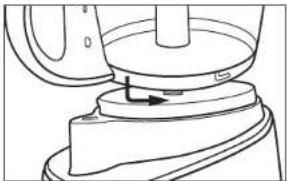
Align the base and bowl as illustrated in Figure 1. Align the bowl handle with the UNLOCK □ mark on the base. Turn the bowl counter-clockwise until it clicks onto the base. The bowl handle should now align with the LOCK □ mark on the base. (The bowl handle will be positioned above the control buttons).
NOTE: There is only one position for the bowl to lock onto the base. The unit will not operate if the bowl does not lock onto the base.
natural_image
Line drawing of a mechanical component with a rotating arrow indicating motion (no text or symbols)Figure 1
How to Lock the Cover
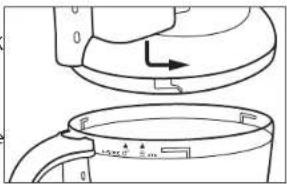
Place the cover onto the bowl. Align the UNLOCK □ mark on the cover and the UNLOCK □ mark on the bowl (as illustrated in Figure 2). Twist the cover counter-clockwise towards the LOCK until it clicks onto the bowl. The LOCK □ mark on the cover should now align with the LOCK mark on the bowl.
NOTE: When the cover is locked into position, the safety mechanism on the cover and bowl will align. The unit will not operate if the cover is
natural_image
Technical line drawing of a kitchen appliance with a lid and handle, showing internal components and a directional arrow (no text or symbols)Figure 2
NOTE: BOWL MUST BE LOCKED INTO BASE BEFORE COVER CAN BE LOCKED INTO POSITION.
How to Lock the Food Chute Lid
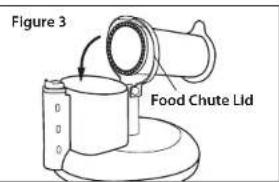
1 The Food Chute lid hinges onto the back of Food Chute. As illustrated in Figure 3.
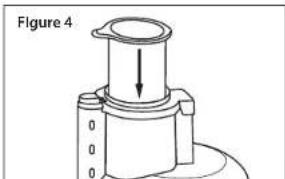
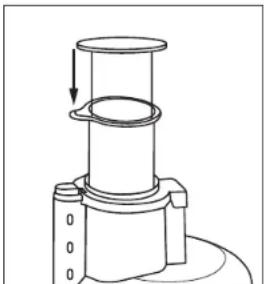
2 Push down the Large Food Pusher into the Food Chute. As illustrated in Figure 4.
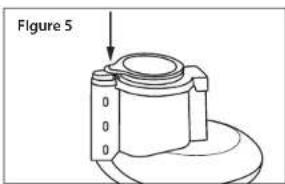
3 Push down on the tab of Large Food Pusher to latch the Food Chute lid onto the Food Chute. As illustrated in Figure 5.
NOTE: Unit will not operate if the Food Chute lid does not latch onto the Food Chute
How to Open the Food Chute Lid
natural_image
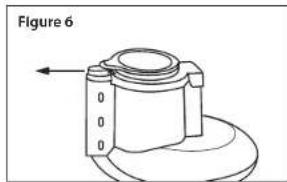
Technical line drawing of a mechanical component labeled 'Figure 6' with no visible text or symbols on the object itself.1 Pull Side Release button out. As illustrated in Figure 6.
natural_image
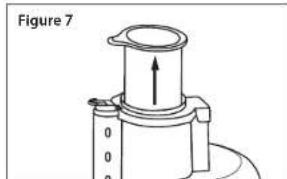
Mechanical component diagram labeled Figure 7, showing a cylindrical assembly with a central housing and an upward arrow indicating motion (no text or symbols beyond label)2 Pull up the Large Food Pusher. As illustrated in Figure 7.
natural_image
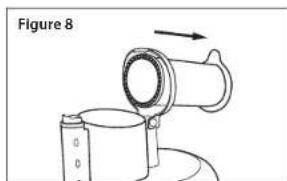
Diagram of a hand pump device with an arrow indicating motion, labeled Figure 8 (no text or symbols on the diagram itself)3 Pull back the food chute lid and Large Food Pusher. As illustrated in Figure 8.
NOTE: Before opening Food Chute lid, turn the unit OFF (O) and unplug the cord.

How to Chop Using the Large Work Bowl
NOTE: Make sure the unit is turned OFF (O) and unplugged before use. Never use hand to push food into processor. Do not use the processor continuously for more than 3 minutes at a time.
1 Lock the large bowl onto base.
(See "How to assemble the large bowl")
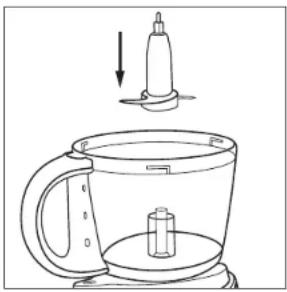
2 Grasp the chopping blade by its stem and slide it onto the center post (Figure 9a).
3 Place food into bowl.
4 Lock cover onto bowl.
(See "How to Lock the cover")
5 Lock the Food Chute Lid.
(See "How to Lock the Food Chute Lid").
6 Plug the cord into an electric outlet. Use the Food Guide to prepare food for chopping.
7 Turn the knob to the desired speed position for continuous processing or the PULSE position for short processing tasks. When using the PULSE setting, hold the knob in the PULSE position for about 2-3 seconds at a time, check results and repeat if desired.
8 When finished processing, release the knob, or if you were using continuous 1, 2 or 3 position, turn the knob to the OFF (O) position and allow the chopping blade to stop rotating.
9 Twist the cover towards the UNLOCK☐ mark to remove lid.
10 Hold the Chopping Blade by its stem and remove. Unlock the bowl by turning it clockwise towards the UNLOCK □ mark, and lift off. Empty the processed food.
NOTE: Chopping Blade is very sharp, use caution when handling.
natural_image
Line drawing of a coffee maker with a lid and a bottle, showing no text or symbolsFigure 9

8
www.oster.com
www.oster.com
9

How to Chop Using the Small Work Bowl
(Do not use slice/shred disc with small work bowl.)
NOTE: Make sure the unit is turned OFF (O) and unplugged before use. Never use hand to push food into processor. Do not use the processor continuously for more than 3 minutes at a time.
1 Lock the large bowl onto base. (See "How to assemble the large bowl") 2 Insert Small work bowl into large work bowl and twist inner bowl until it is seated into the large work bowl.
3 Grasp the small chopping blade by its stem and slide it onto the center post.
4 Place food into bowl.
5 Lock cover onto bowl. (See "How to Lock the cover")
6 Lock the Food Chute Lid. (See "How to Lock the Food Chute Lid").
7 Plug the cord into an electric outlet.
8 Turn the knob to the desired speed position for continuous processing or the PULSE position for short processing tasks. When using the PULSE setting, hold the knob in the PULSE position for about 2-3 seconds at a time, check results and repeat is desired.
9 When finished processing, release the knob, or if you were using a continuous speed, turn the knob to the OFF (O) position and allow the chopping blade to stop rotating.
10 Twist the Lid towards the UNLOCK □ mark to remove.
11 Hold the Chopping Blade by its stem and remove. Lift small work bowl out of the larger work bowl. Empty processed food.
NOTE: When using chopping blade use slower speeds to control size of chopped food. Chopping Blade is very sharp, use caution when handling.
How to Slice or Shred Using the Large Work Bowl
NOTE: Make sure the unit is turned OFF (O) and unplugged before use. Never use hand to push food into processor. Do not use the processor continuously for more than 3 minutes at a time.
Processing Large Amounts of Food
1 Lock the bowl onto base.
(See "How to assemble the bowl")
2 Slide the Disc Stem onto the center post of the base. With the desired side facing up (slicing or shredding), push the slice/shred disc onto the disc stem (Figure 10). Use caution when handling disc, blades are extremely sharp.
3 Lock cover onto bowl.
(See "How to Lock the cover")
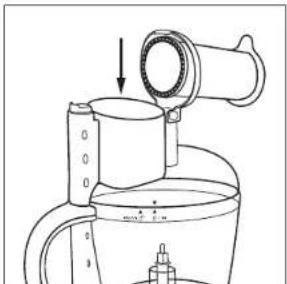
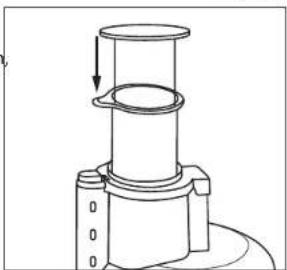
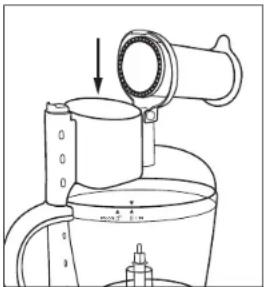
4 Fill the Food Chute with large food such as a chunk of cabbage, green pepper, whole tomato (Figure 11). Lock the food chute lid. (See "How to Lock the Food Chute Lid"). Use the Food Guide to help you prepare food for slice/shred processing.
5 Slide the Small Food Pusher into the Large Food Pusher, plug the cord into an electric outlet.
6 Turn the knob to the desired speed position, then press down lightly but firmly on the Food Pusher (Figure 12).
7 When finished processing, turn the knob to the OFF (O) position and allow the disc to stop rotating. Twist the Bowl lid towards the UNLOCK □ mark to remove the cover.
8 Carefully remove the Shredding Disc. Unlock the bowl by turning it clockwise towards the UNLOCK □ mark and lift off. Empty the processed food.
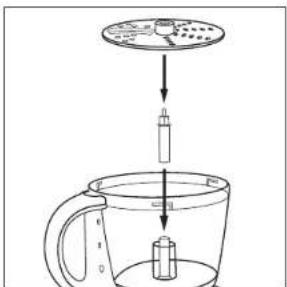
Figure 10
natural_image
Line drawing of a kitchen mixer with a downward arrow indicating compression or lifting (no text or symbols)Figure 11
natural_image
Technical line drawing of a mechanical component with a cylindrical top and flanged base (no text or symbols)Figure 12
NOTE: Shredding Disc is very sharp, use caution when handling.

10
www.oster.com
Processing Long and Thin Foods
NOTE: Make sure the unit is turned OFF (O) and unplugged before use. Never use hand to push food into processor. Do not use the processor continuously for more than 3 minutes at a time.
1 Lock the bowl onto base.
(See "How to assemble the bowl")
2 Slide the Disc Stem onto the center post of the base. With the desired side facing up (slicing or shredding), push the slice/shred disc onto the disc stem (Figure 13). Use caution when handling disc, blades are extremely sharp.
3 Lock cover onto bowl.
(See "How to Lock the cover")
4 Lock the food chute lid. (See "How to Lock the Food Chute Lid". Food Chute Lid can be locked before locking cover onto the bowl).
5 Fill the Large Food Pusher with long and thin food such as potato, pepperoni, carrots and celery.
6 Insert Small Food Pusher into Large Food Pusher (Figure 14), plug the cord into an electric outlet.
7 Turn the knob to 1, 2 or 3 depending on desired position, then press down lightly but firmly on the Small Food Pusher.
8 When finished processing, turn the knob to the OFF (O) position and allow the disc to stop rotating. Twist the Bowl Lid cover towards the UNLOCK mark to remove the cover.
9 Carefully remove the Shredding Disc. Unlock the bowl by turning it clockwise towards the UNLOCK □ mark and lift off. Empty the processed food.
NOTE: Shredding Disc is very sharp, use caution when handling.
Food Processing Tips/Liquids
1 Hot liquids (less than 176°F) and hot foods can be processed in the bowl.
2 Be sure to process small amounts of liquids—2 cups or less at a time. Larger amounts may leak from the bowl.
www.oster.com
11


Care & Cleaning
NOTE: Do not attempt to sharpen the cutting edges of the chopping blade or the reversible disc. They are permanently sharpened at the factory and will be ruined by attempted sharpening.
Cleaning
1 Before cleaning, be sure the unit is switched off and the cord is unplugged.
2 Whenever possible, rinse parts immediately after processing for easy cleanup.
3 Wipe the base, control knob, and feet with a damp cloth and dry thoroughly. Stubborn spots can be removed by rubbing with a damp cloth and a mild, non-abrasive cleaner. Do not immerse the base in liquid.
4 Blades are sharp.
5 All removable parts can be washed by hand or in a dishwasher, top rack.
- If washing by hand, wash in hot sudsy water, rinse, and dry thoroughly. If necessary, use a small nylon bristle brush to thoroughly clean the bowl and food chute/cover, this type of brush will also help prevent cutting yourself on the sharp chopping blade and slice/shred disc.
- If washing in a dishwasher, place removable parts on the top rack only — not in or near the utensil basket.
NOTE: For easier cleaning, the Wide Mouth Food Chute can be removed from the lid.
How To Remove The Wide Mouth Food Chute:
- Pull Slide Release Button out and pull up the Large Food Pusher.
- Pull back the Food Chute lid and Large Food Pusher.
- Push in the white horizontal hinge pin and lift off the Wide Mouth Food Chute (See Figure 1).
How To Re-Attach the Wide Mouth Food Chute:
- Line up the white horizontal hinge pin with the notches.
- Push in to lock into place (See Figure 2).
6 Do not use rough scouring pads or cleansers on any plastic or metal parts.
7 Do not fill the bowl with boiling water or place any of the parts in boiling water. Some foods, such as carrots, may temporarily stain the bowl. To remove stains, make a paste of 2 tablespoons (30ml) baking soda and 1 tablespoon (15ml) warm water. Apply the paste to the stains and rub with a cloth. Rinse with sudsly water and dry.
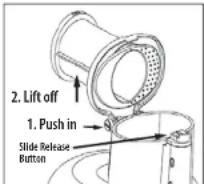
Figure 1
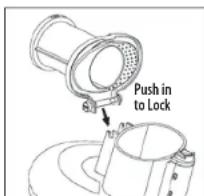
Figure 2

| Shredding Guide for Large Work Bowl | |
| Food Directions | |
| Cabbage Use Shredding Disc | for very fine cabbage or slaw. Cut into pieces to fit Chute. Shred using light pressure. Empty bowl as cabbage reaches Disc. |
| Carrots Position in Chute and | shred. |
| Cheese, cheddar Cheese must | be well chilled. Cut to fit Chute, use light pressure. |
| Cheese, Mozzarella Cut to fit | Chute. Cheese must be chilled in freezer for 30 minutes prior to shredding. Use light pressure. |
| Potatoes Cut to fit Chute. | |
| Zucchini Slice off ends, cut to | fit Chute, either lengthwise or horizontally. |
| Slicing Guide for Large Work Bowl | |
| Food Directions | |
| Apple Halve and stack horizontally in Chute. Use firm pressure. | |
| Cabbage/Lettuce Halve head, cut to fit Chute | |
| Carrots Cut to fit Chute. | |
| Celery | Remove string, pack Chute for best results. |
| Cucumber | Cut to fit Chute if necessary. |
| Mushrooms | Stack Chute with mushrooms on their sides for lengthwise slices. |
| Onions Halve and fill Chute, positioning onions upright for coarsely chopped results. | |
| Peaches/Pears | Halve and core. Position upright in Chute and slice using light pressure. |
| Peppers, Green, Yellow, Red, etc. | Halve and seed. Fit pepper up bottom of Chute squeezing slightly to fit if necessary. Cut large ones into quarters or strips, depending on desired results. Slice using moderate pressure. |
| Pepperoni | Cut into 3 Inch (8cm) lengths. Remove Inedible casing. |
| Potatoes Peel if desired, cut large potatoes in halves, position in Chute. | |
| Strawberries | Hull. Arrange berries on their sides for lengthwise slices. |
| Tomatoes | Use small tomatoes for whole slices, halve if necessary. Use gentle but firm pressure. |
| Turnips | Peel, cut turnips to fit Chute. |
| Zucchini Slice off ends. Use small squash for whole slices; halve larger ones to fit Chute. | |

1 Year Limited Warranty
Sunbeam Products, Inc. doing business as Jarden Consumer Solutions or if in Canada, Sunbeam Corporation (Canada) Limited doing business as Jarden Consumer Solutions (collectively "JCS") warrants that for a period of one year from the date of purchase, this product will be free from defects in material and workmanship. JCS, at its option, will repair or replace this product or any component of the product found to be defective during the warranty period. Replacement will be made with a new or remanufactured product or component. If the product is no longer available, replacement may be made with a similar product of equal or greater value. This is your exclusive warranty. Do NOT attempt to repair or adjust any electrical or mechanical functions on this product. Doing so will void this warranty.
This warranty is valid for the original retail purchaser from the date of initial retail purchase and is not transferable. Keep the original sales receipt. Proof of purchase is required to obtain warranty performance. JCS dealers, service centers, or retail stores selling JCS products do not have the right to alter, modify or any way change the terms and conditions of this warranty.
This warranty does not cover normal wear of parts or damage resulting from any of the following: negligent use or misuse of the product, use on Improper voltage or current, use contrary to the operating instructions, disassembly, repair or alteration by anyone other than JCS or an authorized JCS service center. Further, the warranty does not cover: Acts of God, such as fire, flood, hurricanes and tornadoes.
What are the limits on JCS's Liability?
JCS shall not be liable for any incidental or consequential damages caused by the breach of any express, implied or statutory warranty or condition.
Except to the extent prohibited by applicable law, any implied warranty or condition of merchantability or fitness for a particular purpose is limited in duration to the duration of the above warranty.
JCS disclaims all other warranties, conditions or representations, express, implied, statutory or otherwise. JCS shall not be liable for any damages of any kind resulting from the purchase, use or misuse of, or inability to use the product including incidental, special, consequential or similar damages or loss of profits, or for any breach of contract, fundamental or otherwise, or for any claim brought against purchaser by any other party.
Some provinces, states or jurisdictions do not allow the exclusion or limitation of incidental or consequential damages or limitations on how long an implied warranty lasts, so the above limitations or exclusion may not apply to you.
This warranty gives you specific legal rights, and you may also have other rights that vary from province to province, state to state or jurisdiction to jurisdiction.
How to Obtain Warranty Service
In the U.S.A.
If you have any question regarding this warranty or would like to obtain warranty service, please call 1-800-334-0759 and a convenient service center address will be provided to you.
In Canada
If you have any question regarding this warranty or would like to obtain warranty service, please call 1-800-667-8623 and a convenient service center address will be provided to you.
In the U.S.A., this warranty is offered by Sunbeam Products, Inc. doing business as Jarden Consumer Solutions located in Boca Raton, Florida 33431. In Canada, this warranty is offered by Sunbeam Corporation (Canada) Limited doing business as Jarden Consumer Solutions, located at 20 B Hereford Street, Brampton, Ontario L6Y 0M1. If you have any other problem or claim in connection with this product, please write our Consumer Service Department
PLEASE DO NOT RETURN THIS PRODUCT TO ANY OF THESE ADDRESSES OR TO THE PLACE OF PURCHASE
NOTE: When slicing or shredding use high speed. When using chopping blade use lower speed to control size of chopped food.
natural_image
Line drawing of a kitchen press with a valve and handle (no text or symbols)Figura 1
natural_image
Technical line drawing of a kitchen appliance with a lid and handle, showing internal components and a directional arrow (no text or symbols)Figura 2
natural_image
Technical line drawing of a mechanical component labeled 'Figura 6' with no readable text or symbols beyond the label.natural_image
Technical line drawing of a mechanical component with an arrow indicating direction (no text or symbols)natural_image
Diagram of a mechanical device labeled Figura 8 showing a cylindrical component with an arrow indicating motion (no text or symbols on the device itself)natural_image
Line drawing of a coffee maker with a lid and a bottle, showing no text or symbolsFigure 9

Figura 10
natural_image
Line drawing of a kitchen mixer with a downward arrow indicating the process (no text or symbols present)Figura 11
natural_image
Technical line drawing of a mechanical component with a downward arrow indicating force or motion (no text or symbols)Figura 12

Figura 13
Figura 2


- THIS UNIT IS INTENDED FOR HOUSEHOLD USE ONLY.
- DO NOT ATTEMPT TO DEFEAT THIS SAFETY FEATURE.
- EXTENSION CORD USE
- SAVE THESE INSTRUCTIONS
- Before Using Your Oster® Food Processor
- How To:
- Using Your Food Processor
- How To Assemble the Large Bowl
- How to Lock the Cover
- How to Lock the Food Chute Lid
- How to Open the Food Chute Lid
- How to Chop Using the Large Work Bowl
- How to Chop Using the Small Work Bowl
- (Do not use slice/shred disc with small work bowl.)
- How to Slice or Shred Using the Large Work Bowl
- Processing Large Amounts of Food
- Processing Long and Thin Foods
- Food Processing Tips/Liquids
- Care & Cleaning
- Cleaning
- How To Remove The Wide Mouth Food Chute:
- How To Re-Attach the Wide Mouth Food Chute:
- Year Limited Warranty
- What are the limits on JCS's Liability?
- How to Obtain Warranty Service
- In the U.S.A.
- In Canada
Brand : OSTER
Model : FPSTFP4253
Category : Food processor