VC9678MS - Vacuum Cleaner Khind - Free user manual and instructions
Find the device manual for free VC9678MS Khind in PDF.


User questions about VC9678MS Khind
0 question about this device. Answer the ones you know or ask your own.
Ask a new question about this device
Download the instructions for your Vacuum Cleaner in PDF format for free! Find your manual VC9678MS - Khind and take your electronic device back in hand. On this page are published all the documents necessary for the use of your device. VC9678MS by Khind.
USER MANUAL VC9678MS Khind
USER MANUAL
SERIAL NO.:
KHIND®
Experience More
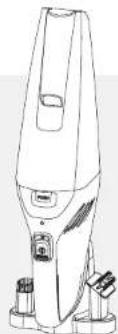
HANDHELD VACUUM CLEANER
VC9678MS
natural_image
Line drawing of a handheld device with a conical top and base mount (no text or symbols)KHIND CARE Mobile App

Mobile App

Download to register for E-Warranty & enjoy hassle-free after-sales services.
1-800-88-0032
khind.com.my

IMPORTANT
Please read this manual carefully before operating this product. Keep this manual handy for further reference,
P/N: 40-51752-00

Safety Precaution Information
Safety & Warning Information
- Read the instruction manual carefully and follow the instruction closely.
- This appliance is not intended for use by persons (including children) with reduced physical, sensory or mental capabilities, or lack of experience and knowledge, unless they have been given supervision or instruction concerning use of the appliance by a person responsible for their safety.
Children should be supervised to ensure that they do not play with the appliance. - This appliance is intended for household use only; commercial use will void warranty.
- This appliance is not suitable for outdoors use or on wet surfaces.
- Use this appliance and adaptor with specified voltage as stated on the rating label. Before connecting the appliance to AC mains, made sure the voltage specified corresponds to the AC supply to your house.
- Do not handle the adaptor and appliance with wet hands
- Do not pull, lift, or carry the appliance by its power cord. Do not excessively bend, stretch, twist, haul and tramp the power cord or place heavy objects on it.
-
If the power cord or adaptor is damaged, it must be replaced by the manufacturer, its service agent or similarly qualified persons in order to avoid a hazard.
-
Use only the attached parts which are supplied by the manufacturer.
-
Do not operate the appliance if any parts appear to be faulty, missing or damaged.
-
Do not operate the appliance near a gas stove, kerosene stove, gas cooker, in any space with an open fire, or in an environment with high temperature.
-
With any indication of damage or malfunction, please stop using the appliance immediately to avoid hazards. Take it to the authorized service centre for repair. Do not attempt to repair or change any parts by yourself.
-
Do not use the appliance without filter in place.
-
Do not use the appliance in areas where flammable or combustible liquids may be present.
-
Do not insert any objects into openings or covers.
-
Keep body away from openings and moving parts.
-
This appliance is intended to pick up cold ash from fireplaces, chimneys, ovens, ash-trays, and similar places of ash accumulation.
-
⚠ WARNING! Risk of fire
Do not suck up any of the following objects to avoid damages to the product and risk of injuries:
- Any large or broken objects such as glass.
- Burning or hot object such as cigarettes, matches or ashes.
- Spilled liquid.
- Reactive liquids such as solvents, corrosives or detergents.
-
Flammable or explosive substances such as alcohol, thinners etc.
-
The dust container must be emptied and cleaned before and after each use.
-
Do not use paper dust bags or bags made from similar flammable materials.
-
Do not rest the vacuum cleaner on flammable or polymeric surfaces, including carpeting and vinyl tile.
-
When battery performance drop after some time, please purchase new battery from service centre as replacement.
- Do not litter dispose the battery by own self.
- The battery is only applicable for this appliance and it must be charged with adaptor provided.
- Do not insert sharp object or disassemble the battery to avoid short circuit and electric shock.
- It is advisable to turn off the power supply whenever the appliance is fully charged.
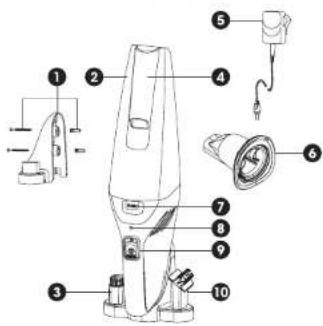
Parts Identification
- Wall Mount
- Dust Container
- Brush
- Flip Crevice Nozzle
- Adaptor
- Fabric Filter
- Dust Container Release Button
- Charging / Power Indicator
- Power Button
- Rubber Wiper
* Pictures are for illustration purpose only
Specifications
| Model | VC9678MS |
| Voltage | 14.8Vd.c. |
| Power | 65W |
| Adaptor Input Voltage | AC100-240V ~ 50-60Hz |
| Adaptor Output Voltage | 17.5Vd.c. |
| Battery Type | Li-ion Battery Pack |
| Battery Voltage | 14.8V 2200mAh |
| Filtration Type | Fabric + Sponge |
| Dust Container Capacity | 0.7L (MAX) |
| Charging Time | ≤5.5 Hours |
| Working Time | 20 Mins |
| Noise Level | ≤80dB |
| Net Weight | 1.3kg |
| Product Dimension (LxWxH) | 410 x 104 x 123mm |
* Specifications are subject to change without prior notice.
3
How to Use
Operation
Charging
- The indicator light will flash during charging and it turns Green steady light when it is fully charged.
- It turns Red when the battery level is low and it will flash for 20 seconds before turning off automatically.
- The appliance needs to be charged periodically (2 to 3 times a month) to ensure optimum battery life.
Assembly
Important! The Fabric Filter must be well installed when operating the appliance.
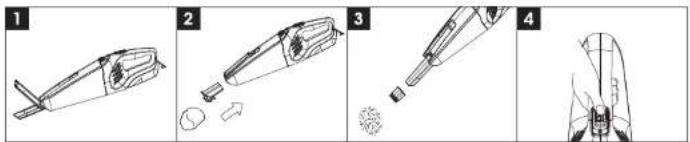
- Flip Crevice Nozzle is built-in and it has to be push out before it can be flip down.
- Rubber Wiper was provided for wet suction and it can be installed by pushing it to nozzle. Ensure it is tightly fixed.
- Brush was provided for general cleaning. Flip down the Crevice Nozzle, then push the Brush attachment to Crevice Nozzle. Ensure it is tightly fixed.
- Slide the Power Switch forward or backward to turn the appliance On / Off.
Maintenance
flowchart
graph LR
    A["1 Bag Disposal"] --> B["2 Bag Disposal"]
    B --> C["3 Bag Disposal"]
    C --> D["4 Toilet"]
    D --> E["5 Toilet"]
    E --> F["24 Hours Window"]
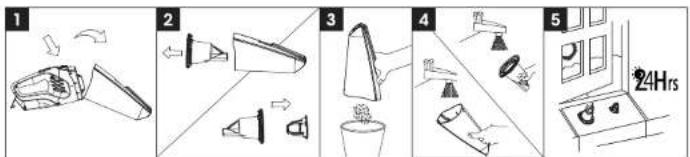
- Press the Dust Container Release Button and pull out the Dust Container.
- Pull out the Filter.
- Empty the Dust Container.
- Wash the Filter and Dust Container under rinsing water.
5 Allow to dry for 24 hours and make sure the Filter and Dust Container are thoroughly dried before fitting them back to the body.
Important! Filters must be cleaned regularly for best suction performance and prevent over-heating and damaged the appliance.
Storage
natural_image
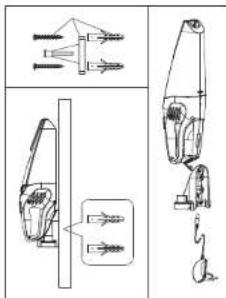
Technical line drawings of mechanical components and parts, including a fan, bracket, and clamped device (no text or symbols)- Wall Mount is supplied with screws and wall plugs.
2 To install the wall mount bracket, position it on the wall at a suitable height. - Mark the two screw holes through on the wall and drill three holes ∅6mm and 35 - 40mm deep with a suitable drill.
- Insert the plastic wall plugs into each hole and gently hammer in until they are flush with the wall. Place the hanging mount over the holes then insert the screws and lighten up. Do not overlighten.
- Insert the DC jack through the bottom hole of wall mount bracket, twist in 90 degrees to hold it at base.
- Place the appliance on the wall mount bracket, the appliance can start charging.
Important! If unsure of the above installation process, you may consult a professional person to have it installed.
Troubleshooting
| Problem | Possible Causes | Solutions |
| The vacuum cleaner does not switch ON. | 1. The Power Switch on the unit is not switched to ON.2. Bad contact to mains power socket / charger jack. | 1. Try sliding the power switch button to ON again.2. Check connection and see if battery is fully charged. |
| Suction not strong. | 1. Brush head not correctly fitted.2. The Dust Container is full.3. The Filters are blocked. | 1. Check Brush head had connected to main unit.2. Empty Dust Container3. Check for any blockages and wash Filter. |

安全注意事项
安全和警告信息
规格
flowchart
graph LR
    A["1: Washing Machine"] --> B["2: Washing Toilet"]
    B --> C["3: Sewer Toward Toilet"]
    C --> D["4: Hand Stamped Toilet"]
    D --> E["5: Toilet with Dish and Oven"]
    E --> F["24Hrs Window"]
natural_image
Technical line drawings of a mechanical device with exploded and assembled views (no text or symbols)flowchart
graph LR
    A["1: Uncleaning funnel"] --> B["2: Bagging with filter"]
    B --> C["3: Potted plant with cloth"]
    C --> D["4: Hand washing machine"]
    D --> E["5: Refrigerator with 24Hrs washing machine"]
- Tekan Butang Pelepas Bekas Habuk dan tarik keluar Bekas Habuk.
- Tarik keluar Penapis.
- Kosongkan Bekas Habuk.
- Basuh Penapis dan Bekas Habuk di bawah bilasan air.
- Biarkannya kering selama 24 jam dan pastikan Penapis dan Bekas Habuk dikeringkan dengan sepenuhnya sebelum dimasukkan semula ke badan.
natural_image
Technical line drawings of mechanical components and parts, no text or symbols presentBrand : Khind
Model : VC9678MS
Category : Vacuum Cleaner