VC9E31 - Vacuum Cleaner Khind - Free user manual and instructions
Find the device manual for free VC9E31 Khind in PDF.


| Product Type | Canister Vacuum Cleaner |
| Brand | Khind |
| Model | VC9E31 |
| Power Consumption | 800 W |
| Suction Power | 200 Air Watts |
| Dust Capacity | 2.5 L |
| Filtration System | HEPA H13 Filter |
| Noise Level | 78 dB |
| Cord Length | 5 m |
| Operating Radius | 8 m |
| Weight | 4.5 kg |
| Dimensions (L x W x H) | 35 x 25 x 30 cm |
| Power Cord Type | Retractable |
| Vacuum Cleaner Type | Bagless |
| Speed Settings | Variable (2 levels) |
| Floor Nozzle | Combination for hard and carpet floors |
| Crevasse Tool | Included |
| Upholstery Brush | Included |
| Dusting Brush | Included |
| Washable Filter | Yes |
| Material of Body | ABS Plastic |
| Voltage | 220-240 V, 50/60 Hz |
| Under Furniture Clearance | Flat design, 8 cm |
Frequently Asked Questions - VC9E31 Khind
User questions about VC9E31 Khind
0 question about this device. Answer the ones you know or ask your own.
Ask a new question about this device
Download the instructions for your Vacuum Cleaner in PDF format for free! Find your manual VC9E31 - Khind and take your electronic device back in hand. On this page are published all the documents necessary for the use of your device. VC9E31 by Khind.
USER MANUAL VC9E31 Khind

KHIND®
Enjoy hassle-free customer service

Scan E-Warranty QR code or go to http://www.khind.com.my/e-warranty.html

Fill-up your details, product information & proof of purchase.

HOTLINE 1800-88-0032
www.khind.com.my
Please read this manual carefully before operating this product. Keep this manual handy for further reference.
This manual is also available online.
P/N:40 51346 00
Safety Precaution Information Safety Precaution Information
SAFETY AND WARNING INFORMATION
- Read the instruction manual carefully and follow the instruction closely.
- Use only the attached parts which are supplied by the manufacturer.
- This appliance is intended for household use only, commercial use will void warranty.
- If the adaptor is damaged, it must be replaced by the manufacturer, its service agent or similarly qualified persons in order to avoid a hazard.
- This appliance is not intended for use by persons (including children) with reduced physical, sensory or mental capabilities, or lack of experience and knowledge, unless they have been given supervision or instruction concerning use of the appliance by a person responsible for their safety.
Children should be supervised to ensure that they do not play with the appliance. - Insert the adaptor to the AC mains securely. Do not operate the adaptor or charging base with wet hands.
- Keep appliance away from ovens and stoves etc. Do not approach the fire source or the heat source, and avoid direct sunlight.
- This appliance is not suitable for outdoors use or on wet surfaces. Use only on dry, indoor surfaces.
- Do not use the appliance if any parts appear to be faulty, missing or damaged.
- Ensure all parts are securely assembled before using the appliance.
- Check to ensure your electricity supply matches that the voltage shown on the rating plate.
The appliance must only be used as rated voltage. - Do not run the Robotic Vacuum during charging.
- Do not unplug the adaptor by pulling on the cable. To unplug, grasp the adaptor, not the cable.
- Do not use the try to ride on the main unit, place heavy objects on it or apply strong impacts to it.
- Do not use the appliance under extremely hot or cold environments. It is recommended to use the appliance in the environment of 0^ C \~ 40^ C.
- Before each use, please clean the inner and suction mouth of the dust container, clean out the hair, cotton fibre and dust. Do not jam the suction of the dust container.
- Do not immerse any part of the appliance into the water or other liquids. (except for those parts and accessories that can be washed with water).
- This appliance can only use the adaptor provided by KHIND inside the packaging.
RISK OF PERSONAL INJURY
- Charge the appliance for 4-5 hours before initial use.
- Never use the appliance without the HEPA Filter or Dust Container in place.
- Do not use the appliance in areas where flammable or combustible liquids may be present.
- When using the Robotic Vacuum for the first time, a smell or vapour may be given off. This will dissipate after few uses.
- Keep hair, loose clothes, fingers and all parts of the body away from openings and moving parts.
- Do not insert any objects into openings or cover the appliance or charging base.
- Take extra care when cleaning and vacuuming at the staircase area.
- In order to prevent damage to the product and reduce risk of fire and/or personal injury, the following objects are strictly prohibited from being sucked up:
- Any large or broken objects such as glass.
• Anything that is burning or smoking such as cigarettes, matches or hot ashes. - Liquid spills
• Reactive liquids (solvents, corrosives, detergents). - Flammable or explosive substances such as alcohol, thinners etc.
• Pet litter or anything with pet waste attached.

!
- Pins, needles, toothpicks, coins, metals, plastics, food wrap, other wrapping films.
• Long pieces of string and belts. - Fringes of coverings and floor cushions or carpets.
• The ends of the table cloths and curtains that reach to the floor. - Damp or wet items
- In order to prevent injury, fire or electric shock due to failing of the main unit or charging base, please do not use in the following places:
• Spring layer or corridor without fence.
• In narrow areas where the main unit cannot turn around.
• In entrance halls, stairways or steep slopes. - Segment difference or concrete floors with hard or uneven surfaces.
- On top of refrigerators or high area locations with limited space (such as surface of the table/chair).
- Do not use the appliance on the carpets or flooring that can be easily damaged, such as waxed floors, marble floors, mirrored surfaces (glass, mirror) etc.
- Do not use it on damaged tiles, carpets, or old tatami mats.
- Discontinue usage and send to nearby Khind Service Centre if encounter the below situations: -
- Battery runtime changes abruptly or the battery has been damaged.
- Charging base/ dock station, AC adapter, plug or main lead are damaged.
- Do not touch the rotating wheels or side brushes.
- Do not block the sensors, infrared transmitters and receivers on the main unit or charging base by putting tape or stickers on them or blocking with cloth.
- Do not block the suction port or exhaust port.
- Keep pets out of the way in their enclosures or in other areas.
- Turn off the main power switch when performing maintenance or when children or pets are present.
- Use only the charger supplied by KHIND. If other chargers are used, this can cause damage to the battery, product or personal property.
- Store the appliance indoors, in a cool and dry place.
SAFETY CONCERN WITH LI-ION BATTERIES
- Before charging, please check whether the adaptor and dock station are properly connected.
- The battery is not fully charged at the time of purchase, so please charge the appliance before initial use. Full charging takes about 4 - 5 hours.
- It is recommended to recharge the appliance in area where the temperature is between 5°C and 35°C. The unit cannot charge properly if the room is too cold or too hot.
- If the operating time reduces significantly even after proper recharging, it means that the battery has reached the end of its service life. Please send in to Khind Customer Service for battery replacement.
- In extreme application conditions or temperature conditions, the battery may leak. If the liquid of the battery has fluid to flow out and stick to the skin, please flush with water in time. If the liquid accidentally enters the eye, wash immediately with water and seek medical advice.
- Do not litter the battery together with the general household waste so as to prevent contamination of the environment. It should be safely discarded and recycle at the appropriate collection site.
- When not using the charging dock station for a long period of time, please unplug it.

WARNING!
Please dispose the battery according to local laws and regulations. Do not incinerate the appliance even if it is severely damaged. The battery can explode and result in fire hazard.


Cleaning & Maintenance
-
Always remove the plug from socket-outlet when not in use, before cleaning or maintaining the appliance.
-
For optimal performance, follow the instruction below to clean and maintain the robotic vacuum regularly. The cleaning frequency will depend on your usage habits.
Recommended cleaning frequency:
| Parts Cleaning Frequency |
| Filters Once every week |
| Rolling Brush Once every week |
| Side Brushes Once every month |
| Brush Guard Once every month |
| Sensors Once every month |
| Charging Pins Once every month |
| Swivel Wheel Once every month |
Dust Container and Filters
- Press the dust container release button to pull it out.
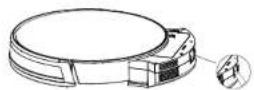
- Open and empty the dust container.
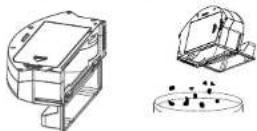
- Take out the foam filter and high-performance filter.
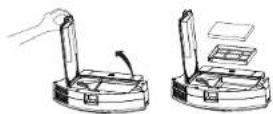
- Clean the dust container and filters with a cleaning brush or soft brush.
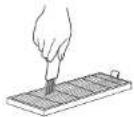
- Use water to rinse the primary filter screen.
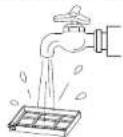
- The dust container can be scrubbed with soft cloth. • Do not allow water flow into the fan port during cleaning process.
- Dry the dust container and filter and keep the robot vacuum dry at all time to ensure its service life.
- Please ensure the high efficiency filter screen and the primary filter screen are dry before installing.
- Do not expose the high efficiency filter screen and the primary filter screen to the sun.
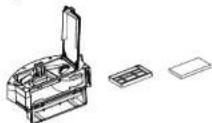
- Put the filters and pre-filter back into the dust container.
3 EN
Water Tank and Mopping Cloth
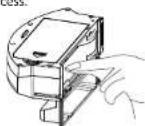
- Press the Water Tank release button to pull it out.
- Remove the Mopping Cloth from the Water Tank.
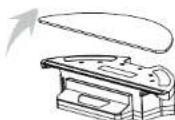
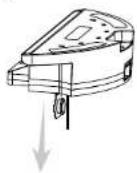
- Open the water inflow hole cover and empty water from Water Tank.
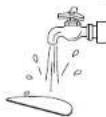
- Use water to clean the Mopping Cloth.
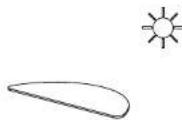
- Dry the Mopping Cloth with sunlight.
- Water Tank can be dried with dry cloth or let it naturally dry with air.
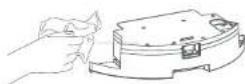
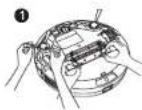
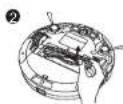
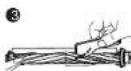
Rolling Brush
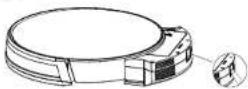
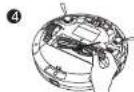
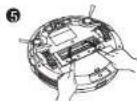
- Pull on the release tabs to unlock the brush guard as shown.
- Lift the rolling brush to remove.
- Clean the rolling brush with the provided cleaning tool or soft brush.
- Reinstall the rolling brush by inserting the fixed protruding end first and then clicking into place.
- Press down to snap the brush guard unto place
4 EN
Side Brushes
Foreign substances, such as hair, can easily get tangled in the side brushes
and dirt adhere to them. Be sure to clean them regularly
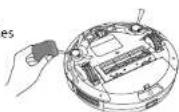
- Remove the side brushes
- Carefully unwind and pull off any hair or string that is wrapped
between the main unit and the side brushes - Use a cloth dampened with warm water to remove dust from the brushes or to gently reshape them
- Only use the side brushes when completely dried
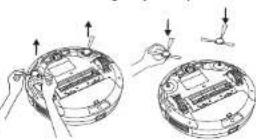
Replace the Side Brushes
The side brushes may become bent or damaged after being used
for a period of time. Follow the instructions below to replace them.
Pull off the old side brushes and snap the new ones into place
Warning: There is a marking on the brush which shows "L" for left
brush and "R" for right brush
Clean the Sensors and Charging Pins
To maintain the best performance, clean the drop sensors and charging pins regularly. Dust off the drop sensors and charging contact pins using a soft cloth or cleaning brush
- Please use dry soft cloth for cleaning and do not use wet cloth to prevent damage caused by water
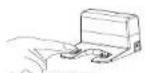
Charging
Deck Pine
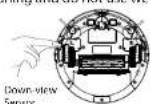
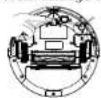
Drive Wheels and Omni-directional Wheel
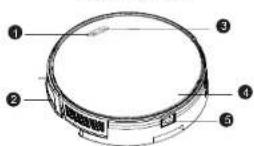
Parts Identification
A. Robot Front View
- "Recharge" or "Home" button
- Omnidirectional Lens
- Power button
- Top Cover
- Dust Box / Water Tank button
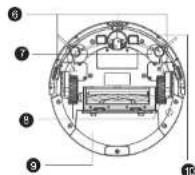
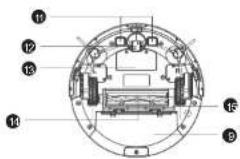
B. Robot Back View
- Drop Sensor
- "L" Side & "R" Side Brush
B. Drive Wheel - Dust box
- Magnetic Sensor
- Charging Contact Pins
- Omnidirectional Wheel
- Battery Compartment
- Rolling Brush
- Brush Guard
Robot front view
Robot back view

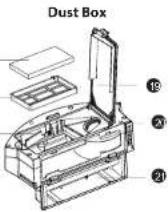
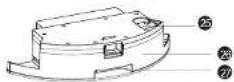
C. Dust Box
- High Efficiency Strainer
- Primary Filter Strainer
- Dust Box Metal Sheet
- High Efficiency Top Cover
- Vent
- Dust Box Swivel Cover
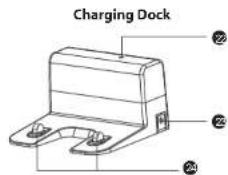
D. Charging Dock
- Signal Sensor
- DC Socket
- Charging Pin
E. Water Tank and Mopping Cloth
- Water Injection Port
- Water Tank
- Mopping Pad
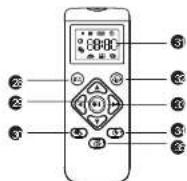
F. Remote Control
[Battery type: 2 pieces of leak-proof UM4
AAA 1.5V battery (not provided)]
- Auto Cleaning Mode Button
(Turbo / Quiet / Standard Mode) - Start / Pause Button
- Schedule Cleaning Setting Button
- Display Screen
- Cleaning Mode Switching Button
(Using dust tank -Edge / Room cleaning mode available;
Using water tank- Edge / Room / Mopping
cleaning mode available
33. Direction Control Button
34. Time Setting Button
35. Recharging Button
G. Accessories
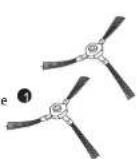
- Replacement Side Brushes x2 pieces
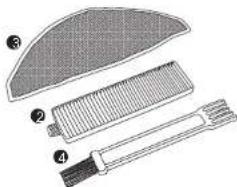
- Replacement HEPA Filter x1 pieces
- Replacement Fiber Mop Cloth x1 piece
- Cleaning Tool
Water Tank and Mopping Cloth
natural_image
Diagram of a hairbrush with three labeled parts (①, ②, ③), showing internal structure without any text or symbols.
Specifications
| Model | VC9E31 |
| Power | 28W |
| Adaptor Input Voltage | AC100-240V~50/60Hz |
| Adaptor Output Voltage | 19V 60A |
| Battery type | Lithium Ion Battery Pack |
| Battery Voltage | 14.4V 2500mAh |
| Filtration Type | HEPA filter |
| Dust Container Capacity | 600ml |
| Water Container Capacity | 350ml |
| Suction Power | 2000Pa |
| Operating Time | 90-120min |
| Charging Time | 4-5hours |
| Charging Option | i) Auto chargingii) Manual charging |
| Anti-collision Sensor | 11 sensors |
| Anti-falling Sensor | 3 sensors |
| Gyroscope | Yes |
| Noise Level | <65db |
| Net Weight | 2.7kg |
| Product Dimension (Diameter x Height)mm | 330x76mm |
Wi-Fi specification
| Model | VC9E31 |
| Feature : | IEEE 802.11 b / g / n |
| Frequency Band : | 2412MHz - 2472MHz |
| Channel Bandwidth : | 20 MHz |
| Half/Full Duplex : | Half |
| Radio Technology : | CKK DSSS / OFDM / OFDM |
| Modem Compatibility | 2.4G (5G is not supported) |
How To Use
Product Usage (Preparation)
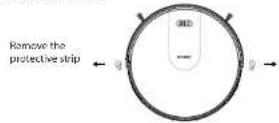
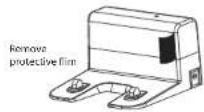
Before using the Robot, remove the protective strip on the Robot and Charging Dock Remove Protection
Product Use / Host Charging
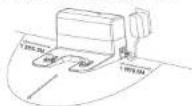
- Place the Charging Dock on a hard, level surface and against a wall. Remove objects within 1.5 ft/0.5 m on both sides and within 3 ft/1 m in front of the Charging Dock.
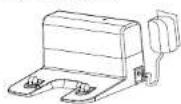
- Plug the adapter into a wall outlet and plug the DC jack into the DC socket of the Charging Dock. When the Charging Dock connects to AC power, the LED indicator on the Charging Dock is flashing green.
• Install the Charging Base in a location that Robot can easily access.
• Always keep the Charging Base plugged in, otherwise the Robot will not automatically return to it.
- Install the side brushes before use.
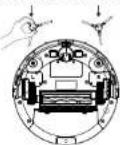
Warning:
There is a marking on the brush which shows "L" for left brush and "R" for right brush
- Charging your robot
- Place the robot on the Charging Dock for battery charging (When charging, indication light is flashing. Light will stay light up when charging is finished. Normal charging time is about 4-5 hours)
- Robot returns to the Charging Dock at the end of a cleaning cycle or when its battery is running low
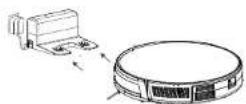
- Do not expose Charging Dock to direct sunlight or any strong reflection on light source.
- Recommend to fully charge the robot to ensure operating time.
- Avoid to have Water Tank inserted in robot when charging
- Avoid to have wet mopping cloth in which may damage wooden floor.
ATTENTION:
- Charge the appliance for at least 4-5 hours before the first use.
- If the battery is fully charged and not used for a long period of time, its capacity may decrease and need to re-charged. Power switch OFF to prevent rapid battery drain.
Product Usage (Select Cleaning Mode)
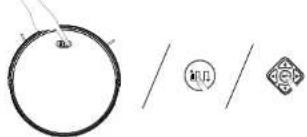
1. Auto Cleaning
- Robot Optimizes its cleaning path by selecting different cleaning modes automatically until cleaning is complete. This is the most commonly used cleaning mode.
- Press (b) the Robot or (an the Remote Control to start cleaning in Auto Mode.
- Press again AB the remote control to select the cleaning strength mode: Turbo mode, Quiet mode or Standard Mode.
- Robot will return to the Charging Base automatically when battery level becomes low or when cleaning is completed.
- By default, Robot starts in Auto Cleaning mode when it is turned on.
natural_image
Simple line drawing of a ring with three separate symbols: a small circle, a diamond, and a circular outline (no text or labels)2. Spot Cleaning
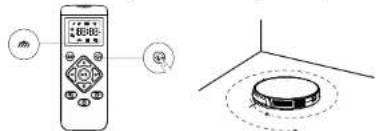
- Robot intensively cleans a specific area in a spiral pattern within the 5ft radius, it is useful if there is a concentrated area of dust or debris.
- Press the Remote Control repeatedly until the icon of Edge Cleaning Mode is displayed on the screen
3. Edge Cleaning
- Robot reduces the moving speed when detects a wall and then follows along the wall the ensure the edge is cleaned thoroughly. Robot will return to Charging Dock when cleaning has finished.
- Press the Remote Control repeatedly until the icon of Edge Cleaning Mode is displayed on the screen.
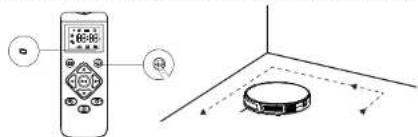
4. Single Room Cleaning
- Select this mode only when one specific room needs to be cleaned. Make sure to confine Robot to the room by closing the door. Robot will also clean the edges before finish cleaning. Press on the Remote Control repeatedly until the icon of Single Room Cleaning Mode is displayed on the screen.
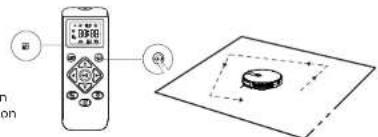
9 EN
5. Manual Cleaning
- You can direct Robot to clean a particular area by using the directional buttons on the Remote Control.
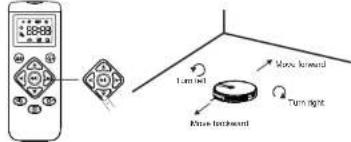
6. Set Time and Scheduled Cleaning
Make sure the time is set correctly to your local time before setting a scheduled cleaning. Make sure the Robot is turned on.
- Set Time
- Press the Remote Control. The time will blink on the display.
- Press to set the "hour" and "minute".
- Press to save the setting.
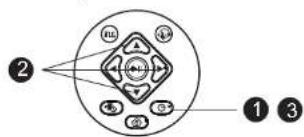
7. Set a Scheduled Cleaning
You can schedule Robot to start cleaning at a specified time.
To cancel a previously scheduled cleaning, press and hold ④ for 3 seconds.
- Press on the Remote Control. The time will blink on the display.
- Press to see the "hour" and "minute".
- Press to save the setting.
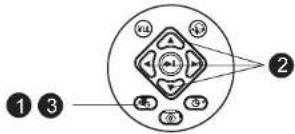
8. Recharging
You can press remote control, the appliance will switch into auto recharge mode and search for charging station.
10 EN
Mopping / Water Tank
- Do not use mopping function with any carpet floor.
- Please remove mopping cloth and clean it after mopping is completed.
- Please empty the water tank after each use.
natural_image
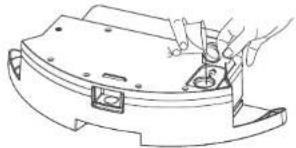
Line drawing of a hand using a tool to adjust or install a curved mechanical component (no text or symbols present)- Open the water inflow hole cover, inject water slowly into the water tank.
natural_image
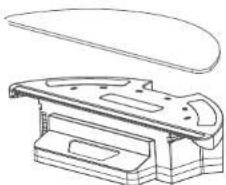
Technical line drawing of a mechanical component with a curved top and flanged base (no text or symbols)• Take out the mopping cloth and place it on top of the water tank. Press the mopping cloth gently to ensure it stick firmly with water tank.
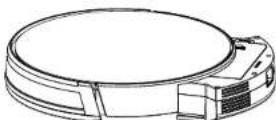
- Replace the dust box of the robot with water tank. Mopping is ready.
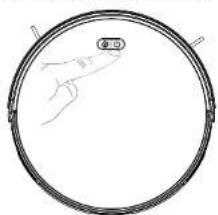
- Press Power button to start mopping.
11 EN
Scan to download APP ( TUYA Smart )
Please read this manual carefully before use and follow the Quick Guide during operation for safety. Please make sure that your robot, router and phone are close to each other before starting APP connection.
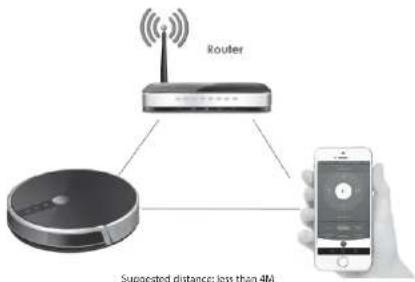
Quick Guide
App Downloading
![Tuya Smart Smart Life Smart Living 4.7 4+ Not 199 What's New Version 3.1.1 Version History [Network Being Management] - Optimized "Auto Scan" experience [Device Management] Preview Control Multiple Devices Only one up to manage multiple devices Bemate Q Comment and A 202](/content/2026/05/1014893/images/07f1d535d05170df0ca6dc450298d4ccd5edad0839a33c82da5667211ea6f3c1.jpg)
Fig 1
IOS APP Android APP
- Scan the QR code above and download "TUYA SMART" from your APP STORE or GOOGLE PLAY. (Fig 1)
- Open "TUYA" on cell phone after download and register an account via email or cell phone number.
- Login with account and password.
12 EN
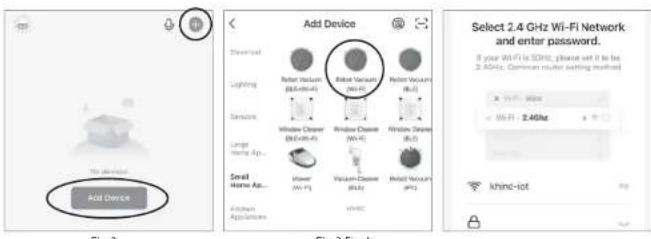
- In your TUYA app, tap on "Add Device" button or + button on the top right corner to add device (Fig 2)
- Tap Small Home Appliances on the left and select Robot Vacuum (Wi-Fi) (Fig 3)
- Key in your WIFI Password and start device connection (Fig 4)
**NOTE** Note: This device is not compatible with 5G network. Ensure that you are connected to 2.4G Wi-Fi network.
Before connecting your device, turn on the robot vacuum. After the voice prompts "Welcome to use robot vacuum cleaner", please press and hold the "Home" button until voice prompts "Smart Link"
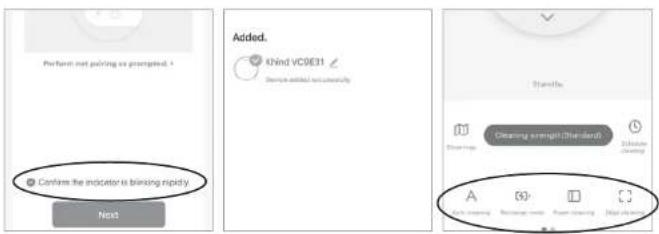
Fig 5 Fig 7 Fig 6
- Click Confirm Indicator Rapidly Blink and press "Next" to connect your device (Fig 5)
- After a voice prompt "Wifi Connected", adding device "Khind VC9E31" to your TUYA app is complete. You can rename your device, eg. My Khind Robot (Fig 6)
- Your robot is initialized and you may start using your TUYA App to control your Robot Vacuum (Fig 7)
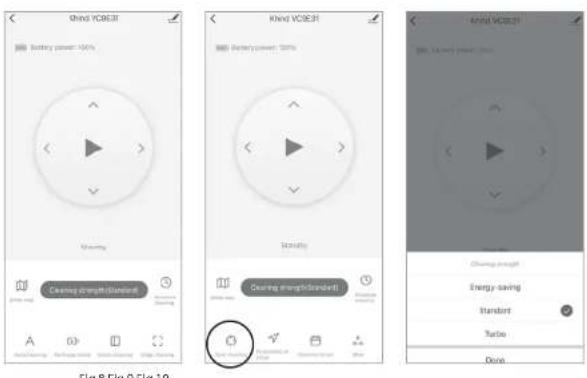
Fig 8 Fig 9 Fig 10
APP Operations
- Select "Auto Cleaning", "Recharge mode", "Room cleaning", "Edge cleaning", "Spot cleaning" as you want to start certain cleaning modes (Fig 8) (Fig 9)
- To set your cleaning strength, press the "Cleaning strength" (Fig 9) button to select Energy-saving, Standard, or Turbo cleaning strength (Fig 10)
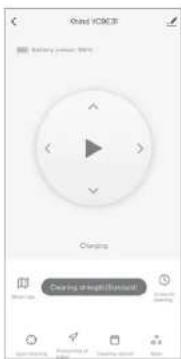
Fig 11 Fig 12
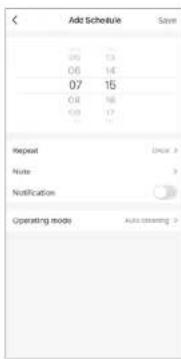
Fig 13
Scheduling
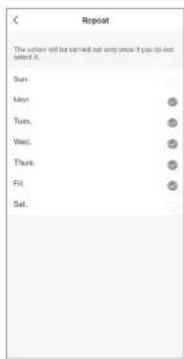
- Choose Schedule cleaning (Fig 11) to enter scheduling interface and select "Add Schedule"
- Choose the desired working time (Fig 12) and day (repeat Monday – Sunday) (Fig 13)
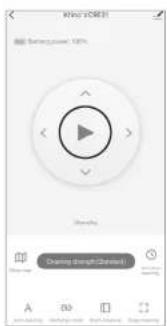
Fig 14 Fig 15 Fig 16
line
| Category | Value | |---|---| | Clearingness | 180 | | ClearingTars | 118 |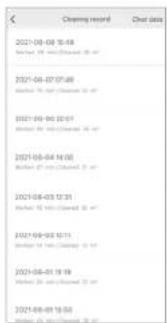
Start / Pause / Standby / Sleeping mode, Working Map and Cleaning Record
-
Press " ▶ " / " ||" to start / pause the robot (Fig 14)
-
Note: When the robot pauses over 10 minutes, it will enter sleeping mode
- If it is in sleeping mode, press , the robot will be wakened up to standby mode
- Press the cleaning mode as you want to start working
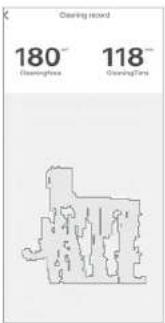
- The App will show the map of working cleaning path of the robot. It may not update in real time (Fig 15)
- Tap "Cleaning record", it will show the cleaning records of working time and cleaned area, also you can clear the data (Fig 16)
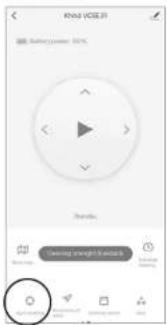
Fig 17 Fig 18 Fig 19
Find Robot
- You may not know where the robot is when it finishes cleaning and stops. Press "Positioning of Ⓥ", and a "Ding Dong" sound will prompt you to find the robot (Fig 17)
Mute
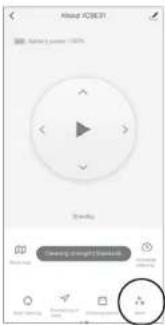
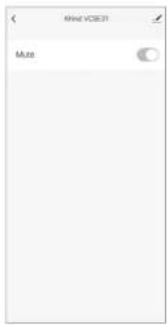
- Tap "More" to enter mute function setting interface (Fig 18). If mute function is active, the robot will cancel voice prompt, so it will not bother you (Fig 19)
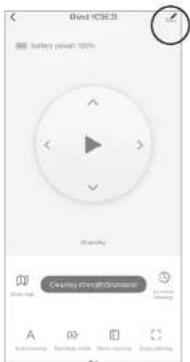
Fig 20 Fig 21 Fig 22
Supported Third-party Control
- The robot works with Amazon Alexa, Google Assistant and some other third-party control devices.
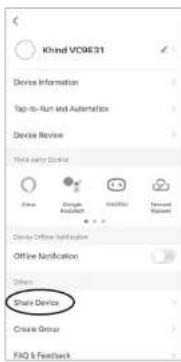
- Tap ⏻ in the top right corner (Fig 20), then find "Supported Third-party Control" and tap corresponding icon to learn connection way (Fig 21)
Share Devices
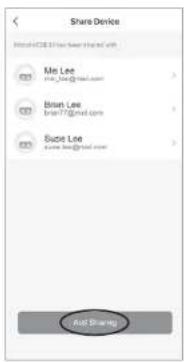
- Only one main ID for one single device is available. If you want to share the device to others in your family, tap on the top right corner and choose "Share device" (Fig 21)
- Type the correct registered cell phone number/email ID to add additional users (Fig 22) (Other users have to register TUYA ID before being added)
Reset WIFI
- Changing the connection from existing WIFI network to new WIFI network, you need to re-connect your robot to the new WIFI network after initializing your robot as step 7 and step 8 then you could connect it to new network
\*\*NOTE\*\*
The APP software is upgrading, the actual APP user interface may be different from the statements in this manual. Some functions may be added while some functions mentioned above may be deleted. As different countries have different networking policy, the real time map displaying function may be delayed or may not be fulfilled. If other languages' version of this APP instruction is confusing or inaccurate, please refer to English version. Our company reserves the right to change the parameters without prior notice.
Trouble Shooting
| Prompt ToneNo Cause of Failure Solution | ||
| 1 | Robot off ground Robopress the cleaning key again suspended Please put the Robot back to the ground and | Return the dust box to the Robot and press thecleaning key again |
| 2 | Dust containerisnt installed Dust box removedand not installed | Contact our customer service department totest battery |
| 3 | Battery failure Abnormal batterycharging | Check whether the wheel is entangled withforeign objects and clean up the entangledobjects |
| 4 | Drive wheel stuck Wheel jammed Check | Check whether the front bumper can reboundnormally |
| 5 | Bumper stuck Front bumperstuck | Check whether can access internet whenconnection is done |
| 6 | Connection failed Robot connectedto server failure | Robot automatically enters the recharge mode |
| 7 | Low power,please charge Battery power lessthan 20% | Check whether the side brush is wound by wireand clean up the wound |
| 8 | Side brush stuck Abnormal edgebrushing | Please move the Robot to an empty place andpress the cleaning key again |
| 9 | Please move theRobot to theopen area Robot failed to getout of trouble | Please move the Robot to an empty place andpress the cleaning key again |
- KHIND®
- Safety Precaution Information Safety Precaution Information
- SAFETY AND WARNING INFORMATION
- RISK OF PERSONAL INJURY
- !
- SAFETY CONCERN WITH LI-ION BATTERIES
- WARNING!
- Cleaning & Maintenance
- Dust Container and Filters
- Water Tank and Mopping Cloth
- Rolling Brush
- Side Brushes
- Replace the Side Brushes
- Clean the Sensors and Charging Pins
- Parts Identification
- Robot Front View
- Robot Back View
- Dust Box
- Charging Dock
- Water Tank and Mopping Cloth
- Remote Control
- [Battery type: 2 pieces of leak-proof UM4
- AAA 1.5V battery (not provided)]
- (Using dust tank -Edge / Room cleaning mode available;
- Accessories
- How To Use
- Product Usage (Preparation)
- Product Use / Host Charging
- Warning:
- ATTENTION:
- Product Usage (Select Cleaning Mode)
- Auto Cleaning
- Spot Cleaning
- Edge Cleaning
- Single Room Cleaning
- Manual Cleaning
- Set Time and Scheduled Cleaning
- Set a Scheduled Cleaning
- Recharging
- Mopping / Water Tank
- Scan to download APP ( TUYA Smart )
- Quick Guide
- APP Operations
- Scheduling
- Start / Pause / Standby / Sleeping mode, Working Map and Cleaning Record
- Find Robot
- Mute
- Supported Third-party Control
- Share Devices
- Reset WIFI
- \*\*NOTE\*\*
Brand : Khind
Model : VC9E31
Category : Vacuum Cleaner