IAP-3125UVF - Air purifier Imarflex - Free user manual and instructions
Find the device manual for free IAP-3125UVF Imarflex in PDF.


| Product Type | Air Purifier with Bladeless Fan |
| Brand | Imarflex |
| Model | IAP-3125UVF |
| Power Supply | 230V a.c., via DC adaptor |
| Fan Speed Settings | 9 speeds |
| Airflow (CADR) | 55 CFM (High) |
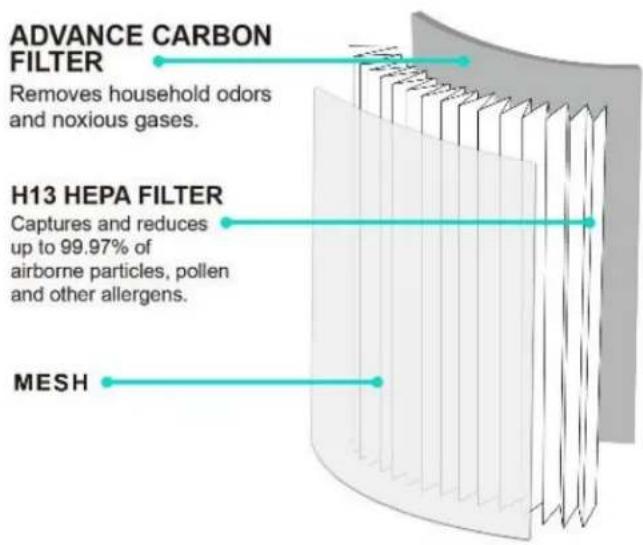
| Filter Type | H13 HEPA Filter + Advanced Carbon Filter |
| Filter Replacement Interval | Approximately every 6 months |
| Filter Replacement Indicator | Yes |
| UV-C Sterilization | Yes, auto-off after 1 hour |
| Plasma Ion Generator | Yes |
| Modes | Max, Natural, Sleep, Auto |
| Timer | 1 to 8 hours auto-off |
| Oscillation | 80° oscillation |
| Air Tilt | 15° front and 15° back |
| Child Lock | Yes, via remote control |
| Control Method | Touch control panel + Remote control |
| Remote Control Battery | CR2025 (coin cell) |
| Power Consumption (High) | 35W |
| Power Consumption (Sleep) | 6.7W |
| Noise Level | Not specified |
| Dimensions | Not specified |
| Weight | Not specified |
| Cleaning Instructions | Wipe surface with damp cloth; do not immerse |
| Safety Features | Overheat protection? (not explicitly stated), child lock, auto-off timer |
Frequently Asked Questions - IAP-3125UVF Imarflex
User questions about IAP-3125UVF Imarflex
0 question about this device. Answer the ones you know or ask your own.
Ask a new question about this device
Download the instructions for your Air purifier in PDF format for free! Find your manual IAP-3125UVF - Imarflex and take your electronic device back in hand. On this page are published all the documents necessary for the use of your device. IAP-3125UVF by Imarflex.
USER MANUAL IAP-3125UVF Imarflex
UV
AIR PURIFIER
BLADELESS FAN

LED UV-C

Plasma Ion Generator

4 Mode Settings

HEPA Filter

9 Fan Speed Settings

DC Motor
TOUCH
Sensitive CONTROL PANEL
CADR: 55CFM
- Child-lock Feature
- Filter Replacement Indicator
- Up to 8-hour Timer
When using electrical appliances, basic safety precautions should always be followed, including the following:
-
Read all instructions carefully.
-
Before using the air purifier, check if the voltage indicated corresponds with the convenience outlet (230Va.c.).
-
Do not use any appliance with a damaged cord or plug. If the cord is damaged it must be replaced with the same type and size or bring the unit to the nearest authorized service center.
-
Place the unit on a flat stable surface, keep it away from the edge of the counter or hang it on a safe place to avoid accidents.
-
Keep curtains, furniture, flammable materials, etc. away from the unit and from the convenience outlet where the unit is plugged in.
-
Do not place on or near a gas stove, an electric burner or in a heated oven.
-
Children should be supervised to ensure that they do not play with the appliance.
-
This appliance is not intended to be used by a person (including children) with reduced physical, sensory or mental capabilities, or lack of experience and knowledge, unless they have been given supervision or instruction concerning the use of the appliance by a person responsible for their safety.
-
After using, switch OFF and unplug the unit from the convenience outlet.
-
Do not immerse the unit in water or in any other liquid.
-
Do not use this unit other than its intended use.
-
In case of malfunctions, please bring the unit to the nearest Imarflex Authorized Service Center.
-
Keep the appliance inlet clear of any items that can block the flow of air, like soft furnishings, curtains, or hanging blinds.
-
Air inlet should be kept a minimum of 38cm away from any wall to allow adequate air flow and circulation.
-
Filter assembly is not washable. Do not immerse any part of the filter assembly in water as this can cause damage to the filter.
-
The fan should be set up dry on a horizontal platform and should not be near heat sources, corrosive air and moisture. The fan should be kept a distance of 15cm around to ensure good air circulation.
-
Avoid blocking the air inlet and air outlet when the product is in use and keep it away from curtains, to avoid blockage of inlet/outlet and obstruct the product from working properly.
-
Do not use an air purifier or similar product near the fan.
-
For household use only; not intended for any business purposes.
-
Save this instruction manual for future reference.
INTRODUCTION:
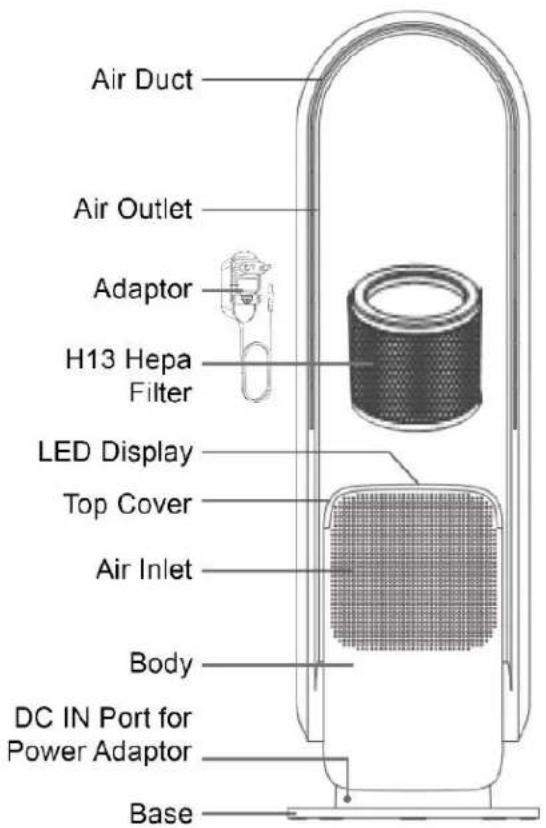
DESCRIPTION OF PARTS:
REMOTE CONTROL:
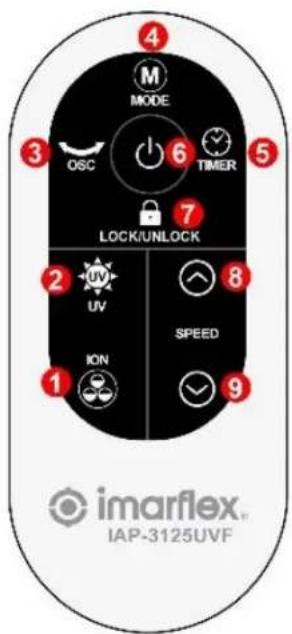
- Plasma Ion Generator
- UV-C Sterilization
- Oscillate
- Mode Settings
- Timer
- Power ON/OFF
- Lock/ Unlock
- Air Volume (+)
- Air Volume (-)
CONTROL PANEL:
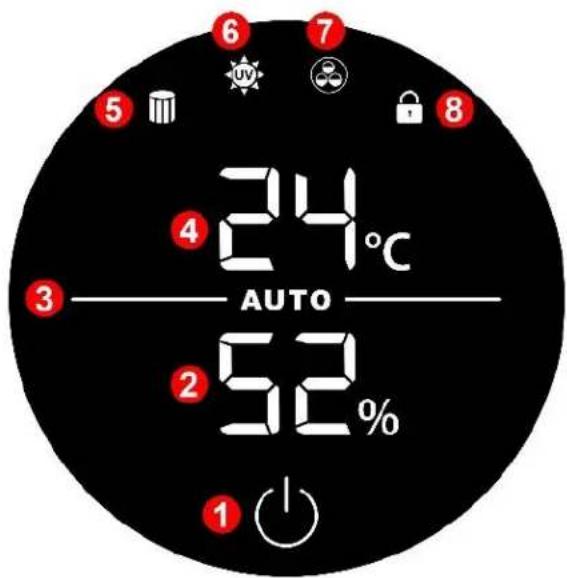
- Power ON/OFF
- Humidity Level Display
- Auto Mode
- Room Temperature Display
- Filter Inidicator
- UV-C Sterilization
- Plasma Ion Generator
- Child Lock
| ICON | DESCRIPTION |
 | ON/OFF (Unit Control)Press button once to turn ON the unit, a beep sound will be heard and the digital display will show power icon indicating that the unit is ONPress button repeatedly to adjust the wind speed from speed 1 to speed 9Press and hold for 1 second to OSCILLATEPress and hold for 2 seconds to turn OFF the unit |
 UV UV | LED UV-C (Remote)This function can be operated through remote controlRemote Control: Press button once, the digital display will show indicating that the UV function is ONUV light will automatically turn off after one (1) hour |
ION | PLASMA ION GENERATOR (Remote)Plasma Ion Technology purify the air by dispersing positive and negative ions throughout the room. The ions actively spread and can even help reduce odors from fabrics within furniture and drapery. It can also decompose formaldehydeThis function can be operated through remote controlRemote Control: Press button once, the digital display will show indicating that the Plasma Ion function is ON |
 | FILTER REPLACEMENT INDICATOR (Remote)The digital display will show indicating that the HEPA Filter needs to be replacedFollow the instruction on how to replace filter (How to Assemble – letter B to D)Remote Control: Press and hold button for 5 seconds to reset the filterThree beep sound will be heard indicating that the filter has been reset |
| 24°C | TEMPERATURE DISPLAY (Unit)Shows the actual room temperature |
 | HUMIDITY LEVEL DISPLAY (Unit)Shows the percentage of water vapors in air0% to 15% | Dry20% to 65% | Comfort70% to 99% | Humid |
 | CHILD-LOCK (Remote)Remote Control: Press button to lock and unlock the function, the digital display will show indicating that the child-lock function is ONUnit control panel keys and remote control keys cannot be used when the child-lock function is ON |
 --- --- | OSCILLATION (Unit Control & Remote)Unit Control: Press and hold button for 1 second to oscillateRemote Control: Press button to oscillateOscillate angle is 80° |
 | AUTO-OFF TIMER (Remote)Press button repeatedly to set the desired auto-off time. Auto-off timer can be set from 1 hour to 8 hoursThe unit will automatically turn off after the countdown |
 MODE MODE | MODES (Remote)Max Mode: Wind speed is set to maximum speed. The digital display will showHHNatural Mode: Wind speed will be changed among speed 3-4-5. The digital display will showSleep Mode: Wind speed is set to lowest speed. The digital display will showLLAuto Mode: Fan speed will automatically adjust according to the room temperature. The digital display will show AUTOPress button repeatedly to set the desired mode setting |
 | FAN SPEED ADJUSTMENT (Remote)Adjust to the desired speed by pressing  Speed setting can be adjusted from speed 1 to 9 Speed setting can be adjusted from speed 1 to 9 |
How to Assemble:
For Initial use, make sure to remove all packaging materials such as HEPA filter plastic bag, insulation sheet and stickers.
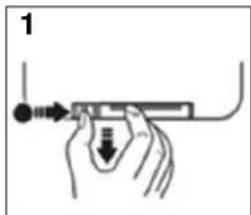
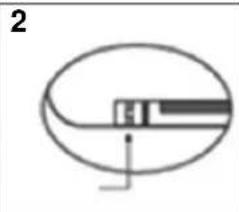
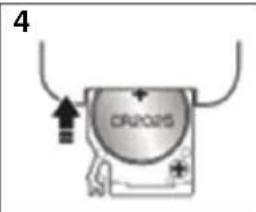
a. Remote Control
- Remove the insulation sheet before using the remote control.
- Follow the photo shown below (step 1 to step 4) on how to put the battery into the remote control
natural_image
Simple line drawing of a curved object with a rectangular element inside, no text or symbols present.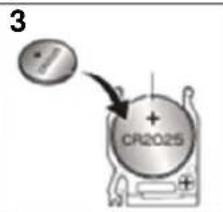
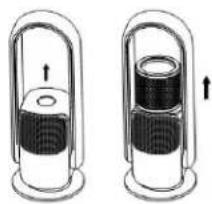
b. Remove Top Cover
- Take off the top cover.
- Lift the top cover to remove from the unit
c. Replace HEPA Filter
- Remove the HEPA Filter from the unit.
Take off the plastic bag and mark the date of first use on the blank space of the HEPA filter.
d. Install the Top Cover
- Place the new HEPA Filter inside the unit body.
- Put the top cover and the magnetic cover will snap into place automatically.
natural_image
Two mechanical components with arrows indicating motion, no visible text or symbols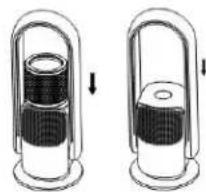
natural_image
Two mechanical components with curved arms and internal black components, shown from different angles (no text or symbols)How to Use:
- Connect the power adaptor into the DC IN port at the back of the unit.
- Make sure that the filter is properly placed before turning ON the unit.
- Plug the unit into the convenience outlet. A beep sound will be heard.
- Press power button once to turn ON the unit (Unit & Remote Control).
- Select the desired speed or mode setting.
a. Unit Control: Press power button repeatedly to adjust the wind speed from speed 1 to speed 9.
b. Remote Control: Adjust to the desired speed by pressing up and down.
- Select the desired mode setting through remote control.
a. Press Mode button repeatedly to set the desired mode setting.
b. Max Mode: Wind speed is set to maximum speed. The digital display will show HH .
c. Natural Mode: Wind speed will be changed among speed 3-4-5. The digital display will show -- .
d. Sleep Mode: Wind speed is set to lowest speed. The digital display will show LL.
e. Auto Mode: Fan speed will automatically adjust according to the room temperature. The digital display will show AUTO.
| Speed | Wattage | Wind speed (m/s) | RPM | CADR(CFM) |
| High | 35W | 3.6m/s | 7150RPM | 55CFM |
| Medium | 11.5W | 1.8m/s | 4200RPM | 27CFM |
| Low | 6.7W | 1.0m/s | 2600RPM | 15CFM |
| Sleep | 6.7W | 1.0m/s | 2600RPM | 15CFM |
- AUTO-OFF TIMER (Remote Control)
a. Select the desired auto-off time.
b. Press timer button repeatedly to set the desired auto-off time.
c. Auto-off timer is from 1hr to 8hrs.
- CHILD-LOCK (Remote Control)
a. Remote Control: Press child-lock button to lock and unlock the function, the digital display will show 🔒 indicating that the child-lock function is ON.
- UV (Remote Control)
a. Press UV button, the digital display will show ▶ indicating that the UV function is ON.
*Note: UV light will automatically turn off after one (1) hour.
- FILTER REPLACEMENT INDICATOR (Remote Control)
a. The digital display will show 📋 indicating that the HEPA Filter needs to be replaced.
b. Follow the instruction on how to replace filter (How to Assemble – letter B to D).
c. Press and hold power button for 5 seconds to reset the filter.
d. Three beep sound will be heard indicating that the filter has been reset.
- PLASMA ION GENERATOR (Remote Control)
a. Press plasma button once, the digital display will show ⚙ indicating that the Plasma Ion function is ON.
- OSCILLATION
a. Unit Control: Press and hold for 1 second to oscillate.
b. Remote Control: Remote Control: Press OSC button to oscillate.
c. Oscillate angle can be adjusted 80^ .
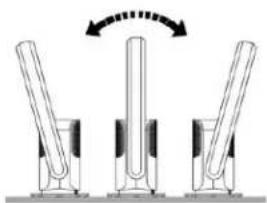
- AIR TILT
a. Adjust the air duct angle according to the desired angle.
b. Air tilt can be adjusted 15^ front and 15^ back.
- Unplug the unit after every use.
natural_image
Diagram of three identical mechanical components with curved arrows indicating motion or rotation (no text or symbols)Cleaning and Maintenance:
- Unplug the unit from the convenience outlet before moving or cleaning.
- Wipe the surface with a damp cloth and polish with a soft, dry cloth.
- Do not use detergents or abrasive cleaners.
- Do not immerse the unit in water or in any other liquid.
- Make sure that the unit is completely dry.
- The HEPA Filter is replaceable and not washable. Do not immerse the filter in water or in any other liquid as this can cause damage to the filter.
*Note: The filter should be replaced approximately after 6 months of use.
REMINDER: Please do not forget to fill up and send the warranty card with a copy of the receipt to our email address imarflexfb@evergoodinc.com
Distributed By: Sabretech Technology Inc.
103-113 Sen Gil Puyat Ave. Pasay
Made in China
Brand : Imarflex
Model : IAP-3125UVF
Category : Air purifier