
ECH/ECN-1000 M EEC - Heating ELECTROLUX - Free user manual and instructions
Find the device manual for free ECH/ECN-1000 M EEC ELECTROLUX in PDF.


| Product Type | Electric convection heater |
| Model | ECH/ECN-1000 M EEC |
| Rated Power | 900-1000 W |
| Rated Voltage | 220-240 V ~ 50/60 Hz |
| Rated Current | 4.09-4.16 A |
| Heating Area | Up to 12 m² |
| Dimensions (W×H×D) | 480 × 405 × 95 mm |
| Net Weight | 3.30 kg |
| Gross Weight | 4.00 kg |
| Ingress Protection | IP20 |
| Protection Class | Class I |
| Thermostat Control | Mechanical thermostat with knob |
| Overheat Protection | Automatic shut-off |
| Operating Temperature Range | -25°C to +30°C |
| Storage Temperature Range | -20°C to +80°C |
| Installation Method | Floor-standing with included wheeled chassis |
| Control Type | On/Off switch and temperature regulator |
| Material | Metal body |
| Color | White (typical) |
| Warranty | 2 years |
| Included Accessories | Chassis set with wheels, fasteners, user manual |
| Recommended Use | Well-insulated spaces, occasional use |
| Cleaning Method | Wipe with soft, lint-free cloth or damp sponge; no abrasives |
Frequently Asked Questions - ECH/ECN-1000 M EEC ELECTROLUX
Tip: For large rooms, set the temperature 2-3°C higher than desired.
Important: Ensure air vents are never blocked.
Typical clearance: At least 50 cm from flammable materials.
Note: Consumables and glass parts are not covered.
User questions about ECH/ECN-1000 M EEC ELECTROLUX
0 question about this device. Answer the ones you know or ask your own.
Ask a new question about this device
Download the instructions for your Heating in PDF format for free! Find your manual ECH/ECN-1000 M EEC - ELECTROLUX and take your electronic device back in hand. On this page are published all the documents necessary for the use of your device. ECH/ECN-1000 M EEC by ELECTROLUX.
USER MANUAL ECH/ECN-1000 M EEC ELECTROLUX
GB · Electric convection heater · User's manual
Fill your life with comfort
Get quick access to instructions, additional product information and support at our website home-comfort.com
- ENGLISH....4
- SHQIP 14
- POLSKI 24
- ROMÂNĂ....34
4 www.home-comfort.com
CONTENT
- INTRODUCTION......5
- SAFETY REGULATIONS 5
- PURPOSE OF THE DEVICE....5
- GENERAL VIEW OF THE DEVICE....5
- CONTROL UNIT DEVICE 5
- PREPARATION FOR WORK....6
- TURNING ON THE DEVICE....6
- SETTING THE TEMPERATURE....6
- FUNCTION......6
- INSTALLATION OF THE DEVICE....6
- CARE 7
- TROUBLESHOOTING 7
- SPECIFICATIONS 8
- COMPLETING UNITS 8
- STORING THE APPLIANCE 8
- RECYCLING......8
- WARRANTY....8
- DATE OF PRODUCTION 9
WE THINK ABOUT YOU
Thank you for purchasing an Electrolux appliance. You have chosen a product, backed by decades of professional experience and innovations. Unique and stylish, it was created with care for you. Therefore, whenever you use it, you can be sure that the results will always be excellent. Welcome to Electrolux!
On our website you can:

Find product recommendations, user manuals, maintenance information: www.home-comfort.com/support/

Buy a product in your city: www.home-comfort.com/search/find-a-store/

While selling this device, dealer must fill "Product details" section located on the inside of the back cover of this manual.
Designation
Caution/Important safety information
i Common information and recommendations
Warranty service is performed according to the terms specified in the "Warranty" section.
Note:
In the text of this manual, the electric convector may have such technical names as appliance, device, vehicle etc.
This product is only suitable for well insulated spaces or occasional use.
Introduction
Please read and strictly follow the requirements contained in this manual. Please keep the manual and documents confirming the date of purchase of the device in a safe place for easy retrieval and use.
The device is intended for air heating in household premises.
Safety regulations

Caution!
Non-following the manual can cause serious injury or serious equipment damage.
When using the device, observe the general safety rules when using electrical devices. Failure to follow safety instructions and instructions can result in electric shock, fire and/or serious injury. Before using the device, carefully read the following safety rules:
- When the heater is turned on for the first time, a characteristic smoke smell may occur due to the burning of oil in the heating elements. It is recommended to turn on the heater for 10-20 minutes in a well-ventilated area before installation.
- Any electrical appliance should be supervised, especially if there are children nearby. Make sure that children do not touch the device with their hands.
- Do not use the convector with damaged and/or damaged or frayed power cable.
- The mains cable must be positioned so that it is not stepped on, that it is not abraded, torn, kinked or otherwise damaged.
- Do not allow foreign objects or liquids to enter the inside of the device.
- Always place the appliance in such a way in such a way as to prevent the possibility of ignition of flammable materials (for example, curtains). Make sure nothing is blocking the inlet and outlet ducts. To avoid fire, do not put clothing or other items on the device.
- Make sure that the bodies of the device and its heating element have cooled down, before the device is dismantled and packed for long-term storage.
- Do not use the device in open spaces
outdoors.
ENGLISH
- Make sure that the mains voltage corresponds to that indicated on the label of the device.
- Do not try to repair the device yourself. Please contact your dealer.
- Unplug the device from the mains when not in use and before cleaning.
Purpose of the device
The device is designed for heating air in the household premises.
General view of the device
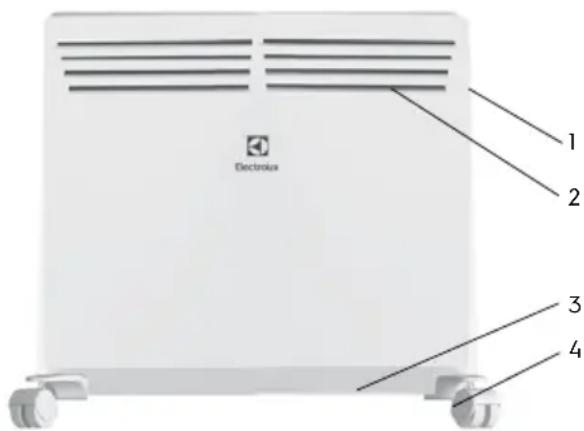
Figure 1
- Control unit
- Ventilation vents
- Ventilation inlets
- Set of the chassis with the rollers.
Control unit device
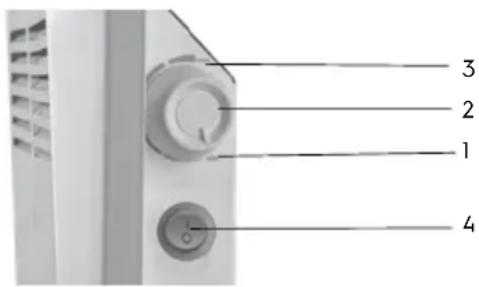
Figure. 2 Control unit
- Minimum temperature
- Temperature regulator
- Maximum temperature
- On / Off
Preparation for work
- Carefully remove the heater from the cardboard box.
- Remove the colored stickers from the front panel before use.
- At the first start-up, some odor may appear, which will disappear after the con-vector starts to work.
- Fix the device in a stable position according to the assembly and installation instructions.
- After installing the convector, plug it into a power outlet. It is not recommended to use the same electrical outlet for simultaneous plugging in heater and other high power electrical appliance.
Turning on the device

Insert the plug into a power outlet, the power indicator will light up and stay on. Set the on / off button on the control unit to the mode, or turn the thermostat control knob on the top panel to the right, so that the device starts working and you can select the required heating temperature. If the ambient temperature is lower than the set one, the convector starts to work, if the ambient temperature becomes higher than the set one, the device automatically turns off and goes into standby mode, and then turns on again when the room temperature drops.
Setting the temperature
To set the required heating temperature and maintain a constant room / premises temperature, turn on the device at full power, turn the thermostat control knob to the right to the maximum value.
When the room / premises temperature reaches a comfortable level for you, slowly turn the thermostat control knob to the left until you hear a click. Thus, the device will remember the temperature that is comfortable for you and will maintain it by automatically switching on and off.

The difference between the on / off temperatures for the set value can be
between 0.1 °C and 3 °C, depending on the volume and thermal insulation of the room / premises. We recommend that when operating the device in large rooms / premises subject to rapid cooling, set the temperature 2 - 3 °C higher than the desired one for more efficient operation of the heater.
"Overheating protection" function
The device is equipped with an automatic switch that is activated when the upper temperature limit is reached. The heater switches off automatically in case of overheating. After eliminating the source of overheating, the heater will turn on automatically.
Installation of the device
The device must be fixed in accordance with the regulations.
The switch and other mechanisms must stay away from splashing water. It is strictly forbidden to cover or plug the air inlets or outlets (grilles), due to the risk of accident or damage to the device. Do not place behind curtains, doors, wall or air vents. Observe the minimum installation distances on floors, surfaces, furniture, etc (Figure. 3).
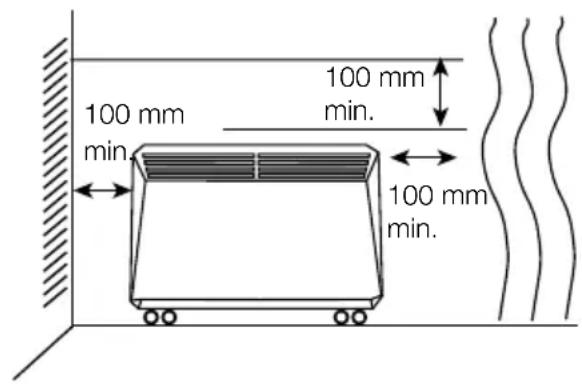
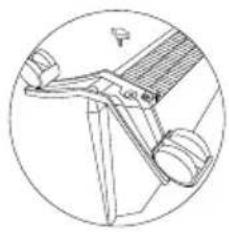
Using the chassis (supplied separately), having previously studied the mounting scheme (Fig. 6), install the device on the floor:
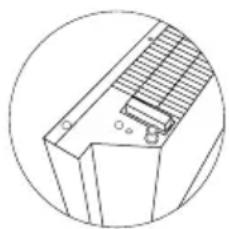
- Carefully turn the convector upside down (Fig. 4).
- Take one of the chassis and attach to the landing area on the right or left side of the
convector so that it fits snugly against the convector body.
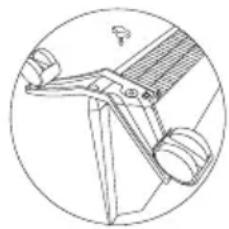
- Secure the chassis using the supplied mount (Fig. 5).
- Repeat the same procedure for attaching the second chassis.
natural_image
Technical line drawing of a mechanical component with no visible text or symbols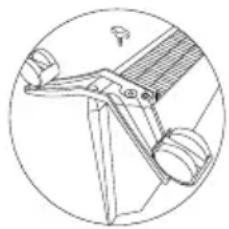
natural_image
Technical line drawing of a mechanical lever assembly (no text or symbols)Figure. 4 Figure. 5
Care
The convector does not require any special maintenance. Before servicing (leaving) the
convector must be disconnected from the power supply.
The body of the device should be periodically wiped with a soft, lint-free cloth or damp sponge. Never use abrasive, foaming detergents or solvents. It is quite easy to clean the space behind a wall-mounted heater.
Press down the two latches on the back of the heater and pull the heater forward. After it is removed, you can wash the wall on which it was installed.
After finishing cleaning, put the heater back in its normal operating position.
Recommended indoor temperature and humidity:
a) for the convector operation: from -25°C to +30°C, humidity from 40% to 90%;
b) for the storage of the convector: from -20^ to +80^ , humidity from 40% to 90%.
Troubleshooting
| Malfunction symptom | Cause of malfunction Troubleshooting steps | |
| No heating | 1) There is no power supply.2) The convector is in standby mode.3) The actual room temperature is higher than the thermostat setting. | 1) Establish a reliable connection.2) Set the convector to operating mode.3) Adjust the temperature mode of the convector. |
| Smell of burnt dust when first turned on | Not a malfunction | The smell disappears after a few minutes of convector operation |
If after trying all the troubleshooting steps, the problem is not resolved, contact an authorized service center in your area or your sales representative.
Specifications
| Model | ECH/ECN-1000 M EEC | ECH/ECN-1500 M EEC | ECH/ECN-2000 M EEC |
| Rated power consumption, W 900-1000 1350-1500 1800-2000 | |||
| Rated current, A 4.09-4.16 6.14-6.25 8.18-8.33 | |||
| Rated voltage, V~Hz 220-240~50-60 220-240~50-60 220-240~50-60 | |||
| Ingress protection class IP20 IP20 IP20 | |||
| Electrical protection class | I | I | I |
| Heating area, m^2* | 10-12 | 13-15 | 18-20 |
| Appliance size (W×H×D), mm | 480×405×95 | 640×405×95 | 800×405×95 |
| Packing size (W×H×D), mm | 510×445×145 | 670×445×145 | 830×445×145 |
| Net weight, kg | 3.30 | 4.15 | 5.25 |
| Gross weight, kg | 4.00 | 5.00 | 6.28 |
* Indicated is a guideline value and may differ depending on actual conditions of use

The convector is supplied with a sticker on the front panel. Remove it before using the device.
Completing units
- Electric heater
- Aset of fasteners
- Operation manual
- Chassis set with wheels
Storing the appliance
Make sure the heater is cool before storing it. It is recommended to clean the heater and store (preferably in the original packaging) in a cool dry place in case you plan not to use device for a long time.
Recycling

The time-expired appliance can't be disposed with household waste (2012/19/EU).
Warranty
Warranty service is performed according to the terms specified in the "Warranty" section.
Warranty:
- Warranty period for the item is two years from the purchase date. If any defects occur due to defects in materials and/or workmanship during this two-year warranty period, the item should be repaired or replaced.
- Free maintenance or replacement is possible only in case if convincing evidence is provided, for example a stub, which confirms that the day when the service is requested, is within the warranty period.
- The warranty does not cover products and/or parts of the product that are subjects to deterioration, may be considered as expendable supplies or which are made of glass.
- The warranty is void if the defect is caused by damage ensuing by misuse, poor maintenance (for example, a failure occurred due to ingress of foreign objects or liquids) or if changes or repairs were performed by persons not authorized by the Manufacturer.
- For the correct use of the product, the user must strictly follow all included in the manual instructions, and also must avoid any action or manipulation described as unwanted or indicated so in this manual.
- These warranty restrictions do not affect your statutory rights.
Support:
The support during and after the warranty period is available in all countries where
the product is officially distributed. Please contact your dealer for help.
Date of manufacture
The date of manufacture is indicated on a sticker on the body of the appliance, and also encrypted in Code-128. The date of manufacture is determined as follows:

month and year of production
Do not remove and keep safe the serial number on the device's body. If the serial number sticker is lost or damaged, it will not be possible to restore the production date if necessary.
Importer:
Manufacturer: CladSwiss AG, Bahnhofstrasse 27, 6300 Zug, Switzerland. E-mail: info@cladswiss.com
Made in PRC.
Electrolux is a registered trademark used under license from AB Electrolux (publ.).
The manufacturer reserves the right to modify the design and characteristics of the device.
This manual may contain technical and typing errors. Changes to technical characteristics and assortment are subject to change without notice.
Mistakes and typing errors may be permitted in texts and numeric notations.
Product design and technical data may vary from the one pictured on the packaging.
Please refer to a sales consultant for more detailed information.
| Information requirement for the electric local space heaters | |||||
| Model identifier(s): ECH/ECN-1000 M EEC | |||||
| Item Symbol Value Unit Item Unit | |||||
| Heat output | Type of heat input, for electric storage local space heaters only (select one) | ||||
| Nominal heat output | P_nom | 0.9-1.0 kW | manual heat charge control, with integrated thermostat | NO | |
| Minimum heat output (indicative) | P_min | 0.81 kW | manual heat charge control with room and/or outdoor temperature feedback | NO | |
| Maximum continuous heat output | P_max,c | 1.05 kW | electronic heat charge control with room and/or outdoor temperature feedback | NO | |
| Auxiliary electricity consumption fan assisted | heat output NO | ||||
| At nominal heat output | eI_max | 0 kW | Type of heat output/room temperature control (select one) | ||
| At minimum heat output | eI_min | 0 kW | single stage heat output and no room temperature control | NO | |
| In standby mode | eI_SB | 0 kW | two or more manual stages, no room temperature control | NO | |
| with mechanic thermostat room temperature control | YES | ||||
| with electronic room temperature control NO | |||||
| electronic room temperature control plus day timer | NO | ||||
| electronic room temperature control plus week timer | NO | ||||
| Other control options (multiple selections possible) | |||||
| room temperature control, with presence detection | NO | ||||
| room temperature control, with open window detection | NO | ||||
| with distance control option NO | |||||
| with adaptive start control | NO | ||||
| with working time limitation | NO | ||||
| with black bulb sensor | NO | ||||
| Contact details | Manufacturer: CladSwiss AG, Bahnhofstrasse 27, 6300 Zug, Switzerland.E-mail: info@cladswiss.com | ||||
| Model identifier(s): ECH/ECN-1500 M EEC | |||||
| Item Symbol Value Unit Item Unit | |||||
| Heat output | Type of heat input, for electric storage local space heaters only (select one) | ||||
| Nominal heat output | P_nom | 1.35-1.5 kW | manual heat charge control, with integrated thermostat | NO | |
| Minimum heat output (indicative) | P_min | 1.215 kW | manual heat charge control with room and/or outdoor temperature feedback | NO | |
| Maximum continuous heat output | P_max,c | 1.575 kW | electronic heat charge control with room and/or outdoor temperature feedback | NO | |
| Auxiliary electricity consumption fan assisted | heat output NO | ||||
| At nominal heat output | el_max | 0 kW | Type of heat output/room temperature control (select one) | ||
| At minimum heat output | el_min | 0 kW | single stage heat output and no room temperature control | NO | |
| In standby mode | el_SB | 0 kW | two or more manual stages, no room temperature control | NO | |
| with mechanic thermostat room temperature control | YES | ||||
| with electronic room temperature control NO | |||||
| electronic room temperature control plus day timer | NO | ||||
| electronic room temperature control plus week timer | NO | ||||
| Other control options (multiple selections possible) | |||||
| room temperature control, with presence detection | NO | ||||
| room temperature control, with open window detection | NO | ||||
| with distance control option NO | |||||
| with adaptive start control | NO | ||||
| with working time limitation | NO | ||||
| with black bulb sensor | NO | ||||
| Contact details | Manufacturer: CladSwiss AG, Bahnhofstrasse 27, 6300 Zug, Switzerland.E-mail: info@cladswiss.com | ||||
| Model identifier(s): ECH/ECN-2000 M EEC | |||||
| Item Symbol Value Unit Item Unit | |||||
| Heat output | Type of heat input, for electric storage local space heaters only (select one) | ||||
| Nominal heat output | P_nom | 1.8-2.0 | kW | manual heat charge control, with integrated thermostat | NO |
| Minimum heat output (indicative) | P_min | 1.62 | kW | manual heat charge control with room and/or outdoor temperature feedback | NO |
| Maximum continuous heat output | P_max,c | 2.1 | kW | electronic heat charge control with room and/or outdoor temperature feedback | NO |
| Auxiliary electricity consumption fan assisted heat output NO | |||||
| At nominal heat output | el_max | 0 kW | Type of heat output/room temperature control (select one) | ||
| At minimum heat output | el_min | 0 kW | single stage heat output and no room temperature control | NO | |
| In standby mode | el_SB | 0 kW | two or more manual stages, no room temperature control | NO | |
| with mechanic thermostat room temperature control | YES | ||||
| with electronic room temperature control NO | |||||
| electronic room temperature control plus day timer | NO | ||||
| electronic room temperature control plus week timer | NO | ||||
| Other control options (multiple selections possible) | |||||
| room temperature control, with presence detection | NO | ||||
| room temperature control, with open window detection | NO | ||||
| with distance control option NO | |||||
| with adaptive start control NO | |||||
| with working time limitation NO | |||||
| with black bulb sensor NO | |||||
| Contact details | Manufacturer: CladSwiss AG, Bahnhofstrasse 27, 6300 Zug, Switzerland.E-mail: info@cladswiss.com | ||||
PERMBAJTJE
- HYRJE 15
- RREGULLAT E SIGURISË 15
- QËLLIMI I PAJISJES....15
- PAMJA E PËRGJITHSHME E PAJISJES 15
- BLLOKU | KONTROLLIT....15
- FILLIMI 16
- NDIZNI PAJISJEN 16
- PËRZGJEDHJA E TEMPERATURËS 16
- FUNKSIONI 16
- INSTALIMI DHE MONTIMI 16
- MIRËMBAJTJA 17
- ZGJIDHJA E DEFEKTEVE 17
- SPECIFIKIMET 18
- PËRMBAJTJA E PAKETIMIT 18
- RUAJTJE E PAJISJES 18
- RICIKLIMI....18
- DETYRIMET E GARANCISË....18
- DATA E PRODHIMIT....19
NE MENDOJMË PËR JU
natural_image
Technical line drawing of a mechanical component with no visible text or symbolsFig. 4 Fig. 5
natural_image
Technical line drawing of a mechanical component with no visible text or symbolsMirëmbajtja
Bahnhofstrasse 27, 6300 Zug, Zvicër.
E-mail: info@cladswiss.com
E prodhuar në Kinë.
natural_image
Technical line drawing of a mechanical component with no visible text or symbols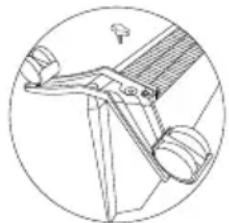
natural_image
Technical line drawing of a mechanical component with no visible text or symbolsRys. 4 Rys. 5
Obstuga
natural_image
Technical line drawing of a mechanical component with no visible text or symbolsFig. 4
natural_image
Technical line drawing of a mechanical component inside a circular frame (no text or symbols)Fig. 5
Îngrijire
You can get additional information about this and other products directly from the Seller or through our information lines:
About the equipment purchase and cooperation:
Tel: +41 41 532 50 00
E-mail: info@cladswiss.com
For technical and service issues:
Tel. +41 41 532 50 01
E-mail: service@cladswiss.com
Internet address: www.home-comfort.com
Product Details (populated upon sale) · Detajet e produktit (të populluara pas shitjes)
- Szczegóty produktu (wypełniane w momencie sprzedaży) • Informații despre articol (se completează la vânzare) • Информация за продукта (попълва се при продажба)
- Informace o produktu (vyplní se při prodeji) • Információ az áruról (eladáskor kitöltendő)
- Detalji o proizvodu (popunjeni prilikom prodaje) • Podaci o proizvodu (popunjava se prilikom prodaje) • Informacije o izdelku (izpolnite ga ob prodaji) • Informácie o produkte (vyplni sa pri predaji) • Информации за производот (што треба да се пополнат кога производот се продава) • Плпрофорієс για το проїо́ν (να συμπληρωθούν κατά την πώληση)
Model · Modelul · Модел
• Modell • Movtélo
Electrolux is a registered trademark used under license from AB Electrolux (publ.).
This manual may contain technical and typing errors. Changes to technical characteristics and assortment are subject to change without notice.
CE ⊕ RoHS IP20

natural_image
Abstract graphic with recycling symbol, waste bin icon, and pink square (no text or labels)- Fill your life with comfort
- www.home-comfort.com
- CONTENT
- WE THINK ABOUT YOU
- Designation
- Note:
- Introduction
- Safety regulations
- Caution!
- Purpose of the device
- General view of the device
- Control unit device
- Preparation for work
- Turning on the device
- Setting the temperature
- "Overheating protection" function
- Installation of the device
- Care
- Completing units
- Storing the appliance
- Recycling
- Warranty
- Warranty:
- Support:
- Date of manufacture
- PERMBAJTJE
- NE MENDOJMË PËR JU
- Mirëmbajtja
- Obstuga
- Îngrijire
Brand : ELECTROLUX
Model : ECH/ECN-1000 M EEC
Category : Heating