
EHS 8675 P - Heating ELECTROLUX - Free user manual and instructions
Find the device manual for free EHS 8675 P ELECTROLUX in PDF.


| Product Type | Ceramic glass induction hob |
| Brand | Electrolux |
| Model | EHS 8675 P |
| Dimensions (Width x Depth x Height) | 780 mm x 520 mm x 48 mm |
| Worktop Cut-out Dimensions (Width x Depth) | 750 mm x 490 mm |
| Power Supply | 230 V~50 Hz, max 7.1 kW |
| Number of Cooking Zones | 4 (front left: 120/175/210 mm, rear left: 145 mm, rear right: 170/265 mm, front right: 145 mm) |
| Triple Ring Cooking Zone | Yes (front left zone, booster for middle and outer rings) |
| Casserole Zone | Yes (rear right zone, round/oval) |
| Automatic Warm-up Function | Yes, on all zones, with adjustable heat settings and automatic warm-up times |
| Timer | Yes, automatic switch-off for each zone, minute minder function |
| Residual Heat Indicator | Yes (H displayed until zone cools) |
| Safety Cut-out | Yes, automatic switch-off after max 6 hours depending on heat setting |
| Control Panel Lock | Yes (child safety feature, locks all except On/Off) |
| Control Type | Touch control sensor fields |
| Heat Settings | 9 levels (1-9) plus keep warm setting |
| Cleaning | Ceramic glass surface; use damp cloth and ceramic cleaner; glass scraper for stubborn soiling |
| Installation Type | Flush-mounted, must be installed by qualified personnel |
| Warranty | 24 months (Australia and New Zealand), subject to terms |
Frequently Asked Questions - EHS 8675 P ELECTROLUX
User questions about EHS 8675 P ELECTROLUX
0 question about this device. Answer the ones you know or ask your own.
Ask a new question about this device
Download the instructions for your Heating in PDF format for free! Find your manual EHS 8675 P - ELECTROLUX and take your electronic device back in hand. On this page are published all the documents necessary for the use of your device. EHS 8675 P by ELECTROLUX.
USER MANUAL EHS 8675 P ELECTROLUX
Installation and Operating Instructions

EHS 8675 P
Dear customer,
Please read these operating instructions carefully.
Pay particular attention to the section "Safety information" on the first few pages. Please retain these operating instructions for later reference. Pass them on to possible new owners of the appliance.
The following symbols are used in the text:

Safety instructions
Warning: Information concerning your personal safety.
Important: Information on how to avoid damaging the appliance.

Information and practical tips

Environmental information
- These numbers indicate step by step how to use the appliance.
2....
3....
These operating instructions contain information on steps you can take yourself to rectify a possible malfunction. Refer to the section "What to do if...".
Contents
Operating Instructions 4
Safety 4
Disposal 5
The Key Features of Your Appliance....6
Description of the Appliance 7
Cooking zones and control panel 7
Digital Displays 8
Cooking Zone Safety Cut-out....8
Before Using for the First Time 9
Initial Cleaning....9
Operating the Hob. 9
Touch Control Sensor Field. 9
Switching On the Appliance 9
Switching Off the Appliance 9
Cooking Zone Selection 10
Heat Setting Selection 10
Switching the Triple Ring Cooking Zone On and Off 10
Switching the Casserole Zone On and Off 11
Switching off a Cooking Zone. 12
Residual Heat Indicator. 12
Cooking with the Automatic Warm up Function.... 13
Cooking without the Automatic Warm up Function 14
Locking/Unlocking the Control Panel 14
Timer 15
Uses, Tables and Tips.... 17
Pans 17
Advice on Cooking with and without Automatic Warm up.... 18
Cleaning and Care 20
Hob 20
What to do if .... 22
Rectifying faults.... 22
installation Instructions 23
Technical Data.... 23
Regulations, Standards,
Directives 23
Safety Instructions for the Installer 24
Electrical Connection 25
Rating Plate. 25
Assembly 26
Guarantee Conditions 29
Service 31
Operating Instructions
⚠ Safety
The safety aspects of this appliance comply with accepted technical standards and the German Appliance Safety Law. However, as manufacturers we also believe it is our responsibility to familiarise you with the following safety instructions.
Electrical Safety
- The installation and connection of the new appliance must only be carried out by qualified personnel.
- Repairs to the appliance are only to be carried out by approved service engineers. Repairs carried out by inexperienced persons may cause injury or serious malfunctioning. If your appliance needs repairing, please contact your local customer center or your dealer.
i Please follow these instructions, otherwise the warranty will not cover any damage that may occur.
- Flush-mounted appliances may only be operated following installation in suitable installation cabinets and workplaces which conform to the relevant standards. This ensures sufficient protection against contact for electrical units as required by the VDE [Association of German Electrical Engineers].
- If your appliance malfunctions or if fractures, cracks or splits appear:
- switch off all cooking zones,
– disconnect the hob from the electricity supply.
Child Safety
The cooking zones will become hot when you cook. Therefore, always keep small children away from the appliance.
The appliance is not intended for use by young children or infirm persons without supervision.
Young children should be supervised to ensure that they do not play with the appliance.
Safety During Use
- This appliance may only be used for normal cooking and frying in the home. It is not designed for commercial or industrial purposes.
-
Do not use the hob to heat the room.
• Take care when plugging electric appliances into mains sockets near the hob. Connection leads must not come into contact with the hot surface. -
Overheated fats and oils catch fire quickly. You should supervise cooking when preparing foods in fat or oil (e.g. chips).
- Switch off the cooking zones after use.
Safety When Cleaning
- For safety reasons do not clean the appliance with a steam jet or high pressure cleaner.
- Clean the hob in accordance with the maintenance and cleaning instructions in this manual.
How to avoid damage to the appliance
- Do not use the cooking area as a worktop or storage space.
- The frameless edge of the glass ceramic surface is susceptible to knocks. Please be careful when moving pots and pans around.
- Do not have the cook zones on with empty pans, or with no pots or pans on them.
- Ceramic glass is very tough, and impervious to sharp temperature changes, but is not unbreakable. It can be damaged if particularly hard or sharp objects fall on to it.
- Do not use pots made of cast iron, or which have damaged bases with rough edges or burrs. Moving these around may cause scratches.
- If sugar or a mixture containing sugar falls onto a hot cooking zone and melts, remove immediately, while still hot, using a kitchen scraper. If left to cool down, it may damage the surface when removed.
- Keep objects or materials liable to melt away from the ceramic glass surface, for example, artificial materials, aluminium foil, or cooking wraps. If any other materials or foodstuffs are melting on the ceramic glass surface, these should also be cleaned away immediately, using a kitchen scraper.

Disposal
Disposing of the packaging material
All materials used can be fully recycled.
Plastics are marked as follows:
-
PE< for polyethylene, as used for the outer wrapping and the bags inside.
-
PS< for polystyrene foam, e.g., as used for the padding materials. They are completely free of CFCs.
Disposal of old appliances

Warning: Before disposing of old appliances please make them inoperable so that they cannot be the source of danger.
To do this, disconnect the appliance from the mains supply and remove the mains lead.
To protect the environment, it is important that worn out appliances are disposed of in the correct manner.
• The appliance must not be disposed of with household rubbish.
- You can obtain information about collection dates or public refuse disposal sites from your local refuse department or council.
The Key Features of Your Appliance
- Ceramic glass cooking surface: The appliance has a ceramic glass cooking surface and 4 rapid response cooking zones. The particularly powerful radiant heater elements significantly shorten the amount of time taken for the zones to heat up.
- Sensor fields: Your appliance is operated using Touch Control sensor fields.
- Cleaning: The advantage of the ceramic glass cooking surface and the sensor fields is their accessibility for cleaning. The smooth, flat surface is easy to clean.
- On/Off sensor field: The "On/Off" sensor field provides the appliance with a separate mains switch. Touching this switches the power supply on or off completely.
- Control and function indicators: Digital indicators or control lamp provide information about settings made, functions activated, as well as any residual heat of the corresponding cooking zone.
- Safety cut-out: A safety cut-out ensures that all cooking zones switch off automatically after a period of time if the setting has not been changed.
- Keep warm setting: ☐ is the setting for keeping foods warm.
- Residual heat indicator: An Ⓗ for residual heat is shown in the display if the cooking zone becomes so hot that there is a risk of burning.
- Multipurpose cooking zone: The hob is equipped with a multipurpose/casserole cooking zone. Depending on the setting, it can be used as a round or oval cooking zone, e.g. for oval casseroles or for keeping dishes or food warm.
- Double and triple cooking zone: In addition the hob has a double and a triple cooking zone. This means the appliance offers cooking zones of variable sizes, suitable, for example, for smaller milk pans. This enables you to save energy.
- Timer: All zones can be automatically switched off using the integrated timer. When the end of the cooking time has been reached, the cooking zone switches off.
Description of the Appliance
Cooking zones and control panel

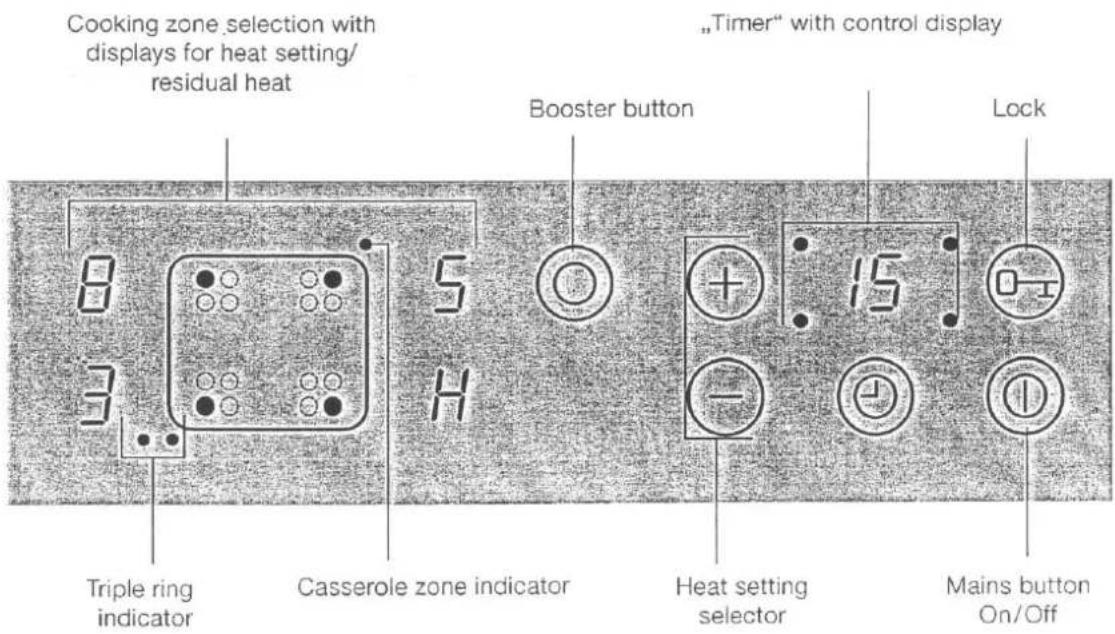
Digital Displays
The four display fields that are assigned to the four cooking zones display:
- □, after being switched on and when the safety function causes an automatic cut-out,
- ① when a cooking zone is selected,
- ☐ to ☑, depending on the selected heat setting,
- ☐ during automatic warm up,
- H when there is residual heat,
- F when there is a fault.

Cooking Zone Safety Cut-out
If one of the cooking zones is not switched off after a certain time or if the heat setting is not changed, the corresponding cooking zone switches itself off automatically.
H appears in the ring display for all rings that are switched on, and □ after they have cooled down.
The rings are switched off at:
• Heat setting 1 - 2 after 6 hours
• Heat setting 3 - 4 after 5 hours
• Heat setting 5 after 4 hours
• Heat setting 6 - 9 after 1.5 hours

If one or more cooking zones switch off before the times indicated see section "What to do if ...".
Cancelling the Safety Cut-out
To cancel the activated safety cut-out the appliance must be switched off and then on again using the ON/OFF ① sensor field. After this the cooking zones are again ready for use.
Switching Off for Other Reasons
Liquid that boils over onto the control panel causes all cooking zones to switch off immediately.
If you place a wet cloth on the control panel it has the same effect. In both cases the appliance has to be switched on again using the mains switch ① after removing the liquid or cloth.
Before Using for the First Time
Initial Cleaning
Wipe the ceramic glass surface with a damp cloth.

Important: Do not use any caustic, abrasive cleaners! The surface could be damaged.
Operating the Hob

When a cooking zone is switched on, it may hum briefly. This is a characteristic of all ceramic glass cooking zones and does not impair either the function or the life of the appliance.
Touch Control Sensor Field
To operate the Touch Control sensor field place your finger from above flat onto the required field until the appropriate displays come on or go out or the required function is carried out.
Switching On the Appliance
The entire appliance is switched on using the "On/Off" ① sensor field.
Touch the "On/Off" sensor field for approx. 2 seconds.
The digital displays will show □ and the decimal point will flash.

Once the "On/Off" sensor field has been operated to switch on the appliance, one of the cooking zones must be selected within approx. 10 seconds using the cooking zone selection buttons. Otherwise the appliance switches off again for safety reasons.
Switching Off the Appliance
To switch off the appliance completely activate the "On/Off" ① sensor field.
Touch the "On/Off" sensor field for approx. 1 second.

When an individual cooking zone or the entire hob is switched off, any residual heat is shown with an H (for "Hot") in the digital display for the appropriate cooking zones.


Cooking Zone Selection
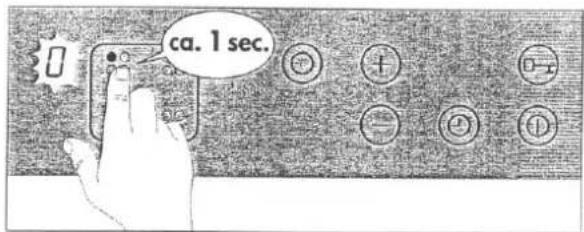
To select the required cooking zone touch the corresponding sensor field for approx. one second.
A zero with a decimal point will light up in the appropriate cooking zone display window ☐.

The decimal point indicates that settings may only be made for this cooking zone.

Heat Setting Selection
For setting and adjusting the heat setting (☐ to ☐) for the selected cooking zone.
Use sensor field ⊕ to increase the heat setting.
Lower the heat setting with sensor field .


If several cooking zones are being used simultaneously, the required cooking zone must be selected by touching the appropriate sensor field before adjusting the heat setting. The decimal point in the display shows which cooking zone has been selected.
Switching the Triple Ring Cooking Zone On and Off
Depending on the size of the pot or pan, when using the triple ring cooking zone each of the larger cooking rings can be switched on in turn, in addition to the smallest cooking zone, using the "booster" sensor field on the control panel.

These can only be activated if the smaller ring is already switched on.
- Select the appropriate cooking zone.

-
Set the required heat setting.
-
Touch the "booster" sensor field.
The middle ring is switched on. The control indicator under the symbol II is illuminated.
- Touching the "booster" sensor field again activates the outer heating ring. The control indicator under symbol III is illuminated.
- To switch off the outer heating rings touch the "booster" sensor field; the corresponding outer heating ring is switched off.

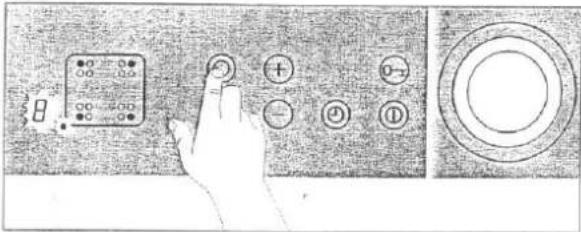

Switching the Casserole Zone On and Off
- Select the appropriate cooking zone.
- Set the required heat setting.
- To switch the casserole zone on or off place your finger flat on the "booster" touch control sensor field, until the control indicator comes on or goes off.


Switching off a Cooking Zone
- Select the required cooking zone with the cooking zone sensor fields.
- Touch sensor fields ⊕ and ⊖ simultaneously to switch off or turn sensor field ⊖ back to zero.

A cooking zone may only be switched off when the decimal point is on in the cooking zone display.

Residual Heat Indicator
When an individual cooking zone or the entire hob is switched off, any residual heat is shown with an H (for "Hot") in the digital display for the appropriate cooking zones.
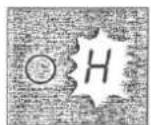
Even after the cooking zone has been switched off, the residual heat indicator only goes out when the cooking zone is cold.

You can use the residual heat for melting and keeping food warm.

Important! As long as the residual heat indicator is illuminated, there is a risk of burns.

Important! If the power supply is interrupted the ⏻ symbol will also go out and information about residual heat will no longer be available. However, it may still be possible to burn yourself. This can be avoided by taking care when near the hob.
Cooking with the Automatic Warm up Function
All four of the hob's cooking zones can be controlled in nine stages and have an automatic warm up function:
- ☐, lowest heat setting
- 9, highest heat setting
- ☐, automatic warm up function
When you select the required heat setting using the sensor field, the cooking zone will work for a specific time on full power and then switch automatically to the set heat setting.
The duration of the automatic warm up function depends on the heat setting selected.
Select the required cooking zone with the cooking zone sensor fields.
Touch sensor field ⊕ until it reaches the required heat ① to ②. The set heat setting will be displayed first. After five seconds ③ (= automatic warm up function) will replace the heat setting in the display. At the end of the warm up time the heat setting will be shown again.


If during the automatic warm up function you select a higher setting, eg. from ☐ to ☐, the warm up time is adjusted to match. If you select a lower setting, the warm up time ends at once.

If you start cooking again on a cooking zone that is still warm, the automatic warm up function uses the residual heat. This saves time and energy.

If you again wish to switch on a cooking zone on which hot items are already standing, you should always select the required heat setting with the sensor field. In this way you can avoid making the food boil over as a result of the extra burst of heat from the automatic warm up.
Cooking without the Automatic Warm up Function
If you wish to use the cooking zone without automatic warm up, select the required heat setting with the sensor field.
- Switch on the appliance and select the desired cooking zone using the cooking zone selection buttons.
- Touch sensor field ⊖ to select the required heat setting from ⑨ to ⑪.

You can adjust the heat setting at any time using the ⊕ and ⊖ buttons, providing the cooking zone has been selected.
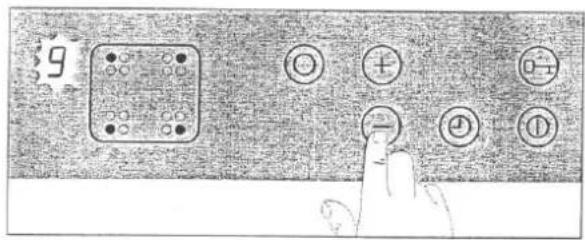
Switching off a cooking zone
- Select the desired cooking zone using the cooking zone buttons.
- Press the ⊕ and ⊖ buttons simultaneously to switch off.

When the rings are still hot cooking should be carried out without automatic warm up.
Locking/Unlocking the Control Panel
With the exception of the "On/Off" sensor field the control panel can be locked at any required time during cooking in order to prevent adjusting the settings such as when wiping over with a cloth. This function is also suitable as a child safety feature.
- Touch the "lock" sensor field until the control indicator comes on.
- To release the lock touch the „lock“ sensor field again continuously until the control indicator goes out.

Child safety feature! If the hob is completely switched off using the "On/Off" sensor field while the lock is on, then the lock will still be active when the hob is switched on again. To reactivate the cooking zones, the locking function must be cancelled as described above.
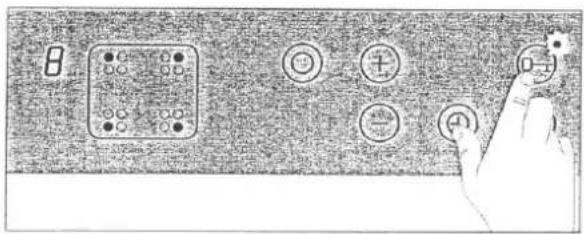
Timer
A cooking duration can be set with the integrated timer for all cooking zones. When the end of the cooking duration is reached, the cooking zone switches itself off automatically.
- Using the cooking zone sensor field, select the required cooking zone and set the required heat setting.
-
Touch the TIMER ⏻ sensor field to activate the timer function for this cooking zone. 📄 will appear in the display.
-
Using the ⊕ or ⊖ sensor fields set or adjust the required period of time until the zone is to switch off automatically (eg. 15 minutes).
After a few seconds the timer will start automatically and will show how much time remains before it will switch off.
In addition, the "Timer active" display for the relevant cooking zone will light up, e.g. the top left control indicator corresponds to the rear left cooking zone.
At the end of the set cooking time, the cooking zone will switch off automatically and an acoustic signal will sound.
4. Touch the TIMER ⏻ sensor field to switch off the signal and control indicator.
To set the timer more quickly, leave your finger on the ⊕ or ⊖ sensor field until the required time is reached.
If the sensor field is operated first, the time setting will begin at 99 minutes; if the sensor field is operated first, the time setting will begin at 1 minute.


Displaying the remaining cooking time
If you select a cooking zone which is in timer mode, the cooking time still remaining appears in the timer display window.
Using the timer to measure short periods of time ("Minute Minder").

Important! None of the cooking zones should be set with the Timer!
- Touch the "On/Off" sensor field for around two seconds.
The digital display ◐ flashes. - Touch the TIMER ⊕ sensor field to activate the Timer function.
- Using the ⊕ or ⊖ sensor fields, set the desired length of time (for example, 20 minutes).
The Timer begins to run after a few seconds, and indicates the time remaining.
When the set time has elapsed, an audible signal is sounded. - Touch the TIMER Ⓐ sensor field, to switch off the signal.
Ending the timer function prematurely
There are two ways of switching off the timer early:
Switching off the cooking zone and timer simultaneously
- Select the desired cooking zone using the cooking zone buttons.
- Touch the ⊕ and ⊖ buttons simultaneously: The cooking zone and timer will switch off.
Switching off the timer - leaving the cooking zone active
- Select the desired cooking zone using the cooking zone buttons.
- Touch the "Timer" button again.
- Touch the ⊕ and ⊖ buttons simultaneously:
- Only the timer will switch off.
- The cooking zone will stay on.
Uses, Tables and Tips
Pans
The better the pan, the better the results.
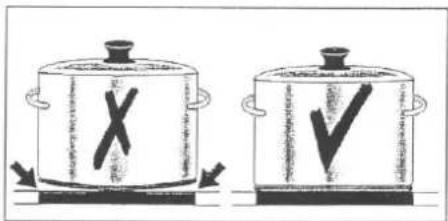
- You can recognise good pans by their bases. The base should be as thick and flat as possible.
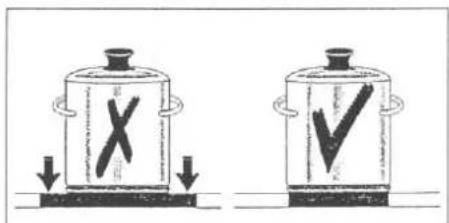
- Pay particular attention when buying new pans to the diameter of the base. Manufacturers often give only the diameter of the upper rim.
- Pots with aluminium or copper bases can cause metallic discolouring on the glass ceramic surface, which is very difficult or impossible to remove.
- Do not use cast iron pans or pans with a rough, burred or damaged base. This can produce permanent scratching if the pan is slid across the surface.
- When cold, pan bases are normally bowed slightly inwards (concave). They should never be bowed outwards (convex).
- If you wish to use special types of pan (e.g. a pressure cooker, simmering pan, wok, etc.), please observe the manufacturer's instructions.

Energy saving tips
You can save valuable energy by observing the following points:
• Always position pots and pans before switching on the cooking zone.
- Dirty cooking zones and pan bases increase power consumption.
- Whenever possible always position the lids firmly on pots and pans to cover completely.
- Switch off the cooking zones before the end of the cooking time to use the residual heat such as to keep foods warm or for melting.
- The base of the pan should be the same size as the cooking zone.
- Using a pressure cooker reduces cooking times by up to 50%.

Advice on Cooking with and without Automatic Warm up
The automatic warm up function is suitable for:
- dishes that start off cold, are heated up at high power and do not need to be continually watched when cooking on the selected heat setting,
• dishes that are put in a hot frying pan.
The automatic warm up function is not suitable for:
- goulash, beef olives and similar braised dishes that need continual turning until browned correctly, have liquid added and are then braised until cooked,
- dumplings, pasta dishes with large amounts of liquid,
• cooking with pressure cookers, - very large quantities of soup/stew with more than 2 litres of liquid.
General notes:
- When cooking without the automatic warm up function, we recommend the use of a high heat setting to warm up the food (using the button) and then leave the dish to finish cooking at an appropriate lower heat setting.
- You can use the ☐ heat setting for keeping food warm.
- Take special note of the results when you first use the appliance! You can then decide which heat setting is the best for "your dishes" in the "quantities you are accustomed to preparing" with "your pans". You will then quickly appreciate the advantages of the automatic function and will feel relaxed about using your new hob.
Typical Heat Settings
The information given in the following tables is for guidance. The heat setting required for cooking depends on the quality of the pans and on the type and quantity of food.
| Switch Setting | Automatic Warm Up Time 1) (Min.) | Cooking Process | Examples of Usage |
| 9 | Warming up Frying Deep-fat frying | Warming up large amounts of liquid, boiling pasta, browning meat, (browning goulash, pot-roast) | |
| 8 | 4.5 | Fast frying | Steaks, pieces of loin, potato fritters, fried sausages, pancakes, doughnuts |
| 7 | 3.5 | ||
| 6 | 2.5 | Frying | Schnitzel/cutlets, liver, fish, rissoles, fried eggs |
| 5 | 8.5 | Boiling | Boiling up to 1.5 l liquid, potatoes, vegetables |
| 4 | 6.5 | ||
| 3 | 4.8 | Steaming Sautéing Poaching | Steaming and sautéing small quantities of vegeta-bles, cooking rice and milk-based dishes |
| 2 | 3.0 | ||
| 1 | 1.0 | Keeping warm melting | Keeping foods warm, melting butter, dissolving gelatine, melting chocolate |
1) When cooking without the automatic warm up function, the warm up time can be selected as required.

When heating up or frying, we recommend using the warm up setting "9" and then continue cooking foods that require longer cooking times at an appropriate lower heat setting.
Cleaning and Care
Hob

Important: Cleaning agents must not come into contact with the hot ceramic glass surface! All cleaning agents must be removed with plenty of clean water after cleaning because they can have a caustic effect when the rings are next heated!
Do not use any aggressive cleaners such as grill or oven sprays, coarse scourers or abrasive pan cleaners.

Clean the ceramic glass surface after each use when it is warm to the touch or cold. This will avoid spillages becoming burnt on.
Remove scale and water marks, fat spots and discolouration with a metallic shimmer using a commercially available ceramic glass or stainless steel cleaner.
Light Soiling
- Wipe the ceramic glass surface with a damp cloth and a little washing up liquid.
- Then rub dry with a clean cloth. Remnants of cleaner must not be left on the surface.
- Thoroughly clean the entire ceramic glass cooking surface once a week with a commercially available ceramic glass or stainless steel cleaner.
- Then wipe the ceramic glass surface using plenty of clean water and rub dry with a clean fluff-free cloth.
Stubborn Soiling
- To remove food that has boiled over or stubborn splashes, use a glass scraper.
- Place the glass scraper at an angle to the ceramic glass surface.
- Remove soiling by sliding the blade.

You can obtain glass scrapers and ceramic glass cleaners from specialist retailers.


Problem Dirt
- Remove burnt-on sugar, melted plastic, aluminium foil or other meltable materials with a glass scraper immediately and while still hot.

Important: There is a risk of burning yourself when the glass scraper is used on a hot cooking zone!
- Then clean the hob normally when it has cooled down.

If the cooking zone on which something has melted has already cooled down, warm it up again for cleaning.
Scratches or dark marks on the ceramic glass surface, caused for example by a pan base with sharp edges, cannot be removed. However, they do not impair the function of the hob.

What to do if ...
Rectifying faults
It is possible that faults have been caused by a minor error, which you can correct yourself with the help of the following instructions. Do not attempt any further repairs if the following instructions do not help in each specific case.

Warning! Repairs to the appliance are only to be carried out by approved service engineers. Improperly effected repairs may result in considerable risk to the user. If your appliance needs repairing, please contact your specialist dealer or customer service.
What do I do if ...
... the cooking zones do not work?
Check whether
- the mains fuse (fuse box) is intact or the circuit breaker (at the household fuse box) has tripped. If the circuit breaker trips or the fuse blows several times, please call an approved electrician.
- the appliance has been properly switched on,
– the control indicators in the control panel are on, - the correct cooking zone has been switched on,
- the cooking zones are set to the desired heat setting for cooking,
- the cooking zones have been switched off by the safety switch (see section "Safety functions").
... the cooking zones cannot be switched on?
Check whether
- the control panel is locked (see section "Locking/ Unlocking the Control Panel").
- more than 10 seconds have elapsed between operating the On/Off button and switching on the desired cooking zone, (see section "Switching on the appliance").
- the sensor fields are partially covered by a damp cloth or with liquid.
... the display suddenly changes to □ or □ for residual heat?
Check whether
- the On/Off button has been operated accidentally.
- the sensor fields are partially covered by a damp cloth, liquid or similar.
– the safety switch has been activated.
... after switching off the cooking zones, neither □ nor □ for residual heat appears in the display?
Check whether
- the cooking zone was only used for a short period and is therefore not hot enough.
If the cooking zone is hot, call the customer service.
... a cooking zone cannot be switched off?
Check whether
- the touch fields are partially covered by a damp cloth or liquid.
- the lock is activated.
... a cooking zone cannot be switched on?
Check whether
- the lock is activated.
... F is shown in the display?
Check whether the cooking zone has been overheated.
This indicator lights up to show overheating, electronic faults or for safety reasons.
If you call in customer service to resolve a problem caused by incorrect operation of the appliance, the customer service engineer's visit will not be free of charge, even during the warranty period.
Installation Instructions

Important! The new appliance may only be installed and connected by qualified personnel.
Please observe this instruction, otherwise the warranty will not cover any damage that may occur.
Technical Data
Appliance dimensions
| Width | 780 mm |
| Depth | 520 mm |
| Height | 48 mm |
Worktop cut-out dimensions
| Width | 750mm |
| Depth | 490mm |
| Corner radius | R5 |
Cooking rings
| Position | Diameter | Power |
| Front left | 120/175/210mm | 800/1600/2300W |
| Rear left | 145mm | 1200W |
| Rear right | 170/265mm | 1500/2400W |
| Front right | 145mm | 1200W |
Connection voltage 230V\~50Hz
Maximum connected load power 7,1 kW
Regulations, Standards, Directives
This appliance meets the following standards:
• EN 60 335-1 and EN 60 335-2-6
relating to the safety of electrical appliances for household use and similar purposes and
• EN 60350, or DIN 44546 / 44547 / 44548 relating to the operating features of electric cookers, hobs, ovens, and grills for household use.
• EN 55014-2
• EN 55014
EN 61000-3-2
• EN 61000-3-3
- relating to basic requirements for electro-magnetic compatibility protection (EMC).

This appliance complies with the following EU Directives:
• 73/23/EWG dated 19.02.1973 (Low Voltage Directive)
- 89/336/EWG dated 03./05.1989 (EMC Directive including Amending Directive 92/31/EWG).

Safety Instructions for the Installer
- A device must be provided in the electrical installation which allows the appliance to be disconnected from the mains at all poles with a contact opening width of at least 3 mm.
Suitable isolation devices include line protecting cut-outs, fuses (screw type fuses are to be removed from the holder), earth leakage trips and contactors. - In respect of fire protection, this appliance corresponds to EN 60 335-2-6. This type of appliance may be installed with a high cupboard or wall on one side.
- Drawers may not be fitted underneath the hob.
• The installation must guarantee shock protection. - The kitchen unit in which the appliance is fitted must satisfy the stability requirements of DIN 68930.
- For protection against moisture, all cut surfaces are to be sealed with a suitable sealant.
- On tiled work surfaces, the joints in the area where the hob sits must be completely filled with grout.
- On natural, artificial stone, or ceramic tops, the snap action springs must be bonded in place with a suitable artificial resin or mixed adhesive.
- Ensure that the seal is correctly seated in the frame and that it is seated against the work surface without leaving any gaps. Additional silicon sealant must not be applied; this will make removal more difficult when servicing.
- The hob must be pressed out from below when removed.
- Clean the worktop around the cut-out area.
- Attach the supplied one-sided adhesive liner tape around the cut-out on the top surface of the work-top. The joining point of the two ends should be in the middle of one of the sides. After cutting the correct length (allow a few millimetres) simply press the two ends against each other.
For Australia:
- CAUTION: The surface temperature exceeds 95°C. To avoid a hazard, underbench access must be restricted.
• Supply cords must have a temperature rating not less than 105° C.
Electrical Connection
Before connecting, check that the nominal voltage of the appliance, that is the voltage stated on the rating plate, corresponds to the available supply voltage. The rating plate is located on the lower casing of the hob.
The heating element voltage is AC230V\~. The appliance also works perfectly on older networks with AC220V\~.
The hob is to be connected to the mains using a device that allows the appliance to be disconnected from the mains at all poles with a contact opening width of at least 3 mm, eg. automatic line protecting cut-out, earth leakage trips or fuse.
A type H05VV-F cable or one with a higher grade must be used as the mains connecting cable.
The connection must be carried out as shown in the diagram. The connecting links should be fitted according to the appropriate connection diagram. The earth lead is connected to terminal ⏻. The earth lead must be longer than leads carrying electric current.
The cable connections must be made in accordance with regulations and the terminal screws tightened securely.
Finally, the connecting cable is to be secured with the mains cable cleat and the covering closed by pressing firmly (lock into place).
Before switching on for the first time, any protective foil or stickers must be removed from the glass ceramic surface.

Once connected to the mains supply check that all cooking zones are ready for use by briefly switching each on in turn at the maximum setting.
Rating Plate
| Modell EHS 8675 P | Prod.Nr. 949591169 | ||
| Typ PEE2 003 | 230 V AC 50 Hz | ||
| Made in Germany | Ser.Nr. .... | 7,1 kW | |

Assembly


Guarantee Conditions
ELECTROLUX WARRANTY AUSTRALIA
Nothing in this warranty, limits any rights you may have under the Trade Practices Act or any other Commonwealth or State legislation. Such rights cannot be changed by the conditions in this warranty.
Subject to the conditions below, this appliance is warranted by Electrolux Home Products Pty. Ltd. A.B.N. 51 004 762 341, (the "Company"), to be free from defects in materials and workmanship for a period of 24 months following the date of purchase (the "Warranty Period").
Conditions of the warranty:
- During the Warranty Period the Company, or its service agent, will only pay the cost of repairing or replacing all Company parts on your appliance which the Company finds to be defective.
- The Company will decide if there are any defects in material and/or workmanship.
- Light globes, batteries and filters are replaceable parts and are not covered under this warranty.
- This warranty applies only for mainland Australia and Tasmania.
- The appliance must be installed and operated in accordance with the Company's instructions.
- This warranty does not apply to normal wear and tear, or any service, which is needed after an accident, alteration, negligence, misuse, fire or flood.
- This warranty does not apply to damage caused if your appliance has been dismantled, repaired or serviced by any person other than someone authorised by the Company.
- If you live outside the service area of the Company or one of its service agents, this warranty does not cover the cost of transport of the appliance for service nor the service agent's travelling costs to and from your home.
- If you are required to transport the appliance to the Company or its service agent, you must ensure it is securely packed and insured. The Company does not accept any responsibility for loss or damage of the appliance prior to it being received by the Company or its service agent.
- This warranty does not cover loss, damage or expense to this appliance caused directly or indirectly by power surges, electrical storm damage or incorrect power current.
-
The Company (and any company related to the Company) will not be liable for any special, incidental or consequential damages or for loss, damage or expense or for personal injury or loss or destruction of property arising directly or indirectly from the use or inability to use this appliance or any of its parts.
-
This warranty applies only to the original buyer.
- This warranty is the only express warranty given by the Company.
- If you are the original buyer, please keep your proof of purchase, which will be required, if you request service under this warranty.
- The Warranty Period is only applicable when your appliance is used at home by you and your family as consumers.
- Use of this appliance for commercial purposes is covered by this warranty for a period of 3 months from the date of purchase.
FOR SERVICE IN AUSTRALIA
PLEASE CALL
13 13 49
FOR SPARE PARTS IN AUSTRALIA
PLEASE CALL
13 13 50
ELECTROLUX APPLIANCE WARRANTY - NEW ZEALAND
This appliance is warranted by Electrolux Home Products (NZ) Ltd ("the Company") from the date of purchase. The following terms and conditions apply:
-
The Company or its Authorised Service Centre will pay the cost of repairing or replacing all parts of the appliance which the Company or its Authorised Service Centre find defective for a period of 24 months following the date of purchase (the "Warranty Period").
-
During the Warranty Period the Company or its Authorised Service Centre, will pay the cost of repairing or replacing all parts, which they find are defective.
-
Light globes, batteries and filters are replaceable parts and are not covered under this warranty.
-
The appliance must be installed and operated in accordance with the Company's instructions.
-
This Warranty does not apply to normal wear and tear, or any service, which is needed after an accident, negligence, alteration or misuse.
-
This Warranty also does not apply to damage caused if your appliance has been dismantled, repaired or serviced by any person other than someone authorised by the Company.
-
If you live outside the service area of the Company or its Authorised Service Centre, this warranty does not cover the cost of transport of the appliance for service nor the Authorised Service Centre's travelling costs to and from your home.
-
If you are required to transport the appliance to the Company or its Authorised Service Centre, it must be securely packed and insured. The Company does not accept any responsibility for loss or damage prior to it being received by the Company or its Authorised Service Centre.
-
This warranty is the only express warranty given by the Company.
-
This Warranty does not cover loss, damage or expense to this appliance caused directly or indirectly by power surges, electrical storm damage or incorrect power current.
-
The Company (and any company related to the Company) will not be liable for any special incidental or consequential damages or for loss, damage or expense directly or indirectly arising from the use or inability to use this appliance, or for personal injury or loss or destruction of other property.
-
Nothing in this warranty is intended to limit the rights you may have under the Consumer Guarantees Act 1993, except to the extent permitted by that Act, and all provisions of this warranty shall be read as modified to the extent necessary to give effect to that intention.
-
The Consumer Guarantees Act 1993 does not apply if your appliance is acquired for the purposes of a "business" (as defined in that Act).
-
This warranty is limited to 90 days from date of purchase if the appliance is used for commercial use.
IMPORTANT NOTICE
Before calling a service technician please carefully check the warranty terms and conditions, the operating instructions and service booklet if applicable. If the product fails for any of the customer responsibility reasons detailed therein, a service fee will be charged. Please present proof of purchase to any Authorised Service Centre should warranty service be required.
SERVICE CENTRES
PLEASE PHONE
0800 10 66 10
For your nearest Authorised
Service Centre please look in
The Yellow Pages under
Home Appliance Servicing
OR
Call 0800 10 66 10
Service
In the "What to do if ..." section a number of malfunctions are listed that you can rectify yourself. Look there first if a fault occurs.
Is it a technical fault?
If so, please contact your customer service centre. (You will find addresses and telephone numbers in the section "Customer Service Centres".)
Always prepare in advance for the discussion. This will make diagnosis of the problem easier and also make it easier to decide if a customer service visit is necessary:
Please make a note of the following information as accurately as possible:
• What form does the fault take?
• Under what circumstances does the fault occur?
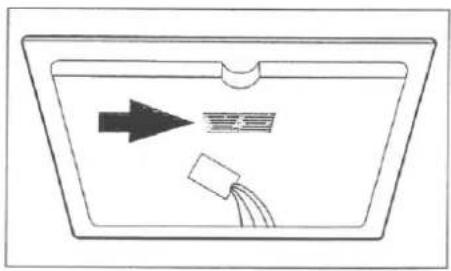
Prior to the telephone call it is important that you make a note of the following appliance code numbers that are given on the rating plate:
- model description,
- PMC code (9 digits),
- S No code (8 digits).
We recommend that you record the code numbers here so that you always have them to hand:
Model:
PNC:
S-No:
When do you incur costs even during the warranty period?
- if you could have remedied the fault yourself using the fault table (see section "What to do if ..."),
- if the customer service technician has to make several journeys because he was not provided with all the relevant information before his visit and therefore, forexample, has to fetch spare parts. These multiple trips can be avoided if you prepare your phone call as described above.
319 652 000-B-181202-03
Subject to change without notice

- INSTALLATION AND OPERATING INSTRUCTIONS
- DEAR CUSTOMER
- THE FOLLOWING SYMBOLS ARE USED IN THE TEXT
- CONTENTS
- OPERATING INSTRUCTIONS
- ⚠ SAFETY
- ELECTRICAL SAFETY
- CHILD SAFETY
- SAFETY DURING USE
- SAFETY WHEN CLEANING
- HOW TO AVOID DAMAGE TO THE APPLIANCE
- DISPOSAL
- DISPOSING OF THE PACKAGING MATERIAL
- DISPOSAL OF OLD APPLIANCES
- THE KEY FEATURES OF YOUR APPLIANCE
- DESCRIPTION OF THE APPLIANCE
- DIGITAL DISPLAYS
- COOKING ZONE SAFETY CUT-OUT
- CANCELLING THE SAFETY CUT-OUT
- SWITCHING OFF FOR OTHER REASONS
- BEFORE USING FOR THE FIRST TIME
- INITIAL CLEANING
- OPERATING THE HOB
- TOUCH CONTROL SENSOR FIELD
- SWITCHING ON THE APPLIANCE
- SWITCHING OFF THE APPLIANCE
- COOKING ZONE SELECTION
- HEAT SETTING SELECTION
- SWITCHING THE TRIPLE RING COOKING ZONE ON AND OFF
- SWITCHING THE CASSEROLE ZONE ON AND OFF
- SWITCHING OFF A COOKING ZONE
- RESIDUAL HEAT INDICATOR
- COOKING WITH THE AUTOMATIC WARM UP FUNCTION
- COOKING WITHOUT THE AUTOMATIC WARM UP FUNCTION
- LOCKING/UNLOCKING THE CONTROL PANEL
- TIMER
- DISPLAYING THE REMAINING COOKING TIME
- USING THE TIMER TO MEASURE SHORT PERIODS OF TIME ("MINUTE MINDER")
- ENDING THE TIMER FUNCTION PREMATURELY
- SWITCHING OFF THE COOKING ZONE AND TIMER SIMULTANEOUSLY
- SWITCHING OFF THE TIMER - LEAVING THE COOKING ZONE ACTIVE
- USES, TABLES AND TIPS
- PANS
- ENERGY SAVING TIPS
- ADVICE ON COOKING WITH AND WITHOUT AUTOMATIC WARM UP
- THE AUTOMATIC WARM UP FUNCTION IS SUITABLE FOR
- THE AUTOMATIC WARM UP FUNCTION IS NOT SUITABLE FOR
- GENERAL NOTES
- TYPICAL HEAT SETTINGS
- CLEANING AND CARE
- HOB
- LIGHT SOILING
- STUBBORN SOILING
- PROBLEM DIRT
- WHAT TO DO IF
- RECTIFYING FAULTS
- WHAT DO I DO IF
- THE COOKING ZONES DO NOT WORK
- THE COOKING ZONES CANNOT BE SWITCHED ON
- THE DISPLAY SUDDENLY CHANGES TO □ OR □ FOR RESIDUAL HEAT
- AFTER SWITCHING OFF THE COOKING ZONES, NEITHER □ NOR □ FOR RESIDUAL HEAT APPEARS IN THE DISPLAY
- A COOKING ZONE CANNOT BE SWITCHED OFF
- A COOKING ZONE CANNOT BE SWITCHED ON
- F IS SHOWN IN THE DISPLAY
- INSTALLATION INSTRUCTIONS
- TECHNICAL DATA
- REGULATIONS, STANDARDS, DIRECTIVES
- SAFETY INSTRUCTIONS FOR THE INSTALLER
- FOR AUSTRALIA
- ELECTRICAL CONNECTION
- RATING PLATE
- ASSEMBLY
- GUARANTEE CONDITIONS
- ELECTROLUX WARRANTY AUSTRALIA
- CONDITIONS OF THE WARRANTY
- FOR SERVICE IN AUSTRALIA
- PLEASE CALL
- FOR SPARE PARTS IN AUSTRALIA
- ELECTROLUX APPLIANCE WARRANTY - NEW ZEALAND
- IMPORTANT NOTICE
- SERVICE CENTRES
- PLEASE PHONE
- SERVICE
- IS IT A TECHNICAL FAULT
- WHEN DO YOU INCUR COSTS EVEN DURING THE WARRANTY PERIOD
Brand : ELECTROLUX
Model : EHS 8675 P
Category : Heating