HAV-130BKSS - Vacuum Cleaner Heinner - Free user manual and instructions
Find the device manual for free HAV-130BKSS Heinner in PDF.


| Product Type | Vacuum Sealer |
| Model | HAV-130BKSS |
| Brand | Heinner |
| Color | Black with stainless steel decoration |
| Power Consumption | 130 W |
| Rated Voltage | 220-240 V |
| Rated Frequency | 50 Hz |
| Package Contents | Vacuum sealer, instruction manual, warranty card, roll bag, hose connector for canisters |
| Main Functions | Dry/Moist food selection, short/long seal time, vacuum seal, pulse vacuum, canister vacuum, seal only, cancel |
| Sealing Strip Type | Heating bar with Teflon tape |
| Vacuum Chamber | Internal, removable for cleaning |
| Canister Adaptor | Included, for vacuum canisters (not included) |
| Bag Cutter | Built-in small bag cutter |
| Safety Features | Automatic shut-off to prevent overheating; requires 5 min cooldown after heavy use |
| Cleaning and Maintenance | Unplug before cleaning; wipe exterior with damp cloth; clean vacuum chamber with mild soap, dry thoroughly; keep lid unlocked when not in use |
| Usage Duration Limit | Do not seal more than 20 bags continuously; wait 25 minutes before resuming |
| Environmental Disposal | Comply with local regulations; hand in waste equipment to appropriate center |
Frequently Asked Questions - HAV-130BKSS Heinner
User questions about HAV-130BKSS Heinner
0 question about this device. Answer the ones you know or ask your own.
Ask a new question about this device
Download the instructions for your Vacuum Cleaner in PDF format for free! Find your manual HAV-130BKSS - Heinner and take your electronic device back in hand. On this page are published all the documents necessary for the use of your device. HAV-130BKSS by Heinner.
USER MANUAL HAV-130BKSS Heinner
natural_image
Exterior view of a modern electronic device with a black handle and digital display (no visible text or symbols)A. DRY/MOIST FOOD (ALIMENTE USCATE/UMEDE)
V. UTILIZAREA APARATULUI
natural_image
Technical line drawing of a mechanical assembly with no visible text or symbolsnatural_image
Exterior view of a modern electronic device with a black handle and digital display (no visible text or symbols)- Vacuum sealer
- Power: 130W
• Color: black with stainless steel decoration
Thank you for choosing this product!
I. INTRODUCTION
Please read this instruction manual carefully before using it and keep it for later
information
This manual is conceived for offering you all of the necessary info regarding installation, using and maintenance of the machine. For a correctly and safely use of the machine, please, read this manual before installation and using.
II. PACKAGE CONTENTS

Vacuum sealer
Instruction Manual
Warranty card
▶ Declaration of conformity
Roll bag
➢ Hose connector for canisters
III. SAFETY MEASURES
Read and fully understand all instructions and warnings prior to using this machine. Your safety is the most important!
- Read the instructions carefully.
- Do not allow the appliance to be used as a toy.
- This appliance should not be operated by children.
- Do not operate the appliance with a damaged power cord or plug.
- Do not use the appliance on a wet or hot surface, or near a heat source.
- Always use the appliance on a level surface.
- Do not immerse any part of the appliance, power cord or plug into water or other liquid.
- To disconnect, unplug the power cord from the electrical outlet. Do not disconnect by pulling on the cord. Always unplug the appliance before cleaning and when not in use.
- Do not operate the appliance if it malfunctions or is any way damaged. If the cord or the machine is damaged, please return it to our after-sales department for proper service, replacement, or repair.
- Close supervision is required when this product is used near children.
- The appliance is not for commercial use. If sealing more than 20 bags continuously, wait at least 25 minutes before resuming use of your appliance.
- Keep the upper lid of the appliance unlocked when not in use.
This appliance is for household use only.
Do not attempt to service this product. Service should be performed by an authorized service representative.
A short power-supply cord is provided to reduce the risk resulting from becoming entangled in or tripping over a longer cord. Extension cords are not prohibited from being used when care is exercised in their use. When an extension cord is used the marked electrical rating of the extension cord shall be no less than the marked electrical rating of the appliance. The longer cord shall be arranged so that it does not drape over the counter-top or tabletop where it is capable of being tripped over, snagged, or pulled on unintentionally, especially by children.
Vacuum sealing guidelines
Food Storage & Safety
IMPORTANT: Vacuum packaging is NOT a substitute for refrigeration or freezing. Any perishable foods that require refrigeration must still be refrigerated or frozen after vacuum packaging.
For best result in extending the life of foods, it is important to vacuum package foods that are fresh. Once food has begun to deteriorate, vacuum packaging may only slow the deterioration process. Vacuum sealing cannot prevent the growth of mold. Other disease-causing microorganisms can still grow in low oxygen environments and may require further measures to be eliminated.
Food Preparation Hints and Tips for Air-tight Vacuum Sealing
Cooking, Thawing and Reheating – Simmering in a vacuum bag helps food retain its flavor and it helps with the clean up as well. No dirty saucepans... When reheating foods in the microwave using your vacuum bags, always puncture open the bag to allow hot air to escape. You can also reheat foods in the vacuum bags by placing them in water at a low simmer below 170^ F ( 75^ C).
IMPORTANT: Always thaw foods in either refrigerator or microwave – do not thaw perishable foods at room temperature.
Preparation Hints for Meat and Fish
Try pre-freezing meats and fish for 1-2 hours before vacuum packaging. This helps retain the juice and shape, also provides for a better seal.
If you can't, place a folded paper towel between the food and top of the bag, but below seal area. Leave paper towel in bag to absorb excess moisture and juices during vacuum packaging process.
Preparation Hints for Cheeses
Vacuum package cheese after each use. If you make your bag just a little longer than needed, you can re-seal the bag after each use.
IMPORTANT: Due to the risk of anaerobic bacteria, soft cheeses should never be vacuum packaged.
Preparation Guidelines for Vegetables
Blanching is a process that should be done before vacuum packaging vegetables. This process stops the enzyme action that could lead to loss of flavor, color and texture. To blanch vegetables, place them in Simmering water or in a microwave until they are cooked, but still crisp.
Blanching times can range from 1 to 2 minutes for leafy greens and peas; 3 to 4 minutes for snap peas, sliced zucchini or broccoli; give your carrots about 5 minutes; and 7 to 11 minutes for corn on the cob. After blanching, immerse vegetables in cold water to stop the cooking process.
NOTE: All vegetables (including broccoli, Brussels sprouts, cabbage, cauliflower, kale, turnips) naturally emit gases, during storage. Therefore, after blanching, it's best if they're stored in the freezer.
More on Vegetables
Vegetables are a great candidate for portion control; when storing vegetables, try pre-freezing them for 1 to 2 hours, then separate them into meal portions within you vacuum bags. After they have been vacuum packaged, return them to the freezer.
IMPORTANT: Due to the risk of anaerobic bacteria, fresh mushrooms, onions & garlic should never be vacuum packaged.
Preparation Hints for Powdery Foods
When vacuum packaging powdery items like flour, it's best to use their original packaging inside of the vacuum bags. The fine powder could get sucked into the machine and cause enough damage to shorten the life of the sealer.
Preparation Hints for Liquids
Before you vacuum package liquid such as soup stock, pre-freeze in a casserole dish, loaf pan or ice cube tray until solid. Remove frozen liquid from pan and vacuum package in the vacuum bags. You can then stack in the freezer. When you're ready to use, just cut corner of bag and place in either a microwave dish or drop into water at a low simmer, below 170°F (75°C).
IV. PRODUCT DESCRIPTION
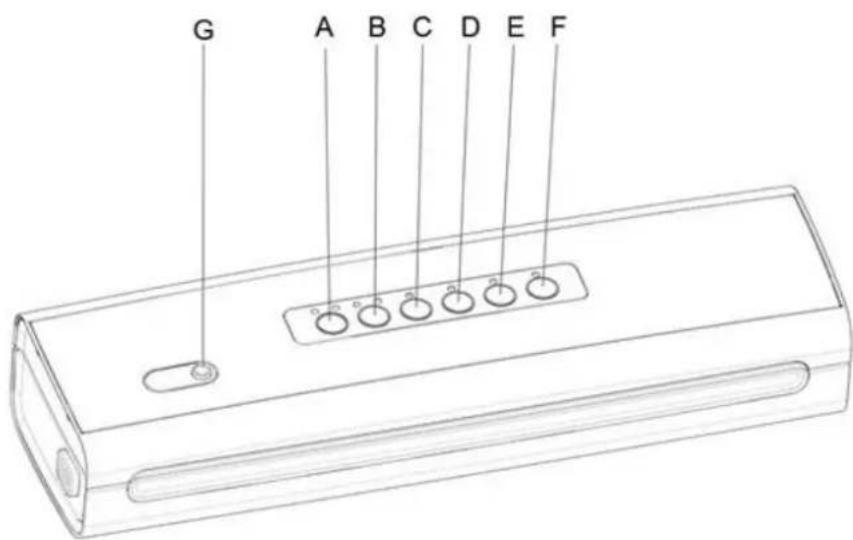
A. DRY/MOIST FOOD
Press this button to choose between dry food pattern or moist food pattern.
B. SHORT/LONG SEAL TIME
Press this button to choose between short seal time or long seal time. When vacuuming moist food or thicker bags, long seal time is suggested.
C. VACUUM SEAL
Press this button to start vacuumizing, when the process is done, the machine will seal the bag automatically.
D. PULSE
This button is used when control of the vacuuming process is needed for delicate foods.
Press the button and the pump turns on, release the button and it shuts off.
E. CANISTER
Press this button to make a vacuum in a canister.
F. SEAL/CANCEL
Press the button to choose between seal only function or cancel function.
SEAL is for sealing the bag without vacuumizing.
CANCEL is to stop the on-going process.
G. PORT FOR VACUUM CANISTER
Insert one end of accessory hose into port on appliance, put the other end onto canister port, then let the appliance make the canister vacuum fresh.
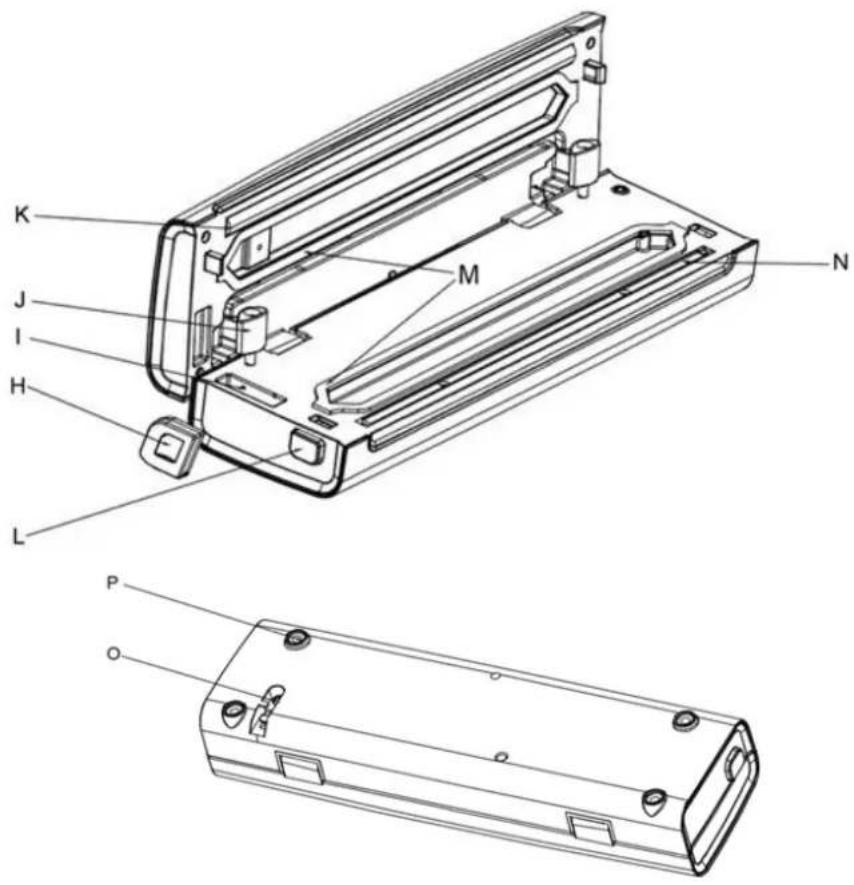
H. SMALL BAG CUTTER
I. CUTTER STORAGE
J. CANISTER ADAPTERS
These two adapters are used only for vacuumizing canisters.
K. SEALING SILICONE
L. RELEASE BUTTON
Press to open lid after sealing process is completed.
M. SEALING GASKET
N. HEATING BAR COVER WITH TEFLON TAPE
O. POWER CORD OULTET HOLE
P. SILICONE PAD
V. USING THE APPLIANCE
How to make custom sized bags
This vacuum sealer is equipped with small bag cutter compatible with various vacuum sealing bags.
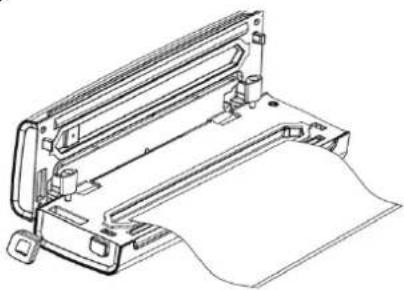
Use the removable cutter on the sealer to cut desired bag length from bag roll. Make sure to cut in a straight line. Plug in power cord.
- Open lid. Place one end of cut bag onto sealing strip, don't worry if you accidentally place any material onto the gasket area.
- Close lid by pressing down on both sides until two "click" sound heard.
NOTE: The sealing strip will NOT work properly unless you lock the lid. Make sure that the lid has been locked on both sides for proper sealing.
- Now that lid has been locked, press the "SEAL" button to create a custom sized bag. The indicator light illuminates during the seal process.
- Once completed the indicator light of seal button will turn off; press the release buttons on both sides of the machine, it is now safe to take out the newly created bag.
- The custom sized bag is now ready for vacuum sealing.
CAUTION: Under heavy usage, appliance will shut off automatically to prevent overheating. please wait 5 minutes to allow appliance to cool down.
How to vacuum and seal the vacuum bags
- Place the item(s) to be sealed into the pre-cut or custom sized bag. Leave at least 2 inches between the contents and the top of the bag to allow for bag contraction.
- Open lid and place the open end of the bag down into the vacuum chamber.
- Close lid by pressing down on both sides until you hear two "click" sounds.
- To begin the vacuum process, press the "VACUUM SEAL" button. The unit will continue to vacuum and then seal once air has been removed.
NOTE: When vacuumizing moist food, please choose moist food pattern and long seal time pattern before pressing "VACUUM SEAL" button.
- Once the indicator light turns off, press the release buttons on both sides of the machine to take out the bag.
natural_image
Technical line drawing of a mechanical device with a paper sheet (no text or symbols)How to use the Pulse vacuum button
Since the pressure under the normal vacuum function is set to be high, sometimes it is easy to destroy some delicate items by high pressure in the vacuum bags. In this case, you can use the "PULSE" vacuum function to control the vacuum time and pressure, and prevent crushing delicate items. When packing some juicy foods, you can also use this function and prevent liquid being sucked out.
- Place the item(s) to be sealed into the pre-cut or custom sized bag. Leave at least 2 inches between the contents and the top of the bag to allow for bag contraction.
- Open lid and place the open end of the bag down into the vacuum chamber.
- Close lid by pressing down on both sides.
- Press the "PULSE" button continually, till it reaches the pressure that you want. You can watch the vacuum bag to decide the pressure. During this process, you can stop vacuum by stop pressing this button, and press it again to vacuum again.
- When the pressure reaches what it needs, press "SEAL" button to start sealing.
- Once the indicator light turns off, press the release buttons on both sides of the machine and take out the bag.
How to vacuum canisters
NOTE: canister is not included.
- Connect the vacuum sealer and the vacuum canister using the 2 adapters and tube.
- Place the product you wish to vacuum pack in the canister. Place the lid on top of the canister and close it using the side fasteners. Select the "Vacuum" position of the canister valve.
- Connect the vacuum sealer and the canister via the connecting gasket. You must connect one of the ends to the canister valve and the other end to the accessory port of the machine.
-
Lower the lid of the machine and press the sides to secure it, the system is properly closed when you hear a "click" on each side. If you wish to open the upper lid once it has been closed, press each side again and gently pull the lid up.
-
To start the vacuum process, press the "Canister" button.
-
This model of vacuum sealer is designed to operate in automatic mode. The machine is equipped with a vacuum measurement sensor, which stops the vacuum process once the vacuum level is reached within the canister. To cancel the vacuum process, press the "Canister" button again.
-
Once the vacuum process is complete, the machine stops automatically. Select the "CLOSE" position of the canister valve and disconnect the connector gasket from the machine.
VI. CLEANING AND MAINTENANCE
- Always unplug the unit before cleaning.
- Do not immerse in water.
- Do not use abrasives to clean the unit.
- Wipe the outer surface with a soft, damp cloth and soap.
- To clean the inside of the unit, wipe away any food or liquid with a paper towel.
- Dry all parts thoroughly before you plug in and operate the unit again.
- Vacuum chamber may trap liquids that were drawn from the bag; it can be removed from the sealer, use a mild dish washing soap and a warm, damp cloth to wipe away any left behind liquid from the vacuum chamber. Dry thoroughly.
- Keep the upper lid of the appliance unlocked when not in use.
VII. TROUBLESHOOTING
Nothing happens when I press the "VACUUM" button:
- Make sure the power cord is correctly plugged into the electrical outlet.
- Make sure the power cord is not damaged in any way.
- Make sure the electrical outlet is operative by plugging in another appliance. If it's not, please check the circuit breakers or fuses in your home.
- Make sure you have turned on the power switch on the back of the machine.
- Make sure the bag is positioned correctly down in the vacuum chamber.
- Press down on both sides of the lid and make sure it is locked in place.
- Wait 5 minutes to allow appliance to cool off, and then try using again.
Air is not vacuumed from the bag:
- Check that there are no gaps, folds, wrinkles or holes in the pre-sealed bags.
- Check for loose, worn or cracked Upper and Lower sealing gaskets.
- Foods with high liquid contents may prevent the bag from sealing properly. Cut bag open and wipe top inside of bag and reseal.
- Check to see if bag is properly inserted into the vacuum chamber.
- Make sure you've placed the bag in the proper place. When making a bag from a roll, make sure end of cut piece is on the sealing strip.
Air has seeped back into the vacuumed bag:
- Check the seal of the bag. There may be a hole or wrinkle that is allowing air to reenter the bag. Carefully cut the bag open and re-seal it, or use an entirely new bag.
- Make sure there is no moisture or liquid from the food present within the bag seal. You may need to cut open the bag and re-seal it, or use an entirely new bag. Partially freeze foods with excess liquids, prior to vacuum sealing.
- Make sure there are no food items with sharp edges that may have punctured the bag. If you find a puncture hole, seal the item in an entirely new bag.
- Make sure no liquids were drawn to the sealing strip area.
- Check for loose, worn or cracked Upper and Lower sealing gaskets.
- Moisture of foods with high liquid content will prevent the bag from sealing properly. Cut bag open and wipe top inside of bag and reseal.
Bag will not seal:
- Check that there aren't any gaps, folds, wrinkles or holes in pre-sealed edges.
- Moisture of foods with high liquid content will prevent the bag from sealing properly. Cut bag open and wipe top inside of bag and reseal.
- Thick bag will not seal properly, Press the "seal time + " button to increase the seal time so as to seal thicker bags
- Make sure you've placed the bag in the proper place. When making a bag from a roll, make sure end of cut piece is on the sealing strip.
| Rated voltage | 220-240 V |
| Rated frequency | 50Hz |
| Power | 130W |
Environment friendly disposal
You can help protect the environment!
Please remember to respect the local regulations: hand in the non-working electrical equipment's to an appropriate waste disposal center.

HEINNER is a registered trademark of Network One Distribution SRL. Other brands and product names are trademarks or registered trademarks of their respective holders.
No part of the specifications may be reproduced in any form or by any means or used to make any derivative such as translation, transformation, or adaptation without permission from NETWORK ONE DISTRIBUTION.
Copyright © 2013 Network One Distribution. All rights reserved.
www.heinner.com, http://www.nod.ro
http://www.heinner.com, http://www.nod.ro

This product is in conformity with norms and standards of European Community
Importer: Network One Distribution
Marcel Iancu Street, no 3-5, Bucharest, Romania
Tel: +40 21 211 18 56, www.heinner.com, www.nod.ro
HEINNER
natural_image
Exterior view of a modern rectangular electronic device with black and silver casing and control buttons (no visible text or symbols)A. DRY/MOIST FOOD (СУХИ/ВЛАЖНИ ХРАНИ)
V. ИЗПОЛЗВАНЕ НА УРЕДА
natural_image
Technical line drawing of a mechanical assembly with no visible text or symbolsnatural_image
Exterior view of a modern rectangular electronic device with black and silver casing and control buttons (no visible text or symbols)A. DRY/MOIST FOOD (SZÁRAZ/NEDVES ÉLELMISZER)
V. A KÉSZÜLÉK HASZNÁLATA
natural_image
Technical line drawing of a mechanical device with rollers and mounting brackets (no text or symbols)- DRY/MOIST FOOD (ALIMENTE USCATE/UMEDE)
- UTILIZAREA APARATULUI
- Thank you for choosing this product!
- INTRODUCTION
- information
- PACKAGE CONTENTS
- SAFETY MEASURES
- This appliance is for household use only.
- Vacuum sealing guidelines
- Food Storage & Safety
- Food Preparation Hints and Tips for Air-tight Vacuum Sealing
- Preparation Hints for Meat and Fish
- Preparation Hints for Cheeses
- Preparation Guidelines for Vegetables
- More on Vegetables
- Preparation Hints for Powdery Foods
- Preparation Hints for Liquids
- PRODUCT DESCRIPTION
- DRY/MOIST FOOD
- SHORT/LONG SEAL TIME
- VACUUM SEAL
- PULSE
- CANISTER
- SEAL/CANCEL
- PORT FOR VACUUM CANISTER
- SMALL BAG CUTTER
- USING THE APPLIANCE
- How to make custom sized bags
- How to vacuum and seal the vacuum bags
- How to use the Pulse vacuum button
- How to vacuum canisters
- CLEANING AND MAINTENANCE
- TROUBLESHOOTING
- Nothing happens when I press the "VACUUM" button:
- Air is not vacuumed from the bag:
- Air has seeped back into the vacuumed bag:
- Bag will not seal:
- Environment friendly disposal
- HEINNER
- DRY/MOIST FOOD (СУХИ/ВЛАЖНИ ХРАНИ)
- ИЗПОЛЗВАНЕ НА УРЕДА
- A KÉSZÜLÉK HASZNÁLATA
Brand : Heinner
Model : HAV-130BKSS
Category : Vacuum Cleaner