
SpeedFace-H5L - Access Control ZKTeco - Free user manual and instructions
Find the device manual for free SpeedFace-H5L ZKTeco in PDF.


| Type of Product | Face Recognition Access Control Terminal |
| Brand | ZKTeco |
| Model | SpeedFace-H5L |
| Display | 5-inch Touch Screen |
| Dimensions (H x W x D) | 204 x 80 x 23 mm |
| Weight | 0.32 kg |
| Power Supply | DC 12V, 2A |
| Power Consumption | < 8W |
| Operating Temperature | -15°C to 45°C |
| Operating Humidity | 20% to 80% |
| User Capacity | 3,000 face templates, 10,000 cards, 10,000 passwords |
| Recognition Speed | < 1 second |
| Authentication Methods | Face, Card (optional), Password, or Combination |
| Communication | TCP/IP, USB Host, RS485, Wiegand |
| Camera | High-resolution infrared dual-sensor |
| Lighting | LED auxiliary light for low-light environments |
| Functions | Face detection, liveness detection, time attendance, access control, anti-passback |
| Access Control Interface | Lock relay, door sensor, exit button, alarm output |
| Software Compatibility | ZKTeco Biometrics Software, third-party via SDK |
| Maintenance and Cleaning | Clean the lens with a soft dry cloth; avoid harsh chemicals |
| Safety | Overcurrent protection, surge protection, tamper switch |
| Spare Parts and Repairability | Contact authorized service center; replaceable power adapter and camera module |
| Certifications | CE, FCC, RoHS |
| General Information | Designed for indoor use; wall-mounted installation |
Frequently Asked Questions - SpeedFace-H5L ZKTeco
User questions about SpeedFace-H5L ZKTeco
0 question about this device. Answer the ones you know or ask your own.
Ask a new question about this device
Download the instructions for your Access Control in PDF format for free! Find your manual SpeedFace-H5L - ZKTeco and take your electronic device back in hand. On this page are published all the documents necessary for the use of your device. SpeedFace-H5L by ZKTeco.
USER MANUAL SpeedFace-H5L ZKTeco
Thank you for choosing our product. Before using this product, please carefully read this instruction manual. This will help prevent unnecessary damage to the product. Follow these instructions to ensure that your product functions properly and completes verifications in a timely manner.
Unless authorized by our company, no group or individual shall take excerpts of or copy all or part of these instructions nor transmit the contents of these instructions in any way.
The products described in this manual may include software that is copyrighted by our company and its possible licensors. No one may copy, publish, edit, take excerpts of, decompile, decode, reverse-engineer, rent, transfer, sublicense, or otherwise infringe upon the software's copyright unless authorized by the copyright holder. This is subject to relevant laws prohibiting such restrictions.

As this product is regularly updated, we cannot guarantee exact consistency between this product and the information provided in these instructions. We will hear no disputes that arise due to differences between the actual product and the contents of these instructions, and you may not be informed of changes in advance.
About This Manual
- This manual introduces the operations, interfaces and functions of visible light face recognition device, including FaceDepot-7A, FaceDepot-7B and SpeedFace series. For installation, please refer to the Quick Start Guide of the product accordingly.
● Features and parameters with ★ are not available in all devices. - All pictures shown are for illustration purpose only. Pictures in this manual may not be exactly consistent with the actual products.
Contents
1. Instruction for Use....1
1.1 USING YOUR FINGERPRINTS 1
1.2 STARTUP SCREEN 2
1.3 VIRTUAL KEYBOARD 3
1.4 CHANGE THE THEME AND WALLPAPER 4
1.5 VERIFICATION METHODS 9
1.5.1 Facial Verification....9
1.5.2 Fingerprint Verification 15
1.5.3 Password Verification 22
1.5.4 Card Verification ★ 27
1.5.5 Combined Verification 27
2. Main Menu 31
3. User Management 33
3.1 ADD AN EMPLOYEE 33
3.1.1 Register Basic Employee Information 35
3.1.2 Register Employee Photo 36
3.1.3 Registration Comparison Methods 40
3.1.4 Permission Settings 51
3.1.5 Verification Mode Setting 53
3.1.6 Access level★ 56
3.2 SEARCHING FOR AN EMPLOYEE 59
3.3 EDIT AN EMPLOYEE 61
3.4 DELETE EMPLOYEE 63
4. Attendance Events ★ 66
4.1 ADD ATTENDANCE EVENTS 66
4.2 EDIT ATTENDANCE EVENTS 71
4.3 DELETE ATTENDANCE EVENTS 73
5. Access Settings 76
5.1 ACCESS CONTROL PARAMETERS 76
5.2 TIME RULE SETTING ★ 78
5.3 HOLIDAY SETTING ★ 81
6. Log ★ 86
6.1 SEARCH FOR ATTENDANCE RECORDS 86
6.2 SEARCH FOR ATTENDANCE PHOTOS 90
6.3 SEARCH FOR BLACKLIST PHOTOS 94
7. Data Management 95
8. USB Disk Management★ 97
8.1 UPLOAD TO USB DRIVE 98
8.2 DOWNLOAD TO A USB DRIVE 98
8.3 USB DISK SETTINGS 98
9. Alarm Management★ 99
9.1 ADD ALARMS 99
9.2 EDIT ALARMS 104
9.3 DELETE ALARMS....106
- System Settings 110
10.1 NETWORK SETTINGS 111
10.1.1 Ethernet Settings 112
10.1.2 Comm Connection Settings 114
10.2 DATE AND TIME 115
10.2.1 Date and Time Settings 116
10.2.2 Date and Time Format Settings....118
10.3 ATT/ACCESS RECORD PARAMETERS 120
10.3.1 Status Mode 121
10.3.2 Plugin Function Rules 132
10.3.3 Capture Photo Settings 133
10.3.4 Verification Settings....134
10.3.5 Validity Period of User Information 136
10.4 CLOUD SERVICE SETTINGS 137
10.5 WIEGAND SETTINGS 138
10.5.1 Wiegand In 139
10.5.2 Wiegand Out 140
10.6 DISPLAY SETTINGS 142
10.7 SOUND SETTINGS 143
10.8 BIOMETRIC PARAMETERS 144
10.9 AUTO-TESTING 146
10.10 ADVANCED SETTINGS 147
10.11 ABOUT THE DEVICE....148
- USB upgrade 149
Statement on the Right to Privacy 150
Eco-friendly Use 151
1. Instruction for Use
1.1 Using Your Fingerprints
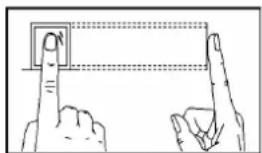
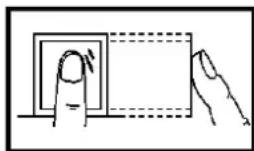
Recommended fingers: index, middle, or ring fingers; avoid using the thumb or pinky, as they are difficult to accurately press onto the fingerprint reader.
● Diagram of how to correctly press your fingers onto the fingerprint reader.
natural_image
Illustration of two hands pointing at a square button with dotted lines indicating alignment (no text or symbols)Press your finger onto the fingerprint reader.
Ensure that the center of your finger is aligned with the center of the fingerprint reader.
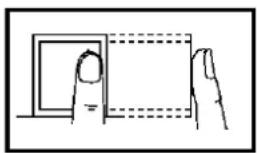
- Incorrect ways of pressing your fingers onto the fingerprint reader.
natural_image
Simple line drawing of a hand pressing a rectangular object with dashed lines indicating hidden edges (no text or symbols)Off-center
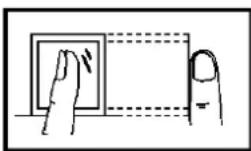
Not the fingerprint's
center
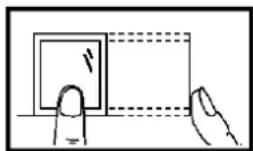
Off-center
Not the fingerprint's
center
Note: Please use the correct method when pressing your fingers onto the fingerprint reader for registration and identification. Our company will assume no liability for recognition issues that may result from incorrect usage of the product. We reserve the right of final interpretation and modification concerning this point.
1.2 Startup Screen
After plugging in the device, press the On/Off switch located on the side. The following screen will load:
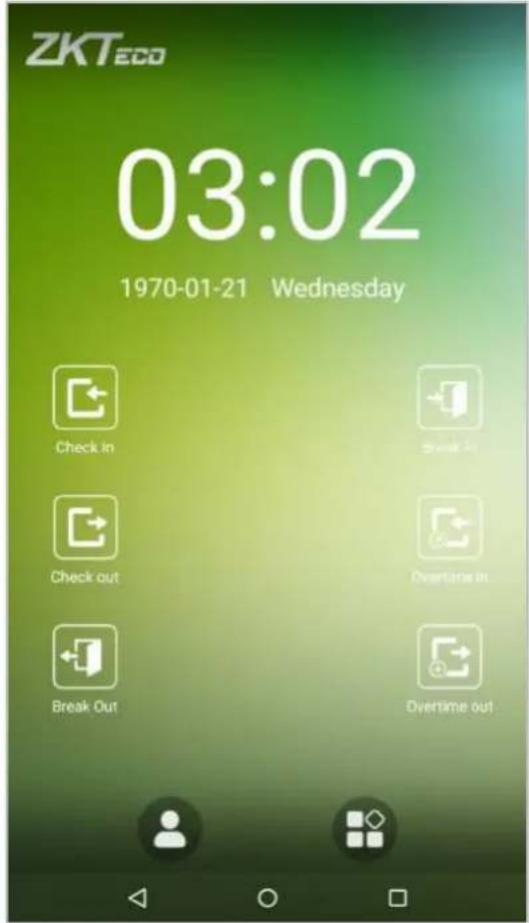
Notes:
The wallpaper can be customized. For more details, please refer to "1.4 Change Theme and Wallpaper".
Tap on 📄 to enter the personnel ID Input screen in 1:1 verification mode. For further information about the 1:1 verification process, see section "1.5 Verification Method".
Tap on to enter the main menu. If a super administrator has already been registered for this device, you will need the permission of the super administrator to enter the main menu.
1.3 Virtual Keyboard
- English keyboard
Note: This device supports input methods of Chinese, English, numbers, and symbols. Press [CN] to switch to the Chinese keyboard; press [EN] to switch to the English keyboard; press [?123] to switch to the numbers and symbols keyboard; and press [Back] to return to the alphabet keyboard. If you tap on an input box, the virtual keyboard will pop up on the screen. To hide the keyboard, tap on the downwards arrow ▼.
1.4 Change the Theme and Wallpaper
Note: Please enable the [User defined theme switch] in [System Settings] > [Display Settings].
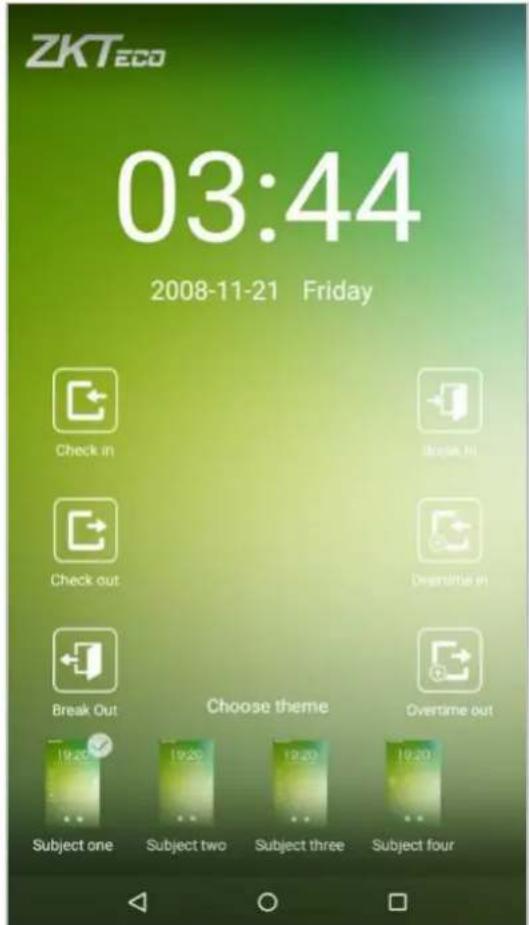
Tap on any blank area with your finger on the initial interface to change the theme and wallpaper, as shown below:
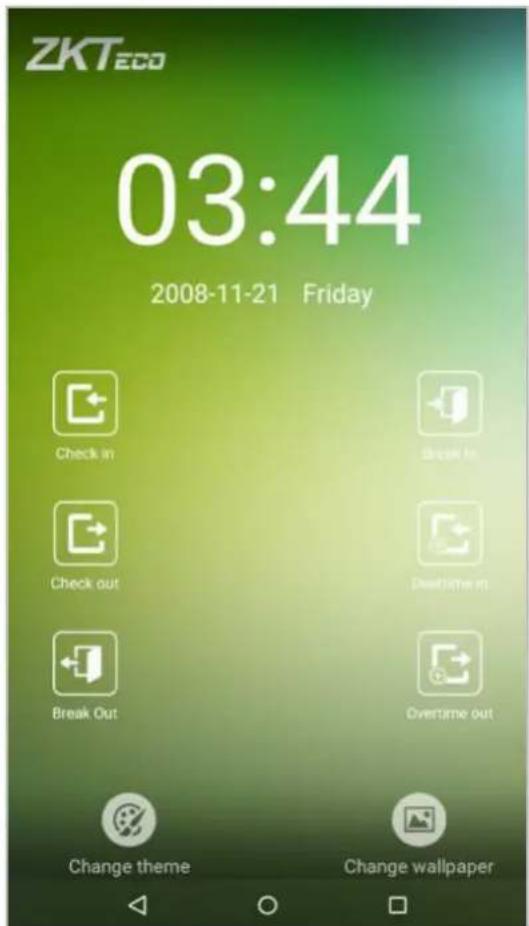
- Change the theme
- Tap on [Choose theme] and select a theme at the bottom of the interface.
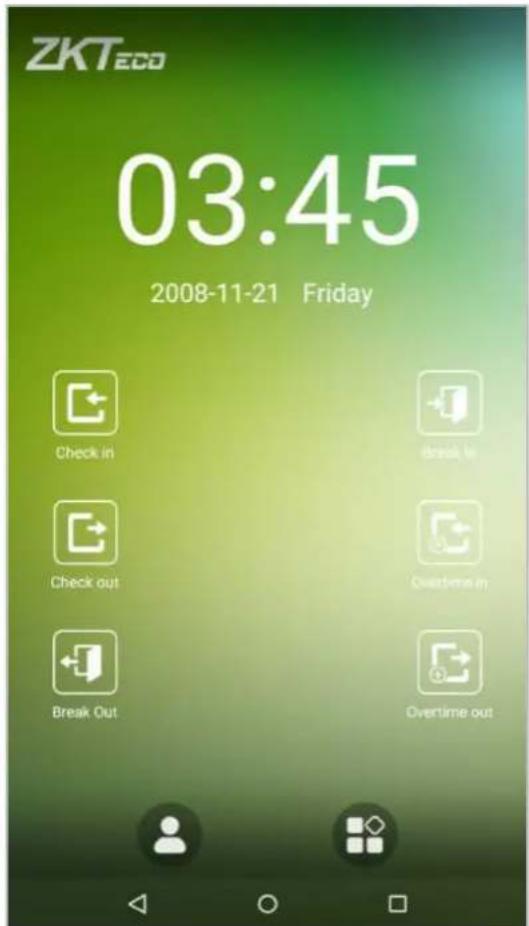
- After the theme was set successfully, it will be displayed on the standby interface.
- Change the wallpaper
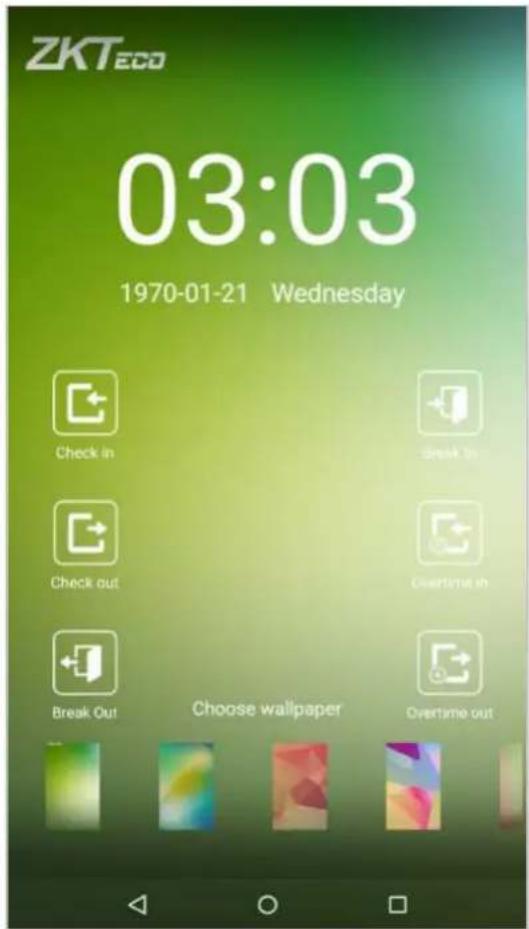
- Press on any blank area on the screen for a while, then tap on the [Change wallpaper] icon, slide from right to left and back in the wallpaper choosing area to choose the desired wallpaper.
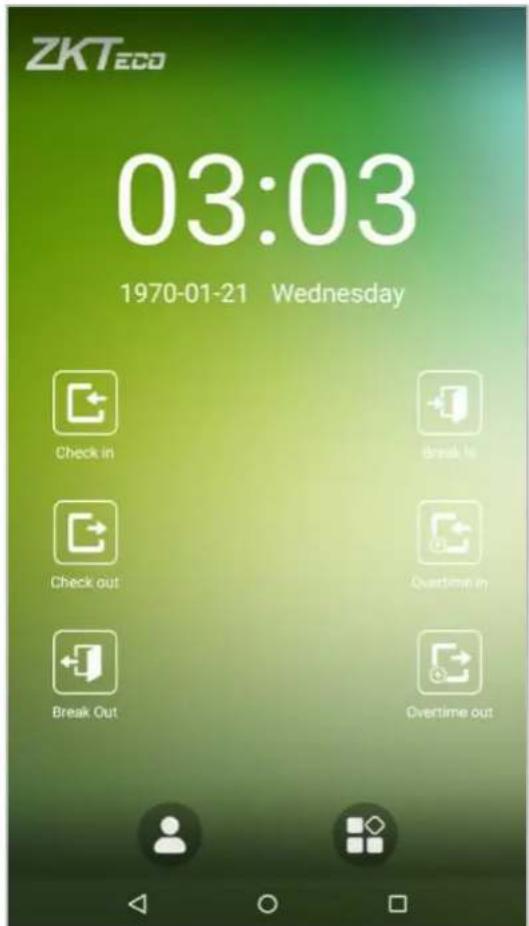
- The wallpaper is set successfully and displayed on the standby interface.
1.5 Verification Methods
1.5.1 Facial Verification
● 1:N face verification
Compares the acquired facial images with all of the facial templates that are stored in the device. The device will automatically detect faces nearby. Align your face into the capture area of the camera.
- Successfully verified.
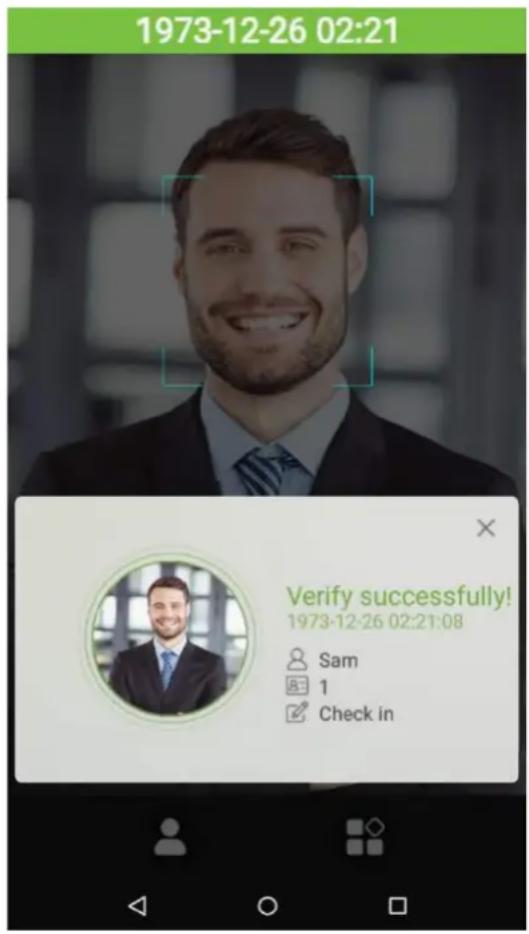
- Verification is failed.
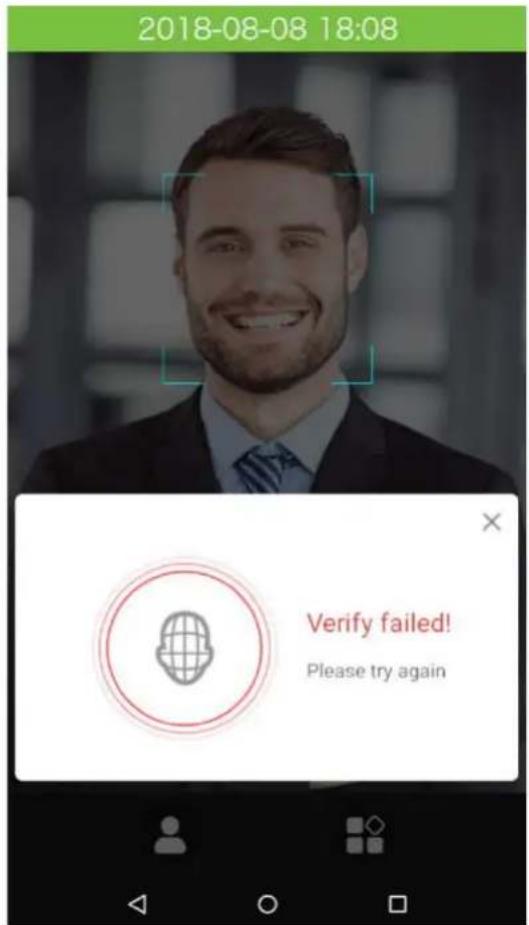
● 1:1 face verification
Compare the face captured by the camera with the facial template related to the personnel ID input. Press on the main interface and enter the 1:1 facial verification mode.

- Input the personnel ID, click on [OK].
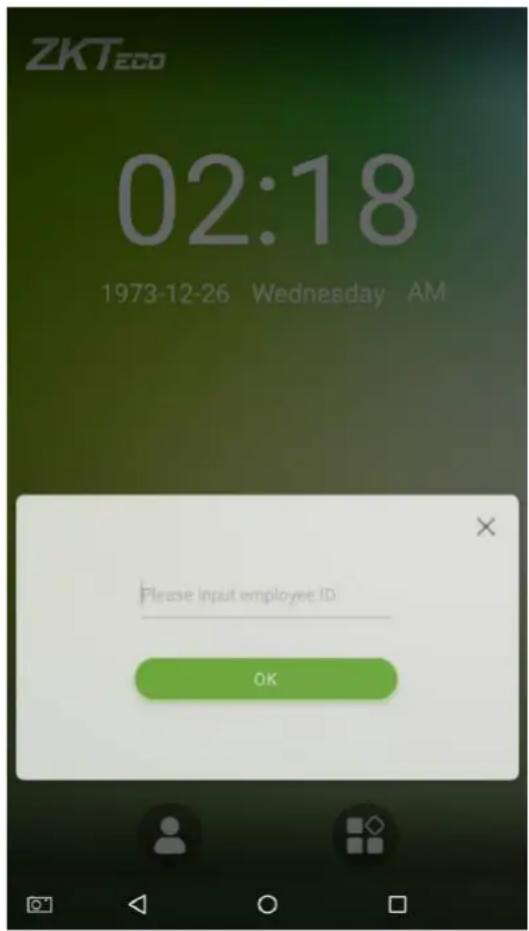
- Look at the camera; make sure your face stay in the center of the camera.
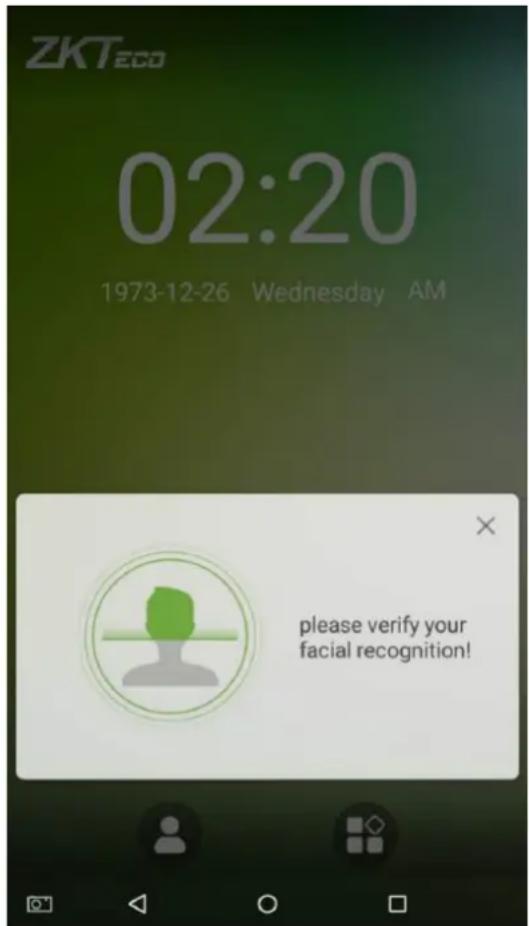
- Successfully verified.
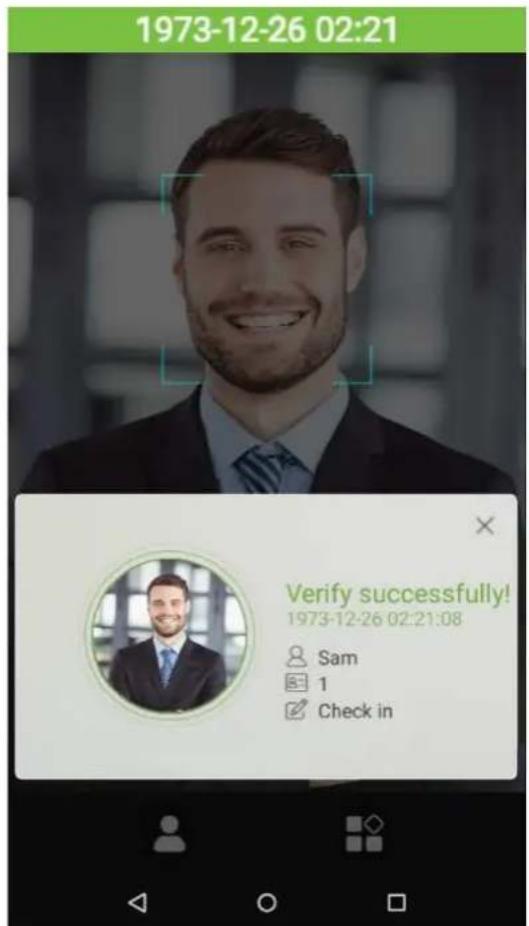
- Verification is failed.
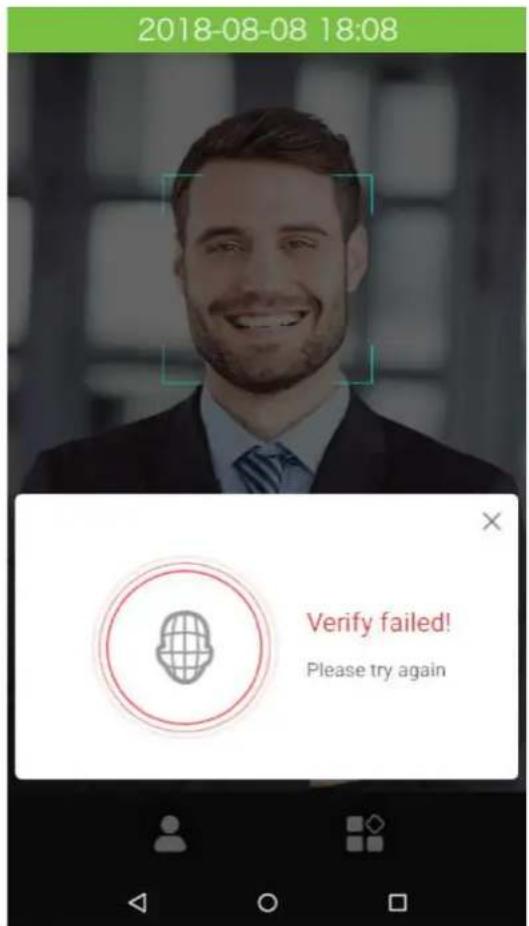
1.5.2 Fingerprint Verification
● 1:N fingerprint verification
Compare the fingerprint that is being pressed onto the fingerprint reader with all of the fingerprint data that is stored in the device.
To enter fingerprint verification mode, simply press your finger on the fingerprint reader.
Make sure that you correctly press your fingerprint onto the fingerprint reader. Please refer to section "1.1 Using your finger" for further details.
Successful verification:
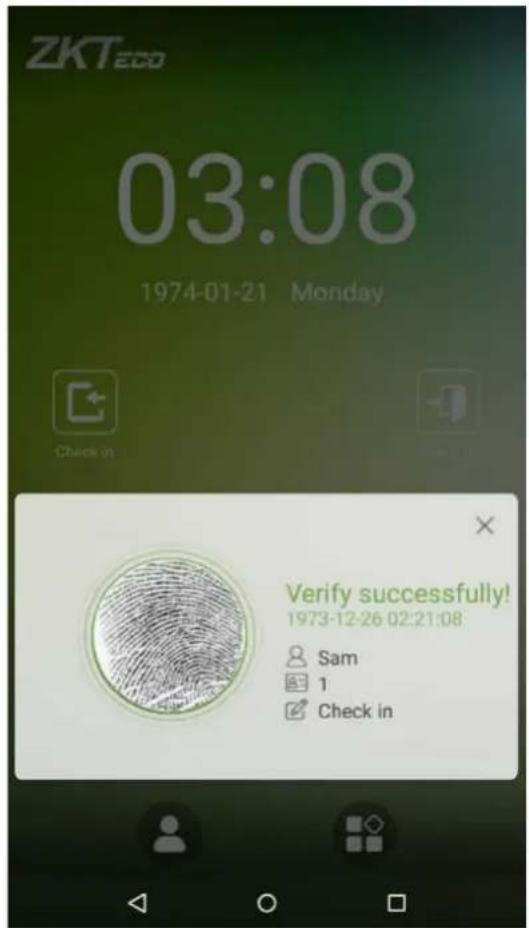
Verification is failed:
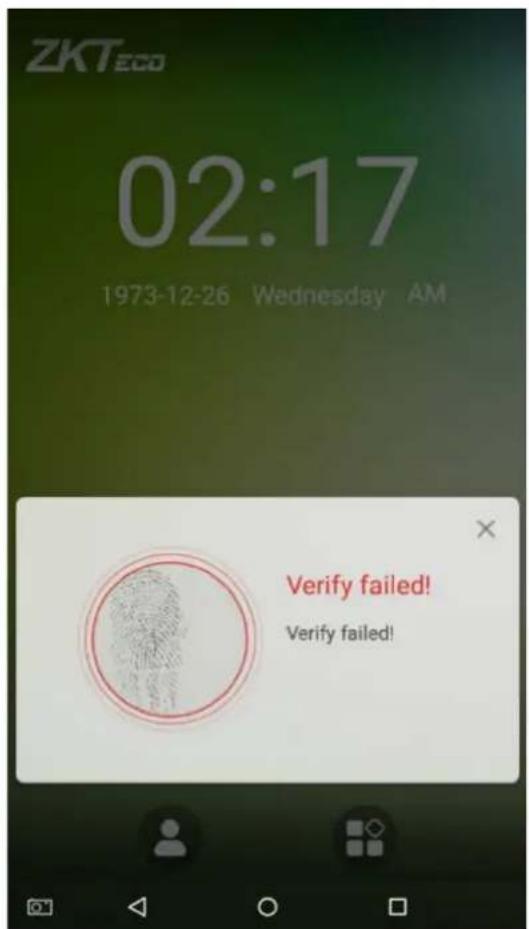
● 1:1 fingerprint verification
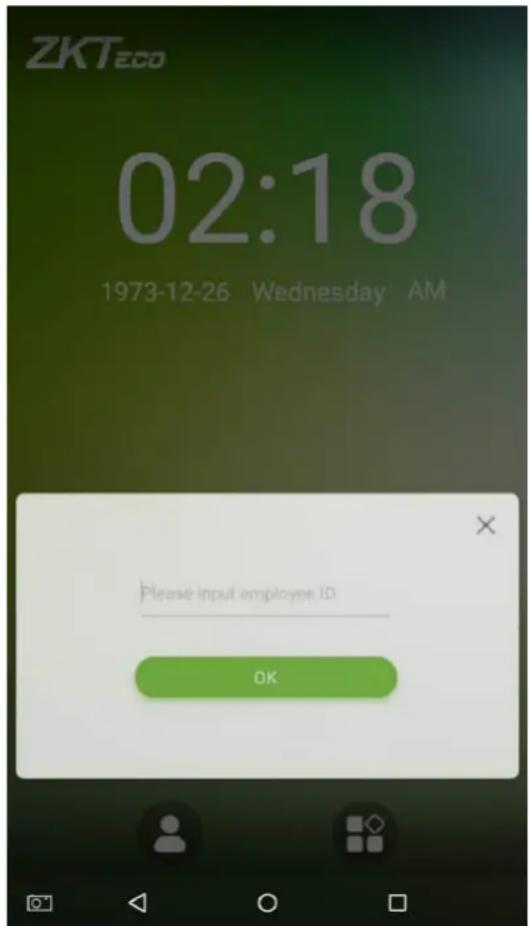
Compares the fingerprint that is being pressed onto the fingerprint reader with the fingerprints that are linked to Employee ID input via the virtual keyboard. This method can be used when the system has trouble recognizing an employee's fingerprints.
Press the button on the main screen to enter 1:1 fingerprint verification mode:
- Enter the Employee ID and press [OK].
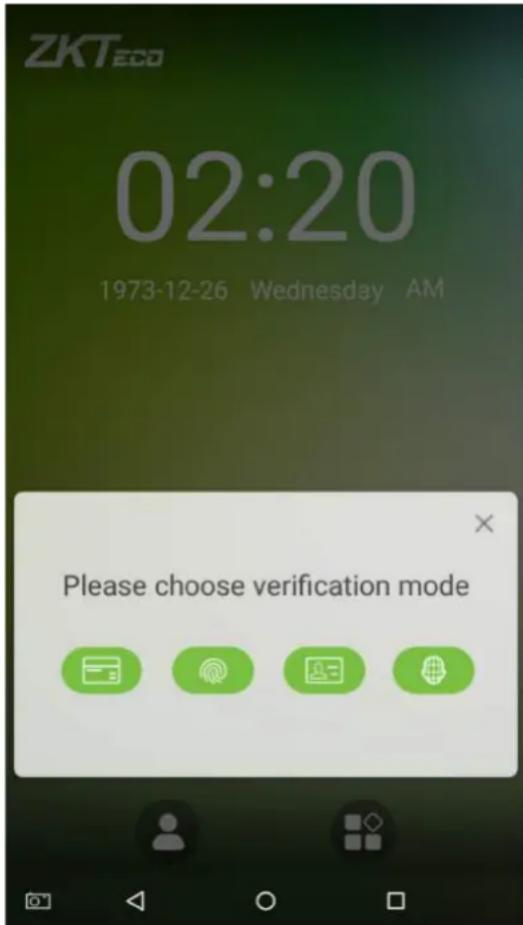
If an employee has registered a face, a password and badge★ in addition to his/her fingerprints and the verification method is set to fingerprint/ password/ badge★/ face verification, the following screen will appear. Select the
fingerprint icon
to enter fingerprint verification mode:
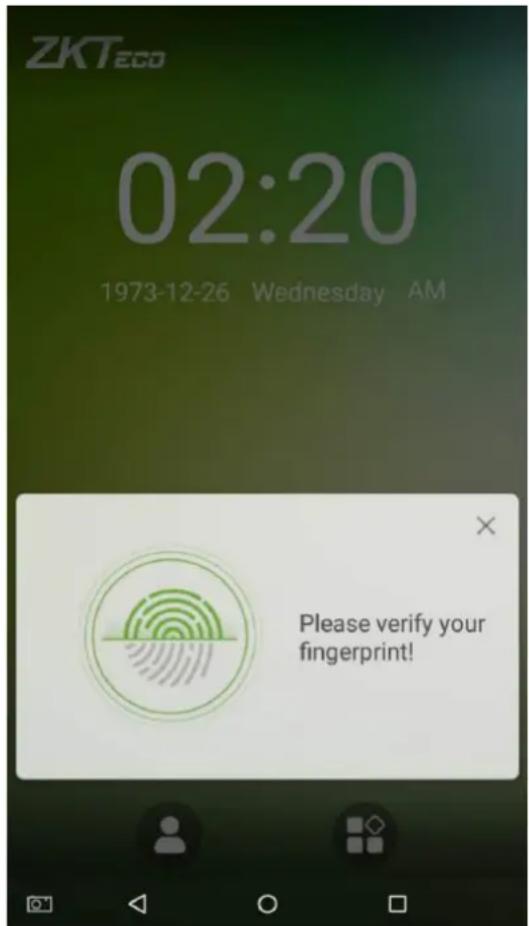
- Press the finger on the fingerprint reader to proceed with verification.
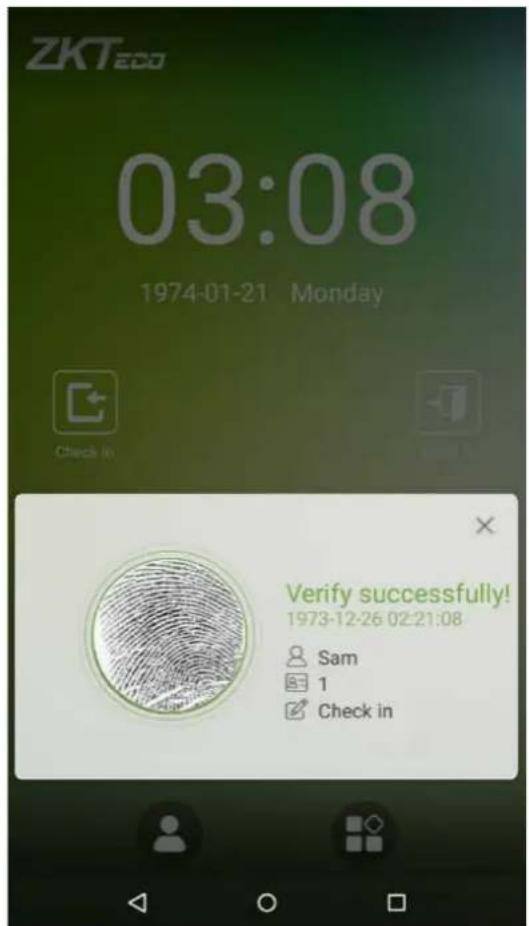
- Successfully verified.
- Verification is failed.
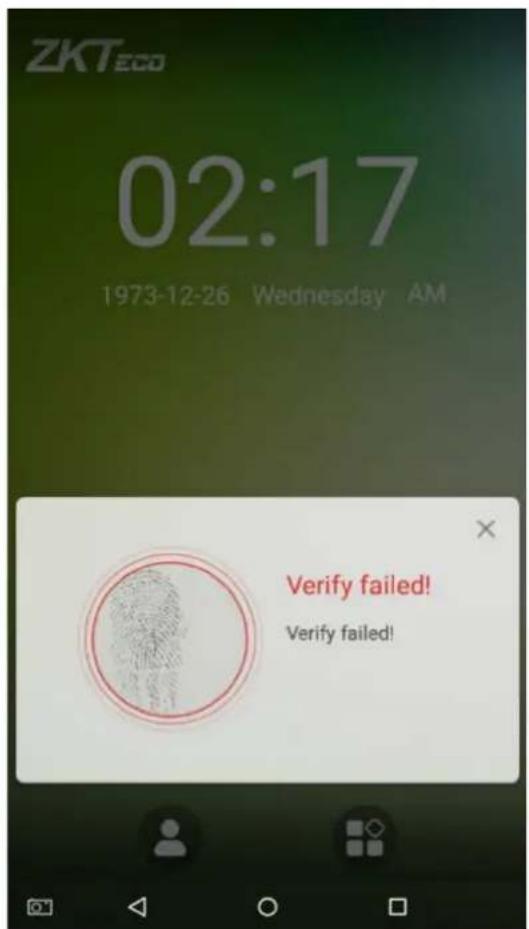
1.5.3 Password Verification
When an employee inputs his/her personnel ID and password into the device, the data will be compared to the personnel IDs and passwords saved in the system.
Tap on the button on the main screen to enter the 1:1 password verification mode.
- Enter the employee ID and press [OK].
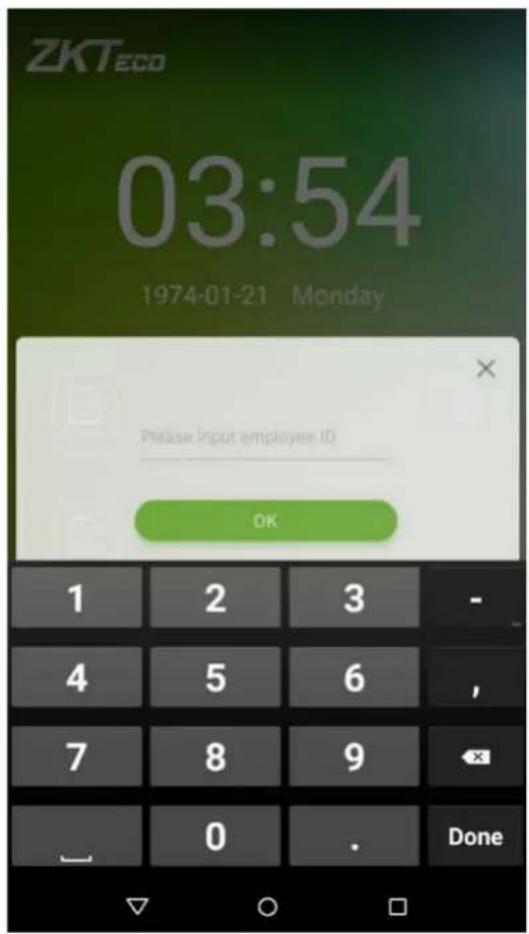
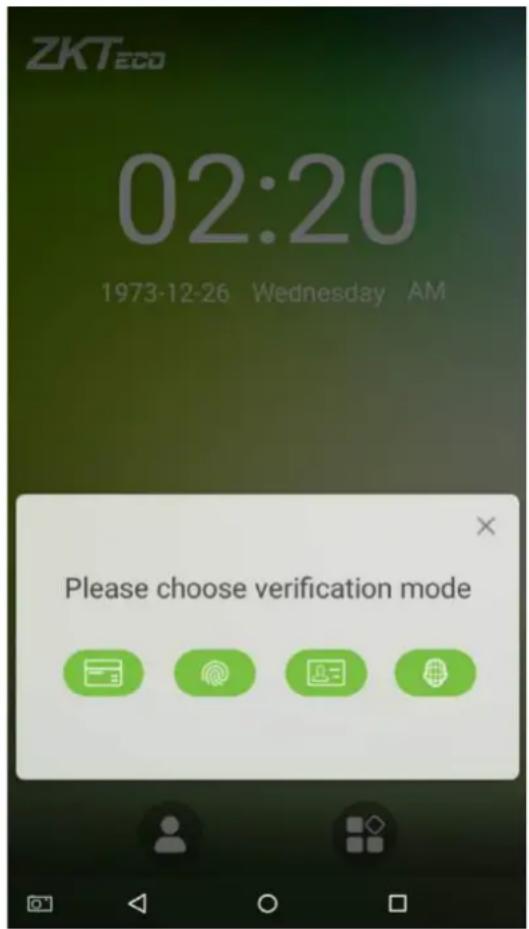
If an employee has registered a face, a fingerprint and badge★ in addition to his/her password and the verification method is set to fingerprint/ password/ badge★/ face verification, the following screen will appear. Select the
password icon
to enter password verification mode.
- Enter a password and press [OK].
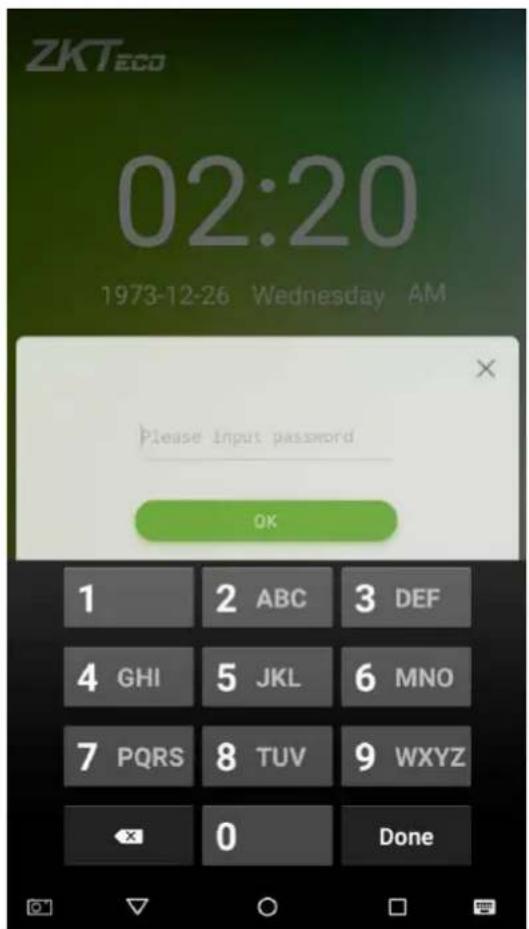
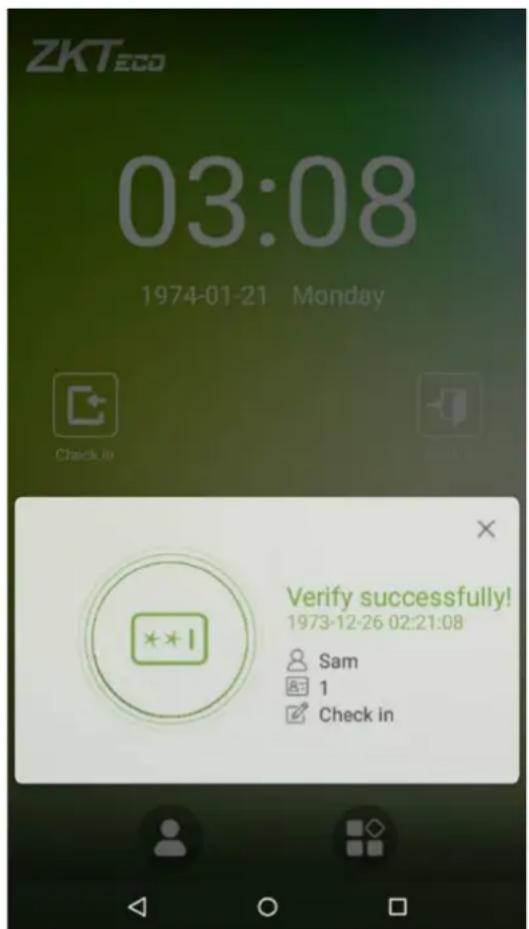
- Successfully verified.
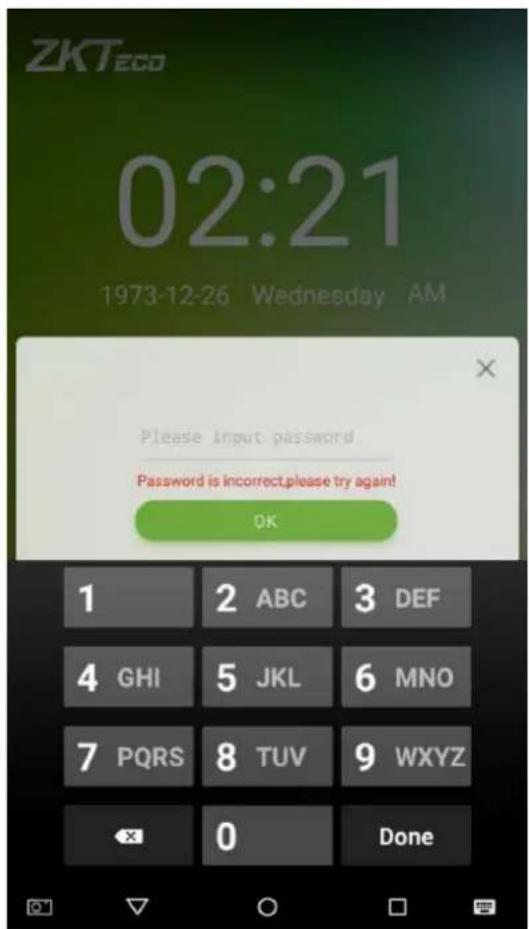
- Verification is failed.
1.5.4 Card Verification★
Only the product with the card module offers the card verification function.
Please place the registered card on the card reader.
1.5.5 Combined Verification
To increase security, this device offers the option of using multiple forms of verification methods. A total of 21★ different verification combinations can be used, as shown below:
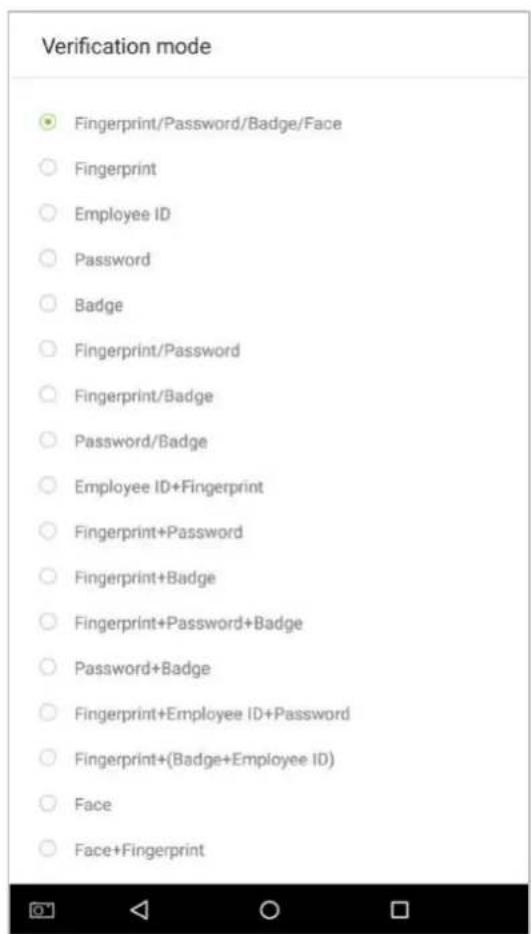
Notes:
- “/” means “or” and “+” means “and”.
- Combined verification requires employees to register the information needed to complete verification. Otherwise, employees may not be able to complete the verification process. For instance, when employee A registers with his/her fingerprint data, and the system's verification mode is set as "Fingerprint + Password", the employee will not be able to complete the verification process.
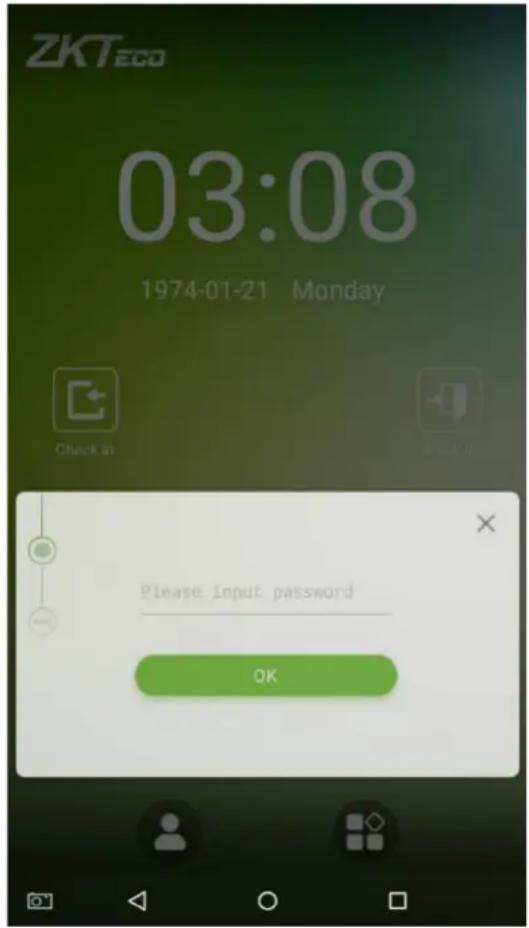
The example below shows "Fingerprint + Password" verification. To log in to the system, please follow these steps: 1. Press your finger on the fingerprint reader, then the following window will appear. Enter the password and tap on [OK].
- Successfully verified.
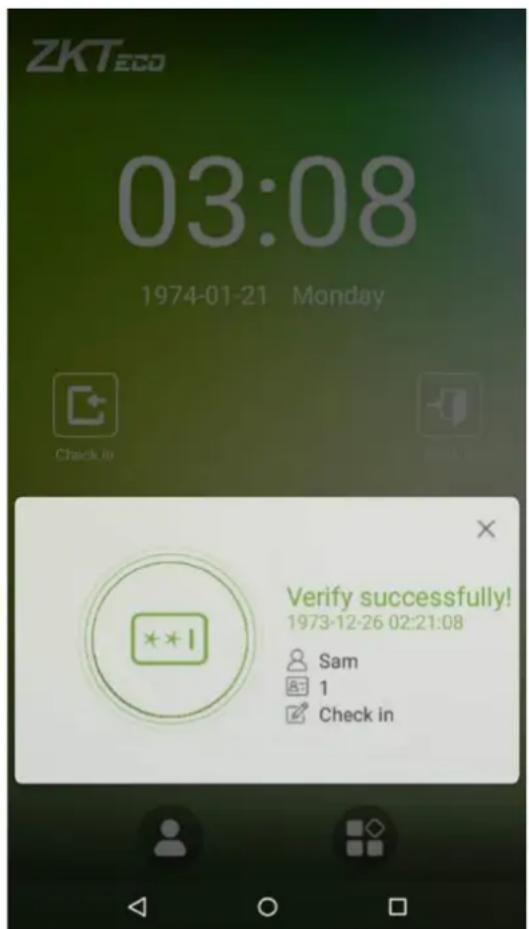
- Verification is failed.
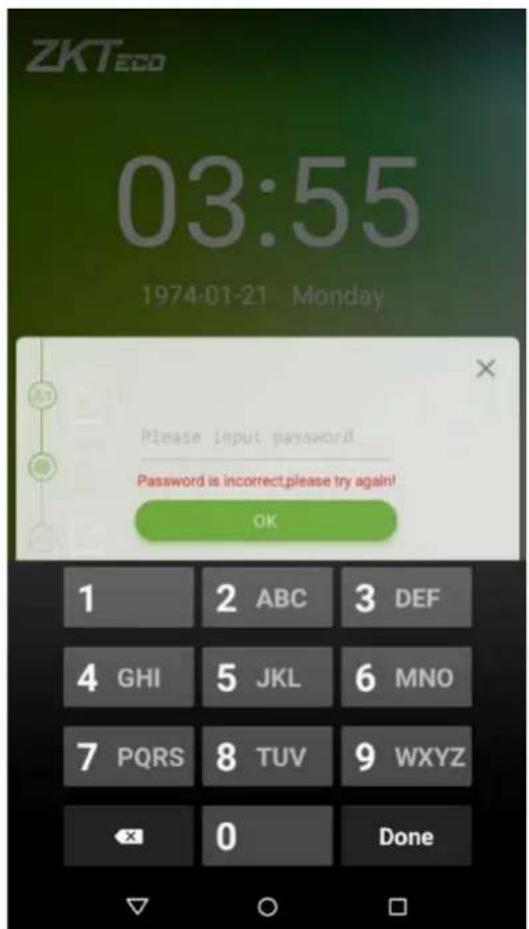
Note: A combined verification method can only be used when an employee has registered a comparison method and that method has been selected in the system. For further details, please see section "3.1 Add an Employee" below.
2. Main Menu
On the startup screen, press

to enter the main menu, as shown in the diagram below:
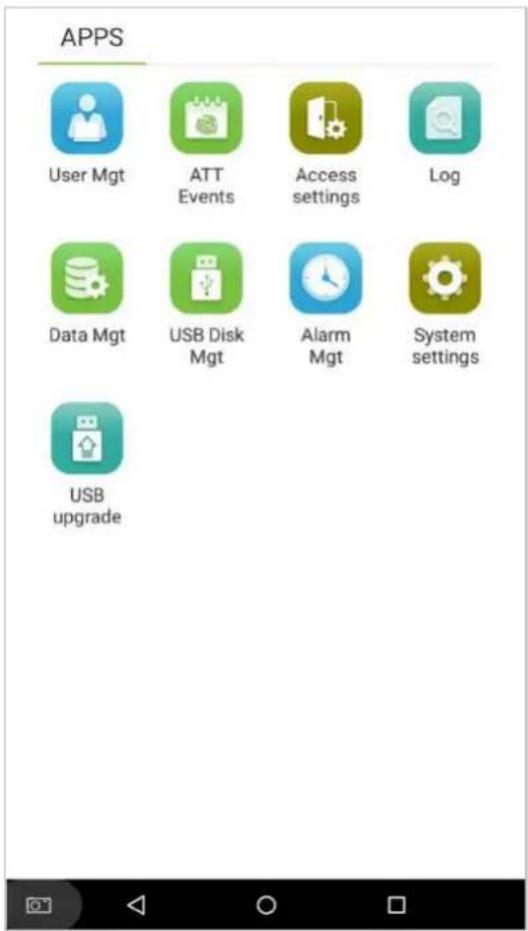
Attendance device Access device
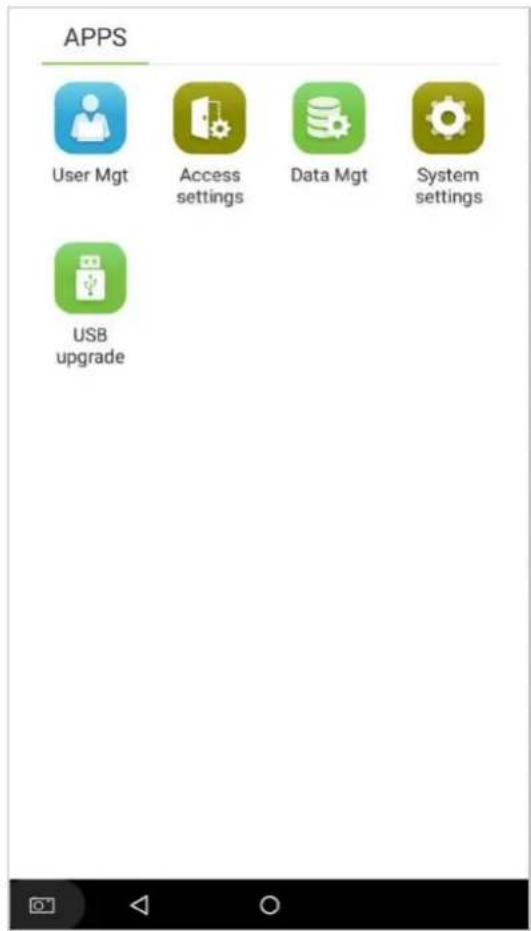
| Menu Options | Function Description |
| User management | Add, view and edit employee information. |
| Attendance events★ | Records various clock-in or clock-out data based on different attendance status. |
| Access settings | Achieve simple access control settings. |
| Log★ | Look up attendance log, view attendance photo and blacklist photo. |
| Data management Delete data from the device. | |
| USB Disk management★ | Use a USB drive to upload and download. |
| Alarm management★ | Once an alarm has been set, the device will automatically play preselected ringtone when the designed time is reached. It will stop ringing after the alarm time elapsed. |
| System settings | Set the network, date, time, attendance parameters, cloud server, Wiegand, display, sound settings, biometric parameters, automatic test, advanced settings of the device. |
| USB upgrade | Upgrade the firmware of the device with the upgrade file in a USB drive |
Note: If the device does not have a super administrator, any user can enter the menu by pressing the key; after a super administrator has been set on the device, ID verification will be required to enter the menu. Once password verification is successful, users can enter the menu. To ensure the security of the device, we recommend registering an administrator the first time you use this device. For detailed operating instructions, please see section "3.1 Add an Employee".
3. User Management
3.1 Add an Employee
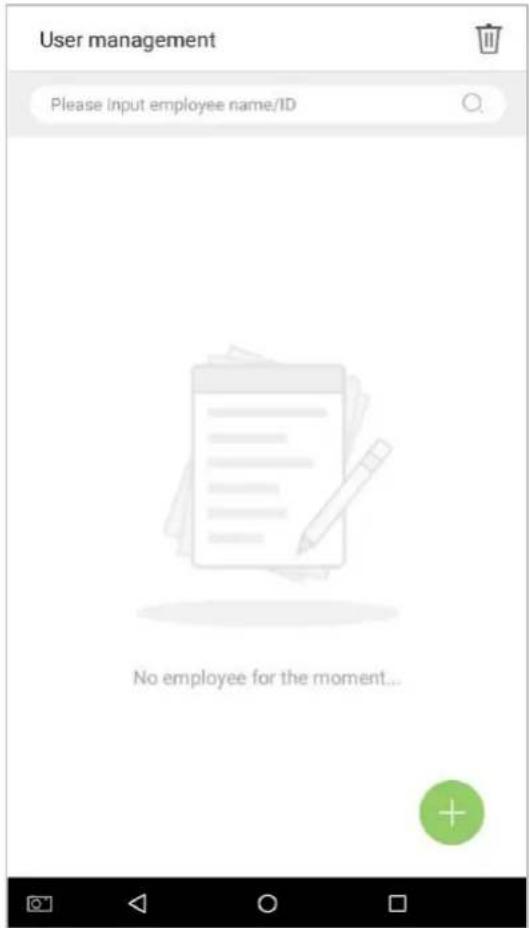
Tap on [User Management] in the main menu:
- Tap on on the [User Management] interface to enter the employee creation wizard.
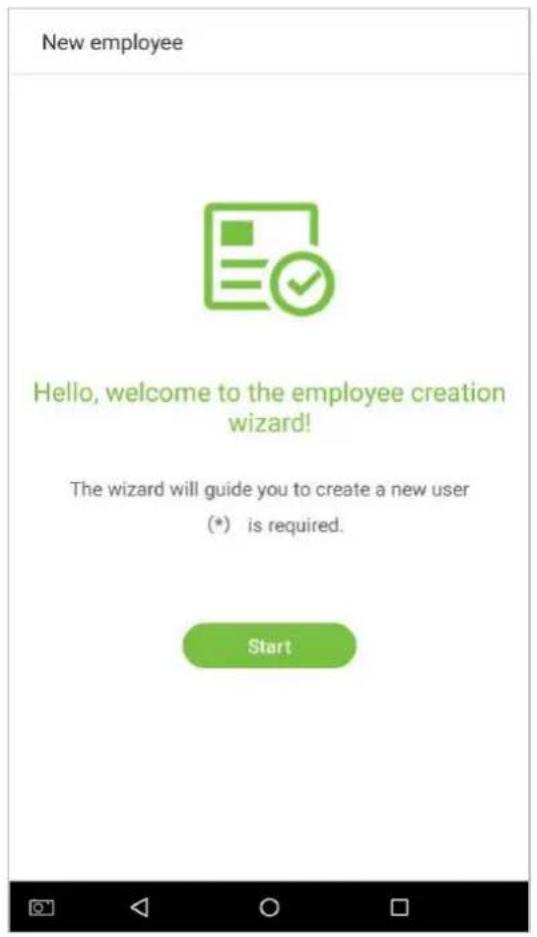
- Tap on [Start] on the employee creation wizard.
3.1.1 Register Basic Employee Information
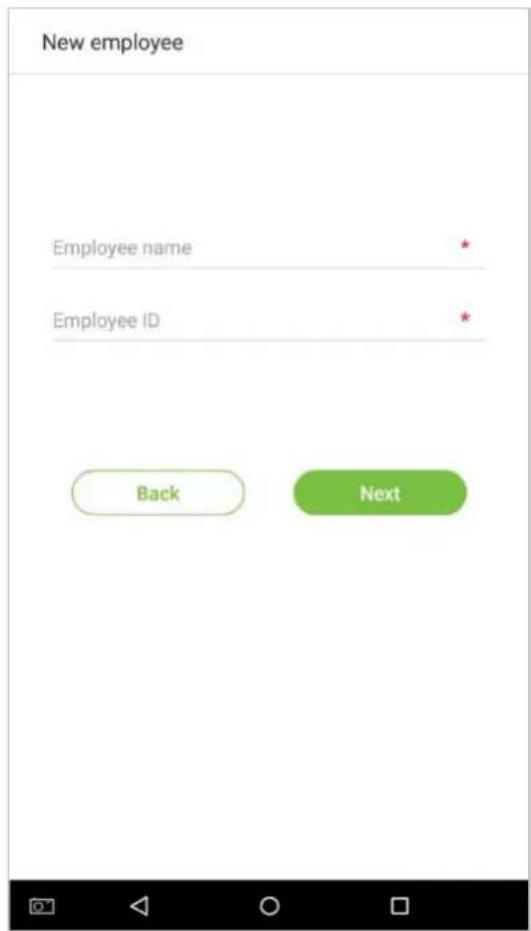
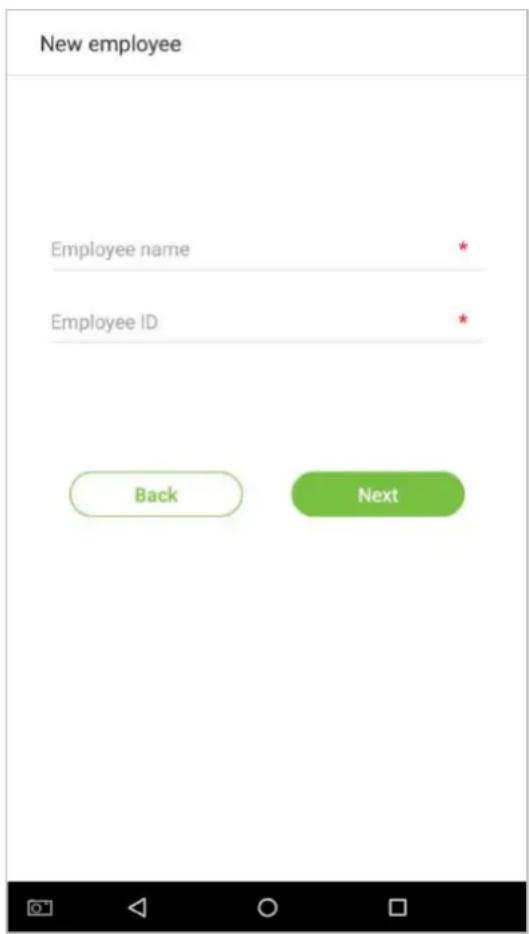
Enter the employee name in the [Employee Name] field, and the personnel ID in the [Employee ID] field:
Notes:
- The name refers to the employee's name. Its maximum length is 24 characters.
- The system supports employee IDs from 1 to 9 digits by default. A maximum of 23 digits can be input. To increase the number of digits that can be input, please contact our pre-sale tech department.
- Employee IDs can be changed the first time that they are used to log in to the system. After they have been used to log in, employee numbers can no longer be edited.
- The message "This Employee ID is already in use!" indicates that the ID number you have input is already being used. Please input another ID number.
3.1.2 Register Employee Photo
After inputting the employee's basic information, tap on the right arrow to register an employee photo.
1. Tap on the

icon to enter the camera interface.
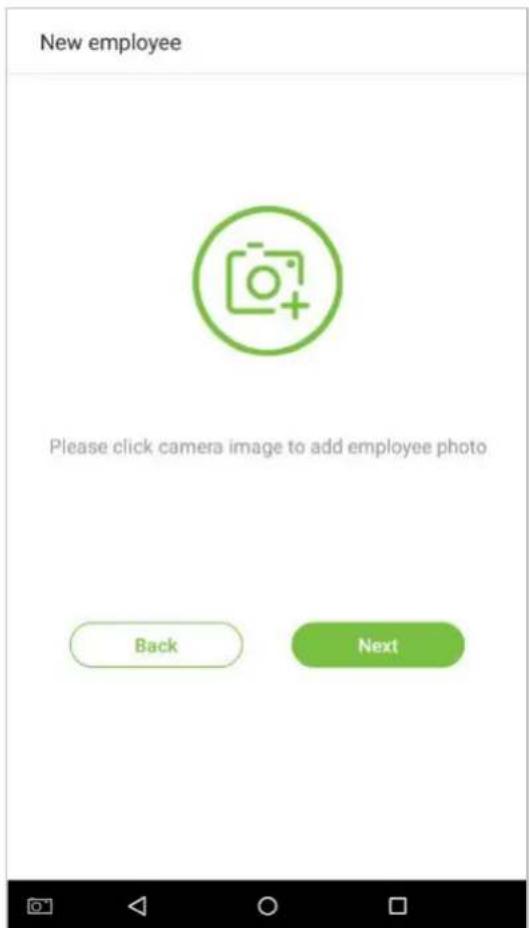
- Employee should face the lens and then adjust the position. Tap on the icon to take a photo.
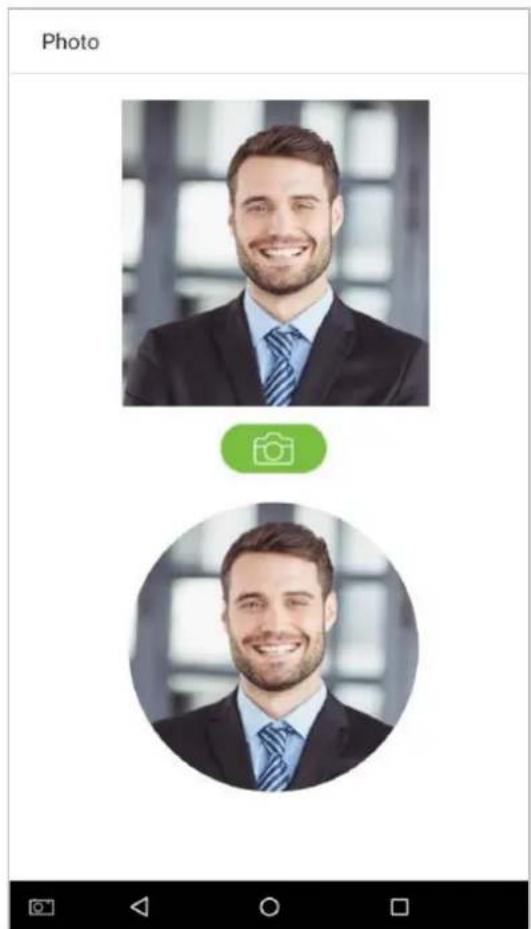
- Tap on the

icon on the bottom side, select a photo, and then tap on the

icon to continue
taking another photo.
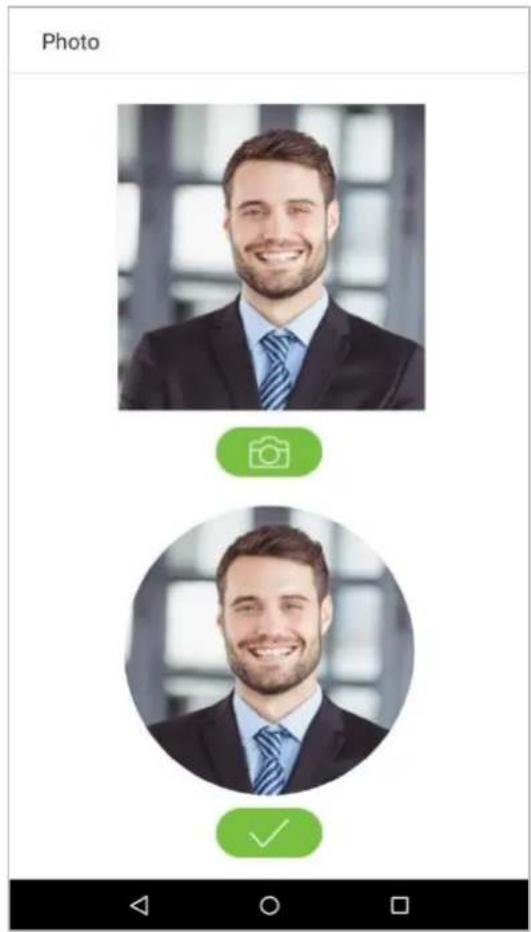
- Tap on the rightwards arrow to complete adding the photo.
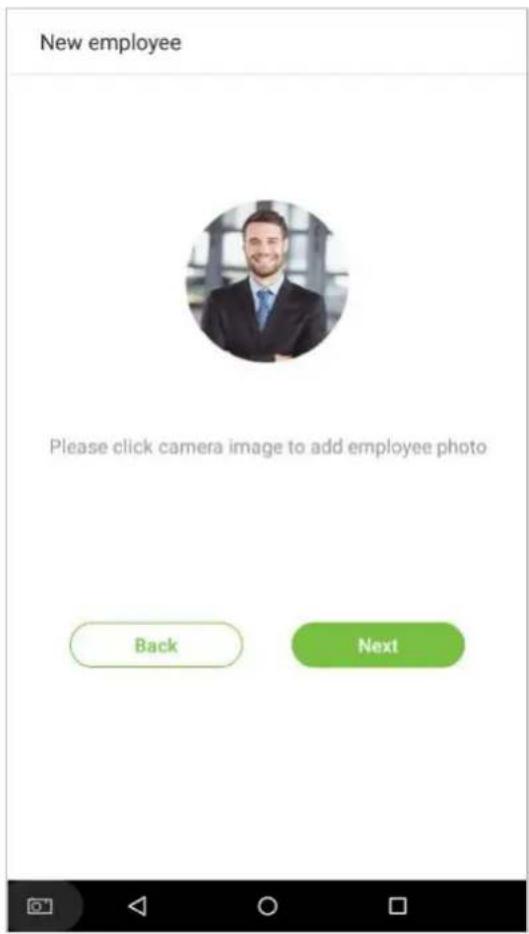
3.1.3 Registration Comparison Methods
The registration comparison method is the method used to verify a login. This includes registering a face, a password, fingerprints, or badge number. Select a registration that best suits your needs.
Click on the rightwards arrow on the interface shown after the message [Employee photo added successfully], then enter the verification method entry page:
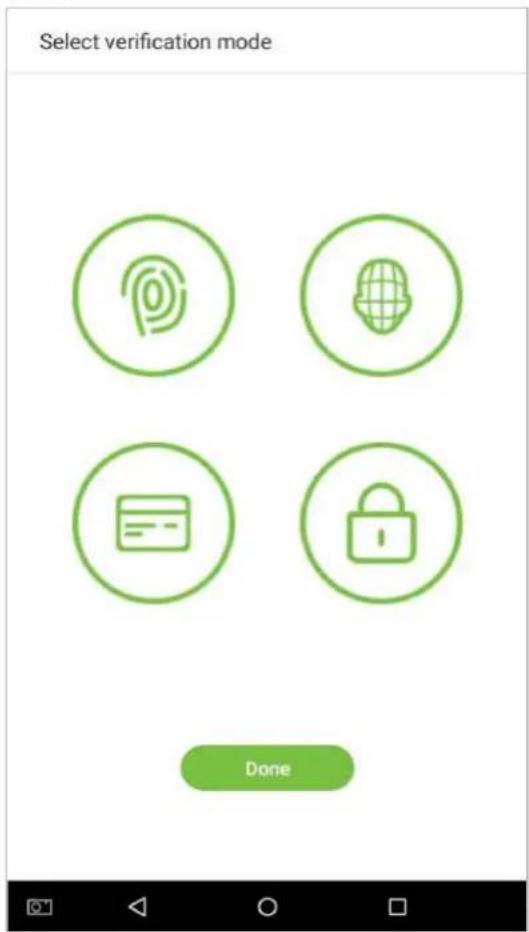
- Register fingerprints
- On the registration method entry interface, tap on the icon to enter the fingerprint registration page. Select the icon on the left or right side of the screen and then tap on the finger you would like to register a fingerprint for.
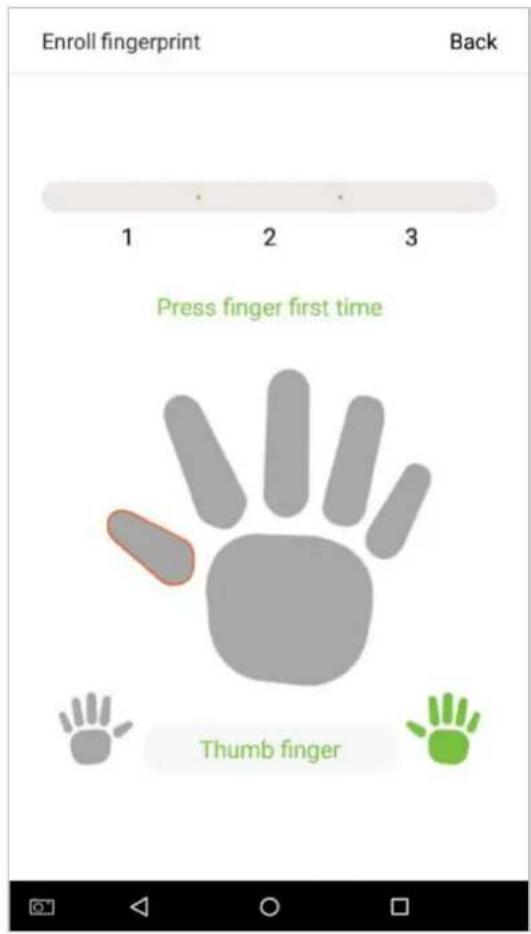
- Press the same finger on the fingerprint reader three times. Green indicates that the fingerprint was input successfully.
If you press different fingers onto the fingerprint scanner during the 2^nd and 3^rd contacts, you will be prompted to "Please use the same finger".
- If fingerprint is successfully registered, a "Continue to enroll the next fingerprint?" dialog box will appear. Tap on [Yes] to record the next fingerprint, or [No] to return to the fingerprint registration interface.
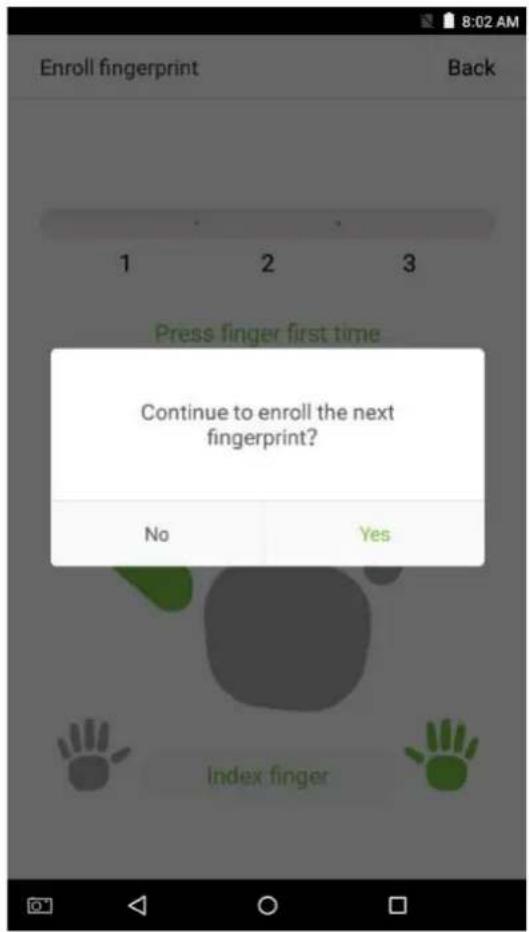
- Register face
On the registration method entry interface, tap on the adjust your face on the register area.

icon to enter the face registration page. Move and
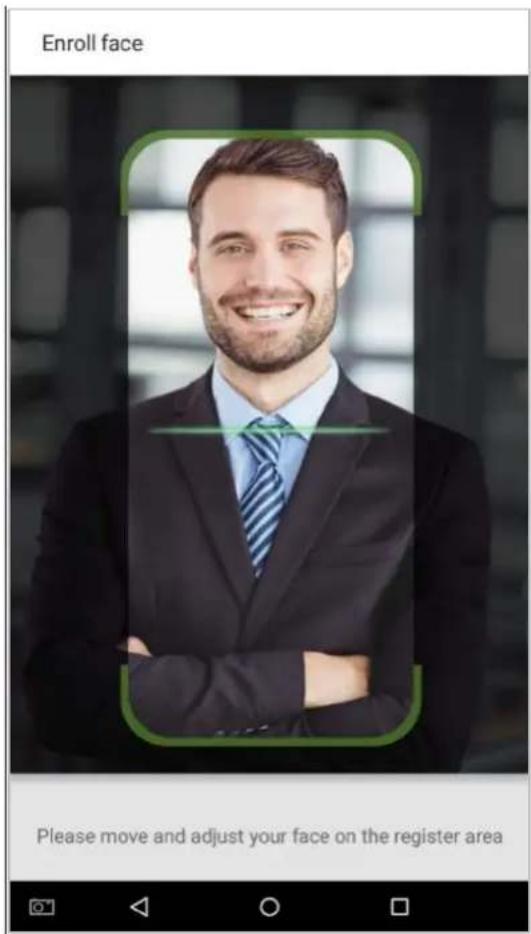
- Register badge number ★
On the registration method entry interface, tap on the Place your badge close to the card swiping area.

icon to enter the badge number registration page.
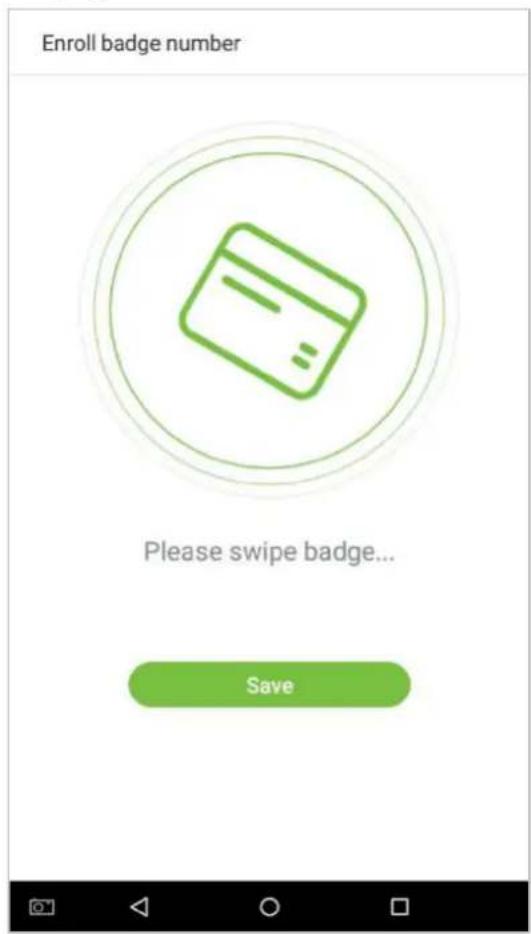
- Register passwords
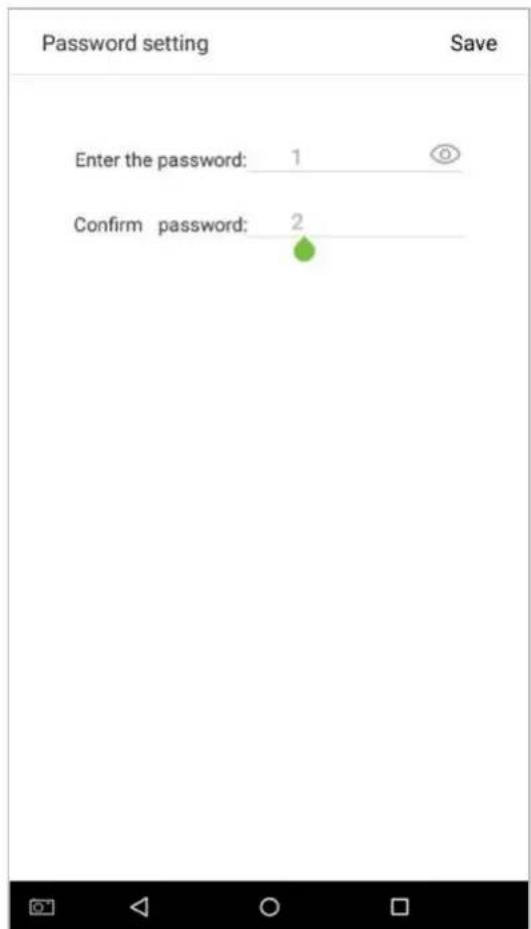
- On the registration method entry interface, click on the icon to enter the register password page. Enter a password in the [Enter the password] field, then re-enter the password in the [Confirm password] field. Tap on [Save] (Note: the employee password must be an 8-digit number).
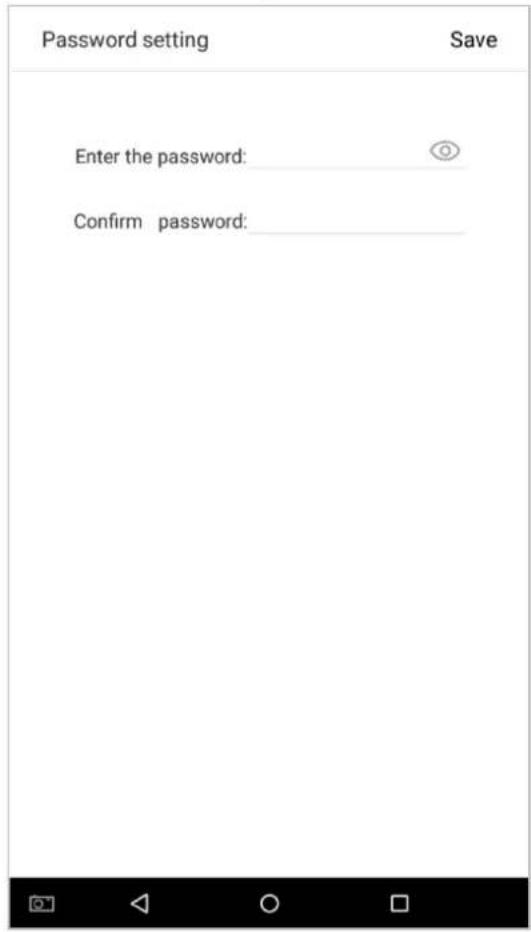
Tap on ✕ to encrypt the password; tap on Ⓞ to make the password visible, as shown below:
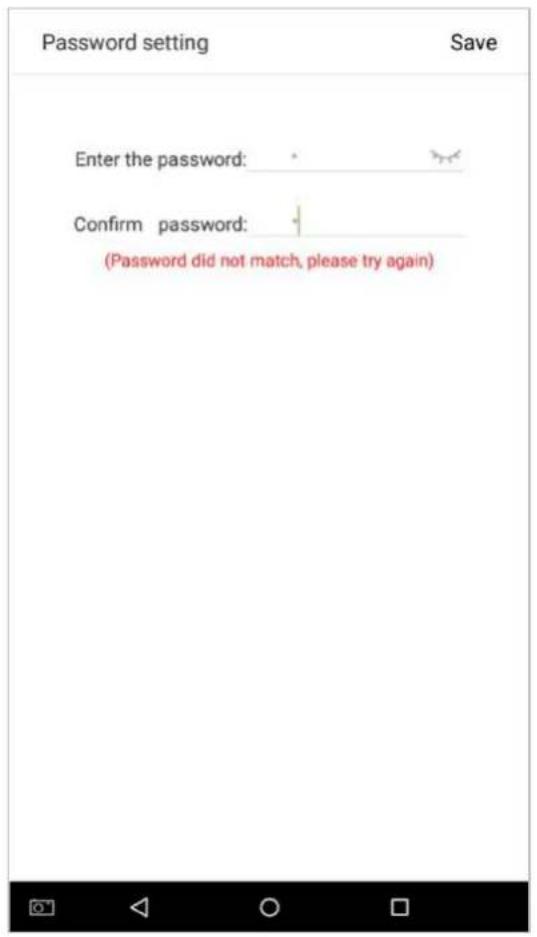
- If the password you input in both fields does not match, you have to re-enter the passwords.
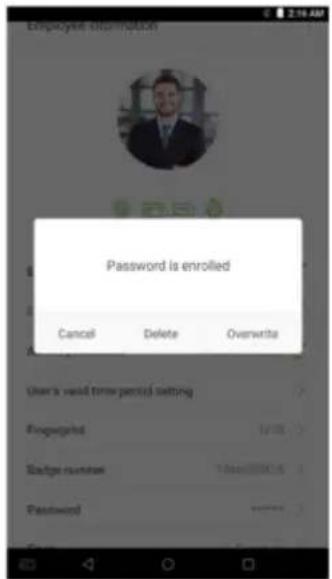
- The password which has been registered can be deleted or covered.
- Delete/Overwrite registered passwords
On the User management interface, tap an employee in the employee list to enter the employee information page, and then tap on [Password].
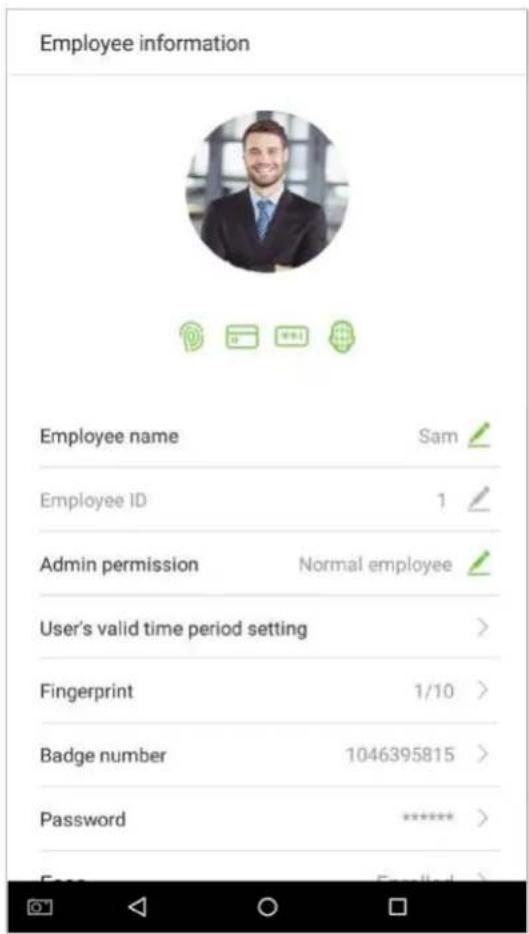
Press [Delete]/ [Overwrite] in the dialog window that pops up.
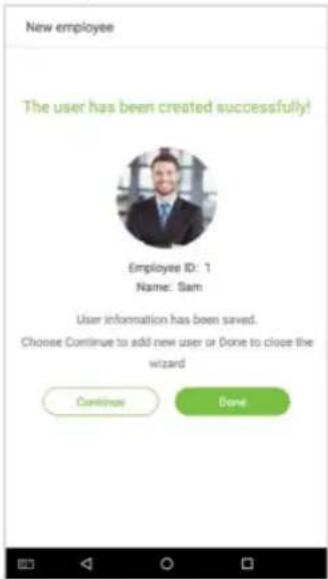
Click [Done] after the registration, a new employee is created successfully.
3.1.4 Permission Settings
Personnel who use this device have two types of permissions: normal employee and super administrator. After a super administrator is registered on the device, normal employees can only verify and compare their accounts using methods that have already been registered. Super administrator has the same privileges as normal employees, but can also enter the main menu.
- On the [User Management] interface, tap on an employee in the employee list to visit the employee's information.
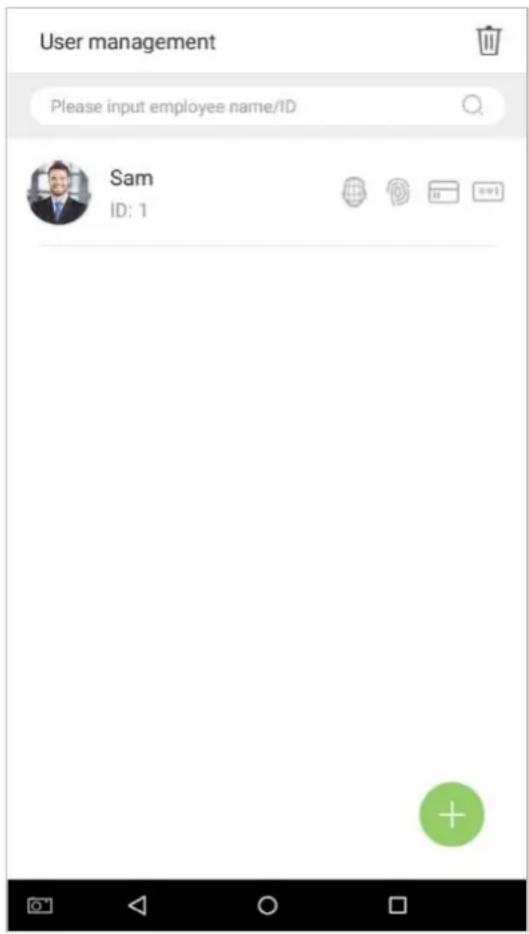
- Once you have entered the "Employee information" interface, tap on the [Admin permission] column and select [Normal employee] or [Super administrator] in the window that appears.
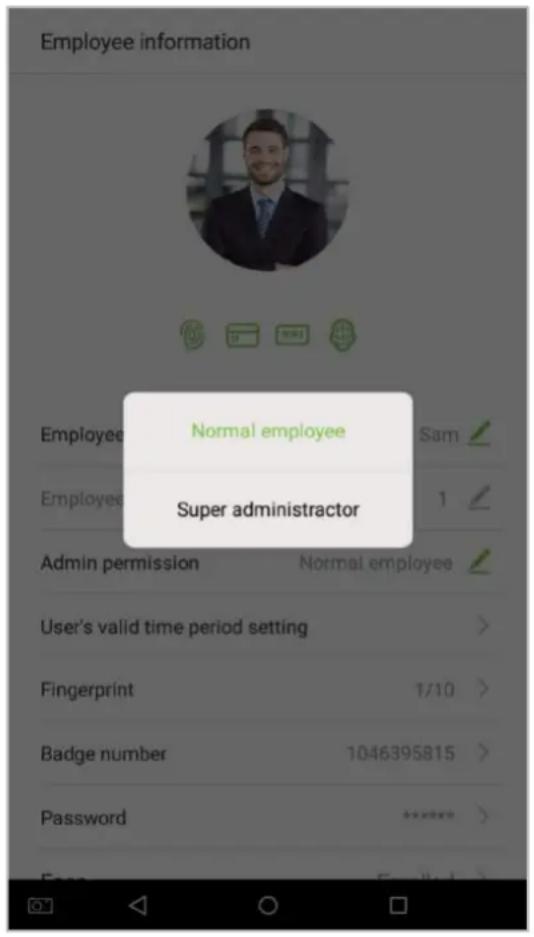
Note: When a user is given super administrator privileges, entering the main menu will require ID verification. The verification process depends on the verification method that was used during user registration. See the description in section "1.5 Verification Methods".
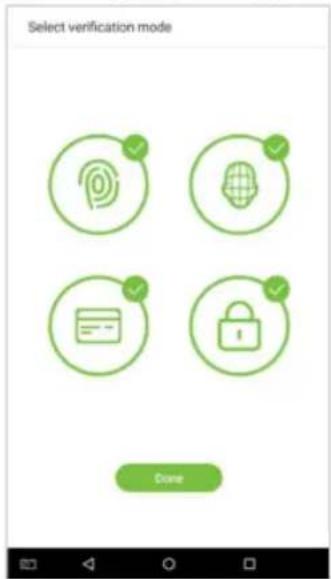
3.1.5 Verification Mode Setting
To improve security, this device features combination verification modes, which can create a total of 21★ verification modes. Enter an applicable verification mode in this line.
- Tap on the [Verification Mode] field on the "Employee information" interface.
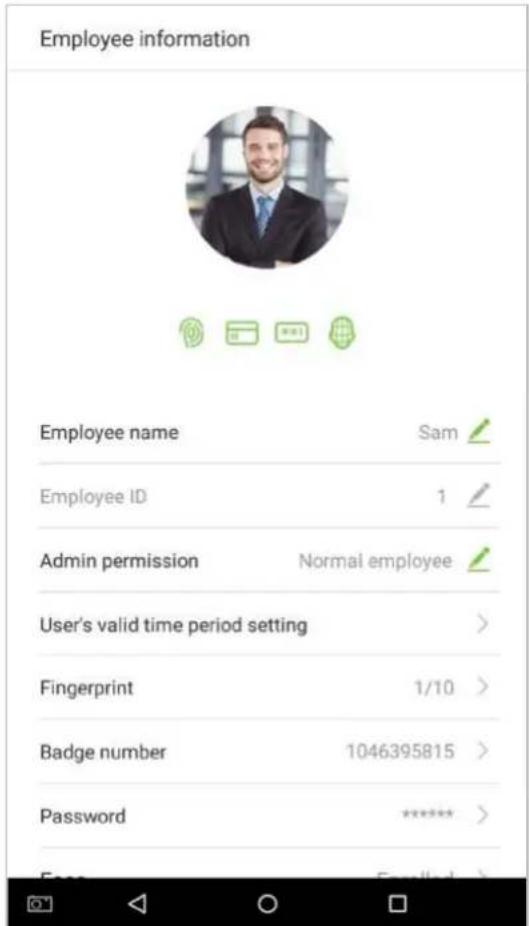
2. Select [Verification Mode], and then select a verification mode.
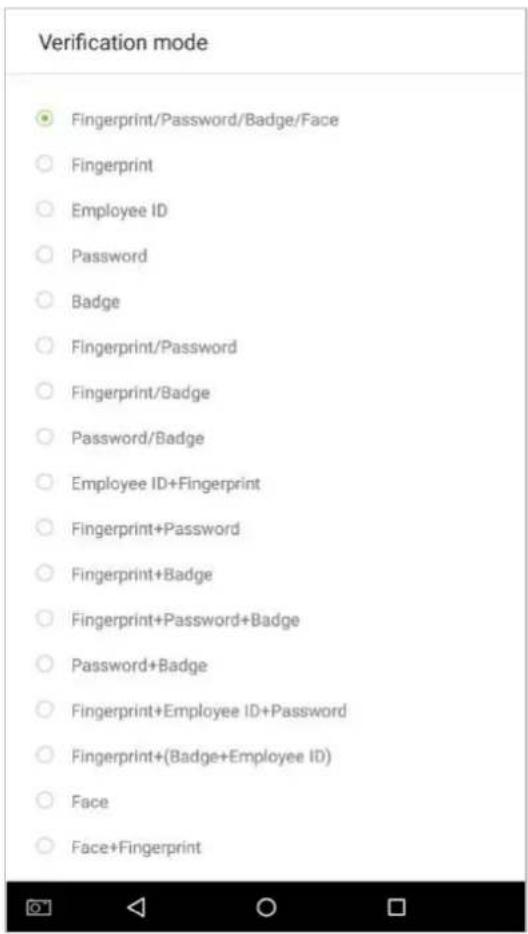
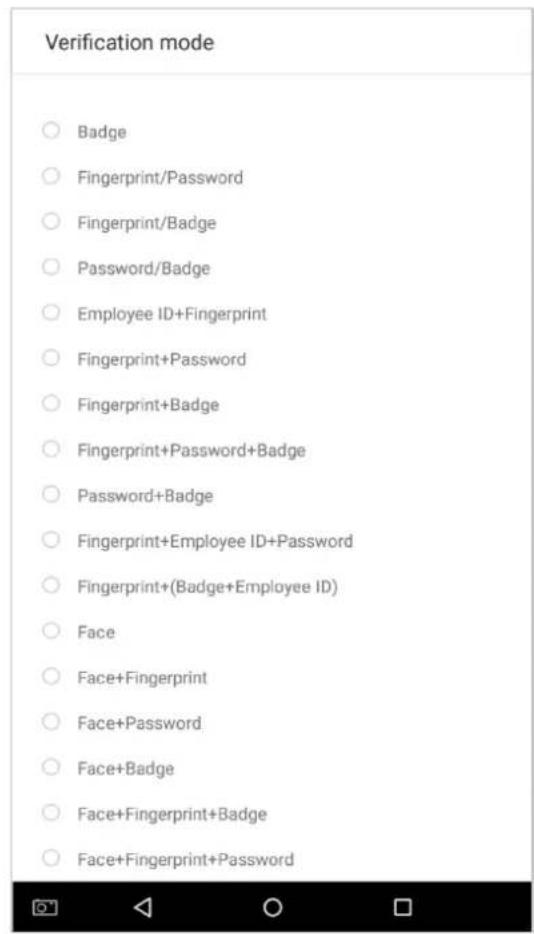
- Return to the "Employee information" interface and it will display the verification mode you have chosen.
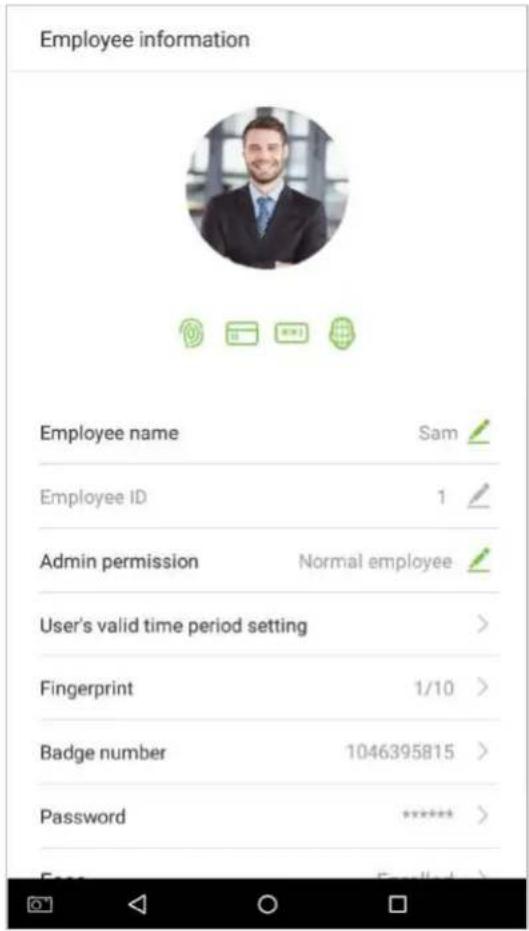
Notes:
- “/” means “or” and “+” means “and”.
- Support 21★ different verification method combinations: fingerprint/ password/ badge/ face; fingerprint; employee ID; password; badge; fingerprint/ password; fingerprint/ badge; password/ badge; employee ID + fingerprint; fingerprint + password; fingerprint + badge; fingerprint + password + badge; password + badge; fingerprint + employee ID + password; fingerprint + (badge + employee ID); face; face + fingerprint; face + password; face + badge; face + fingerprint + badge; face + fingerprint + password.
- Combined verification requires employees to register the information needed to complete verification. Otherwise, employees may be unable to complete the verification process. For instance, when employee A registers with his/her fingerprints and the system's verification method is set as "Fingerprint + Card", the employee will not be able to complete the verification process.
3.1.6 Access level ★
User access level sets the door unlocking rights of each person, including the access control settings of the group that the user belongs to and the available time zones.
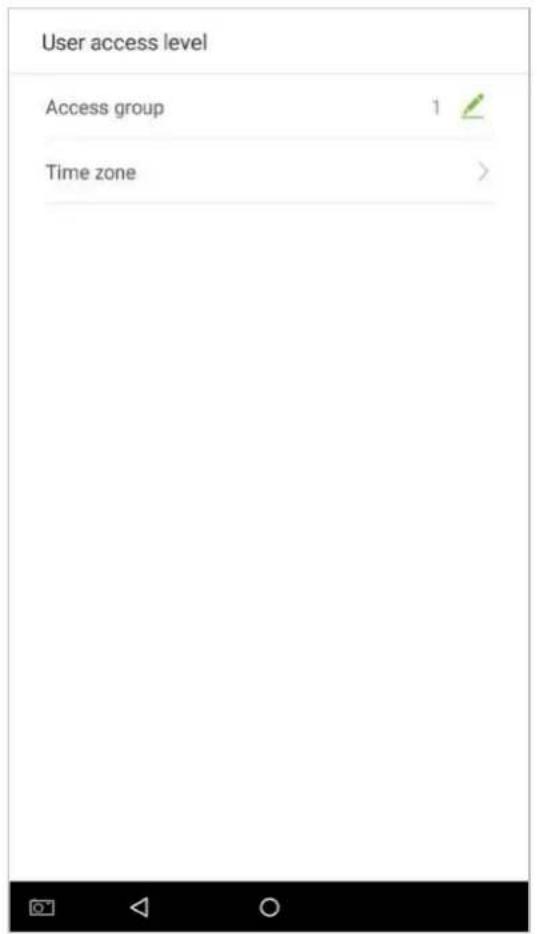
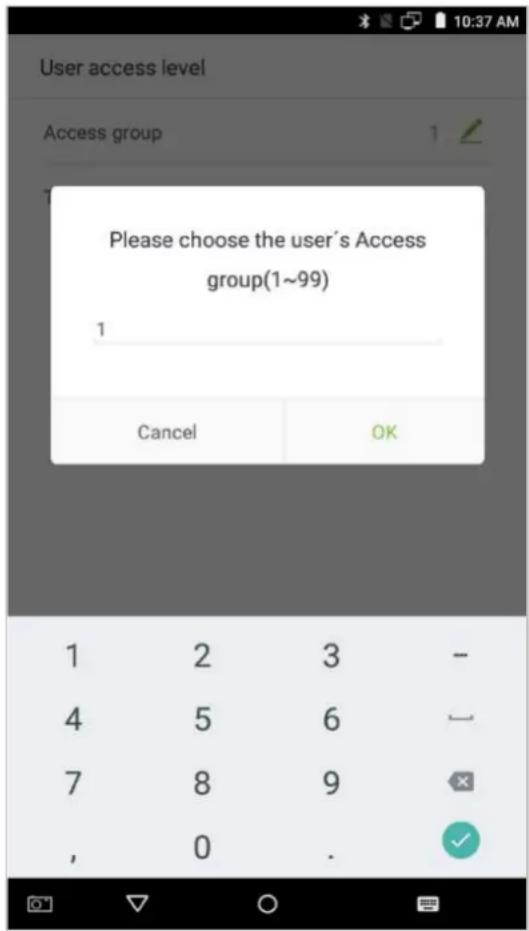
- Access group
You may assign the registered users to different groups for better management. New users belong to Group 1 by default, and can be reassigned to other groups. The device supports up to 99 access control groups.
- Time zone
Select whether to use the time zone of access for the user. Users follow the settings of their groups by default. If the same time period is not applied, the access time of the specific user should be set. Such arrangement will not affect the time period settings of other group members.
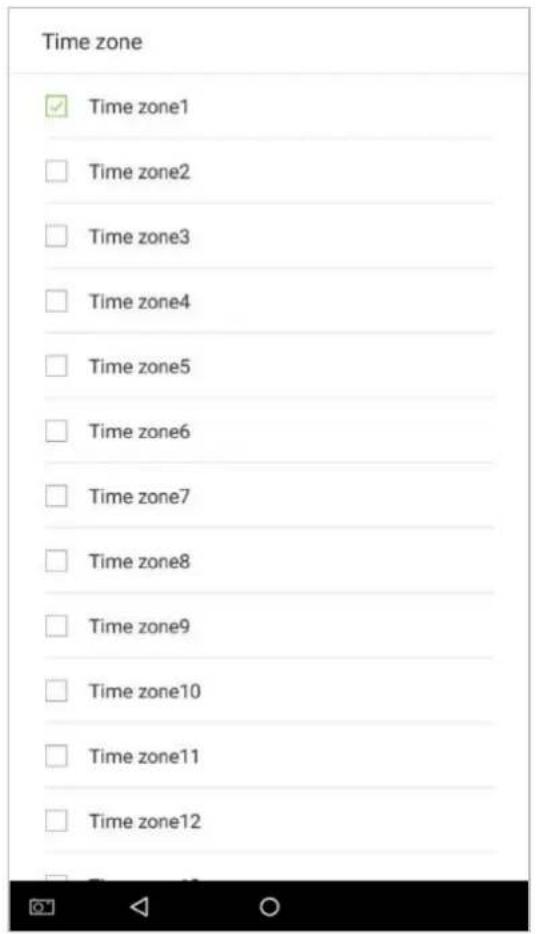
Note: A total of 50 time zones can be set. For details, please see section 5.2 "Time rule setting".
3.2 Searching for an Employee
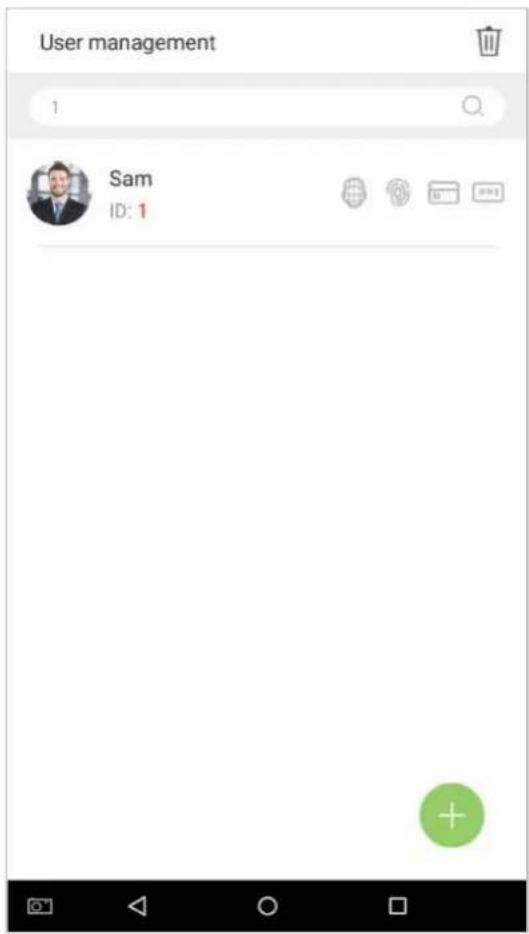
- Tap on the search bar located on the [User Management] interface and enter a search query (Note: search for users based on their personnel IDs, surnames, or given names).
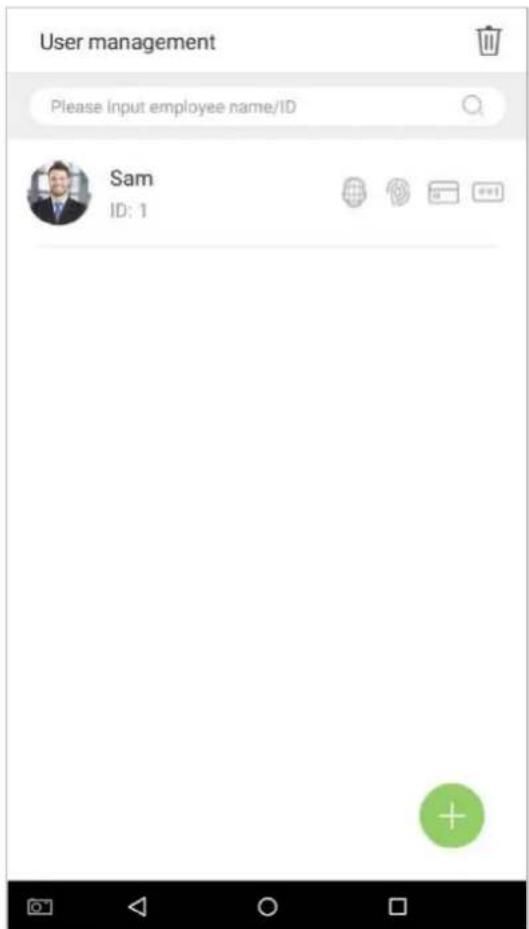
- Automatically finds employees with information that is relevant to the search query.
3.3 Edit an Employee
- Select an employee on the employee list.
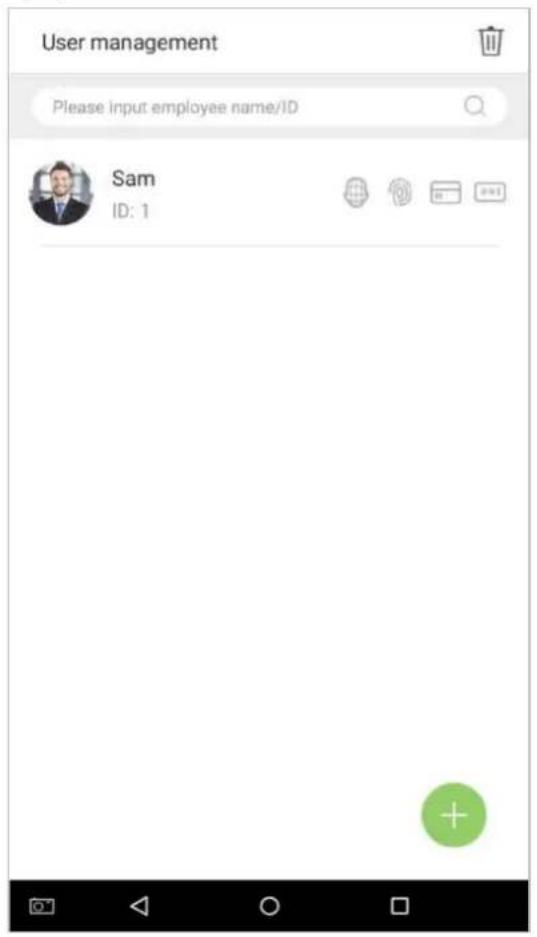
- Enter the interface where users may edit the employee information.
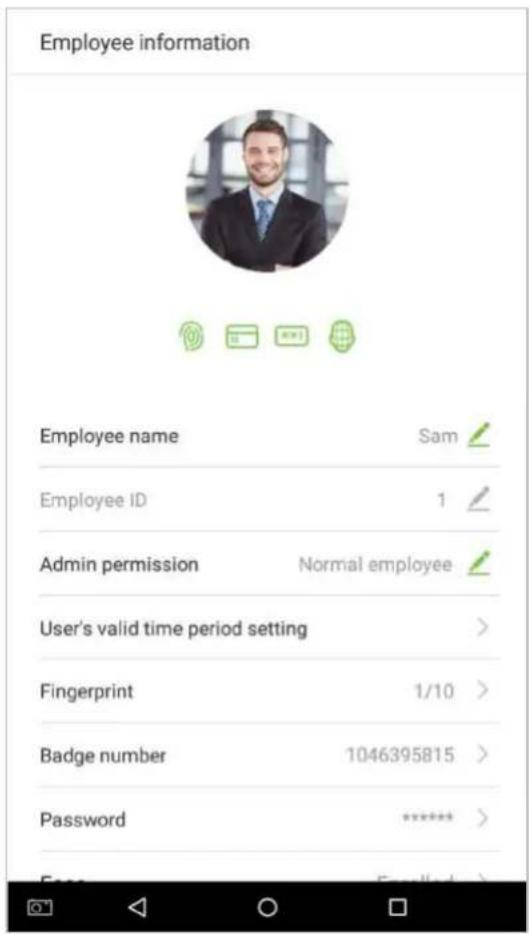
Note: Unless an employee ID cannot be modified, other operations are similar to adding a new employee and will not be discussed here. For further information, please see section "3.1 Add an Employee".
3.4 Delete Employee
- On the "User Management" interface, tap on the 📋 button in the upper right corner.
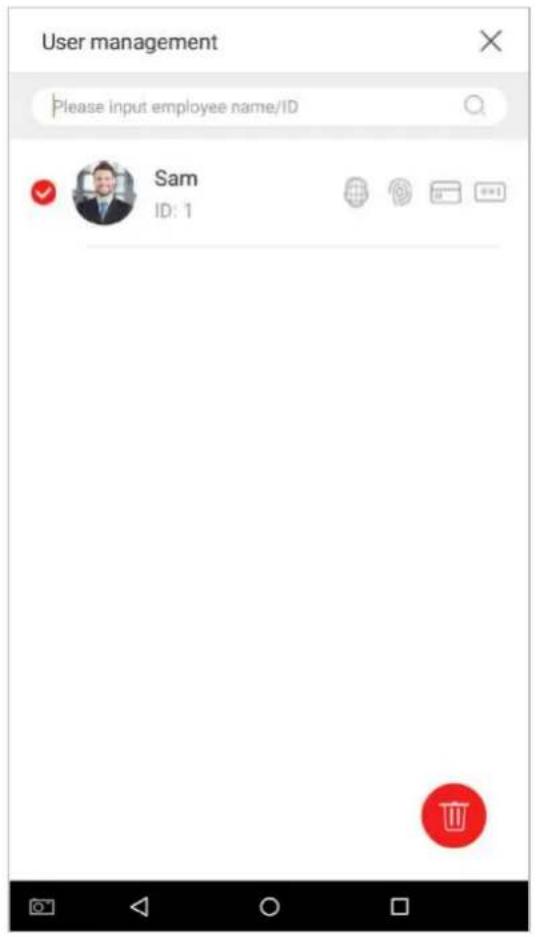
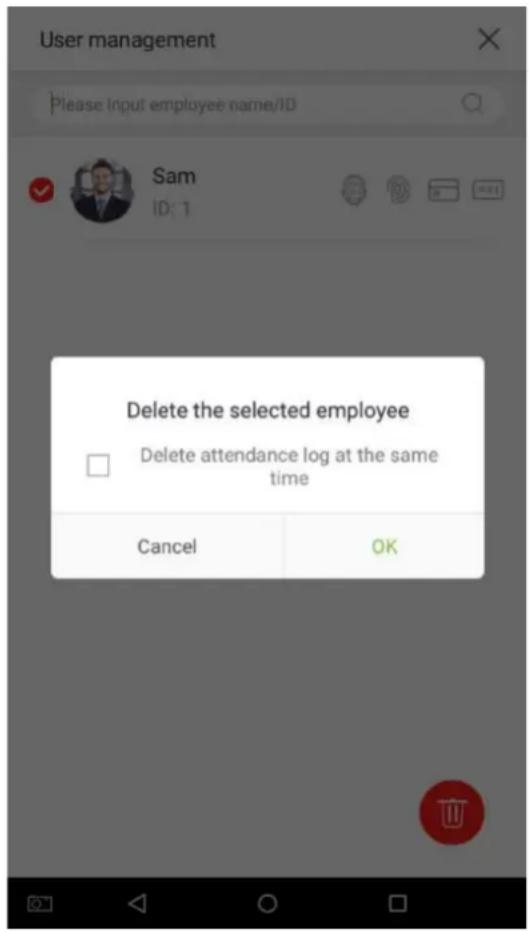
- Select the employee who you would like to delete, tap on the button in the lower right corner and a window will pop up. Decide whether or not to check the box next to [Delete attendance log at the same time], tap on [OK] (this option can be checked or left un-checked based on your requirements).
- The employee now has been deleted and will no longer appear.
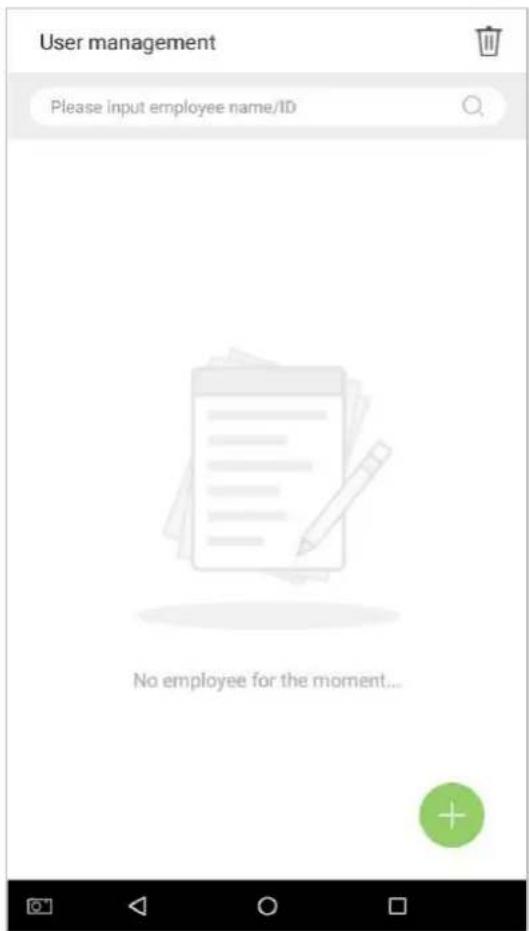
Note: If [Delete Employee] is selected, all of this employee's related information will be cleared.
4. Attendance Events★
Attendance events are used to record clock-in/out status. There are 6 default attendance statuses, including clock in, clock out, break out, break in, overtime in, overtime out. The 6 default statuses cannot be deleted or modified.
4.1 Add Attendance Events
Tap on [Attendance Events] in the main menu:
- On the "Attendance Events" interface, tap on to enter the "Attendance Event" interface.
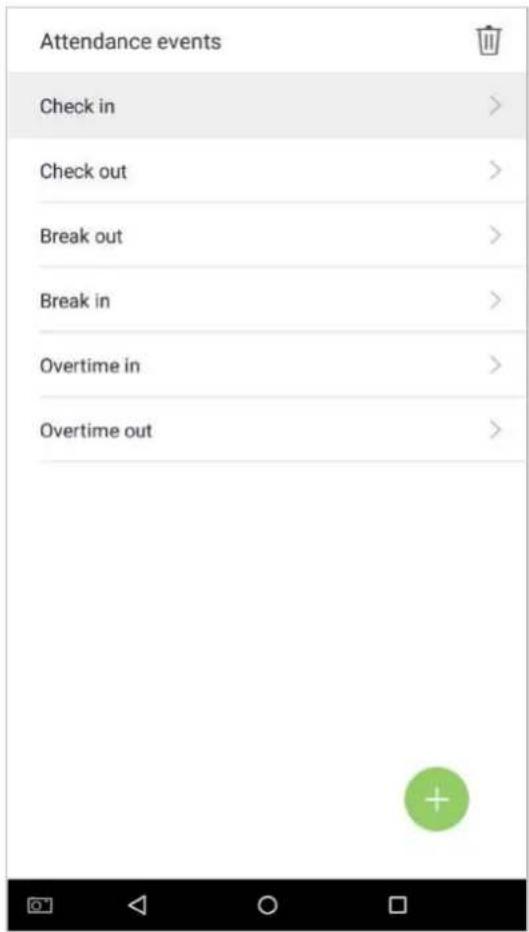
- In the attendance event creation wizard, tap on [Start].
![Add Attendance event Hello, welcome to our Wizard for creation of attendance [Creation of attendance event?]events This Wizard will help you to create an attendance event, (*) Required Content. Start](/content/2026/05/933151/images/a8340c0b15fab950d610f693b17a3c83f3458fdf7ef6e7a4e84b7403e560a1ec.jpg)
- Enter the [Name] and [Status Value] of the new attendance event. Tap on the right arrow (note: maximum length of the name is 24 characters; status values must be unique and cannot be duplicated. The value ranges from 6 to 250.)
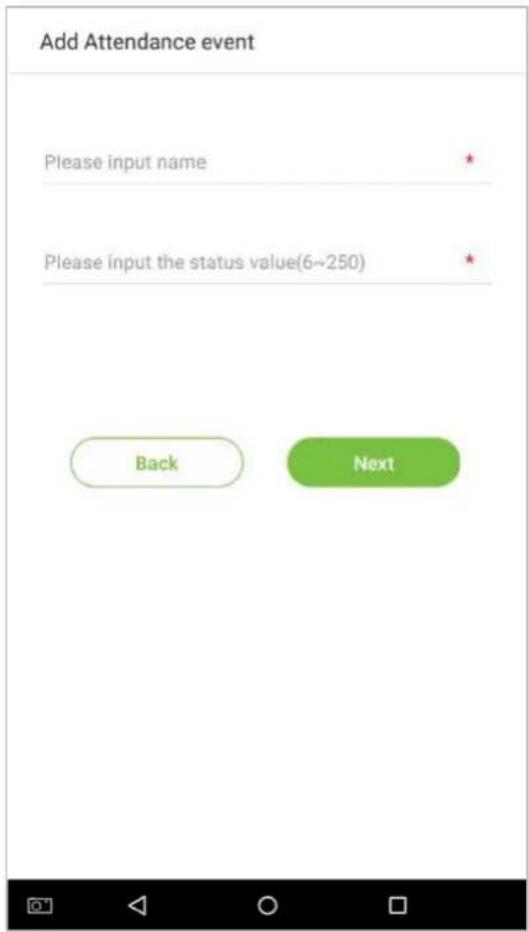
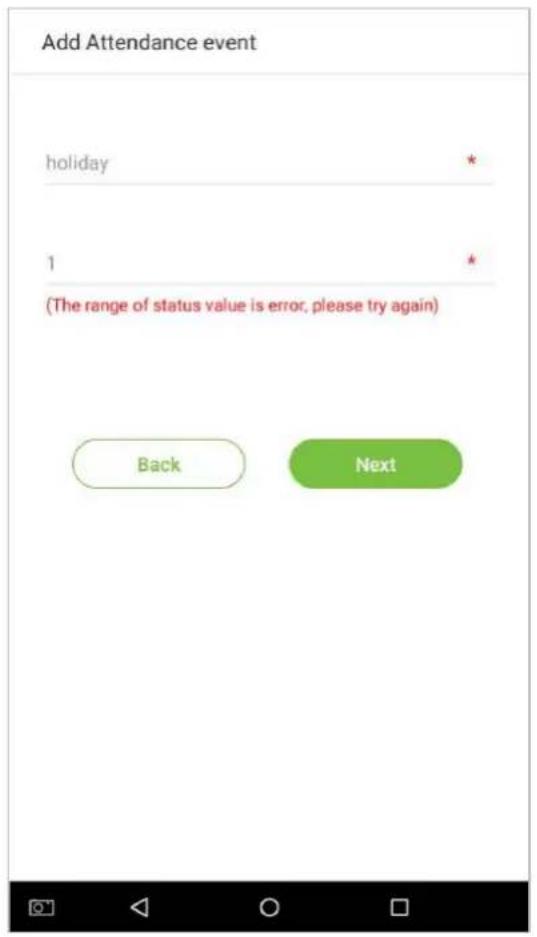
If the input status value is a duplicate or exceeds the permitted range, the following message will appear:
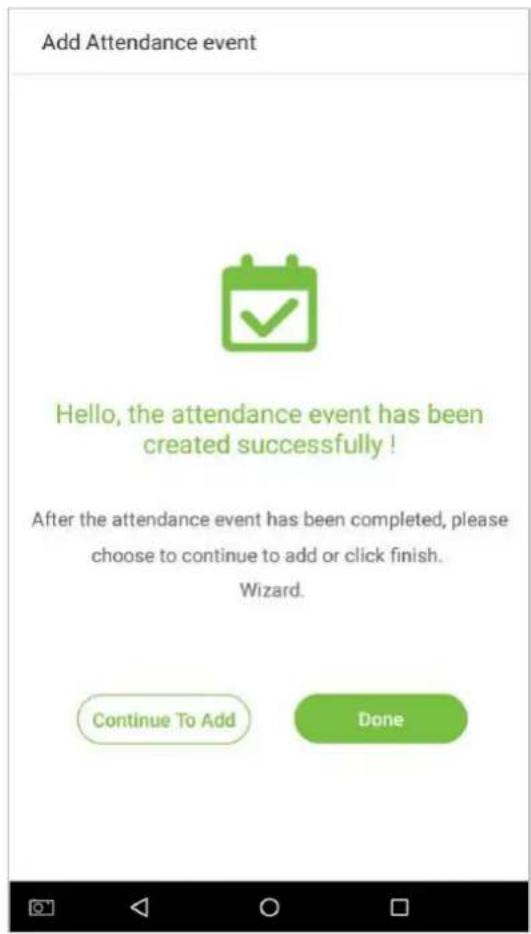
- Successfully created.
4.2 Edit Attendance Events
- Select an employee attendance event.
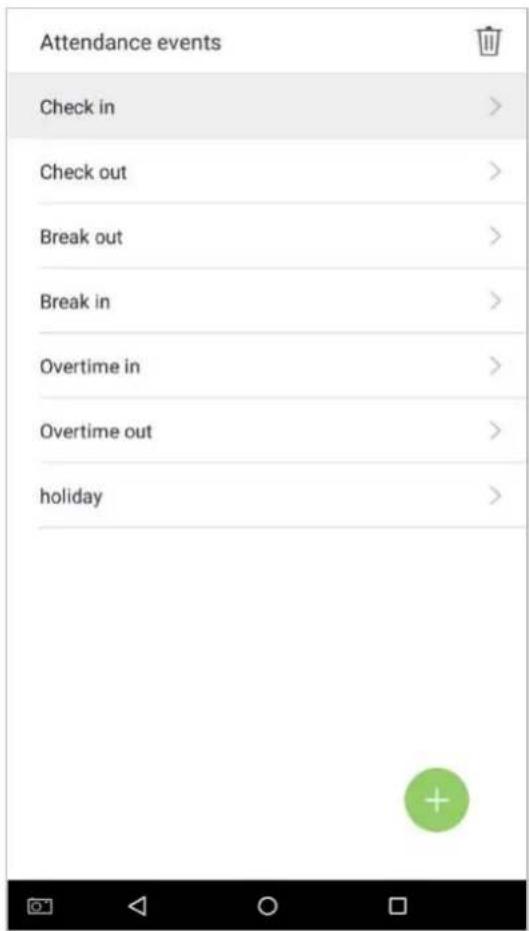
- Tap on [Name] or [Status Value] to edit (note: the first 6 attendance events cannot be edited; status values must be unique and cannot be duplicated)
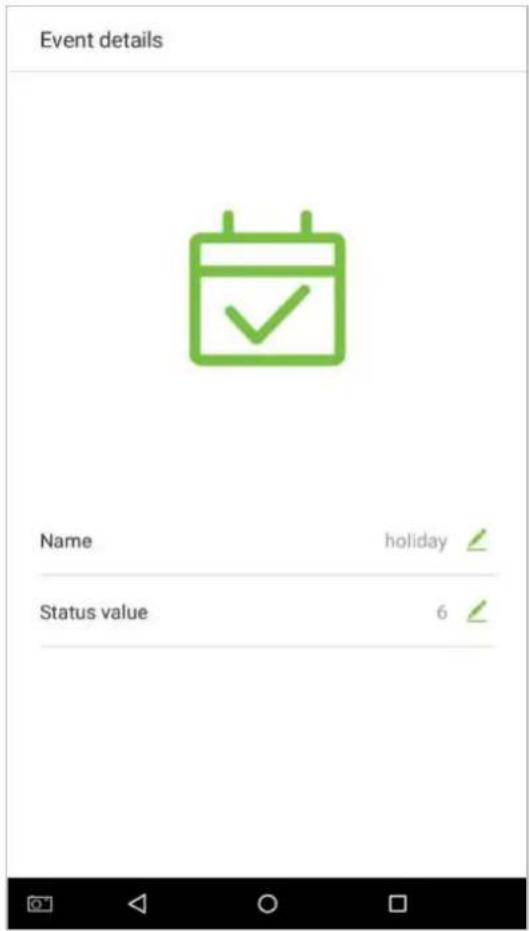
This operation is similar to adding a new event and will not be described here. For further information, see section "4.1 Add Attendance Events".
4.3 Delete Attendance Events
- Tap on the 📁 icon in the upper right corner and select an attendance event (Note: the first 6 events cannot be deleted, so the delete button will not appear).
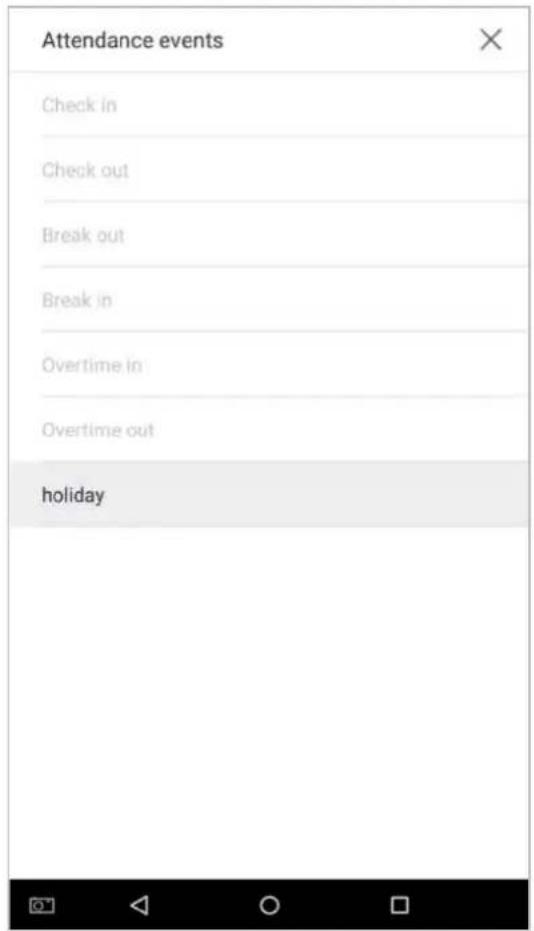
- A window will appear. Tap on [OK].
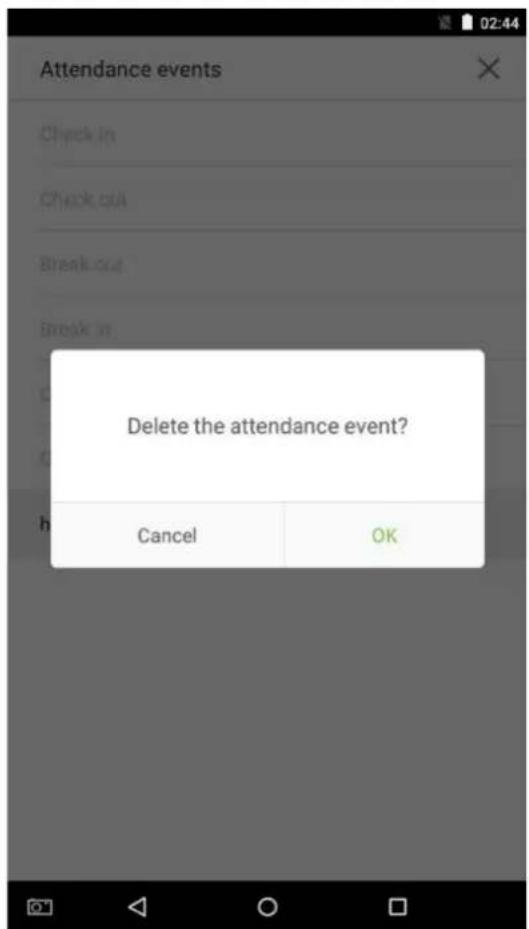
- The event is now deleted and will not appear on the list.
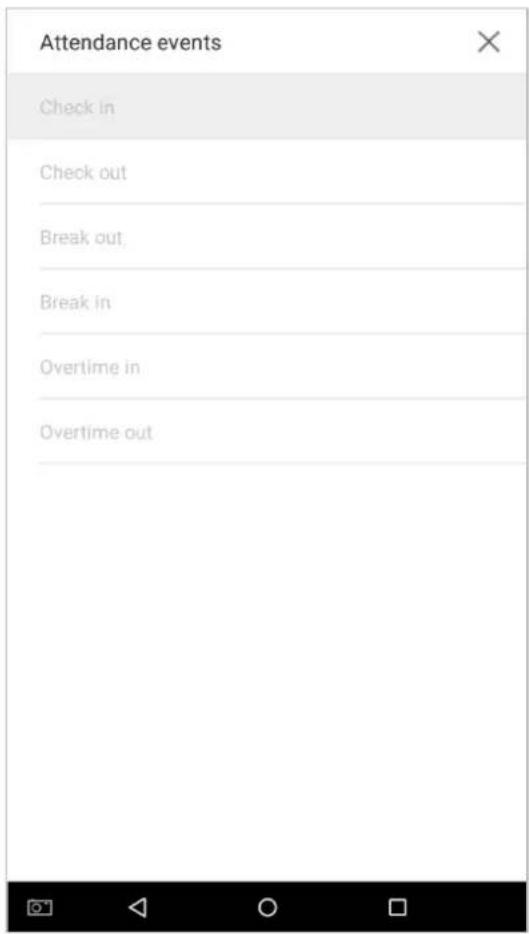
5. Access Settings
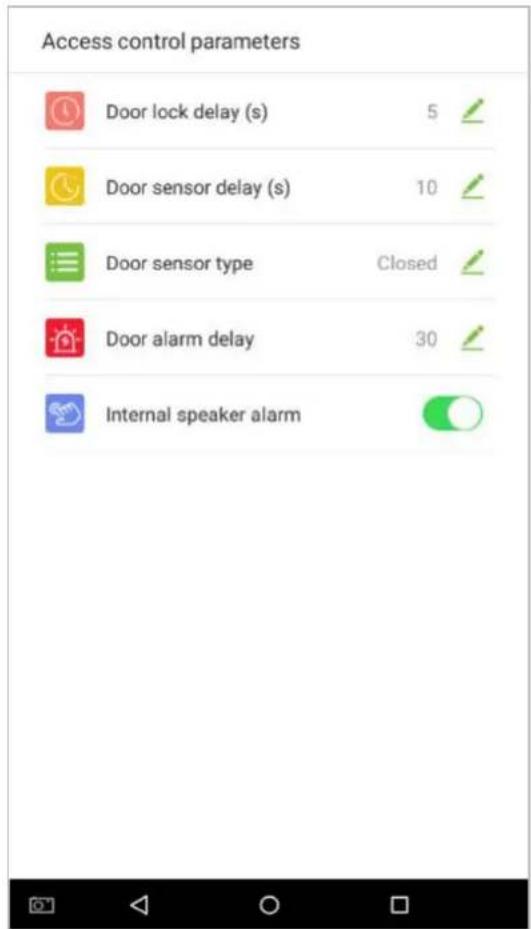
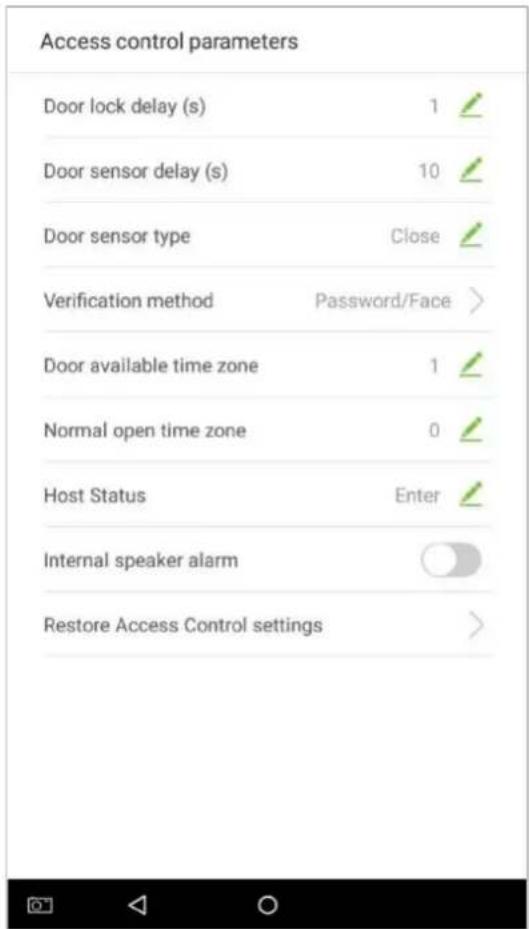
5.1 Access control parameters
The access management allows users to set access parameters.
Tap on [Access Settings] in the main menu.
Attendance device Access device
| Menu Options | Function Description |
| Door lock delay | When the door opens, the lock begins to count down. When the time is over, the lock will close. |
| Door sensor delay | When the door opens, the door delay timer starts counting down. When the countdown is completed, the system will send an alarm signal from the local, then the door sensor delay timer will continue to be effective. |
| Door sensor type | There are different types of door sensors. Subject to different locations, the status value of the door sensor is different; the value of the magnetic door in the “always open” mode is the opposite of that in the “always close” mode. |
| Verification method★ | Select verification mode to open door. |
| Door alarm delay★ | When the door delay ends and the status of the door is not “closed”, the door alarm delay timer will start counting down. When the countdown is completed and the status is still not “closed”, an external alarm signal will be transmitted and output to relay. |
| Door available time zone★ | To set time zone for door, so that the door is available only during this. |
| Normal open time zone★ | To set time zone for Normally Open, so that the door is always unlocked during this time zone. |
| Host status★ | When setting up the master and slave, the status of the master can be set to exit on enter.Exit: The record verified on the host is the exit record.Enter: The record verified on the host is the entry record. |
| Internal speaker alarm | To transmit a sound alarm signal from the local, then send an unpack alarm signal. When the door is closed, the system will cancel the alarm from the local. After the signal is successfully confirmed, the alarm will be cancelled from the local. |
| Restore Access Control settings★ | To reset parameters of Access Control settings. |
Note: Registered employees need to fulfill certain conditions before unlocking the system, which means that the current unlock time should be within the effective time period, or the door cannot be opened.
5.2 Time rule setting★
Time Rule is the minimum time unit of access control settings; at most 50 Time Rule can be set for the system. Each Time Rule consists of 7 time sections (a week) and 3 holiday time schedules, and each time section is the valid time within 24 hrs.
You may set a maximum of 3 time periods for every time rule. The relationship among these time periods is "or". When the verification time falls in any one of these time periods, the verification is valid. The time period format is HH:MM-HH:MM in the 24-hour system with precision to minute.
![Time rule(2/50) Please enter the time rule number (2~50) Sunday [00:00 23:59] [00:00 23:59] [00:00 23:59] > Monday [00:00 23:59] [00:00 23:59] [00:00 23:59] > Tuesday [00:00 23:59] [00:00 23:59] [00:00 23:59] > Wednesday [00:00 23:59] [00:00 23:59] [00:00 23:59] > Thursday [00:00 23:59] [00:00 23:59] [00:00 23:59] > Friday [00:00 23:59] [00:00 23:59] [00:00 23:59] > Saturday [00:00 23:59] [00:00 23:59] [00:00 23:59] > Holiday 1 [00:00 23:59] [00:00 23:59] [00:00 23:59] > Holiday 2 [00:00 23:59] [00:00 23:59] [00:00 23:59] > Holiday 3 [00:00 23:59] [00:00 23:59] [00:00 23:59]](/content/2026/05/933151/images/f0c0304b42fe4ba55fb640570c884b78e35b442990ba4293eb0e2b21fe092a8a.jpg)
- Enter the number of time rule (maximum: 50 rules) in the search bar.
![Time rule(3/50) Sunday [00:00 23:59] [00:00 23:59] [00:00 23:59] > Monday [00:00 23:59] [00:00 23:59] [00:00 23:59] > Tuesday [00:00 23:59] [00:00 23:59] [00:00 23:59] > Wednesday [00:00 23:59] [00:00 23:59] [00:00 23:59] > Thursday [00:00 23:59] [00:00 23:59] [00:00 23:59] > Friday [00:00 23:59] [00:00 23:59] [00:00 23:59] > Saturday [00:00 23:59] [00:00 23:59] [00:00 23:59] > Holiday 1 [00:00 23:59] [00:00 23:59] [00:00 23:59] > Holiday 2 [00:00 23:59] [00:00 23:59] [00:00 23:59] > Holiday 3 [00:00 23:59] [00:00 23:59] [00:00 23:59]](/content/2026/05/933151/images/1743b7fb7250451c7dd574f7eb83998037b07fd625e6e92d3ee87ca688014851.jpg)
- Tap the date on which time rule settings is required.
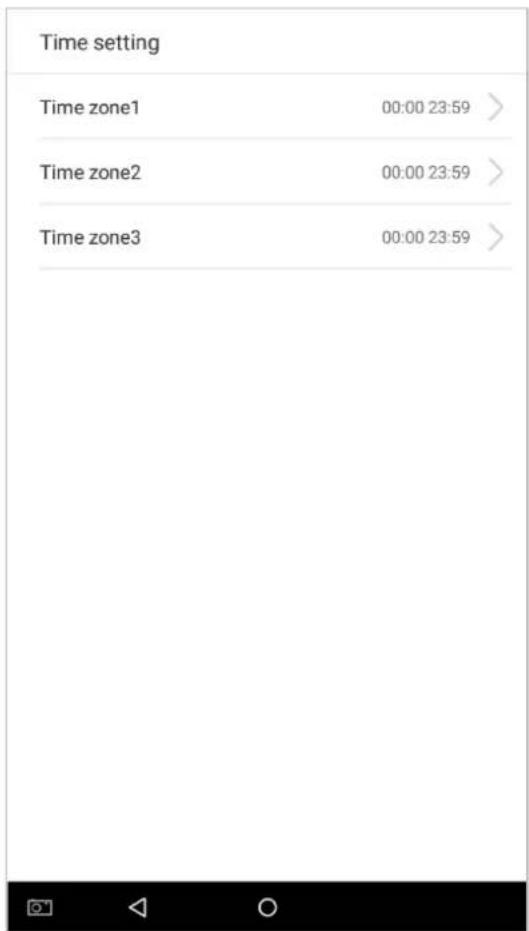
- Set the starting and ending time, and then press [OK].
Notes:
- When the ending time is earlier than the starting time, such as 23:57\~23:56, it indicates that access is prohibited all day; when the ending time is later than the starting time, such as 00:00\~23:59, it indicates that the interval is valid.
- The effective time period to unlock the door: open all day (00:00\~23:59) or when the ending time is later than the starting time, such as 08:00\~23:59.
- The default time zone 1 indicates that door is open all day long, it can't be edited.
5.3 Holiday setting★
Whenever there is a holiday, you may need a special access time; but changing everyone's access time one by one is extremely cumbersome, so you can set a holiday access time which is applicable to all employees, and the user will be able to open the door during the holidays. The time period set here is taken as the standard.
- Tap on on the [Holiday setting] interface to enter Add new holiday wizard.
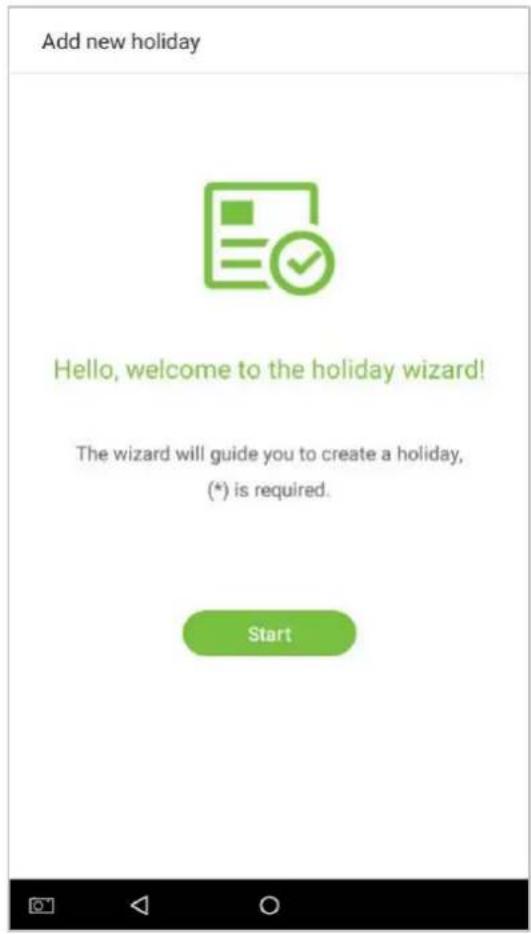
- Select a date and type of the holiday. Enable [Recurring holiday] to recur the holiday yearly.
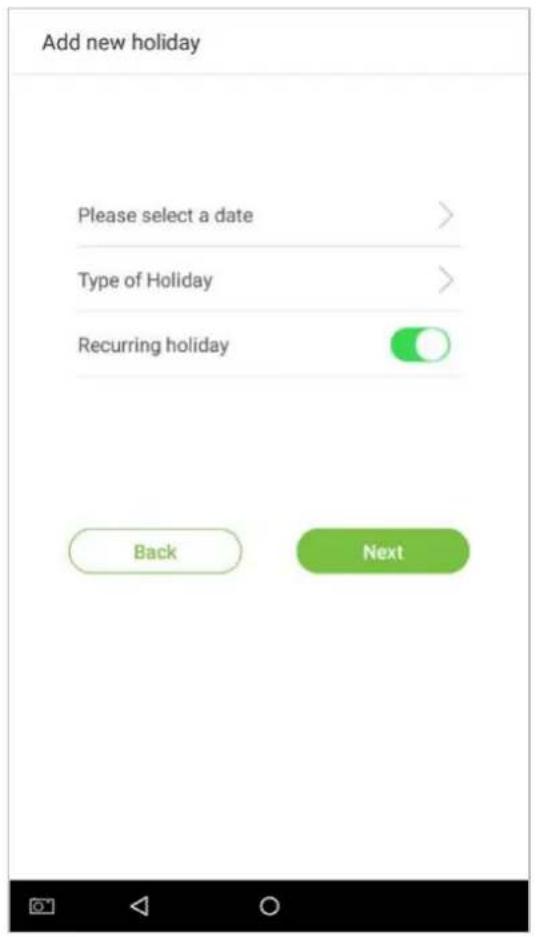
-
Click [Done], a new holiday is created successfully.
-
Select an employee on the employee list.
- Delete a holiday
- On the "Holiday period" interface, tap on the button in the upper right corner.
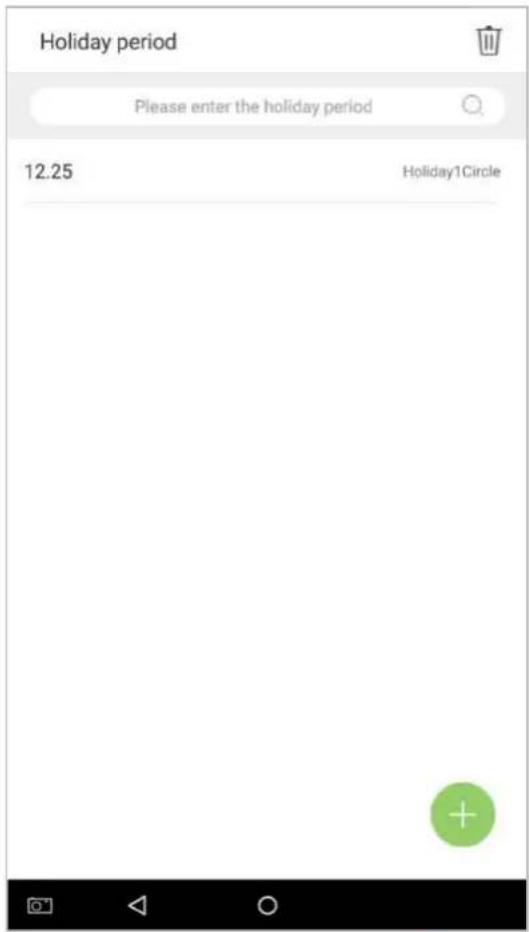
- Select the holiday which you would like to delete, tap on the button in the lower right corner and a window will pop up.
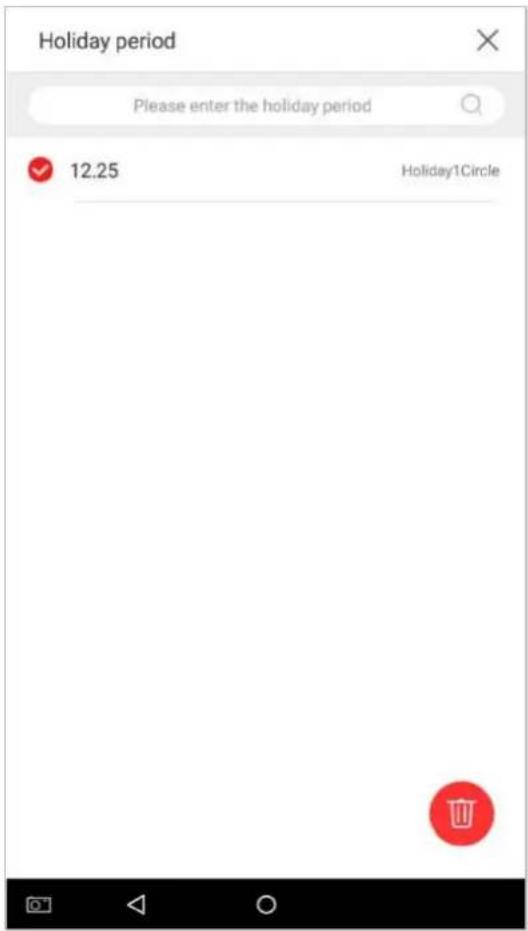
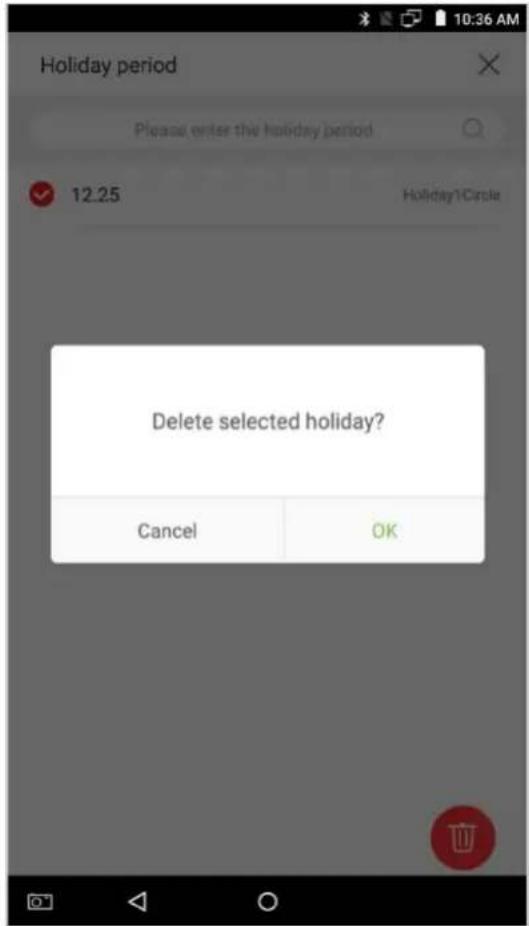
6. Log★
Employee attendance records will be saved in the device, making it easier to find employees' attendance records. Users can search for ATT Logs, ATT Photos, and Blacklist Photos. Searches support retrieval queries, date queries, or a combination of the two.
6.1 Search for Attendance Records
- Tap on [Log] in the main menu, then the following interface of work record history will pop up.
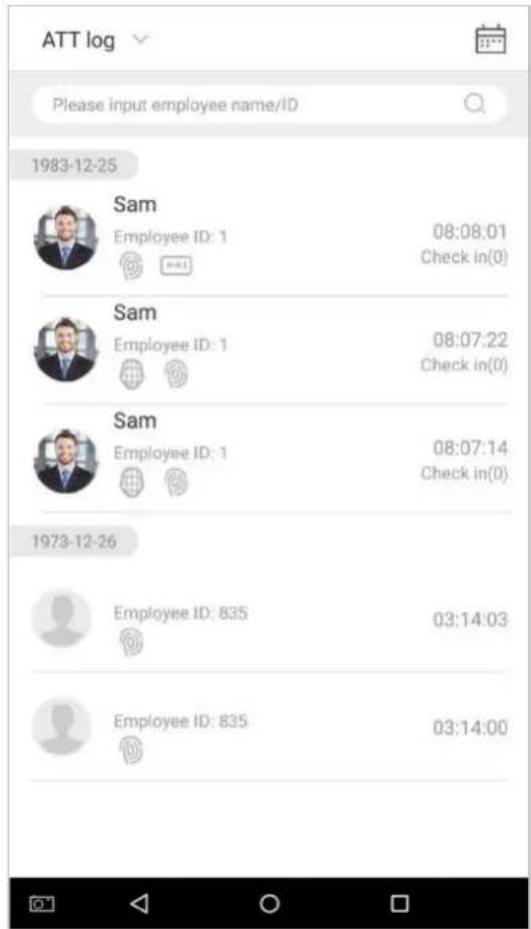
- Enter information such as the employee ID, first or last name of an employee in the search bar.
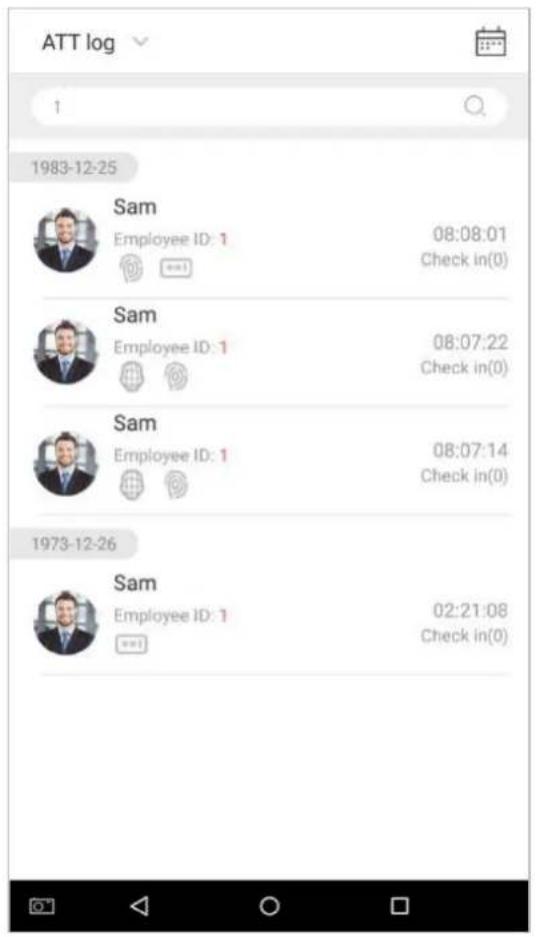
- Automatically finds the employees with information that is relevant to the search query.
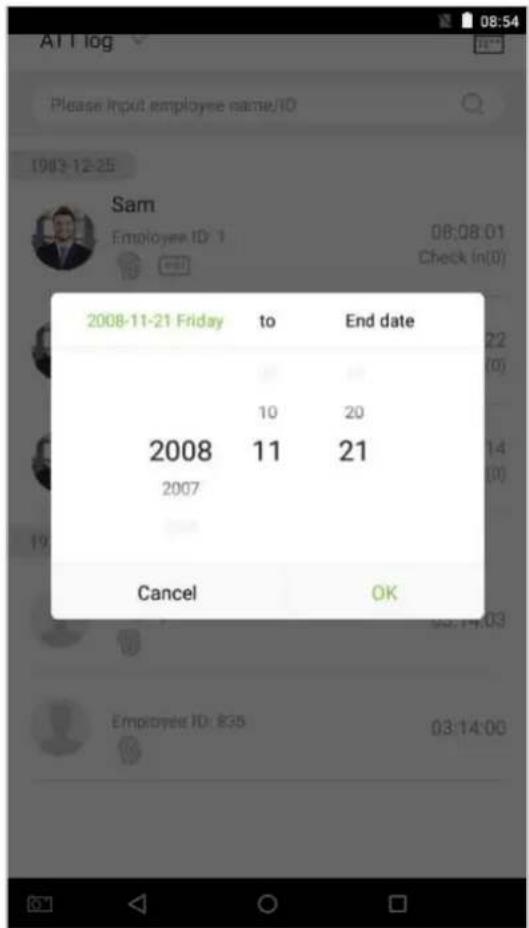
- Tap on the button to access the following window where you can select the [Starting Date] and [Ending Date]. Tap on [OK].
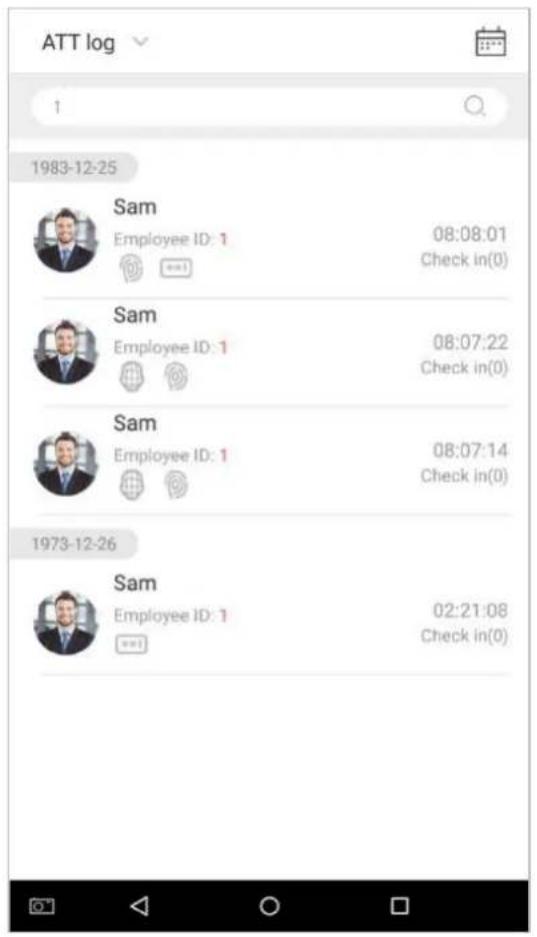
- Show search results.
6.2 Search for Attendance Photos
The query operation supports search bar queries, date queries, and combined search bar + date queries.
- Tap on the drop-down button in attendance logs and select [Employee Photo].
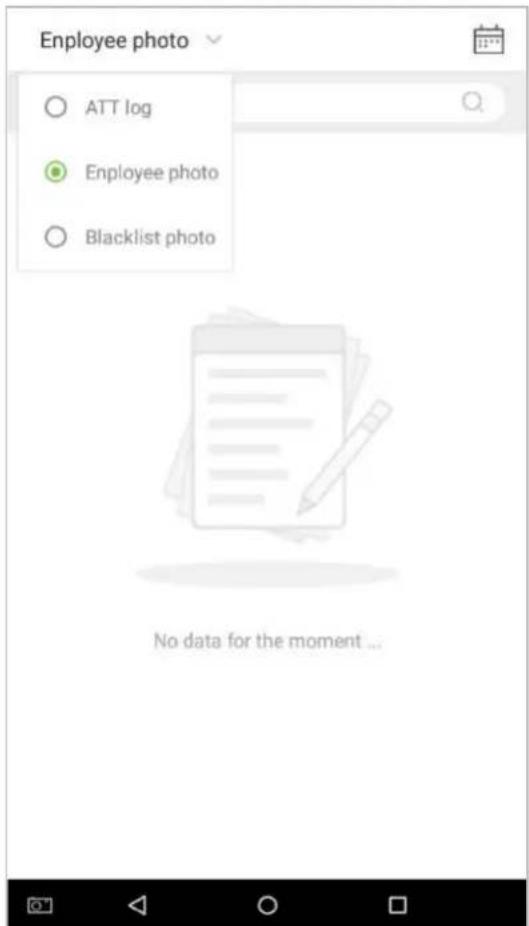
- Enter the Employee photos interface.
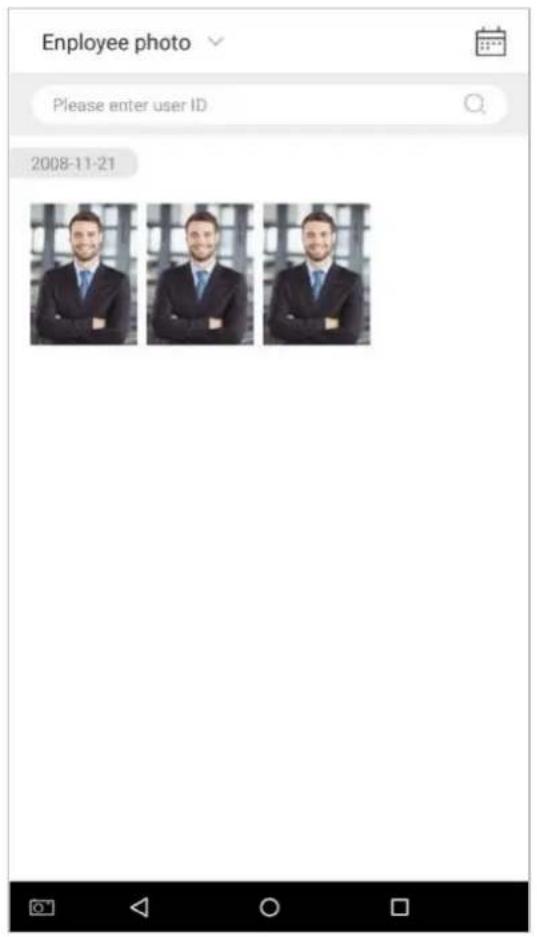
-
Enter search information interface, namely, the personnel ID, in the search bar, the system the system will then automatically search for the employee with the corresponding personnel ID.
-
Tap on 📋 and a window will pop up. Select the [Starting Date] and [Ending Date].
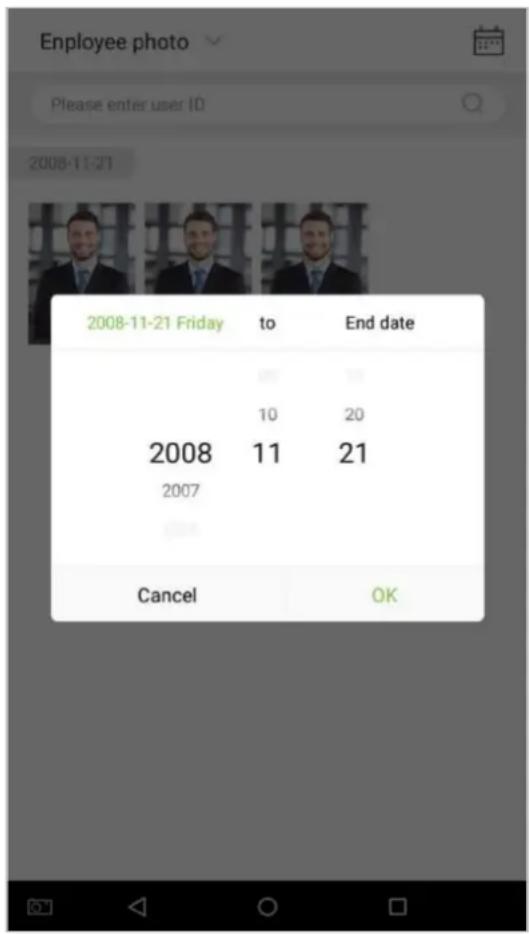
- Show search results.
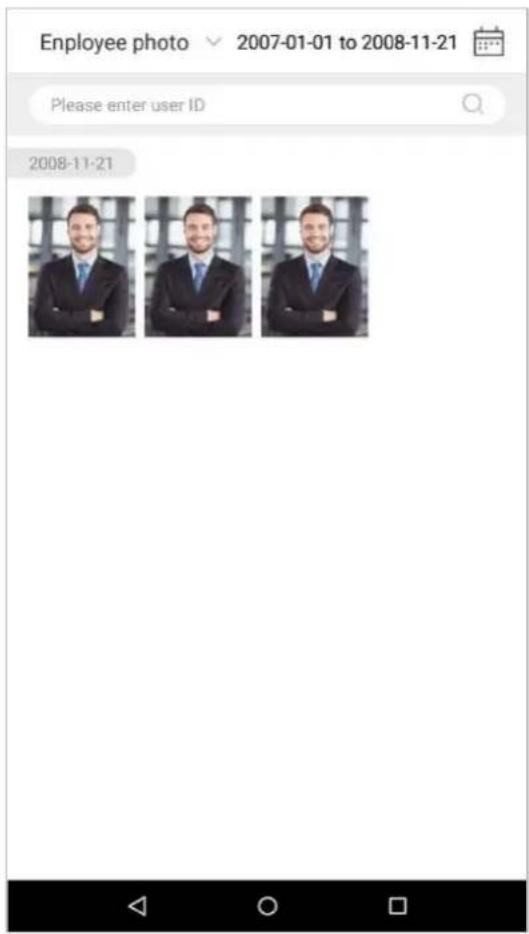
- Tap on an attendance photo to view that photo's details.
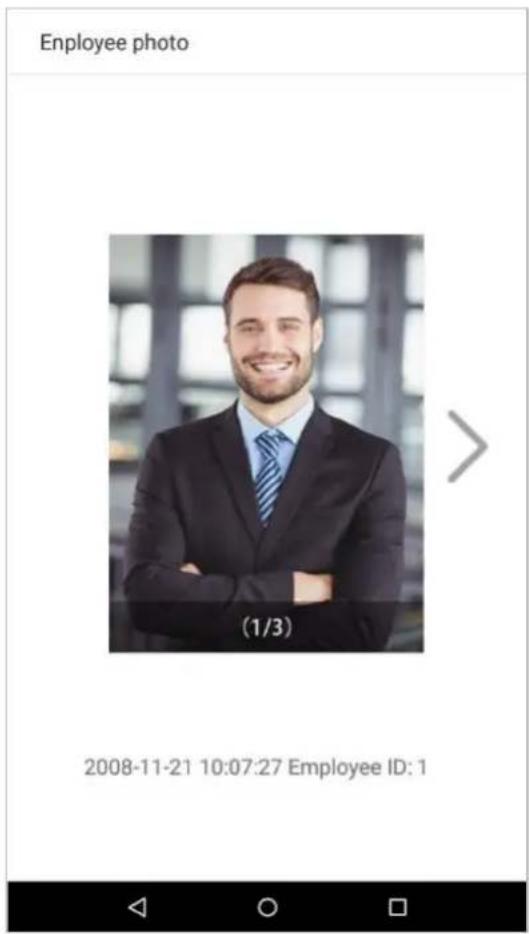
6.3 Search for Blacklist Photos
To conduct a blacklist photo query, follow the same steps required to complete an employee photo query. For exact operation details, see section "6.2 Search for Attendance Photos".
7. Data Management
Manage the device's data, including Delete attendance log, Delete attendance photo, Delete blacklist photo, Delete all data, Delete admin permission, Delete user photo, and Delete wallpaper.
Tap on [Data Management] in the main menu.
| Data management | |
| Delete attendance log | Delete all data |
| Delete Access photo | Delete blacklist photo |
| Clear admin permission | Delete user photo |
| Delete wallpaper | |
| Menu Options Function Description | |
| Delete attendance log | 1. Delete all; 2. Delete invalid user accounts (deleting the account will not delete the attendance log); 3. Delete the attendance logs within a specified time range. |
| Delete all data | Delete business data stored in the terminal device, including attendance logs, attendance pictures, blacklist pictures, fingerprint/ facial biometric data, privileges of the super admin, employee photos, wallpaper, employee data, work codes and access control data. |
| Delete access photo | 1. Delete all; 2. Delete invalid user accounts; 3. Delete the attendance photos within a specified time range. |
| Delete blacklist photo | 1. Delete all (including attendance records and the photos of the employee in blacklist); 2. Delete the blacklist photos, together with the attendance records, within a specified time range. |
| Delete admin permission | Turn the super administrator into a general employee. |
| Delete user photo | Delete all employee photos. |
| Delete wallpaper | Delete all wallpapers stored in the device. |
8. USB Disk Management★
Use a USB drive to import the system's employee information, fingerprint template, or attendance data into the accompanying attendance software for processing, or import employee information and fingerprints onto another fingerprint device for use. Before uploading or downloading using a USB drive, plug the USB drive into the device's USB port, then conduct each operation.
On the USB disk management interface, tap on the [USB disk upload] field:
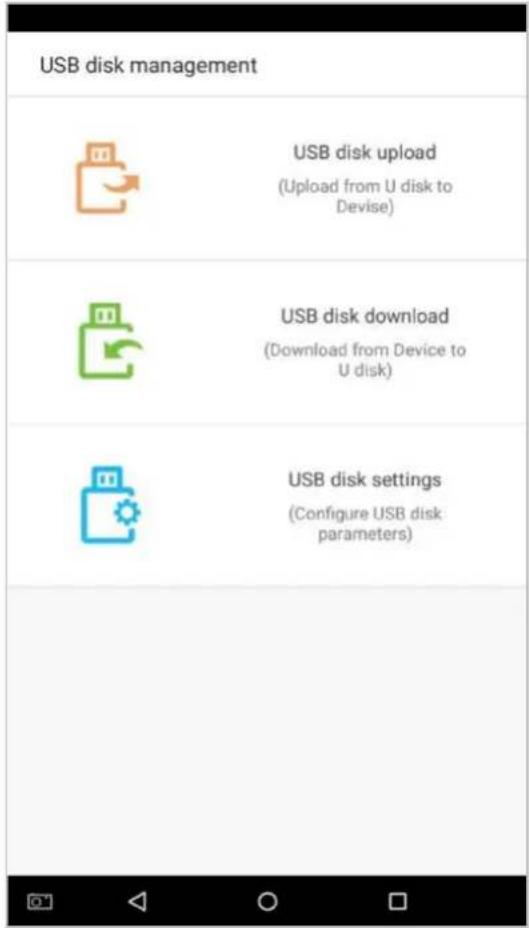
8.1 Upload to USB Drive
On the USB disk management interface, tap on the [USB disk upload] field:
| Menu Options | Function Description |
| Upload Employee Data | Upload employee information, fingerprint templates, facial templates from a USB drive to the device. |
| Upload Employee Photo | Upload a JPG photo that is named with a personnel ID from a USB drive to the device. Each photo may not exceed 250k, otherwise the system will remind the user that the uploading is failed. |
| Upload Work Code | Upload work codes from a USB drive to the device. |
| Upload Wallpapers | Upload all JPG pictures from a USB drive to the device. |
8.2 Download to a USB Drive
On the USB disk management interface, tap on the [USB Disk Upload] field.
| Menu Options Function Description | |
| Download ATT Data | Save the attendance data within the specified time range (all, this week, last week, this month, user-defined) onto the USB drive. If there is no data, there will be no prompt. |
| Download Employee Data | Download all the user information, fingerprint and facial biometric data and stored them in the USB drive. |
| Download Employee Photo | Copy JPG pictures to the USB. |
| Download ATT Photo | Copy attendance pictures stored in the device to the USB drive. The format of the picture is JPG. |
| Download Blacklist Photo | Download the blacklist photos within the specified time range (all, the current week, last week, the current month, last month, user-defined). |
8.3 USB Disk Settings
On the USB drive management interface, tap on the [Settings] field:
| Menu Options Function Description | |
| Encrypt ATT Data | Encrypt employee attendance logs while downloading or uploading. |
| Delete Attendance Logs after Successfully Downloading | After attendance logs have been successfully copied to the USB drive, the logs stored on the device will be deleted. |
9. Alarm Management★
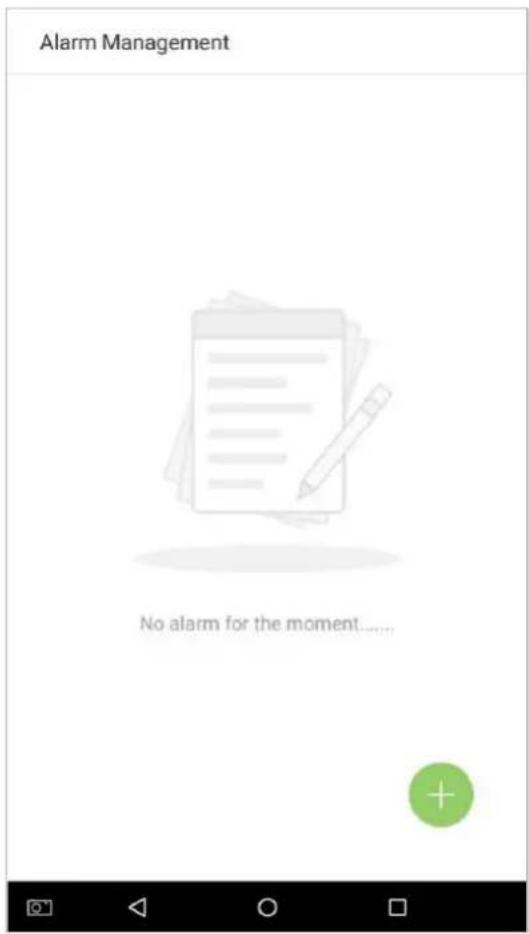
Employees can set an alarm time according to their needs. Once an alarm has been set, the device will automatically begin playing a preselected ringtone when the designated time is reached. It will stop ringing after the alarm time has elapsed.
9.1 Add Alarms
In the main menu, tap on [Alarm Management]:
- On the alarm management interface, tap on

to enter the "Add Alarms" page.
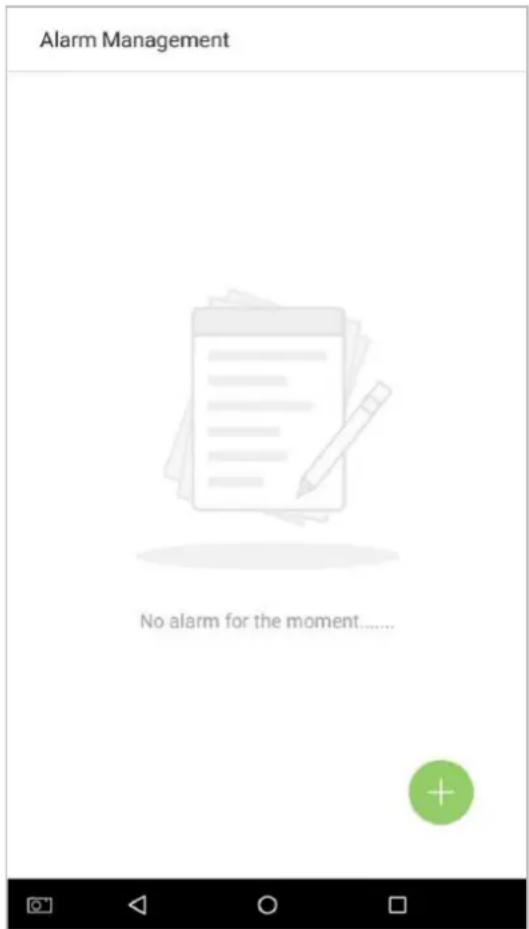
- Set Time-- select [Hour] and [Minute].
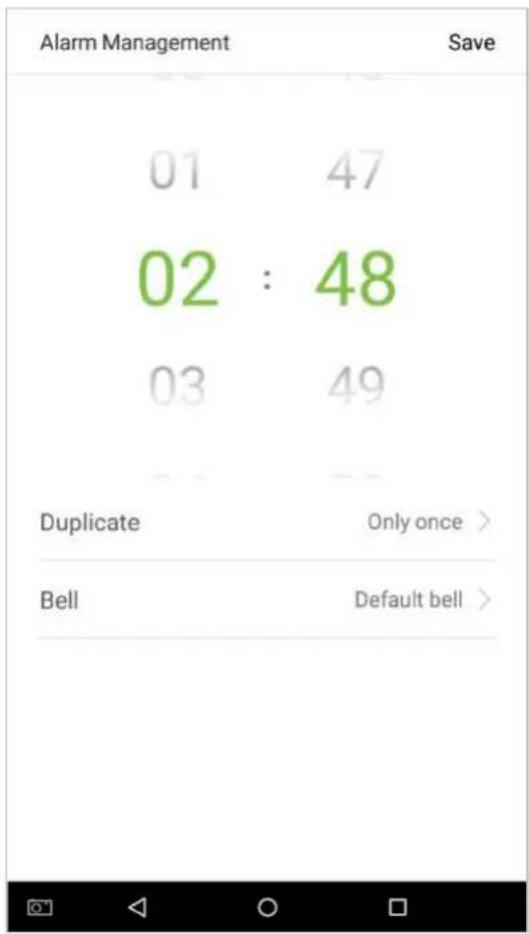
- Duplicate-- the default is set to "Only once". To copy the settings, tap on the [Duplicate] button and a window will pop up. Select the date and tap on [OK].
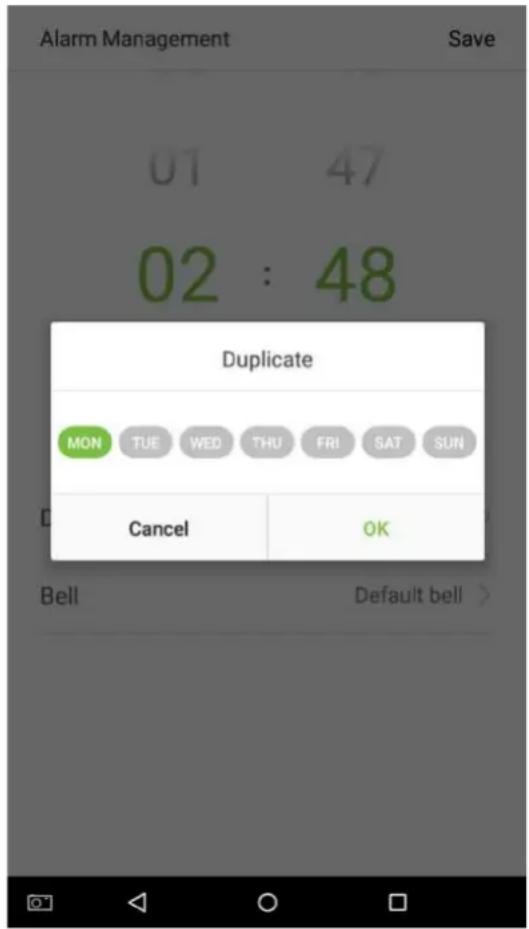
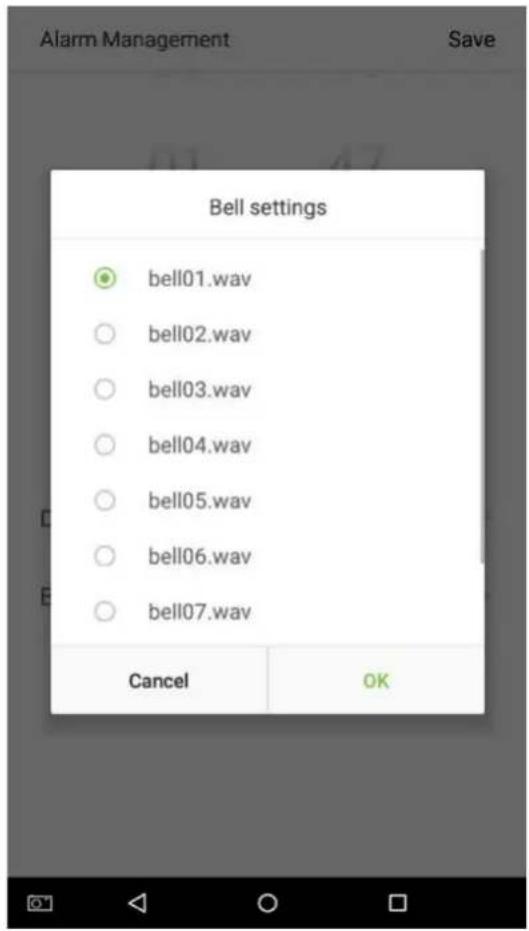
- Tap on the [Bell] button and a window will pop up. Select a ringtone and tap on [OK].
- Tap on the [Save] key and the alarm will be successfully added. The alarm will be enabled by default.
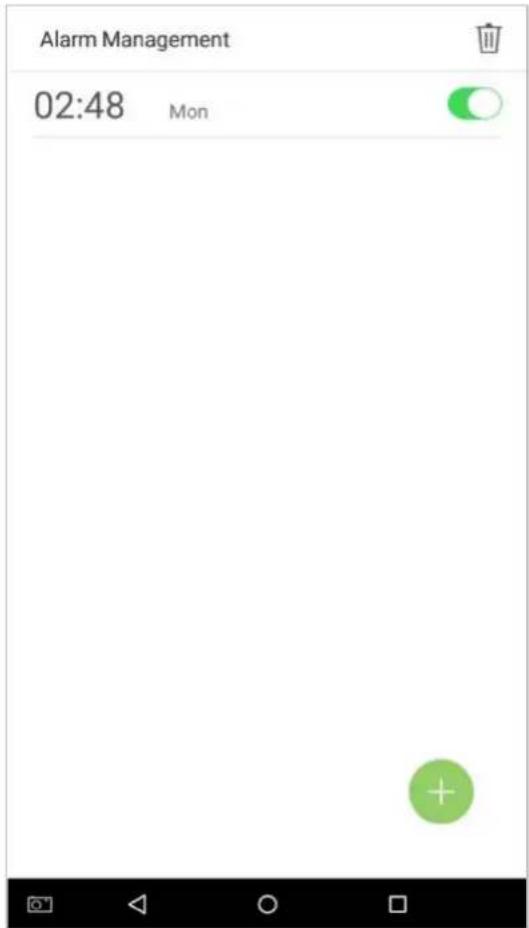
- Enable [Alarm Switch] to change the alarm's status. Green indicates that the alarm is on, while gray indicates that the alarm is off.
9.2 Edit Alarms
- Select an alarm from the alarm list.
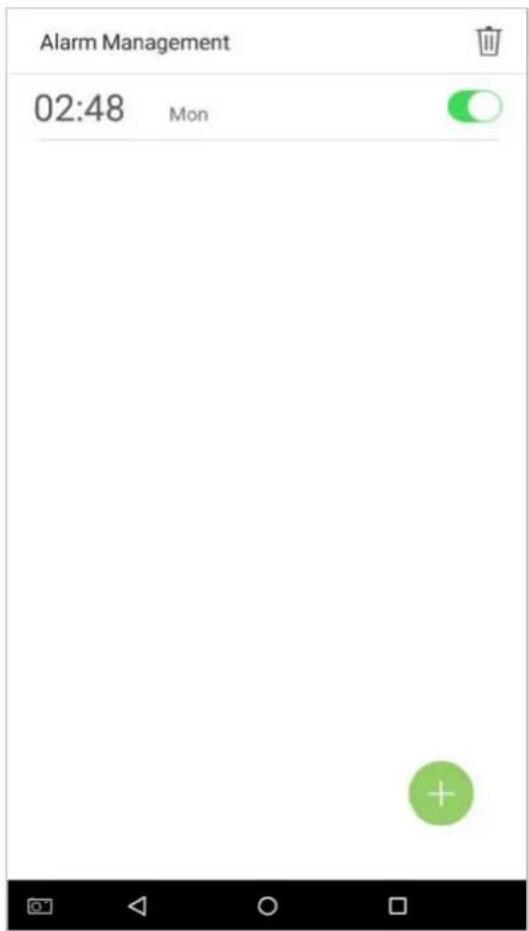
2. Enter the alarm editing interface.
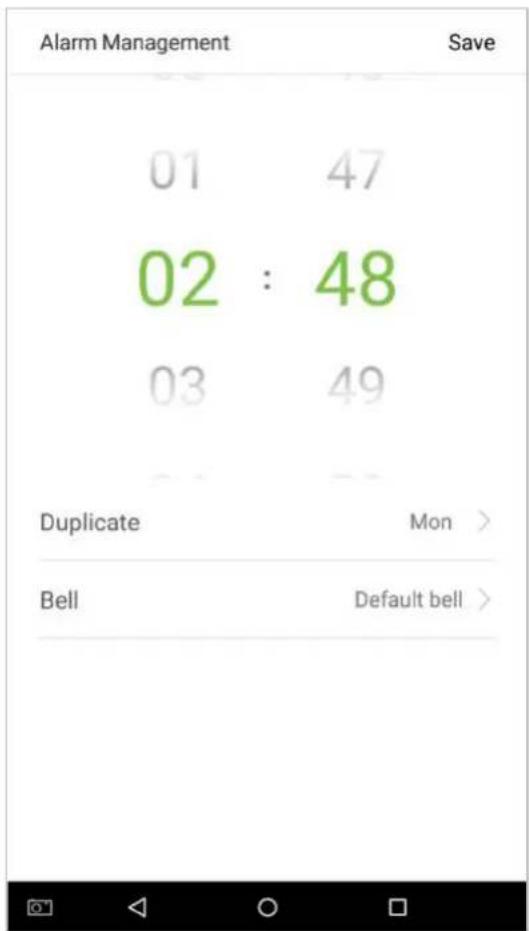
This operation is similar to adding a new event and will not be described here. See section "9.1 Add Alarms" for more details.
9.3 Delete Alarms
- On the Alarm Management interface, tap on the 📋 button on the upper right corner.
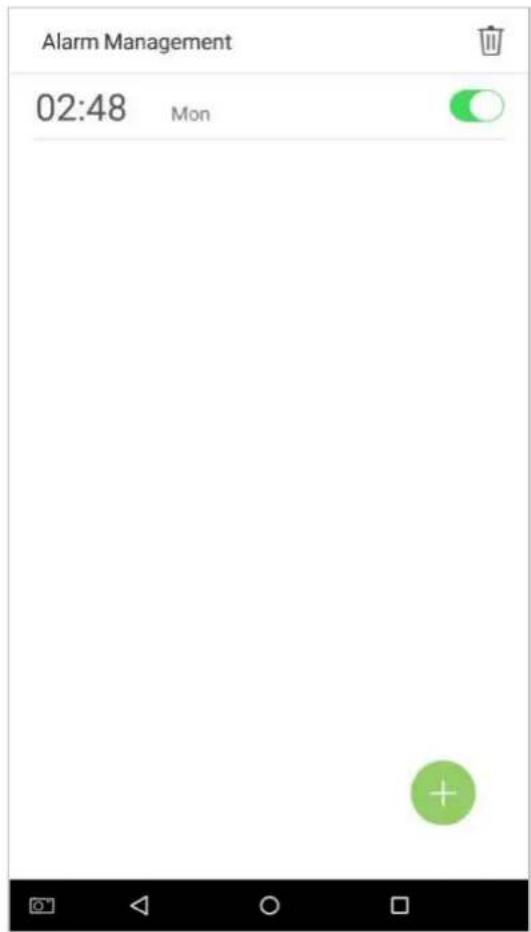
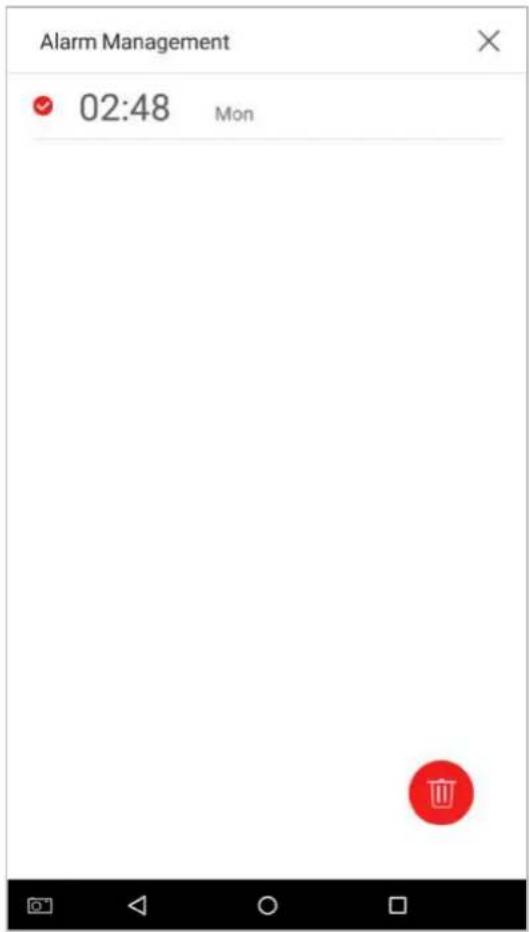
- Select the alarm that you would like to delete, and then tap on the corner.

button on the lower right-hand
- A window will appear. Tap on [OK].
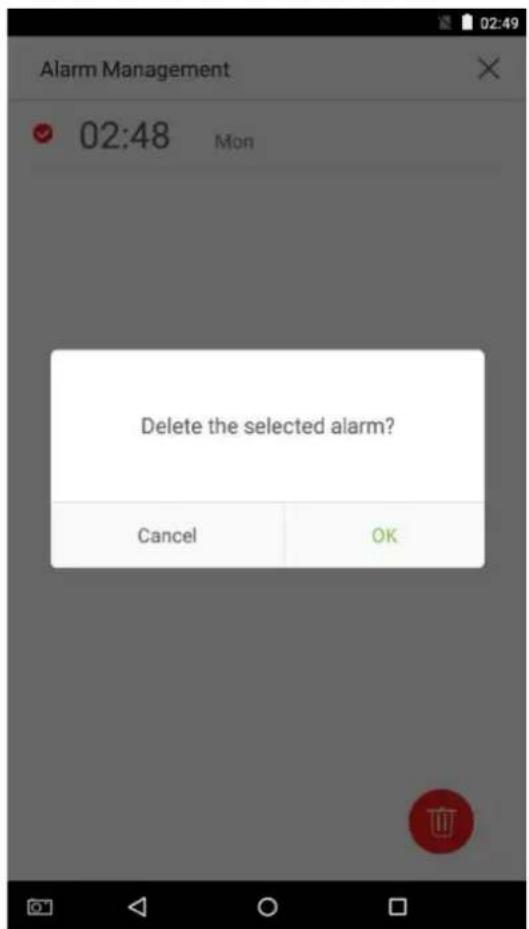
- The event is now deleted and will not appear on the list.
10. System Settings
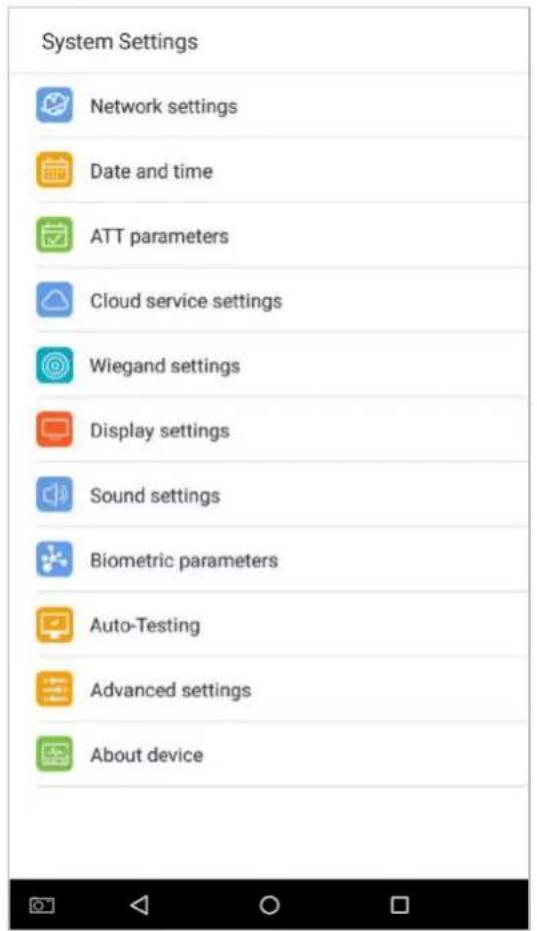
Set system parameters to maximize the device's ability to meet the needs of employees.
In the main menu, tap on [System Settings]:
10.1 Network Settings
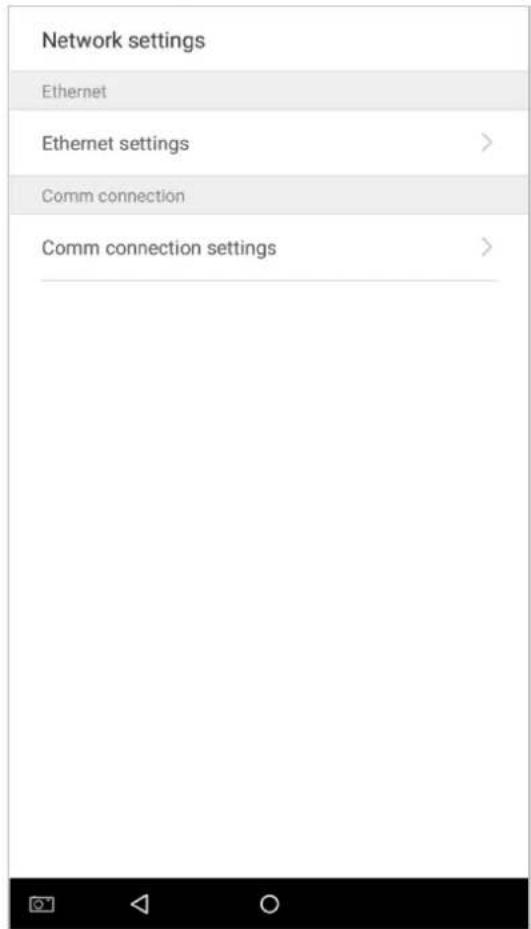
On the system settings list, tap on [Network settings] to enter the Network Settings interface:
10.1.1 Ethernet Settings
When the device communicates with a PC via Ethernet, the network must be set up.
When the device is not connected to the network, tap on [TCP/IP Settings] on the "Network Settings" interface. The following page will display:
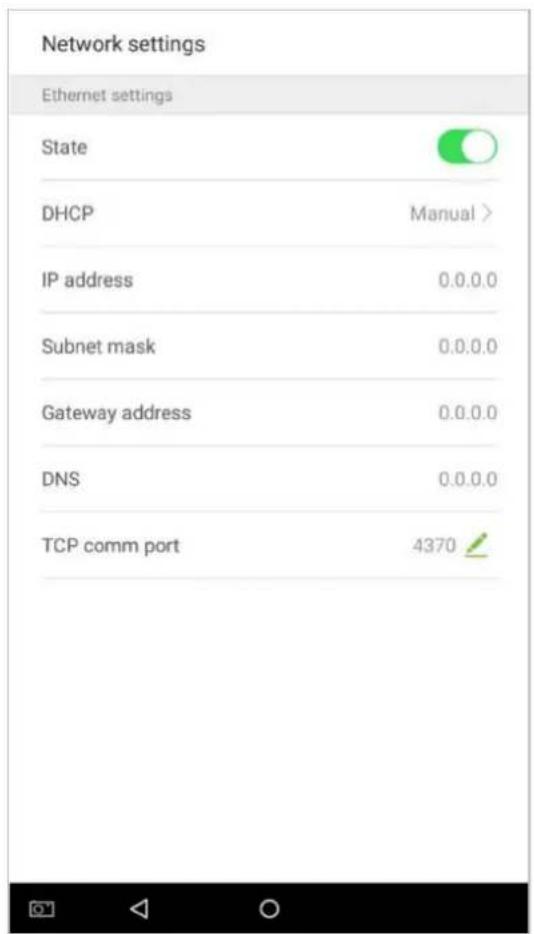
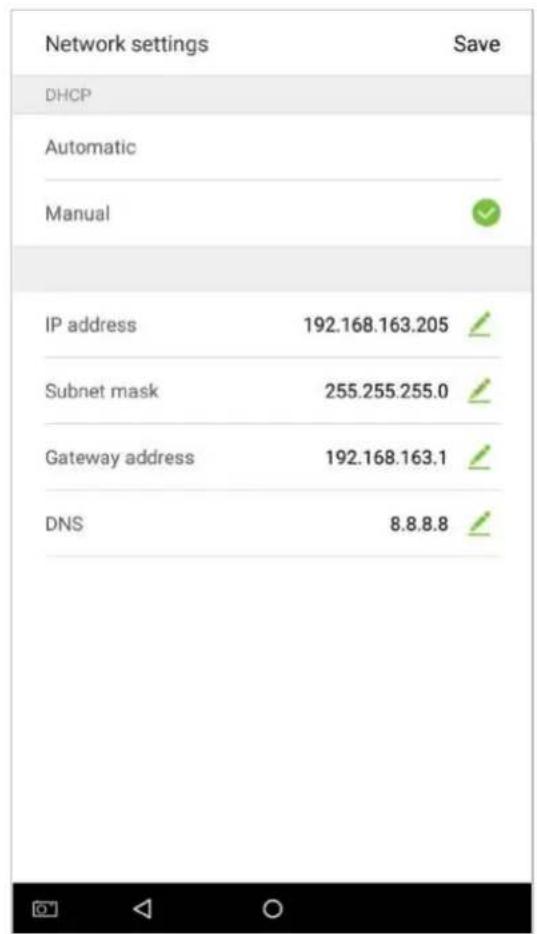
| Menu Options Function Description | |
| Enable Ethernet | Enable to modify the Ethernet network address parameters. If this is not enabled, users cannot modify the Ethernet network address parameters. |
| Switch | |
| DHCP | Enable DHCP to assign an IP address to the internal network or network service provider. |
| IP Address | The default IP is 0.0.0.0; Changeable; IP address of the device and the PC are connecting to the same network segment. |
| Subnet Mask | The default subnet mask is 0.0.0.0 (can be changed). |
| Gateway Address | The default gateway address is 0.0.0.0 (can be changed). |
| DNS | The default address is 0.0.0.0 (can be changed). |
| TCP COMM Port | The default TCP port is 4370 (can be changed). |
When the device is connected to the network after setting the above parameters, the following page will display: The connection succeeds, with status displayed on the icon bar.
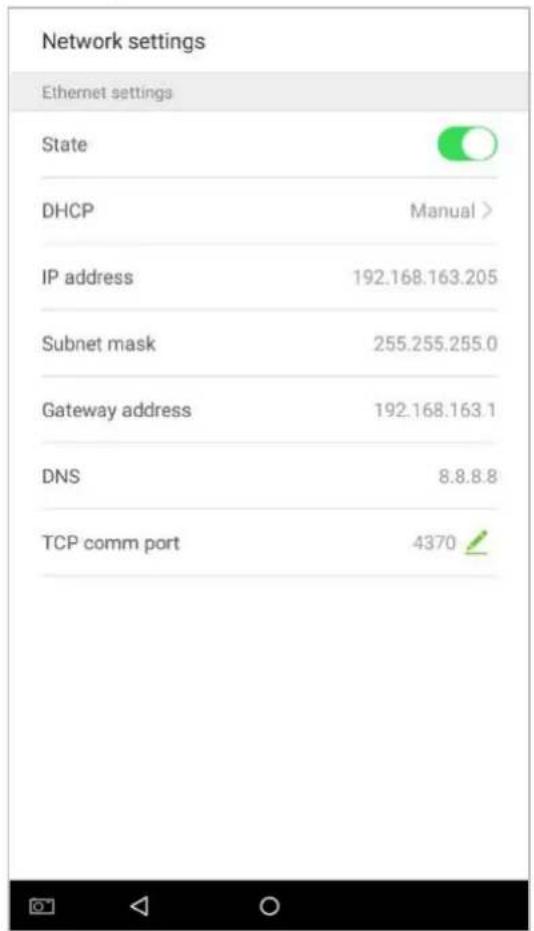
10.1.2 Comm Connection Settings
To develop the security and confidentiality of the attendance data, you need to set a connection password. Before successful connection between the PC software and the device, the connection password must be input correctly.
On the "Network Settings" interface, tap on [Comm connection settings]:
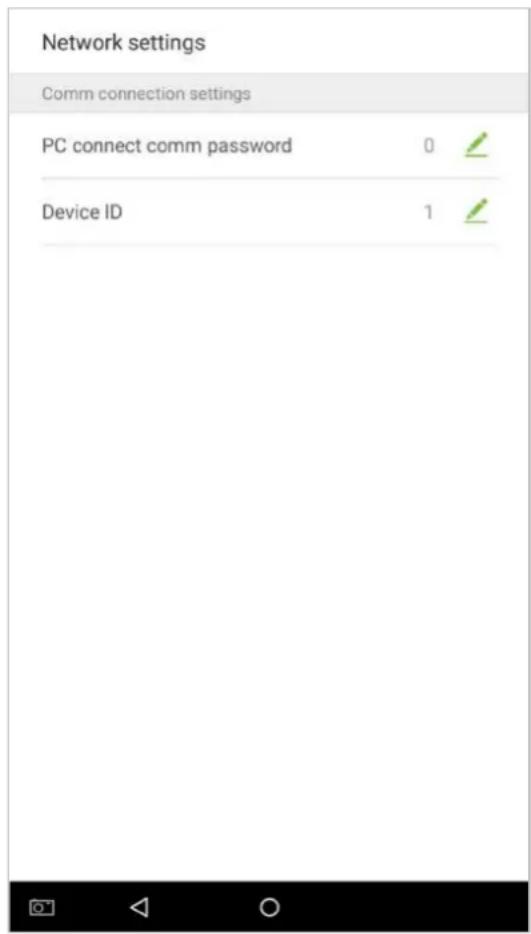
| Menu Options Function Description | |
| PC connectionComm password | It is used to gain the connection permission when using offline SDK or PULL SDK connection. If the password is not correct, the communication connection cannot be built. The value ranges from 0 to 999999. When the value is 0, there's no code status. |
| Device ID | The ID ranges from 1 to 254. If the system is using the RS232/RS485 communication method, please input the device ID during software communication. |
10.2 Date and Time
In system settings, tap on [Date and time] to enter the date and time settings interface:
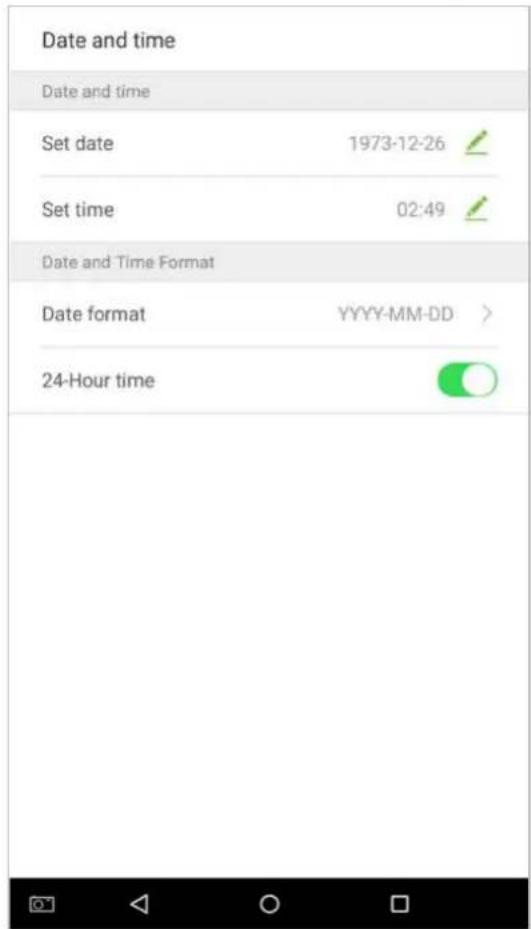
10.2.1 Date and Time Settings
- Tap on [Set Date] and swipe up and down to set the year, month, and day. Tap on [OK].
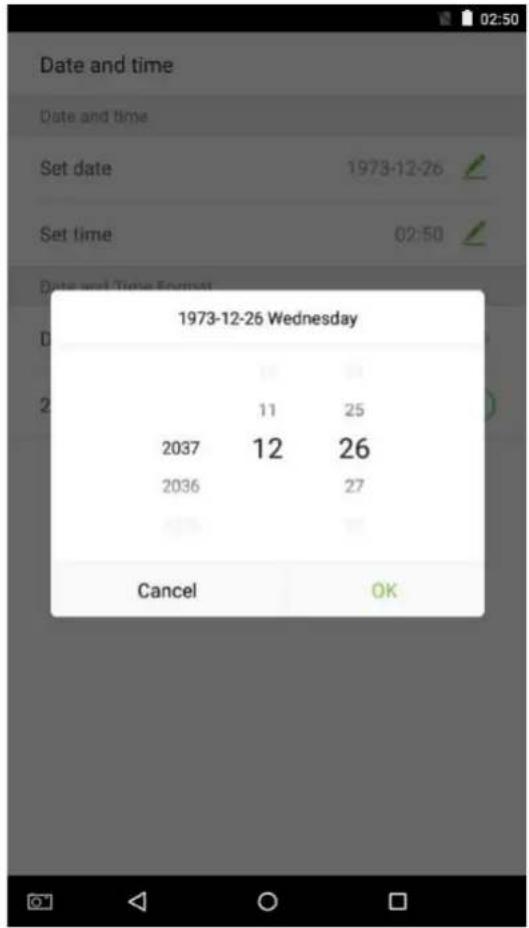
- Tap on [Set Time] and swipe up and down to set the hour and minute. Tap on [OK].
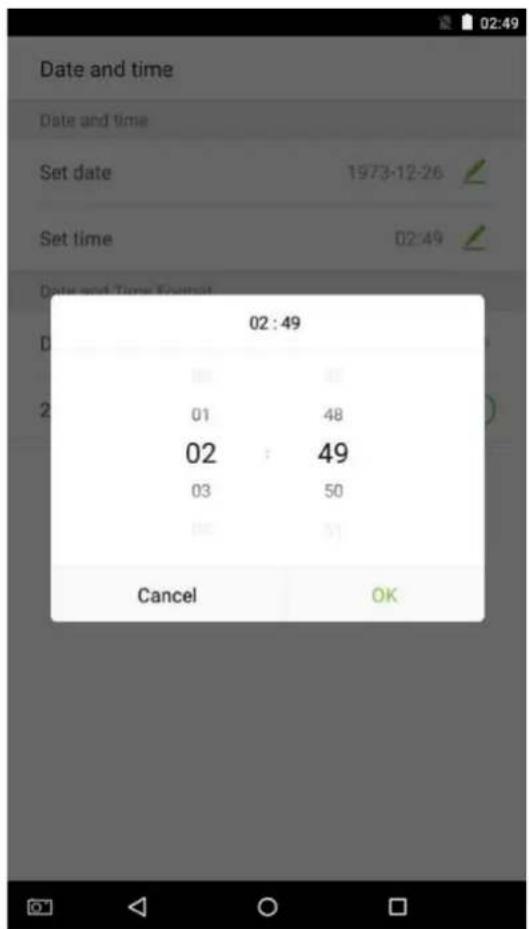
10.2.2 Date and Time Format Settings
- Tap on [Date Format] and select a date format.
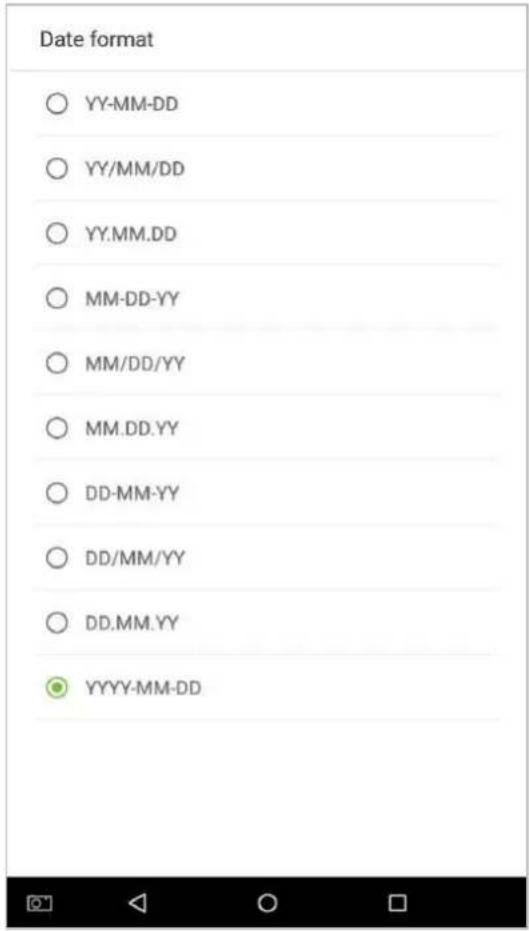
- Tap on [24-Hour Time] to enable this function. It will appear green if enabled or gray if disabled.
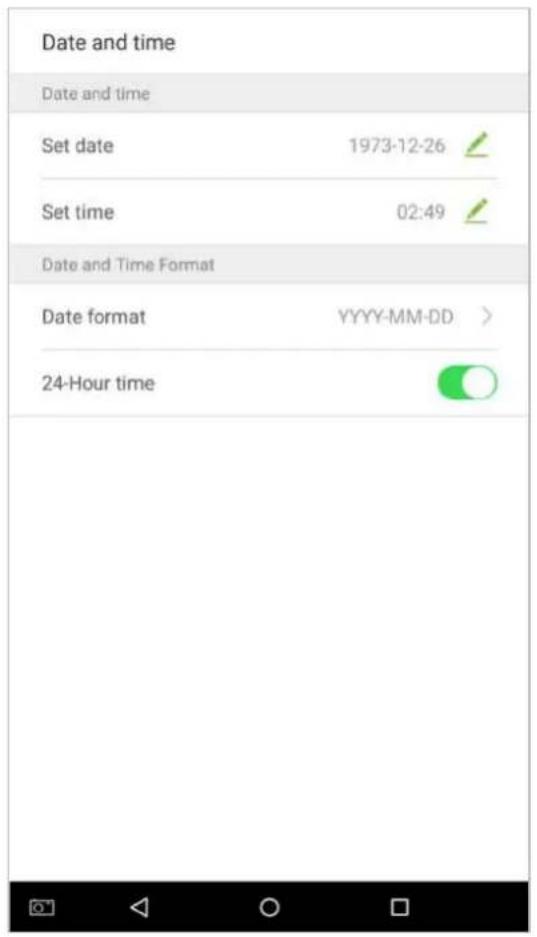
10.3 ATT/Access record Parameters
In system settings, tap on [ATT parameters] to enter the ATT parameters settings interface:
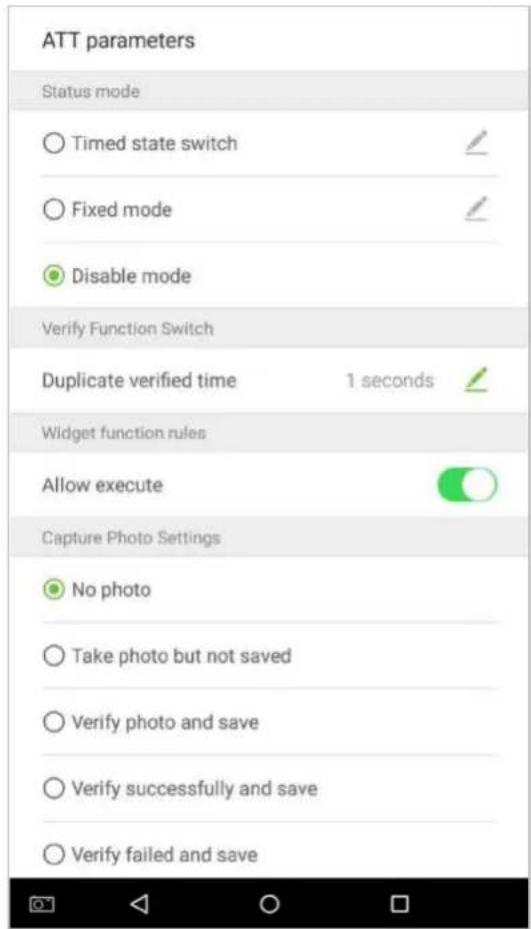
10.3.1 Status Mode
1. Status mode settings
There are three modes for attendance statuses:
Timed state switch: display different attendance statuses at different times.
Fixed mode: there is only one fixed attendance mode.
Disable mode: this function is not used.
- Set in [Timed state switch] mode
- After selecting "Timed state switch", tap on the button to enter the related settings interface.
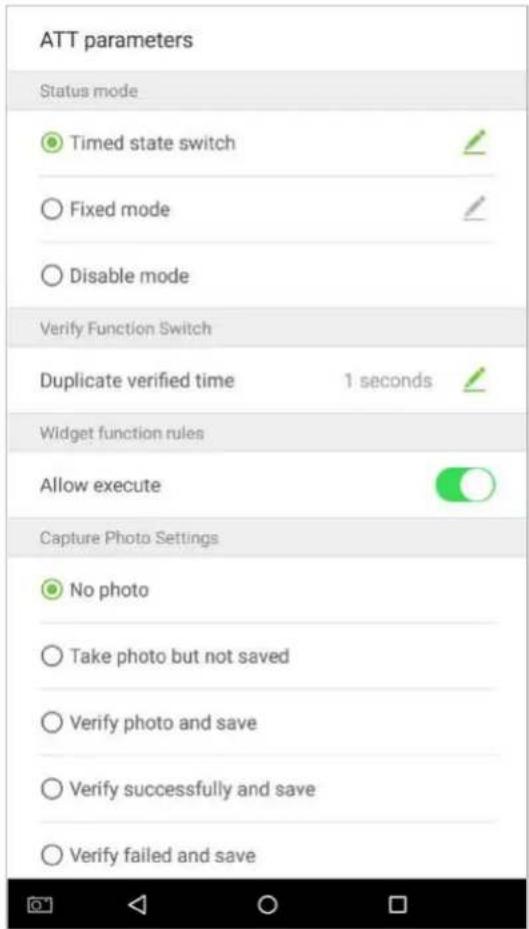
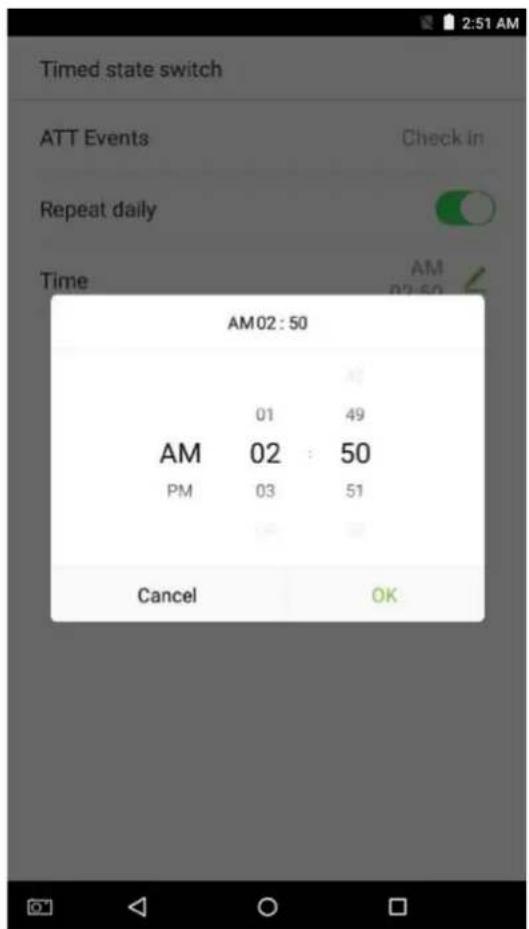
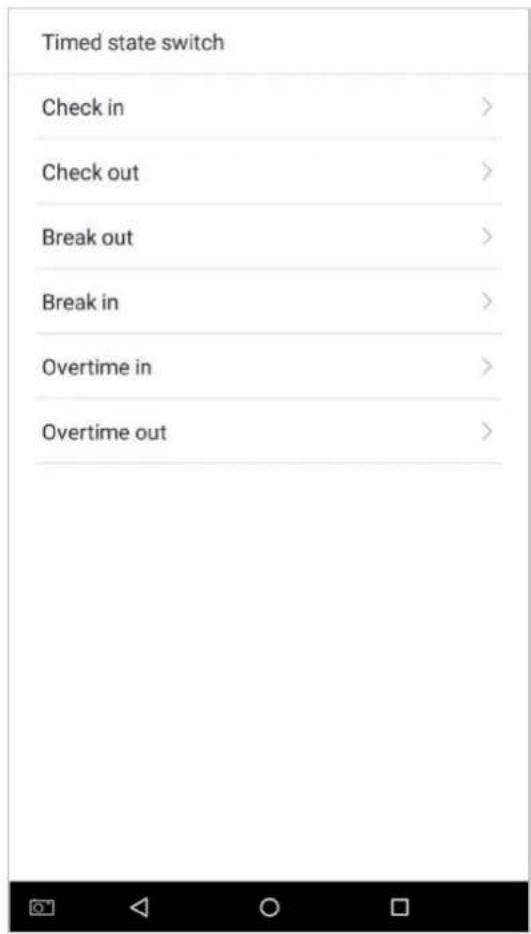
- On the timed state switch interface, tap on [Check in], then tap on [Repeat daily]. This will appear green if enabled or gray if disabled.
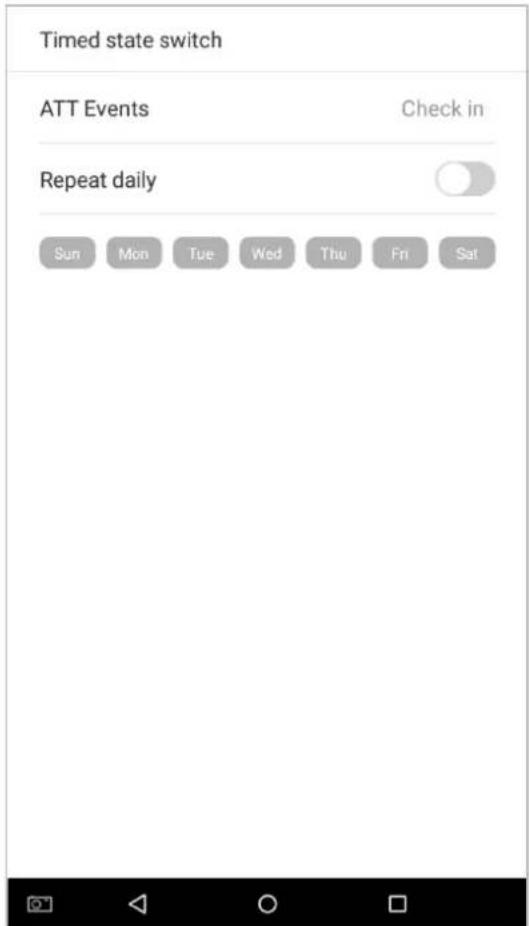
3. Set the time
When the [Repeat daily] switch is turned on, the following will display:
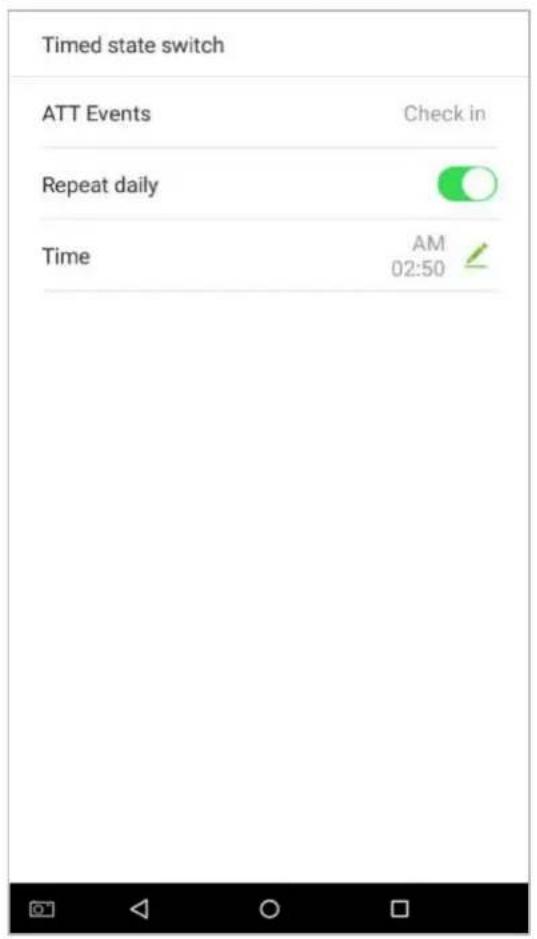
- Tap on the [Time] button and swipe up and down to set the corresponding time. Tap on [OK].
- When the [Repeat Daily] switch is disabled, the following will display:
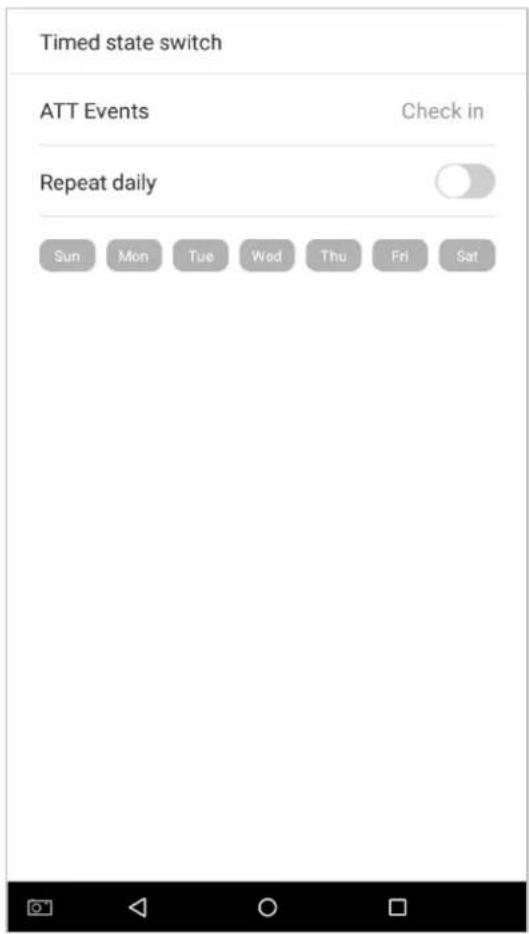
- Tap on the button for the date you would like to set, then swipe up and down to set the corresponding time. Tap on [OK].
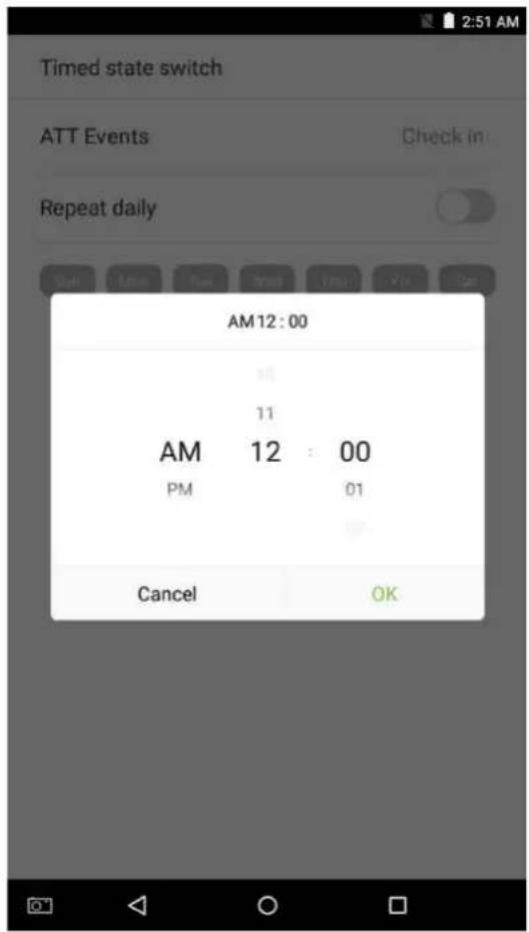
7. Settings Applied.
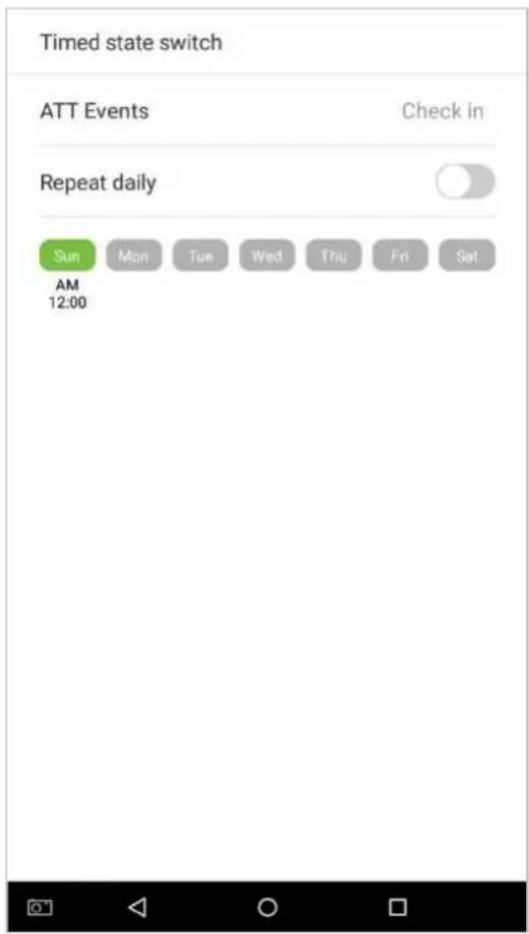
Note: The settings process for "Check out", "Break out", "Break in", "Overtime in", and "Overtime out" is the same as "Check in".
- Set to [Fixed mode] status.
- Once the status mode is set to "Fixed mode", tap on the button to enter the Fixed mode options menu.
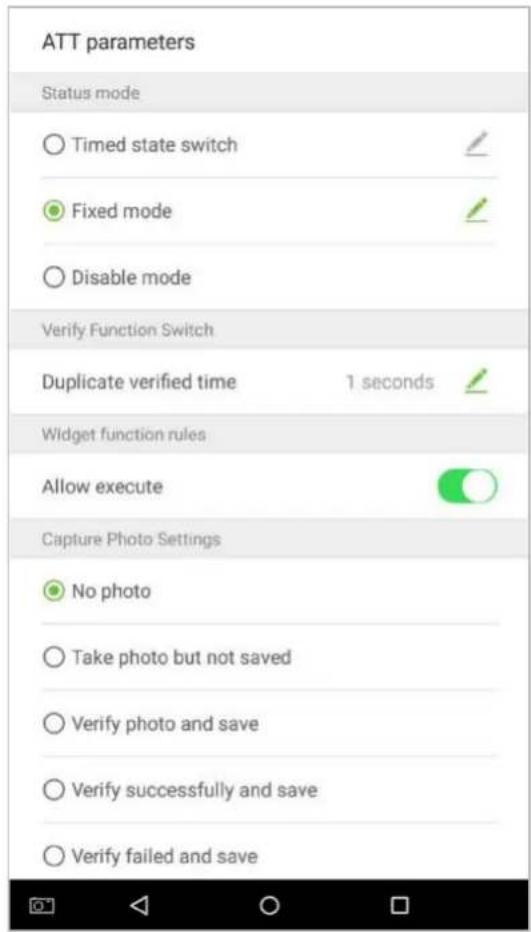
- In the Fixed mode selection menu, select the attendance status that you would like to set.
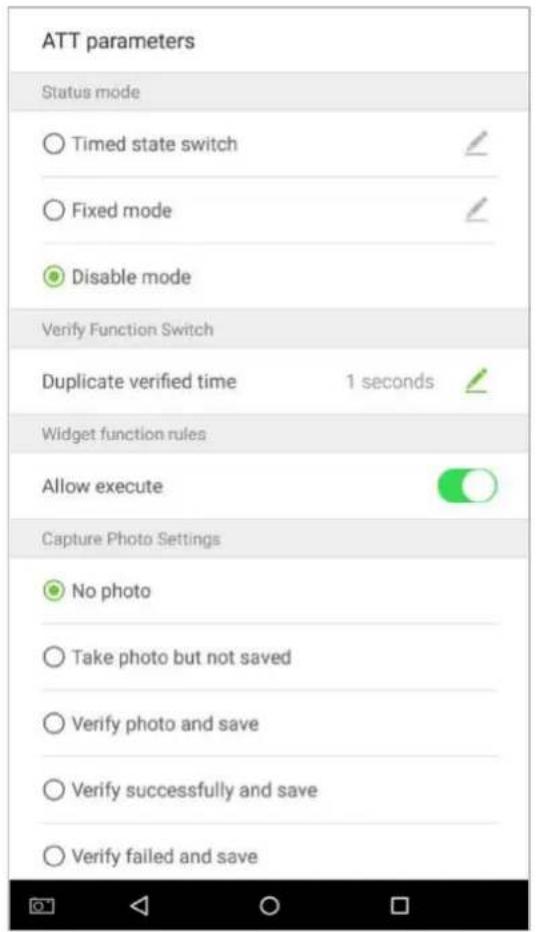
- Set this mode to disabled.
- Select the Status Mode as "Disable mode".
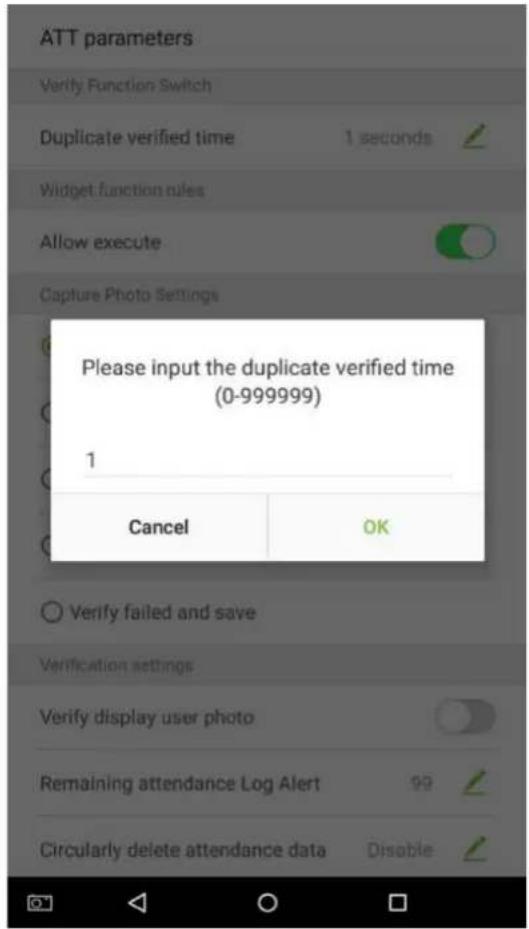
- Duplicate verified time settings.
Tap on [Duplicate verified time] and a dialog box will appear asking you to input time (unit: seconds). Tap on [OK].
10.3.2 Plugin Function Rules
Tap on the [Allow Execute] switch. It will turn green when enabled and gray when disabled:
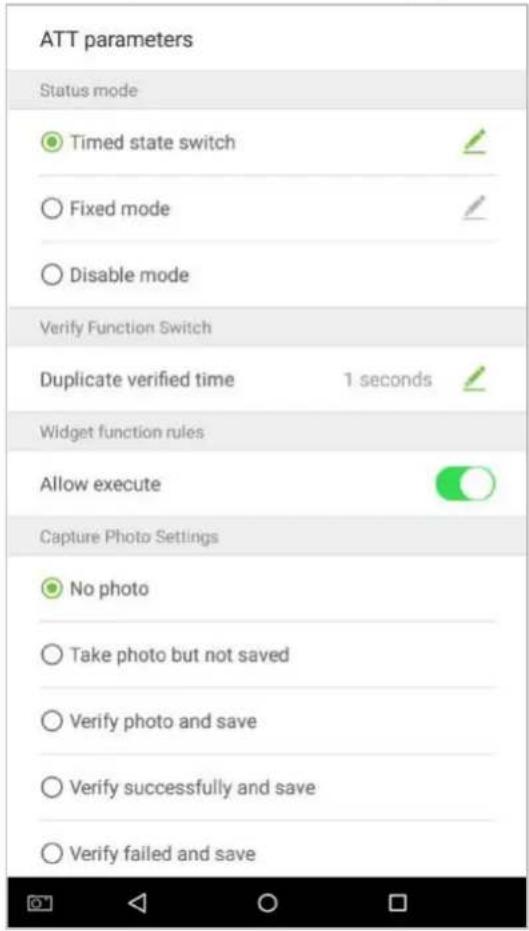
10.3.3 Capture Photo Settings
Select the circumstances in which the camera will take photos and whether or not the photos are saved to assist with attendance records.
Tap on the [Capture Photo Settings] that you would like to configure:
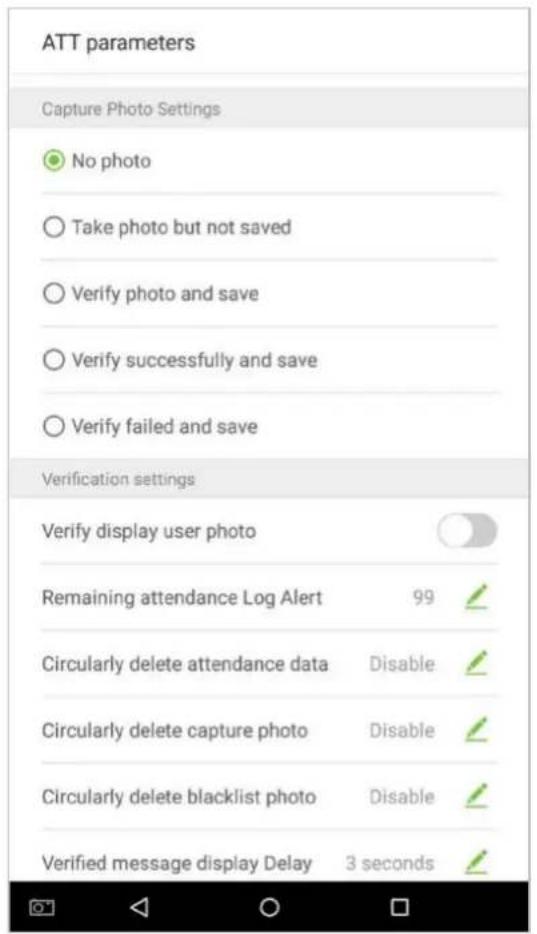
10.3.4 Verification Settings
Configure settings for attendance verification parameters:
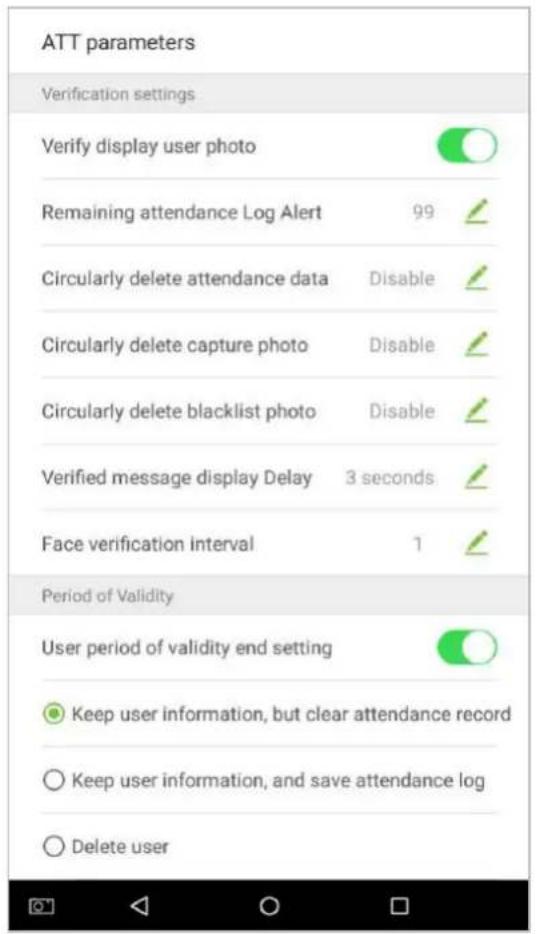
| Menu Options Function Description | |
| Verify display user photo | If it is enabled, the employee photo will be displayed; if not, the employee photo will not be displayed. |
| Remaining attendance Log Alert | When the remaining record space reaches a set value, the device will automatically display a remaining record memory warning. When the value is set as 0, the function is disabled. |
| Cyclically Delete ATT Data | When the attendance record memory has reached full capacity, the device will automatically delete a set value of old attendance records. When the value is set as 0, the function is disabled. |
| Cyclically Delete ATT Photo | When the space storing the attendance photos have reached full capacity, the device will automatically delete a set value of old attendance photos. When the value is set as 0, the function is disabled. |
| Cyclically Delete Blacklist Photo | When the space storing blacklisted photos have reached full capacity, the device will automatically delete a set value of old blacklisted photos. When the value is set as 0, the function is disabled. |
| Verify Message Display Delay | This is the length of time that an employee's information will display on the system's screen after successful verification. Unit: seconds. |
| Face verification interval | To set the facial template matching time interval as needed. Valid value: 0~9 seconds. |
10.3.5 Validity Period of User Information
This is used to determine if employee validity periods are enabled or disabled when registering employees.
- Tap on the [User period of validity end setting] switch. It will turn green when enabled and gray when disabled.
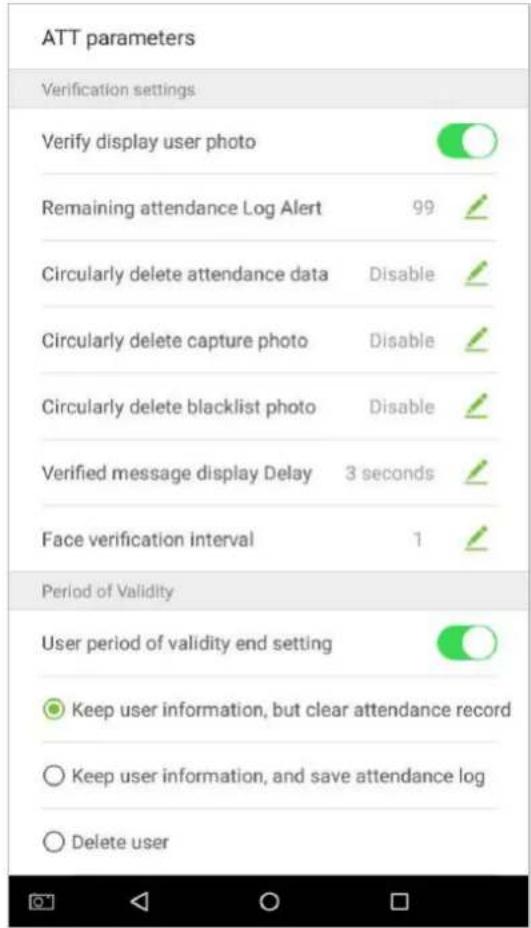
- When User period of validity end setting is enabled, the following will display. Select the setting you would like to configure.
10.4 Cloud Service Settings
In the system settings list, tap on [Cloud Service Settings] to enter the Cloud service settings interface:
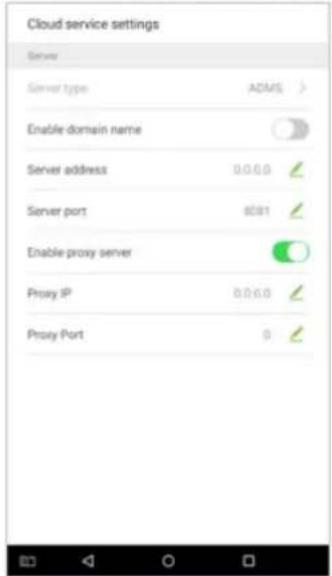
Item
Descriptions
10.5 Wiegand Settings
Tap on [Wiegand Settings] in the system setting list to access the interface as shown below.
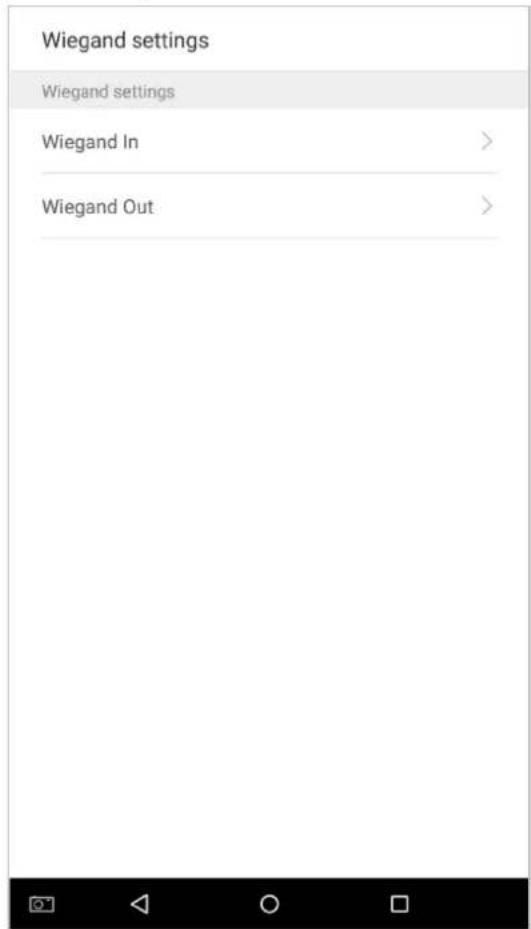
10.5.1 Wiegand In
Tap on [Wiegand In] to enter the interface of settings of "Wiegand In".
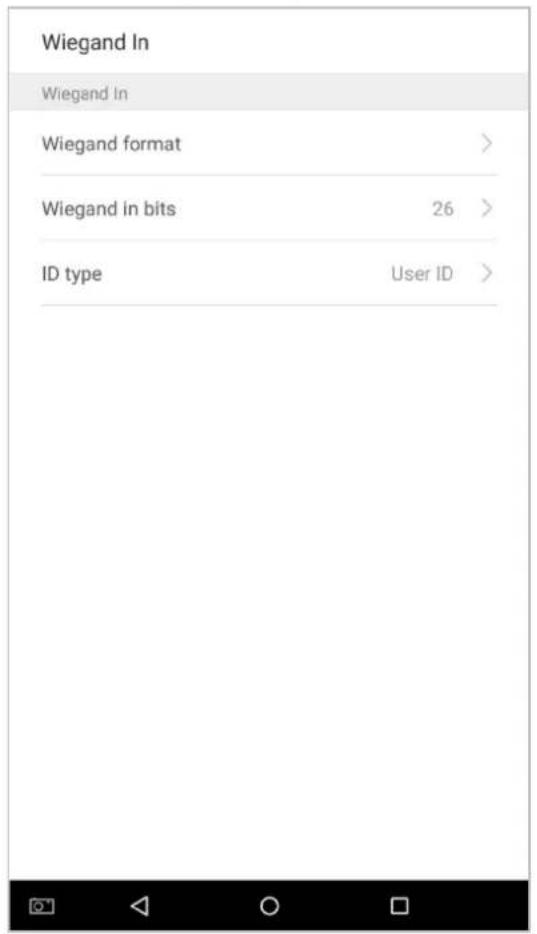
| Menu Options Function Description | |
| Wiegand Format | The Wiegand value could be 26bits, 34bits, 36bits, 37bits, or 50bits. |
| Wiegand in bits | Number of bits of Wiegand data. After choosing [Wiegand input bits], the device will use the set number of bits to find the suitable Wiegand format in [Wiegand Format]. |
| ID type | Input content included in Wiegand input signal. User ID or Badge number can be chosen. |
10.5.2 Wiegand Out
Tap on [Wiegand Out] to enter the below interface:
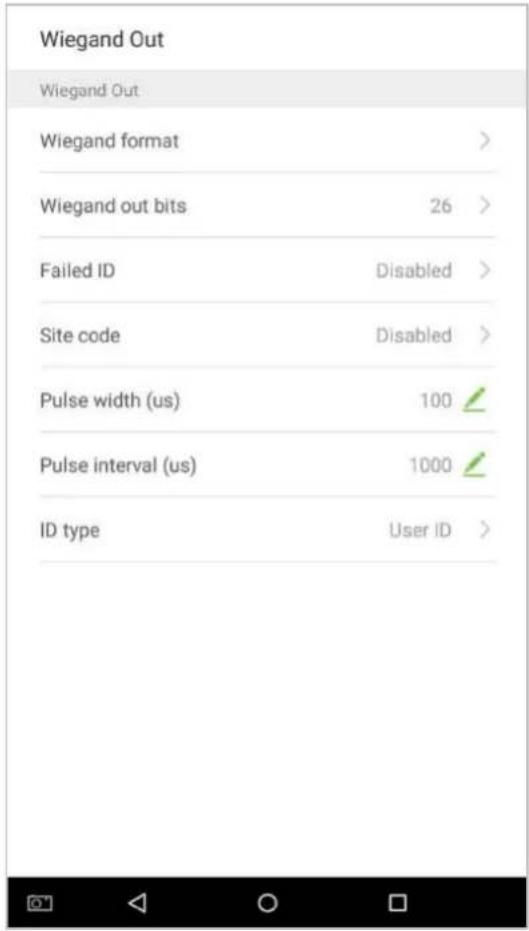
Menu Options Function Description
| Wiegand format | The Wiegand value could be 26bits, 34bits, 36bits, 37bits, 50bits. |
| Wiegand out bits | After choosing the Wiegand format, you can select one of the corresponding output digits in the Wiegand format. |
| Failed ID | If the verification is failed, the system will send the failed ID to the device and replace the card number or personnel ID with the new ones. |
| Site code | It is similar to device ID except that it can be set manually and repeatable with different devices. The default value ranges from 0 to 256. |
| Pulse width(us) | The time width represents the changes of the quantity of electric charge with high-frequency capacitance regularly within a specified time. |
| Pulse interval(us) | The time interval between pulses. |
| ID type | Users may be verified with the specific work codes and card numbers. If the device supports alphabetical work codes, work code output will not be supported and only card number output can be available. |
10.6 Display Settings
In the system settings list, tap on [Display Settings] to enter the display settings page:
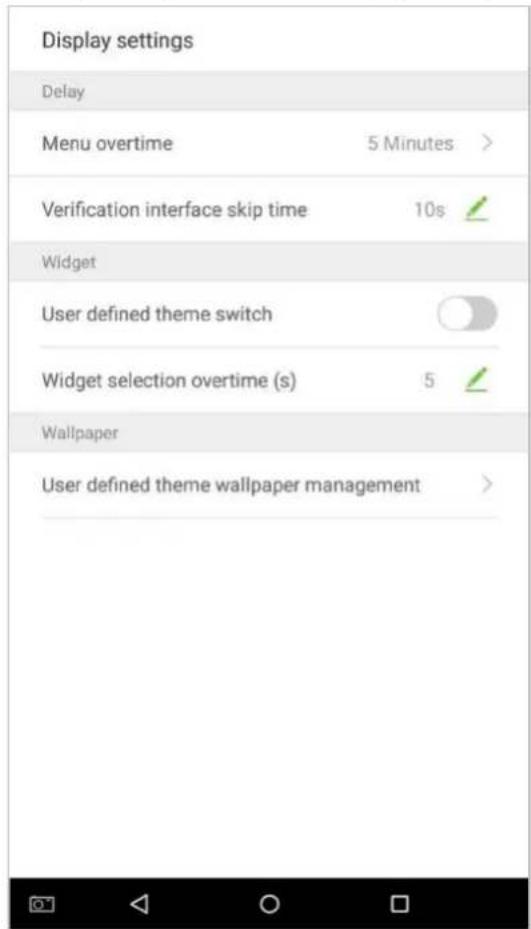
| Menu Options Function Description | |
| Menu overtime | Menu overtime occurs when no operations are performed for a certain amount of time after a user has entered the menu, and the menu enters a standby screen.Parameter options include: 30 seconds, 1 minute, 2 minutes, 5 minutes, 10 minutes, or disabled. When this feature is disabled, the menu (including sub-menus) will not automatically close. Users must press "Exit" to exit the menu. |
| Verification interface skip time | When there is no person nearby after a user verified, the verification interface remains for a certain amount of time and then skip to the standby screen. The skip time values from 5s to 30s. |
| User defined theme switch | When this switch is enabled, users can drag plugin; when disabled, widgets cannot be dragged. (When this is enabled, anyone can modify the theme. We recommend that the administrator disable this function after making the desired changes). |
| Widget selection overtime(s) | If a overtime message occurs while selecting plugin status time, the default status will be restored. When the value is set as 0, this function is disabled. Unit: seconds. |
| User defined theme wallpaper management | This displays all uploaded custom wallpapers. Users can set and delete wallpapers. |
10.7 Sound Settings
On the system settings list, tap on [Sound Settings] to enter the interface of sound settings.
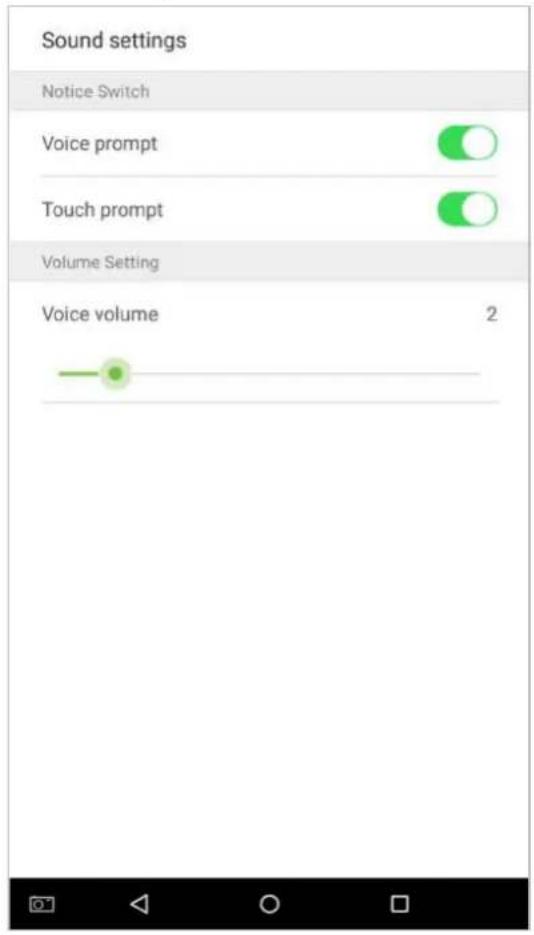
| Menu Options Function Description | |
| Voice prompt | When voice prompts are enabled, users will receive voice prompts. Voice prompts will not be received when this setting is disabled. When disabled and then re-enabled, the volume level will be set to 1. |
| Touch prompt | This switch enables/disables touchscreen prompt. When enabled, users will receive touchscreen prompts. When disabled, no touchscreen prompts will be received. |
| Voice volume | Adjust volume volume. This can only be used if audio prompts are enabled. It can be set from 0-15. |
10.8 Biometric Parameters
On the system settings list, tap on [Biometric Parameters] to enter the "Biometric parameters" interface:
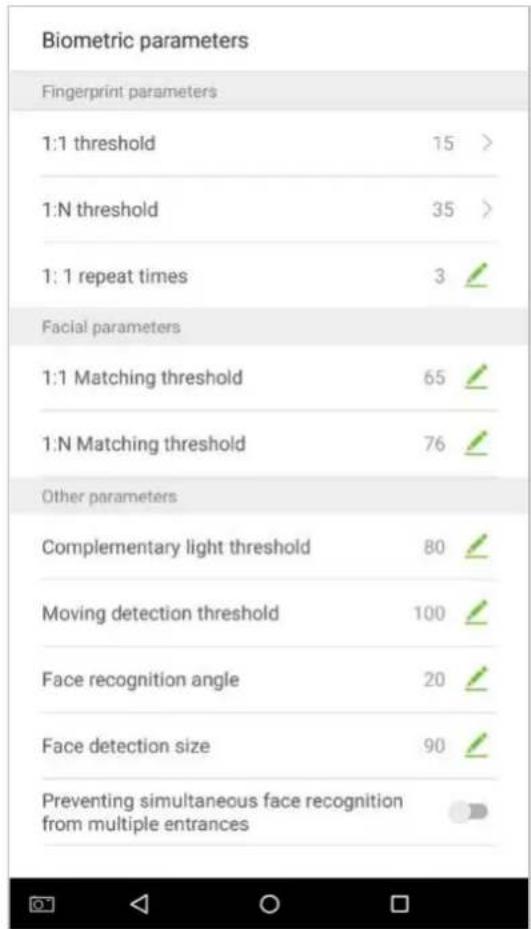
| Menu | Function Description |
| 1:1 threshold | When conducting 1:1 fingerprint verification, fingerprint data is collected and instantly compared with fingerprint data using a 1:1 algorithm. This is converted into a value that is then compared to a set value. If the value of the scanned fingerprint exceeds that of the set value, the verification passes. If it does not, the verification fails. |
| 1:N threshold | When conducting 1:N verification, fingerprint data is collected and instantly compared with all fingerprint templates on the system using a 1:N algorithm. This is converted into a value that is compared to a set value. If the value of the scanned fingerprint exceeds that of the set value, the verification has passes. If it does not, the verification fails. |
| 1:1 repeat times | The upper limit of the number of failed verification under 1:1 verification. When the number of failed verification reaches the set value, the system will return to the standby interface. |
| 1:1 matching threshold | When conducting 1:1 face verification, face data is collected and instantly compared with face data using a 1:1 algorithm. This is converted into a value that is then compared to a set value. If the value of the scanned face exceeds that of the set value, the verification passes. If it does not, the verification fails. |
| 1:N matching threshold | When conducting 1:N verification, face data is collected and instantly compared with all face templates on the system using a 1:N algorithm. This is converted into a value that is compared to a set value. If the value of the scanned face exceeds that of the set value, the verification has passes. If it does not, the verification fails. |
| Complementary light threshold | Detect ambient light brightness. When the brightness of the surrounding environment is less than the threshold, the complementary light is turned on; when the brightness is greater than the threshold, the complementary light is not turned on.The default value is 80. |
| Moving detection threshold | Detect whether there is a moving person in front of the device to determine whether the face recognition function is enabled. The default value is 100. |
| Face recognition angle | To limit the face angle at face recognition, the recommended threshold is 20. |
| Face detection size | The size of the face when face recognition. The range is 65-320 cm. The smaller the value, the farther the detectable distance is; otherwise, the closer it is. |
| Preventing simultaneous face recognition from multiple entrances | When multiple devices are installed on the side-by-side entrance, please enable this function to prevent multiple devices from simultaneously recognizing the face.Set the threshold to three types: high, medium, and low. The higher the threshold, the narrower the distance between the guide lines and the smaller the face recognition range on the screen. When setting the threshold, it is recommended to open auxiliary line correction function. |
10.9 Auto-testing
On the system settings list, tap on [Auto-Testing] to enter the auto testing interface:
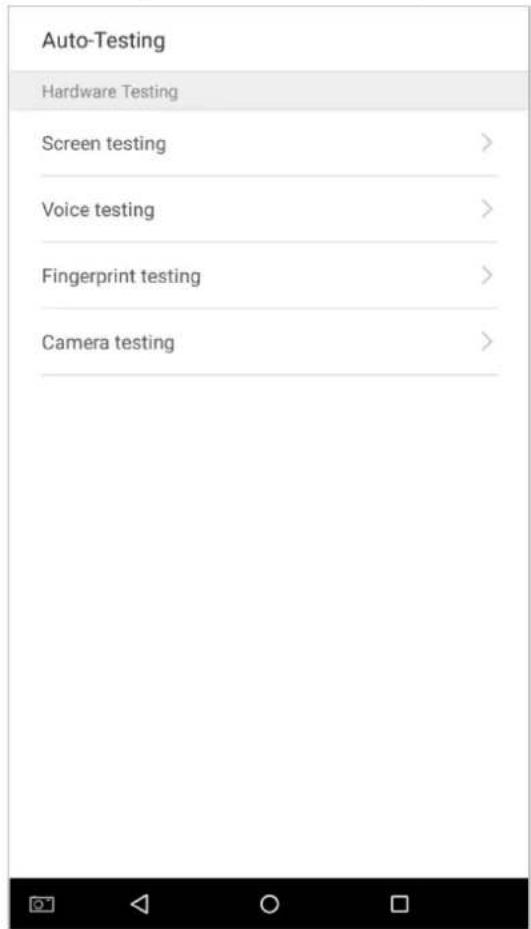
| Menu Options Function Description | |
| Screen testing | Test the screen's display. The screen will display red, green, blue, white, and black tests. Check if the screen color is uniformly correct across each area of the screen. Tap on anywhere on the screen during testing to continue testing. Tap on the back key to exit testing. |
| Voice testing | The device automatically tests audio prompts by playing back audio files that are stored in the device to test if the device's audio files are complete and if the audio effects are in good working order. Tap on the back key to exit testing. |
| Fingerprint testing | The device automatically tests if the fingerprint scanner is functioning properly by testing a fingerprint that is pressed onto the scanner, and seeing if the fingerprint image is clear and usable. When pressing a fingerprint onto the scanner, the screen will display an image of the scanned fingerprint. |
| Camera testing | Test if the camera is functioning properly. Check to see if the image quality is clear and usable. |
10.10 Advanced Settings
On the system settings list, tap on [Advanced settings] to enter the "Advanced settings" interface:
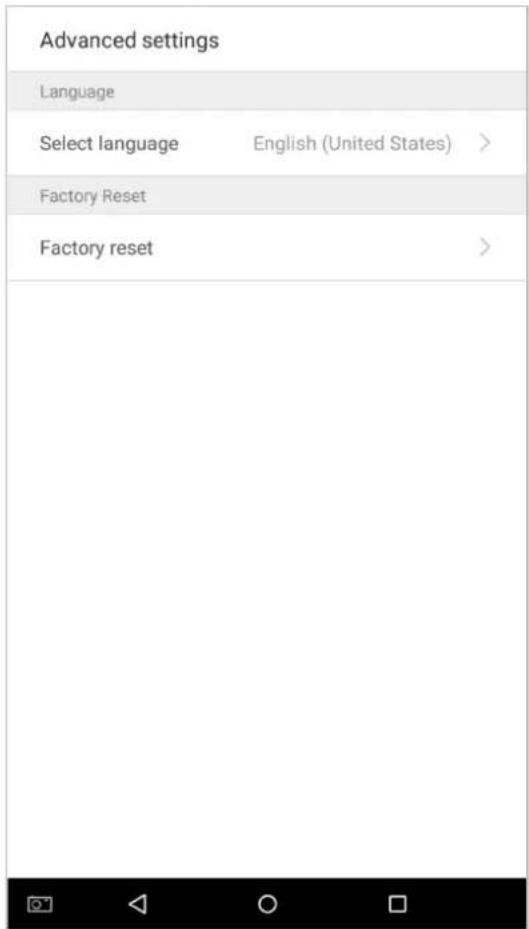
| Menu Options | Function Description |
| Select language | Select English or Simplified Chinese. |
| Restore factory | Restores the settings of the device, including communication settings, system settings, to the factory settings. |
10.11 About the Device
On the system settings list, tap on [About the Device] to enter the "About the Device" interface:
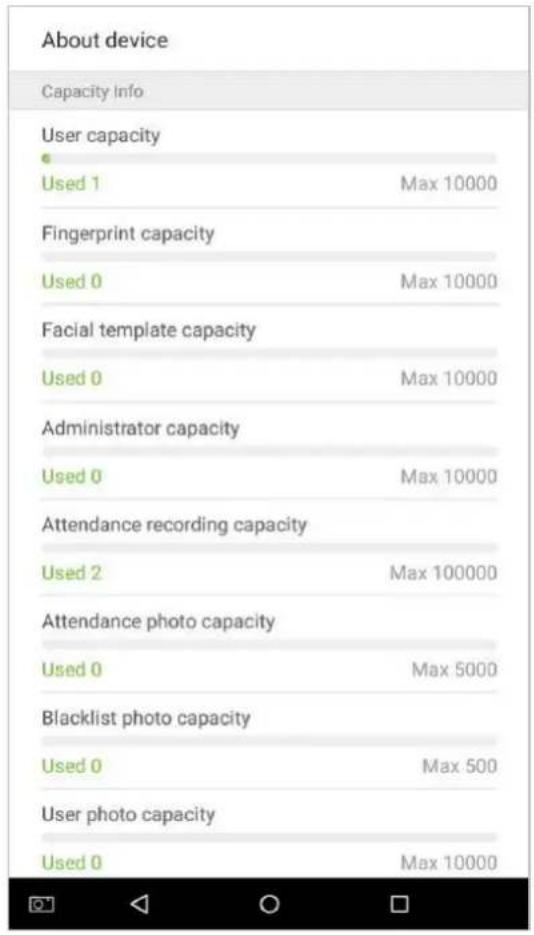
| Menu Options Function Description | |
| Capacity Information | Displays the current device's employee storage, fingerprint and face storage, administrators, attendance records, attendance photos, blacklist photos, and employee photos. |
| Device Information | Displays the device's name, serial number, MAC address, fingerprint algorithm version information, platform information, and manufacturer. |
| Version | Displays all the versions of all the system's apps, such as the system settings, quick parts, data manager, and other installed apps. |
11. USB upgrade
The device's firmware program can be upgraded with the upgrade file in a USB drive. Before conducting this operation, please ensure that the USB drive contains the correct upgrade file and is properly inserted into the device.
Note: If you need an upgrade file, please contact out technical staff. Firmware upgrade is not recommended under normal circumstances.
Statement on the Right to Privacy
Dear Customers:
Thank you for choosing this hybrid biometric recognition product, which was designed and manufactured by ZKTeco. As a world-renowned provider of core biometric recognition technologies, we are constantly developing and researching new products, and strive to follow the privacy laws of each country in which our products are sold.
We Declare That:
- All of our civilian fingerprint recognition devices capture characteristics, not fingerprint images, and do not involve privacy protection.
- None of the fingerprint characteristics that we capture can be used to reconstruct an image of the original fingerprint, and do not involve privacy protection.
- As the provider of this device, we will assume no direct or indirect responsibility for any consequences that may result from your use of this device.
- If you would like to dispute human rights or privacy issues concerning your use of our product, please directly contact your employer.
Our other police fingerprinting devices or development tools can capture original images of citizens' fingerprints. As to whether or not this constitutes infringement of your rights, please contact your government or the final supplier of the device. As the manufacturers of the device, we will assume no legal liability.
Notes:
Chinese law includes the following provisions on the personal freedoms of its citizens:
- There shall be no illegal arrest, detention, search, or infringement of persons;
- Personal dignity as related to personal freedom shall not be infringed upon;
- A citizen's house may not be infringed upon;
- A citizen's right to communication and the confidentiality of that communication is protected by law.
As a final point we would like to further emphasize that biometric recognition is an advanced technology that will undoubtedly be used in e-commerce, banking, insurance, legal, and other sectors in the future. Every year the world is subjected to major losses due to insecure nature of passwords. Biometric products serve to protect your identity in high-security environments.
Eco-friendly Use

- This product's "eco-friendly use period" refers to the period during which this product will not leak toxic or hazardous substances, when used in accordance with the conditions in this manual.
- The eco-friendly use period indicated for this product does not include batteries or other components that are easily worn down and must be periodically replaced. The battery's eco-friendly use period is 5 years.
Hazardous or Toxic Substances and Their Quantities
| Component Name | Hazardous/Toxic Substance/Element | |||||
| Lead (Pb) | Mercury (Hg) | Cadmium (Cd) | Hexavalent chromium (Cr6+) | Polybrominated biphenyls (PBB) | Polybrominated diphenyl ethers (PBDE) | |
| Chip Resistor | × | ○ | ○ | ○ | ○ | ○ |
| Chip capacitor | × | ○ | ○ | ○ | ○ | ○ |
| Chip inductor | × | ○ | ○ | ○ | ○ | ○ |
| Diode | × | ○ | ○ | ○ | ○ | ○ |
| ESD component | × | ○ | ○ | ○ | ○ | ○ |
| Buzzer | × | ○ | ○ | ○ | ○ | ○ |
| Adapter | × | ○ | ○ | ○ | ○ | ○ |
| Screws | ○ | ○ | ○ | × | ○ | ○ |
| ○: indicates that the total amount of toxic content in all of the homogeneous materials is below the limit requirements specified in SJ/T 11363—2006.×: indicates that the total amount of toxic content in all of the homogeneous materials exceeds the limit requirements specified in SJ/T 11363—2006.Note: 80% of this project's components are made using non-toxic, eco-friendly materials. Those which contain toxins or harmful materials or elements are included due to current economic or technical limitations which prevent their replacement with non-toxic materials or elements. | ||||||
www.zkteco.eu
- About This Manual
- Contents
- Instruction for Use....1
- Main Menu 31
- User Management 33
- Attendance Events ★ 66
- Access Settings 76
- Log ★ 86
- Data Management 95
- USB Disk Management★ 97
- Alarm Management★ 99
- Instruction for Use
- Using Your Fingerprints
- Startup Screen
- Notes:
- Virtual Keyboard
- - English keyboard
- Change the Theme and Wallpaper
- - Change the theme
- - Change the wallpaper
- Verification Methods
- Facial Verification
- ● 1:N face verification
- ● 1:1 face verification
- Fingerprint Verification
- ● 1:N fingerprint verification
- Successful verification:
- Verification is failed:
- ● 1:1 fingerprint verification
- Password Verification
- Card Verification★
- Combined Verification
- Main Menu
- User Management
- Add an Employee
- Register Basic Employee Information
- Register Employee Photo
- Tap on the
- Registration Comparison Methods
- - Register fingerprints
- - Register face
- - Register badge number ★
- - Register passwords
- - Delete/Overwrite registered passwords
- Permission Settings
- Verification Mode Setting
- Select [Verification Mode], and then select a verification mode.
- Access level ★
- - Access group
- - Time zone
- Searching for an Employee
- Edit an Employee
- Delete Employee
- Attendance Events★
- Add Attendance Events
- Edit Attendance Events
- Delete Attendance Events
- Access Settings
- Access control parameters
- Time rule setting★
- Holiday setting★
- - Delete a holiday
- Log★
- Search for Attendance Records
- Search for Attendance Photos
- Search for Blacklist Photos
- Data Management
- USB Disk Management★
- Upload to USB Drive
- Download to a USB Drive
- USB Disk Settings
- Alarm Management★
- Add Alarms
- Edit Alarms
- Enter the alarm editing interface.
- Delete Alarms
- System Settings
- Network Settings
- Ethernet Settings
- Comm Connection Settings
- Date and Time
- Date and Time Settings
- Date and Time Format Settings
- ATT/Access record Parameters
- Status Mode
- Status mode settings
- - Set in [Timed state switch] mode
- Set the time
- Settings Applied.
- Plugin Function Rules
- Capture Photo Settings
- Verification Settings
- Validity Period of User Information
- Cloud Service Settings
- Wiegand Settings
- Wiegand In
- Wiegand Out
- Display Settings
- Sound Settings
- Biometric Parameters
- Auto-testing
- Advanced Settings
- About the Device
- USB upgrade
- Statement on the Right to Privacy
- Dear Customers:
- We Declare That:
- Eco-friendly Use
Brand : ZKTeco
Model : SpeedFace-H5L
Category : Access Control