
CE-T - Receiver TECHNISAT - Free user manual and instructions
Find the device manual for free CE-T TECHNISAT in PDF.


| Product Type | Digital Terrestrial Receiver |
| Brand | TechniSat |
| Model | CE-T |
| Supported Standards | DVB-T2, MPEG-4 AVC/H.264, MPEG-2 |
| Input Frequency | 170-230 MHz (VHF) / 470-860 MHz (UHF) |
| RF Input Level | 25-78 dBm |
| Demodulation | QPSK, 16QAM, 64QAM |
| Video Output | 576P, 720P, 1080I, 1080P, 4:3 and 16:9 |
| Audio Output | Digital audio (S/PDIF coaxial) |
| Video Output Ports | HDMI, SCART (CVBS/RGB) |
| USB Support | Yes, for multimedia playback (AVI, WMA, JPEG, BMP) and PVR recording |
| Power Supply | DC 5V (adapter included, 1.5A recommended for USB hard disk) |
| Max Power Consumption | 6W |
| Dimensions (approx.) | 130 mm x 80 mm x 30 mm (estimated) |
| Weight (approx.) | 0.3 kg (estimated) |
| Remote Control Range | Up to 7 meters, ±60 degrees |
| Casing Color | Black |
| Safety Certification | CE, double insulation, Dolby Audio licensed |
| Accessories Included | Remote control (batteries not included), AC adapter, user manual |
Frequently Asked Questions - CE-T TECHNISAT
User questions about CE-T TECHNISAT
0 question about this device. Answer the ones you know or ask your own.
Ask a new question about this device
Download the instructions for your Receiver in PDF format for free! Find your manual CE-T - TECHNISAT and take your electronic device back in hand. On this page are published all the documents necessary for the use of your device. CE-T by TECHNISAT.
USER MANUAL CE-T TECHNISAT
natural_image
Black TechniSet 8013-branded electronic device (no visible text or symbols on body)Manufactured under license from Dolby Laboratories. Dolby, Dolby Audio, and the double-D symbol are trademarks of Dolby Laboratories
Spis treści
natural_image
Pure black rectangle with a thin white corner line, no text or symbols present.natural_image
Pure black rectangle with a thin white corner line, no text or symbols present.
natural_image
Pure black rectangle with a thin white corner line, no text or symbols present.4.2 Edycja programu
natural_image
Pure black rectangle with a thin white corner line, no text or symbols present.N
PL
4.4 Sortowanie
natural_image
Pure black rectangle with a thin white corner line, no text or symbols present.5.2 Rozdzielczość
[480i]: dla systemu NTSC.
natural_image
Pure black rectangle with a thin white corner line, no text or symbols present.
natural_image
Pure black square with a thin white corner line (no text or symbols)natural_image
Pure black rectangle with a thin white corner line, no text or symbols present.PLINHU
natural_image
Pure black rectangle with a thin white corner line, no text or symbols present.8.1 Język OSD
natural_image
Pure black rectangle with a thin white corner line (no text or symbols)NHU
PL
natural_image
Pure black rectangle with a thin white corner line, no text or symbols present.natural_image
Pure black rectangle with a thin white corner line, no text or symbols present.10.1 Multimedia
natural_image
Pure black rectangle with a thin white corner border (no text or symbols)10.3 Opcję filmów
1 Important Safety Instructions 23
1 Connectors 24
1.1 Front Panel 24
2.2 Rear Panel 25
- Remote Control 26
3 Connections 28
- First Time Installation 28
4.1 Basic Operation 29
4.1 Basic Operation 1 4.2 Program Edit 20
4.2 Program Edit 29 4.2.1 Set Favourite Program 20
4.2.1 Set Favourite Program 29
4.2.2 View Favourite Program 30
4.2.3 Delete a TV or Radio Program 30
4.2.4 Skip TV or Radio Program 30
4.2.5 Move a TV or Radio Program 30
4.2.6 Lock Program 30
4.3 EPG (Electronic program guide) 31
4.4 Sort 31
4.4 Soft 31 4.5 ICN (Logical channel number) 31
4.5 EON (Logian channel number) 31 5. Video Setting 21
5.1 Asset Ratio 31
5.1 Aspect Ratio 37
5.2 Resolution 32
5.3 TV format 32
5.4 Video output 32
6 Channel Search 32
6.1 Auto Search 32
6.2 Manual Search 33
6.3 Country 22
6.3 Country 53 6.4 Antenna power 37
6.4 Antenna power 50 7. Time Setting 22
7 Time Setting 33 7.4 Time effect: 20
7.1 Time offset 33
7.2 Country Region 33
7.3 Time Zone 33
7.4 Auto standby 34
8 Option 34
8.1 OSD Language 34
8.2 Subtitle Language 34
8.2 Audio Languages 24
8.3 Audio Language 34 8.4 Digital Audio 24
8.4 Digital Audio 34
9 System Setting 34 0.1 Rewardal Guidance 25
9.1 Parental Guidance 35
9.2 Set Password 35
9.3 Factory Default 35
9.4 Information 35
10 USB support movie playback 35
10.4 Multimedia 20
10.1 Multimedia 36
10.2 Photo configure 36
10.3 Movie Configure 37
10.4 PVR Configure 37
1 Important Safety Instructions
- Important Safety Instructions
« Warning: To reduce the risk of electric shock, do not remove the cover or back. There are no user-serviceable parts inside. Refer servicing to qualified personnel.
Warning: To prevent fire or electric shock hazard, do not expose the unit to rain or moisture. Do not expose the Adaptor and Digital Photo Frame to water (dripping or splashing) and no objects filled with liquids, such as vases, should be placed on the unit.
Keep the product away from direct sunlight and heat source such as radiators or stoves. Do not block the ventilation openings. Slots and openings on the unit are provided for ventilation. The openings should never be blocked by placing your product on a cushion, so other similar surface.
« Do not place the product on unstable cart, stand, tripod, bracket or table. The unit may resulting in possible damage or injury.
« Only use the AC adapter included with product. Using any other adapter will void your warranty. « Unplug the power from the outlet when the unit is not in use.
« Attention should be drawn to the environmental aspects of battery disposal.
« WARNING: The battery (battery or batteries or battery pack) shall not be exposed to excessive heat such as sunshine, fire or the like.
« WARNING: Excessive sound pressure from earphones or headphones can cause hearing loss.
« WARNING: Only use attachments/accessories specified provided by the manufacturer, the product is supplied by AC adapter, the AC adapter is used as disconnect device, the disconnect device shall remain readily operable.
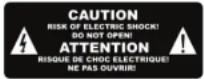

The symbol indicates that dangerous voltages constituting a risk of electric shock are present within this unit.

The symbol indicates that there are important operating and maintenance instructions in the literature accompanying this unit.

This symbol indicates that this product incorporates double insulation between hazardous mains voltage and user accessible parts. When servicing use only identical replacement parts.

CAUTION:
When the apparatus was in electrostatic circumstance, it may be malfunction and need to reset by user. The USB memory stick should be plug in the unit directly. USB extension cable should not be used to avoid failing of data transferring and interference caused.
This ma indicates that this product should not be disposed with other household wastes
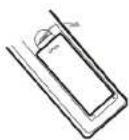
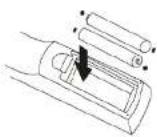
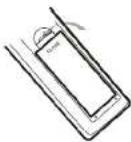
Installing the Batteries
Remove the battery cover from the Remote Control and put 2x/AAA size batteries inside the compartment. The diagram inside the Battery Compartment shows the correct way to install the batteries.
Using the Remote Control
To use the Remote Control, point it towards the front of the Digital Set Top Box. The Remote Control has a range of up to 7 metres from the Set Top Box at an angle of up to 60 degrees.
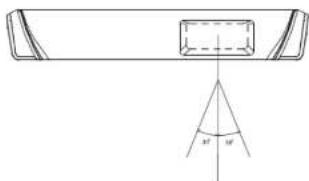
Attention: The Remote Control will not operate if its path is blocked. Sunlight or very bright light will decrease the sensitivity of the Remote Control.
1 Connectors
1.1 Front Panel
- STANDBY INDICATOR: Used to visually show power state of the set top box, the green LED will be light if turned on the set top box and the red LED will be light if the set top box entered standby mode.
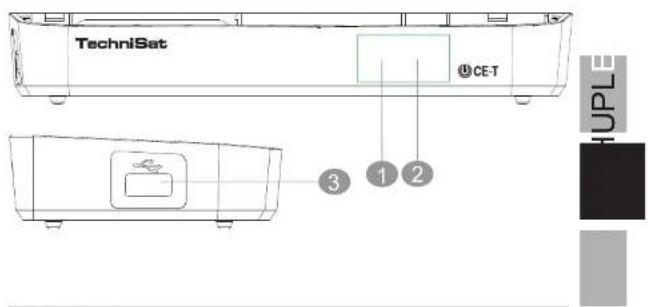
2.2 Rear Panel
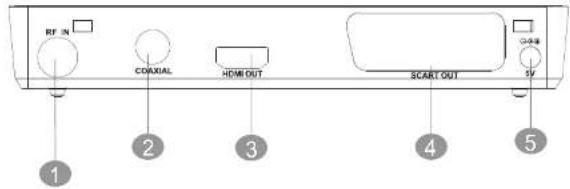
- RF IN: This socket connects to your external aerial.
- COAXIAL: This socket connects to a coaxial socket on your surround sound system.
- HDMI OUT: This socket connects to HDMI in device.
- SCART OUT: This socket connects to your TV.
- DC IN 5V: Used to connect the 5V DC adapter.*
Note: If an external hard disk is connected to the USB port, suggest to use the adapter which supply DC5V/1.5A that is not provided.
2 Remote Control
-
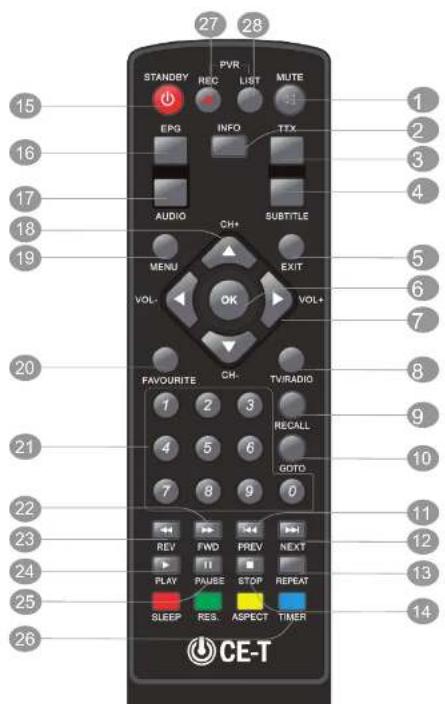
MUTE: Mute or Restore Audio Output.
-
INFO: Displays additional channel information.
-
TTX: Displays Teletext Information.
-
SUBTITLE: Selects Subtitles Language.
-
EXIT: Exits the current Menu or returns to the previous Menu.
-
OK: Confirms an entry or selection. Displays the list of channels.
-
RIGHT / LEFT: Navigates through the Menus. Increases or decreases volume.
-
TV/RADIO: Switches from TV function to Radio and from Radio to TV.
-
RECALL: 10. GOTO: Selects the play time of media.
-
PREV: Skips to the previous track during, playing media and skips to the previous channel during playing DTV.
-
NEXT: Skips to the next track during playing media and skips to the next channel during playing DTV.
-
REPEAT: Selects Repeat or turn off Repeat mode.
-
STOP: Stops media play.
-
STANDBY: Switch the product to on or standby.
-
EPG: (Electronic Program Guide) Turns the program guide on.
-
AUDIO: Selects an Audio Language or Audio Mode
-
UP / DOWN: Navigates through the Menus. Selects the next or previous Channel.
-
MENU: Turns on Main Menu.
-
FAVOURITE: Turns on Favourite Menu
-
0-9 (Num. Buttons): Selects a channel or setting.
-
FWD: Searches forwards during media play.
-
REV: Searches backwards during media play.
-
PLAY: Starts or resumes media play.
-
PAUSE: Pauses media play.
-
COLOUR BUTTONS: Also used with the USB play/record functions.) Used to switch between the last two viewed channels. Switch the product to on or standby. Operate different function in TEXT screen.
-
REC: Used to record the program.
-
LIST: Used to show the record program list on the current disk.

3 Connections
Caution: Make sure to check the voltage specification of the wall outlet is the same rating with the receiver. To prevent the risk of electric shock, do not open the cover or the back of the receiver.
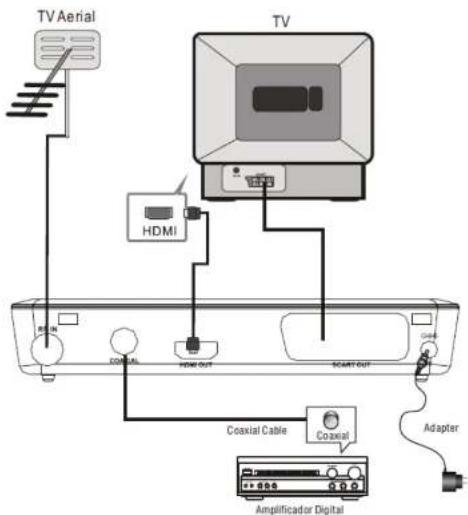
Note: When connecting the receiver to other equipment, e.g., TV, VCR and amplifier, make sure to refer to relevant user manual for instruction. Also, make sure you disconnect all the equipments from the mains supply before the connection.
4 First Time Installation
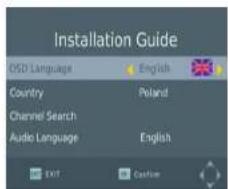
- Select [OSD Language] and press RIGHT/LEFT key to select an language
- Select [Country] and press RIGHT/LEFT key to select your country of residence
- Select [Channel Search] and press RIGHT or OK key to begin Automatic channel search
- Once channel tuning is complete, you are now ready to watch TV

4.1 Basic Operation
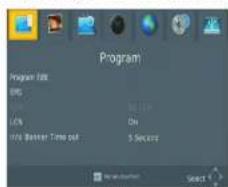
Program Manage Settings
To access the Menu, press the MENU button and select [Program]. The Menu provides options to adjust the Program Manage Settings. Select an option and press OK or RIGHT to adjust that setting. Press the EXIT button to exit the Menu.
4.2 Program Edit
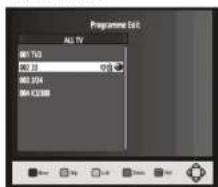
To edit your program preferences (lock, skip, favourite, move or delete), you will need to enter the Program Edit Menu. This Menu requires a password to access. Enter the default password '000000'.
A heart-shaped symbol will appear and the program is marked as a favourite.
-
Repeat the previous step to select more Favourite programs.
-
To confirm and exit the Menu, press the EXIT key Disable favourite TV or Radio Program: Press the FAVOURITE button on the Remote Control with the heart-shaped symbol.
4.2.2 View Favourite Program
-
Press the Favourite button and the Favourite Menu will appear.
-
Press UP/DOWN to select your Favourite Programs.
-
Press OK to select your favourite program.
4.2.3 Delete a TV or Radio Program
- Select the Program and then press the BLUE button
A message will appear. Press OK to delete the program
- Repeat the previous step to select more programs to delete.
4.2.4 Skip TV or Radio Program
-
Select the program you would like to skip and press the GREEN button. A skip symbol is displayed. The program is marked as a skip.
-
Repeat the previous step to select more programs.
-
To confirm and exit the menu, press EXIT key. Disable a skip TV or Radio program: Press the GREEN button on the skip program with the skip symbol.
4.2.5 Move a TV or Radio Program
- Select the preferred program then press the RED button.
A move symbol will appear
-
Press UP/DOWN to move the program
-
Press OK to confirm
-
Repeat the above steps to move more channel
4.2.6 Lock Program
You can lock selected programs for restricted view. Lock a TV or Radio Program:
-
Select the preferred program then press the YELLOW button. A lock-shaped symbol is displayed. The program is now marked as locked
-
Repeat the previous step to select more programs
-
To confirm and exit the menu press the EXIT button
4.3 EPG (Electronic program guide)
The EPG is an on-screen TV guide that shows scheduled programs seven days in advance for every tuned channel. Press the EPG button on the Remote Control to access guide.
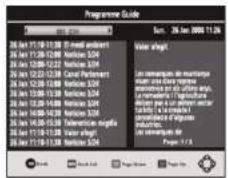
You can use the UP/DOWN key to select the preferred program. If there is more than one page of information, use the BLUE button for page up and the YELLOW button for page down.
4.4 Sort
Sort your channels from the following options:
[LCN] - Sort the channels in ascending order
[Name] - Sort the channels in alphabetical order
[Service ID] - Sort the channels according to the station
4.5 LCN (Logical channel number)
Set LCN on or off.
5 Video Setting
To access the Menu, press MENU then select [Picture]. The Menu provides options to adjust the video settings. Press UP/DOWN to select an option and press RIGHT/LEFT to adjust that setting. Press EXIT to exit the menu.
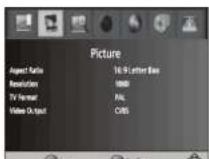
5.2 Resolution
If the video does not appear correctly, change the setting. This setting is to match the most common setting for HDMI.
[480i]: for NTSC system TV.
[480P]: for NTSC system TV.
[576i] for PAL system TV.
[576P]: for PAL system TV.
[720P]: for NTSC or PAL system TV.
[1080I]: for NTSC or PAL system TV.
[1080P] 50Hz.
5.3 TV format
If the video does not appear correctly, you need to change the settings. This should match the most common setting for TVs in your country.
[NTSC]: for NTSC system TV.
[PAL]: for PAL system TV.
5.4 Video output
[CVBS]: CVBS output.
[RGB]: RGB output.
6 Channel Search
To access the menu, press MENU and select [Search Channel]. The Menu provides options to adjust the Search channel settings. Select an option and press RIGHT/LEFT to adjust the setting. Press EXIT to exit the Menu
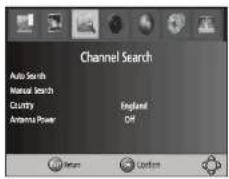
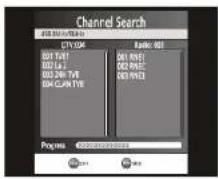
6.2 Manual Search
Install new channels manually. This option adds new channels without changing the current channels list.
- Select [Manual Search] then press OK or RIGHT. The channel search screen will appear.
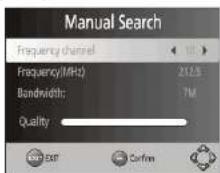

- Press the RIGHT/LEFT key to select the channel frequency
- Press OK to start searching channels If a channel is found, it is saved and added to the channels list. If channels can't be found, then exit the menu.
6.3 Country
Select your country of residence.
6.4 Antenna power
Enable Antenna Power if an external active antenna is connected.
7 Time Setting
To access the Menu, press MENU then select [Time]. The Menu provides options to adjust the time settings. Press UP/ DOWN to select an option and press RIGHT/LEFT to adjust the setting. Press EXIT to exit the menu.
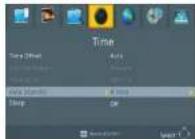
7.1 (1) Time offset
Select auto or manual for GMT offset adjustments.
7.4 Auto Standby
If this setting is off, this function does not work. If this setting is not off, a message will pop up after 3 Hours, that the device will go in to sleep mode. This message will appear under no any operation. Press STANDBY button to exit sleep / auto-off mode.
8 Option
To access the Menu, press MENU and select [Option]. The menu provides options to adjust the OSD Language, Subtitle Language and Audio Language. Select an option and press RIGHT/LEFT to adjust the setting. Press EXIT to exit the Menu.
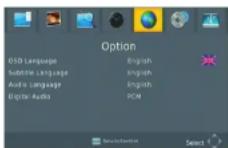
8.1 OSD Language
Select an OSD language
8.2 Subtitle Language
Select the preferred subtitle language.
8.3 Audio Language
Select the preferred audio language for watching TV channels. If the language is not available, the default program language will be used.
8.4 Digital Audio
Select digital audio output mode.
9 System Setting
To access the Menu, press MENU and select [System]. The menu provides options to adjust the system settings. Press the UP/DOWN key to select an option and press RIGHT/LEFT to adjust the setting. Press EXIT to exit the Menu.

9.1 Parental Guidance
You can restrict access to channels that are unsuitable for children. To restrict/lock the channel you will need to enter either the default password '000000' or your own password.
9.2 Set Password
Set or change the password for locked programs. Enter your old password or the default password '000000'. You will then be asked to enter your new password. To confirm re-enter your new password. Once it is confirmed, press EXIT to exit the Menu.
9.3 Factory Default
Reset your Set Top Box to the Default Factory Settings. In Main Menu select [Default] and press OK or RIGHT to select. Enter your password or the default password '000000' and press OK to confirm. This option will delete all preset channels and settings.
9.4 Information
View model, hardware and software information. 10 Obsluga USB
10 USB support movie playback
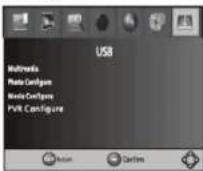
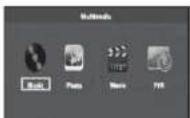
To access the Menu, press the MENU button and select [USB] using the RIGHT/LEFT keys. The menu provides options to playback Music, Photo and Multimedia files. It can support AVI, WMA, JPEG and BMP formats.
10.1 Photo Configure
- Slide Time: adjust slide show interval to 1\~8 seconds.
- Slide Mode: adjust slide show effect as mode 0\~59 or random.
- Aspect Ratio: Keep displays the picture as its original aspect, Discard displays the picture in full screen mode.
10.2 Movie Configure
- Aspect Ratio:
[Keep]: Play movie as its original aspect.
[Discard]: Play movie in full screen mode.
- Subtitle Specific:
[Small]: Displays the subtitle as small mode.
[Normal]: Displays the subtitle as normal mode.
[Big]: Displays the subtitle as big mode.
- Subtitle BG:
[White]: Displays the subtitle in white background.
[Transparent]: Displays the subtitle in transparent background.
[Grey]: Displays the subtitle in grey background.
[Yellowgreen]: Displays the subtitle in yellowgreen background.
[White]: Displays the subtitle in White background.
- Subtitle Font Color:
[Red]: Displays Subtitle in red font.
[Blue]: Displays Subtitle in blue font.
[Green]: Displays Subtitle in green font.
[White]: Displays Subtitle in white font.
[Black]: Displays Subtitle in black font.
Note: We cannot guarantee compatibility (operation and/or bus power) with all USB mass storage devices and assumes no responsibility for any loss of data that may occur when connected to this unit. With large amounts of data, it may take longer for the system to read the contents of a USB device. Some USB devices may not be properly recognized. Even when they are in a supported format, some files may not play or display depending on the content
11 PVR Configure
[Record Device]: Select the disk for the record.
12 Troubleshooting
| Problem Potential Reasons What to do | ||
| No picture | Power isn't connected Connect the power | |
| The power switch is not on Switch on the power | ||
| Screen shows No Signal | Not connect DVB-T cabl Plug in the DVB-T cable | |
| Incorrect setting Set up correct parameter | ||
| No sound from speaker | No or incorrect connection Connect the audio cable | |
| with audio cable correctly | ||
| Mute the sound Switch on the correct | ||
| Only sound, no image on the screen | No or incorrect connection with AV cable | Connect the audio cable correctly |
| The program is a radio program | Presskey to shift into TV mode | |
| Remote control unit is not workable | The battery is exhausted Change new battery | |
| Remote control unit is not in the right opposite of the front panel or too far from it | Adjust the way of holding remote control unit and near from the panel | |
| The image stop suddenly or mosaic | The signal is too weak Strengthen the signal | |

13 Technical Data
| Item Sub Item Parameter | ||
| Tuner | Input Frequency | 170-230 Mhz470-860 Mhz |
| RF Input level 25-78 dBm | ||
| IF Bandwidth 7Mhz and 8Mhz | ||
| Modulation QPSK, 16QAM | 64 QAM | |
| Video | Decoder Format MPEG 4 | AVC/H.264 HP@L4MPEG2 MP@ML.HL |
| Output Format 576P, 720P, | 1080I, 1080P, 4:3and 16:9 | |
| Output Port HDMI, SCART | ||
| Audio | Decoder Format MPEG-1 (layer1&2) | |
| Audio output Digital audio; | S/PDIF | |
| Power | Voltage DC 5V Supply | |
| Power Max 6W | ||
UPLE


TechniSat CET is CE marked device.
Decoder meets all standards required by the EU.
TechniSat reserves the possibility to changes and printing errors.
Issued 11/11.
TechniSat and TechniSat CE-T are registered trademarks
owned business:
natural_image
Black TechniSat 3D device with visible brand logo and control buttons (no readable text beyond branding)Digital Set Top Box



Tartalomjegyzék
natural_image
Pure technical line drawing of a mechanical component with no text or symbolsnatural_image
Color palette bar with grayscale shades and a small crosshair symbol (no text or labels)
- Spis treści
- Edycja programu
- Sortowanie
- Rozdzielczość
- Język OSD
- Multimedia
- Opcję filmów
- Important Safety Instructions
- CAUTION:
- Installing the Batteries
- Using the Remote Control
- Connectors
- Front Panel
- Remote Control
- Connections
- Basic Operation
- Program Edit
- View Favourite Program
- Delete a TV or Radio Program
- Skip TV or Radio Program
- Move a TV or Radio Program
- Lock Program
- EPG (Electronic program guide)
- Sort
- LCN (Logical channel number)
- Video Setting
- Resolution
- TV format
- Video output
- Channel Search
- Manual Search
- Country
- Antenna power
- Time Setting
- (1) Time offset
- Auto Standby
- Option
- OSD Language
- Subtitle Language
- Audio Language
- Digital Audio
- System Setting
- Parental Guidance
- Set Password
- Factory Default
- Information
- USB support movie playback
- Photo Configure
- Movie Configure
- PVR Configure
- Troubleshooting
- Tartalomjegyzék
Brand : TECHNISAT
Model : CE-T
Category : Receiver