000-706 - Angle Grinder Meec Tools - Free user manual and instructions
Find the device manual for free 000-706 Meec Tools in PDF.


| Product Type | Angle Grinder |
| Brand | Meec Tools |
| Model | 000-706 |
| Disc Diameter | 125 mm |
| Power Input | 1100 W |
| Voltage | 230 V ~ 50 Hz |
| No-Load Speed | 11000 rpm |
| Weight | 2.2 kg |
| Spindle Thread | M14 |
| Safety Features | Overload protection, anti-kickback, soft start |
| Housing Material | Metal gear head, reinforced plastic body |
| Includes | Side handle, spanner, guard, extra brushes |
| Dimensions (LxWxH) | 350 x 120 x 100 mm |
| Power Cord Length | 2.5 m |
| Vibration Level | < 2.5 m/s² |
| Sound Pressure Level | 90 dB(A) |
| Maintenance | Clean air vents regularly, replace carbon brushes |
| Repairability | Replaceable carbon brushes, available spare parts |
Frequently Asked Questions - 000-706 Meec Tools
User questions about 000-706 Meec Tools
0 question about this device. Answer the ones you know or ask your own.
Ask a new question about this device
Download the instructions for your Angle Grinder in PDF format for free! Find your manual 000-706 - Meec Tools and take your electronic device back in hand. On this page are published all the documents necessary for the use of your device. 000-706 by Meec Tools.
USER MANUAL 000-706 Meec Tools
natural_image
Exterior view of a red and silver M850 electric grill with black handle (no text or symbols visible)EN - Operating instructions (Translation of the original instructions)
Iula reserves the right to make changes. In the event of problems, please contact our service department.
www.ju13.com
Tillverkare/ Produsent / Produenci/ Manufacturer
Jula AB, Box 363, 532 24 SKARA
Importör/ Importör/ Importer/ Importer
Care for the environment!
Must not be discarded with household waste! This product contains electrical or electronic components that should be recycled. Leave the product for recycling at the designated station e.g. the local authority's recycling station.
SVENSKA....5
SÄKERHETSANVISNINGAR....5
TEKNISKA DATA....13
BESKRIVNING 14
MONTERING 15 HANDUWANDE 16
UNDERHALL 17
NORSK 18
SIKKERHETSANVISNINGER 18
TEKNISKE DATA 26
BESKRIVELSE....27
MONTERING 28
VEDIUKEHOLD 30
POLSKI 31
ZASADY BEZPIECZEŃSTWA 31
DANE TECHNICZNE 39
OPIS 40
MONTAZ 41
OBSLUGA 42
KONSERWACJA 43
ENGLISH 44
SAFETY INSTRUCTIONS....44
TECHNICAL DATA 52
DESCRIPTION 53
ASSEMBLY 54
USE....55
MAINTENANCE 56
SÄKERHETSANVISNINGAR

natural_image
Mechanical assembly diagram showing a valve assembly with a handle and base mount (no text or labels)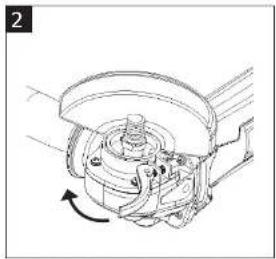
natural_image
Mechanical assembly diagram showing a rotating component with no visible text or symbolsHandtag
natural_image
Close-up of a mechanical component with a central threaded bolt and four mounting holes (no text or symbols visible)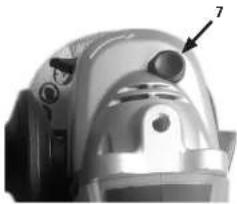
natural_image
Close-up of a metallic mechanical component with a numbered arrow pointing to a feature (no visible text or symbols)1 Indre flensskive S Spennelde
2 Yire flensskive 6 Slope-/kappeskive
natural_image
Mechanical assembly diagram showing a component being lifted into a housing (no text or labels)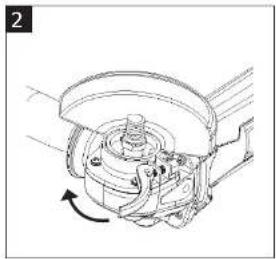
natural_image
Mechanical assembly diagram showing a rotating component with no visible text or symbolsHändtak
Det ekstra håndtaket (4) monteres på verstre eller høyre side, alternativt på oversiden av maskinen. Velg den stillingen som qir den sikreste og mest komfortable håndleringen.
Slipe-/kappeskive
- Plasser den indre flensskiven (1) over spindelen med låsekantene (A) venet nedover, og pass på at skivens og spindelens kanter (8) låser mot hverandre. Flensskiven skal ikke rotere frill, men skal følge spindelens rotasjon.
NO
natural_image
Close-up of a mechanical component with a central threaded bolt and four mounting holes (no text or symbols visible)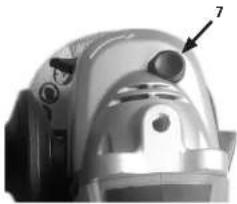
natural_image
Close-up of a metallic helmet with a labeled component (no visible text or symbols)natural_image
Illustration of a hand using a power tool to cut a circular component, with no text or symbols present.VEDLIKEHOLD
VEDLIKEHOLD OG INSPEKSJON
natural_image
Mechanical assembly diagram showing a clamping mechanism with no visible text or symbols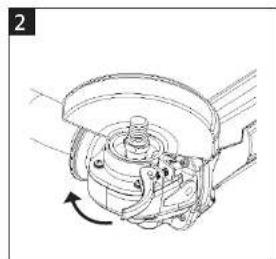
natural_image
Mechanical assembly diagram showing a rotating component with no visible text or symbolsUchwyt
natural_image
Close-up of a mechanical flange with bolt holes and threaded center (no text or symbols visible)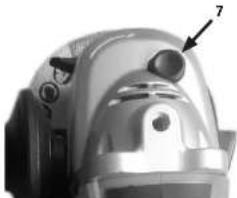
natural_image
Close-up of a metallic mechanical component with a numbered annotation pointing to a feature (no readable text or symbols)natural_image
Illustration of a hand using a power tool to cut a circular component with directional arrows (no text or symbols)KONSERWACJA
KONSERWACJA I KONTROLA
WARNING: Read all safety regulations and all instructions. Failure to follow safety regulations and instructions can lead to electrocution,
fire and/or serious personal injury. Save all the safety regulations and
instructions for future reference. The term "power tool" in the safety instructions refers to your mains-powered (corded) or battery-powered (cordless) power tool.
Safety in the work area
- Keep the work area clean and well lit. Dark and cluttered work areas increase the risk of accidents and injuries.
- Do not use power tools in explosive environments, such as in the vicinity of flammable liquids, gases or dust. Power tools produce sparks that can ignite dust and fumes.
- Keep children and onlookers at a safe distance when working with a power tool. You can lose control of the tool if you are distracted.
Electrical safety
- The mains plug on the power tool must match the mains socket. Never modify the plug in any way. Never use adapters with earthed power tools. Intact plugs and matching outlets reduce the risk of electric shock.
- Avoid body contact with earthed surfaces such as pipes, radiators, cookers and refrigerators. There is an increased risk of electric shock if your body is earthed.
- Do not expose power tools to rain or moisture. There is a greater risk of electric shock if water gets into a power tool.
- Be careful with the power cord. Never use the power cord to carry or pull the power tool, or to pull out the plug from the mains. Keep the power cord away from heat, oil, sharp edges and moving parts. Damaged or tangled power cords increase the risk of electric shock.
- When you use a power tool outdoors, use an extension cord intended for outdoor use. Using cords intended for outdoor use reduces the risk of electric shock.
EN
Personal safety
- Stay alert, pay attention to what you are doing, and use your common sense when working with power tools. Never use power tools if you are tired or under the influence of drugs, alcohol or medication. A moment of inattention when using a power tool can result in serious personal injury.
- Use safety equipment. Always wear safety glasses. The correct use of safety equipment such as a dust filter mask, non-slip safety shoes, helmets and ear protection, reduces the risk of personal injury.
- Avoid accidental starting. Check that the power switch is in the OFF position before connecting to the mains and/or the battery, or lifting/carrying the tool. Carrying a power tool with your finger on the switch, or connecting a tool to the mains supply when the switch is in the ON position, increases the risk of accidents and injuries.
- Remove all Allan keys/spanners etc. before switching on the power tool. A forgotten spanner in a rotating part of the power tool can result in personal injury.
- Do not overreach. Always maintain a firm footing and good balance. This will ensure you have better control over the tool in unexpected situations.
- Wear suitable clothing. Do not wear loose-fitting clothing or jewellery. Keep your hair, clothing and gloves away from moving parts. Loose fitting clothing, jewellery and long hair can get caught in moving parts.
- If dust extraction and dust collection equipment is available, this should be connected and used correctly. The use of such devices can reduce the risk of dust-related problems.
Using and looking after power tools
- Do not force the power tool. Use the correct power tool for the planned work. The correct power tool functions better and more safely when used with the load for which it was designed.
- Do not use the power tool if it cannot be switched on and off with the power switch. Power tools that cannot be controlled with the power switch are dangerous and must be repaired.
-
Unplug the plug from the mains and/or remove the battery from the power tool before making any adjustments, replacing accessories or putting the tool away.
-
Store power tools out of the reach of children when not in use. Never allow anyone who is unfamiliar with the power tool and these instructions to use the tool. Power tools are dangerous in the hands of inexperienced users.
- Keep the power tool properly maintained. Check that moving parts are not misaligned, jammed or loose, and that there are no other factors that could affect the safe use of the tool. If the power tool is damaged, it must be repaired before being used again. Many accidents are caused by poorly maintained power tools.
- Make sure that cutting tools are sharp and clean. Properly maintained cutting tools with sharp cutting edges are less likely to jam and are easier to control.
- Use the power tool, accessories and bits etc., in accordance with these instructions, taking into account the actual working conditions and the work that is to be done. Using the power tool for anything other than its intended purpose can lead to dangerous situations.
Battery-powered tool use and care
- The battery must only be charged with the charger specified by the manufacturer. A charger that is suitable for one type of battery can result in a fire risk if used with other types of batteries.
- Only use the type of battery intended for the actual power tool. The use of any other type of battery can result in a risk of personal injury and fire.
- When the battery is not in use keep it away from other metal objects such as paperclips, coins, keys, nails, screws and other small metal objects that can short circuit the two terminals. If the battery terminals are short-circuited this can result in burn injuries or a fire.
- Incorrect use of the product can cause fluid to leak from the battery; avoid contact. Rinse immediately with plenty of water if you get fluid on your skin. Seek medical attention if you get fluid in your eyes. Fluids from the battery can cause skin irritation or burns.
Service
- The power tool must only be serviced by qualified service personnel using
EN
General safety instructions for the angle grinder
- This power tool may only be used for grinding. Observe all warnings, instructions, illustrations and data supplied with the machine. If you do not observe the following instructions, there is a risk of electric shock, fire and/or serious personal injury.
- This power tool is not suitable for sanding, work with wire brushes, polishing or cutting. If the power tool is used for work for which it is not designed for this could result in dangerous situations and personal injury.
- Do not use accessories that are not intended for this power tool or that the manufacturer has not specifically recommended. Even if the accessory can be attached to the power tool, this is not a guarantee of safe use.
- The permitted speed of the attachment must be at least equal to the maximum speed specified on the power tool. Accessories that rotate faster than permitted may be destroyed.
- The outer diameter and thickness of the attachment must correspond with the dimensions of the power tool. Incorrectly dimensioned attachments cannot be screened off and controlled in a satisfactory way.
- Grinding discs, flanges, support discs and other accessories must fit the power tool's grinding spindle exactly. Attachments that do not fit the power tool's grinding spindle rotate unevenly, vibrate very heavily and can cause you to lose control of the machine.
- Never use damaged attachments. Check before each use that the attachments are in perfect condition, e.g. that the grinding discs do not show signs of splitter damage or cracks. If the power tool or attachment has fallen down, you must verify that the attachment is not damaged. Otherwise, you must use an undamaged attachment. When you have checked and mounted the attachment, let the power tool run at its highest speed for one minute. You and other bystanders must stand outside the attachment's plane of rotation during this operation. In most cases damaged attachments fail during this test operation.
-
Use personal safety equipment. Wear a full face shield, safety goggles or safety glasses, depending on the type work. If necessary wear a dust mask, hearing protection, protective gloves or protective apron that protects against fine abrasive and material particles. The eyes must be protected against foreign
-
Ensure that other persons maintain a safe distance from the work area. Anyone within the work area must wear personal safety equipment. Fragments from the work piece or broken attachments can be thrown out and cause injuries even outside of the direct work area.
- Only hold the machine by the insulated grip surfaces when working in areas where the attachment may come into contact with concealed electrical cables. Contact with a live conductor can make metal machine parts live and in doing so lead to electrocution.
NOTE: In some cases the safety instructions above do not apply if polishing or sanding are the only recommended usage types.
- Keep the power cord away from rotating attachments. If you lose control of the machine, the power cord can be cut or drawn in resulting in your hand or arm being pulled towards the rotating attachment.
- Never put down the power tool until the attachment has stopped completely. The rotating attachment can come in contact with the ground so that you risk losing control of the power tool.
- The power tool must not be running when you carry it. Clothes coming into temporary contact with the rotating attachment can be drawn in so that the attachment is drawn towards your body.
- The ventilation openings on the power tool should be cleaned regularly. The motor fan draws dust into the housing and a considerable accumulation of metal dust can cause an electrical hazard.
- Do not use the power tool in the vicinity of flammable materials. The material may be ignited by sparks.
- Do not use attachments that require liquid coolants. Water or other liquid coolants can result electrical shock.
NOTE: The safety instructions above do not apply to power tools designed for connection to a liquid supply.
EN
Additional safety instructions for all areas of application
Warning for kickback
Kickback is a sudden reaction by a rotating attachment when, for example, the grinding disc, support disc or steel brush become caught or blocked. This causes the rotating attachment to stop abruptly. The result is that the power tool uncontrollably accelerates against the attachment's direction of rotation at the point of binding.
If, for example, a grinding wheel becomes caught or blocked in the work piece, the edge of the grinding wheel can jam in the work piece so that the disc fails or causes kickback. The grinding disc will then moves towards or away from the user, depending on the disc's direction of rotation at the point of binding. Grinding discs can also rupture. Kickback is caused by the power tool being used incorrectly. Kickback can be prevented by appropriate precautions as set out below.
- Hold the power tool firmly and position your body and arms in a position that gives you the ability to resist the forces of kickback. Always use the support handle (if present) to give you the best possible control over the forces of kickback and the reaction torque during start. With appropriate precautions, you can master kickback and reaction forces.
- Always keep your hands at a safe distance from the rotating attachment. The attachment can move towards your hands in the event of kickback.
- Avoid holding your body within the area where the power tool moves in the event of kickback. The kickback forces the power tool in the opposite direction to the rotation of the grinding disc at point of binding.
- Use special care when working corners, sharp edges, etc. Hold so that the attachment does not bounce out from the work piece or become snagged. The rotating attachment tends to become snagged in corners, sharp edges or when it bounces. This can result in kickback or the lose of control.
- Never use a saw chain or saw blade or with teeth. Such attachments often cause kickback or a loss of control over the power tool.
Supplementary safety instruction for grinding
Special warnings for grinding
- Use only disc types that are recommended for your power tool and the specific guard designed for the selected disc. Discs for which the power tool was not designed cannot be adequately guarded and are unsafe.
- The abrasive surface of the middle wheels must be mounted below the level of the protective edge. The abrasive surface of the middle wheels must be mounted below the level of the protective edge. An incorrectly mounted disc that protrudes over the edge of the guard, cannot be properly protected.
- The guard must be securely attached to the power tool and positioned for maximum safety, so the least amount of disc is exposed towards the user. The guard helps to protect the user from broken disc fragments, accidental contact with disc and sparks that could ignite clothing.
- Wheels must be used only for recommended applications. Example: For example: do not grind with the side of cut-off wheel. Abrasive cut-off wheels are intended for peripheral grinding, side forces applied to these wheels may cause them to shatter.
- Always use undamaged wheel flanges that are of correct size and shape for your selected grinding disc. Proper wheel flanges support the disc thus reducing the possibility of disc breakage. Flanges for cut-off wheels may be different from grinding disc flanges.
- Do not use worn down discs from larger power tools. Discs intended for larger power tool are not suitable for the higher speed of a smaller power tool and may fail.
Remaining risks
Even if the power tool is used as prescribed, there are some risks. The construction and design of the power tool can result in the following risks:
- Damage to the lungs, if a suitable dust protection mask is not worn.
- Hearing impairment if no suitable ear protection is used.
- Health problems due to vibrations in the hands and arms, if the machine is used continuously for a long time or is not handled and maintained correctly.
EN
WARNING: The machine produces an electromagnetic field during operation. This field can in some circumstances affect active or passive medical implants. If you have a medical implant you should consult your doctor and/or the manufacturer of the medical implant before using the tool to reduce the risk of serious or fatal personal injury.
Explanation of the symbols used on the product:

Read the User Instructions

Wear safety glasses
TECHNICAL DATA
Rated voltage DC 18 V
Speed no load 8000 rpm
Spindle thread M14
Grinding/Cut-off disc's outer diameter 115 mm
Grinding/Cut off disc's hole diameter 22 mm
Noise
| Sound pressure level L | F_g = 78.50 dB( A) ,K_gE = 3 dB |
| Sound power level L | W_mH = 29.50 dB( A) ,K_mM = 3 dB |
| Vibration | |
| Vibration for surface grinding a | h,AC = 7.54 m/s^2, K = 1.5 m/s^2 |
Always wear ear protection!
The declared vibration value, which has been measured by a standardised test method, can be used to compare different tools with each other and for a preliminary assessment of exposure.
WARNING: The actual vibration level when using a power tool can deviate from the specified
maximum value, depending on how the tool is used. It is therefore necessary to determine which safety precautions are necessary in order for the user, based on an estimate of exposure in actual operating conditions (taking into account all stages of the work cycle, e.g., the time when the tool is switched off and when it is run without load, in addition to the start-up time).
EN
DESCRIPTION
Parts of the angle grinder
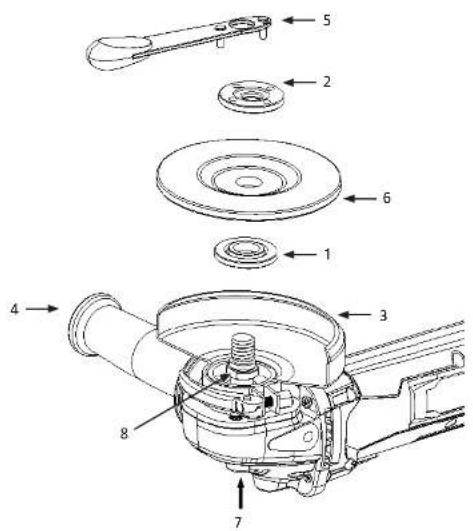
1 Inner flange disc 5 tightening key
2 Outer flange disc 6 Grinding/cut-off disc
3 Guard 7 Spindle lock button
6.12.2015年7月1日
ASSEMBLY
IMPORTANT: The machine must be switched off and disconnected from the mains supply before any work on the machine can be performed.
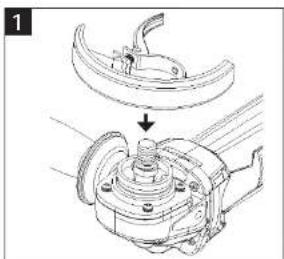
Guard
Fit the guard (3) as shown in the illustration. Adjust the clamping force of the locking arm by tightening the hex screw out or in when the locking arm is unloaded.
natural_image
Mechanical assembly diagram showing a clamping mechanism with no visible text or symbols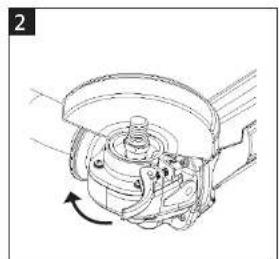
natural_image
Mechanical assembly diagram showing a rotating component with no visible text or symbolsHandle
The extra handle (4) is mounted on the left or right side alternatively on the top of the machine. Choose the position that provides the most comfortable and safest handling.
Grinding - cut-off disc
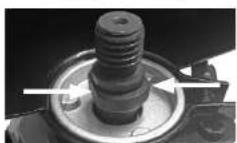
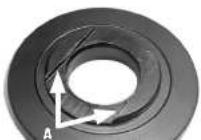
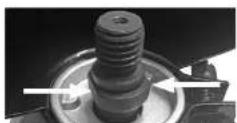
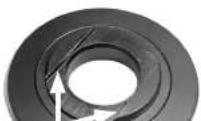
- Place the inner flange disc (1) over the spindle with the locking edges (A) facing down, and make sure that the disc and spindle's edges (8) mate. The flange disc must not rotate freely, but must follow the rotation of the spindle.
EN
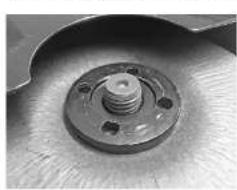
- Now fit the outer flange disc (2) and tighten with the tightening key (5). Press and hold in the button for the spindle lock (7) to prevent the spindle from rotating during tightening.
natural_image
Close-up of a mechanical flange with threaded bolt and four mounting holes (no text or symbols visible)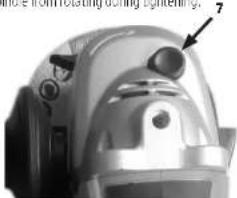
natural_image
Close-up of a mechanical device with no visible text or symbols- After filling or replacing the disc, the grinder should be test-run at a low speed for a few minutes, without the disc being placed against an object. If the disc is damaged it must be replaced immediately.
USE
Applications
This angle grinder can be used to grind steel, stone and ceramic objects. Never attempt to grind wood or soft metals such as lead. Such material will quickly "clog" the grinding disc and make it unusable.
Ensure before each use, that no damage has occurred to the grinding/cut-off disc, power cable or the rest of the machine. The guard must be mounted in such a way that it prevents abrasive particles from reaching the user.
- Never cover the ventilation holes when the machine is used. This can damage the motor and impair its operation.
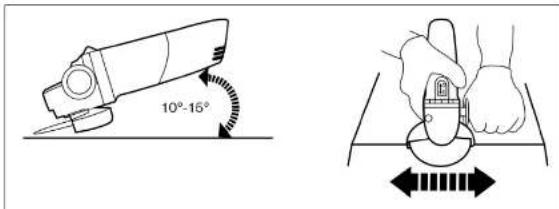
- Move the machine back and forth over the work piece with smooth movements.
Grinding
NOTE: Do not turn the power switch to the on or off position when product is in contact with the work piece. This reduces the life span of the power switch and can damage the work piece.
1. Tilt the product at an angle of 10^ to 15^ for easy handling and smooth grinding.
2. Place the disc against the work piece with a light and steady pressure for maximum removal. It is never necessary to use the angle grinder with extreme force. The weight of the angle
- Move the angle grinder continuously back and forth.
MAINTENANCE
MAINTENANCE AND INSPECTION
IMPORTANT: Always ensure that the machine is turned off and unplugged from the mains supply before starting inspection or maintenance work.
- The frame and motor holder are the core of the power tool. Check with great accuracy that these are not damaged or exposed to oil or water.
- Regularly check all fasteners and bolts, and make sure that they are tight. If you find loose screws, these must be tightened immediately. Otherwise, serious injuries could occur.
- You should allow an authorised service centre clean and lubricate this tool thoroughly at least once a year.
- Make sure that the tool is clean and free from dust after use.

EC DECLARATION OF CONFORMITY
EG FÖRSÄKRAN OM ÖVERENSSTÄMMELSE
EF SAMSVARSERKLÆRING
DEKLARACJA ZGODNOŚCI WE

Jula AB, Box 363, SE-532 24 SKARA, SWEDEN
certify that the design and manufacturing of this product
Machinery Directive 2006/42/EC
EN 60745-1:2009+A11, EN 60745-2-3:2011+A2+A11+A12
Electromagnetic Compatibility Directive 2014/30/EU
EN 55014-1:2006+A1+A2, EN 55014-2:1997+A1+A2
RoHS Directive 2011/65/EU
EN 62321:2009
This product was CE marked in year -15
Name and address of the person authorised
to compile the technical file
- Care for the environment!
- SÄKERHETSANVISNINGAR
- Handtag
- Händtak
- Slipe-/kappeskive
- VEDLIKEHOLD
- VEDLIKEHOLD OG INSPEKSJON
- Uchwyt
- KONSERWACJA
- KONSERWACJA I KONTROLA
- Safety in the work area
- Electrical safety
- EN
- Personal safety
- Using and looking after power tools
- Battery-powered tool use and care
- Service
- General safety instructions for the angle grinder
- NOTE: In some cases the safety instructions above do not apply if polishing or sanding are the only recommended usage types.
- Additional safety instructions for all areas of application
- Warning for kickback
- Supplementary safety instruction for grinding
- Special warnings for grinding
- Remaining risks
- TECHNICAL DATA
- Always wear ear protection!
- WARNING: The actual vibration level when using a power tool can deviate from the specified
- DESCRIPTION
- ASSEMBLY
- Guard
- Handle
- Grinding - cut-off disc
- Applications
- Grinding
- MAINTENANCE
- MAINTENANCE AND INSPECTION
Brand : Meec Tools
Model : 000-706
Category : Angle Grinder