010-190 - Grinder Meec Tools - Free user manual and instructions
Find the device manual for free 010-190 Meec Tools in PDF.

User questions about 010-190 Meec Tools
0 question about this device. Answer the ones you know or ask your own.
Ask a new question about this device
Download the instructions for your Grinder in PDF format for free! Find your manual 010-190 - Meec Tools and take your electronic device back in hand. On this page are published all the documents necessary for the use of your device. 010-190 by Meec Tools.
USER MANUAL 010-190 Meec Tools
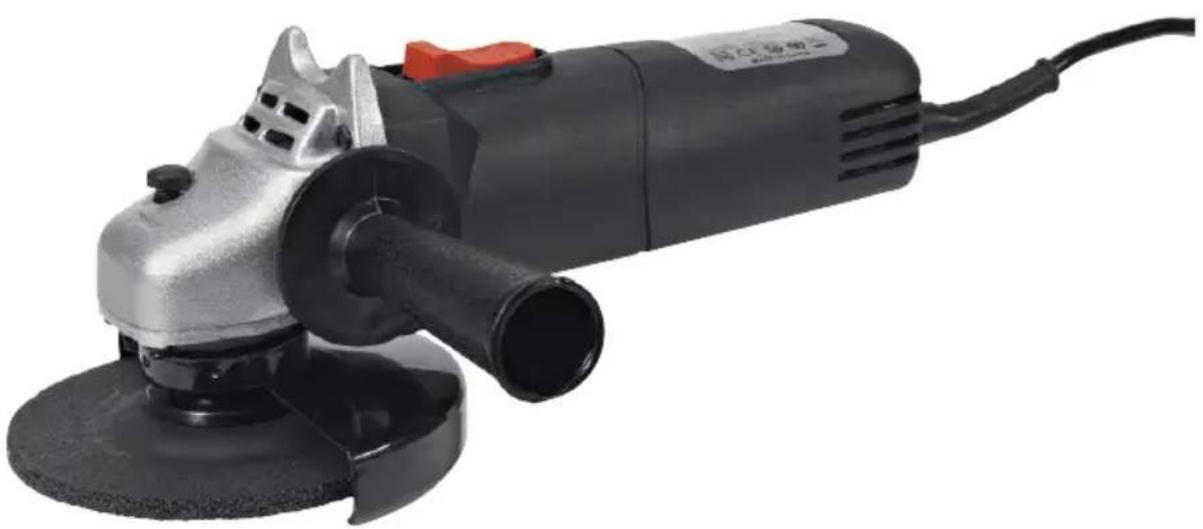
natural_image
Exterior view of a black and silver electric grinder with a red handle (no visible text or symbols)EN User instructions for angle grinder
SE - Bruksanvisning i original
EN - Translation of operating instructions in original
Date of production: 2015-03-24
© Jula AB
SVENSKA....4
SÄKERHETSANVISNINGAR....4
TEKNISKA DATA 11
BESKRIVNING 12
MONTERING....12
HANDHAVANDE 15
UNDERHÅLL 17
FELSÖKNING....18
NORSK 20
SIKKERHETSANVISNINGER 20
TEKNISKE DATA 27
BESKRIVELSE....28
MONTERING 28
BRUK....31
VEDLIKEHOLD 33
FEILS∅KING.... 34
POLSKI 36
ZASADY BEZPIECZEŃSTWA 36
DANE TECHNICZNE 44
OPIS 45
MONTAŻ 45
OBSŁUGA 48
KONSERWACJA 50
WYKRYWANIE USTEREK 52
ENGLISH 54
SAFETY INSTRUCTIONS 54
TECHNICAL DATA....61
DESCRIPTION 62
ASSEMBLY....62
USE....65
MAINTENANCE 67
TROUBLESHOOTING 68
SÄKERHETSANVISNINGAR
natural_image
Technical line drawing of a power tool and its internal components (no text or symbols)flowchart
graph TD
    A["Left Chamber 1"] --> B["Inner Structure"]
    B --> C["Flow Direction: ↑ and ↓"]
    C --> D["Right Chamber 2"]
    D --> E["Inner Structure"]
    E --> F["Flow Direction: ↑ and ↓"]
    F --> G["Inner Structure"]
    style A fill:#f9f,stroke:#333
    style G fill:#bbf,stroke:#333
Slipning
natural_image
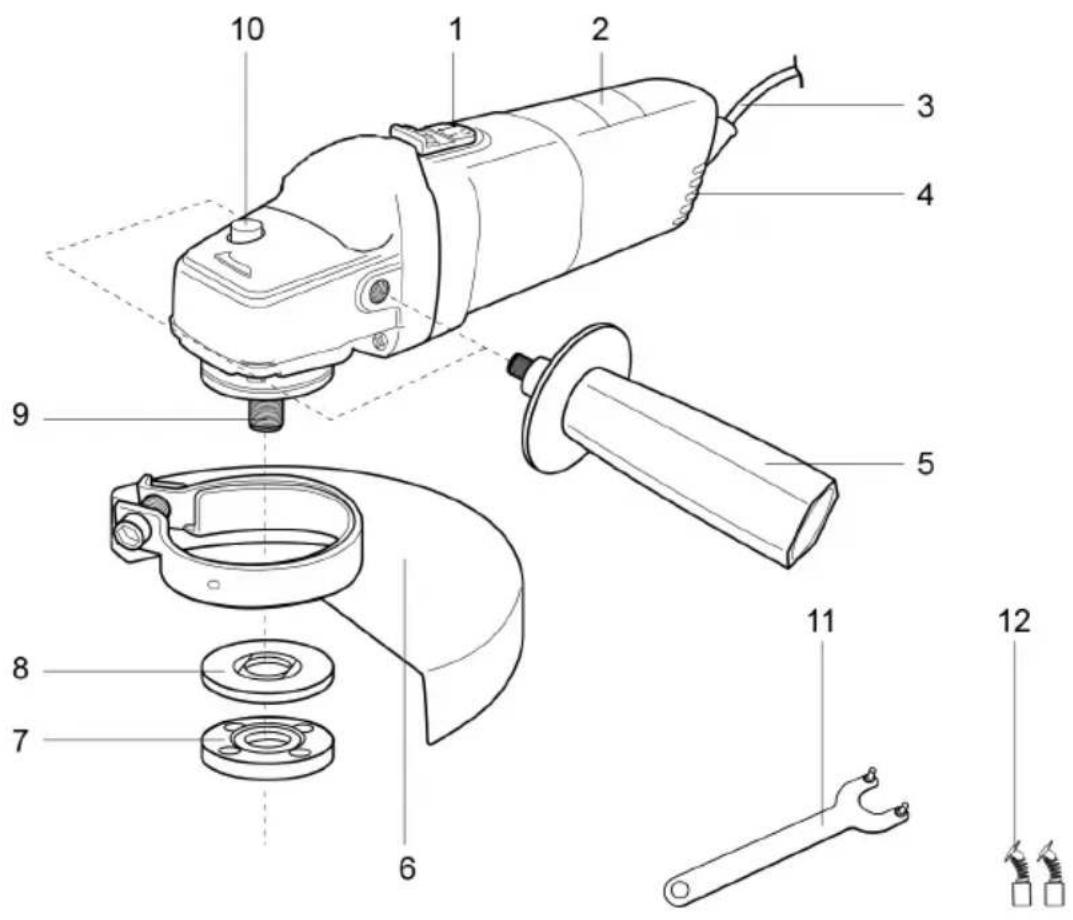
Simple line drawing of a trash bin with no text or symbolsVärna om miljön!
natural_image
Technical line drawing of a power tool and its internal components (no text or symbols)- Plasser skiven på spindelen med etiketten vendt mot vinkelsliperen. Hullet på skiven skal plasseres på spindelen og passe skikkelig på den utskytende delen av støtteflensen.
-
Plasser läseflensen på spindelen med den utskytende siden vendt mot skiven.
-
Trykk ned spindellåseknappen og trekk låseflensen med klokken med skrunøkkelen.
- Drei skiven med hånden for å teste om den dreier smidig. Skiven skal ikke bevege seg ujevnt.
- Start vinkelsliperen og la den gå på tomgang i minst ett minutt for å bekrefte at skiven er installert på riktig måte.
natural_image
Symbol of a trash bin with no visible text or labelsVerne om miljøet!
natural_image
Technical line drawing of a power tool and its assembly, showing disassembly and mounting components (no text or labels)Szlifowanie
natural_image
Pure electrical circuit lines without any symbolsDBAJ O ŚRODOWISKO!
Read the User Instructions carefully before use.
Save them for future reference.
General safety instructions for power tools
WARNING: Read all the safety instructions and other instructions. Failure to follow the safety instructions and other instructions can result in electric shock, fire and/or serious personal injury. Save all the safety instructions and other instructions for future reference. The term "power tool" in the safety instructions refers to your mains-powered (corded) or battery-powered (cordless) power tool.
Safety in the work area
- Keep the work area clean and well lit. Dark and cluttered work areas increase the risk of accidents and injuries.
- Do not use power tools in explosive environments, such as in the vicinity of flammable liquids, gases or dust. Power tools produce sparks that can ignite dust and fumes.
- Keep children and onlookers at a safe distance when working with a power tool. You can lose control of the tool if you are distracted.
Electrical safety
- The mains plug on the power tool must match the mains socket. Never modify the plug in any way. Never use adapters with earthed power tools. Intact plugs and matching outlets reduce the risk of electric shock.
- Avoid body contact with earthed surfaces such as pipes, radiators, cookers and refrigerators. There is an increased risk of electric shock if your body is earthed.
- Do not expose power tools to rain or moisture. There is a greater risk of electric shock if water gets into a power tool.
- Be careful with the power cord. Never use the power cord to carry or pull the power tool, or to pull out the plug from the mains. Keep the power cord away from heat, oil, sharp edges and moving parts. Damaged or tangled power cords increase the risk of electric shock.
- When you use a power tool outdoors, use an extension cord intended for outdoor use. Extension cords approved for outdoor use reduce the risk of electric shock.
- If you have to use a power tool in damp conditions, use a mains connection protected by a residual current device RCD. Using an RCD reduces the risk of electric shock.
Personal safety
-
Stay alert, pay attention to what you are doing, and use your common sense when working with power tools. Never use power tools if you are tired or under the influence of drugs, alcohol or medication. A moment of inattention when using a power tool can result in serious personal injury.
-
Use safety equipment. Always wear safety glasses. The correct use of safety equipment such as a dust filter mask, non-slip safety shoes, helmets and ear protection, reduces the risk of personal injury.
- Avoid accidental starting. Check that the power switch is in the OFF position before connecting to the mains, or lifting/carrying the tool. Carrying a power tool with your finger on the switch, or connecting a tool to the mains when the switch is in the ON position, increases the risk of accidents and injuries.
- Remove all Allan keys/spanners etc. before starting the tool. A forgotten spanner in a rotating part of the power tool can result in personal injury.
- Do not overreach. Always maintain a firm footing and good balance. This will ensure you have better control over the tool in unexpected situations.
- Wear suitable clothing. Do not wear loose-fitting clothing or jewellery. Keep your hair, clothing and gloves away from moving parts. Loose-fitting clothing, jewellery and long hair can get caught in moving parts.
- If dust extraction and dust collection equipment is available, this should be connected and used correctly. The use of such devices can reduce the risk of dust-related problems.
Using and looking after power tools
- Do not force the power tool. Use the correct power tool for the planned work. The correct power tool functions better and more safely when used with the load for which it was designed.
- Do not use the power tool if it cannot be switched on and off with the power switch. Power tools that cannot be controlled with the power switch are dangerous and must be repaired.
- Unplug the plug from the mains and/or remove the battery from the power tool before making any adjustments, replacing accessories or putting the tool away. These safety precautions reduce the risk of accidentally starting the power tool.
- Store power tools out of the reach of children when not in use. Never allow anyone who is unfamiliar with the power tool and these instructions to use the tool. Power tools are dangerous in the hands of inexperienced users.
- Keep the power tool properly maintained. Check that moving parts are not misaligned, jammed or loose, and that there are no other factors that could affect the safe use of the tool. If the power tool is damaged, it must be repaired before being used again. Many accidents are caused by poorly maintained power tools.
- Make sure that cutting tools are sharp and clean. Properly maintained cutting tools with sharp cutting edges are less likely to jam and are easier to control.
- Use the power tool, accessories and bits etc., in accordance with these instructions, taking into account the actual working conditions and the work that is to be done. Using the power tool for anything other than its intended purpose can lead to dangerous situations.
Service
Make sure that the power tool is serviced by qualified technicians that only use the specified spare parts. This will ensure that the power tool remains safe to use.
Safety instructions for angle grinders
The safety instructions apply to all types of grinding.
- This power tool is intended to be used as a grinder. Read all the safety instructions, other instructions, illustrations and specifications supplied with this power tool. Failure to follow all the instructions below can result in the risk of electric shock, fire and/or serious personal injury.
- This power tool can be used for grinding, steel brushing or cutting. Using the tool for any other purposes can be dangerous and cause personal injury.
- This power tool is not intended to be used for polishing.
- Do not use accessories that are not specifically designed for the tool and recommended by the tool manufacturer. Just because a tool can be fitted to the power tool does not mean that it is safe to use.
- The rated speed of the accessory must be the same as the specified maximum speed for the power tool. Accessories that are run faster than the specified rated speed can break, or shatter.
- The outer diameter and thickness of the accessory must lie within the performance rating of the power tool. It is not possible to protect and control accessories of the wrong size properly.
- Thread unions on accessories must match the spindle thread on the grinder. For flanged accessories the spindle hole must match the centering diameter of the flange. Accessories that do not fit the tool properly will rotate out of balance, vibrate excessively and can cause you to lose control of the tool.
- Do not use damaged accessories. Always check an accessory before using it, for example, make sure that grinding discs are not chipped, cracked or worn, and that steel brushes do not have loose or damaged wires. If you drop the power tool or an accessory, check that it is not damaged. Fit a new accessory if necessary. After checking and fitting an accessory, position yourself and other persons in the vicinity away from the direction of rotation of the accessory and then run the tool at maximum speed for one minute. Damaged accessories will normally break during this test period.
- Always use personal safety equipment. Depending on the application, you must use a face mask or safety glasses, safety goggles. When necessary you must use a dust filter mask, hearing protection, gloves and a workshop apron that can stop small grinding and workpiece fragments. The eye protection must be able to stop the flying waste particles produced by the tool during different applications. The dust filter mask or breathing mask must be able to filter the particles produced by the tool. Prolonged exposure to high intensity noise can cause hearing impairment.
-
Make sure that onlookers stay at a safe distance from the work area. All persons that enter the work area must wear personal safety equipment. Fragments from the workpiece, or from a defective accessory, can fly off and cause personal injury beyond the actual work area.
-
If there is a risk of coming into contact with concealed electric cables or the power cord on the tool, make sure to only hold the tool by the insulated grips. When cutting accessories come into contract with a live cable, unprotected metal parts on the tool can conduct the current and give the user an electric shock.
- Position the power cord so that it will not come into contact with the rotating accessory. If you lose control, the power cord can be cut off, or fasten, and your hand or arm could be pulled into the rotating accessory.
- Never put down the power tool until the accessory has completely stopped. The rotating accessory can catch on the surface and cause you to lose control of the tool.
- Do not run the power tool while carrying by your side. Unintentional contact with the rotating accessory can cause it to catch in your clothes and pull the tool towards your body.
- Check the ventilation grilles on the tool at regular intervals. The fan on the motor pulls dust inside the tool casing and a large accumulation of metal powder can put the electrical safety at risk.
- Do not use the power tool in the vicinity of flammable materials. Sparks can ignite such materials.
- Do not use accessories that require liquid coolants. The use of water or other liquid coolants can cause an electric shock.
Other safety instructions for all applications – kickback and related warnings
Kickback is a sudden reaction caused by a rotating disc, supporting disc, a brush or other accessory, jamming or catching on something. This causes the rotating accessory to suddenly stop, which in turn can force the uncontrolled power tool in the opposite direction to the rotating accessory.
If, for example, a grinding disc is pinched or clenched in the workpiece the edge of the disc can dig into the surface of the material and cause the disc to kick up. The disc can either kick towards or away from the user, depending on the direction of rotation of the disc at the pinch point. Grinding discs can also break or shatter in such circumstances.
Kickback is caused by using the power tool incorrectly and/or a result of incorrect work procedures or working conditions. Kickback can be avoided by taking the following precautions:
-
Keep a firm grip on the tool and position your body and arms so that you can withstand the force of a potential kickback. Alway use the support handle, if there is one, for maximum control of kickback or the torque response when starting the tool. The user can control torque responses and kickback forces if suitable precautions are taken.
-
Never place your hands near the rotating accessory. Kickback can cause the accessory to touch your hand.
-
Do not place your body within the area where the tool will move if kickback occurs. Kickback forces the tool in the opposite direction to the rotation of the disc at the pinch point.
-
Take extra care when working on corners and sharp edges, etc. Avoid jerking the accessory, or letting it catch. Corners, sharp edges and jerking can cause the rotating accessory to get caught and cause you to lose control of the tool, or cause kickback.
-
Do not connect a saw chain blade for wood carving, or a toothed saw blade. These types of blades often cause kickback and loss of control.
Special safety instructions for grinding and abrasive cutting
- Only use the types of discs recommended for your power tool and the special guard designed for the selected disc. Discs that the tool is not designed for cannot be protected properly and are therefore not safe to use.
- The grinding surface on discs with recessed centres must be fitted below the level of the guard flange. An incorrectly fitted disc that sticks out past the level of the guard flange cannot be properly protected.
- The guard must be properly fixed to the tool and positioned for maximum safety, so that the minimum possible part of the disc is exposed to the user. The guard helps to protect the user from broken off fragments of the disc, unintentional contact with the disc, and sparks that can burn clothing.
- Discs must only be used for the recommended applications. For example: Do not grind with the side of a cutting disc. Abrasive cutting discs are intended for grinding with the outer edges. The application of lateral tensions to these discs can cause them to shatter.
- Always use the right size and shape of undamaged disc flanges for the disc you have chosen. Correct disc flanges support the disc, reducing the risk of the disc breaking. Flanges for cutting discs can differ from flanges for grinding discs.
- Do not use worn discs from larger power tools. Discs from larger tools are not suitable for the higher speed of small tools and can crack.
Safety instructions for bonded grinding discs
Grinding discs can break and are sensitive to knocks and pressure. Special care must therefore be taken when handling grinding discs:
- Do not drop grinding discs or expose them to knocks.
- Do not use damaged grinding discs or discs that have been dropped.
- Avoid damaging the centre hole.
- Do not expose grinding discs to pressure; do not put anything on top of them.
- Store grinding discs flat, or vertically, in a dry and frost-free area.
- If possible store grinding discs in their original pack, or in special containers or on special shelves.
Vibration and noise damping
To minimise the effects of noise and vibration you should limit the time the tool is used, use positions for low vibration and low noise, and use personal safety equipment. Pay attention to the following to minimise the risk of exposure to vibration and high noise levels:
- Only use the power tool for the purpose for which it was designed, and in accordance with these instructions.
-
Make sure that the tool is in good condition and well maintained.
-
Always use the correct accessories for the tool and make sure they are in good condition.
- Keep a firm grip on the handles/grips.
- Maintain the power tool in accordance with these instructions and make sure that it is well lubricated (where appropriate).
- Plan the work so that you spread the use of the tool with high vibration levels over a longer period of time.
Emergency situations
Familiarise yourself with how to use this power tool with the help of these instructions. Pay close attention to allo the safety instructions, and apply them in all circumstances. This will enable you to avoid risks and dangerous situations.
- Always pay attention when using this power tool, so that you detect and handle risks at an early stage. Quick action can prevent serious personal injury and material damage.
- Switch off the power tool and unplug it from the mains in the event of a fault. Make sure that the power tool is checked by a qualified technician and if necessary repaired before using it again.
Additional risks
Even if you use this power tool in accordance with all the safety instructions there are still risks of personal injury and material damage. The following risks can occur as a result of the inherent design of this power tool:
- Harmful effects on health as a result of vibrations if the power tool is used for long periods, or is not handled and maintained properly.
- Personal injury and material damage as a result of defective accessories, or contact with concealed objects when in use.
- Risk of personal injury and material damage as a result of flying objects.
WARNING: This power tool produces an electromagnetic field during use. This field can in some circumstances affect active or passive medical implants. To reduce the risk of serious or life-threatening harm we therefore recommend that persons with medical implants consult their doctor and the manufacturer of the medical implant before using this power tool.
Symbols

Wear ear protection.

Wear safety glasses.

Read the instructions.

Direction of rotation of spindle.

This power tool has safety class II. This means it is fitted with extra or double insulation.

The power tool complies with current EU directives, and an assessment method to check conformity with these directives has been used.
WEEE symbol. Used electrical products must not be disposed of with household waste. Rycycle according to local regulations. Check with your local authority or local dealer for information on recycling.
TECHNICAL DATA
| Rated voltage 230 VAC / 50 Hz | |
| Output 500 W | |
| Speed (no load 11000 rpm) | |
| Disc diameter ∅ 115 mm | |
| Spindle | M14 |
| Safety class II | |
| Weight 2.1 kg | |
| Sound pressure level LpA 85 dB(A), K=3 dB | |
| Sound power level, LwA 96 dB(A), K=3 dB | |
| Vibration level 5 m/s2, K=1.5 m/s2 | |
Always wear ear protection.
The declared vibration value has been measured in accordance with a standard test method and can be used to compare one product with another. The declared vibration value can also be used in a preliminary assessment of exposure.
WARNING: Depending on the actual use of the product the vibration values can differ from the declared total value. Take appropriate measures to protect yourself from exposure to vibration. Take into consideration the entire work process including the time the power tool is run with no load, or is switched off. Suitable measures include regular maintenance and care of the product and accessories, keeping your hands warm, frequent pauses and proper planning of the work.
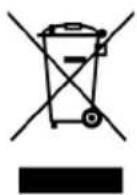
DESCRIPTION
- Power switch with lock button
- Marking
- Power cord
- Ventilation grille
- Support handle
-
Guard
-
Lock flange
- Support flange
- Spindle
- Spindle lock button
- Spanner
- Carbon brushes
ASSEMBLY
Unpacking
- Unpack all the parts and place them on a level and stable surface.
- If necessary remove all the packaging material and all freight implements.
-
Check that the delivery is complete and undamaged. Do not use the power tool if any parts are missing or damaged, contact your dealer instead. Using an incomplete or damaged power tool involves the risk of personal injury and material damage.
-
Make sure that all the accessories and tools needed for assembly and use are available. This also included suitable personal safety equipment.
WARNING: The power tool and packaging are not toys. Do not allow children to play with plastic bags, foil or small parts. Risk of suffocation.
Support handle
For safety reasons the support handle must be fitted when using the power tool.
- Screw on the support tool clockwise in one of the thread fittings.
- Make sure that the support handle is firmly attached.
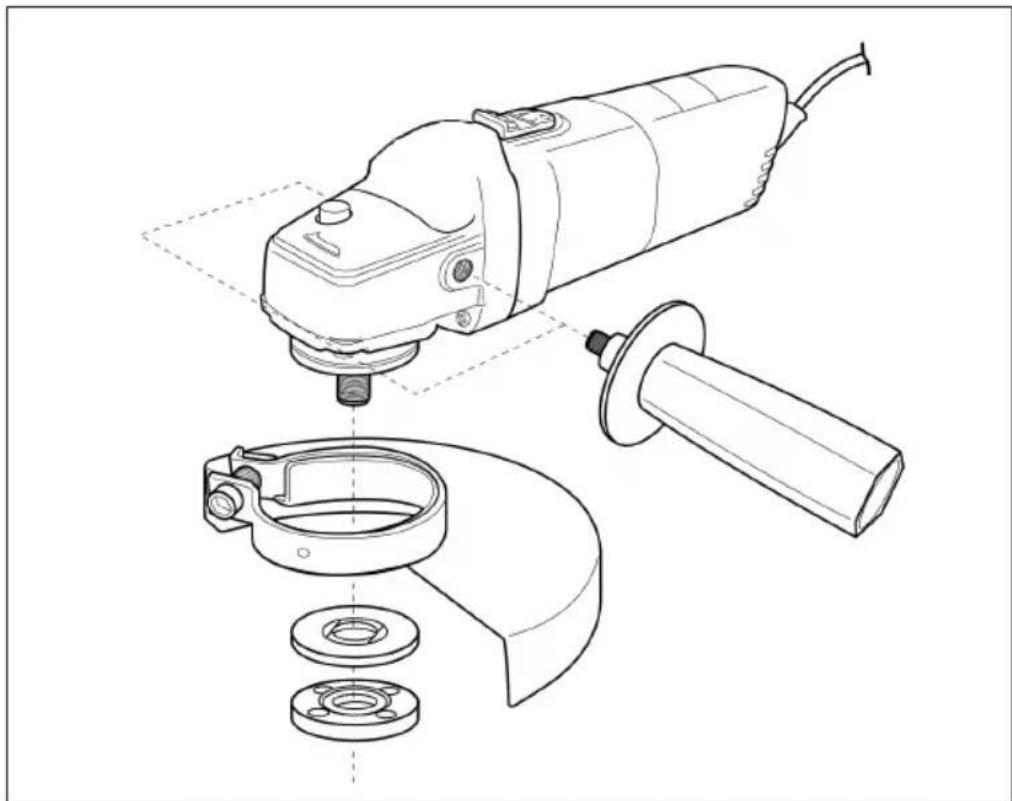
Guard
- Align the pins on the ring to the slots in the spindle collar and then turn the guard.
- Use a Phillips screwdriver to tighten the locking screws on the collar.
- Undo the locking screws to adjust the guard.
- Rotate the guide to the required position and tighten the screws.
natural_image
Technical line drawing of a power tool and its internal components (no text or symbols)WARNING: Adjust the position of the guard according to the intended application. The closed side of the guard must always be turned towards the user.
Grinding discs
WARNING: Always use suitable grinding discs for the intended application. Never use, for example, a disc intended for grinding for cutting, and vice versa.
Take the technical requirements for this product into consideration (see section on Technical data) when buying and using grinding discs.
NOTE: Grinding discs get hot when in use. Handle them with care. Wear safety gloves when handling discs to avoid burning or cutting yourself.
Inspection of discs
Always inspect discs before using them to make sure they are not damaged or cracked. You should never fit discs showing signs of cracking, incorrect handling, or storage. Cracks in grinding discs are often not visible to the naked eye.
| Shape Thickness Flange positioning | ||
 Type 27 Type 27 | 4-6 mm | 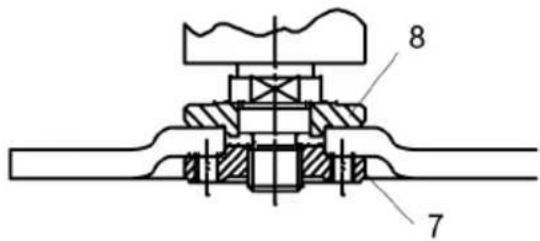 |
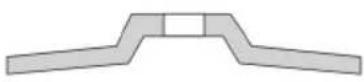 Type 28 Type 28 |
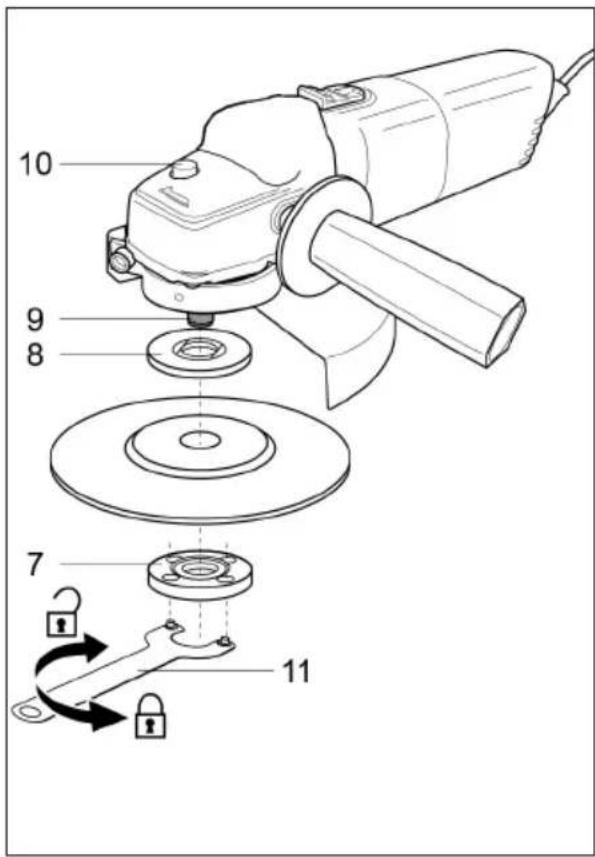
Fitting and replacing
- Make sure that the disc has stopped and press down the spindle lock button (10) and turn the spindle (9) until it locks in place.
- Keep the spindle lock button pressed down and undo the lock flange (7) anticlockwise with the spanner (11).
- Remove the lock flange, the disc (if already fitted) and the support flange (8) from the spindle.
- Check that the flanges are not damaged or worn. Replace if necessary.
- Clean any dust off the flanges and spindle.
- Put the support flange on the spindle and make sure it fits properly. The two surface-finished parts must be turned towards the angle grinder and placed in the correct position on the spindle.
- Place the disc on the spindle with label turned towards the angle grinder. The hole in the disc must be placed on the spindle and fit properly into the protruding part of the support flange.
- Place the locking flange on the spindle with protruding side turned towards the disc.
- Press down the spindle lock button and tighten the locking flange clockwise with the spanner.
- Turn the disc by hand to check that it rotates smoothly. The disk must not wobble.
- Start the angle grinder run with no load for at least one minute to confirm that the disc has been fitted in the right way.
WARNING: Make sure that the disc is firmly attached, but do not use excessive force to tighten the flange. High pressure causes damage, e.g. cracks in the disc.
USE
Applications
- The angle grinder is intended for grinding with bonded grinding discs in metal and steel, for example, pipes. This angle grinder must not be used with coated abrasives or super abrasives such as diamond cutting discs. It is intended or cutting and grinding, or for metal brushes. Do not work with soft materials like wood, or wood substitutes, or with soft metals like aluminium and lead.
- The angle grinder must only be used for dry work, without water or other coolants.
- To ensure safe use it is very important to read and follow all the instructions before using the angle grinder for the first time.
- This angle grinder is only intended for home use. It must not be used for any other purposes than the ones described.
Connect to the power source
WARNING: Check that the mains voltage matches the information on the angle grinder's rating label.
- Make sure the power switch is in the OFF position.
- Plug the plug into a suitable socket.
- The product is now ready to use.
General use
- Always check before using that the angle grinder, the power cord and plug, including also the accessories, are not damaged. Do not use the product if it is damaged, or shows signs of wear.
- Check that the accessories are properly fitted.
- Always hold the angle grinder with the grip. Keep the grip dry to ensure a good grip.
- Make sure that the ventilation grilles are not blocked. Clean them if necessary with a soft brush. Blocked ventilation grilles can result in the angle grinder overheating and being damaged.
-
Switch off the angle grinder immediately if the work is interrupted by other persons coming into the work area. Always allow the angle grinder to stop completely before putting it down.
-
Do not overwork the tool or yourself. Take regular pauses to stay concentrated on the job and in full control of the angle grinder.
- Secure the workpiece firmly, e.g. with clamps or a vice.
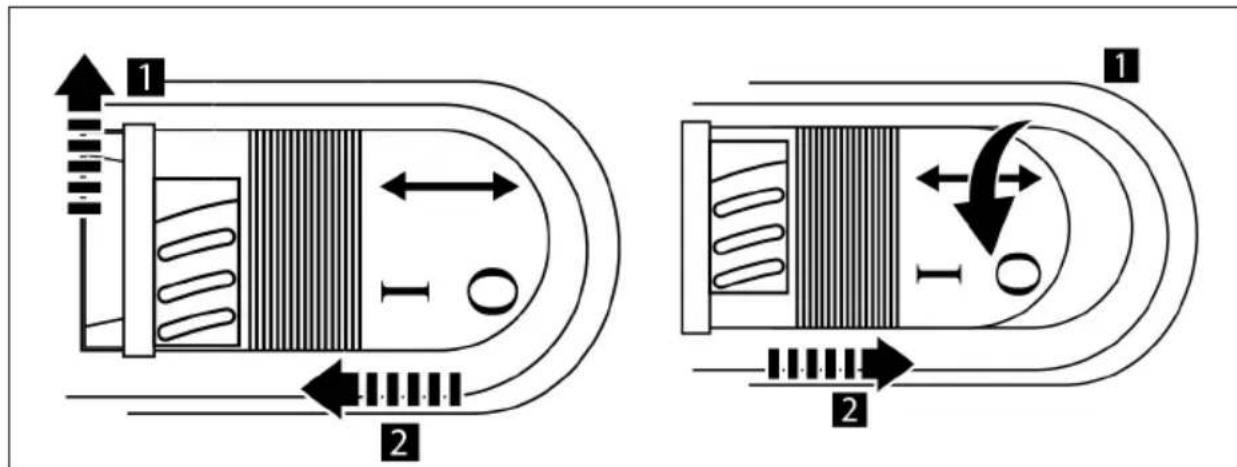
Switching On/Off
- Move the lock button (step 1, see below) and push the power switch forwards until it locks in the On position (step 2).
- Press the back of the power switch to release the button so that it snaps back to the Off position.
Grinding
NOTE: Do not put the power switch in the On position or Off position when the product is in contact with the workpiece. This will reduce the lifespan of the power switch and can cause damage to the workpiece.
- Tilt the product at a 10^ to 15^ angle to simplify handling and ensure smooth grinding.
- Apply the disc against the workpiece with a light and steady pressure for maximum grinding effect. It is never necessary to apply heavy pressure on the angle grinder. The weight of the grinder provides sufficient pressure.
- Too much pressure will finally overload the motor, slow down the grinding, put dangerous pressure on the disc and cause it to break.
- Move the angle grinder steadily forwards and backwards.

After use
- Switch off the angle grinder, unplug it from the mains, and allow it to cool.
- Check, clean and store the angle grinder as described below.
MAINTENANCE
WARNING: Always switch off the angle grinder, unplug it from the mains, and allow it to cool before inspecting, maintaining or cleaning it.
WARNING: Carry out repairs and maintenance only in accordance with these instructions. All other work must be carried out by an authorised specialist.
Cleaning
- Keep the angle grinder clean. Always remove any debris from it after using it and before putting it away.
- Clean the angle grinder with a dry cloth. Use a brush for areas that are difficult to get at.
- Make sure to always clean the ventilation grilles with a cloth and brush after use.
- Remove stubborn dirt with compressed air (max 3 bar).
NOTE: Do not use chemical, alkaline, abrasive or other strong detergents or disinfectants to clean the angle grinder, as such products can damage the surfaces.
Maintenance
Always check that the angle grinder and its accessories are not worn or damaged before and after using it. Check that there are no worn or damaged parts. When necessary replace worn parts, or allow an authorised service centre to repair the angle grinder before using it again. Pay attention to the technical specifications.
Power cord
If the power cord is damaged it must be replaced by an authorised service centre.
Repairs
This angle grinder does not contain any parts that can be repaired by the user. Allow an authorised service centre or qualified technician to examine and repair the angle grinder.
Storage
- Switch off the angle grinder and unplug it from the mains.
- Release the angle grinder as described above.
- Store the angle grinder and its accessories in a dark, dry and frost-free, well ventilated area. The ideal storage temperature is from 10 to 30°C.
-
Always store the angle grinder where it is out of the reach of children.
-
We recommend using the original packaging for storage, or that the angle grinder is covered with a suitable cloth or equivalent to protect it from dust.
Transport
- Switch off the angle grinder and unplug it from the mains.
- Always carry the angle grinder with the grip.
- Protect the angle grinder from heavy knocks and vibrations that it could be exposed to when transported in a vehicle.
- Secure the angle grinder to prevent it sliding, or falling down.
TROUBLESHOOTING
The user can most often rectify any faults that occur. For this reason, check the angle grinder with the help of this section. Most problems can usually be quickly fixed.
WARNING: Only the steps described in these instructions must be carried out. All other inspection, maintenance and repair work must only be carried out by an authorised service centre or technician if you cannot solve the problem yourself.
| Problem Possible cause Solution | ||
| The angle grinder will not start. Not plugged into the mains. Plug into mains. | ||
| The angle grinder does not achieve full power. | The extension cord used is not suitable to be used with this product. | Use a suitable extension cord. |
| Not enough voltage from power source. | Plug into other power source. | |
| Ventilation grilles are blocked. Clean ventilation grilles. | ||
| Unsatisfactory results. | The grinding disc is blunt/damaged. | Replace with a new one. |
| The grinding disc is not suitable for the material in the workpiece. | Use a suitable grinding disc. | |
| Heavy vibrations or abnormal noise. | The grinding disc is blunt/damaged. | Replace with a new one. |
| Screws/nuts are loose. Tighten screws/nuts | ||
Jula reserves the right to make changes. In the event of problems, please contact our service department. www.jula.com
natural_image
Pure mechanical diagram showing a binocular device with no text or symbolsCare for the environment!
Must not be discarded with household waste!
This product contains electrical or electronic components that should be recycled.
Leave the product for recycling at the designated station e.g. the clocal authority's recycling station.
CE
EC DECLARATION OF CONFORMITY
EG FÖRSÄKRAN OM ÖVERENSSTÄMMELSE
EF SAMSVARSERKLÆRING
DEKLARACJA ZGODNOŚCI WE

Jula AB, Box 363, SE-532 24 SKARA, SWEDEN
Machinery Directive 2006/42/EC
EN 60745-1:2009+A11, EN 60745-2-3:2011
Electromagnetic Compatibility 2004/108/EC
EN 55014-1:2006+A1+A2, EN 55014-2:1997+A1+A2
EN 61000-3-2:2006+A1+A2, EN 61000-3-3:2008
RoHS Directive 2011/65/EU
This product was CE marked in year -07
Name and address of the person authorised to compile the technical file: