
TO2000 - Oven WINDMERE - Free user manual and instructions
Find the device manual for free TO2000 WINDMERE in PDF.


| Brand | Windmere |
| Model | TO2000 |
| Product Type | Toaster Oven |
| Functions | Toasting, Baking, Broiling, Defrosting |
| Temperature Control | Dial with settings for Toast (Light/Medium/Dark), Broil, and specific baking temperatures up to 455°F (235°C) |
| Timer | 15-minute mechanical timer with continuous ON position |
| Power | 120 V, 60 Hz, 1500 W (est.) |
| Dimensions (approx.) | 12.5 × 10 × 8.5 inches |
| Weight (approx.) | 6 lb |
| Construction | Metal body with glass door, carrying handles on sides |
| Heating Elements | Upper and lower (both operate for baking; only upper for broiling and toasting) |
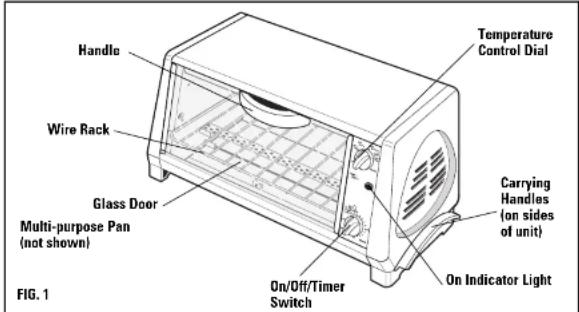
| Accessories Included | Wire rack, multi-purpose pan |
| Cleaning | Removable crumb tray; rack and pan washable; do not immerse unit; avoid abrasive cleaners |
| Safety Features | Polarized plug, short power cord to prevent tripping, automatic shut-off at timer end |
| Warranty | 1 year against defects in material or workmanship |
Frequently Asked Questions - TO2000 WINDMERE
User questions about TO2000 WINDMERE
0 question about this device. Answer the ones you know or ask your own.
Ask a new question about this device
Download the instructions for your Oven in PDF format for free! Find your manual TO2000 - WINDMERE and take your electronic device back in hand. On this page are published all the documents necessary for the use of your device. TO2000 by WINDMERE.
USER MANUAL TO2000 WINDMERE
2001_3_22_134_LAG 3/11/01 4:17 PM Page
SAVE THIS USE AND CARE BOOK
natural_image
Line drawing of a toaster oven with cooling rack and side outlets (no text or symbols)When using electrical appliances, basic safety precautions should always be followed, including the following:
■ READ ALL INSTRUCTIONS BEFORE USING.
■ Do not touch hot surfaces. Use handles or knob.
■ To protect against electric shock, do not immerse cord or plug in water or other liquid.
■ Close supervision is necessary when appliance is used by or near children.
■ Unplug from outlet when not in use and before cleaning. Allow to cool before putting on or taking off parts.
■ Do not operate any appliance with a damaged cord or plug or after the appliance malfunctions or has been damaged in any manner. Return appliance to the nearest authorized service facility for examination, repair or adjustment.
■ The use of accessory attachments not recommended by the appliance manufacturer may cause injuries.
■ Do not use outdoors.
■ Do not let cord hang over edge of table or counter or touch hot surfaces.
■ Do not place on or near a hot gas or electric burner or in a heated oven.
■ Extreme caution must be used when moving an appliance containing hot oil or other hot liquids.
■ Before disconnecting, turn all controls to "Off"; then remove plug from wall outlet.
■ Do not use appliance for other than its intended use.
■ Oversize foods or metal utensils must not be inserted into the toaster oven, as they may create a fire or risk of electric shock.
■ A fire may occur if the toaster oven is covered or touching flammable material, including curtains, draperies, walls, and the like, when in operation. Do not store any items on top of the appliance when in operation.
■ Do not clean with metal scouring pads. Pieces can break off the pad and touch electrical parts, involving a risk of electrical shock.
■ Extreme caution should be exercised when using containers constructed of materials other than metal or glass.
- Do not store any materials, other than manufacturer's recommended accessories, in this unit when not in use.
■ Do not place any of the following materials in the oven: paper, cardboard, plastic, and any other materials that may catch fire or melt
OPERATING INSTRUCTIONS
PRODUCT MAY VARY SLIGHTLY FROM ILLUSTRATIONS

POLARIZED PLUG (120V models only)
This appliance has a polarized plug (one blade is wider than the other). As a safety feature, this plug fits in a polarized outlet only one way. If the plug does not fit into the outlet, reverse the plug and try again. If it still does not fit, contact a qualified electrician. Do not attempt to defeat this safety feature.
LINE CORD SAFETY TIPS
-
Never pull or yank on the cord or the appliance.
-
To insert plug, grasp it firmly and guide it into outlet.
-
To disconnect appliance, grasp plug and remove it from outlet.
-
Before each use, inspect the line cord for cuts and/or abrasion marks. If any are found, this indicates that the appliance should be serviced and the line cord replaced. Please return it to our Service Department or to an authorized service representative.
-
Never wrap the cord tightly around the appliance, as this could place undue stress on the cord where it enters the appliance and cause it to fray and break. DO NOT OPERATE APPLIANCE IF THE LINE CORD SHOWS ANY DAMAGE, OR IF APPLIANCE WORKS INTERMITTENTLY OR STOPS WORKING ENTIRELY.
If the supply cord is damaged, it must be replaced by the manufacturer or its service agent or similarly qualified person in order to avoid a hazard.
ELECTRIC CORD
A short power supply cord is provided to reduce the hazards resulting from entanglement or tripping over a longer cord. An extension cord may be used with care; however, the marked electrical rating shall be at least as great as the electrical rating of this appliance. The extension cord should not be allowed to drape over the tabletop where it can be pulled on by children or tripped over.
HOW TO USE
This appliance is for HOUSEHOLD USE ONLY and may be plugged into a standard electrical outlet.
BEFORE USING
Unpack carefully and wipe outer surfaces with a clean, damp cloth to remove residual packing debris. Remove wire rack from unit. (See CARE AND CLEANING for directions.) Wash rack and multi-purpose pan in hot, soapy water, and dry thoroughly. Replace wire rack.
Before attempting to operate toaster oven, familiarize yourself with the controls (Fig. 2) to ensure optimum performance.
CAUTION: The temperature of the door or the outer surface may be high when the
Toasting tip: Initially, toast a slice or two at the Medium setting, as results will vary according to humidity, thickness and texture. Allow some additional toasting time for larger quantities and thicker breads, toaster pastries and any foods containing fillings.
ATTENTION: Bread may burn. Therefore toaster must not be used near or below curtains and other combustible materials. They must be watched.
FOR TOP-BROWNING:
- Place food in oven in multi-purpose pan. Do not place food directly on wire rack.
- Set temperature control dial to BROIL and timer at 1-15 minutes or continuous ON setting. Only the top heating element will operate.
- Do not leave toaster oven unattended. Monitor food while it is browning, as browning times will vary according to item and user preference.
- When browning is completed, switch unit OFF and remove food from oven.
FOR BAKING:
- Set control dial at temperature specified in recipe or package directions. Set timer at 5 minutes for preheating, and while oven preheats, place food on multi-purpose pan.
- When timer bell rings, place pan atop wire oven rack, close door, and reset timer to desired baking time. Both heating elements will operate.
- If baking time specified in recipe or on package is 15 minutes or less, set timer. Bell will ring and oven will shut off automatically when baking is complete.
- For a longer baking time, set timer at continuous On position, and monitor visually until finished. Turn unit off manually, and remove food from oven.
IMPORTANT: Always check food periodically to ensure that it is baking properly.
FOR BROILING:
- Place food in multi-purpose pan, and set pan atop wire rack. NEVER place food directly on wire rack.
- Close oven door, set temperature control to BROIL and switch oven ON. It is not necessary to preheat. In this setting, only the upper heating element will operate
- For broiling time of 15 minutes or less, set the timer. Bell will ring and oven will shut off automatically when broiling is complete.
- Although 15 minutes of broiling should be sufficient for most items, if anything does require more time, set timer to continuous On position and monitor item visually.
-
For even broiling, turn food over when it is about half-cooked.
-
When broiling has finished, switch oven OFF and remove food.
IMPORTANT: To avoid overcooking, always monitor food carefully when broiling.
FOR DEFROSTING:
-
Place item in the multi-nurnose pan with all plastic and naner wrannins removed
-
When food is ready, turn oven OFF manually and remove pan.
HINTS AND TIPS
- During the first few minutes of initial use, you may notice smoke and a slight odor. This is normal and should disappear after about 15 minutes.
- Smoke may also appear during broiling or baking. When broiling, always trim excess fat before placing food in oven. If oven smokes during baking, this usually means the oven interior or pan requires cleaning. (See CARE AND CLEANING.)
- Cooking toaster foods and some other items may produce condensation on the oven door. This is normal and will quickly disappear.
- Frozen foods and thick meats will take longer to cook.
- When defrosting, always arrange food in a SINGLE LAYER on multi-purpose pan.
- To prevent heat loss, avoid opening oven door unless absolutely necessary.
- For best results when toasting frozen bread or multiple slices, use a darker setting and allow a longer toasting time.
- Except when toasting, NEVER place items directly on rack. ALWAYS use the multi-purpose pan.
- Remove all plastic and paper wrappings from food before cooking.
• Always leave space between top of food being cooked and upper heating element. - If the power cord begins to heat and smoke, stop using and unplug appliance immediately.
| AT-A-GLANCE REFERENCE GUIDE | ||
| Refer to Figure 2 for control panel diagram | ||
| FUNCTION TEMPERATURE SETTING TIMER SETTING | (On/Off Switch) | |
| Toasting Toast position Light, Medium or Dark | ||
| Baking Specific temperature desired For 15 minutes or less:or suggested in recipe Set timer. Baking is completewhen bell sounds and ovenshuts off automatically.For more than 15 mintures:Place timer in Oven ON positionand monitor visually. | ||
GUIDELINES FOR USE
| NOTE: Preheat toaster oven for 5 minutes at specified temperature before using. | ||
| TYPE OF FOOD AMOUNT | INSTRUCTIONS | |
| Chicken Pieces Single layer | in Bake at 205°C (400°F) multi-purpose pan Turn and | for 40-50 minutes, monitor visually until done. |
| Ham, Meatloaf, Single layer in Follow recipe. If browning too rapidly, Lamb or Pork Chops multi-purpose pan cover with foil or turn frequently. | ||
| Baked Potatoes 1-4 medium | size Wash and pierce potatoes, place directly on rack and bake at 235°C (455°F) for 1 to 1-1/4 hours. | |
| Tomatoes 1-6 medium-size | halves Place in pan, top with bread crumbs or shredded cheese and bake at 175°C (350°F) for 12-15 minutes. | |
| Frozen French Fries, Single layer in Follow package directions and monitor Onion Rings multi-purpose pan visually until browned to taste. | ||
| Leftover Pizza Single layer in Bake until crisp or until cheese multi-purpose pan bubbles. Monitor visually throughout. | ||
| Cookies (drop or refrigerator) | 6-8 (depending on size) in multi-purpose pan | Follow package directions. |
| Cakes/Bar Cookies, Biscuits/Dinner Rolls (refrigerated) | Arrange to fit in multi-purpose pan package | Bake according to recipe or directions. |
ATTENTION: When broiling always place food in multi-purpose pan, NEVER directly on rack. Monitor visually, and turn at least once during broiling process.
CARE AND CLEANING
This appliance requires little maintenance. It contains no user serviceable parts. Do not try to repair it yourself. Refer it to qualified personnel if servicing is needed.
TO CLEAN: Unplug unit, and when it has cooled, wipe food particles off with a damp sponge or cloth. Never immerse toaster oven in water or any other liquid.
For more thorough cleaning, wash rack and multi-purpose pan in hot, soapy water.
TO REMOVE RACK: Unplug unit, allow to cool and open oven door. Tilt unit upward slightly, and pull rack forward until it slides out completely. Clean oven interior with a damp cloth, paying special attention to the grooves that hold the wire rack. If grooves are not thoroughly clean, it may impede operation of unit.
TO REPLACE RACK: Open oven door and tilt upward slightly. Slide the rack into the two grooves on sides, making sure hooks on door are correctly positioned to guide rack until it is completely reinstalled (Fig. 3).
DO NOT WIPE THE HEATING ELEMENTS. Do not use abrasive cleaners, as they may cause damage to the unit. Dry unit completely before storing.
TO CLEAN THE CRUMB TRAY, tilt and rest toaster oven on its back. Grasp and unlatch the knob underneath the unit. Open crumb tray and use a damp sponge or cloth to wipe crumbs away. Close the tray and place unit upright (Fig. 4).
CAUTION: TO PREVENT DAMAGE TO COUNTERTOP, TOASTER OVEN MUST BE OPERATED WITH THE CRUMB TRAY IN PLACE, SECURELY CLOSED AND CLEANED OF EXCESS FOOD.
ALWAYS UNPLUG THIS TOASTER OVEN WHEN NOT USING.
NOTE: Never operate the toaster oven with the glass door open.
TO STORE: Unplug appliance and store in its box or in a clean, dry place. Do not put stress on the cord where it enters the unit, as it could cause the cord to fray and break.
Service, if necessary, must be performed by Applica Consumer Products, Inc. or Authorized Household Appliance Service Center. The Service Center nearest you can be found in the yellow pages of your phone book under "Appliances – Small." If mailing or shipping your unit, pack it carefully in a sturdy carton with enough packing material to prevent damage. Include a note describing the problem to our Service Center and be sure to give your return address. We also suggest that you insure the package for your protection.
ONE-YEAR WARRANTY
Applica Consumer Products, Inc. warrants this product against any defects that are due to faulty material or workmanship for a one-year period after the original date of consumer purchase. This warranty does not include damage to the product resulting from accident or misuse, or repairs performed by non-authorized repair shops. If the product should become defective within the warranty period, we will repair it or elect to replace it free of charge. To honor this warranty, the product with the corresponding registration card is required. This warranty gives you specific legal rights and you may
Favor consultar la dirección de su servicentro más cercano. For the nearest service center, please see the appropriate address below.
ARGENTINA
Ae Maiu 3850
1636 Dlives
1000 times, Buerra Aires
Buenos Aires Tel: 0.900.0.1224
Tel: 0-
CHILE
Cruz Del Sur 64
Los Condes
Santiann
Santiago Tel: 562
Tel: 552-370-6523
COLOMBIA
Cartera 38 No. 166-54
Santa Fe de Bogota
Tel: 571-677-7496
COSTA RICA
COSTA RICA 200 metros cents x 150 cents
Col. Deylan Vallante
Col. Pradds Vanianta 450007
45020 Zapopan, Jal.
Tel: (91-36) 73-28-15
•PUEBLA
17 Norto +205
17 NORTE N205 72000 Double
7200 Pledna, Pub.
Tel: (91-22) 4b-37-26
•QUERÉTARO
Blvd. Independecia 96 Pte
27DOO Torreón Coah
Tel: (91-17) 16-52-65
Tel. (01-17) 10-32-03
•VERACHUZ
Bexco Industrial Park
Canara Heights Station
Caparrà Heights Station San Juan DP 00026
San Juan, P.R. Dus34
Tel: 1-800-34.
VENEZUELA
Copyright © 2001 Applica Consumer Products, Inc.
Printed in People's Republic of China
- OPERATING INSTRUCTIONS
- POLARIZED PLUG (120V models only)
- LINE CORD SAFETY TIPS
- ELECTRIC CORD
- HOW TO USE
- BEFORE USING
- FOR TOP-BROWNING:
- FOR BAKING:
- FOR BROILING:
- FOR DEFROSTING:
- HINTS AND TIPS
- CARE AND CLEANING
- ONE-YEAR WARRANTY
- Favor consultar la dirección de su servicentro más cercano. For the nearest service center, please see the appropriate address below.
- ARGENTINA
- Tel: 0-
- COLOMBIA
- COSTA RICA
- •QUERÉTARO
- •VERACHUZ
- Tel: 1-800-34.
Brand : WINDMERE
Model : TO2000
Category : Oven