721-490 - Mincer Meec Tools - Free user manual and instructions
Find the device manual for free 721-490 Meec Tools in PDF.


| Product Type | Electric Meat Grinder (Mincer) |
| Brand | Meec Tools |
| Model | 721-490 |
| Power | 800 W |
| Voltage | 220-240 V, 50/60 Hz |
| Housing Material | Stainless steel and plastic |
| Grinding Plates | 3 stainless steel plates (fine, medium, coarse) |
| Accessories | Kubbe attachment, sausage stuffing tube, food pusher |
| Dimensions (L x W x H) | Approx. 30 x 18 x 25 cm |
| Weight | Approx. 4.5 kg |
| Capacity | Up to 2 kg per minute (continuous) |
| Reverse Function | Yes, for clearing jams |
| Overload Protection | Built-in thermal cut-off |
| Cleaning | Detachable parts dishwasher safe (top rack) |
| Safety Features | On/off switch with safety lock, non-slip feet |
| Noise Level | < 80 dB |
| Warranty | 2 years |
Frequently Asked Questions - 721-490 Meec Tools
User questions about 721-490 Meec Tools
0 question about this device. Answer the ones you know or ask your own.
Ask a new question about this device
Download the instructions for your Mincer in PDF format for free! Find your manual 721-490 - Meec Tools and take your electronic device back in hand. On this page are published all the documents necessary for the use of your device. 721-490 by Meec Tools.
USER MANUAL 721-490 Meec Tools
natural_image
Red and white industrial machine with wheels and handle (no visible text or symbols)EN - Operating instructions (Translation of the original instructions)
Jula reserves the right to make changes. In the event of problems, please contact our service department.
www.ju la.com
Tillverkare/ Produsent / Produenci/ Manufacturer
Jula AB, Box 363, 532 24 SKARA
Importör/ Importör/ Importer/ Importer
Jula Norge AS, Solheimsveren 6–8, 1471 L∅RENSKOG
Distributör/Distributör/Dystrybutor/Distributor
Jula Poland Sp. z o.o., ul. Maiborska 49, 03-286 Warszawa, Polska

Värna om miljön!
Care for the environment!
Must not be discarded with household waste! This product contains electrical or electronic components that should be recycled. Leave the product for recycling at the designated station e.g. the local authority's recycling station.
SVENSKA....5
SÄKERHETSANVISNINGAR....5
TEKNISKA DATA....9
BESKRIVNING 10
MONTERING....10
HANDHAVANDE 11
UNDERHÄLL 14
FELSÖKNING 15
NORSK 16
SIKKERHETSANVISNINGER 16
TEKNISKE DATA 20
BESKRIVELSE....21
MONTERING 21
BRUK....22
VEDLIKEHOLD 25
FEILS∅KING....26
POLSKI 27
ZASADY BEZPIECZEŃSTWA 27
DANE TECHNICZNE 31
OPIS 32
MONTAZ 32
OBSLUGA 33
KONSERWACJA 36
WYKRYWANIE USTEREK 37
ENGLISH 38
SAFETY INSTRUCTIONS 38
TECHNICAL DATA 42
DESCRIPTION 43
SÄKERHETSANVISNINGAR
A - | ju kâ pa
C - Hju
H - Mutter
K - Fot
B - Skruv
F - Bricka
| - Static
1 - Skruv
C - Bricka
G-Mutter
J-Fotkapa
D - Russning
natural_image
Close-up of a mechanical component with a cylindrical part inserted, showing a black arrow pointing to it (no text or symbols visible)


Manöverpanel
• Grön knapp 1: Slerl
- Rod knapp 0: Stopp
A - Ind kennqslampa
B. Framstretation
C-Bakåtrotation
D-Stop
E-Start
Rotationsväljare
(6) A classical diagram of the process of a material-based process

BESKRIVELSE
- Materatt
- Låseratt
- Static
- Oppsamlingsbeholder
- Fot
6.1u
/. Læspak for
oppsamlingsbeholder
8. Indikatorlampe
9. Retningsvelger
10. Strömbviter
11. Strémkabel
MONTERING
A - | ju dekse
C-Hju
|| - Mutter
K - Fot
B - Skrue
F - Skive
| - Static
1 - Skrue
C-Skve
G-Mutter
J - Fotdeksel
D - Bøssing
natural_image
Close-up of a mechanical component with a cylindrical part inserted, showing no visible text or symbols.
Betjeningspanel
• Grönn knapp I: Starl
- Ruid knapp 0: Stopp
A - Indikatorlampe
B. Foroverrotasjon
C - Bakoverrotasjon
D - Stopp
E-Start
Rotasjonsvelger
A - ostona kota
C - kolo
II - nakrętka
K-nózka
B-Sruba
F - podkładka
| - stela?
1 - Šruba
C - podkładka
G-nakrętka
J - ostona nożki
D - 24a/ka
natural_image
Pure mechanical component diagram without any text, numbers, or symbolsPanel sterowania
A - lampka kontrolna
Read the operating instructions carefully before use.
Save them for future reference.
- WARNING: A damaged power cord must be replaced by an authorised service centre, or other qualified personnel, to ensure safe use.
• The machine needs to be assembled before use. - The machine must be earthed.
• Only use an earthed extension cord - The machine must only be connected to an earthed mains outlet with a minimum 10 A fuse.
- If the machine is used outdoors, only use an extension cord approved for outdoor use. Always check that the extension cord is in good condition before use.
- Protect the cord from heat, oil, sharp edges and moving parts.
- Never use a damaged extension cord. If the cord is damaged it must be replaced to ensure safe use.
- Check that the mains voltage corresponds to the rated voltage on the type plate.
- Never move the machine by pulling the power cord. Do not pull the power cord to unplug the plug.
- Switch off the machine before unplugging the power cord/extension cord.
- Switch off the machine, unplug the power cord, and wait until all moving parts have completely stopped before moving the machine.
- Never leave the machine unsupervised when its running.
- Switch off the machine and unplug the power cord before leaving the machine, and if there is a power failure.
- Keep onlookers, especially children, and pets at a safe distance.
- Never allow children, or anyone who is unfamiliar with the machine and these instructions, to use it.
EN
- Switch off the machine, unplug the power cord and wait until all moving parts have completely stopped before carry out maintenance and/or cleaning.
- Be careful when cleaning and carrying out maintenance. NOTE: Wear safety gloves – risk of personal injury.
- Never modify the safety devices in any way.
- Place the machine on a level, stable surface.
- Do not tilt the machine when the motor is running.
- Do not use the machine on surfaces where ejected material could cause personal injury.
- Only use the machine in daylight, or in good artificial lighting.
• Always wear ear protection and safety glasses. - Do not wear loose-fitting clothing, ties, scarves, etc., that can get caught in moving parts.
General safety instructions for usage
- The infeed funnel must be correctly fitted before use.
- Never put your hands in the infeed or outfeed openings.
- When feeding make sure that no metal, stones, glass, soil, plastic or other foreign objects get into the machine – this can damage the roller and motor. Never use the machine for anything other than its intended purpose.
- Switch off the motor immediately if the machine starts vibrating abnormally. Identify the cause. Vibration usually indicates a problem.
- Allow the machine to cool before checking, adjusting, or putting it away, etc.
- Do not use the machine if the roller is not correctly fitted.
- Before using the machine, check that it is not damaged and that it is working properly. Check that all the screwed joints and other joint are correctly tightened and that the guards and screens are in place before starting the machine. Rectify any faults before using the machine.
-
If the roller knocks against a foreign object, or if the machine starts vibrating or making an abnormal noise, unplug the power cord and wait until all moving parts have completely stopped.
-
Replace damaged or worn parts. Only use spare parts recommended by the manu-
facturer. The use of other parts can lead to personal injury or material damage. - Do not use the machine near water, or use it outdoors when it is raining or snowing.
- Store the machine in a dry place out of the reach of children.
- Check that the infeed is empty before starting the machine.
- Keep your head and other parts of your body away from the infeed.
- Keep your hands and other parts of your body, including your clothing, away from the infeed, the ejector and moving parts.
- Always maintain a firm footing and good balance. Do not overreach. Never stand higher up than the machine when feeding.
- Do not stand in front of the infeed when the machine is running.
- Do not allow processed material to collect in the ejector. This can prevent proper emptying and could result in the backflow of material through the infeed.
- If the machine gets blocked, switch off and unplug the power cord before clearing the blockage.
- The safety devices must be fitted correctly and work properly.
- Be careful when working near the roller and the fixed blade. The roller can move even when the motor is not running.
- Switch off the machine and unplug the power cord before fitting/removing the collector funnel.
- WARNING: Keep plastic bags from the packaging out of the reach of children – risk of suffocation.

Symbols
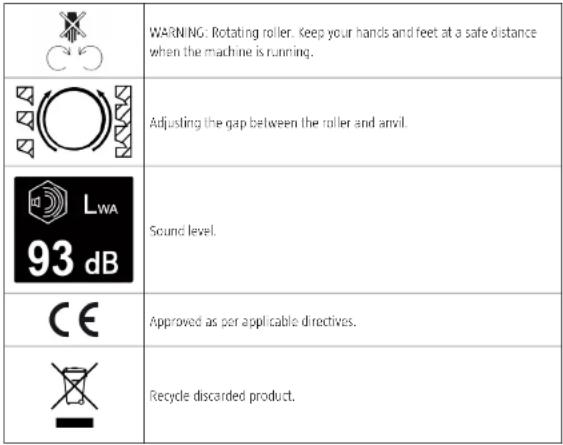
 | Carefully read the instructions. Follow all the instructions. |
 | WARNING: |
 | Wear safety glasses and ear protection. |
 | Wear safety gloves. |
 | Disconnect the machine from the mains supply when leaving the machine unattended. |
 | Disconnect the machine from the mains supply before making any adjustments or before servicing. |
 | Protect the machine from moisture. |
 | Dangerous objects can be ejected a high speed when the motor is running. Keep people and gets at a safe distance from the risk area. |
 |
TECHNICAL DATA
Rated voltage 230 V AC / 50 Hz
Output S1: 2000 W
S6 (40%): 2500 W
Speed (no load) 40/min
Max processing diameter of branches ^4 40 mm
Protection rating IP24
Weight 26 kg
Sound pressure level, LpA 74 dB(A), k=3 dB
Measured sound power level, LwA 93 dB(A), K=3 dB
Duty cycle 56 (duty factor 40%) indicates 4 min loaded and 6 min unloaded.

DESCRIPTION
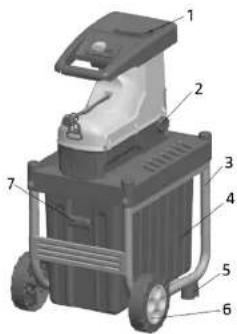
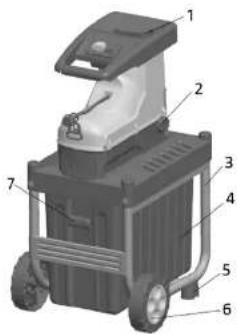
- Infeed funnel
- Lock knob
- Stand
- Collector tank
- Foot
- Wheel
- Locking lever for collector tank
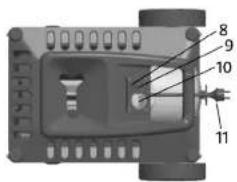
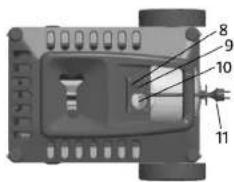
- Status lamp
- Rotation selector
- Power switch
- Power cord
ASSEMBLY
- Remove all the parts from the packaging.
- The motor unit and assembly accessories are placed in the collector tank on delivery
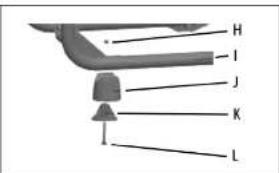
- Fit the wheels and feet.
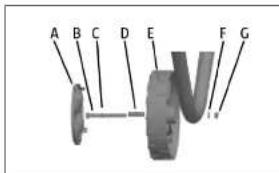
A - Wheel cap
C-Wheel
H - Nut
K - Foot
B-Screw
F-Washer
- Stand
1 - Screw
C-Washer
G-Nut
J-Foot housing
D - Bushing
- Fit the motor on the stand with the three supplied screws and washers.
USE
Intended use
The compost shredder is only intended for domestic use. The compost shredder is intended for shredding branches, twigs and other similar garden waste.
Collector tank
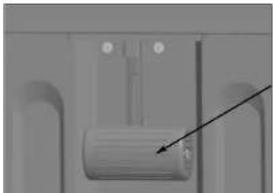
- Put the collector tank in place and check that the locking lever is in the locked position. The compost shredder will not start if the locking lever is not locked.
- The locking lever must be unlocked to pull out the collector tank.
Move the locking lever up or down to locked or unlocked position.
natural_image
Close-up of a mechanical component with a cylindrical part inserted, showing no visible text or symbols.
Control panel
- Green button | Start
- Red button 0: Stop
NOTE: The machine does not start automatically after a power failure. To start the machine after a power failure, first press the 0 button and then the 1 button.
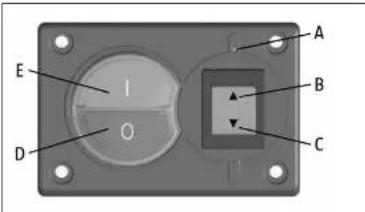
A - Status lamp
B. Forward rotation
C - Backward rotation
D-Stop
E-Start
Rotation selector
- Press the button for forward rotation (normal direction of rotation) to shred the feed material
- Press the button for backward rotation to feed out infeed material that has got stuck.
Status lamp
The status lamp goes on when the compost shredder is running, and goes off when the compost shredder stops.
Use
- Press the I button. The compost shredder starts and the status lamp goes on. The compost shredder starts with the normal direction of rotation.
- If the compost shredder gets blocked the backward rotation starts automatically. If this does not remove the blockage the compost shredder stops automatically after is s. The status lamp stays on. You can run the compost shredder in the required direction of rotation with the rotation selector. If the blockage is not removed the compost shredder stops after 5 seconds after each change in the direction of rotation.
- If the collector tanks is taken out when the compost shredder is running it will stop and the status lamp will go off.
Start
- Insert the collector tank.
- Put the interlocking lever for the collector tank in locked position.
- Connect the compost shredder to the mains supply.
- Start the compost shredder by pressing the I button.
- Feed in material.
- Switch off the compost shredder by pressing the 0 button.
Emptying the collector tank
- Switch off the compost shredder.
- Put the locking lever for the collector tank in the unlocked position.
- Pull out the collector tank and empty it.
- Replace the collector tank.
NOTE:
- Change the direction of rotation several times to release large or hard pieces of wood that have got stuck.
- Use a pusher and/or a picker hook to remove blockages from the feed and outfeed openings.
IMPORTANT: Wait until all moving parts have completely stopped before starting the compost shredder again.
- Material that sticks out from the infeed opening can be thrown back and forwards when it is pulled in by the roller. Keep at a safe distance.
- If the roller gets blocked the compost shredder switches automatically to backward rotation so that the fed material can be pulled out.
- Check the collector pan at regular intervals and empty when necessary.
- Do not feed in too much material at once – risk of blocking the roller and the infeed.
- Feed in garden waste that has lain and wilted for a few days, alternating with branches.
- Do not attempt to shred kitchen waste and the like.
- Branches with leaves must be completely shredded before feeding in new material
• Always keep the ventilation openings clean and free from blockages.

Adjusting the anvil
The optimum gap between the and I (B) and roller (C) is 5 mm. Maintain this gap to achieve the best efficiency. There is an adjuster knob (A) on the side of plastic casing for the collector tank.
IMPORTANT: Check the gap between the arvil and the roller before starting the compost shredder
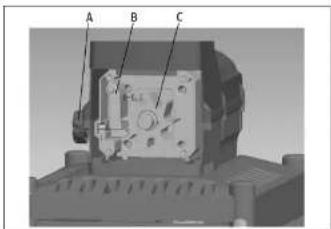
NOTE:
• Hard branches can block the roller
- Soft material, like leaves and stalks, can block the infeed opening. Feed in soft material with the supplied pusher.
- Feed in material in the right-hand corner of the feed opening.
- When feeding make sure that no metal, stones, glass, soil, plastic or other foreign objects get into the compost shredder – this can damage it.
MAINTENANCE
NOTE: Make sure the compost shredder is not connected to the mains when carrying out maintenance.
- Clean and maintain the compost shredder regularly for best results and useful life
- Keep the ventilation openings clean and unblocked.
- Never spray water on the compost shredder.
- Do not use detergents or solvents that can damage the plastic parts.
- Check that all screw connections are properly tightened at regular intervals.
TROUBLESHOOTING
| Problem Action | |
| The branches are not shredded properly. Adjust the gap between the anvil and roller by turning the adjuster knob clockwise a half turn. | |
| The motor will not start. Check the power cord, connectors and interlocks are in good condition. | |
| The roller goes in the opposite direction of rotation. | If the roller gets blocked the machine switches automatically to backward rotation so that the fed material can be pulled out. Change the direction of rotation of the roller when the blockage is removed. |
| The infeed opening is blocked. Remove the blockage from the infeed opening. Use the pusher to push the material. | |

EC DECLARATION OF CONFORMITY EG FÖRSÄKRAN OM ÖVERENSSTÄMMELSE EF SAMSVARSERKLÆRING DEKLARACJA ZGODNOŚCI WE

Jula AB, Box 363, SE-532 24 SKARA, SWEDEN
- Värna om miljön!
- Care for the environment!
- SÄKERHETSANVISNINGAR
- Manöverpanel
- Rotationsväljare
- MONTERING
- Betjeningspanel
- Rotasjonsvelger
- Panel sterowania
- Read the operating instructions carefully before use.
- EN
- General safety instructions for usage
- TECHNICAL DATA
- ASSEMBLY
- USE
- Intended use
- Collector tank
- Control panel
- Rotation selector
- Status lamp
- Start
- Emptying the collector tank
- NOTE:
- Adjusting the anvil
- MAINTENANCE
- NOTE: Make sure the compost shredder is not connected to the mains when carrying out maintenance.
Brand : Meec Tools
Model : 721-490
Category : Mincer