Izzycomm Z700 II - Tablet E-Boda - Free user manual and instructions
Find the device manual for free Izzycomm Z700 II E-Boda in PDF.


| Product Type | Tablet |
| Brand | E-Boda |
| Model | Izzycomm Z700 II |
| Operating System | Android 4.0 (estimated) |
| Connectivity | Wi-Fi 802.11 b/g/n, Bluetooth 2.1+EDR, 3G (HSPA), GPS, FM radio |
| SIM Card | Mini-SIM (2G/3G) |
| Storage | Internal: 5.68 GB (approx.); External: microSD card slot (up to 32 GB supported) |
| Battery | Rechargeable lithium-ion; charges via USB adapter; LED indicator (red charging, green full) |
| Camera(s) | Rear camera and front camera (specific resolutions not provided) |
| Multimedia | Music player, video player, FM radio, sound recorder |
| GPS | Built-in GPS with A-GPS and EPO assistance |
| Sensors | G-sensor (accelerometer), proximity sensor (for phone function) |
| Ports | Micro USB (charging and data), 3.5 mm headphone jack |
| Power Button | Short press: sleep/wake; long press: power on/off |
| Safety | Keep dry; avoid extreme temperatures; do not disassemble; use only approved charger |
| Cleaning | Wipe with a dry cloth; do not use liquids or aerosols |
| Spare Parts and Reparability | Not user-serviceable; contact authorized E-Boda service center for repairs |
| Compliance | CE, RoHS compliant |
Frequently Asked Questions - Izzycomm Z700 II E-Boda
User questions about Izzycomm Z700 II E-Boda
0 question about this device. Answer the ones you know or ask your own.
Ask a new question about this device
Download the instructions for your Tablet in PDF format for free! Find your manual Izzycomm Z700 II - E-Boda and take your electronic device back in hand. On this page are published all the documents necessary for the use of your device. Izzycomm Z700 II by E-Boda.
USER MANUAL Izzycomm Z700 II E-Boda
1.1 Knowing the Product 3
1.2 Notifications 4
1.3 Safety Measures....4
2 Introducing the Tablet 5
2.1 Operations and Tablet Preparation....5
2.2 Tablet Status and Memento....5
3 Quick Start Guide....6
3.1 Function Keys....6
3.2 Power On and Power Off....7
3.3 Turn On and Turn Off the Screen 7
3.4 Using the Touch Screen 9
3.5 Home Page....10
3.6 Accessing Applications.... 13
3.7 USB Connection....13
3.8 Type Words....14
3.9 Operating Technique....16
4 Basic Settings....16
4.1 Wireless and Internet 16
4.2 Bluetooth 19
4.3 Data Usage....22
4.4 More 23
4.5 Audio Profiles....27
4.6 Display....30
4.7 Storage....34
4.8 Battery 36
4.9 Apps....36
4.10 Accounts & Sync 38
4.11 Localisation services....39
4.12 Security 42
4.13 Language & Input 44
4.14 Backup & Reset 45
4.15 Date & time 46
4.16 Schedule power on / off.... 47
4.17 Accessibility 48
E-BODA
4.18 Developer options....49
4.19 About the Tablet 50
5 Multimedia....51
5.1 Music Player .... 51
5.2 Video Player 52
5.3 Gallery 52
5.4 Photo camera 54
5.5 FM Radio....54
6 Communication Function....56
6.1 Phone....56
6.2 Messaging....57
6.3 People 57
6.4 Set a new APN....59
7 Internet 60
7.1 Browser....60
7.2 E-mail 61
8 GPS Function 63
8.1 GPS Browse....63
9 Procedures of Other Applications 64
9.1 Clock....64
9.2 Computer 65
9.3 File Manager....65
9.4 Sound Recorder 68
10 Installation Procedure 68
10.1 Installation 68
10.2 Uninstall 69
11 Troubleshooting....69
E-BODA
1 Introduction
1.1 Knowing the Product
The product is designed with a wide range of functions, including 2G, 3G, WIFI, BT, GPS, FM, voice dial etc.. It allows an easy realisation of wireless and internet communications, you have access to browse the internet anytime and anywhere; also, it is built with a GPS mode so that it can be used for browsing from the maps application. There are many sensors that offer new functioning and entertainment operations; furthermore, it has the screenshot function.
This manual will systematically introduce you with the tablet functions, techniques of use and notifications. Please carefully read this manual before starting to use the tablet.
E-BODA
1.2 Notifications
Preventive maintenance
- Please always keep the tablet interface dry. In order to avoid damaging the product, please protect the tablet from water or other liquids and also avoid using it or the charger when your hands are wet.
● To avoid damaging the device, the battery and the charger, please protect the tablet and the charger from violent shocks or strong bumps.
● To keep a proper functioning of the tablet, battery and charger, please protect them from very high or very low temperatures. Do not place the device in direct sunlight.
- Do not throw the tablet, do not drop it on the ground, do not place it in unsuitable places and do not bend it.
- Do not arbitrarily dismantle the device and its accessories, otherwise the device and its accessories lose their warranty.
1.3 Safety Measures
Before beginning the operations on the tablet, please read this chapter and explain it to the children. For further information please refer to the safety instructions and the notification.
● To prevent accidents, never use the tablet while driving the car.
● Inside a hospital, medical clinics and near medical devices from these enclosures, please turn off the device.
- Inside an airplane, please turn off the tablet or pass the device on "Airplane Mode".
● Turn off the tablet near high accuracy electronic devices in order to avoid their damage.
- Please do not remove the tablet or its accessories. In case of damage, please call your authorised service.
- Protect the tablet from magnetic equipment; it can delete the data due to the waves emitted by the tablet.
- Do not use the tablet near very high temperatures or
E-BODA
flammable gas (gas stations).
- Avoid the use of the tablet by young children without parental supervision.
2 Introducing the Tablet
2.1 Operations and Tablet Preparation
Charging the Battery
If this device is used for the first time, use the adapter for a full charge.
- Plug the adapter jack into the specific space to start charging the tablet.
- The red LED indicates that charging begins. Please wait until the charging is complete and do not disconnect the charger jack while charging. When charging is completed, the LED will turn green.
2.2 Tablet Status and Memento
Memento icons
When you have messages that announce something, that remind something, they appear on the top of the screen and can be seen if you pull the window from top to bottom. Below there are the most common messages that can appear:
 | New e-mail |  | Airplane mode | |
 | Connected USB |  | Connected USB adjustment | |
 | Back button |  | Downloading | |
E-BODA
 | Displaying the recently used applications |  | Home button |
 | Battery status |  | Connected WIFI, available internet |
Memento panel
Memento icons will work when you receive e-mails, when the WIFI is turned on, you can open the memento panel to see detailed information.
Opening the memento panel
When the memento column displays the new memento icon, please press and hold on it and slide your finger down and then the memento panel will open.
3 Quick Start Guide
3.1 Function Keys
Description of function keys:
| Power button | Short press for the Sleep/Wake up mode, long press for on or off |
| Volume + (up) | Increasing the volume |
| Volume - (down) | Decreasing the volume |
HOME button(Home) | Pressed in any interface, it will bring you on the Home screen |
BACK button(Back) | Pressed in any interface, it will bring you back to the previous menu |
E-BODA
Menu button (Menu)  | This button will display the menu interface |
Displays recently used applications  | Displays the history of recently viewed applications |
3.2 Power On and Power Off
Power on
Long press the POWER button for three seconds, you can enter the startup image. The system automatically locks the screen; unlock it by sliding to the right.
Power off
- Long press POWER, and the shutdown window will appear.
- The shutdown window contains Mute Mode, Airplane Mode and the Power Off option.
- You have to make the last step for turning off the tablet by pressing the Power Off button.
3.3 Turn On and Turn Off the Screen
The screen will automatically turn off when you do not perform any action.
- The screen will automatically turn off to save the battery power if there is no operation performed.
- When the screen is turned on, press the POWER button and it will immediately shutdown.
Turn on the screen when it is turned off.
If the screen is turned off, short press the POWER button to turn it on. The screen will be locked at startup, it will be displayed as presented in image 3.1, slide to the left to unlock and open the Photo Camera application and slide to the right to unlock the screen.
E-BODA
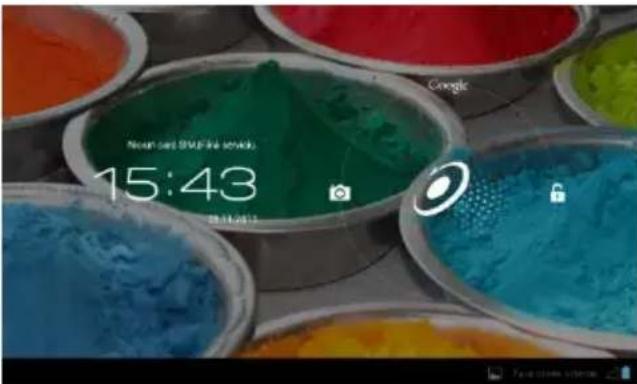
Image 3.1
E-BODA
Using the Touch Screen
Methods for tablet operation
You can see below the methods for operating the tablet's main screen, menu and applications.
Click
When you want to use the tablet keyboard or selecting an application, you just have to touch it with your finger.
Clicking
If you want to open an article (text box or web page link), or shortcuts, you can click on that article.
Rapid movement up or down
You can slide in any direction on the touch screen, up or down by finger touch.
Movement
Before moving an article where you want, first you have to press and hold it.
Sweep
To view most images, movies or even when you write, you just have to turn the tablet horizontally or vertically. Visualization will automatically change depending on the position of the tablet.
E-BODA
3.4 Home Page
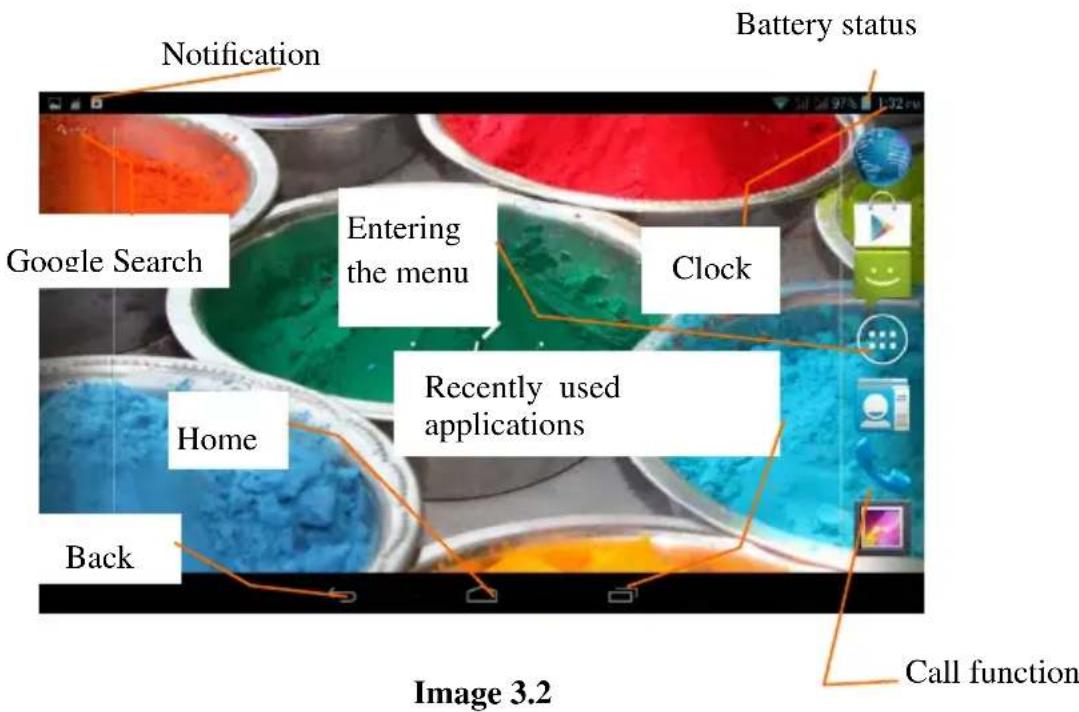
For the main interface from image 3.2, long press on the empty screen and a window will open to set the wallpaper, folder, widgets, and shortcut.
Extending the Home Page
The start page can be extended beyond the screen width to offer more space, on which you can add new icons, shortcuts or widgets. Click on the empty space of the main page and then slide to the left or the right of the screen. The main page is extended with the other two pages. See image 3.3
E-BODA

Image 3.3
Icon Management for Shortcuts
Create a folder with icons on the desktop
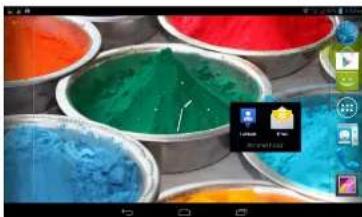
- Drag the icons you want to put together over one icon (also, you can overlay multiple icons), see image 3.4.
- Then click on the overlapping icons, they can be folded, see image 3.5.
Click the unnamed folder in the black box, the hidden keyboard will appear and you can rename the folder. The position of the folder can be changed by long press on it.
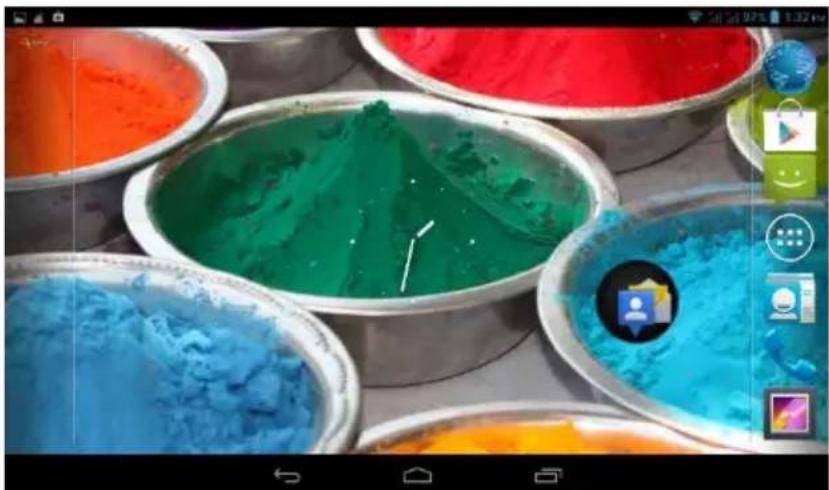
Image 3.4
E-BODA

Image 3.5
Delete icons from the desktop
- Long press the icon you want to delete, then the top right side of the screen, the icon will appear.
- Drag the icon you want to delete over the Remove icon, until it becomes red, and then lift your finger in order for it to be removed.
Changing the desktop wallpaper
- On the Home page, long press on any empty space until a window where you can select the new wallpaper will appear. - Select Gallery, Wallpapers or Live wallpapers to choose the new wallpaper.
Voice search
- Touch the microphone icon

- Choose from Google selection what you want.
- Set the language you want in the window of the voice search, then press confirm
- Speak into the microphone and say what you are searching for and the browser will open the list with the search results.
Note: before voice search, make sure that the tablet is connected to the internet.
E-BODA
3.5 Accessing Applications
Click the button in the top right side (see image 3.2), enter the main interface (see image 3.6) and choose the application you want to access.

Image 3.6
Return to Home Page
3.6 USB Connection
Configure the storage space of the tablet
Before beginning the file transfer, you have to configure your tablet storage space:
- Connect the tablet to the computer using the USB cable and the memento panel will show the notification of the USB connection.
- Open the memento panel.
- In the memento panel, click on "connected USB", (see image 3.4), then click on "Enable USB storage".
- Now the tablet is connected to the computer through the USB.
E-BODA
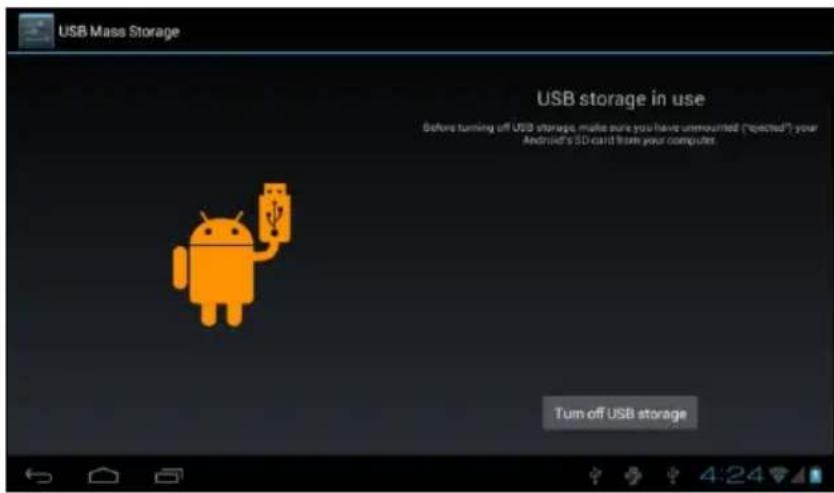
Image 3.7
Copy the file in the memory card
- Connect the tablet to the computer through the USB cable.
- Open "My computer" from your computer and search "Removable Disk".
- Copy the desired files in "Removable Disk".
- After you finished copying the files, press "Disable USB storage" in order to disconnect the computer tablet.
Note: When the tablet is connected through the USB cable, you cannot see the tablet memory. This option is valid after you disconnected the tablet from the USB cable.
3.7 Type Words
Use the onscreen keyboard
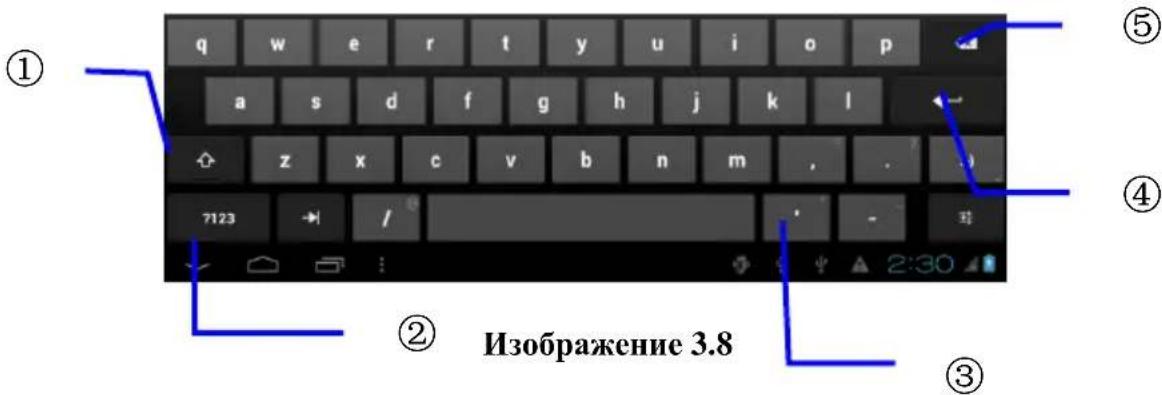
When you begin the procedure or when you choose words or numbers, the keyboard will be automatically displayed. The keyboard is the version for Android.
Select the desired typing method
- Click on the Settings option of the application.
- Click Language and Keyboard.
- In the text setting area, you will see all the installed methods
E-BODA
for words and the typing methods from your tablet.
- Select the desired typing method.
Use and switch the input method

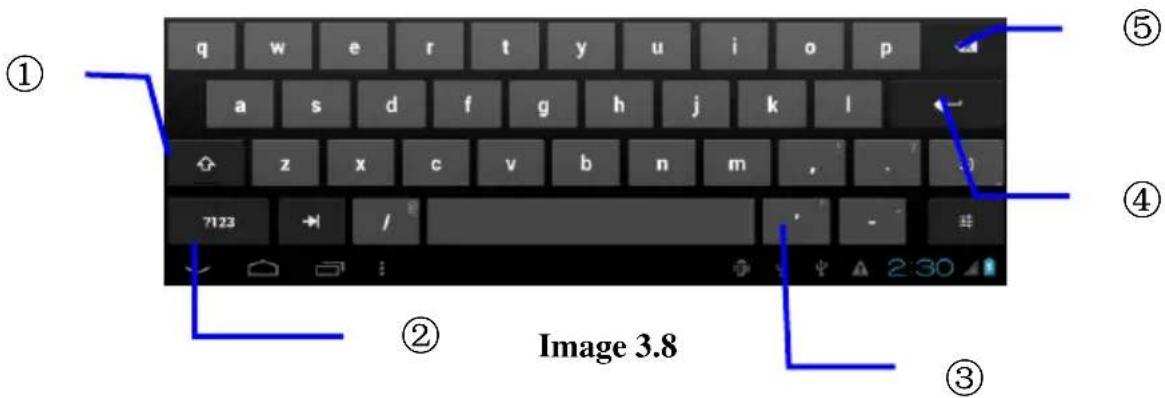
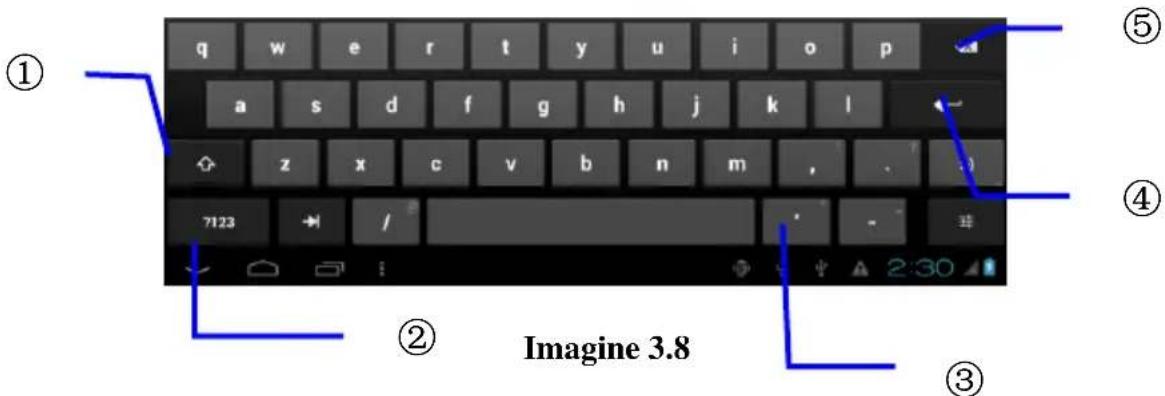
| 1 | Switch between uppercase and lowercase |
| 2 | Switch the mode for input words |
| 3 | Click to enter space |
| 4 | Click to run |
| 5 | Delete the character from the left of the cursor, press and hold to delete all the characters from the left of the cursor |
E-BODA
3.8 Operating Technique
Accessing the Widget Interface
In the application interface press “Widget Objects” on the top of the screen or slide the screen until they will be displayed. Long press on any Widget in order to create the shortcut, then you can access the application from the created shortcut.
Creating shortcuts for icons
In the applications interface or widgets interface, long press on any icon in order to automatically transfer it on the desktop, drag and hold any icon to move it on any part and in any part of the desktop.
Note: If there is no space left on the desktop where you want to place the icon, it will not be placed on the page of the main desktop.
4 Basic Settings
4.1 Wireless and Internet
1. Wi-Fi connection
- In the main menu or interface, select Settings application.
- Touch the Wi-Fi option, activate wireless, and the tablet will automatically search the available wireless networks. See image 4.1
- Select the Wi-Fi network to which you want to connect, if it will have the password, a window where you can enter the password will be displayed then press connect.
E-BODA
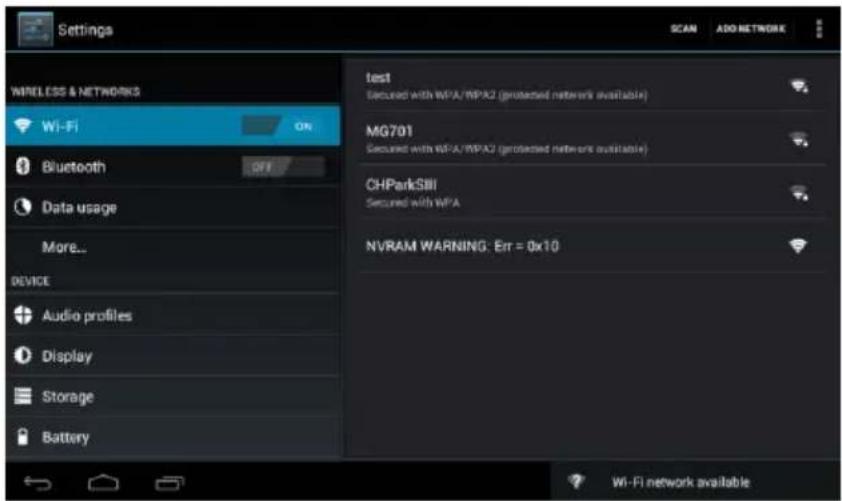
Image 4.1
2. Add Network
- Press ADD NETWORK the top right side, see image 4.2

Image 4.2
- Enter the SSID network, the name of the wireless network, press Save.
- Select the name of the saved user, press connect to use the network, see image 4.3
E-BODA
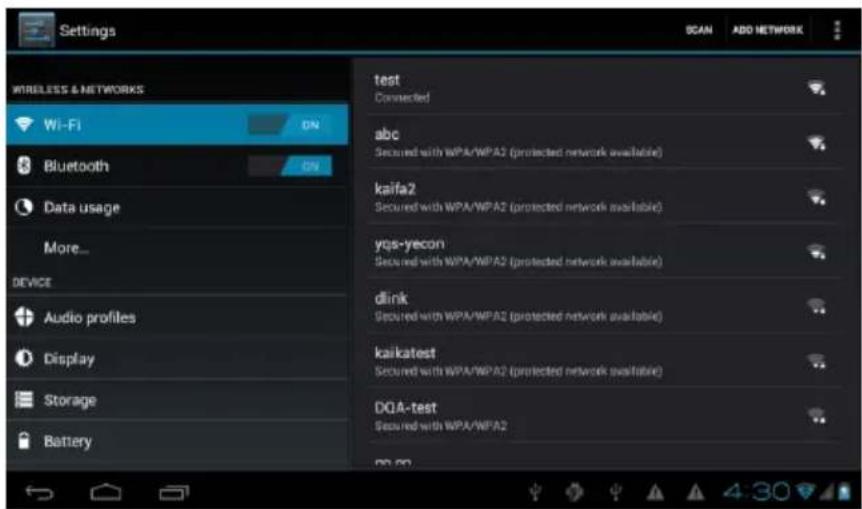
Image 4.3
2. Network Notifications
If you open the Network Notifications option, when the Wi-Fi signal appears, in the bottom right side, you will notice the wireless connection, see image 4.1
-
Keep Wi-Fi signal on during sleep mode.
-
Press icon in the top right side, see image 4.3; select
Advanced.
- Press Wi-Fi maintenance during deactivation, see image 4.4
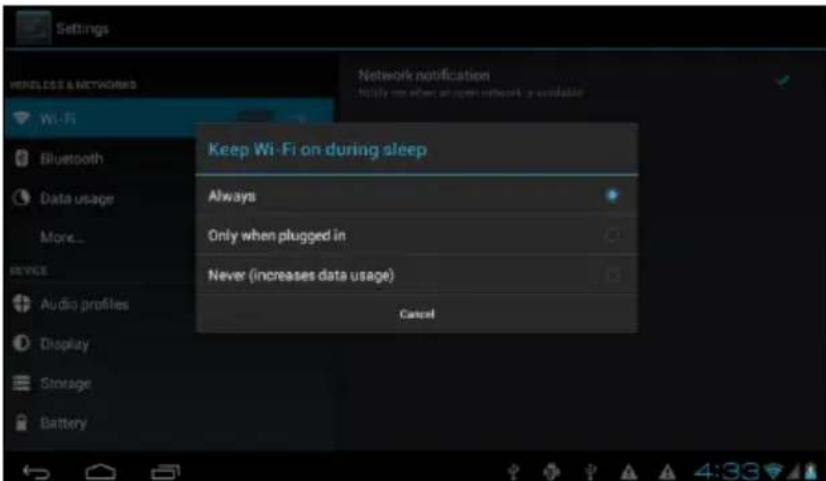
Image 4.4
E-BODA
4.2 Bluetooth
Functions of the Bluetooth Operation
- In the main menu or interface, choose the Settings application.
- Select Bluetooth and activate it.
- If someone near you has the Bluetooth activated, press Search Device in the top right and the tablet will automatically search Bluetooth devices. See image 4.5

Image 4.5
-
Press search to identify Bluetooth devices, a window will be displayed requesting the pairing of devices, enter the correct password and if your friend confirms the request, pairing the devices will be successfully performed.
-
After realising the pairing of devices, you will find the name of the device with which you want to operate, press on, enter the interface, see image 4.5, you can operate as displayed in the image:


Image 4.6
Bluetooth Settings
1. Rename Tablet
Press 10 on in the top right side (see image 4.5), and as you can notice in image 4.7, select Rename Tablet and you can key in any name you want.

Image 4.7
2. Verify the Visibility Timeout
Select Visibility timeout (see image 4.7), set the time during which you want your tablet to be visible, see image 4.8.
E-BODA
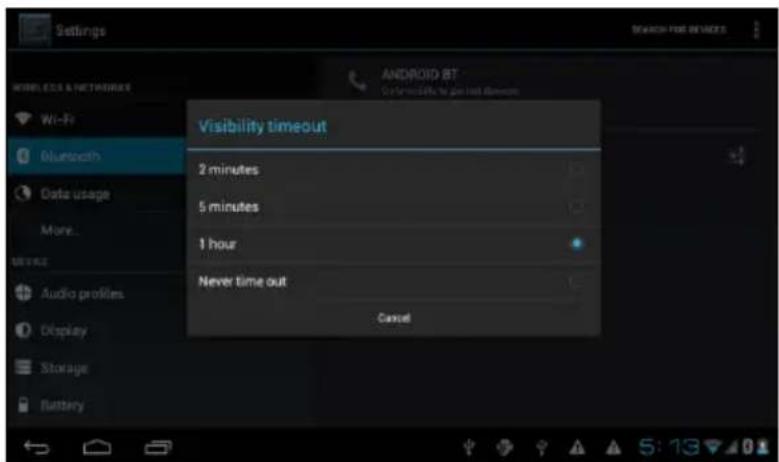
Image 4.8
3. Show received files
Choose show received file, see image 4.7 and you can see the downloaded or sent files.
4. Bluetooth advanced settings
Select Bluetooth Advanced Settings (see image 4.7) and enter the setting. See image 4.9.

Image 4.9
5. Send files
Open the sending files service, connect the Bluetooth, search the file in the tablet and then choose the sending option.
E-BODA
6. Bluetooth distance limit
When two Bluetooth devices are out of the service area and the connection cannot be performed anymore, the Bluetooth function will issue a warning sound.
4.3 Data Usage
Verify the data usage on the SIM card, see image 4.10.

Image 4.10
Verify Wi-Fi connection data usage.
Press ☐ on from the top right, see image 4.4, press Data Usage, see image 4.11

Image 4.11
E-BODA
4.4 More
4.4-1 Airplane Mode
The Airplane Mode stops the Wi-Fi and the GSM connection, when the Airplane Mode is turned on, the Wi-Fi and the GSM connection will automatically begin.
4.4-2 VPN
Open VPN, select Add VPN Network, see image 4.12. Enter the name and address of the server, then save.

Image 4.12
Select VPN, see image 4.13, enter the VPN user name and password, press connect.
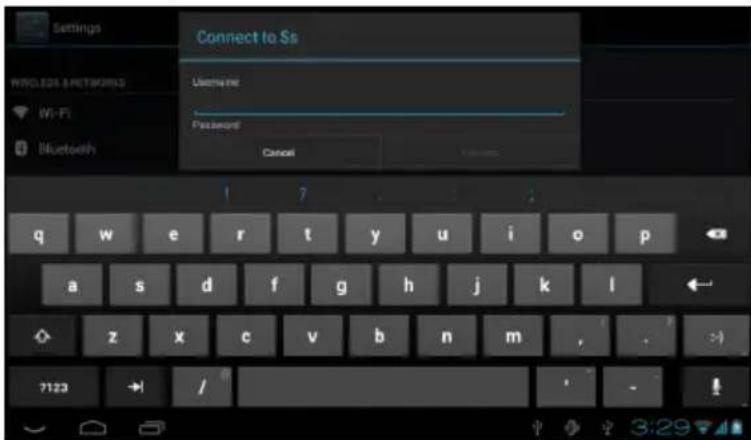
Image 4.13
4.4-3. Sharing network and portable hotspots Portable Wi-Fi hotspots
E-BODA
1 Click on settings in the main menu to apply.
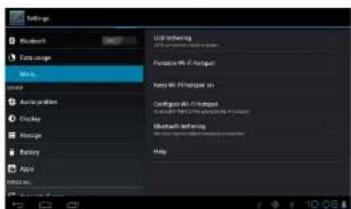
2 Press "More" when the Wi-Fi is properly connected and open Tethering & portable hotspot.

Image 4.14
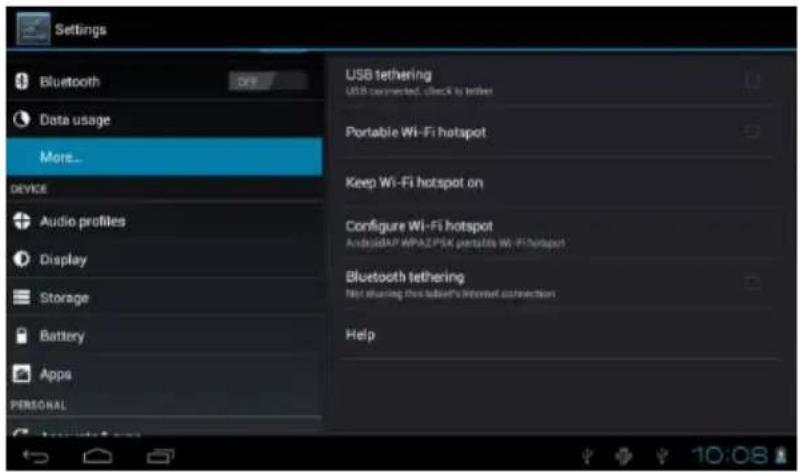
Image 4.15
3 Press Maintain enabled Wi-Fi hotspot and choose the enabled maintaining time.
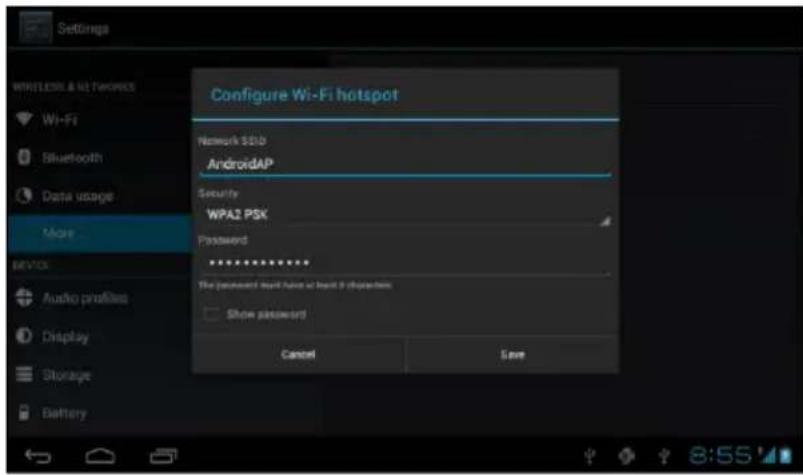
4 Return to previous menu, open the portable WLAN hotspot then click Configure WI-FI hotspot.
5 Set the desired password; it must contain more than 8 characters.
E-BODA

Image 4.16
4.4-4 Mobile Networks
1. Data usage
When you open the data usage, you can notice 2G/3G through the SIM card.
2. Data Roaming
When you open the data roaming, you can browse the internet through the SIM card.
3. Network mode
Choose the 2G or 3G band. (GSM is the 2G network, WCDMA is the 3G network.) See image 4.17

Image 4.17
E-BODA
4. Name of access points (APN)
Press Mobile Networks, see image 4.18.

Image 4.18
Choose the name of the access point (APN)
Choose the connection type, see image 4.19

Image 4.19
Remark: (CMWAP transmission through GPRS; the visited page is part of the wap website, and the www CMNET support represents the navigation through the phone function network of the tablet and it can also be connected to websites from the computer. Prices vary depending on the mobile data traffic.
E-BODA
5. Network Operator
Press network operator, the tablet will search for the available GSM and WCDMA networks, see image 4.20

Image 4.20
4.4-5 GPRS preferred data mode
After you turned on the GPRS preferred data mode, the tablet will choose this network as priority.
4.5 Audio Profiles
- Open Settings, press audio profiles, see image 4.21

Image 4.21
E-BODA
2 Press General to enter its options, see image 4.22

Image 4.22
1. Vibrations
In image 4.22, press vibrations and the tablet will vibrate when someone calls you.
2. Volumes
In image 4.22, press volumes; you can select the ringtone, notifications and alarm volume, see image 4.23

Image 4.23
3. Ringtone for voice call
In image 4.22, press ringtone for voice call to select the ringtone, see image 4.24
E-BODA

Image 4.24
4. Video call ringtone
In image 4.22, press video call ringtone to select the video call ringtone, see image 4.25
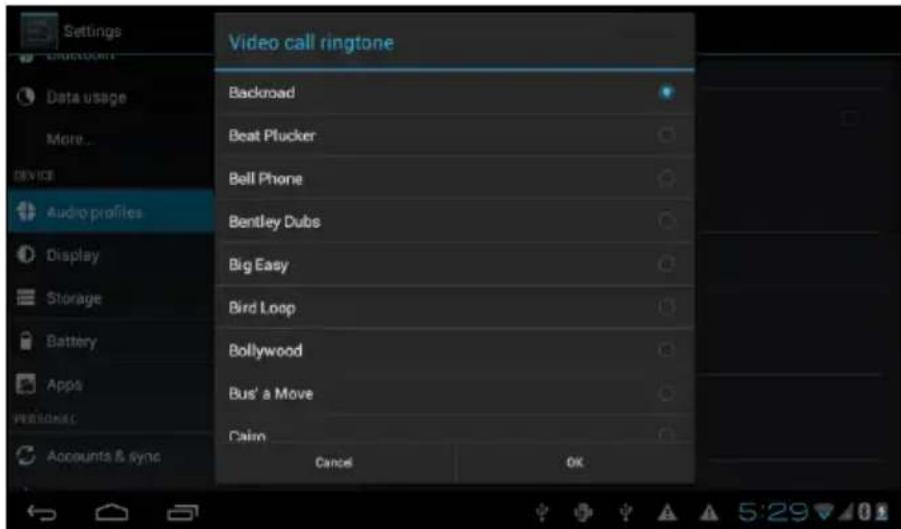
Image 4.25
Note: Except for the General mode, the other modes can only be selected having presets.
E-BODA
4.6 Display
4.6-1 Adjust Display Brightness
- Press Settings to apply.
- Press Display, select Brightness.
- Drag the indicator to the left or to the right to adjust brightness, see image 4.26
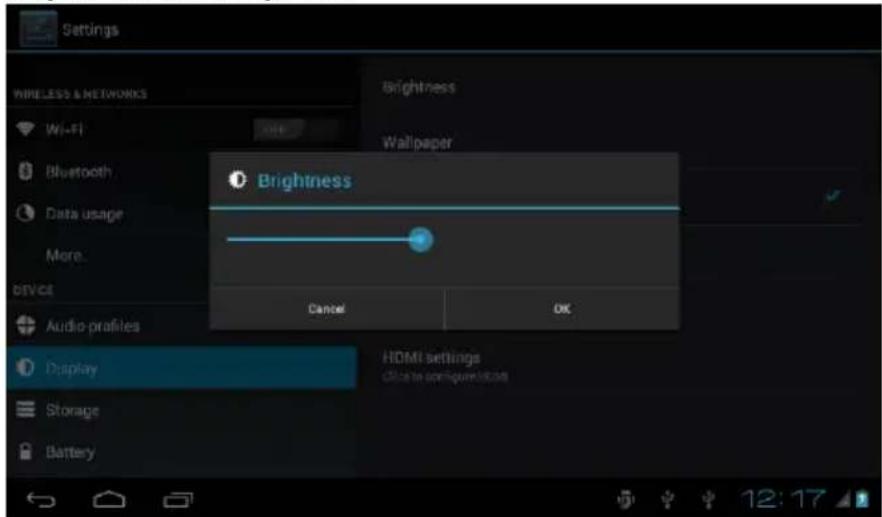
Image 4.26
Press OK after adjusting brightness.
Scenes
- Press Settings to apply.
- Press Screen, then Scenes.
- The tablet will display the scenes available for selection, see image 4.27
E-BODA
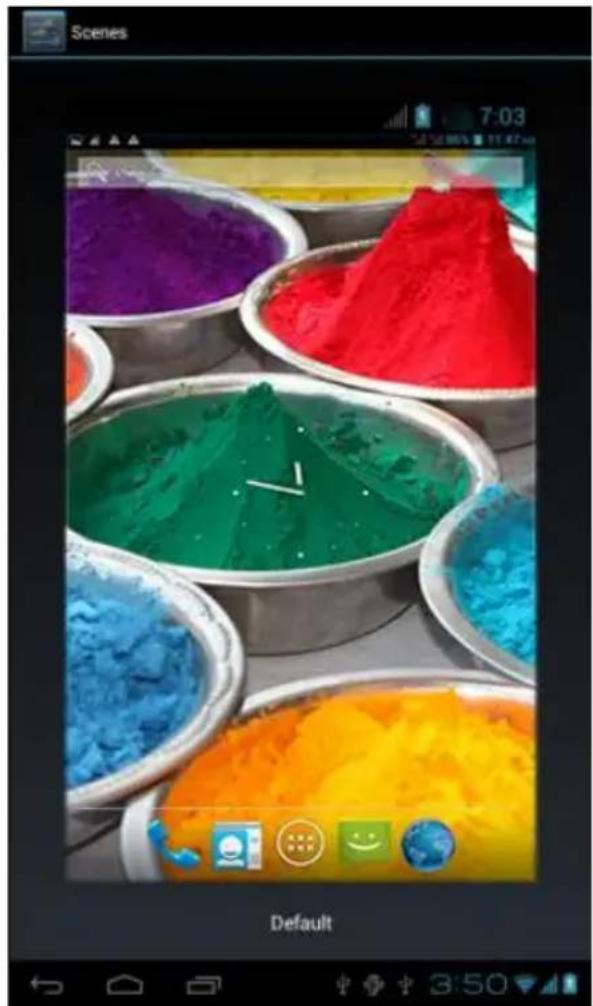
Image 4.27
4.6-2 Wallpaper
-
Press Settings to apply.
-
Press Screen, select Wallpaper.
-
You can select different wallpapers as you wish – Gallery (your personal selection of images) - Wallpaper (tablet images) – Live wallpapers – Video wallpaper, see image 4.28.
E-BODA
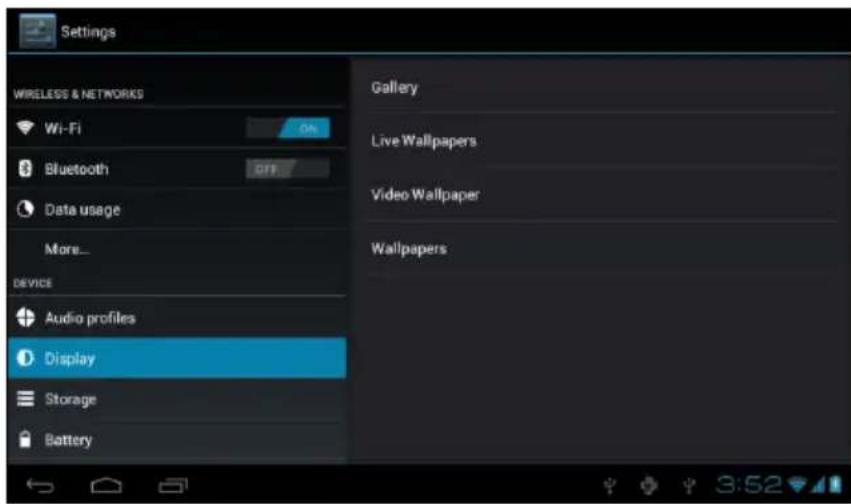
Image 4.28
4.6-3 Theme
-
Press Settings to apply.
-
Press Screen, Select theme, you can choose one of the four styles, see image 4.29

Image 4.29
4.6-4 Auto-rotate screen
The device is automatically set for auto-rotate and if this is turned off, the device will not use the tablet G-sensor anymore.
4.6-5 Sleep
1 Press Settings to apply.
2 Press Screen.
3 Press Sleep.
E-BODA
4 Select the decay time of the screen, see image 4.30

Image 4.30
4.6-6 Font Size
Press Font Size to adjust the size of the font, see image 4.31

Image 4.31
E-BODA
4.7 Storage
Open Settings function, click on the Favourite installation destination, you can set the new favourite storage space for the new applications.
Verify the System Storage, Internal Storage or Card SD.
- Enter the Application Settings.
- Press Storage, verify the storage space.
- System storage space
(1) System storage
System storage is the default space of the tablet for the operating system, see image 4.35. This partition is hidden; you cannot see details about it.

Image 4.35
(2) Internal Storage
Internal storage is the NAND storage space of the tablet, see image 4.36, if you want to verify the storage content, you can see it in the Storage main menu.
E-BODA
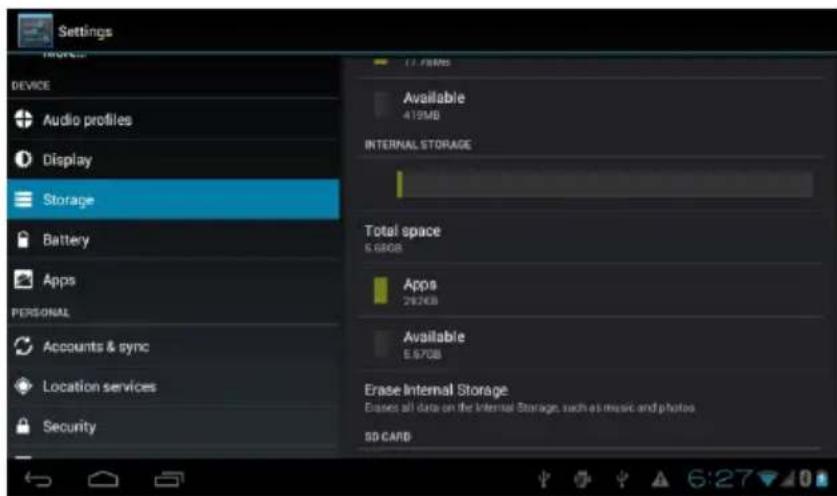
Image 4.36
2. SD Card
You can verify the available storage space of the card, Unmount SD card and Erase SD card, see image 4.37

Image 4.37
Safely unmount the SD card
- Select Storage application.
- Press memory.
- Press unmount SD card.
- Now you can safely unmount the SD card.
Note: Safely unmount the SD card protects the card and increases its lifespan.
E-BODA
4.8 Battery
Press the Battery function and here you can see details on the battery, see image 4.38

Image 4.38
4.9 Apps
- Press the Apps function.
- Select Apps and afterwards you can manage and erase the installed applications, you can verify the used space and the free space. (See image 4.39)

Image 4.39
- Verify the used space and the free space of the internal storage, see image 4.40
E-BODA

Image 4.40
- Verify the apps running on the device, the used space and the free space, see image 4.41

Image 4.41
E-BODA
4.10 Accounts & Sync
- Select the Accounts & Sync function
- Open the Accounts & Sync function, see image 4.42

Image 4.42
- Press Add Account, see image 4.43

Image 4.43
- After the account was successfully added, the sync function will open, see image 4.44
E-BODA
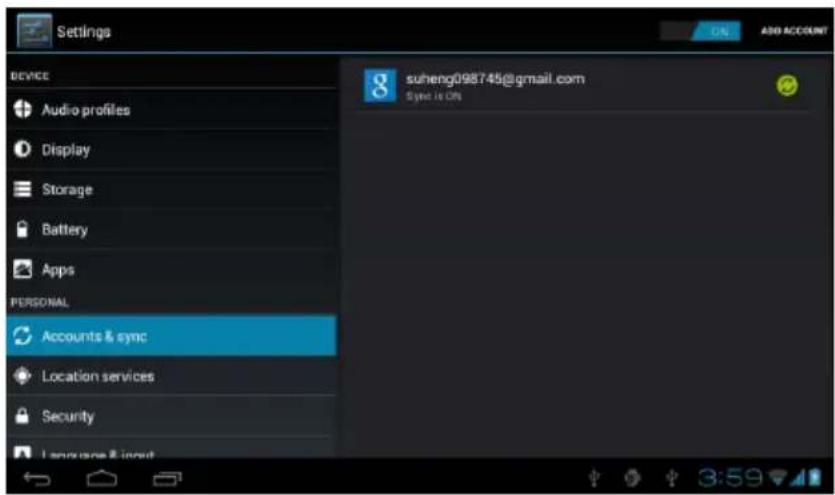
Image 4.44
4.11 Localisation services
Press Settings, choose Localisation services, see image 4.45

Image 4.45
1. Google localisation service
Open the Google localisation service, you can use WiFi in order for your location to be found.
2. GPS satellites
Open the GPS Satellites; you can use the GPS in order for your location to be found.
3. GPS EPO Assistance
Open GPS EPO Assistance and it will increase the GPS
E-BODA
positioning speed. This option uses the transmissions of the SIM card data.
4. EPO Settings
Press EPO Settings, enter these settings (see image 4.46), then verify the information on your position in case EPO has enabled the Auto download option.

Image 4.46
5. A-GPS
After enabling A-GPS, you can increase the positioning speed by the internet network.
6. A-GPS Settings
Press A-GPS Settings, enter these settings, see image 4.47

Image 4.47
E-BODA
1. Disable after Reboot
Select Disable after reboot and when you reboot the device, A-GPS will automatically stop.
2. Network Request
Select Network Request and the tablet can see your location through the internet network.
3. Network Used
Open Network Used, you can select the type of network, see image 48

Image 4.48
4. Server
Press Server, it can switch the localisation service, see image 4.49

Image 4.49
5 Google Localisation and Search
Open the location and allow Google search, you can use the
E-BODA
information of your location to improve the results of your search as well as other services.
4.12Security
Set screen lock
Lock the touch screen by the unlock icon or the password to protect the data from your tablet.
Note: After setting the lock screen, you must enter the access code every time the tablet is turned on or the screen is locked.
Set Unlock Pattern
- Press Settings in the main interface.
- Press Pattern.
- Press Draw unlock pattern.
- Choose the desired drawing.
- Press Forward, keeping in mind the drawing traced on the screen.
- See the box with unlock image, find touch points, connect four of these on the vertical, horizontal or on the diagonal. As shown in image 4.10, lift your finger from the screen when you have finished drawing the model. The system will record your new unlock pattern.
- Press Continue.
- When you see the image drawn by you, enter the pattern again, then press Confirm.

Image 4.11
E-BODA
Set unlock PIN code
-
Press Settings in the main interface.
-
Press Security.
-
Press Lock screen.
-
Choose PIN option.
-
Enter the new PIN code (numbers) then press Continue.
-
Enter the new PIN code then press Confirm.
Set unlock password
-
Press Settings in the main interface.
-
Press Security.
-
Press Lock screen.
-
Set the password in the specific box.
-
Set the new password (letters and numbers) then press Continue.
-
Enter again the password and then press Confirm.
Unknown Sources
-
In the main interface, press Settings.
-
Press Security.
-
Select Unknown sources, see image 4.51
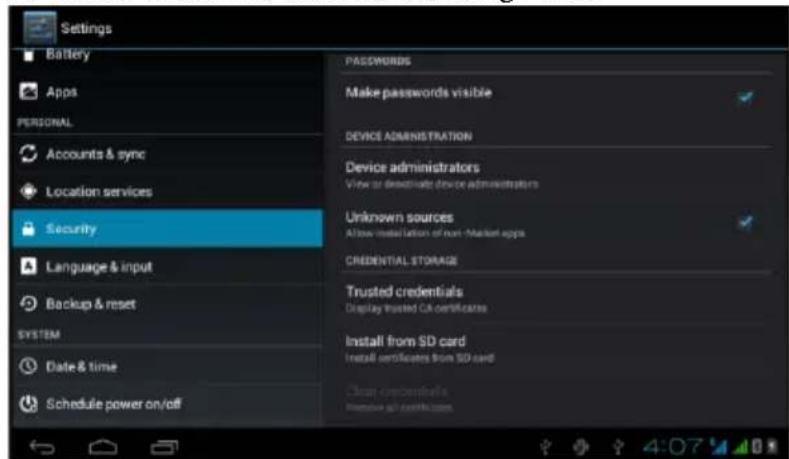
Image 4.51
Note: Manual installation of applications (APK), requires activation of the Unknown sources option.
E-BODA
4.13Language & Input
Press Settings, select Language & input, select Language to modify the desired language, see image 4.52

Image 4.52
Press Settings, choose Language & input, select Android Keyboard, see image 4.53

Image 4.53
Choose the language you want to select from the list, see image 4.54
E-BODA

Image 4.54
Return to Language & input, choose the language from the list (see image 4.55), select the input method you want to use.
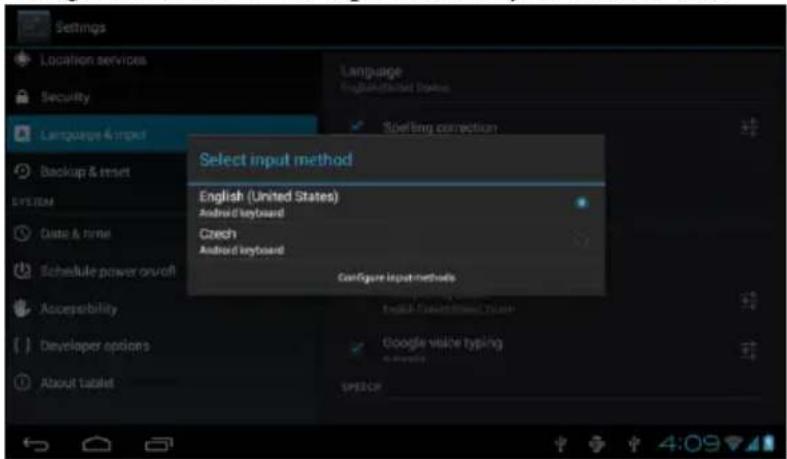
Image 4.55
4.14Backup & Reset
Connect the WiFi and login to your Google account, choose My data backup, the system will create a backup in the Google server. If you want to return to the default settings of the tablet, please press Full data reboot, see image 4.56 if you want to format the NAND partition, please check the option Delete SD card, then press Reset tablet.
E-BODA
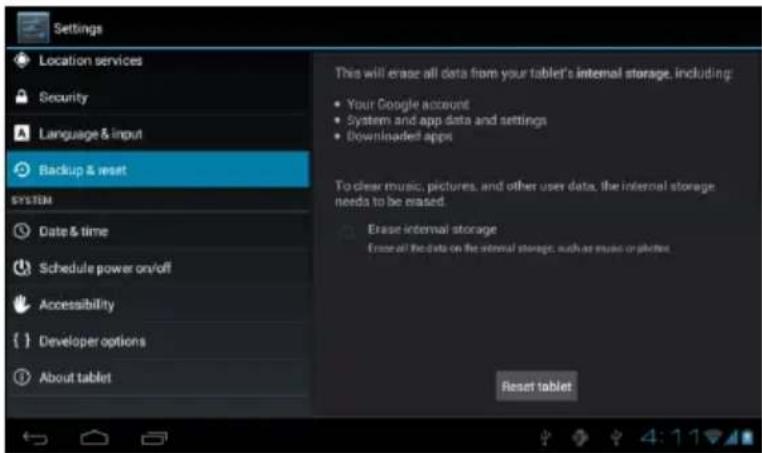
Image 4.56
4.15Date & time
According to the default settings, the system will automatically apply the time zone supplied by the Internet connection.
Manually set date and time
- Press Settings in the main interface.
- Slide down on the screen, then select Date and time.
- Disable the option "Automatic time zone".
- Disable the option "Use of time provided by the network" which you can find in Automatic date and time.
- Press Change time zone, then select from the list the desired time zone. Slide down to see all the options.
- Press Use 24-hour format to select the AM or PM clock format.
- Press Select date format, then click to adjust the date, month and year.
Note: If the option Automatic time zone is enabled, you cannot set the date and time.
E-BODA
4.16 Schedule power on / off
- Press Settings in the main interface.
- Select Schedule power on / off.
- Apply such as shown in image 4.57 and 4.58.

Setting the hour for powering on
Image 4.57
E-BODA
Accessibility
4.17-1. Large text
Touch to enlarge system font.
4.17-2. The Power button closes the call
During a phone call, when you press the Power button, the call will be closed and not answered.
4.17-3. Touch & hold delay
Touch the option and hold to increase the time, see image 4.59

Image 4.59
4.17-4 Install web scripts
It gives you the possibility of installing web scripts at system startup, and it also increases the risk for browsing websites.
E-BODA
4.17 Developer options
4.18-1 USB Troubleshooting
After enabling USB Troubleshooting, you can use programs that can read the tablet soft and when USB troubleshooting is enabled, USB Storage requires manual adjustment.
4.18-2 Remain in active state
If you enable Remain in active state, your tablet will never enter the sleep mode when charging.
4.18-3 Pointer location
If you enable Pointer location, the vertical and the horizontal direction will be displayed on the screen.
4.18-4 Show touches
If you enable Show touches, the operations you make will appear on the screen. We recommend using this option together with Pointer location.
4.18-5 Show screen updates
When you turn the screen on, the related areas will be displayed.
4.18-6 Show CPU usage
After you enabled the option Show CPU usage, the top right side of the screen, the activity of the tablet processor will be displayed, see image 4.60
E-BODA
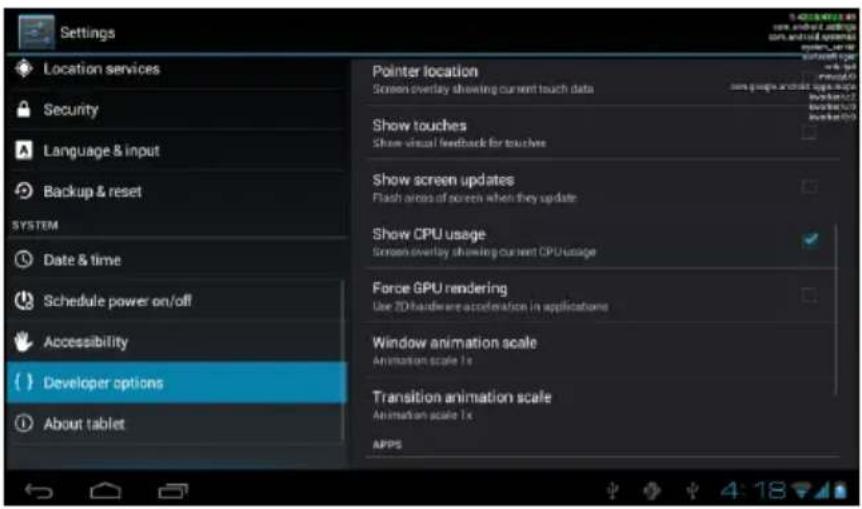
Image 4.60
4.18About the Tablet
Verify tablet status
- Verify Application settings.
- Press About tablet, verify the state, model, Android version, version number etc..
- Press Status, verify Battery status, Battery level, SIM card signal, IMEI number, IP address
E-BODA
5 Multimedia
5.1 Music Player

To enter the Music Player, from the menu or desktop press icon, then click on the song you want to play, see image 5.1:


E-BODA
-
Drag the progress bar to scroll forward or backward.
-
You will notice operations of the Music Player in image 5.2.
5.2 Video Player
-
To enter the Video Player, from the menu or the desktop press 📄on, then choose the movie you want to play.
-
You will notice operations of the Video Player in image 5.3.

Image 5.3
5.3 Gallery
The Gallery Application automatically searches photos and movies in the SD card. The Gallery will classify the files found in their folders. You can apply directly from the Gallery to display and edit photos, to set photos as wallpapers and you can also watch movies.
Display photos
- Choose the Gallery application from the menu or desktop.
E-BODA
-
Enter the Gallery, click on the folder you want to view.
-
Press the image you want to view and the system will fully display it on the screen automatically.
-
You can zoom in or out a photo by holding two fingers on the screen; pulling the fingers to the outside enlarges the photo and pulling the fingers to the inside shrinks the photo. This operation can be also performed by touching the screen with your finger twice.
Note: When you view the photos, slide to the left or to the right to pass to the previous or to the next image.
Edit and set photos
When viewing photos in full screen mode, press the settings button the top right side of the screen, you can choose the selection you need to edit and set the photo.
1. Presentation
a) Open a photo, press the settings button in the top right side of the screen and a window with options will appear.
b) Press Presentation, the photos will be automatically displayed in the loop (or from the photo frame press key).
2. Cut
-
Press the Settings button in the top right side of the screen.
-
Then press Cut, click with your finger and slide the desired area for cut.
-
Press in the middle of the frame for cut to move it in the place desired for the photo.
-
After you have adjusted the new sizes, press Cut. If you want to cancel cutting the photo, press Cancel.
3. Edit
a) Press the Settings button in the top right side of the screen.
b) Press Edit.
c) Adjust Brightness, Style, Colour, Photo distortion. Press Save.
d) If you want to cancel photo editing, press Back button.
E-BODA
5.4 Photo camera
In the main interface or on the desktop, press Photo camera, enter the Photo camera application.

- You will notice operations of the photo camera in image 5.4.
- Switch the camera: press the Photo camera icon from the camera menu to switch between the frontal/rear camera, see
image 5.5

Image 5.4
5.5 FM Radio
Press in the main menu or on the desktop to open FM Radio.
• Radio operations in image 5.5.
Open speaker
Channels list

E-BODA
- RDS settings: press the Menu button in the radio interface, then press RDS settings and choose the option you want to add.
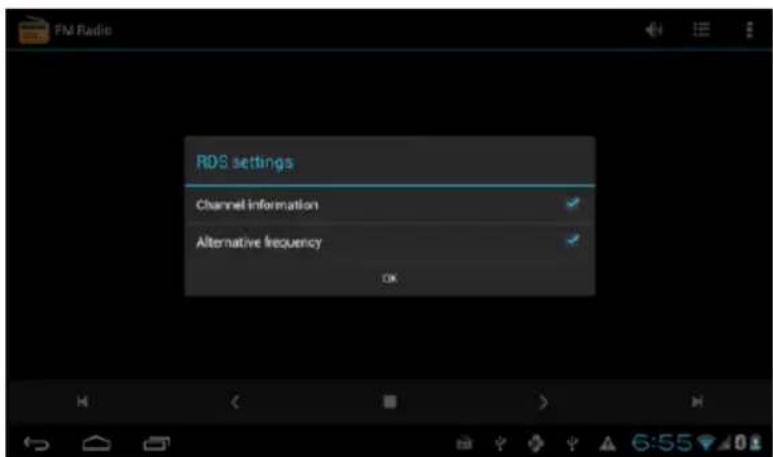
Image 5.6
- Channel search: Press Menu in the radio interface, press the Search button. The device will automatically begin searching radio channels; they will be automatically saved in the channel list.
- Save channels: Press the button in the radio interface to save the desired channel; the channel will be saved in the channel list.
Note: To use FM radio, you must introduce the headsets. They will be used as an antenna for receiving the radio stations.
E-BODA
6 Communication Function
6.1 Phone
- Press Phone application.
- Operations in image 5.7.

Image 5.7
E-BODA
6.2 Messaging
- Enter the main menu, choose the Messaging application by
pressing the icon.
- Press Send new message
Add attachment
Message settings

Image 5.8
6.3 People
Press People 📄 the main menu or on the desktop to see the contacts, see image 5.9.
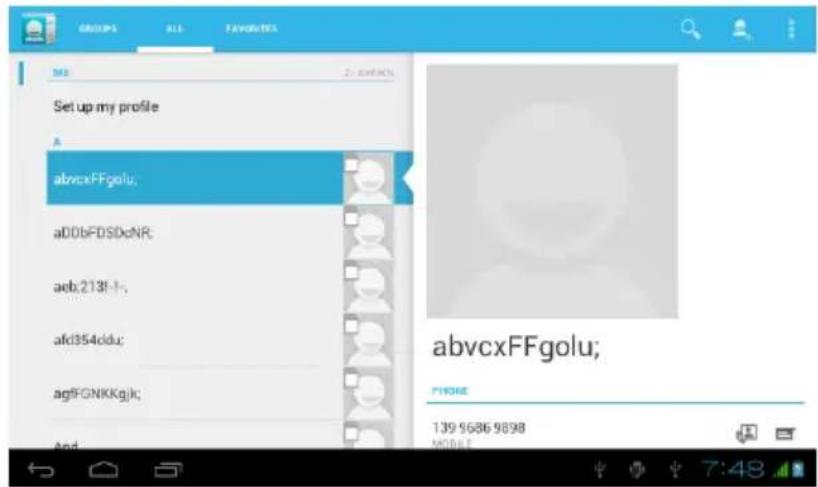
Image 5.9
E-BODA
- Contact search: press search button, enter the search function.
- Add contact: press the button, enter Add contacts interface.

E-BODA
6.4 Set a new APN
For setting a new APN (Acces Point Name), the following steps must be followed:
1) Enter the settings menu.
2) Select the More... option
3) Select Mobile networks


4) Ensure that the Data roaming option is checked
5) Select the Access Point Names option

6) Press button in the top right corner
7) Select New APN option
8) Enter the data provided by the mobile phone operator
E-BODA
9) Press again the ☐ button in the top right corner, then select Save
10) Wait approximately 30-40 seconds in order for the tablet to connect to the new APN, then you can use the internet connection through mobile data.
7 Internet
7.1 Browser
If you have a good WiFi connection or mobile internet (Please read chapter 4.1 for further information on wireless and mobile internet settings), press Browser icon 📁 in the main menu or the desktop, see image 6.0.

Image 6.0
E-BODA
7.2 E-mail
The E-mail application procedure contains a guide for settings, you can add a POP3 or IMAP external email account and you can also add an Email account for usual services (For example: Yahoo, Gmail, Hotmail), see image 6.1.

Image 6.1
a. E-mail settings
-
After you clicked on the icon for sending the e-mail, you can see the guide for e-mail settings that will assist you in setting up your account.
-
Enter your e-mail address and password.
-
Press "Forward" button and choose the type of e-mail you want from the two: POP3 or IMAP.
-
Press "Forward" button, verify whether you e-mail service can receive and send e-mails.
-
Enter the e-mail account to send, the subject, then press Send.
-
If the e-mail service is available, you will automatically enter the inbox.
b. Delete the e-mail account
You can delete your POP3 or IMAP e-mail account from the tablet.
E-BODA
Press

- Enter the e-mailbox.
- Press Menu button.
- Press Settings.
- Press Eliminate account.
- Press on the account you want to delete.
- Press Confirm to delete.
c. Send e-mail
- Press the 📋 icon in order for the e-mailbox to be displayed.
- Press Inbox, the page will automatically be refreshed, then press on the new e-mails to read them.
- Press the Settings button, the menu will be displayed.
- Press the Add icon to enter the New e-mail interface.
- Enter the address to which you want to send your e-mail.
- Enter the subject and the content of the e-mail.
- If you want to add an attachment, press the Settings button, the menu will be displayed.
- Press Add attachment (photos, films).
- Press Send to send the e-mail.

Image 6.2
E-BODA
8 GPS Function
8.1 GPS Browse
- In case you do not want to browse through the internet service, the installation of a new application that contains maps for GPS browse is necessary. If you browse through the internet service, the Browse application of the tablet that contains the Google maps can be used.
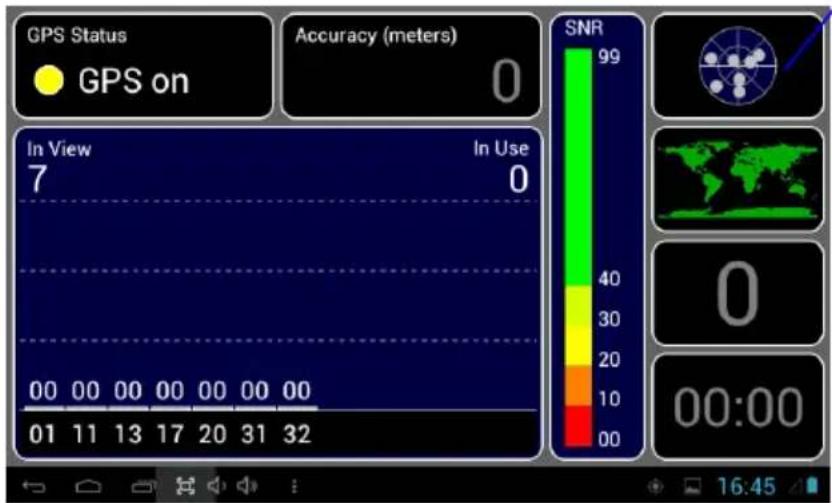
- Enter the main menu, press icon, enter the application from image 6.3.
Return
Image 6.3
When positioning was successfully realised, the gray scale value will turn green. It will display the latitude, longitude, height, speed and time zone of your location. See image 6.4.
These values represent signal power, the time zone is the time of the location in which you are and if time is not correctly set, verify the settings of the time zone from the tablet menu.
E-BODA

9 Procedures of Other Applications
9.1 Clock
Open the Clock application, enter its interface, see image 6.5.

Image 6.5
E-BODA
9.2 Computer
- Press

-
Enter the Computer application interface.
-
Carefully touch the buttons to operate calculations.
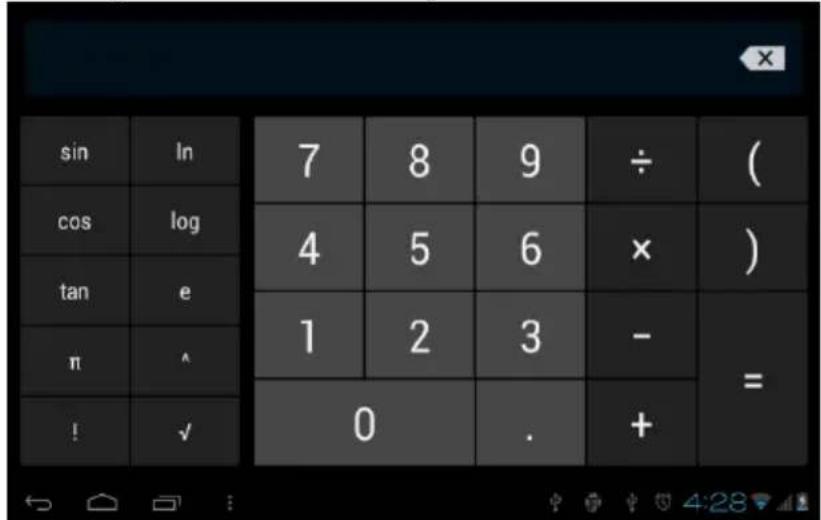
Image 6.6
9.3 File Manager
The File Manager will copy, cut, delete, rename your documents both from the tablet memory and from the SD card memory and it will also share files or install apps (APK). In the main menu or on the desktop press icon to enter the file manager.
![graph TD A["sdcard"] --> B["SD card"] C["sdcard2"] --> D["Internal memory"]](/content/2026/05/924449/images/1044c41b3644cb470f3b3708a036d0a8af82c30f64e3d904f87c3ec68950e6d1.jpg)
Image 6.7
E-BODA
a. Copy, cut, delete, rename files and folders. Choose the file or folder, long press until the options window will appear. See operations in image 6.8.

Image 6.8
b. Paste the copied file or cut. Choose the file you want to paste, press the icon on the top right side to operate (see image 7.0), then press icon for more options.

Image 6.9
E-BODA
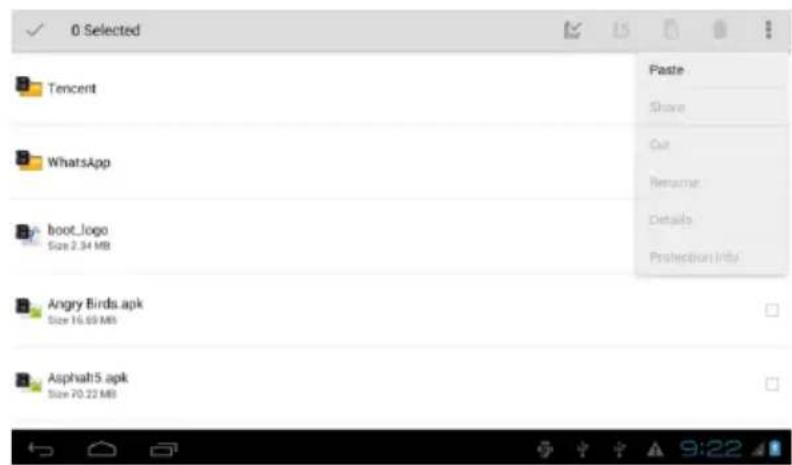
Image 7.0
c. Share files. Choose any file, long press on it, the options window will appear. Press share, then Send file.

Image 7.1
d. Install applications (APK). Choose the files with “.apk” extension from the files manager. You can install your personal applications.
e. Create folder. Press the icon on the top right side and you can create a new folder and you can also rename the folder as you wish.
E-BODA
9.4 Sound Recorder
In the main menu or on the desktop, press icon to open the Sound Recorder application. Press icon to start recording. Press icon to stop recording. Press icon to play the recorded sound.
The system informs with regard to Cancelling or Saving the recorded sound.
Play the recording. Choose the Video Player for playing the recording.

Image 7.2
10 Installation Procedure
10.1 Installation
Installation of third party apps
- Open the File Manager; choose the application you want to install.
- Press and hold on the application you want to install.
- An installation window will appear, select Install.
- After installation is complete, press Finished.
Note: The installation of third party apps downloaded from the internet contains the “.apk” extension.
E-BODA
10.2 Uninstall
Uninstall apps
- Enter the Settings application.
- Press the Applications option and the applications installed on the system will be listed.
- Press on the application you want to delete, then press uninstall.
- Press Confirm to finish uninstalling.
Note: There are more methods to uninstall applications, when clicking an application, all the options and permissions of the respective application will be displayed.
11 Troubleshooting
1. The tablet is slower the first time it is turned on
At the first startup, the tablet needs approx. 2-3 minutes to install its own applications. Previous startups will be faster.
2. The tablet cannot connect to WiFi
- Make sure that the wireless router or the internet service is working properly.
• Make sure that the tablet is in the range of the wireless router and that between them there are no separating walls that can affect router signal coverage.
• Make sure that the name and password are entered correctly.
3. The tablet gets too hot
When more apps run at the same time or when the screen is turned on for a longer time, the tablet may become very hot. This is normal.
4. The e-mail cannot be set
• Make sure that the internet service is working properly.
• Make sure that the e-mail settings are correct.
- Set the time zone according to the area in which you are located.
E-BODA
5. The system remains locked
When you install third party applications, they may affect the normal functioning of the tablet operating system. You can press Reset button (it can be found on the back cover of the tablet, next to the power button), to reset the system.
6. The web page cannot be opened
-
Keep a proper distance between the tablet and the range of the wireless router.
-
Restart WiFi and try again.
7. The tablet sometimes runs very difficult
This is a normal phenomenon. Please stop the applications you do not need, or uninstall third party applications you do not use to free the internal memory of the device.
E-BODA

CE marking is a mandatory conformity mark for products placed on market in the European Economic Area. CE Marking on a product ensures that the product complies with the essential requirements of the applicable EC directives.
This product is marked with the distinctive symbol for electrical and electronic waste selective sorting. This symbol indicates that the product must be accepted by a selective waste collection system, in accordance with the EU 2002/96/EC directive, so it can be recycled or dismantled to reduce the impact on the environment.
Attention! Electronic products that are not sorted selectively may affect the environment and people's health, as they may contain dangerous substances.
ROHS (Restriction on Hazardous Substances). This directive is a regulation that was implemented on 01 July 2006 and refers to restrictions on the marketing of products and electrical and electronic equipment

containing hazardous substances such as lead, hexavalent chromium, cadmium, brominated biphenyl (PBB), polybrominated diphenyl ethers (PBDE).
E-BODA
DECLARATIE DE CONFORMITATE nr. 1040-EBD
Director General Emilia Burcea

E-BODA
Cuprins
1 Introducere .... 3
1.1 Cunoasterea produsului 3
1.2 Anunturi 4
1.3 Instructiuni de Siguranta .... 4
2 Introducerea Tabletei....5
2 Introducerea Tabletei
2.1 Operatiuni si Pregatirea Tabletei
Incarcarea Bateriei
Imagine 3.3
Imagine 3.4

Imagine 3.5
Stergerea pictogramelor de pe desktop
Imagine 3.7
Copiati fisierul in cardul de memorie
Imagine 4.1
2. Adaugare Retea
- Apasati pictograma un partea dreapta de sus, vedeti imaginea 4.2

Imagine 4.2
- Introduceti SSID retea, numele retelei wireless, apasati Salvati.
E-BODA

Imagine 4.3
Imagine 4.4
E-BODA
4.2 Bluetooth
Functiile operatiunii Bluetooth
-
In meniul principal sau interfata, alegeti aplicatia Setari.
-
Selectati Bluetooth si activati-1.
-
Daca cineva din apropierea dumneavoastra are Bluetooth activat, apasati Cautare Dispozitiv in partea dreapta sus, iar tableta v-a cauta automat dispozitive Bluetooth. Vedeti imaginea 4.5

Imagine 4.5
Imagine 4.7
2. Verificati Durata limitei de vizibilitate
Imagine 4.10
Imagine 4.11
E-BODA
4.4 Mai mult
4.4-1 Mod Avion
Modul Avion opreste conexiunea Wi-Fi si GSM, cand Modul Avion este pornit, conexiunea Wi-Fi si GSM va porni automat.
4.4-2 VPN
Deschideti VPN, selectati Adaugare retea VPN, vedeti imaginea 4.12. Introduceti numele si adresa serverului, apoi salvati.

Imagine 4.12
Selectati VPN, vedeti imaginea 4.13, introduceti nume utilizator VPN si parola, apasati conectare.

Imagine 4.13
E-BODA
4.4-3. Partajare retea si hotspot-uri portabile
Hotspot-uri WiFi portable
Imagine 4.14

Imagine 4.15
- Apasati Mentinere hotspot WiFi activat, alegeti timpul de mentinere activat al acestuia.
- Reveniti la meniul anterior, deschideti WLAN hotspot portabil dupa care clic pe configurare WI-FI hotspot.â
- Setati parola dorita, aceasta trebuie sa contina mai mult de 8 caractere.
E-BODA
Imagine 4.16
4.4-4 Retele Mobile
Imagine 4.17
E-BODA
4. Numele punctelor de acces (APN)
Imagine 4.18
Imagine 4.20
4.4-5 Modul preferat de date GPRS
Dupa ce ati deschis modul preferat de date GPRS, tableta va alege aceasta retea ca fiind prioritara.
4.5 Profiluri audio
- Deschideti Setari, apasati pe profiluri audio, vedeti imaginea 4.21

Imagine 4.21
E-BODA
Imagine 4.22
1. Vibratii
In imaginea 4.22, apasati vibratii, tableta va vibra atunci cand cineva va apeleaza.
2. Volume
In imaginea 4.22, apasati volume, puteti selecta soneria, notificari si volumul alarmei, vedeti imaginea 4.23

Imagine 4.23
Imagine 4.24
Imagine 4.25
Nota: Exceptand modul General celelalte moduri pot fi doar selectate avand setari prestabilite.
E-BODA
4.6 Ecran
Imagine 4.26
Imagine 4.30
4.6-6 Marine font
Imagine 4.31
E-BODA
4.7 Stocare
Imagine 4.35
(2) Stocare interna
Imagine 4.36
2. Card SD
Puteti verifica spatiul de stocare disponibil al cardului. Demontati cardul SD si Stergeti cardul SD, vedeti imaginea

Imagine 4.37
Imagine 4.38
4.9 Aplicatii
- Apasati functia Aplicatii.
- Selectati Aplicatii, dupa aceea puteti administra si sterge aplicatile instalate, verifica spatiul utilizat si spatiul liber. (Vedeti imaginea 4.39)

Imagine 4.39
E-BODA
Imagine 4.40
Imagine 4.42
- Apasati Adaugare cont, vedeti imaginea 4.43

Imagine 4.3
Imagine 4.44
4.11 Servicii de localizare
Apasati Setari, alegeti Servicii de localizare, vedeti imaginea 4.45

Imagine 4.45
Imagine 4.46
5. A-GPS
Dupa ce ati activat A-GPS, puteti creste viteza pozitionarii prin reteua de internet.
6. Setari A-GPS
Imagine 4.47
1. Dezactivare dupa repornire
Selectati Dezactivare dupa repornire, cand reporniti dispozitivul, A-GPS se va opri automat.
2. Solicitare retea
Selectati Solicitare retea, tableta poate vedea locatia dumneavoastra prin reteaua de internet.
3. Retea utilizata
Deschideti Retea utilizata, puteti selecta tipul retelei, vedeti imaginea 48

Imagine 4.48
E-BODA
4. Server
Imagine 4.49
Imagine 4.11
Setati deblocare cod PIN
- Apasati Setari in interfata principala.
- Apasati Securitate.
- Apasati Blocare ecran.
- Alegeti optiunea PIN.
- Introduceti noul cod PIN (numere) apoi apasati Continuare.
- Introduceti din nou codul PIN apoi apasati Confirmare.
Setati deblocarea Parola
- Apasati Setari in interfata principala.
- Apasati Securitate.
E-BODA
Imagine 4.51
Nota: Instalarea manuala a aplicatilor (APK), necesita activarea optiunii Surse necunoscute.
4.13 Limba si intrare
E-BODA
Imagine 4.52
Apasati Setari, alegeti Limba si introducere, selectati Tastatura Android, vedeti imaginea 4.53

Imagine 4.53
Imagine 4.54
E-BODA
Imagine 4.55
4.14 Copie de rezerva si reinitializare
Conectati WiFi si logati-va la contul dumneavoastra Google, alegeti Copie de rezerva a datelor mele, sistemul va crea o copie de rezerva in serverul Google.
In cazul in care doriti sa reveniti la setarile din fabrica a tabletei, va rugam apasati Reinitializare completa a datelor, vedeti imaginea 4.56, daca doriti sa formatati partitia NAND, va rugam sa bifati optiunea Stergeti cardul SDdupa care apasati Resetati tableta.

Imagine 4.56
E-BODA
4.15 Data si ora
Imagine 4.59
4.17-4 Instalare notite web
Imagine 4.60
E-BODA
4.19 Despre tableta
Imagine 5.1
E-BODA

Imagine 5.3
5.3 Galerie
Aplicatia Galerie cauta automat fotografii si filme in cardul SD. Galeria va clasifica fisierele gasite in folderele acestora. Puteti aplica direct din Galerie afisarea si editarea pozelor, setarea pozelor ca imagine de fundal, de asemenea puteti urmari filme.
Afisarea fotografiilor
Imagine 5.6
- Cautare canal: Apasati meniu in interfata radio, apasati butonul Cautare. Dispozitivul va incepe cautarea canalelor radio automat, acestea vor fi salvate automat in lista canalelor.
E-BODA
Imagine 6.1
a. Setari Email

Imagine 6.2
E-BODA
8 Functia GPS
8.1 Navigare GPS
Imagine 6.3
Imagine 6.5
9.2 Calculator
- Apasati .

Imagine 6.8
Imagine 6.9
E-BODA

Imagine 7.0
c. Partajati fisiere. Alegeti orice fisier, apasati lung pe acesta, va aparea fereastra cu optiuni. Apasati Partajare dupa care Trimitere fisier.
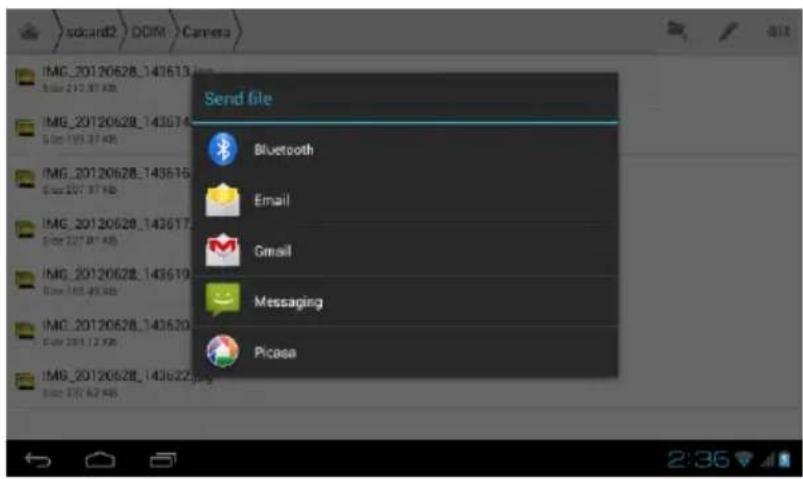
Imagine 7.1
d. Instalati aplicatii (APK). Alegeti fisierele cu extensia “.apk” din managerul de fisiere. Puteti instala aplicatile dumneavoastra personale.

eare folder. Apasati pictograma din partea dreapta de sus , puteti crea folder nou, de asemenea puteti redenumi rul asa cum doriti.
9.4 Inregistrare sunet
Imagine 7.2
10 Procedura de instalare
10.1 Instalare
Instalarea aplicatilor third party
Director General Emilia Burcea

E-BODA
Съдържание
1 Въведение .... 3
Изображение 3.3
Изображение 3.4

Изображение 3.5
Изображение 3.7
E-BODA
Изображение 4.4
4.2 Bluetooth
E-BODA
Изображение 4.10
Изображение 4.18
Изображение 4.20
E-BODA
Изображение 4.23
Изображение 4.27
4.6.2. Фонова картина
Изображение 4.28
4.6-3 Tema
Изображение 4.30
Изображение 4.31
E-BODA
4.7 Съхранение
Изображение 4.35
Изображение 4.37
Изображение 4.38
E-BODA
4.9 Приложения
Изображение 4.39
Изображение 4.40
E-BODA
Изображение 4.41
E-BODA
Изображение 4.3
Изображение 4.44

Изображение 4.45
Изображение 4.46
5. A-GPS
Изображение 4.47
E-BODA
Изображение 4.48
4. Сървър
Изображение 4.11
Изображение 4.51
Изображение 4.53
Изображение 4.54
Изображение 4.56
4.15 Дата и час
Изображение 4.57
E-BODA
4.17 Достъшност
4.17-1. Голям текст
Натиспите за да увеличите системния шрифт.
E-BODA
4.19 Информация за таблета
Изображение 5.3
5.3 Галерия
Изображение 5.4
E-BODA
6.4 Настройка на нова APN

Изображение 6.1
Изображение 6.3
Изображение 6.8
3.3 Kép
3.4 Kép
E-BODA
3.5 Kép
3.6 Kép
3.7 Kép
4.1 Kép
4.3 Kép
4.4 Kép
E-BODA
4.2 Bluetooth
4.7 Kép
4.9 Kép
5. Mappák küldése
411 Kón
E-BODA
4.4 Mások - More
4.12 Kép
4.13 Kép
4.14 Kép
4.15 Kép
4.17 Kón
E-BODA
4.18 Kép
4.20 Kép
4.22 Kép
- Rezgések
4.23 Kép
4.26 Kép
4.27 Kép
4.6-2 Háttérkép
4.28 Kép
4.6-3 Téma
4.30 Kép
4.6-6 Bettiméret
4.31 Kép
E-BODA
4.7 Tárolás
4.35 Kép
(2) Belső tárolás
4.36 Kép
2. SD kártya
4.37 Kép
4.41 Kép
E-BODA
4.42 Kép
4.43 Kép
4.44 Kép
4.45 Kép
4.46 Kép
5. A-GPS
4.49 Kép
E-BODA
4.53 Kép
4.54 Kép
4.55 Kép
4.59 Kép
4.60 Kép
4.19A tabletröl

■A77
E-BODA
6.1 Kép
6.3 Kép
6.8 Kép
7.1 Kép
Importation: China, in and 2014.
- 2 INTRODUCING THE TABLET 5
- 3 QUICK START GUIDE....6
- 4 BASIC SETTINGS....16
- E-BODA
- 1 INTRODUCTION
- 1.1 KNOWING THE PRODUCT
- 1.2 NOTIFICATIONS
- PREVENTIVE MAINTENANCE
- 1.3 SAFETY MEASURES
- 2 INTRODUCING THE TABLET
- 2.1 OPERATIONS AND TABLET PREPARATION
- CHARGING THE BATTERY
- 2.2 TABLET STATUS AND MEMENTO
- MEMENTO ICONS
- MEMENTO PANEL
- OPENING THE MEMENTO PANEL
- 3 QUICK START GUIDE
- 3.1 FUNCTION KEYS
- 3.2 POWER ON AND POWER OFF
- POWER ON
- POWER OFF
- 3.3 TURN ON AND TURN OFF THE SCREEN
- THE SCREEN WILL AUTOMATICALLY TURN OFF WHEN YOU DO NOT PERFORM ANY ACTION
- TURN ON THE SCREEN WHEN IT IS TURNED OFF
- USING THE TOUCH SCREEN
- METHODS FOR TABLET OPERATION
- CLICK
- CLICKING
- RAPID MOVEMENT UP OR DOWN
- MOVEMENT
- SWEEP
- 3.4 HOME PAGE
- EXTENDING THE HOME PAGE
- ICON MANAGEMENT FOR SHORTCUTS
- CREATE A FOLDER WITH ICONS ON THE DESKTOP
- DELETE ICONS FROM THE DESKTOP
- CHANGING THE DESKTOP WALLPAPER
- VOICE SEARCH
- 3.5 ACCESSING APPLICATIONS
- 3.6 USB CONNECTION
- CONFIGURE THE STORAGE SPACE OF THE TABLET
- COPY THE FILE IN THE MEMORY CARD
- 3.7 TYPE WORDS
- USE THE ONSCREEN KEYBOARD
- SELECT THE DESIRED TYPING METHOD
- USE AND SWITCH THE INPUT METHOD
- 3.8 OPERATING TECHNIQUE
- ACCESSING THE WIDGET INTERFACE
- CREATING SHORTCUTS FOR ICONS
- 4 BASIC SETTINGS
- 4.1 WIRELESS AND INTERNET
- WI-FI CONNECTION
- ADD NETWORK
- NETWORK NOTIFICATIONS
- ADVANCED
- 4.2 BLUETOOTH
- BLUETOOTH SETTINGS
- RENAME TABLET
- VERIFY THE VISIBILITY TIMEOUT
- SHOW RECEIVED FILES
- BLUETOOTH ADVANCED SETTINGS
- SEND FILES
- BLUETOOTH DISTANCE LIMIT
- 4.3 DATA USAGE
- 4.4 MORE
- 4.4-1 AIRPLANE MODE
- 4.4-2 VPN
- 4.4-4 MOBILE NETWORKS
- DATA USAGE
- DATA ROAMING
- NETWORK MODE
- NAME OF ACCESS POINTS (APN)
- NETWORK OPERATOR
- 4.4-5 GPRS PREFERRED DATA MODE
- 4.5 AUDIO PROFILES
- 2 PRESS GENERAL TO ENTER ITS OPTIONS, SEE IMAGE 4.22
- VIBRATIONS
- VOLUMES
- RINGTONE FOR VOICE CALL
- VIDEO CALL RINGTONE
- 4.6 DISPLAY
- 4.6-1 ADJUST DISPLAY BRIGHTNESS
- SCENES
- 4.6-2 WALLPAPER
- 4.6-3 THEME
- 4.6-4 AUTO-ROTATE SCREEN
- 4.6-5 SLEEP
- 4 SELECT THE DECAY TIME OF THE SCREEN, SEE IMAGE 4.30
- 4.6-6 FONT SIZE
- 4.7 STORAGE
- SYSTEM STORAGE
- INTERNAL STORAGE
- SD CARD
- 4.8 BATTERY
- 4.9 APPS
- 4.10 ACCOUNTS & SYNC
- 4.11 LOCALISATION SERVICES
- GOOGLE LOCALISATION SERVICE
- GPS SATELLITES
- GPS EPO ASSISTANCE
- EPO SETTINGS
- A-GPS
- A-GPS SETTINGS
- DISABLE AFTER REBOOT
- NETWORK REQUEST
- NETWORK USED
- SERVER
- 5 GOOGLE LOCALISATION AND SEARCH
- 4.12SECURITY
- SET SCREEN LOCK
- SET UNLOCK PATTERN
- SET UNLOCK PIN CODE
- SET UNLOCK PASSWORD
- UNKNOWN SOURCES
- 4.13LANGUAGE & INPUT
- 4.14BACKUP & RESET
- 4.15DATE & TIME
- 4.16 SCHEDULE POWER ON / OFF
- ACCESSIBILITY
- 4.17-1. LARGE TEXT
- 4.17-2. THE POWER BUTTON CLOSES THE CALL
- 4.17-3. TOUCH & HOLD DELAY
- 4.17-4 INSTALL WEB SCRIPTS
- 4.17 DEVELOPER OPTIONS
- 4.18-1 USB TROUBLESHOOTING
- 4.18-2 REMAIN IN ACTIVE STATE
- 4.18-3 POINTER LOCATION
- 4.18-4 SHOW TOUCHES
- 4.18-5 SHOW SCREEN UPDATES
- 4.18-6 SHOW CPU USAGE
- 4.18ABOUT THE TABLET
- 5 MULTIMEDIA
- 5.1 MUSIC PLAYER
- 5.2 VIDEO PLAYER
- 5.3 GALLERY
- DISPLAY PHOTOS
- EDIT AND SET PHOTOS
- PRESENTATION
- CUT
- EDIT
- 5.4 PHOTO CAMERA
- 5.5 FM RADIO
- 6 COMMUNICATION FUNCTION
- 6.1 PHONE
- 6.2 MESSAGING
- 6.3 PEOPLE
- 6.4 SET A NEW APN
- 7 INTERNET
- 7.1 BROWSER
- 7.2 E-MAIL
- E-MAIL SETTINGS
- DELETE THE E-MAIL ACCOUNT
- PRESS
- SEND E-MAIL
- 8 GPS FUNCTION
- 8.1 GPS BROWSE
- 9 PROCEDURES OF OTHER APPLICATIONS
- 9.1 CLOCK
- 9.2 COMPUTER
- 9.3 FILE MANAGER
- IMAGE 7.0
- IMAGE 7.1
- 9.4 SOUND RECORDER
- 10 INSTALLATION PROCEDURE
- 10.1 INSTALLATION
- INSTALLATION OF THIRD PARTY APPS
- 10.2 UNINSTALL
- UNINSTALL APPS
- 11 TROUBLESHOOTING
- THE TABLET IS SLOWER THE FIRST TIME IT IS TURNED ON
- THE TABLET CANNOT CONNECT TO WIFI
- THE TABLET GETS TOO HOT
- THE E-MAIL CANNOT BE SET
- THE SYSTEM REMAINS LOCKED
- THE WEB PAGE CANNOT BE OPENED
- THE TABLET SOMETIMES RUNS VERY DIFFICULT
- DECLARATIE DE CONFORMITATE NR. 1040-EBD
- CUPRINS
- 2 INTRODUCEREA TABLETEI
- 2.1 OPERATIUNI SI PREGATIREA TABLETEI
- INCARCAREA BATERIEI
- STERGEREA PICTOGRAMELOR DE PE DESKTOP
- COPIATI FISIERUL IN CARDUL DE MEMORIE
- ADAUGARE RETEA
- IMAGINE 4.7
- VERIFICATI DURATA LIMITEI DE VIZIBILITATE
- 4.4 MAI MULT
- 4.4-1 MOD AVION
- 4.4-3. PARTAJARE RETEA SI HOTSPOT-URI PORTABILE
- HOTSPOT-URI WIFI PORTABLE
- 4.4-4 RETELE MOBILE
- NUMELE PUNCTELOR DE ACCES (APN)
- IMAGINE 4.18
- 4.4-5 MODUL PREFERAT DE DATE GPRS
- 4.5 PROFILURI AUDIO
- VIBRATII
- VOLUME
- 4.6 ECRAN
- 4.6-6 MARINE FONT
- 4.7 STOCARE
- STOCARE INTERNA
- CARD SD
- 4.9 APLICATII
- 4.11 SERVICII DE LOCALIZARE
- SETARI A-GPS
- DEZACTIVARE DUPA REPORNIRE
- SOLICITARE RETEA
- RETEA UTILIZATA
- SETATI DEBLOCARE COD PIN
- SETATI DEBLOCAREA PAROLA
- 4.13 LIMBA SI INTRARE
- IMAGINE 4.52
- IMAGINE 4.53
- 4.14 COPIE DE REZERVA SI REINITIALIZARE
- 4.15 DATA SI ORA
- 4.17-4 INSTALARE NOTITE WEB
- 4.19 DESPRE TABLETA
- 5.3 GALERIE
- AFISAREA FOTOGRAFIILOR
- SETARI EMAIL
- IMAGINE 6.2
- 8 FUNCTIA GPS
- 8.1 NAVIGARE GPS
- 9.2 CALCULATOR
- 9.4 INREGISTRARE SUNET
- 10 PROCEDURA DE INSTALARE
- 10.1 INSTALARE
- INSTALAREA APLICATILOR THIRD PARTY
- СЪДЪРЖАНИЕ
- ФОНОВА КАРТИНА
- 4.6-3 TEMA
- 4.7 СЪХРАНЕНИЕ
- 4.9 ПРИЛОЖЕНИЯ
- СЪРВЪР
- 4.15 ДАТА И ЧАС
- 4.17 ДОСТЪШНОСТ
- 4.19 ИНФОРМАЦИЯ ЗА ТАБЛЕТА
- 5.3 ГАЛЕРИЯ
- 6.4 НАСТРОЙКА НА НОВА APN
- ИЗОБРАЖЕНИЕ 6.1
- MAPPÁK KÜLDÉSE
- 4.4 MÁSOK - MORE
- 4.6-2 HÁTTÉRKÉP
- 4.6-3 TÉMA
- 4.7 TÁROLÁS
- BELSŐ TÁROLÁS
- SD KÁRTYA
- 4.19A TABLETRÖL
Brand : E-Boda
Model : Izzycomm Z700 II
Category : Tablet