220-142 - Pressure washer Hamron - Free user manual and instructions
Find the device manual for free 220-142 Hamron in PDF.


| Product Type | Electric Pressure Washer |
| Model | 220-142 |
| Brand | Hamron |
| Power Supply | 230 V ~ 50 Hz |
| Power Consumption | 1400 W |
| Max Pressure | 110 bar |
| Rated Pressure | 90 bar |
| Max Flow Rate | 6 L/min |
| Rated Flow Rate | 5 L/min |
| Max Inlet Water Temperature | 40 °C |
| Dimensions (L x W x H) | 45 × 35 × 38 cm |
| Weight | 12.5 kg |
| Hose Length | 8 m |
| Power Cable Length | 5 m |
| Main Functions | High-pressure cleaning, foam application, variable pressure settings |
| Safety Features | Auto shut-off trigger, thermal overload protection, pressure relief valve |
| Maintenance | Clean water filter, check oil level, descale when needed |
| Spare Parts Availability | Nozzles, brushes, hoses, fittings, pump repair kits |
| Reparability Index | 7.5/10 (spare parts and exploded view available) |
| Manual Pages | 43 |
Frequently Asked Questions - 220-142 Hamron
User questions about 220-142 Hamron
0 question about this device. Answer the ones you know or ask your own.
Ask a new question about this device
Download the instructions for your Pressure washer in PDF format for free! Find your manual 220-142 - Hamron and take your electronic device back in hand. On this page are published all the documents necessary for the use of your device. 220-142 by Hamron.
USER MANUAL 220-142 Hamron
Installation Instructions for High Pressure Washer
220-142

natural_image
Green and black PAPRON water heater device with visible branding (no text or symbols on body)SV Bruksanvisning i original
NO Bruksanvisning i original
EN Installation instructions in original
SVENSKA 1
SÄKERHETSANVISNINGAR 4
Symboler 5
TEKNISKA DATA 5
BESKRIVNING 7
MONTERING....7
SAFETY INSTRUCTIONS....34
Symbols 35
TECHNICAL DATA.... 35
DESCRIPTION 37
ASSEMBLY 37
Assembly of spray head and high-pressure hose 38
OPERATION 38
General information before starting 38
Preparation 38
Starting 39
MAINTENANCE 41
Repairs....42
Storage 42
TROUBLESHOOTING 42
SÄKERHETSANVISNINGAR

natural_image
Technical line drawing of a mechanical assembly with no visible text or symbolsnatural_image
Line drawing of a hairdryer with a cable inserted, showing the cable being inserted (no text or symbols present)HANDHAVANDE
Allmänt före start
natural_image
Line drawing of a diesel engine pump in operation, showing internal components and exhaust pipe (no text or symbols)
Start
natural_image
Two circular illustrations showing hands holding a tool, one with a curved handle and the other with a pointed tip (no text or symbols)Uppstart

UNDERHÅLL
Reparationer

natural_image
Technical line drawing of a mechanical device with internal components and directional arrows indicating motion (no text or symbols)natural_image
Line drawing of a hand holding a spray gun connected to a coiled hose (no text or symbols)BRUK
natural_image
Line drawing of a car engine bay with a Diesel fuel injector (no text or symbols on the diagram itself)Oppstart
natural_image
Two circular illustrations showing hands holding a tool, one open and one with a handle (no text or symbols)Oppstart
VEDLIKEHOLD
Reparasjoner

natural_image
Technical line drawing of a mechanical assembly with no visible text or symbolsnatural_image
Line drawing of a hairdryer with a cable inserted, showing the cable being inserted (no text or symbols present)OBSŁUGA
Rozruch
natural_image
Two circular illustrations showing hands holding a tool, one with a pointed tip and the other with a curved handle (no text or symbols)Rozruch
KONSERWACJA
Naprawy
Read these instructions carefully before use!
- Read these instructions carefully before using the product.
- Must only be used by adults of sound judgement.
- Do not immerse the appliance in liquid.
- Only use the appliance for its intended purpose.
- Before connecting it to the mains, check that the appliance's rated voltage corresponds to the mains supply voltage.
- The appliance must not be connected to the mains supply when performing servicing or adjustments.
- Check that the power cord is intact.
- The appliance must be positioned so that air can circulate freely around it during use.
- Never move the machine while in operation.
- The power cord must never come into contact with hot components.
- This product must not be used if it is damaged.
- Do not allow children to play with this product.
- Never leave the appliance unattended when in operation to ensure that children or animals do not come into contact with it.
- Disconnect the power cord from the wall socket before cleaning the appliance.
- Never pull the cord. Hold the plug when disconnecting the unit from the wall socket.
• Repairs must only be carried out by the supplier. - The power cord must only be replaced by the supplier.
- The appliance must not be used in areas where flammable liquids are stored or where flammable fumes/gases can occur.
- Store in a dry place when not in use.
- Do not expose to chemicals.
- The machine must be placed on a flat and stable surface.
- Never use the appliance without safety guards.
- Never aim the pressure jet at any part of the body.
- Never aim the jet at electrical equipment. Risk of fatal electric shock and fire.
- The operator and anyone else within the work area must wear protective clothing.
• Always connect the water to the appliance before starting it. - Never use the appliance in the rain.
- The start button must never be locked in the ON position.
- The appliance must never be operated unless incoming water is connected at the prescribed pressure. See “Technical data”.
- The appliance may only be connected to power outlets that are protected by an RCD, with a breaking current of 30 mA.
- The appliance may only be connected to drinking water systems on the condition that an approved non-return valve is installed in accordance with DIN 1998.
- Only use original spare parts and accessories.
- Only use the supplied detergent.
• Turn off the appliance with the power switch when the appliance is being left or is not in use.
Symbols

- Never spray electrical cables.
- Never spray at people or animals.
- Never repair a hose.
- Never pull the power cord when disconnecting.
- Never pull the machine by the power cord.
- Never use the machine in a thunderstorm.
- Never repair the power cord.
- Never cover the appliance.
| SYMBOL | DESIGNATION | EXPLANATION |
 | Read the User Instructions | Read these instructions carefully before use, and save them for future reference. |
 | DANGER: | Indicates an immediately dangerous situation that could lead to fatal or serious personal injury if the instructions are not followed. |
 | WARNING: | Indicates a potentially dangerous situation that could lead to fatal or serious personal injury if the instructions are not followed. |
 | IMPORTANT: | Indicates a potentially dangerous situation that could lead to minor personal injury and/or material damage if the instructions are not followed. |
| (KD5Z) | IMPORTANT: | (without symbol) Indicates a potentially dangerous situation that could lead to minor personal injury and/or material damage if the instructions are not followed. |
 | IMPORTANT: | Indicates a potentially dangerous situation that could lead to material damage if the instructions are not followed. |
 | NOTE: | Indicates tips and instructions that simplify the work and ensure safe use. |
 | Waste disposal | Recycle products that have reached the end of their useful life according to local regulations. |
 | Wear safety glasses | Wear safety glasses. |
 | Equipment, class II | Double insulation. |
 | Keep onlookers at a safe distance | Keep onlookers at least 15 metres from the work area. |
 | High-pressure jets can be dangerous if they are not used properly. | High-pressure jets can be dangerous if they are not used properly. Do not point the jet at persons or animals, at live electrical equipment, at the high-pressure washer unit, or towards yourself, e.g. to clean your clothes or shoes. |
 | Avoid the risk of electric shock | Unplug the power cord from the mains immediately if the cord gets damaged. |
 | Sound power level L_WA | Measured sound power level: 80 dB(A) |
 | Electrical safety | Electrical safety |
 | The machine is not suitable for connection to the drinking water supply. | This high-pressure washer must only be connected to the municipal water conduit system if a suitable check valve is installed. |
 | Hot surface | Hot surface. Do not touch! |
TECHNICAL DATA
| Rated voltage | 230 VAC ~ 50 Hz |
| Min. supply flow | 12 litres/minute |
| Spraying capacity | 450 litres/hour |
| Incoming water temp. | max. 40°C |
| Max. water temp. | 90°C |
| Water inlet pressure | max. 3 bar |
| Max. pressure | 145 bar |
| Safety class | IPX5 |
| Sound pressure level, L_pA | 80 dB(A), K= 3 dB |
| Measured Sound power level, L_wA | 96 dB(A), K= 3 dB |
| Guaranteed Sound power level, L_wA | 97 dB(A) |
| Vibration level | does not exceed 2,5 m/s ^2 |
Always use hearing protection!
DESCRIPTION
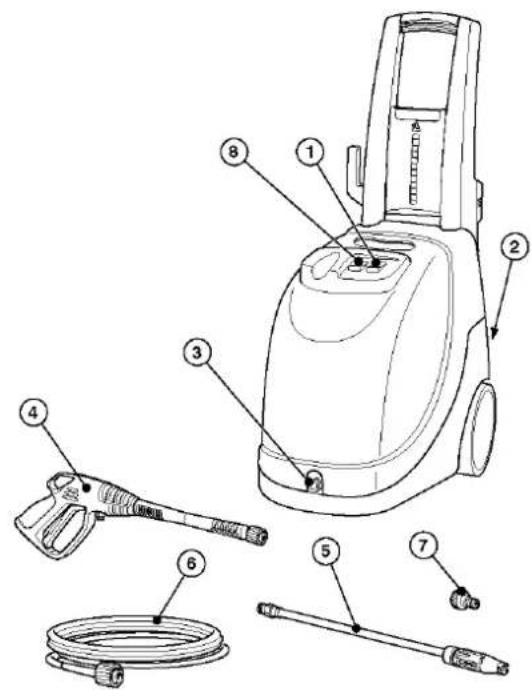
The appliance is intended for cleaning vehicles, building facades and path tiles, as well as other robust outdoor objects that can be cleaned with aggressive pressure washing. The appliance has an onboard detergent tank.
The appliance has the following parts.
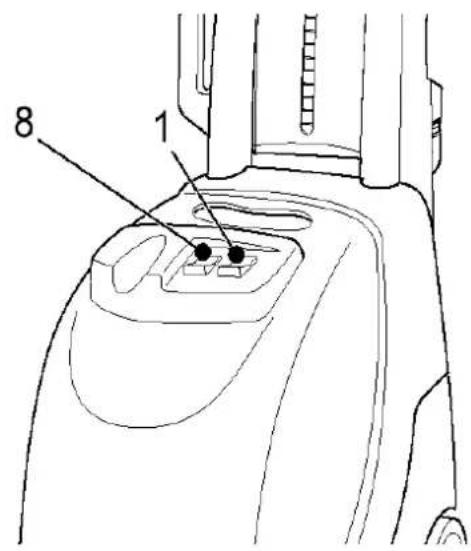
- Power switch for electric pump
- Outlet
- Water inlet + filter
- Spray gun
- Spray head
- High pressure hose
- Tube connection
- Power switch for burner
ASSEMBLY
Assemble the machine as illustrated.

natural_image
Technical line drawing of a mechanical assembly with no visible text or symbolsAssembly of spray head and high-pressure hose
Fit the outer part 1 to the handle 2. Screw in the direction of the arrow A and tighten.

Fit the high-pressure hose to the handle as illustrated.

natural_image
Line drawing of a hairdryer with a cable inserted, showing the cable being inserted (no text or symbols present)OPERATION
General information before starting
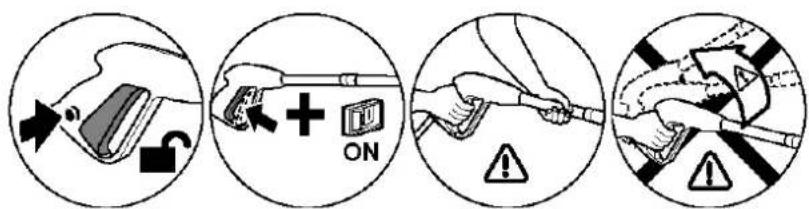
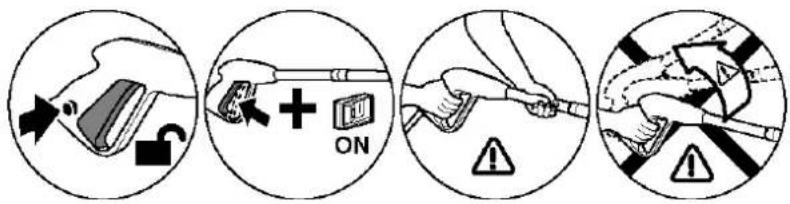
The appliance is fitted with an automatic stop system (A.S.S.) that stops the appliance in standby. It is therefore important to start with the power switch first and then to open the nozzle. The automatic stop system will then start the appliance and stop automatically when the spray handle is released. Always lock the spray handle with the safety catch when not spraying.
Observe the following:
- If the appliance starts automatically without the spray handle being pressed, this will cause air bubbles in the water. This is not harmful.
- Never leave the appliance in standby for more than 5 minutes. For the safety of the appliance, the power switch must be turned off.
- Check that all high-pressure connections and high-pressure hoses are correctly connected and that there are no water leaks. If the appliance is fitted with a pressure regulator:
- When the pressure is set to minimum, A.S.S. will not be activated. For this reason, never leave the appliance in bypass for more than 1 minute.
• Do not activate the spray handle too frequently. (This will cause malfunction.)
Preparation
- Check that the power switch is turned off and that the water filter is installed in the inlet.
- Connect the quick-release coupling without using any tools.
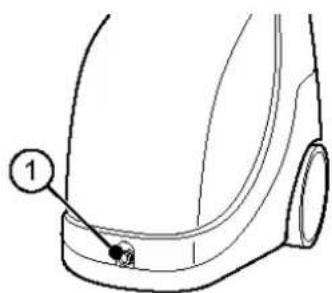
- Connect the water hose, which must have an internal diameter of at least 13 mm, to the outlet 1 in the figure.
- Connect the high-pressure hose to the intended outlet. Press the high-pressure connection down fully and tighten without using any tools.
- Connect the spray gun to the hose using two spanners.
- Open the tap. The water temperature must be below 40°C.
IMPORTANT! The water must be completely clean. Otherwise the machine will be damaged.
- Remove the handle lock, press in the spray handle and spray until all air has disappeared.
- Fit the spray head to the spray gun.
- Connect the power cable.
- To start the appliance, press the spray handle and activate the power switch simultaneously.
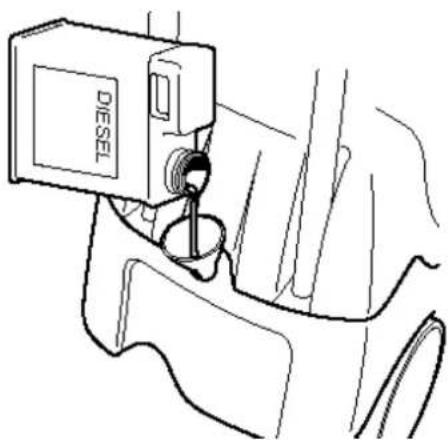
- Fill the tank with fuel as indicated on the data plate.
NOTE: Never operate the machine with an empty tank. This will damage the fuel pump. The correct fuel must always be used. If it is not, this represents a safety risk.
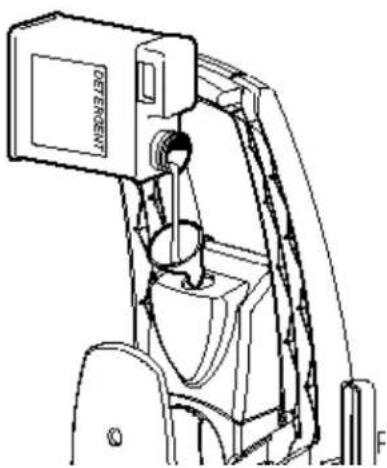
- Fill the detergent tank with a suitable detergent (for high pressure washer).
WARNING! Only liquid detergent may be used. The detergent must not contain acid or be too alkaline. Only use detergent that is intended for high pressure washer.
Starting
Press the start button and allow the machine to run for a few minutes so that the air bubbles disappear. Then stop the machine.
When the machine is restarted, check that the jet is even. If it is not, the nozzle must be cleaned. Then wait for a few seconds until the pressure has risen, and open and close the handle 2-3 times. To use hot water, activate switch (8). The burner is activated when the machine is under pressure. To mix in detergent, open the regulator to the required amount, see below.
Adjusting the jet

natural_image
Two circular illustrations showing hands holding a tool, one with a curved handle and the other with a pointed tip (no text or symbols)Drawing up detergent


natural_image
Two circular diagrams showing a tooth being digested into a tooth and a tool emitting smoke (no text or symbols)Avoid trapping the hose

Safety device for handle

Starting

MAINTENANCE
Carry out the following measures before performing maintenance.

- Before performing maintenance work on the appliance, disconnect the power cord and the water supply.
- Clean the water filter regularly. Remove the filter with a small pair of pliers and rinse it under running water.
- Clean the spray head under running water and clean the nozzle if necessary with the supplied cleaning needle. Keep the appliance clean so that the cooling air can circulate freely.
- Only use original spare parts from the supplier for repairs. If the machine is to be stored where there is a risk of frost, or if it is to be stored for more than 3 months, antifreeze (as used in cars) must be drawn into the appliance.
• After start-up, there may be minor leakage from the pump, which will cease after a couple of hours. Approx. 10 drips per minute is normal. If the leakage is greater than this, contact the supplier. - The electric motor is fitted with overcurrent protection. If this has been tripped, wait for 5-10 minutes before restarting the appliance. If the problem persists, see the troubleshooting chart or contact your supplier.
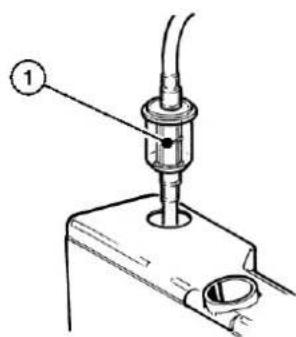
- Check the fuel filter regularly (1 in the figure below). Replace the filter if it is damaged or dirty.
- Replace the fuel line if it is damaged.
Repairs
The power cord must only be replaced by the supplier or an authorised electrician.
Storage
The appliance must be stored in a dry, secure location. Never expose it to freezing conditions during storage. Freezing conditions may damage it, due to residual water in pipes and the pump.
TROUBLESHOOTING
Use this troubleshooting guide to help you solve any problems.
| Fault | Cause | Action |
| The pump will not start. | Electricity not connected.No power.Cable area too small.Voltage too low.The pump's fuse has tripped. | Connect correctly.Check the connection.Check the system.See the section on electrical connection.Activate the power switch with the nozzle open. |
| The machine starts, but no water comes out. | Pump or hoses frozen.No water.Defective water filter.Blocked nozzle. | Allow it to thaw.Connect to water.Clean the filter.Dismantle the spray head and clean the nozzle. |
| The pump is working, but there is no pressure. | Poor water supply.Defective filter.Pressure regulator at minimum.The spray head nozzle is worn.Valves defective or worn. | Check that the flow is at least 12 l/min.Clean the filter.Increase the pressure by turning the handle.Change the spray head.Contact your supplier. |
| Uneven working pressure. | The spray head nozzle is defective or worn.Air in the water.Suction filter defective.Valves defective or worn.Gasket defective.Pressure regulator gasket defective. | Dismantle the spray head and clean the nozzle.Connect to water.Clean the filter.Contact your supplier.Contact your supplier.Contact your supplier. |
| The motor stops suddenly. | The overcurrent protection has tripped.Cable area too small. | Allow the motor to cool. If the fault persists, contact the supplier.Connect correctly. |
| Water leaks. | Hose leakage.Leakage in coupling.Pump leak | Tighten the coupling. If the fault persists, contact the supplier.Tighten the coupling.Contact your supplier. |
| Abnormal noise. | Suction filter defective.Incoming water too hot.Valves defective.Bearings worn. | Clean the filter. See MAINTENANCE.Reduce the temperature.If the fault persists, contact the supplier.If the fault persists, contact the supplier. |
| Water in the oil. | O-ring worn. | If the fault persists, contact the supplier. |
| The machine restarts with released spray gun (versions with A.S.S.). | Water leak from hose or spray gun.Air in the water.Water leak from the spray gun.Water leak from the pump. | Tighten the connection with two spanners.Rectify the water.If the fault persists, contact the supplier.If the fault persists, contact the supplier. |
| Does not draw in detergent. | Tank empty.Spray head set for high pressure.Transparent suction line damaged or not connected. | Fill the tank.Set low pressure by moving the control towards the nozzle.Reconnect the pipe. If the fault persists, contact the supplier. |
| The boiler does not start. | No fuel.Fuel filter blocked.Fuel pump blocked or defective.Damaged thermostat.Poor or no ignition spark.Incorrect electrode distance. | Reset the tank level or clean the suction line.Change the filter.Replace.Replace.If the fault persists, contact the supplier.If the fault persists, contact the supplier. |
Jula reserves the right to make changes. In the event of problems, please contact our service department.
www.jula.com

Care for the environment!
Must not be discarded with household waste! This product contains electrical or electronic components that should be recycled. Leave the product for recycling at the designated station e.g. the local authority's recycling station.
- SVENSKA 1
- SÄKERHETSANVISNINGAR
- HANDHAVANDE
- Allmänt före start
- Start
- Uppstart
- UNDERHÅLL
- Reparationer
- BRUK
- Oppstart
- VEDLIKEHOLD
- Reparasjoner
- OBSŁUGA
- Rozruch
- KONSERWACJA
- Naprawy
- Read these instructions carefully before use!
- Symbols
- TECHNICAL DATA
- DESCRIPTION
- ASSEMBLY
- Assembly of spray head and high-pressure hose
- OPERATION
- General information before starting
- Preparation
- Starting
- MAINTENANCE
- Repairs
- Storage
- Care for the environment!
Brand : Hamron
Model : 220-142
Category : Pressure washer