220-131 - Pressure washer Hamron - Free user manual and instructions
Find the device manual for free 220-131 Hamron in PDF.


| Product Type | High-pressure washer |
| Brand | Hamron |
| Model | 220-131 |
| Rated Voltage | 220–240 VAC, 50 Hz |
| Rated Power | 2500 W |
| Protection Class | Class I |
| Enclosure Class | IPX5 |
| Rated Pressure | 130 bar |
| Max. Pressure | 170 bar |
| Rated Flow | 8 l/min |
| Max. Flow | 8.5 l/min |
| Weight | 26 kg |
| Sound Pressure Level (LpA) | 67 dB(A), K=3 dB |
| Measured Sound Power Level (LwA) | 79 dB(A), K=3 dB |
| Guaranteed Sound Power Level (LwA) | 86 dB(A) |
| Vibration Level | ≤ 2.5 m/s² |
| Operating Temperature | 0–40 °C |
| Max. Inlet Water Pressure | 7 bar |
| Max. Inlet Water Temperature | 60 °C |
| Pressure Modes | High pressure and low pressure with detergent injection |
| Safety Features | Overpressure valve, trigger lock, overheating protection |
| Accessories Included | Spray gun, wand with adjustable nozzle, high-pressure hose, detergent container |
| Maintenance Interval | Clean suction and injection filter every 50 operating hours |
| Intended Use | Household cleaning of vehicles, machinery, buildings |
| Minimum Hose Length (between check valve and washer) | 10 m, reinforced, 1/2" (13 mm) minimum |
Frequently Asked Questions - 220-131 Hamron
User questions about 220-131 Hamron
0 question about this device. Answer the ones you know or ask your own.
Ask a new question about this device
Download the instructions for your Pressure washer in PDF format for free! Find your manual 220-131 - Hamron and take your electronic device back in hand. On this page are published all the documents necessary for the use of your device. 220-131 by Hamron.
USER MANUAL 220-131 Hamron
natural_image
Green AMRON water heater with black handle and control panel, next to a circular cleaning brush (no text or symbols visible)SE Bruksanvisning för högtryckstvätt
NO Bruksanvisning for høytrykksspyler
PL Instrukcja obsługi myjki wysokociśnieniowej
EN User instructions for high-pressure washer
SE - Bruksanvisning i original
NO - Bruksanvisning i original
EN - Operating instructions in original
Date of production: 2014-09-12
© Jula AB
SVENSKA....5
SÄKERHETSANVISNINGAR....5
TEKNISKA DATA....7
BESKRIVNING 8
MONTERING 9
HANDHAVANDE 10
STARTA 10
HÖGTRYCKSDRIFT / LÄGTRYCKSDRIFT 11
STÄNGA AV 11
UNDERHÅLL 12
FELSÖKNING....12
NORSK 15
SIKKERHETSANVISNINGER 15
TEKNISKE DATA 17
BESKRIVELSE....18
MONTERING....19
BRUK....20
STARTE 20
H∅TRYKKSDRIFT / LAVTRYKKSDRIFT 21
SLÅ AV....21
VEDLIKEHOLD 22
PROBLEMS∅KING....22
POLSKI 25
ZASADY BEZPIECZEŃSTWA 25
DANE TECHNICZNE 27
OPIS 28
MONTAŽ 29
OBSŁUGA 30
URUCHAMIANIE 30
PRACA Z WYSOKIM CIŚNIENIEM / NISKIM CIŚNIENIEM. 31
WYŁĄCZANIE....31
KONSERWACJA 32
WYKRYWANIE USTEREK 32
ENGLISH 35
SAFETY INSTRUCTIONS....35
TECHNICAL DATA....37
DESCRIPTION 38
INSTALLATION 39
OPERATION 40
STARTING 40
natural_image
Illustration of hands using a tool to adjust a mechanical component, with an inset showing the close-up of the component (no text or symbols present)
natural_image
Line drawing of a handgun being adjusted with a wrench, no text or symbols presentnatural_image
Technical line drawing of a mechanical device with coiled cable and attached lever (no text or symbols)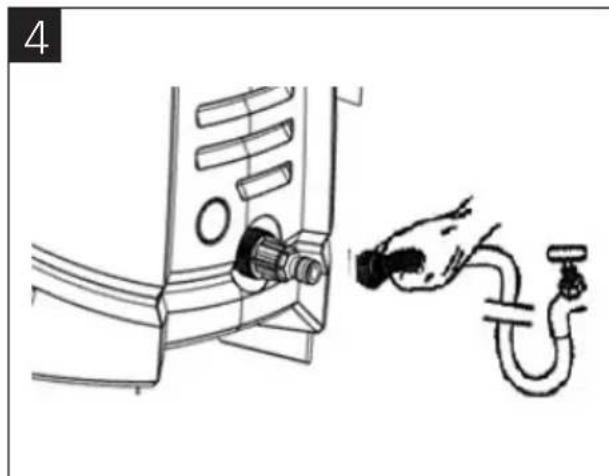
natural_image
Line drawing showing a hand inserting a plug into a device panel, with a pipe inserted (no text or symbols)HANDHAVANDE
oBS!
natural_image
Diagram of a connector with threaded body and connector pin, showing two views of the connector (no text or symbols present)2

natural_image
Diagram of a mechanical component with threaded ends and a directional arrow indicating movement (no text or symbols)STÄNGA AV
natural_image
Technical line drawing of a mechanical component with no visible text or symbols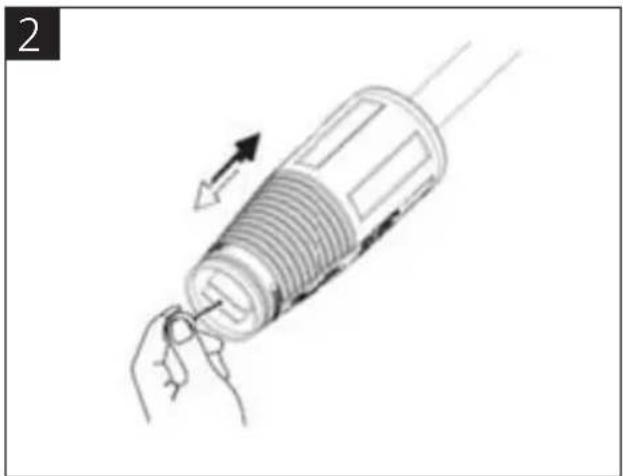
natural_image
Illustration of a hand inserting a plug into a cylindrical device with arrows indicating direction (no text or symbols)FELSÖKNING
oBS!
natural_image
Symbol of a trash bin with diagonal lines crossing it, no text or labels presentVärna om miljön!
natural_image
Illustration of hands using a tool to adjust a mechanical component, with an inset showing the close-up of the component (no text or symbols present)
natural_image
Line drawing of a handgun being adjusted with a wrench, no text or symbols presentnatural_image
Technical illustration of a mechanical device with coiled cable and attached clamp (no text or symbols)
natural_image
Line drawing showing a hand inserting a plug into a car compartment with a water tap (no text or symbols)BRUK
mERK
H∅TRyKKSDRIFT / LAVTRyKKSDRIFT
natural_image
Diagram of a connector with two parts, one showing internal structure and the other showing a pin (no text or symbols)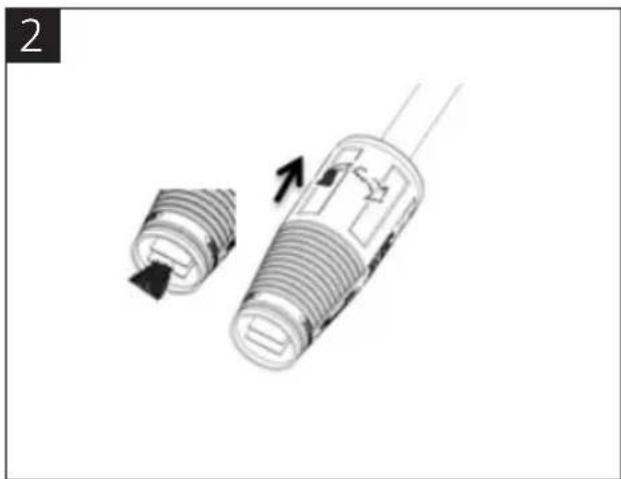
natural_image
Diagram of a mechanical component with two parts, one showing internal threading and the other showing a threaded end (no text or symbols)SLÅ AV
natural_image
Technical line drawing of a mechanical component with no visible text or symbols
natural_image
Illustration of a hand inserting a plug into a cylindrical device with arrows indicating direction (no text or symbols)pRoBLEmS∅KING
mERK
natural_image
Illustration of hands using a tool to adjust a mechanical component, with an inset showing the close-up of the component (no text or symbols present)
natural_image
Line drawing of a handgun being adjusted with a wrench, no text or symbols presentnatural_image
Technical line drawing of a mechanical device with coiled cable and attached lever (no text or symbols)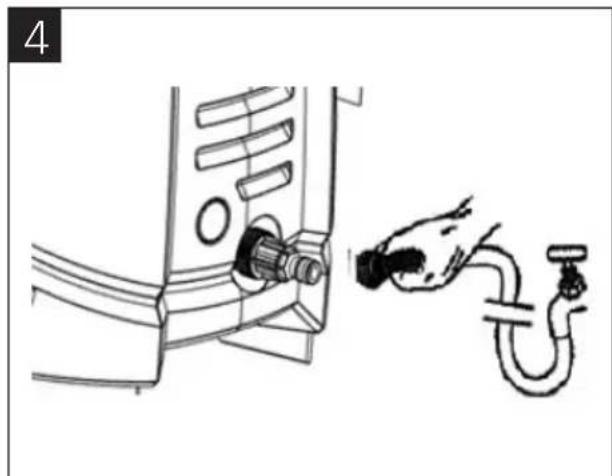
natural_image
Line drawing showing a hand inserting a plug into a device panel, with a faucet nearby (no text or symbols)oBS†UGA
UWAGA!
natural_image
Diagram of a mechanical component with two parts, one showing internal threading and the other showing a pin inserted (no text or symbols present)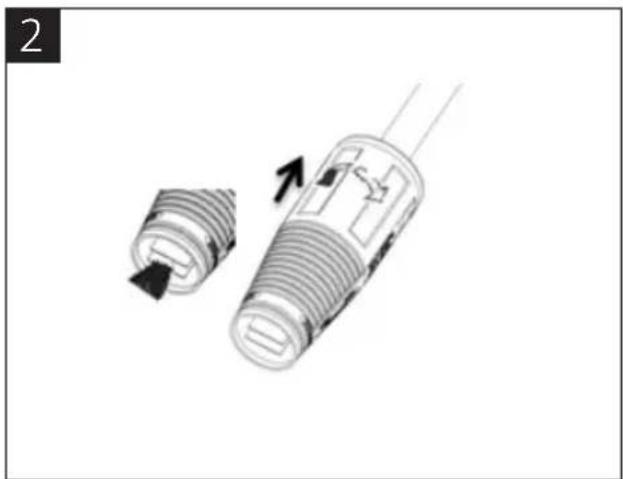
natural_image
Diagram of a mechanical component with two parts, one showing internal threading and the other showing a pin (no text or symbols)WyłączANIE
natural_image
Technical line drawing of a mechanical component with no visible text or symbols
natural_image
Diagram of a hand inserting a spring into a cylindrical device with arrows indicating motion (no text or symbols)WyKRyWANIE USTEREK
UWAGA!
natural_image
Pure electrical circuit lines without any symbolsDBAJ O ŚRODOWISKO!
Read the operating instructions carefully before use!
Please retain for future reference.
| SYMBOL NAME | EXPLANATION | |
 | WARNING! | Indicates a potentially dangerous situation which could result in death or serious injury if the instructions are not followed. |
 | Waste disposal | The spent appliance must be disposed of in accordance with local regulations. |
 | Wear safety goggles. | Wear safety goggles. |
 | Class II equipment Double-insulated. | |
 | Wear ear protection. | Wear ear protection. |
  | Keep bystanders at an appropriate distance. | Keep bystanders at least 15 m from where the appliance is being used. |
 | High-pressure jets can be dangerous if they are not used properly. | High-pressure jets can be dangerous if they are not used properly.Do not point the jet at persons or animals, live electrical equipment,towards the high-pressure washer or yourself, for example, to clean clothes or shoes. |
 | Avoid electric shocks | Pull the power cord out of the mains socket immediately if it becomes damaged. |
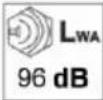 | Sound power level L_wA | Measured sound power level. |
 | Electrical hazard Electrical hazard | |
 | The machine is not suitable for connection to the drinking water supply | This high pressure washer may only be connected to the municipal water supply system if a suitable check valve is installed. |
 | Hot surface Hot surface. Do not touch. |
WARNING!
- This appliance is not intended for use by persons (children or adults) with any kind of disability or by persons who do not have sufficient experience or knowledge regarding its use, unless they have been given instruction concerning use of the appliance by a person responsible for their safety. Children should be supervised to ensure that they do not play with the appliance.
- Do not use the appliance around other people who are not wearing protective clothing.
- Check before use that no parts are damaged. Do not use the appliance if it is damaged.
- Only use water that is free of sand, chemicals and other contaminants. Contaminants can impair the function and shorten the appliance's service life.
- Only use chemicals recommended by the manufacturer. In the event of contact with other chemicals, immediately turn the appliance off and rinse with lots of water.
- Never spray flammable liquids – risk of explosion.
- Never use the appliance in explosive environments, for example in the vicinity of inflammable liquids, gases or dust.
- High-pressure jets can be dangerous if used incorrectly. Do not point the jet at people or animals, live electrical equipment or the high-pressure washer.
- Do not point the jet at yourself or anyone else, for example, to clean clothes or shoes.
- Only use spare parts and accessories recommended by the manufacturer.
- Never modify the spray wand or nozzles in any way and never cover them over.
• Water which has passed through the backflow check valve is not suitable as drinking water.
- High-pressure hoses, fittings and couplings are very important parts for the safe use of the appliance. Only use hoses, fittings and couplings recommended by the manufacturer.
- Do not use the appliance if the power cord or other important parts, for example safety devices, high-pressure hoses and trigger handle, are damaged.
- The appliance must not be used at temperatures lower than 0^ .
- The water's inlet temperature must not exceed 60^ . The water's inlet pressure must not exceed 7 bar.
- The appliance must be placed on a level, stable surface during operation, handling, transport and storage. If the appliance tips over or falls, it can cause personal injury.
- Never modify the plug in any way.
- When starting the appliance there may be a temporary voltage drop in the mains supply, which could affect other equipment.
- Check the power cord. To ensure safe use, a damaged cord must be replaced by an authorised service representative or other qualified person.
- Do not use contaminated water. Fit an extra filter if there is a risk of getting sand in the incoming water (e.g. from your own well). Use an appropriate filter.
• Always pull the extension cord all the way out.
- Any extension cord used must be water resistant. Keep power cord connections dry and above ground.
- Unsuitable extension cords can cause a fire and/or electric shock.
- Switch off the appliance immediately in the event of problems or malfunctioning.
TECHNICAL DATA
| Rated voltage 220–240 VAC, 50 Hz | |
| Output 2,500 W | |
| Protection class I | |
| Enclosure class IPX5 | |
| Rated pressure 130 bar | |
| Max. pressure 170 bar | |
| Rated flow 8 l/min | |
| Max. flow 8.5 l/min | |
| Operating temperature 0–40°C | |
| Max. inlet pressure 7 bar | |
| Weight 26 kg | |
| Sound pressure level, LpA 67 dB(A), K= 3 dB | |
| Measured sound power level, LwA | 79 dB(A), K= 3 dB |
| Guaranteed sound power level, LwA | 86 dB(A) |
| Vibration level | does not exceed 2.5 m/s ^2 |
DESCRIPTION
Note!
• The appliance is intended for cleaning vehicles, machinery and buildings etc.
• The appliance is only intended for household use.

- Wheel
- Nozzle
- Spray gun
- Trigger
-
High pressure hose
-
Water outlet
- Power switch
- Switch for injection
- Water inlet
-
Cord
-
Warning sign
- Trigger lock
- Rating plate
- Chemicals container
INSTALLATION
Note!
- Place the appliance on a level, stable surface when in use, as close to the water supply as possible.
- The length of the hose between the check valve and the high pressure washer must be at least 10 metres to dampen any pressure surges.
- The hose should be reinforced. Minimum hose dimension is 1/2'' (13 mm).
- Incoming water flow must be at least equal to the appliance's maximum flow.
-
This high pressure washer may only be connected to the municipal water supply system if a suitable check valve is installed.
-
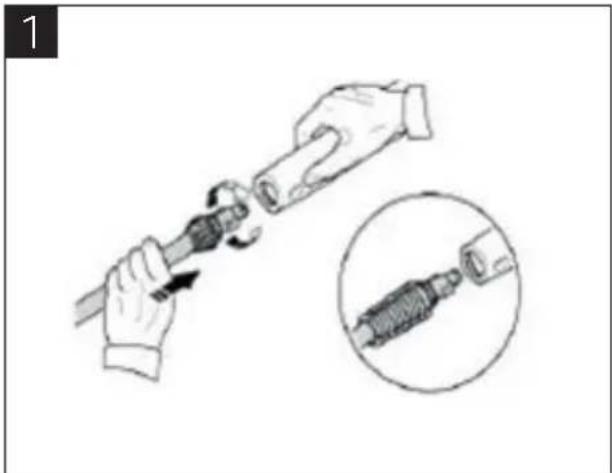
Fit the wand in the spray gun and twist to lock in place.
- Connect the spray gun to the high pressure hose.
natural_image
Illustration of hands using a tool to adjust a mechanical component, with an inset showing the close-up of the component (no text or symbols present)
natural_image
Line drawing of a handgun being adjusted with a wrench, no text or symbols present- Connect the high pressure hose to the appliance's water outlet.
- Connect the water hose's female coupling to the appliance's water inlet.

natural_image
Technical illustration of a mechanical device with coiled cable and attached clamp (no text or symbols)
natural_image
Line drawing showing a hand inserting a plug into a car compartment while connecting to a water tap (no text or symbols)OPERATION
Note!
- The appliance is equipped with an overpressure valve. The spray gun has a trigger lock.
- The motor is equipped with overheating protection. The appliance starts again after a few minutes, when it has cooled.
- Operating temperature: 0 to 40^ C .
STARTING
Note! The motor only works when the trigger is pressed.
- Plug in the power cord.
- Fully open the water tap.
- Always keep the trigger pressed in when the motor is started.
- Release the trigger lock and press the trigger for a few seconds to remove any air and relieve the pressure in the hose.
- Keep the trigger pressed and press the power switch to start the motor.
- Apply chemicals on a dry surface with a wide spray pattern. Work from below and up on vertical surfaces. Allow to act for a few minutes, but do not let it dry. Make sure that water is not sprayed on surfaces that should not be wet.
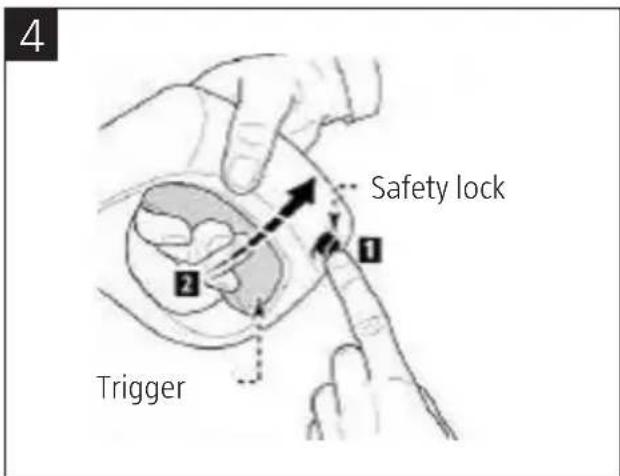

WARNING! Do not adjust the nozzle when the trigger is pressed.
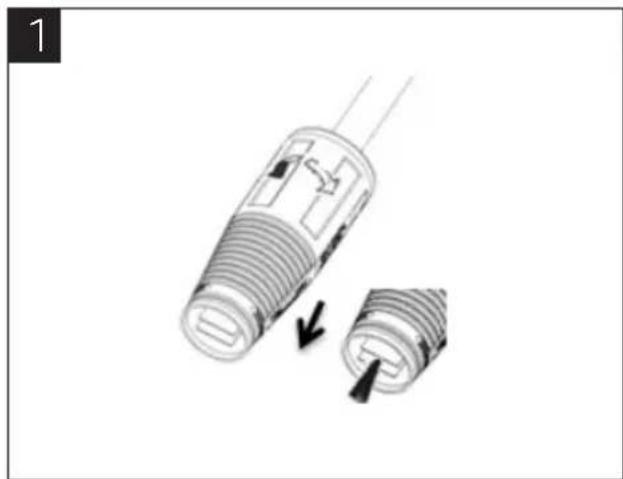
- The jet pipe with nozzle for a straight jet has been designed for both high and low pressure.
- The standard setting for the adjustable nozzle with straight jet is high pressure.
-
The amount of detergent mixture can be adjusted using the control knob on the front of the washer.
-
Twist the tip of the nozzle to change to low pressure. In this mode (low pressure), detergent is automatically transferred from the in-built detergent container.
-
Twist the tip of the nozzle back to change to high pressure mode.
natural_image
Diagram of a connector with two parts, one showing internal structure and the other showing a pin (no text or symbols)
natural_image
Diagram of a mechanical component with two parts, one showing internal threading and the other showing a threaded end (no text or symbols)TURNING OFF
- Switch off the appliance.
- Turn off the water tap.
- Empty the chemicals from the container.
- Relieve the pressure in the appliance by pressing the trigger until no water comes out through the nozzle.
- Lock the trigger lock.
-
Unplug the power cord.
-
Treat the appliance with non-corrosive, non-toxic antifreeze before putting into winter storage.
Note! Flush the appliance with clean water before using it again. Antifreeze can damage washed surfaces.
MAINTENANCE
Note! Switch off the appliance and unplug the power cord before cleaning and/or maintenance.
- Clean the suction and injection filter at intervals of 50 working hours.
- Clean the nozzle with the tool supplied. Remove the wand from the spray gun, clean the hole and rinse.

natural_image
Technical line drawing of a mechanical component with no visible text or symbols
natural_image
Illustration of a hand inserting a spring into a cylindrical device with arrows indicating motion (no text or symbols)TROUBLESHOOTING
Note!
- Switch off the appliance and unplug the power cord before maintenance and/or inspection.
- Check the following points before contacting your dealer for a service.
| PROBLEM POSSIBLE CAUSE ACTION | ||
| The appliance will not start | The power cord is not plugged in. | Plug in the power cord. |
| There is no current in the mains socket. | Try another mains socket. | |
| The fuse has tripped. | Switch off any other appliances connected to the same circuit, and replace the fuse. | |
| The extension cord is defective. | Try with another extension cord. | |
| The pressure fluctuates. | The pump sucks air. Check that hoses and connections are airtight. | |
| The valves are dirty, worn or have stuck. | Clean and replace, or contact your dealer. | |
| The pump seals are worn. Clean and replace, or contact your dealer. | ||
| The appliance stops. | The fuse has tripped. | Switch off any other appliances connected to the same circuit, and replace the fuse. |
| Incorrect mains voltage. | Check that the mains voltage corresponds to the rated voltage on the rating plate. | |
| The overheating protection has tripped. | Allow the appliance to cool for 5 minutes. | |
| The nozzle is partially blocked. | Clean the nozzle. | |
| The fuse trips. Fuse is too weak. | Connect the appliance to a mains socket with a fuse suitable for the appliance's power consumption. Try using the appliance without an extension cord. | |
| Pulsating flow. | Air in the inlet hose. | Press the trigger and allow water to run out until the normal operating pressure is restored. |
| The water supply is inadequate. | Check that the water's inlet pressure is adequate. Note! Do not use a hose smaller than 1/2". | |
| The nozzle is partially blocked. | Clean the nozzle. | |
| The water filter is blocked. | Clean the filter. | |
| The hose is bent or kinked. | Straighten out the hose. | |
| The appliance starts and stops without pressing the trigger. | There is a leak in the pump/spray gun. | Contact the retailer. |
| The appliance starts but no water comes out. | The pump, hoses and/or accessories are frozen. | Allow the pump, hoses and/or accessories to thaw out. |
| No water supply. Connect the water supply. | ||
| The water filter is blocked. Clean the filter. | ||
| The nozzle is blocked. Clean the nozzle. | ||
Jula reserves the right to make changes. In the event of problems, please contact our service department. www.jula.com

natural_image
Symbol of a trash bin crossed with no text or labels, representing waste sorting or disposal (no text present)Care for the environment!
Must not be discarded with household waste!
This product contains electrical or electronic components that should be recycled.
Leave the product for recycling at the designated station e.g. the clocal authority's recycling station.
CE
EC DECLARATION OF CONFORMITY
EG FÖRSÄKRAN OM ÖVERENSSTÄMMELSE
EF SAMSVARSERKLÆRING
DEKLARACJA ZGODNOŚCI WE

Jula AB, Box 363, SE-532 24 SKARA, SWEDEN
certify that the design and manufacturing of this product
Machinery Directive 2006/42/EC,
Noise Emission for Outdoor Equipment 2000/14/EC, amended by 2005/88/EC
RoHS Directive 2011/65/EU
This product was CE marked in year -14
Name and address of the person authorised to compile the technical file.
Viktoria Klaar Box 363, SE-532 37 Skara, Sweden
Skara 2013-10-23
Tobias Hammer
PRODUCT MANAGER
- SVENSKA....5
- SÄKERHETSANVISNINGAR....5
- TEKNISKA DATA....7
- BESKRIVNING 8
- MONTERING 9
- HANDHAVANDE 10
- STARTA 10
- HÖGTRYCKSDRIFT / LÄGTRYCKSDRIFT 11
- STÄNGA AV 11
- UNDERHÅLL 12
- FELSÖKNING....12
- NORSK 15
- SIKKERHETSANVISNINGER 15
- TEKNISKE DATA 17
- BESKRIVELSE....18
- MONTERING....19
- BRUK....20
- STARTE 20
- H∅TRYKKSDRIFT / LAVTRYKKSDRIFT 21
- SLÅ AV....21
- VEDLIKEHOLD 22
- PROBLEMS∅KING....22
- POLSKI 25
- ZASADY BEZPIECZEŃSTWA 25
- DANE TECHNICZNE 27
- OPIS 28
- MONTAŽ 29
- OBSŁUGA 30
- URUCHAMIANIE 30
- PRACA Z WYSOKIM CIŚNIENIEM / NISKIM CIŚNIENIEM. 31
- WYŁĄCZANIE....31
- KONSERWACJA 32
- WYKRYWANIE USTEREK 32
- ENGLISH 35
- SAFETY INSTRUCTIONS....35
- TECHNICAL DATA....37
- DESCRIPTION 38
- INSTALLATION 39
- OPERATION 40
- STARTING 40
- HANDHAVANDE
- oBS!
- STÄNGA AV
- FELSÖKNING
- Värna om miljön!
- BRUK
- mERK
- H∅TRyKKSDRIFT / LAVTRyKKSDRIFT
- SLÅ AV
- pRoBLEmS∅KING
- oBS†UGA
- UWAGA!
- WyłączANIE
- WyKRyWANIE USTEREK
- DBAJ O ŚRODOWISKO!
- Read the operating instructions carefully before use!
- WARNING!
- DESCRIPTION
- Note!
- INSTALLATION
- OPERATION
- STARTING
- TURNING OFF
- MAINTENANCE
- TROUBLESHOOTING
- Care for the environment!
- CE
- EC DECLARATION OF CONFORMITY
- EG FÖRSÄKRAN OM ÖVERENSSTÄMMELSE
- EF SAMSVARSERKLÆRING
- DEKLARACJA ZGODNOŚCI WE
Brand : Hamron
Model : 220-131
Category : Pressure washer