220-151 - Pressure washer Hamron - Free user manual and instructions
Find the device manual for free 220-151 Hamron in PDF.


| Product Type | Electric High Pressure Washer |
| Brand | Hamron |
| Model | 220-151 |
| Power Source | 230 V / 50 Hz |
| Max Power Consumption | 1800 W |
| Max Water Pressure | 130 bar |
| Max Water Flow Rate | 6.5 L/min |
| Motor Type | Universal Brush Motor |
| Weight | 9.5 kg |
| Dimensions (L x W x H) | 35 x 30 x 50 cm |
| High Pressure Hose Length | 8 m |
| Power Cord Length | 5 m |
| Water Supply Connection | Garden hose (3/4 inch) |
| Safety Features | Auto shut-off trigger, thermal overload protection |
| Included Accessories | Adjustable spray gun, 3 nozzles (0°, 25°, 40°), foam nozzle, detergent tank, brush, wheeled frame |
| Detergent Tank Capacity | 0.8 L |
| Sound Level | 85 dB(A) |
| Vibration Level | 2.5 m/s² |
| Protection Class | IPX5 |
| Maintenance | Clean filter regularly, check pump oil, descale nozzles as needed |
| Repair / Spare Parts | Replacement hoses, nozzles, and seals available; contact Hamron support |
Frequently Asked Questions - 220-151 Hamron
User questions about 220-151 Hamron
0 question about this device. Answer the ones you know or ask your own.
Ask a new question about this device
Download the instructions for your Pressure washer in PDF format for free! Find your manual 220-151 - Hamron and take your electronic device back in hand. On this page are published all the documents necessary for the use of your device. 220-151 by Hamron.
USER MANUAL 220-151 Hamron
natural_image
Green and gray electric water purifier with attached hose and brush (no visible text or symbols)EN - Operating instructions in original
Date of production: 2014-12-08
© Jula AB
SVENSKA....5
SÄKERHETSANVISNINGAR....5
TEKNISKA DATA 6
BESKRIVNING 7
MONTERING....7
HANDHAVANDE 9
Starta 9
Stoppa 11
UNDERHÅLL 11
SAFETY INSTRUCTIONS 38
TECHNICAL DATA 39
DESCRIPTION 40
ASSEMBLY....41
OPERATION 42
Starting 42
Stopping....44
MAINTENANCE 44
Cleaning spray nozzle....44
Water filter 45
Lubrication 45
Fuse replacement....45
For battery operation....45
STORAGE 46
Emptying of water 46
anti-freeze....46
TROUBLESHOOTING 47
SÄKERHETSANVISNINGAR
moNTERING
natural_image
Line drawing of a stylized helmet or device with no visible text or symbols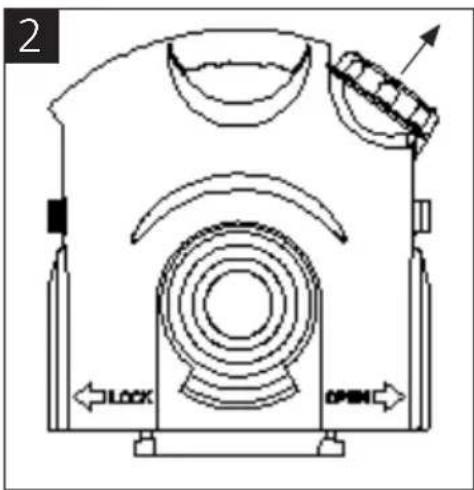
natural_image
Line drawing of a portable water dispenser with faucet and ventilation slots (no text or symbols)
natural_image
Technical line drawing of a mechanical component with a mesh fill and an arrow pointing to a feature (no text or symbols)
natural_image
Illustration of a hand using a tool to adjust or install a component, with an inset showing a hand holding a tool (no text or symbols present)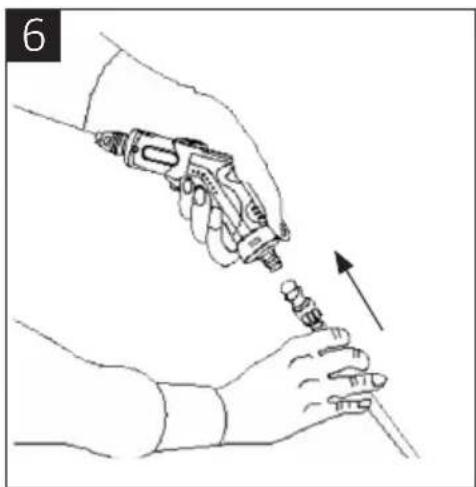
natural_image
Illustration of a hand holding a tool with an arrow indicating motion (no text or symbols)natural_image
Two identical line drawings of a handgun with arrows indicating movement or force direction (no text or symbols)Kontinuerligt flöde
natural_image
Two illustrations of a firearm with arrows indicating motion, no text or symbols presentJustera strålen
natural_image
Line drawing of a handheld electric gun with motion arrow indicating rotation (no text or symbols)
natural_image
Line drawing of a hand using a tool to connect a component into a device (no text or symbols)Fylla på vatten
natural_image
Line drawing of a hand holding a handheld device, no text or symbols present
natural_image
Line drawing of two hands holding a tool, no text or symbols presentVATTENFILTER
natural_image
Technical line drawing of a mechanical connector assembly (no text or symbols)VID BATTERIDRIFT
natural_image
Symbol of a trash bin with diagonal lines crossing it, no text or labels presentVärna om miljön!
natural_image
Line drawing of a stylized, multi-armed robot or mechanical device with no visible text or symbols
natural_image
Line drawing of a water dispenser with faucet and fan (no text or symbols)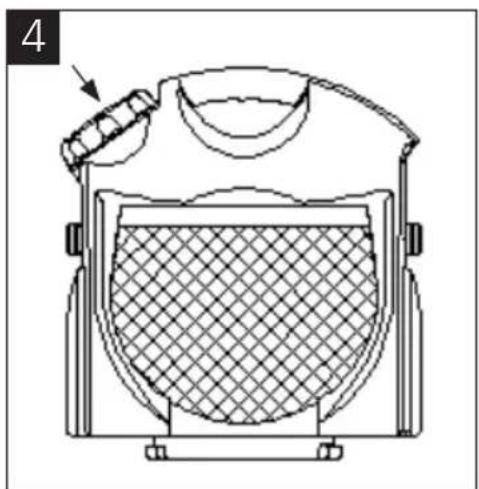
natural_image
Technical line drawing of a mechanical device with a mesh cover and handle (no text or symbols)
natural_image
Illustration of a hand using a tool to adjust or install a component, with an inset showing a hand holding a tool (no text or symbols present)
natural_image
Illustration of a hand holding a medical or laboratory device with an arrow indicating motion (no text or symbols present)natural_image
Line drawing of a car interior showing hands operating a seatbelt (no text or symbols)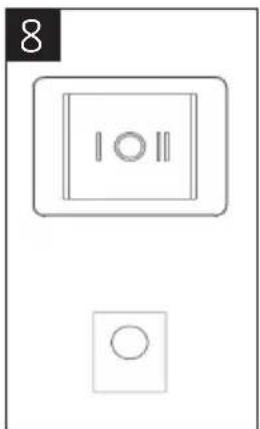
natural_image
Simple line drawing of a door with two circular indicators (no text or symbols)Batteri
mERK!
natural_image
Two identical line drawings of a handgun with arrows indicating motion direction (no text or symbols)Kontinuerlig flyt
natural_image
Two illustrations of a firearm with arrows indicating motion, no text or symbols presentJustere strålen
natural_image
Line drawing of a handheld electric gun with motion arrow indicating rotation (no text or symbols)
natural_image
Line drawing of a hand using a tool to connect a component to a machine (no text or symbols)Fylle på vann
natural_image
Line drawing of a hand holding a handheld device with a probe inserted (no text or symbols)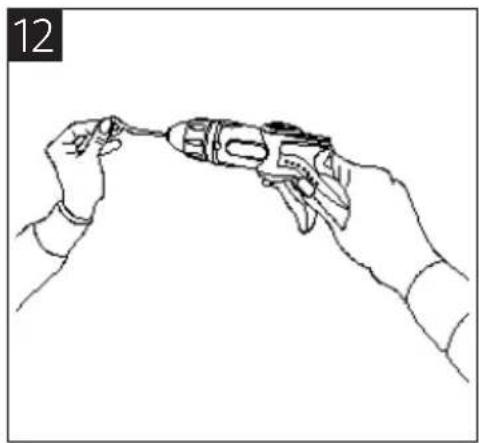
natural_image
Line drawing of two hands holding a tool, no text or symbols presentVANNFILTER
natural_image
Line drawing of a mechanical connector with three ports and connectors (no text or symbols)VED BATTERIDRIFT
natural_image
Line drawing of a stylized, multi-armed robot or mechanical device with no visible text or symbols
natural_image
Line drawing of a portable water heater with faucet and ventilation duct (no text or symbols)
natural_image
Technical line drawing of a mechanical device with a mesh cover and handle (no text or symbols)

natural_image
Illustration of a hand holding a medical or laboratory device with an arrow indicating motion (no text or symbols present)Akumulator
UWAGA!
natural_image
Two identical line drawings of a handgun with arrows indicating motion or movement (no text or symbols)Strumień ciągły
natural_image
Two identical illustrations of a handgun with arrows indicating motion or rotation (no text or symbols)natural_image
Line drawing of a handheld electric gun with motion arrow indicating rotation (no text or symbols)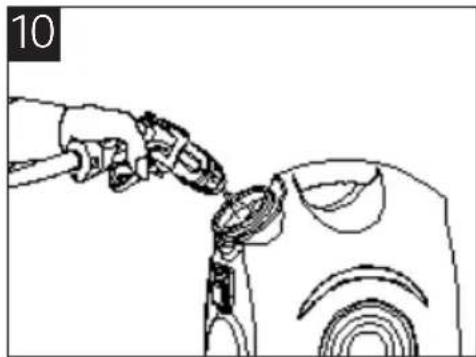
natural_image
Line drawing of a hand pouring liquid into a washing machine (no text or symbols)natural_image
Line drawing of a hand holding a handheld device with a probe inserted (no text or symbols)
natural_image
Line drawing of two hands holding a tool, no text or symbols presentFILTR WoDy
natural_image
Line drawing of a mechanical connector assembly with three parts (no text or symbols)ZASILANIE AKUmULAToRoWE
natural_image
Pure electrical circuit lines without any symbolsDBAJ O ŚRODOWISKO!
Read the operating instructions carefully before use!
Please retain for future reference.
- Do not leave the washer unattended when it is plugged in. Disconnect the power cable when the washer is not in use and prior to carrying out any maintenance.
- The washer is NOT a toy. Take particular care when the washer is being used in the vicinity of children.
- Only use accessories and spare parts that are recommended by the manufacturer.
- Do not use the washer if the power cable or plug is damaged. Do not use the washer if it is damaged or has been dropped in water, or if it is not functioning normally.
- Do not pull on the cable or lift the washer by the cable. The cable must not be used as a handle or be pulled over sharp edges. Keep the cable away from hot surfaces.
- Ensure that the spray nozzle is not clogged. Do not use the washer if the spray nozzle is clogged. Keep the spray nozzle free from dust, rubbish, hair and anything else that might obstruct the flow of water.
- Keep your hair, clothing, hands and other body parts at a safe distance from moving parts.
- Do not use the washer without a water filter fitted.
• Turn off all controls before disconnecting the power. - If incorrect voltage is used, the motor can be damaged and there is a risk of personal injury. The correct voltage value is given on the rating plate.
- Do not point the water jet at the washer itself, electrical parts or other electrical equipment.
- The nozzle's original diameter must not be changed.
- Release the remaining pressure before the hose is disconnected from the portable washer.
- Check that all screws are tightened and that no parts are worn or damaged before using the washer.
-
The washer must not be used with a chlorine-based detergent or other cleaning agents.
-
The water container must not be filled with anything other than water, otherwise the warranty is invalidated.
- Never immerse the washer in water.
- Protect the washer from cold (below 0 degrees). Always empty the washer and store it indoors. If the content in the washer freezes, the pump and water pipes can be damaged.
- Do not remove the exterior casing and do not attempt to dismantle the washer. In such cases the warranty is invalidated and furthermore there is a risk of serious injury.
- Always use recommended plug/fuse for the washer. If another plug/fuse is used, the washer or car may be damaged.
- Do not spray water directly towards your eyes or mouth.
- Carefully monitor the device when it is used by, or in the vicinity of, children or people with disabilities.
- This appliance is not intended for use by persons (children or adults) with any kind of disability or by persons who do not have sufficient experience or knowledge regarding its use, unless they have been given instruction concerning use of the appliance by a person responsible for their safety.
-
Children should be supervised to ensure that they do not play with the appliance.
• Always take basic safety precautions when using the washer: -
Never fill the washer with any liquid other than clean water, as it can lead to serious damage.
– Study the washer and all controls carefully before use. - Do not use the washer if you are unsure of how to use it, or if you are under the influence of alcohol or medication.
- Damaged hoses can crack, which can lead to dangerous situations and injury. Hoses must not be folded, twisted or squashed and must not have any damage. Replace the hose if any of these occur.
- Only use water with a temperature of between 10^ and 40^ .
TECHNICAL DATA
Pressure 3-9 bar
Volume water tank 17 litres
Voltage 12 V
Power 60 W
Hose length 6 metres
DESCRIpTIoN

- Water container
- Cap
- Adjustable shoulder strap
- Hose-coupling
- Plug for charger
- On-Off switch
- Mesh pocket for storage
- Wheel
- Power cable
- Compartment for power cable
-
Battery cover
-
Water outlet
- Water inlet
- Indicator
- Charger
- Brush nozzle
- Trigger lock
- Spray nozzle
- Adjustable spray nozzle
- Shower nozzle
- Hose
ASSEmBLy
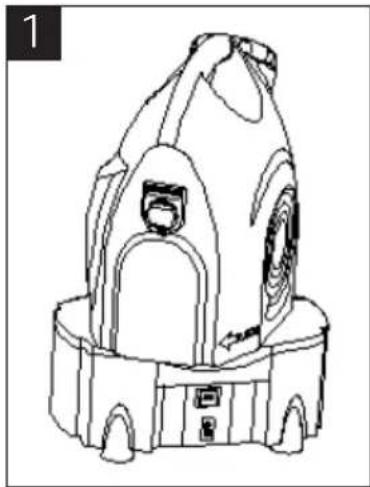
- Remove the water container.
- Turn the cap anticlockwise to remove it.
natural_image
Line drawing of a stylized helmet or device with arched windows and buttons (no text or symbols)
- Fill the container with clean water. NOTE! The water temperature must be between 10-40°C.
- Replace the cap by turning it clockwise.

natural_image
Line drawing of a mechanical device with a faucet and ventilation duct (no text or symbols)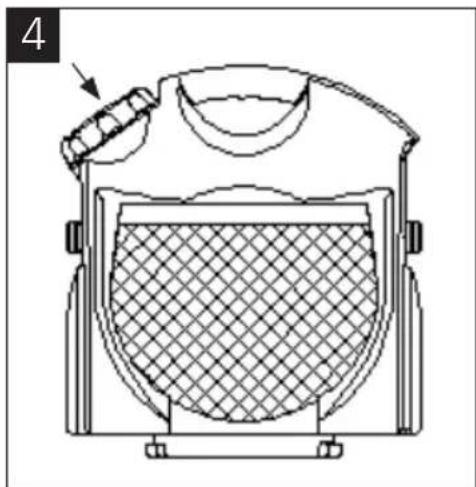
natural_image
Technical line drawing of a mechanical device with a mesh cover and handle (no text or symbols)
natural_image
Illustration of a hand holding a tool near a vertical pipe or pipe junction, with an inset showing a hand adjusting the pipe (no text or symbols present)
natural_image
Line drawing of a hand holding a tool with an arrow indicating motion (no text or symbols)-
Connect the hose to the container by pressing down the quick connector.
-
Connect the spray nozzle by pressing down the quick connector.
-
Align the pin on the brush/shower nozzle with the hole on the spray nozzle and press them firmly together.

OPERATION
STARTING
Cigarette lighter socket
NOTE!
- In some vehicles the ignition switch must be turned to the on position.
- Always remove the plug when the car engine is turned off for some time. In some cars the power is not turned off even though the engine is off. If the washer remains connected, the car battery can be discharged or damaged.
- If the washer is connected to the cigarette lighter socket and used for more than 30 minutes, the engine must be started to ensure that the car battery is not discharged.
-
If you are not sure of the car battery's capacity, start the engine before using the washer.
-
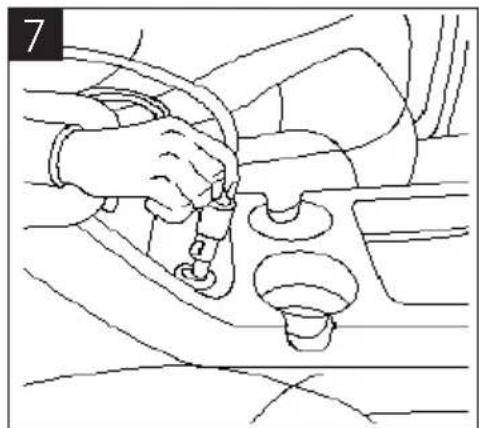
Connect the washer to the cigarette lighter socket or the power point (Figure 7).
natural_image
Line drawing of a car interior showing hands adjusting seatbelt (no text or symbols)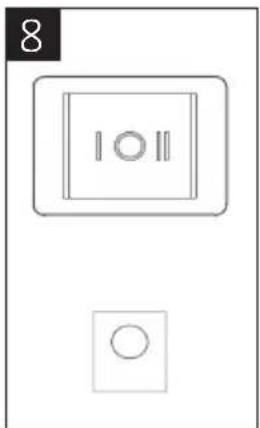
natural_image
Simple line drawing of a door with two circular indicators (no text or symbols)Battery
NOTE!
- Charge the battery for 6-8 hours after it has been used.
-
The battery's indicator changes from red to green when the battery is fully charged.
-
Turn the power switch to the "I" position for battery operation (Figure 8).
Interval flow
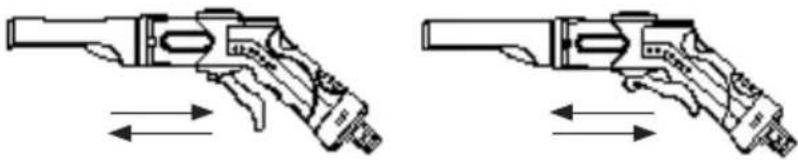
- Alternately press and release the trigger to bring about an interval flow.
natural_image
Two identical illustrations of a handgun with arrows indicating movement or force direction (no text or symbols)Continuous flow
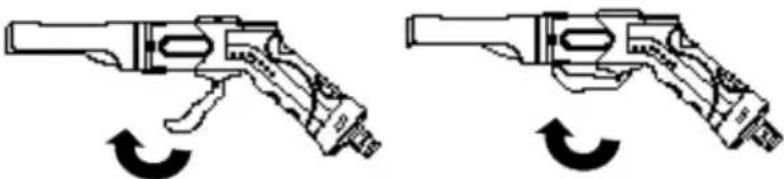
- Fix the trigger in place by pressing forward into position 1 or 2 for a continuous flow of water.
natural_image
Two identical illustrations of a handgun with a curved arrow indicating rotation (no text or symbols)Adjust the jet
- Press the spray nozzle trigger and adjust the flow of water as needed.
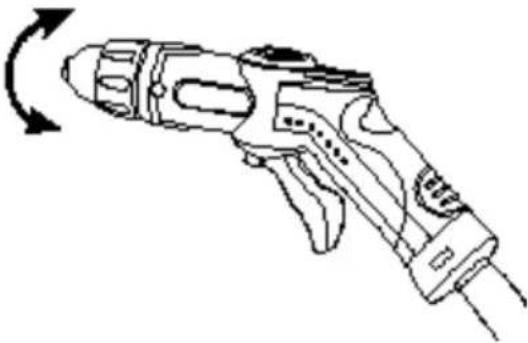
natural_image
Line drawing of a handheld electric gun with motion arrow indicating rotation (no text or symbols)Purging the system of air
Air bubbles can arise in the hose with normal use. We recommend the following measures to bleed the system in order to achieve the greatest possible pressure in the portable washer.
- Purge the system of air by moving the switch to "II" or "I" (Figure 9).
- Point the spray nozzle into the water container and press the trigger until an even jet of water comes out of the hose (Figure 10).
Filling with water
Always do as follows after you have filled the water container:
- Fill the container with water.
- Connect the hose to the washer.
- Connect the power cable to the washer.
- If the cigarette lighter socket is used: Connect to the cigarette lighter socket or the power plug. Move the switch to "II".
- For battery operation: Fit the battery and move the switch to "I".
- Point the hose (without spray nozzle) into the water container.
- Start the washer and use it for about 30 seconds or until there is an even jet of water.
- Turn off the washer.
- Insert the spray nozzle in the hose.
STOPPING
Automatic shutdown function
- When the trigger is released the pressure rises, which means that the washer's motor turns off automatically.
- When the trigger is pressed in the pressure falls, which activates the motor so that the pressure rises again (with some delay).
- For this function to work, more than 5-10 seconds have to pass between when the trigger is released and pressed in.
Turning off
- Move the switch to the OFF position.
- Press the trigger on the spray nozzle to release any remaining water in the hose and the spray nozzle.
- Disconnect the hose from the washer.
- Disconnect the spray nozzle from the hose.
- Press the trigger to remove the last of the water from the spray nozzle.
MAINTENANCE
WARNING Always disconnect the power plug before maintenance begins.
CLEANING SPRAY NOZZLE
If the spray nozzle is clogged the pressure in the washer becomes too high, which leads to overloading.
-
Turn off the washer and remove the power cable. Press the trigger on the spray nozzle to reduce the pressure and disconnect the spray nozzle from the hose (Figure 11).
-
Clean the spray nozzle with the cleaning tool (Figure 12).
-
Flush the spray nozzle in the opposite direction with water or compressed air.
-
Repeat steps 1-2 if the pressure is still too high.

natural_image
Line drawing of a hand holding a handheld device with a tool, no text or symbols present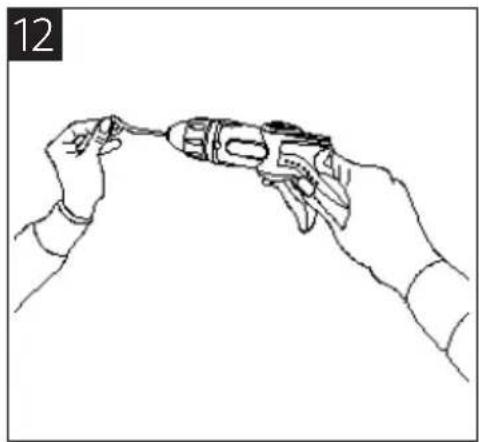
natural_image
Line drawing of two hands holding a tool, no text or symbols presentWATER FILTER
- Inspect the water filter before the container is filled with water.
- Clean the water filter as necessary.
LUBRICATION
- This pump does not need to be lubricated. The O-rings on the hose coupling can be lubricated with silicone grease if it is difficult to secure the couplings.
- If the spray nozzle has not been used for some time, the spray nozzle's metal part can be lubricated with a small amount of silicone grease.
FUSE REpLACEmENT
- Unscrew the outer part of the power plug and take out the old one. Put in a new fuse.

natural_image
Line drawing of a connector with three ports and connectors (no text or symbols)FoR BATTERy opERATIoN
- Make sure that the battery is always fully charged. The battery should always be fully charged after every use so that the battery lasts for as long as possible. Charge the battery before the washer is used for the first time.
-
Note that the battery's charging rate decreases over time if the washer is stored without being used. The battery should be charged at least once every three months so that it remains fully charged.
-
Check the battery clamps regularly to see whether they have come loose, rusted or been affected by defects or leakage. Maintenance may be necessary.
- Protect the battery, the washer and the power supply components from high temperatures, and keep them away from flammable/explosive materials.
- The risk of electric shocks can be reduced by using insulated tools or gloves when carrying out repairs or maintenance.
- Contact the manufacturer or the distributor if the battery is faulty. Do not dismantle the battery yourself.
- Do not clean the battery with organic solvents as this may damage the battery.
STORAGE
- The portable washer is sensitive to cold. The washer should consequently not be stored outdoors or in other places where the temperature can fall below 0^ (32°F).
- If the temperature falls below the freezing point, the washer can be extensively damaged, invalidating the warranty.
- Before storing the washer it must be turned off according to the instructions.
EMPTYING OF WATER
- Turn off the switch and press the trigger on the spray nozzle to reduce the pressure. Remove the spray nozzle and press the trigger to empty out all the water. Empty the water container. Start the washer and run it for about 30 seconds without the spray nozzle.
- Remove the hose. Lift up one end of the hose so that the water runs out.
- Remove and place hose, spray nozzle and power cable in the storage pocket.
- If the washer has to be stored in a place where there is a risk of the temperature falling below 0 degrees, or if it is stored for more than 30 days, a pump rust protector or non-toxic anti-freeze for cars can be used to counteract frost and reduce the amount of mineral deposits.
ANTI-FREEZE
WARNING Only use anti-freeze for cars. Other types of anti-freeze can cause rust which will damage the pump and invalidate the warranty.
Refilling with anti-freeze
- Pour about 3 litres of anti-freeze into the water container.
- Connect the hose, spray nozzle and power cable.
- Start the washer and press the trigger until an even flow of anti-freeze sprays out of the spray nozzle.
- Turn off the washer. Press the trigger to reduce the pressure.
- Remove and place hose, spray nozzle and power cable in the storage pocket.
Emptying anti-freeze before use
- Empty the washer of anti-freeze. (Follow steps 1 and 2 under "Emptying of water".)
- Completely fill the container with clean, fresh water and run it through the system before the washer is used, to ensure that all anti-freeze is flushed out.
TROUBLESHOOTING
| The water pump does not work. Check that the | power cable has been connected correctly. |
| Check the car battery and the cigarette lighter socket. | |
| Check the fuse for the cigarette lighter socket. | |
| No water appears when the water pump is started. | Check that the spray nozzle is not clogged. |
| Check that the water inlet is not clogged. | |
| Check that the water hose is not bent. |
Jula reserves the right to make changes. In the event of problems, please contact our service department. www.jula.com

natural_image
Symbol of a trash bin crossed with no text or labels, representing waste sorting or disposal (no text present)Care for the environment!
Must not be discarded with household waste!
This product contains electrical or electronic components that should be recycled.
Leave the product for recycling at the designated station e.g. the clocal authority's recycling station.
- SVENSKA....5
- SÄKERHETSANVISNINGAR....5
- TEKNISKA DATA 6
- BESKRIVNING 7
- MONTERING....7
- HANDHAVANDE 9
- Starta 9
- Stoppa 11
- UNDERHÅLL 11
- SAFETY INSTRUCTIONS 38
- TECHNICAL DATA 39
- DESCRIPTION 40
- ASSEMBLY....41
- OPERATION 42
- Starting 42
- Stopping....44
- MAINTENANCE 44
- Cleaning spray nozzle....44
- Water filter 45
- Lubrication 45
- Fuse replacement....45
- For battery operation....45
- STORAGE 46
- Emptying of water 46
- anti-freeze....46
- TROUBLESHOOTING 47
- SÄKERHETSANVISNINGAR
- moNTERING
- Kontinuerligt flöde
- Justera strålen
- Fylla på vatten
- VATTENFILTER
- VID BATTERIDRIFT
- Värna om miljön!
- Batteri
- mERK!
- Kontinuerlig flyt
- Justere strålen
- Fylle på vann
- VANNFILTER
- VED BATTERIDRIFT
- Akumulator
- UWAGA!
- Strumień ciągły
- FILTR WoDy
- ZASILANIE AKUmULAToRoWE
- DBAJ O ŚRODOWISKO!
- Read the operating instructions carefully before use!
- TECHNICAL DATA
- DESCRIpTIoN
- ASSEmBLy
- OPERATION
- STARTING
- Cigarette lighter socket
- NOTE!
- Battery
- Interval flow
- Continuous flow
- Adjust the jet
- Purging the system of air
- Filling with water
- STOPPING
- Automatic shutdown function
- Turning off
- MAINTENANCE
- CLEANING SPRAY NOZZLE
- WATER FILTER
- LUBRICATION
- FUSE REpLACEmENT
- FoR BATTERy opERATIoN
- STORAGE
- EMPTYING OF WATER
- ANTI-FREEZE
- Refilling with anti-freeze
- Emptying anti-freeze before use
- Care for the environment!
Brand : Hamron
Model : 220-151
Category : Pressure washer