32Z011 - Blender Zelmer - Free user manual and instructions
Find the device manual for free 32Z011 Zelmer in PDF.


| Product Type | Stand Blender |
| Brand | Zelmer |
| Model | 32Z011 |
| Type Code | 322011 |
| Voltage | 230-240 V |
| Capacity | 1.5 L (1500 ml) |
| Speed Settings | 3 speeds (I, II) + Pulse (P) |
| Pulse Function | Yes, momentary operation at maximum speed |
| Motor Base Material | Plastic |
| Jug Material | Transparent plastic |
| Blade Material | Stainless steel (sharp) |
| Maximum Continuous Operation | 2 minutes |
| Cooling Interval | At least 10 minutes |
| Noise Level | ≤ 80 dB(A) |
| Safety Class | II (double insulated) |
| Anti-Slip Feet | Yes |
| Dishwasher Safe (Jug and Blades) | Not recommended |
| Maximum Liquid Temperature | 60 °C |
| Color | White |
| Country of Origin | Poland |
| Includes | Motor base, blender jug, lid, lid overlay, blade unit, gasket |
Frequently Asked Questions - 32Z011 Zelmer
User questions about 32Z011 Zelmer
0 question about this device. Answer the ones you know or ask your own.
Ask a new question about this device
Download the instructions for your Blender in PDF format for free! Find your manual 32Z011 - Zelmer and take your electronic device back in hand. On this page are published all the documents necessary for the use of your device. 32Z011 by Zelmer.
USER MANUAL 32Z011 Zelmer
natural_image
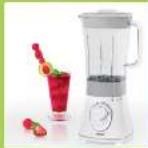
White blender with red fruit and mint garnish next to a glass of strawberry juice (no text or symbols visible)| NETFLIKIA JZYTOJANIA MKSER KELICHOWY | |
| Typ 322011 | 4-8 |
| NAWOD KROUTI STOLNI MIXER Typ 322011 | 7-9 |
| NAWOD KA OBSLUHU STOLOVÝ MIXER Typ 322011 | 10-12 |
| HD | HASTNA AT UTASITASKELYHES MIXER327111 Tipus | 13-15 |
| RO | ESTRUCTURA DE UTUSAREBLENDER STATIVTip 322011 | 18-18 |
| RU | HECTPYGALFO SICRU/ATALNEMEHDEPTon 322011 | 19-21 |
| ISO | ИНСТРНОК 34 УПОТРЕВАШЕМКЪР КАНАТип 322011 | 22-24 |
| US | ИНСТРНОК 36 КРАСТЯВАННОМИКСЕР 3 ЧАШЕКОТип 322011 | 25-27 |
| EN | USER KANJALSTAND BLENDERType 322011 | 28-30 |
32Z011
Mikser klelichowy
Stand blender
The quick brown fox jumps over the lazy dog.

(1)

2021年
zelmer
www.cfmet.pl
www.zelmer.com
A
B
C
PL
Important safety instructions
Read the whole instruction for use before you start using your stand blender.
The stand blender is intended for domestic usage only. In case it is used for gastronomic business purposes, warranty terms and conditions change.
- connect the appliance to 230-240 V mains supply.
Always place the appliance on flat, plain surface.
Always unplug the appliance when it is not in use and before cleaning.
Do not unplug by pulling on cord.
The supplying cord shall not be hanged over the edge of the table or board, nor touch any hot surface.
Do not operate the appliance if the cord, the housing or the handle is visibly damaged. In such a case, return the appliance to a service center.
If the non-detachable part of the cord is damaged, it should be replaced by the producer or at a proper service point or by a qualified person in order to avoid any hazards.
The appliance should be repaired by trained staff only. Improper repair can result in serious hazard for a user. In case of defects we recommend you to contact qualified service desk.
Do not immerse motor housing in water or any other liquid; do not use it in bathroom and outdoors.
Do not use stand blender without feeder opening stopper.
Do not fill the jug in with boiling liquids.
Do not put your hands inside the jug, even if it is removed for cleaning, as the cutting blades are still dangerous – very sharp.
Do not put any objects (spoon, etc.) into the jug, when the blender is connected to power supply.
Keep the stand blender and supplying cord away from hot surfaces and burners.
it is possible, store the stand blender away from direct sun radiation and glow-like light.
Never store with lid closed on the blender jug. Damp the lid gasket with water before usage, and insert the lid on the jug.
Do not overflow the jug. In case the liquid gets under the motor housing, it can be vacuumed into the motor, causing its damage.
Do not fill the jug over 1500 ml mark – in such case, the content of the jug can lift the lid when the motor starts up
After 2 minutes operation stop the appliance for at least minute to let the motor cool down. You can repeat this cycle maximum10 times.
Do not operate when the jug is empty, as it can get overheated.
Do not wash the cutting blades directly with hand.
Use the soft brush for washing metal parts, especially the sharp blades.
This appliance is not intended for use by persons (including children) with reduced physical, sensory or mental capabilities, or lack of experience and knowledge, unless they have been given supervision or instruction concerning use of the appliance by a person responsible for their safety.
●children should be supervised to ensure that they do not play with the appliance.
The temperature of mixed ingredients should not exceed 60^ C.
Make sure you understand well above mentioned instructions.
Technical specification
Technical parameters are indicated on the nameplate of the product.
Admissible time of uninterrupted operation: 2 minutes.
Time of interval before next operation: 10 minutes.
Maximum noise level: 80 dB/A.
The stand blender is built in 2nd isolation class.

It does not require connection to the socket equipped with grounding pin.
The stand blender meets the requirements of standards in force.
The appliance meets the requirements of the directives:
Low Voltage Device (LVD) - 2006/95/EC. -
Electromagnetic compatibility (EMC) - 2004/108/EC.
The product is marked with CE mark on the nameplate.
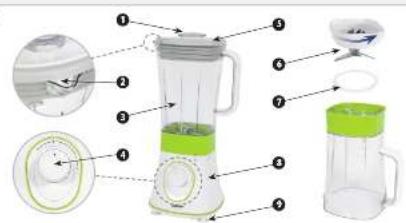
The outline of the appliance (Fig. A)
1 Lid overlay
2 Lid sieve
3 Blender jug
4 Speed control knob
5 Lid
6 Blade unit
7 Gasket
8 Motor unit
9 Anti-slip foot
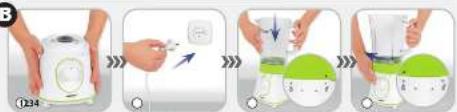
Handling and operation (Fig. B)
Preparation for operation
Before first operation of the stand blender (or operation after longer storage time), clean the blender jug (3), lid (5) and lid overlay (1) in warm water with dish washing liquid, rinse them well and dry. Keep your hands far from the blades – they are sharp.
Instructions for use
① Place the motor unit (8) on the dry, firm, horizontal surface near the power supply outlet and out of the reach of children.
Arrange the power supply cord, so that it is not hanging down the table or counter and it could not be pulled or fastened.
2 Connect the plug of the power supply cord to the power supply outlet. In
Make sure, that before connecting the appliance to the power supply, the speed control knob (4) is set in position 0.
3 Assemble the blender jug (3) on the motor unit, so that
the symbol on the motor unit (8) is in line with the mark ▼ on the jug.
4 Lock the blender jug (3) turning it in clockwise direction,
so that the symbol on the motor unit (8) is in line with the mark ▼ on the jug.
The handle of the blender jug (3) shall be placed on the right side of the appliance.
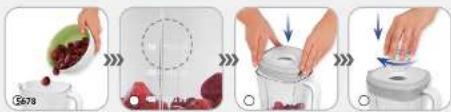
5 Put the ingredients into the blender jug (3).
6 Do not fill over 1500 ml mark on the blender jug (3).
If you do so, the ingredients can lift the lid (5) when the motor is started.
7 Before use of the stand blender, insert the lid (5) onto the blender jug (3) so, that its protrusion is in line with the protrusion on the jug.
ATTENTION: Before inserting the lid (5) moisturize the gasket with water.
8 Insert the lid overlay (1) into the inlet in the lid (5) so, that the protrusions of the overlay enter the cuts in the lid inlet and turn it left or right until it moves. 4
Do not start up the stand blender without the lid overlay (1), especially when solid ingredients shall be used. They can be ejected through the inlet.
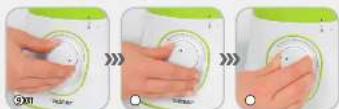
9 Switch on the mixing by turning the speed control knob (4) to adequate position (P, I, II).
10 In order to stop the appliance turn the speed control knob to position 0.
11 P (PULSE) functions
Turning the knob in Po(PULSE) position shall cause the short operation of the appliance with maximum speed for the time of holding the knob.
Do not operate the appliance for longer than 2 minutes, otherwise it can be overheated.
In case you need to add some ingredients during the stand blender operation, turn and lift the lid overlay (1), insert new ingredients through the inlet, then replace the lid overlay (1) and turn it right until it moves.
Make sure, that the added ingredients shall not exceed the volume inside the jug over 1500 ml mark on the blender jug (3).
In order to stop the appliance, turn the speed control knob to position 0.
Hold the motor ur(8) with one hand, catch the jug handle with the other hand and remove it out of the motor unit (8) turning it counter-clockwise.
- remove the li(5) out of the blender jug (3).
Unplug the appliance from the mains supply when not in use.
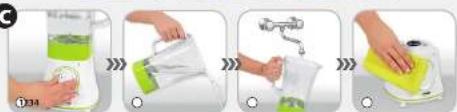
Clean after operation as soon as possible, to prevent the pulp accumulation inside the jug (3).
1 Pour approximately 1 liter of water to the blender jug (3) and start-up the appliance for approximately 30 seconds and hold the P (PULSE) button.
2 Then empty the blender jug (3), turn it upside-down and
3 If necessary, clean the jug (3), lid (5), feeder opening stopper (1) and blades (6) in warm water with wash-up liquid.
Then rinse it under clean running water and dry.
If you left the jug for longer time without cleaning and some particles glued to the jug inner, use nylon brush.
We do not recommend cleaning the ju(3), blades (6), lid (5) and feeder opening stopper (1) in dish washer. Aggressive cleaning agents applied in such device can influence negative the surface conditions.
^4 Clean the outsider of the motor housing (8) with damp, gentle cloth.
ATTENTION: Do not immerse the motor housing (8) in water or other liquid.
Do not clean the outside of the housing(8) with aggressive detergents such as emulsion milk or pastes, etc. They can remove information graphic symbols.
Do not clean the transparent ju(3) with harsh sponges or clothes.
After washing dry thoroughly all the parts of the appliance.
Disassembling of cutting unit
Remove the plug of the power supply cord from the mains supply outlet.
Empty the blender ju(g).
Remove the li(5) from the blender jug (3). Turn the blender jug (3) „upside down” and place on the ☐at and ☐rm surface.
Hold the blender ju(3) with one hand, and unscrew the blade unit with the other hand (counter-clockwise).
Carefully remove the blade unit(6) including the gasket (7).
ATTENTION: The appliance blades are sharp. Handle them carefully.
Blade unit assembling
insert the gasket (7) on the blade unit flange (6).
Remove the lid (5) from the blender jug (3). Turn the blender jug (3) „upside down” and place on the flat and firm surface.
Insert the blade unit (6) into the inlet on the bottom of the blender jug (3).
-lock the blade unit (6) turning it counter-clockwise until it moves.
Ecology – environment protection
Each user can protect the natural environment. It is neither difficult nor expensive.
In order to do it: put the cardboard packing into recycling paper container; put the polyethylene (PE) bags into container for plastic.
When worn out, dispose the appliance to particular disposal centre, because of the dangerous elements of this appliance, which can be hazardous for natural environment.
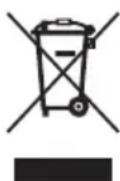
Do not dispose into the domestic waste disposal!!!
The manufacturer/importer does not accept any liability for any damages resulting from unintended use or improper handling.
The manufacturer/importer reserves his rights to modify the product any time in order to adjust it to law regulations, norms, directives, or due to construction, trade, aesthetic or other reasons, without notifying in advance.
Notes
Notes
Brand : Zelmer
Model : 32Z011
Category : Blender