
Viva Collection HR2330 - Pasta machine PHILIPS - Free user manual and instructions
Find the device manual for free Viva Collection HR2330 PHILIPS in PDF.


| Product Type | Pasta and noodle maker |
| Model | Philips Viva Collection HR2330 |
| Motor Power | 200 W |
| Dimensions (L x W x H) | 343 mm x 215 mm x 300 mm |
| Capacity | Up to 500 g flour (1-4 servings) |
| Programs | Automatic (mixing + extrusion) and extrusion-only |
| Servings Options | 1-2 servings (250 g) or 3-4 servings (500 g) |
| Shaping Discs Included | Flat thin noodle and round thin noodle discs |
| Safety Features | Safety switch on mixing chamber lid and disc holder; auto-stop if lid open |
| Continuous Working Time | Up to 45 minutes, then 15 minutes rest recommended |
| Ease of Cleaning | Removable parts dishwasher safe; main unit wipe clean only |
| Included Accessories | Flour cup, water cup, disc cleaning tool, mixing paddle, 2 shaping discs |
| Material | Plastic housing, stainless steel mixing chamber and discs |
| Weight | Approximately 4.2 kg (estimate based on dimensions) |
| EMF Compliant | Yes, meets all applicable standards |
Frequently Asked Questions - Viva Collection HR2330 PHILIPS
User questions about Viva Collection HR2330 PHILIPS
0 question about this device. Answer the ones you know or ask your own.
Ask a new question about this device
Download the instructions for your Pasta machine in PDF format for free! Find your manual Viva Collection HR2330 - PHILIPS and take your electronic device back in hand. On this page are published all the documents necessary for the use of your device. Viva Collection HR2330 by PHILIPS.
USER MANUAL Viva Collection HR2330 PHILIPS
Always there to help you
Register your product and get support at www.philips.com/welcome

HR2330
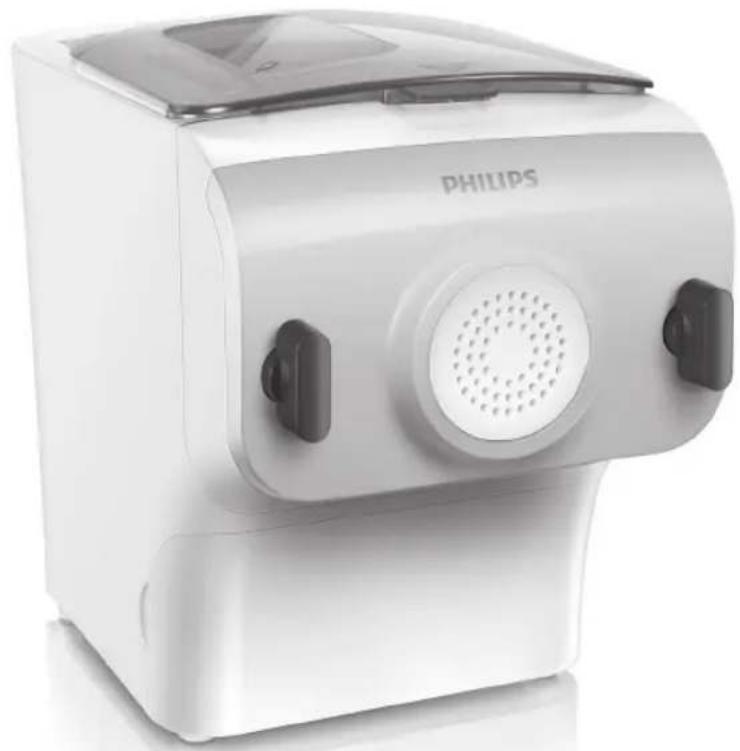
natural_image
White Philips kitchen appliance with a circular vent and side buttons (no visible text or symbols on the device body)User manual 3
使用手册 21
PHILIPS
Contents
1 Important 4
Safety 4 Electromagnetic fields (EMF) 4
2 Your noodle maker 5
3 Overview 5
Noodle maker overview 6 Control panel overview 6
4 Disassemble and cleaning before first use 7
5 Assemble 8
6 Use the noodle maker 8
7 Cleaning 11
8 Recipes 12
Noodle making recipes 12 Cooking recipes 14
9 Troubleshooting 16
10 Product information 18
11 Recycling 19
12 Guarantee and service 20
1 Important
Safety
Read this user manual carefully before you use the appliance, and save it for future reference.

Warnings
Before processing
Before you connect the appliance to the power, make sure that the voltage indicated on the bottom of the appliance corresponds to the local power voltage.
- Make sure that the plug is firmly inserted into the power outlet.
- Make sure that your hands are dry before you insert the plug into the power outlet.
- Never connect this appliance to a timer switch, to avoid a hazardous situation.
- Before you insert the plug into the power outlet, make sure that the appliance is assembled correctly.
- If the power cord, the plug, or other parts are damaged do not use the appliance.
- If the power cord is damaged, you must have it replaced by Philips, a service center authorized by Philips or similarly qualified persons to avoid a hazard.
- Do not replace parts of the appliance yourself.
- This appliance is not intended for use by persons (including children) with reduced physical, sensory or mental capabilities, or lack of experience and knowledge, unless they have been given supervision or instructions concerning use of the appliance by a person responsible for their safety.
- For their safety, do not allow children to play with the appliance. Keep the appliance and its power cord out of the reach of children.
- To prevent any accidents, do not use the appliance if it is damaged for any reasons.

Cautions
Before processing
Before using the appliance for the first time, disassemble and wash the accessories thoroughly (see "Disassemble and cleaning before first use" section.)
• The appliance is intended for household use only.
During processing
Do not use this appliance on an unstable or uneven surface.
- Keep the appliance and its power cord out of the reach of children.
- Do not disconnect the power cord before processing is complete. If you have to stop processing, disconnect the power cord before you perform other operations.
- To better protect the lifetime of the appliance, we recommend the continuous working time to be less than 45 minutes. You can restart using the appliance after 15 minutes.
- If you intend to use the appliance continuously, clean the shaping disc with the supplied cleaning tool each time after use. For cleaning ease, do not soak the shaping disc into the water directly.
After processing
- Disconnect the power and remove the power cord before cleaning or disassembling this appliance.
- Do not immerse the main unit in water.
- Place the appliance to a dry and well ventilated place after use.
- To prevent a short circuit or an electric shock, do not pour water or any liquid into the safety switch.
Electromagnetic fields (EMF)
This Philips appliance complies with all applicable standards and regulations regarding exposure to electromagnetic fields.
2 Your noodle maker
Congratulations on your purchase, and welcome to Philips!
To fully benefit from the support that Philips offers, register your product at www.Philips.com/welcome.
Read this user manual carefully before you install and use the unit. Save it for future reference.
3 Overview
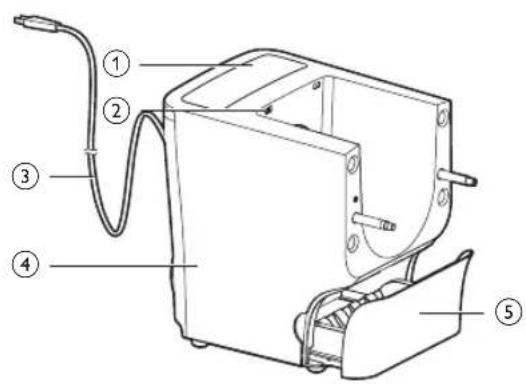
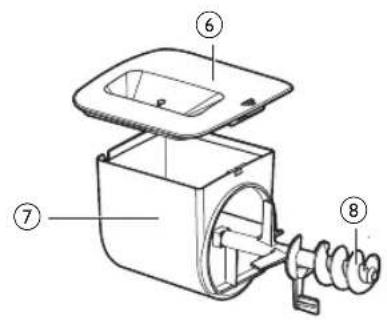
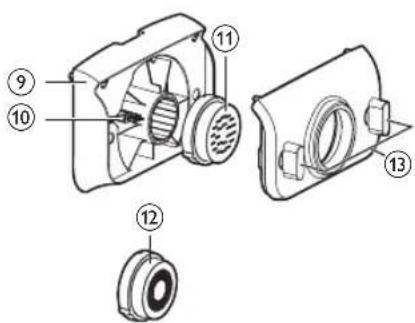
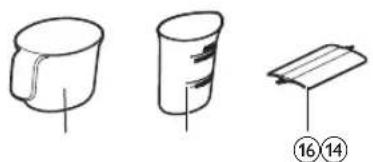
natural_image
Three technical line drawings of cylindrical and rectangular components with numbered labels (14, 16) — no readable text or symbols beyond labels.Noodle maker overview
| 1 | Control panel | |
| 2 | Safety switch hole of the mixing chamber lid | |
| 3 | Power cord | |
| 4 | Main unit | |
| 5 | Shaping discs storage | |
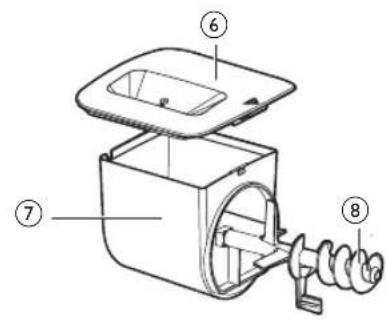
| 6 | Mixing chamber lid | |
| 7 | Mixing chamber | |
| 8 | Mixing paddle | |
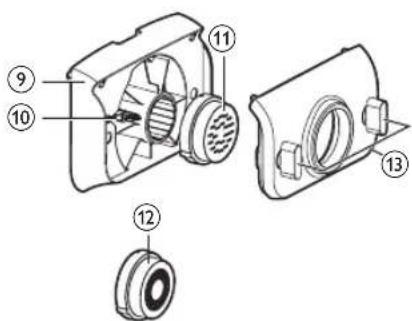
| 9 | Disc holder | |
| 10 | Disc holder safety switch | |
| 11 | Shaping discs | Flat thin noodle |
| 12 | Round thin noodle | |
| 13 | Front panel knob | |
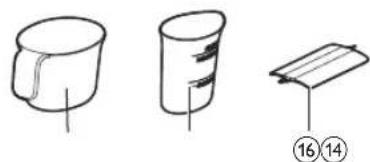
| 14 | Flour cup | |
| 15 | Water cup | |
| 16 | Disc cleaning tool | Scrape off excessive flour while measuring flour. |
| Use as a noodle cutting knife. | ||
| Use the pointed end to remove the leftover dough from the holes of the shaping disc. | ||
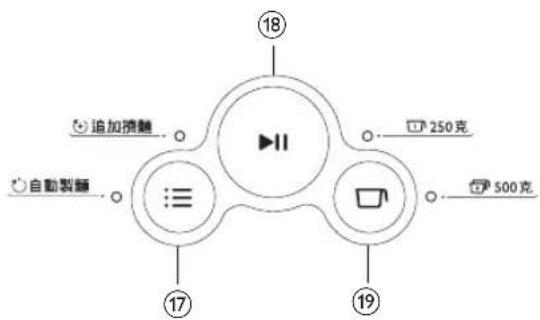
Control panel overview
flowchart
graph TD
    A["18"] --> B["17"]
    B --> C["19"]
    C --> D["250克"]
    D --> E["500克"]
    F["追加装糖"] --> G["自动装糖"]
    G --> H["三"]
    H --> I["播放器"]
| 17 | Programs button - select extrusion-only program ☑ or automatic program ☺ |
| 18 | Start/pause button |
| 19 | Servings button - select ☑250g)or ☑500g) |
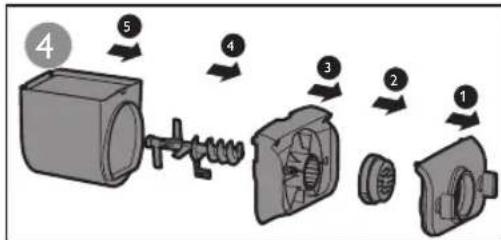
4 Disassemble and cleaning before first use

Cautions
Before using the noodle maker, make sure all parts and accessories are completely dry.
- Do not use water to rinse nor soak the main unit.
- Do not use a scourer or similar cleaners as these will scratch the plastic surface and affect the lifetime of the noodle maker.
natural_image
Illustration of a mechanical device with a lever and base, no text or symbols present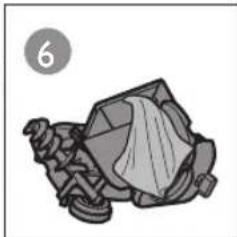
natural_image
Illustration of a mechanical component with a circular label showing number 6 (no text or symbols on the object itself)
Notes
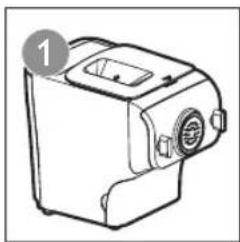
Take out all the parts and accessories.
- Clean the parts and accessories before first use (see "Cleaning" section).
natural_image
Line drawing of a mechanical device with a circular label and arrow, no text or symbols present.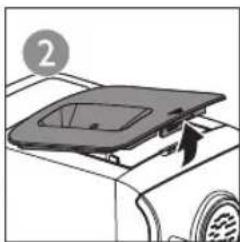
natural_image
Diagram of a car front panel with airflow direction arrow (no text or symbols)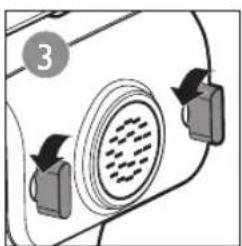
natural_image
Diagram of a car interior with ventilation duct and directional arrows indicating airflow or movement (no text or symbols)5 Assemble
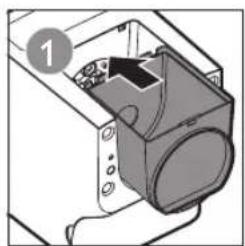
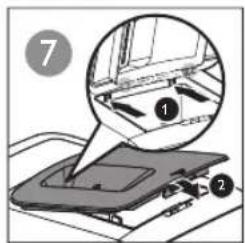
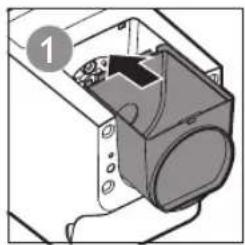
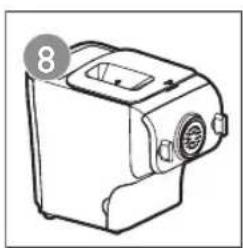
Follow the assembling steps below to install the noodle maker.

Caution
Make sure to tighten the front panel knob during assembling.
natural_image
Technical diagram of a mechanical component with no visible text or symbols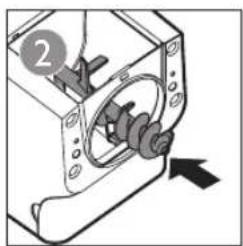
natural_image
Mechanical assembly diagram showing a motor and gear mechanism (no text or labels)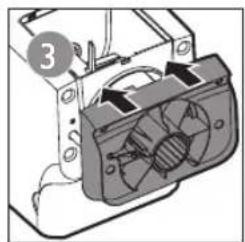
natural_image
Diagram of a device's internal fan assembly with labeled component (no text or symbols present)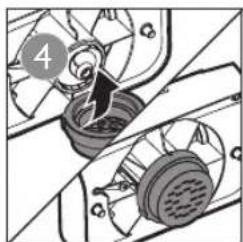
natural_image
Diagram of a camera module with arrows indicating internal components (no text or symbols)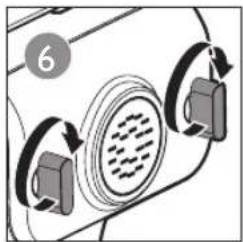
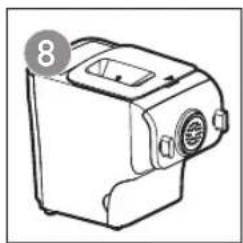
natural_image
Line drawing of a kitchen appliance with a numbered label (8) and no visible text or symbols on the device itself.6 Use the noodle maker

Cautions
Never put in excessive ingredients in the noodle maker. Otherwise, it will damage the appliance.
- Do not put in any ingredients that are 60°C or above to the noodle maker, nor place the noodle maker in surroundings with high temperature (60°C), for instance in a high temperature sterilization. This will deform the appliance.
- Follow the operating instructions completely. Put in the flour into the chamber first, then place the chamber lid onto the chamber. Start the noodle maker, and then slowly pour water along the entire length of the opening in the lid.
- Never pour in water before you place the chamber lid onto the chamber. Do not pour in any liquids into the safety switch hole.

Notes
During processing, if the chamber lid is open or loose, the noodle maker will automatically stop processing.
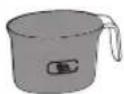
- Use the supplied flour cup and water cup for accurate measure of flour and water ratio. This is very important to the noodle texture.
• After processing, it is normal to find some leftover dough inside the chamber.
1 Measure one full cup of flour. Scrap off any excessive flour from the cup edge with the supplied cleaning tool. One full cup is equivalent to 1-2 servings (\~250g).

Caution
- Do not shake nor hit the flour cup to remove excessive flour. This will affect the flour weight.
2 Open the chamber lid, and pour the flour into the chamber. If you want to make 3-4 servings (\~500g), repeat step 1 as you will need 2 cups of flour.
3 Close the chamber lid.
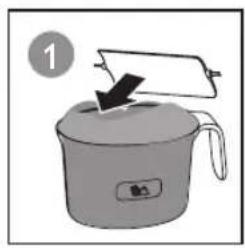
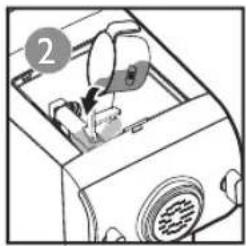
natural_image
Diagram of a refrigerator interior showing a door, vent, and air vent (no text or symbols)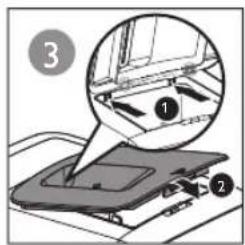
4 Based on the "Flour/water proportion table" to measure the required amount of water. (Figure 4-5)
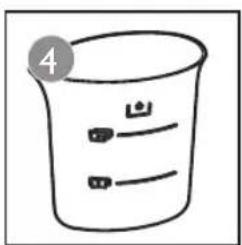
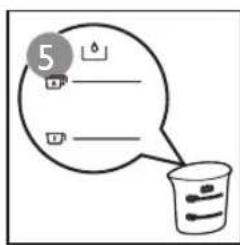

Note
There are 2 sets of water markings on the supplied water cup. One set is for plain noodle making, and the other set is for egg noodle and other flavors noodle making..
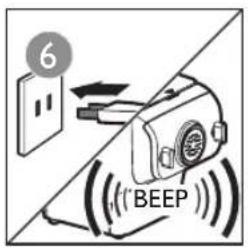
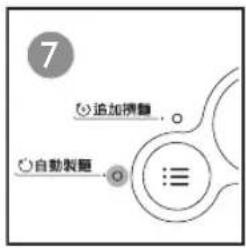
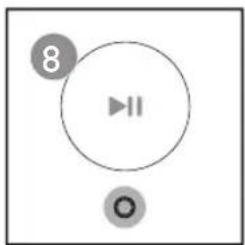
5 Connect to the power. The noodle maker will sound once (Figure 6), and all indicators will flash once. The noodle maker is in standby mode. → Automatic indicator() and the start/pause indicator (▶) will light up. The serving indicators (1/2) will flash in cycle. (Figure 7-9)
flowchart
graph TD
    A["○自動製題"] --> B["○追加機器"]
    B --> C["●三"]
natural_image
Simple diagram with a play button inside a circle and an 'O' button below, no text or symbols present.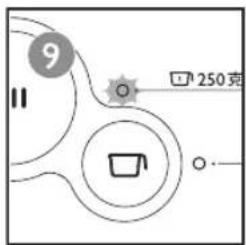

Caution
By default, the program is set as automatic program. If this is not the case, press the programs button (☐) to reselect.
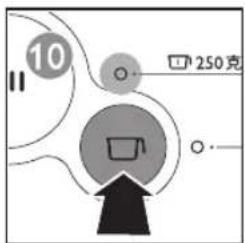
6 Based on the amount of flour, press the servings button (☐) to select ☐ for the respective servings. (Figure 10)
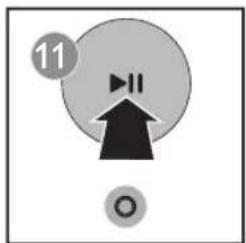
7 Press start/pause button ( ) to start processing. (Figure 11)
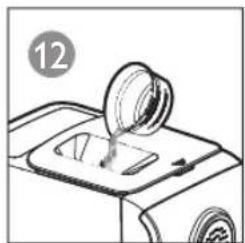
8 During processing, slowly pour in the water or other ingredients, which you measure with the supplied water cup, along the entire length of the opening in the lid. (Figure 12)
natural_image
Line drawing of a kitchen appliance with a lid pouring liquid into a sink (no text or symbols)
Cautions
- During dough mixing, do not add in other ingredients after you pour in the water. Otherwise, it will affect the results of the noodle texture. - If you notice the program is not set as automatic program while noodle is extruding, press start/pause button (▶) to stop the program. Then, disconnect from the power. After cleaning the shaping discs, you can restart the process by connecting the noodle maker to power again.
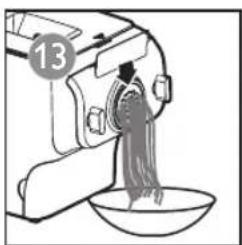
9 The noodles will start extruding out after a few minutes. Place a container right under the outlet. Cut the noodles to the desired length with the supplied disc cleaning tool. (Figure 13)
natural_image
Illustration of a person pouring liquid from a mixing machine into a bowl (no text or symbols)
Notes
After the noodle making is complete, if you notice there are some leftover doughs inside the chamber, you can press the programs button (☐) to select the extrusion-only program.
- The countdown timer of extrusion-only program is 3 minutes. - You may find some fine noodle threads on the noodle's surface. This is normal.

Caution
Do not select the extrusion-only program before the dough mixing is complete. Otherwise, this will damage the noodle maker and its lifetime.
| Flour/water ratio table | ||
| Flour | Plain noodle Egg noodle | |
| Water (marking) | Egg+Water mixture (marking) | |
 1 cup (~250g) 1 cup (~250g) | 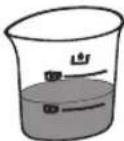 Amount of water needed for a cup of flour (~85ml) Amount of water needed for a cup of flour (~85ml) | 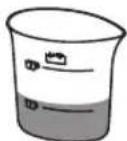 Amount of egg mixture needed for a cup of flour (~95ml) Amount of egg mixture needed for a cup of flour (~95ml) |
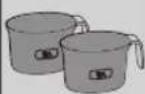 2 cups (~500g) 2 cups (~500g) | 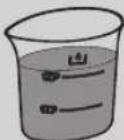 Amount of water needed for 2 cups of flour (~170ml) Amount of water needed for 2 cups of flour (~170ml) | 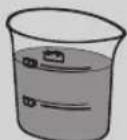 Amount of egg mixture needed for 2 cups of flour (~190ml) Amount of egg mixture needed for 2 cups of flour (~190ml) |
7 Cleaning

Cautions
- Disconnect the power and remove the power cord before cleaning or disassembling this appliance.
- Do not immerse the main unit in water.
- Do not use a scourer, caustic cleaners, or abrasive cleaners (for examples, gasoline, alcohol, and propanol) to clean the appliance.

Tip
• It is easier for you to clean the chamber after the dough residues dry up.
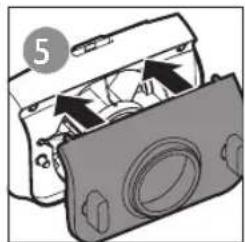
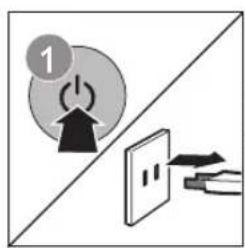
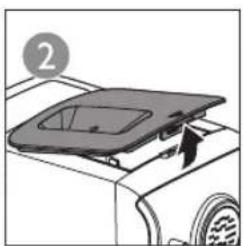
1 Disconnect from the power outlet. Loosen the front panel control knob. Then, disassemble the front panel, the shaping disc, the shaping disc holder, the mixing paddle, and others in order. (Figure 1-4)
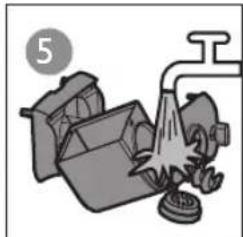
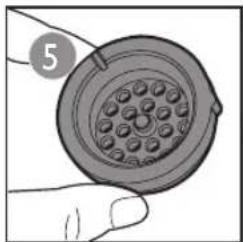
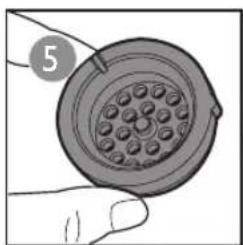
2 Clean the shaping disc with the supplied cleaning tool to remove the dough residues. After that, you can clean it with water. (Figure 5-6)
- Put the shaping disc aside and allow it to completely dry up for about 20 minutes. It will be easier for you to clean later on.
3 Clean all parts. (Figure 7) Use a dry cloth to clean the main unit, control panel, and the exterior of the noodle maker.
natural_image
Diagram of a car interior showing a lid and vent, with no visible text or symbols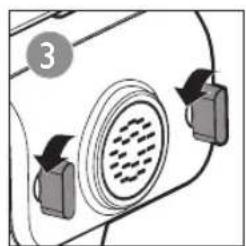
natural_image
Diagram of a car interior with ventilation grilles and directional arrows (no text or symbols)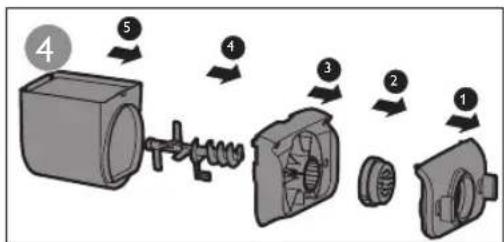
natural_image
Illustration of a hand holding a circular mechanical component with a grid of spherical holes (no text or symbols)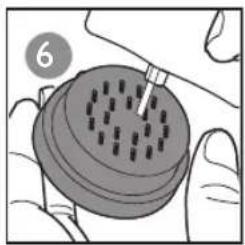
natural_image
Illustration of a hand holding a circular object with internal patterns, no text or symbols present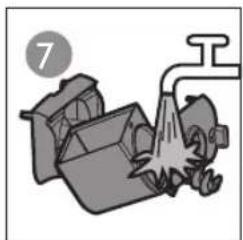
natural_image
Illustration of a mechanical device with a faucet and lever, no text or symbols present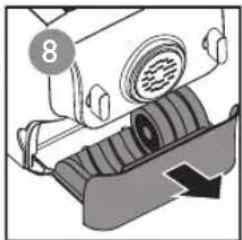
natural_image
Mechanical component diagram showing a valve and gear assembly (no text or symbols)
Tip
After cleaning, make sure all parts and the shaping disc storage are dry. Assemble the noodle maker back for next use.
8 Recipes
For more recipes, you can visit Philips MyKitchen websites www.philips.com.tw/mykitchen.

Notes
To guarantee the quality of the noodle, use gluten flour to make noodle. Follow the recommended proportion to add the ingredients.
- Seasonal changes and using ingredients from different regions may affect the flour/water ratio. You may adjust based on the recommended proportion.
- When making the egg noodle or vegetable noodle, make sure you whisk the egg mixture or vegetable juice evenly before pouring into the chamber.
Noodle making recipes
Pour the flour into the chamber first, then select the corresponding servings, and the noodle maker will start. Slowly pour the water or ingredients mixture in through the opening of the chamber lid. Place a container right under the outlet. Cut the noodles to the desired length with the supplied cleaning tool. The appliance will sound to indicate the noodle making is complete. After finished cooking in the boiling water, the noodles are ready to serve.

Tip
The cooking time of the noodles varies depending on personal preferences, noodle shapes, and number of servings.
| Recipes Flour (g) Ingredients | ||
| Plain noodle | 1 cup of flour (~250g) | 85 ml of water (use the water cup to measure the water to [1]). |
| 2 cups of flour (~500g) | 170ml of water (use the water cup to measure the water to [2]). | |
| Egg noodle | 1 cup of flour (~250g) | A medium size egg (~45g), whisk the egg in the water cup, then pour water in to the water marking of [1]. Total volume is around 95ml. |
| 2 cups of flour (~500g) | 2 medium size eggs (~90g), whisk the eggs in the water cup, then pour water in to the water marking of [2]. Total volume is around 190ml. | |
| Spinach noodle | 1 cup of flour (~250g) | Spinach juice (Use a juicer to freshly extract the juice, then use the water cup to measure it to the water marking of [1]. Total volume is around 95ml. |
| 2 cups of flour (~500g) | Spinach juice (Use a juicer to freshly extract the juice, then use the water cup to measure it to the water marking of [2]. Total volume is around 190ml. | |
| Tomato noodle | 1 cup of flour (~250g) | Tomato juice (Use a juicer to freshly extract the juice, then use the water cup to measure it to the water marking of 1. Total volume is around 95ml. |
| 2 cups of flour (~500g) | Tomato juice (Use a juicer to freshly extract the juice, then use the water cup to measure it to the water marking of 2. Total volume is around 190ml. | |
| Carrot noodle | 1 cup of flour (~250g) | Carrot juice (Use a juicer to freshly extract the juice, then use the water cup to measure it to the water marking of 1. Total volume is around 95ml. |
| 2 cups of flour (~500g) | Carrot juice (Use a juicer to freshly extract the juice, then use the water cup to measure it to the water marking of 2. Total volume is around 190ml. | |
Cooking recipes
| Recipes Ingredients Cooking | ||
| Taiwanese Dan Zai Noodles | 1 whole pack of fresh noodles1 pound pork tenderloin (minced or ground)6 cloves garlic (minced)1 medium size red onion (thinly sliced)500ml chicken broth (optional)1⁄2 stalk spring onionsOil | 1 In a pot, boil water. Add noodles and simmer for half a minute.2 Remove the noodles and drain then set aside.3 In a pan, heat oil and add red onion and garlic. Stir-fry until the garlic turns brown.4 Add the meat and stir-fry until the meat is almost cooked.5 Add the chicken broth and bring to a boil.6 Add the noodles and simmer for 1 minute.7 Add some salt according to your taste.8 Top with spring onions when serving. |
| Taiwanese Beef Noodle Soup | 2 pounds boneless beef shank, cut into 1-inch pieces5 cups water2 cups beef broth1/2 cup soy sauce1/3 cup cooking rice wine1/4 cup tomato paste1 piece (1 1/2 inches) fresh ginger, peeled, cut into matchstick-size strips2 tablespoons spicy bean paste1 1/2 teaspoons sugar1 1/2 teaspoons five spice powder4 green onions, thinly sliced1 pound Chinese broccoli1 package (11.2 ounces) dried Taiwanese wheat noodles | 1 In a 4- to 5-quart slow cooker, combine beef, water, broth, soy sauce, rice wine, tomato paste, ginger, spicy bean paste, sugar, five spice powder and half of the sliced green onions.2 Cover; cook on Low heat setting for 8 to 9 hours (or on High setting for 4 to 5 hours).3 Separate thin Chinese broccoli stems from large stalk; discard large stalks. Cut small stems, florets and leaves into 2-inch pieces.4 Stir chopped Chinese broccoli into beef mixture in slow cooker. Cover; cook about 10 minutes longer or until broccoli is crisp tender.5 Cook and drain noodles. Rinse with cold water; drain.6 Divide noodles among bowls; ladle soup mixture over the noodles. Top with remaining sliced green onions.Tip:For more traditional flavor, use a tablespoon of Chinese rock sugar or yellow sugar instead of granulated sugar and let it slowly dissolve by itself in the slow cooker. |
| Recipes Ingredients Cooking | |
| TaiwaneseColdSesameNoodles | 1 lb. Chinese egg noodles, fresh or frozen 14 cup toasted sesame oil 312 tbsp, soy sauce2 tbsp. rice wine vinegar2 tbsp. sesame paste2 tbsp. smooth peanut butter1 tbsp. sugar 212 tsp. chile-garlic paste, such as sambal oelek2 tsp. toasted sesame seeds2 cloves garlic, finely chopped2 scallions, thinly sliced1 ( 112 ”) piece ginger, peeled and finely chopped1 small cucumber, peeled, seeded, and julienned1 carrot, peeled and juliennedChopped roasted peanuts, to garnish |
| 1 Bring a large pot of water to a boil. Add noodles, and cook until barely tender, about 5 minutes; drain in a colander, rinse with cold water, and drain again. Transfer to a bowl and add 3 tbsp. sesame oil; toss until evenly coated and set aside.2 In another bowl, whisk together remaining sesame oil, soy sauce, vinegar, sesame paste, peanut butter, sugar, chili-garlic paste, sesame seeds, garlic, scallions, and ginger. Pour over noodles along with cucumber and carrot, and toss until evenly combined. Transfer to a serving bowl, and garnish with peanuts. |
9 Troubleshooting
This chapter summarizes the most common problems you could encounter with the appliance. If you are unable to solve the problem with the information below, contact the Consumer Care Center in your country.
| Problem Cause Possible solution | ||
| The indicators do not light up. | The power plug is connected incorrectly. | Check whether the power plug is plugged correctly. |
| The power button is not pressed. | Press the power on/off button (10) | |
| After pressing the start/pause button (the appliance sounds but it does not work. | The chamber is assembled incorrectly. | Make sure you follow the user manual to assemble all parts correctly. |
| The shaping disc, or the front panel is assembled incorrectly. | ||
| The preferred servings is not selected. | Make sure you have selected the servings before pressing the start/pause button (11) | |
| During processing, the appliance suddenly stop, and then suddenly restart again. | The front panel knob is loosen. | Make sure the front panel is securely assembled. |
| The safety switch of the shaping disc holder is triggered. | The ratio of the flour and water is incorrect. | Follow the flour/water ratio table to measure the amount of flour and water needed. |
| During processing, the appliance stops. There is no alarm sound or flashes. | The noodle maker is overheat due to long continuous working time. | Disconnect from the power, and allow the noodle maker to cool down. |
| The appliance stops during processing, then the indicators are flashing quickly, and the alarm sounds. | The mixing paddle can be blocked by some foreign objects. | Disconnect from the power, clean the noodle maker, and follow the user manual again to restart the noodle making. |
| The dough can be too dry. | ||
| The wrong program is selected. | ||
| Too much leftover dough inside the chamber. | The flour is either exposed to moisture before use, or the dough is too wet. | Keep your flour dry during storage. Follow the user manual to restart the noodle making. |
| The chamber, the mixing paddle, the shaping disc are not cleaned properly before use. | Make sure all parts are clean before use. | |
| The mixing paddle or the chamber is still wet. | Make sure all parts are dry before use. | |
| The water is not pour in the right time. | Follow the user manual to make noodle. | |
| The flour type is not suitable. | ||
| Incorrect servings was selected. | Select the extrusion-only program. | |
| Small amount of water is leaking out from the appliance. | The method to pour water is incorrect. | Follow the user manual to make noodle. |
| The mixing paddle is running idle, and there is no noddle coming out. | The ratio of the flour and water is incorrect. | Disconnect from the power, clean the noodle maker, and follow the user manual again to restart the noodle making. |
10 Product information
Motor power: 200W
Dimensions (L × W × H):
- 343mm × 215mm × 300mm
Capacity: 500g (for 1-4 servings)
For rated voltage and frequency information, refer to the typeplate on the product. Product information is subjected to change without prior notice.
11 Recycling

Do not throw away the appliance with normal household waste at the end of its life, but hand it in at an official collection
point for recycling. By doing this, you help to preserve the environment.
12 Guarantee and service
If you have a problem, need service or need information, see www.philips.com/support or contact the Philips Consumer Care Center in your country.
目錄
natural_image
Three technical line drawings of cylindrical and rectangular components with numbered labels (14, 16) — no readable text or symbols beyond labels.愛麵機概覽
natural_image
Two-step illustration showing a trash bin being discarded into a pipe and then into a bag (no text or symbols)
注意
natural_image
Line drawing of a mechanical device with no visible text or symbols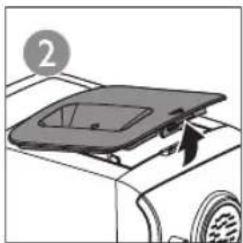
natural_image
Diagram of a car front panel with a lid and arrow indicating direction (no text or symbols)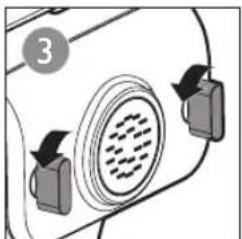
natural_image
Diagram of a car air vent with directional arrows indicating airflow or movement (no text or symbols)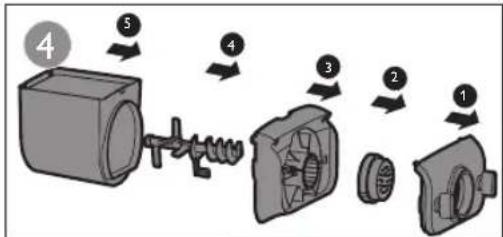
5 組裝
請依照下列組裝步驟安裝愛麵機。

注意
組裝時請確實將前面板旋鈕轉緊。
natural_image
Mechanical assembly diagram showing a component with a numbered label (1), no readable text or symbols present.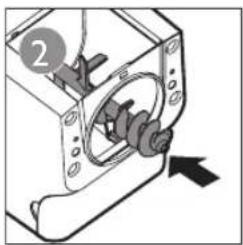
natural_image
Mechanical assembly diagram showing a motor or gear mechanism inside a housing frame (no text or symbols)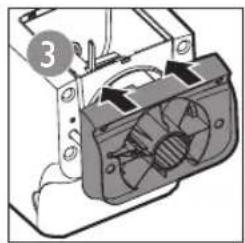
natural_image
Technical illustration of a mechanical device with a fan and wiring (no text or symbols)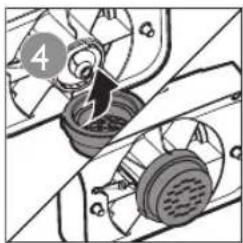
natural_image
Mechanical assembly diagram showing two components with a numbered label (4) and directional arrow, no readable text or symbols.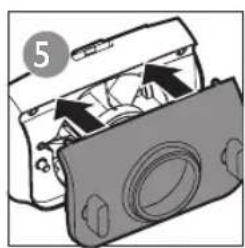
natural_image
Diagram of a camera module with arrows indicating internal components (no text or symbols)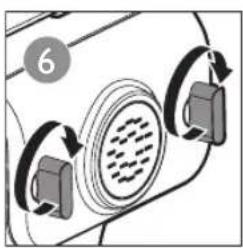
natural_image
Diagram of a car interior with directional arrows indicating movement or rotation (no text or symbols)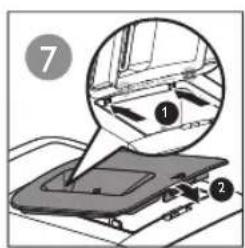
natural_image
Line drawing of a kitchen machine with a circular badge showing number 8 (no text or symbols on the device itself)6 使用愛麵機

注意
natural_image
Diagram of a refrigerator interior showing the door, vent, and lid (no text or symbols)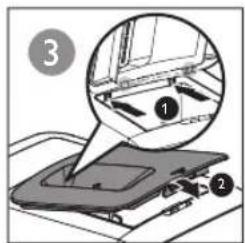
natural_image
Line drawing of a mechanical component with a lid pouring liquid into a container (no text or symbols)
注意
natural_image
Illustration of a person pouring liquid from a mixing machine into a bowl (no text or symbols)
備註
natural_image
Diagram of a car interior showing a lid and vent, with no visible text or symbols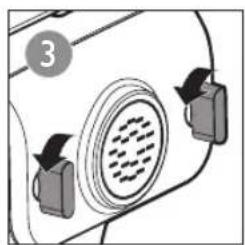
natural_image
Diagram of a car air vent with directional arrows indicating airflow or movement (no text or symbols)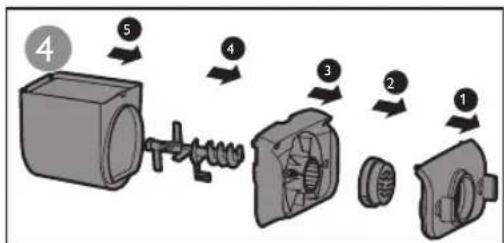
natural_image
Illustration of a hand holding a circular mechanical component with internal components (no text or symbols)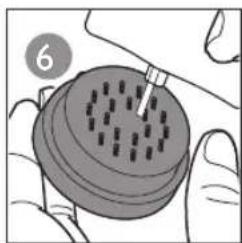
natural_image
Illustration of a hand holding a chocolate chip with a pipette inserted (no text or symbols)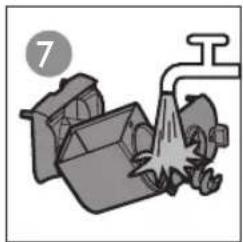
natural_image
Illustration of a mechanical device with a faucet and gear (no text or symbols)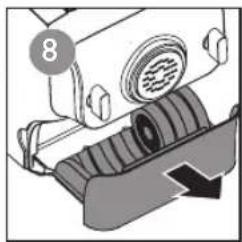
natural_image
Mechanical component diagram showing a valve or pump assembly with no visible text or symbols
秘訣
- Always there to help you
- Contents
- Important 4
- Your noodle maker 5
- Overview 5
- Disassemble and cleaning before first use 7
- Assemble 8
- Use the noodle maker 8
- Cleaning 11
- Recipes 12
- Troubleshooting 16
- Product information 18
- Recycling 19
- Guarantee and service 20
- Important
- Safety
- Warnings
- Before processing
- Cautions
- During processing
- After processing
- Electromagnetic fields (EMF)
- Your noodle maker
- Overview
- Noodle maker overview
- Control panel overview
- Disassemble and cleaning before first use
- Notes
- Assemble
- Caution
- Use the noodle maker
- Close the chamber lid.
- Based on the "Flour/water proportion table" to measure the required amount of water. (Figure 4-5)
- Note
- Connect to the power. The noodle maker will sound once (Figure 6), and all indicators will flash once. The noodle maker is in standby mode. → Automatic indicator() and the start/pause indicator (▶) will light up. The serving indicators (1/2) will flash in cycle. (Figure 7-9)
- Based on the amount of flour, press the servings button (☐) to select ☐ for the respective servings. (Figure 10)
- Press start/pause button ( ) to start processing. (Figure 11)
- During processing, slowly pour in the water or other ingredients, which you measure with the supplied water cup, along the entire length of the opening in the lid. (Figure 12)
- Cleaning
- Tip
- Recipes
- Noodle making recipes
- Cooking recipes
- Troubleshooting
- Product information
- Recycling
- Guarantee and service
- 目錄
- 愛麵機概覽
- 注意
- 組裝
- 使用愛麵機
- 備註
- 秘訣
Brand : PHILIPS
Model : Viva Collection HR2330
Category : Pasta machine